center console BMW M3 2008 Owners Manual
[x] Cancel search | Manufacturer: BMW, Model Year: 2008, Model line: M3, Model: BMW M3 2008Pages: 266, PDF Size: 8.85 MB
Page 16 of 266
Cockpit
14
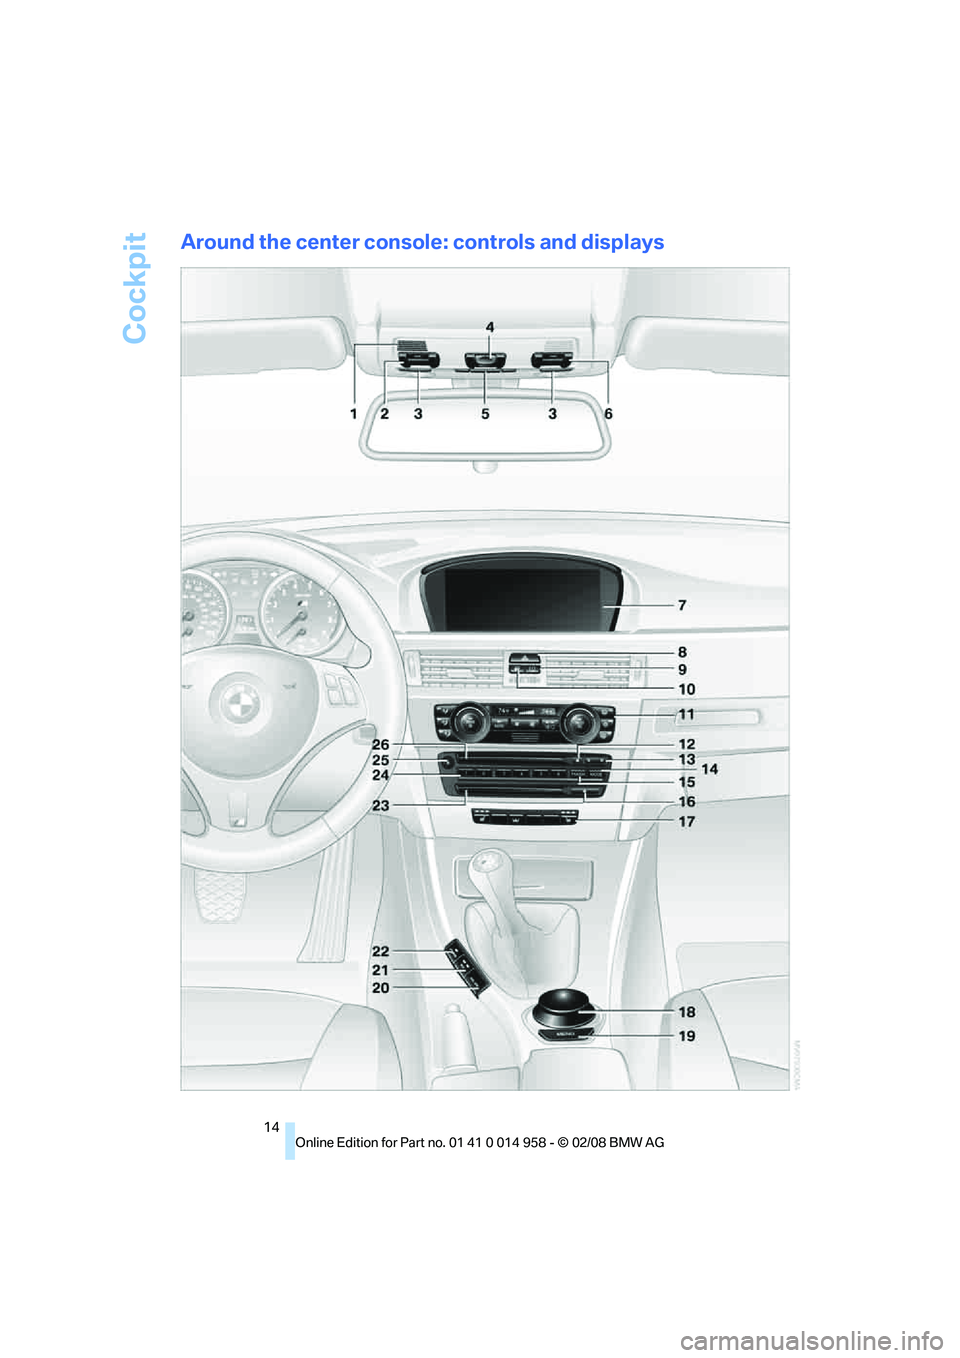
Around the center console: controls and displays
Page 51 of 266
Controls
49Reference
At a glance
Driving tips
Communications
Navigation
Entertainment
Mobility
The setting is stored for the remote control cur-
rently in use.
Activating the settings
Press the button on the steering wheel.
The indicator lamp in the instrument
cluster comes on. The settings made
on the Control Display for the functions
in MDrive are active.
Pressing the button again deactivates MDrive.
If the indicator lamp flashes after the but-
ton was pressed, MDrive was unable to
respond because the Antilock Brake System
ABS or Dynamic Stability Control DSC are cur-
rently regulating driving stability. Press the
button again when the indicator lamp is no
longer flashing.<
You can change individual settings outside of
MDrive even when MDrive is activated, e. g.
using the buttons on the center console. To
reactivate all settings made on the Control Dis-
play for MDrive: press the button twice.
Key-dependent settings
For the remote control currently in use, you can
set your preferred program for the M Engine
Dynamics Control and Electronic Damper Con-
trol EDC. These presettings are called up when
the engine is started.
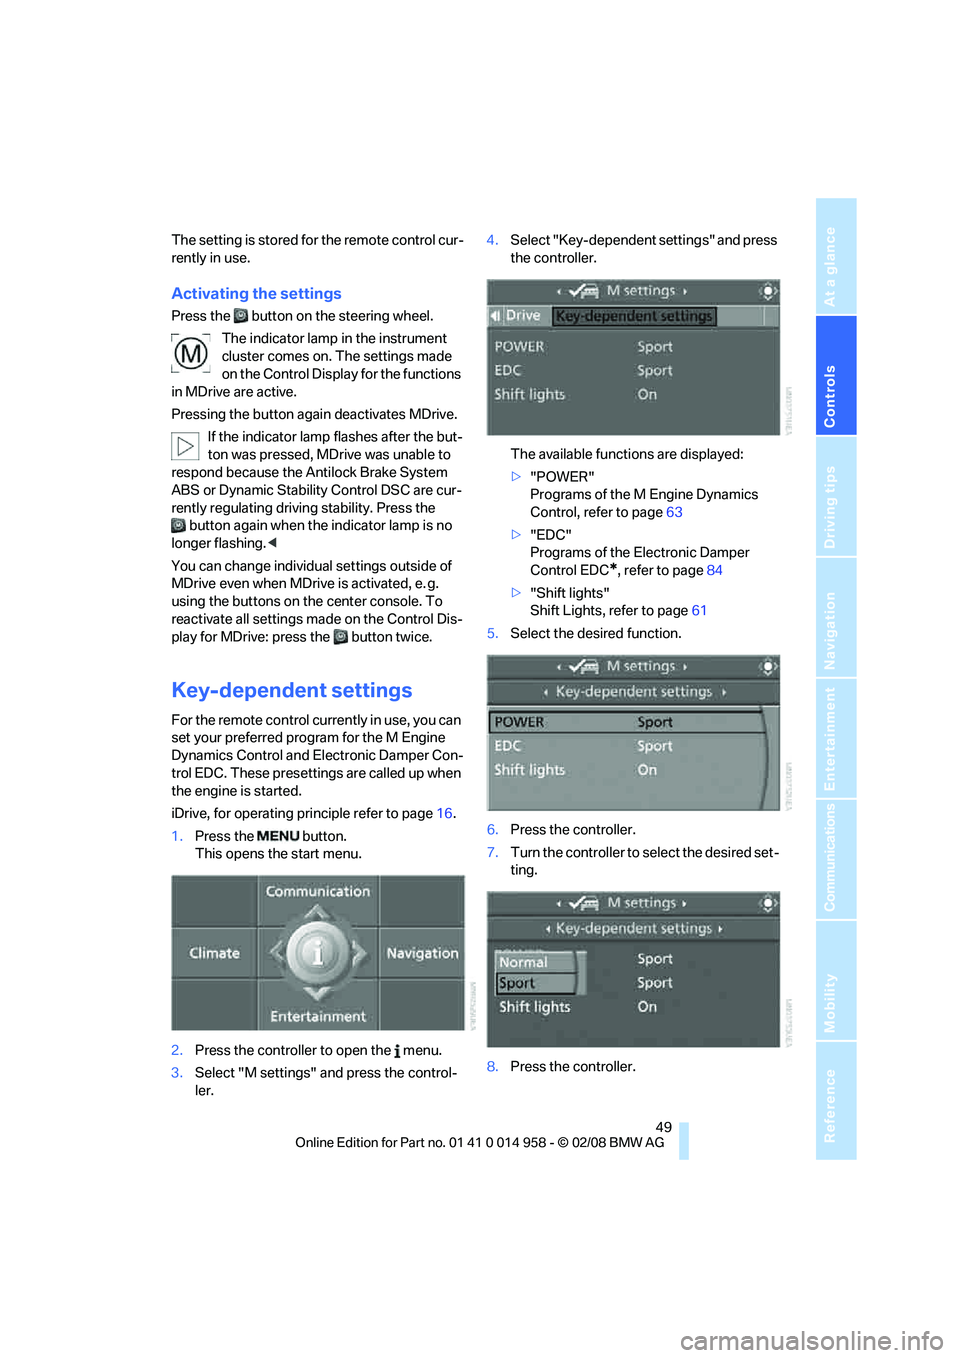
iDrive, for operating principle refer to page16.
1.Press the button.
This opens the start menu.
2.Press the controller to open the menu.
3.Select "M settings" and press the control-
ler.4.Select "Key-dependent settings" and press
the controller.
The available functions are displayed:
>"POWER"
Programs of the M Engine Dynamics
Control, refer to page63
>"EDC"
Programs of the Electronic Damper
Control EDC
*, refer to page84
>"Shift lights"
Shift Lights, refer to page61
5.Select the desired function.
6.Press the controller.
7.Turn the controller to select the desired set-
ting.
8.Press the controller.
Page 62 of 266
Driving
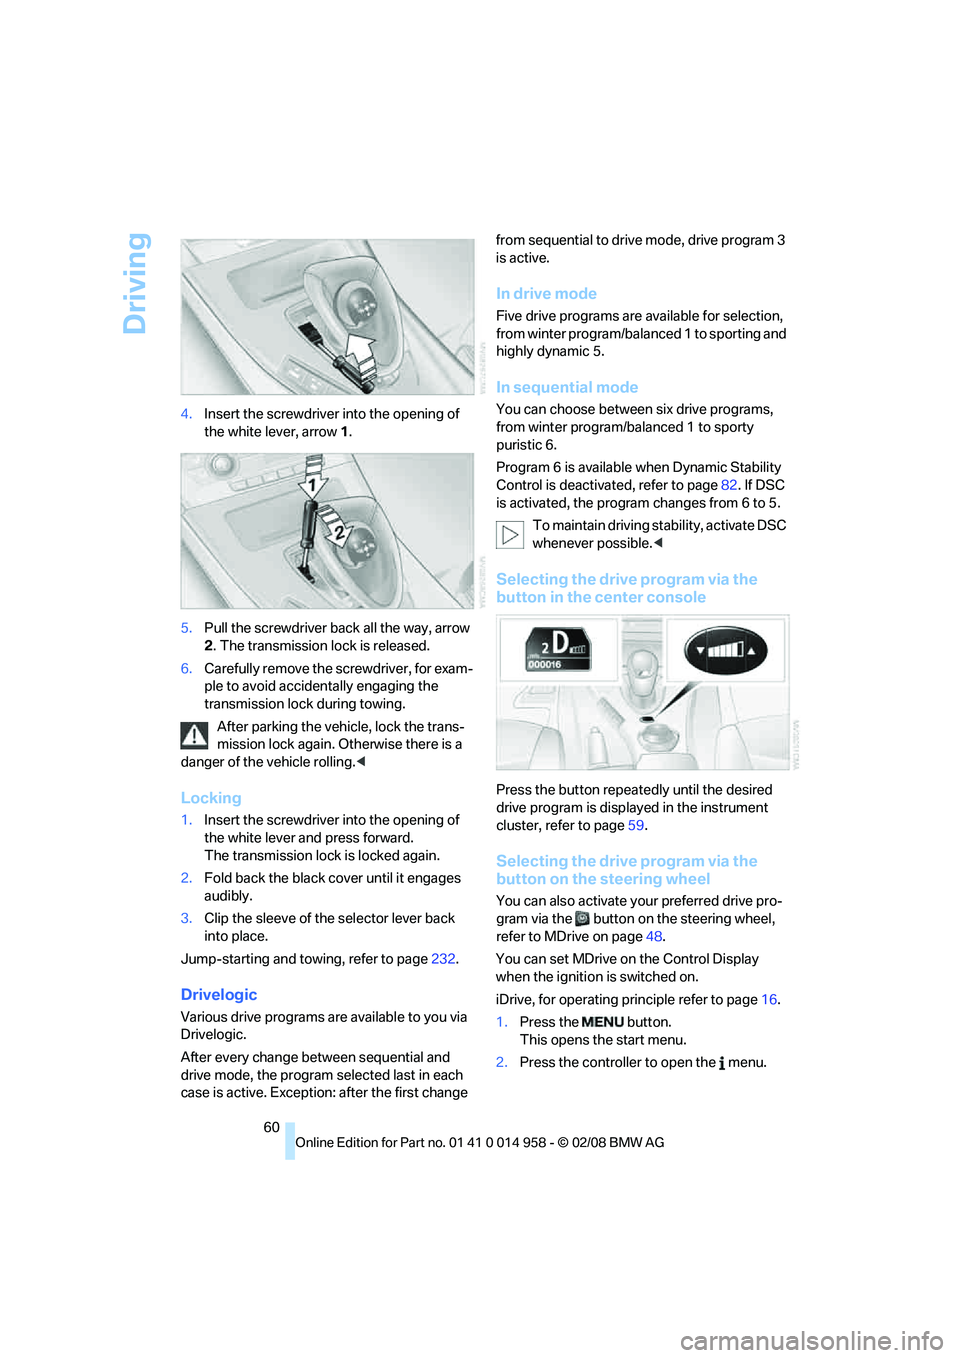
60 4.Insert the screwdriver into the opening of
the white lever, arrow 1.
5.Pull the screwdriver back all the way, arrow
2. The transmission lock is released.
6.Carefully remove the screwdriver, for exam-
ple to avoid accidentally engaging the
transmission lock during towing.
After parking the vehicle, lock the trans-
mission lock again. Otherwise there is a
danger of the vehicle rolling.<
Locking
1.Insert the screwdriver into the opening of
the white lever and press forward.
The transmission lock is locked again.
2.Fold back the black cover until it engages
audibly.
3.Clip the sleeve of the selector lever back
into place.
Jump-starting and towing, refer to page232.
Drivelogic
Various drive programs are available to you via
Drivelogic.
After every change between sequential and
drive mode, the program selected last in each
case is active. Exception: after the first change from sequential to drive mode, drive program 3
is active.
In drive mode
Five drive programs are available for selection,
from winter program/balanced 1 to sporting and
highly dynamic 5.
In sequential mode
You can choose between six drive programs,
from winter program/balanced 1 to sporty
puristic 6.
Program 6 is available when Dynamic Stability
Control is deactivated, refer to page82. If DSC
is activated, the program changes from 6 to 5.
To maintain driving stability, activate DSC
whenever possible.<
Selecting the drive program via the
button in the center console
Press the button repeatedly until the desired
drive program is displayed in the instrument
cluster, refer to page59.
Selecting the drive program via the
button on the steering wheel
You can also activate your preferred drive pro-
gram via the button on the steering wheel,
refer to MDrive on page48.
You can set MDrive on the Control Display
when the ignition is switched on.
iDrive, for operating principle refer to page16.
1.Press the button.
This opens the start menu.
2.Press the controller to open the menu.
Page 87 of 266
Controls
85Reference
At a glance
Driving tips
Communications
Navigation
Entertainment
Mobility
System limitations
The Flat Tire Monitor is unable to warn
the driver of sudden, severe tire damage
caused by external factors, nor can it identify
the gradual loss of pressure that will inevitably
occur in all four tires over a lengthy period of
time.<
In the following situations, the system could be
delayed or malfunction:
>System has not been initialized
>Driving on snowy or slippery road surface
>Performance-oriented style of driving: slip
in the drive wheels, high lateral acceleration
>Snow chains are attached
Initializing the system
The initialization is completed during driv-
ing, which can be interrupted at any time.
When driving resumes, the initialization is con-
tinued automatically.
Do not initialize the system while snow chains
are attached.<
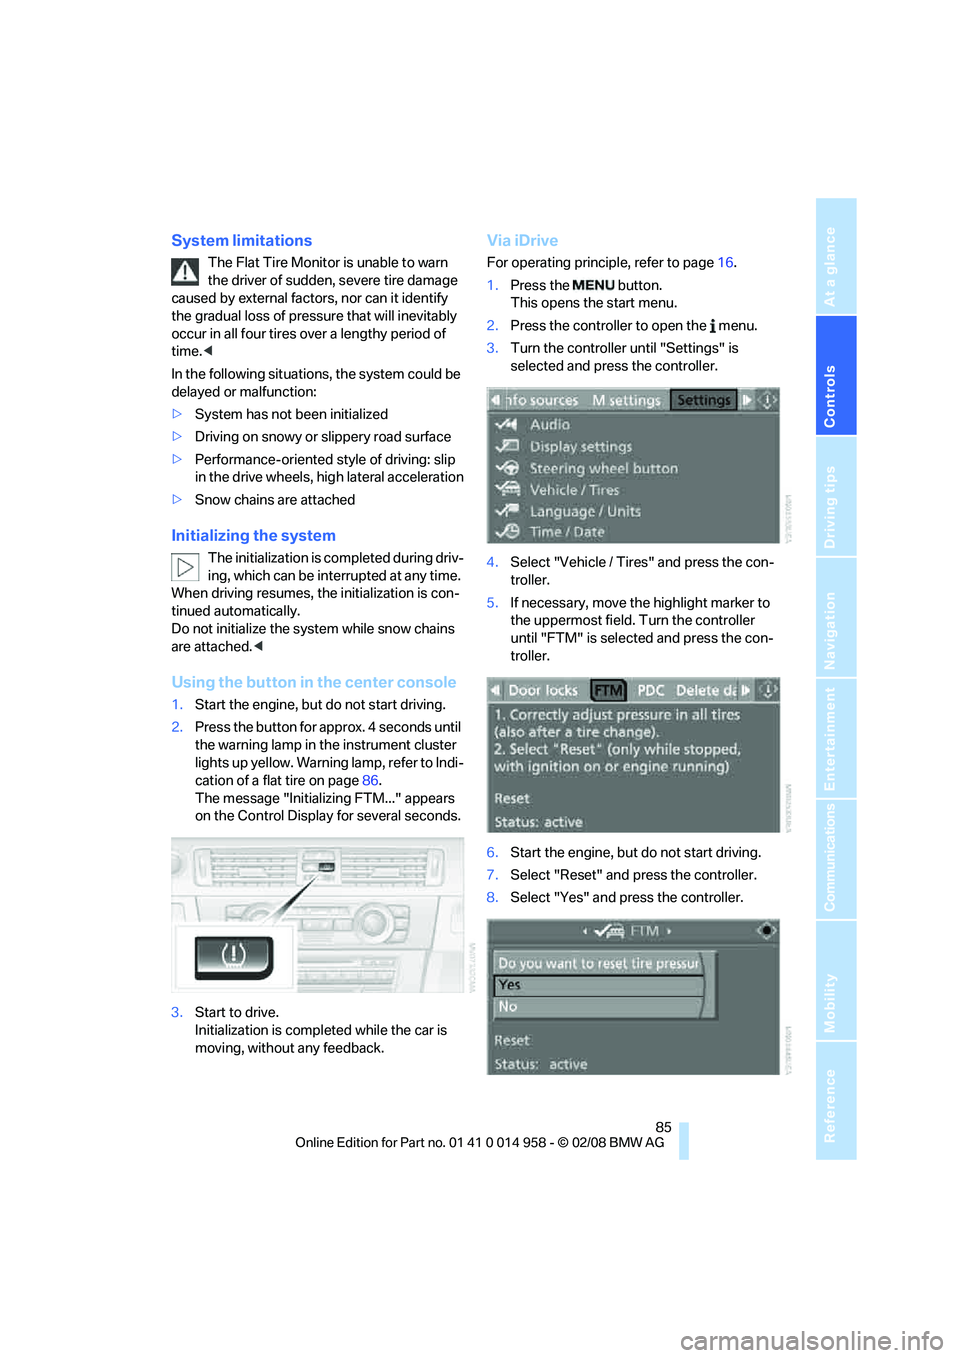
Using the button in the center console
1.Start the engine, but do not start driving.
2.Press the button for approx. 4 seconds until
the warning lamp in the instrument cluster
lights up yellow. Warning lamp, refer to Indi-
cation of a flat tire on page86.
The message "Initializing FTM..." appears
on the Control Display for several seconds.
3.Start to drive.
Initialization is completed while the car is
moving, without any feedback.
Via iDrive
For operating principle, refer to page16.
1.Press the button.
This opens the start menu.
2.Press the controller to open the menu.
3.Turn the controller until "Settings" is
selected and press the controller.
4.Select "Vehicle / Tires" and press the con-
troller.
5.If necessary, move the highlight marker to
the uppermost field. Turn the controller
until "FTM" is selected and press the con-
troller.
6.Start the engine, but do not start driving.
7.Select "Reset" and press the controller.
8.Select "Yes" and press the controller.
Page 89 of 266
Controls
87Reference
At a glance
Driving tips
Communications
Navigation
Entertainment
Mobility
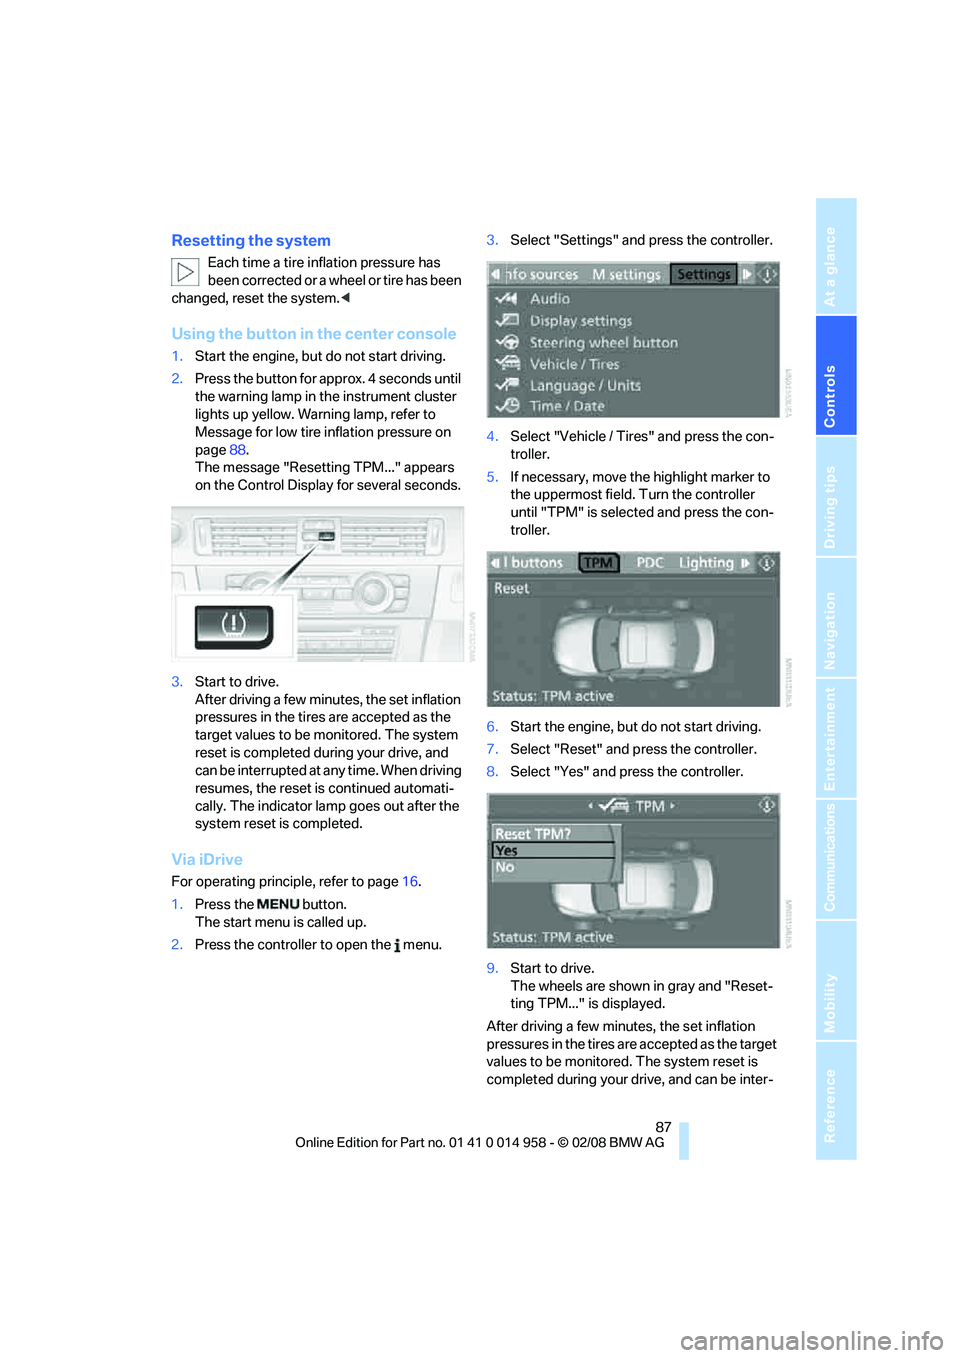
Resetting the system
Each time a tire inflation pressure has
been corrected or a wheel or tire has been
changed, reset the system.<
Using the button in the center console
1.Start the engine, but do not start driving.
2.Press the button for approx. 4 seconds until
the warning lamp in the instrument cluster
lights up yellow. Warning lamp, refer to
Message for low tire inflation pressure on
page88.
The message "Resetting TPM..." appears
on the Control Display for several seconds.
3.Start to drive.
After driving a few minutes, the set inflation
pressures in the tires are accepted as the
target values to be monitored. The system
reset is completed during your drive, and
can be interrupted at any time. When driving
resumes, the reset is continued automati-
cally. The indicator lamp goes out after the
system reset is completed.
Via iDrive
For operating principle, refer to page16.
1.Press the button.
The start menu is called up.
2.Press the controller to open the menu.3.Select "Settings" and press the controller.
4.Select "Vehicle / Tires" and press the con-
troller.
5.If necessary, move the highlight marker to
the uppermost field. Turn the controller
until "TPM" is selected and press the con-
troller.
6.Start the engine, but do not start driving.
7.Select "Reset" and press the controller.
8.Select "Yes" and press the controller.
9.Start to drive.
The wheels are shown in gray and "Reset-
ting TPM..." is displayed.
After driving a few minutes, the set inflation
pressures in the tires are accepted as the target
values to be monitored. The system reset is
completed during your drive, and can be inter-
Page 107 of 266
Controls
105Reference
At a glance
Driving tips
Communications
Navigation
Entertainment
Mobility
>The compass direction shown does not
change although the direction of travel
does.
>Not all compass directions are shown.
Procedure
1.Make sure that no large metal objects or
overhead power lines are in the vicinity of
your vehicle and that you have enough
space to drive in a circle.
2.Set the currently valid compass zone.
3.Press the adjustment button for approx.
6-7 seconds to call up C. Then drive in at
least one full circle at a speed of no more
than 4 mph or 7 km/h.
If calibration is successful, the display
changes from C to a compass direction.
Setting right-hand/left-hand steering
Your digital compass is factory-set to right-
hand or left-hand steering, in accordance with
your vehicle.
Setting the language
You can set the language of the display:
Press the adjustment button for approx.
12-13 seconds. Briefly press the adjustment
button again to switch between English, "E",
and German, "O".
The setting is automatically saved after approx.
10 seconds.
Roller sun blinds*
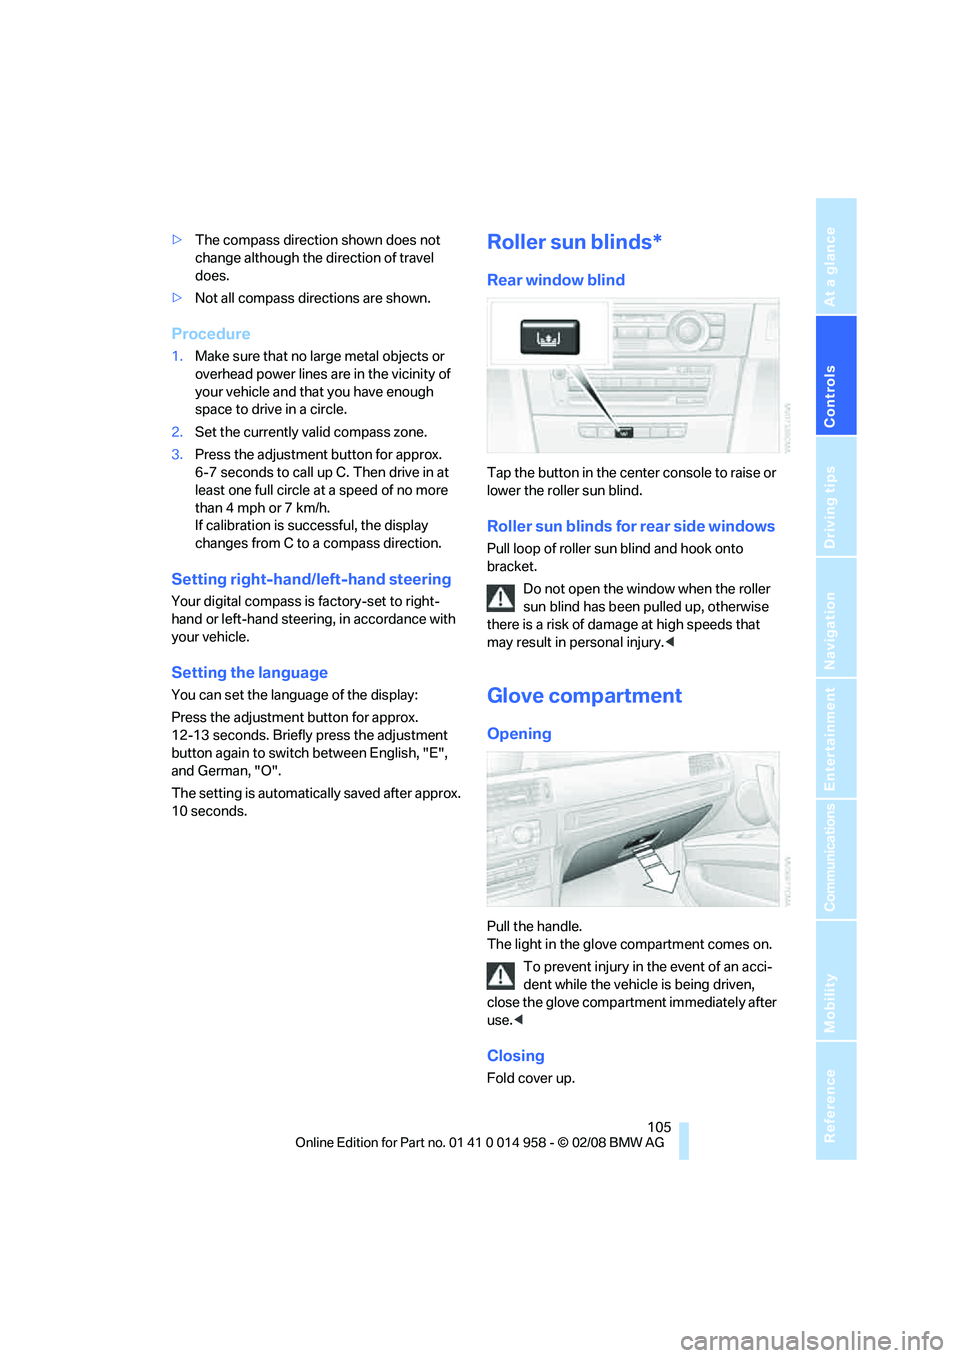
Rear window blind
Tap the button in the center console to raise or
lower the roller sun blind.
Roller sun blinds for rear side windows
Pull loop of roller sun blind and hook onto
bracket.
Do not open the window when the roller
sun blind has been pulled up, otherwise
there is a risk of damage at high speeds that
may result in personal injury.<
Glove compartment
Opening
Pull the handle.
The light in the glove compartment comes on.
To prevent injury in the event of an acci-
dent while the vehicle is being driven,
close the glove compartment immediately after
use.<
Closing
Fold cover up.
Page 110 of 266
Practical interior accessories
108 remote control so that children cannot operate
the cigarette lighter and burn themselves.<
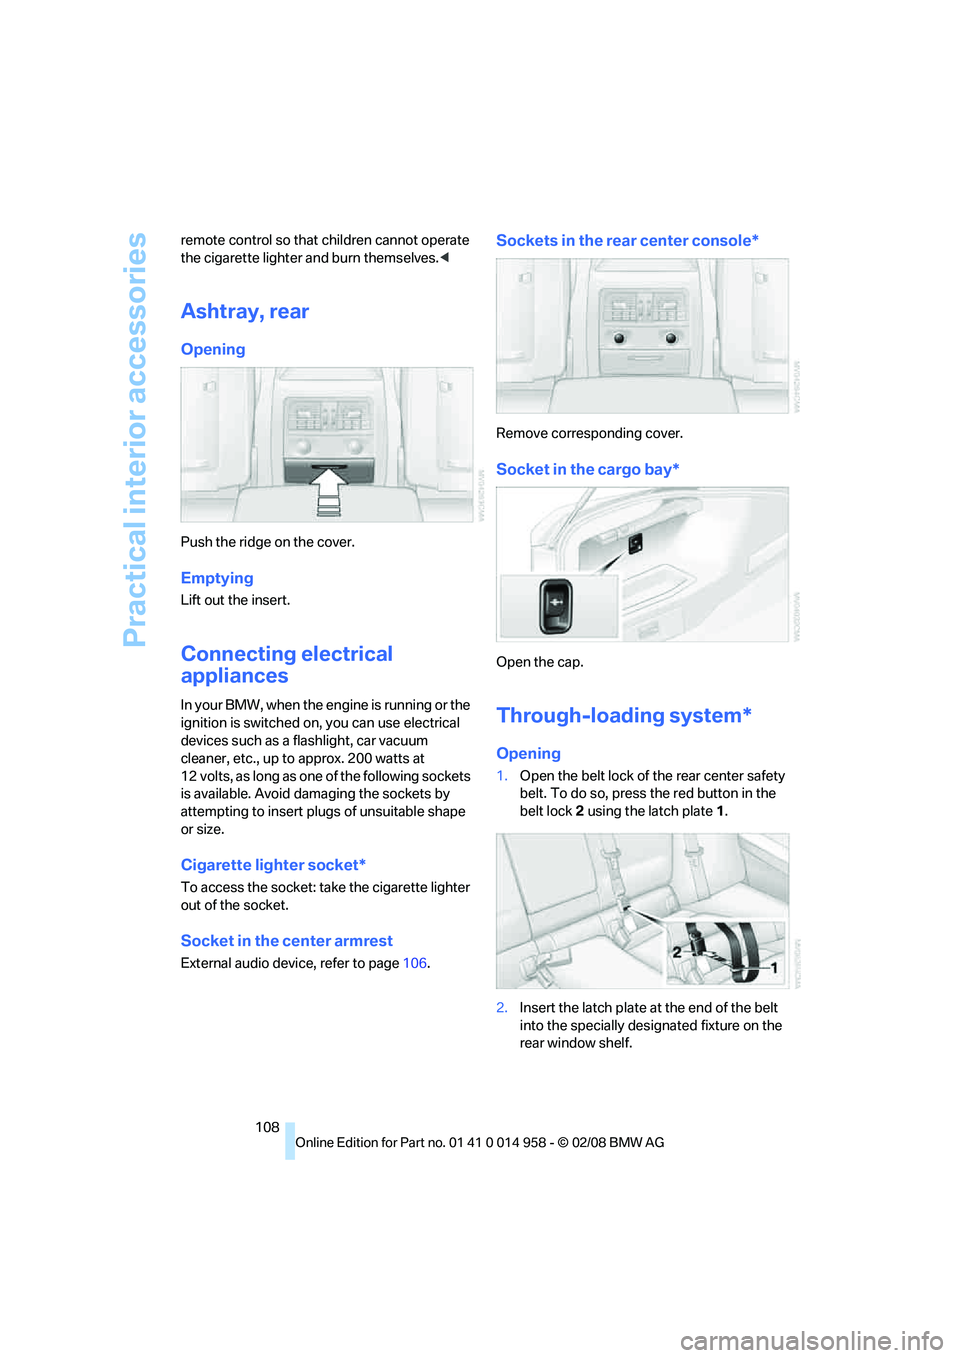
Ashtray, rear
Opening
Push the ridge on the cover.
Emptying
Lift out the insert.
Connecting electrical
appliances
In your BMW, when the engine is running or the
ignition is switched on, you can use electrical
devices such as a flashlight, car vacuum
cleaner, etc., up to approx. 200 watts at
12 volts, as long as one of the following sockets
is available. Avoid damaging the sockets by
attempting to insert plugs of unsuitable shape
or size.
Cigarette lighter socket*
To access the socket: take the cigarette lighter
out of the socket.
Socket in the center armrest
External audio device, refer to page106.
Sockets in the rear center console*
Remove corresponding cover.
Socket in the cargo bay*
Open the cap.
Through-loading system*
Opening
1.Open the belt lock of the rear center safety
belt. To do so, press the red button in the
belt lock 2 using the latch plate1.
2.Insert the latch plate at the end of the belt
into the specially designated fixture on the
rear window shelf.
Page 132 of 266
Destination entry
130 the controller.
The destination is stored in the destination
list, refer to page133.
Entering a destination by
voice commands*
You can enter a desired destination via the
voice command system. During the destination
input, you can switch between voice entry and
entry via iDrive at any time. To do so, reactivate
the voice command system if necessary.
You can have the possible commands
read aloud via {Options}.<
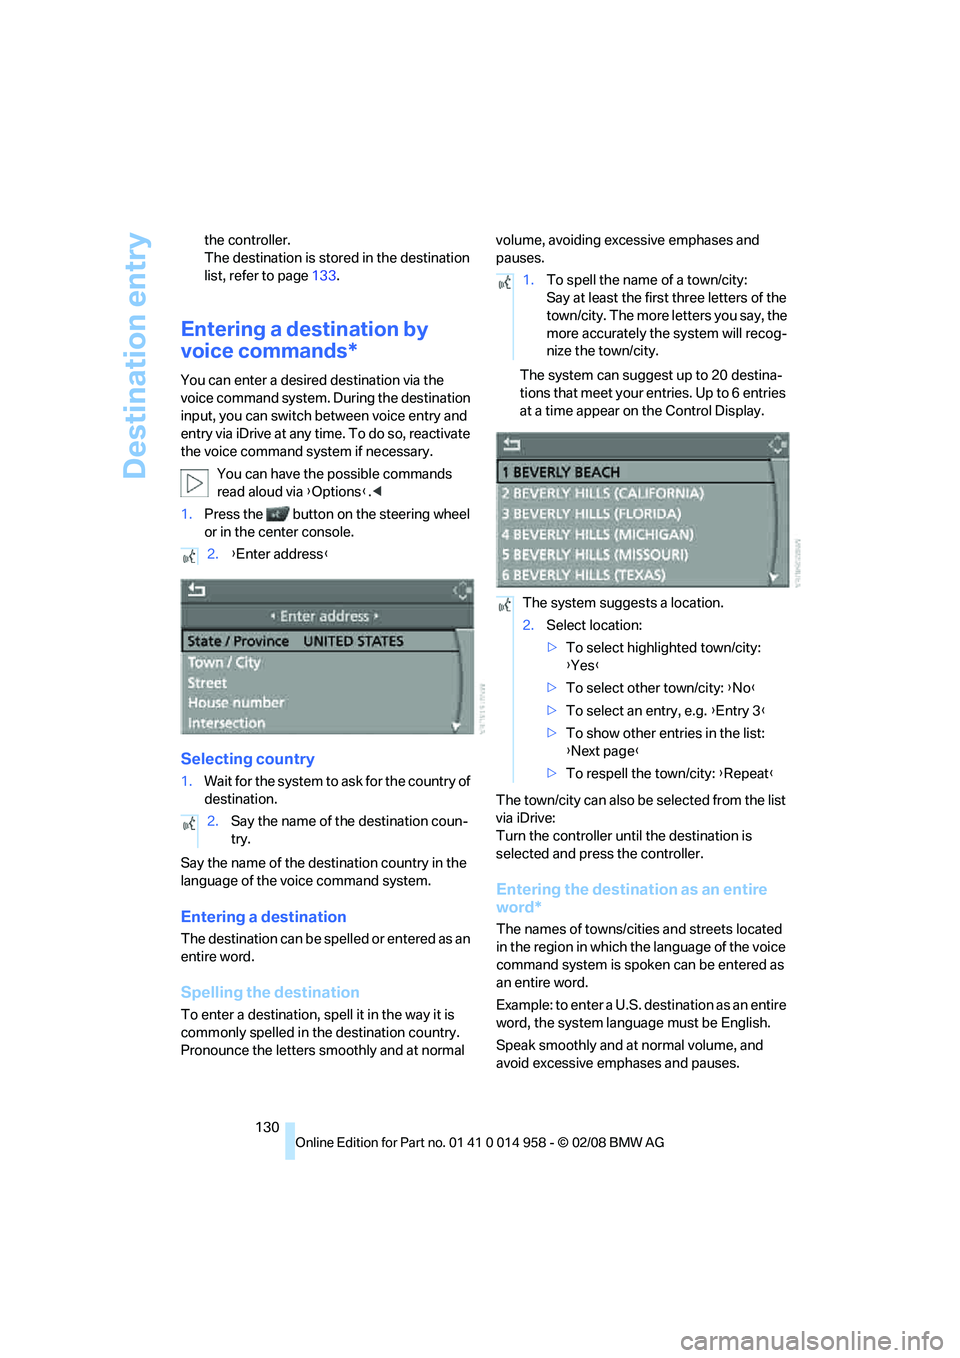
1.Press the button on the steering wheel
or in the center console.
Selecting country
1.Wait for the system to ask for the country of
destination.
Say the name of the destination country in the
language of the voice command system.
Entering a destination
The destination can be spelled or entered as an
entire word.
Spelling the destination
To enter a destination, spell it in the way it is
commonly spelled in the destination country.
Pronounce the letters smoothly and at normal volume, avoiding excessive emphases and
pauses.
The system can suggest up to 20 destina-
tions that meet your entries. Up to 6 entries
at a time appear on the Control Display.
The town/city can also be selected from the list
via iDrive:
Turn the controller until the destination is
selected and press the controller.
Entering the destination as an entire
word*
The names of towns/cities and streets located
in the region in which the language of the voice
command system is spoken can be entered as
an entire word.
Example: to enter a U.S. destination as an entire
word, the system language must be English.
Speak smoothly and at normal volume, and
avoid excessive emphases and pauses. 2.{Enter address}
2.Say the name of the destination coun-
try.
1.To spell the name of a town/city:
Say at least the first three letters of the
town/city. The more letters you say, the
more accurately the system will recog-
nize the town/city.
The system suggests a location.
2.Select location:
>To select highlighted town/city:
{Yes}
>To select other town/city: {No}
>To select an entry, e.g. {Entry 3}
>To show other entries in the list:
{Next page}
>To respell the town/city: {Repeat}
Page 250 of 266
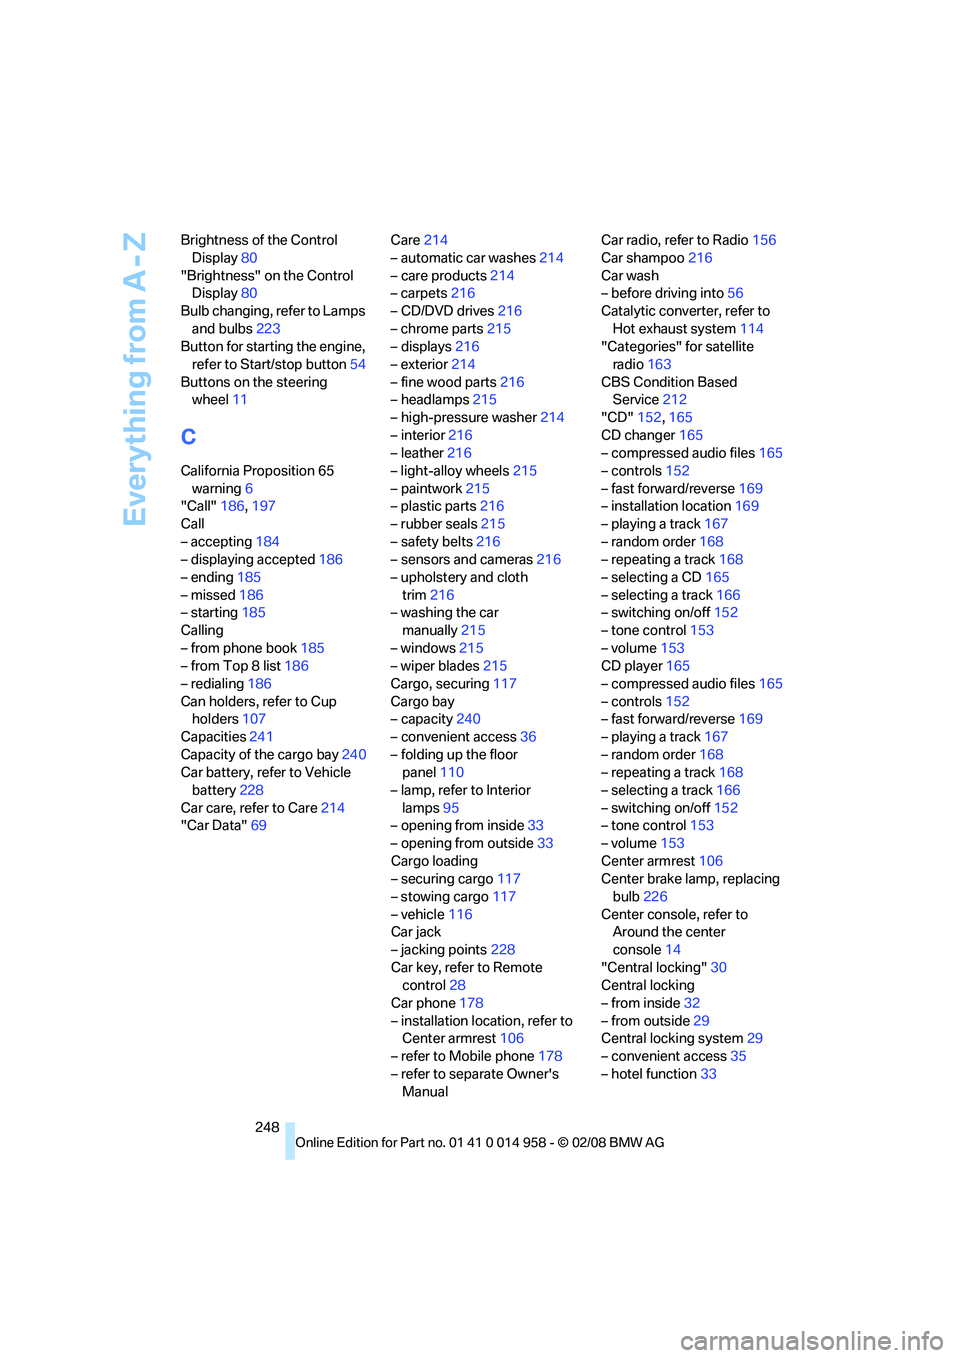
Everything from A - Z
248 Brightness of the Control
Display80
"Brightness" on the Control
Display80
Bulb changing, refer to Lamps
and bulbs223
Button for starting the engine,
refer to Start/stop button54
Buttons on the steering
wheel11
C
California Proposition 65
warning6
"Call"186,197
Call
– accepting184
– displaying accepted186
– ending185
– missed186
– starting185
Calling
– from phone book185
– from Top 8 list186
– redialing186
Can holders, refer to Cup
holders107
Capacities241
Capacity of the cargo bay240
Car battery, refer to Vehicle
battery228
Car care, refer to Care214
"Car Data"69Care214
– automatic car washes214
– care products214
– carpets216
– CD/DVD drives216
– chrome parts215
– displays216
– exterior214
– fine wood parts216
– headlamps215
– high-pressure washer214
– interior216
– leather216
– light-alloy wheels215
– paintwork215
– plastic parts216
– rubber seals215
– safety belts216
– sensors and cameras216
– upholstery and cloth
trim216
– washing the car
manually215
– windows215
– wiper blades215
Cargo, securing117
Cargo bay
– capacity240
– convenient access36
– folding up the floor
panel110
– lamp, refer to Interior
lamps95
– opening from inside33
– opening from outside
33
Cargo loading
– securing cargo117
– stowing cargo117
– vehicle116
Car jack
– jacking points228
Car key, refer to Remote
control28
Car phone178
– installation location, refer to
Center armrest106
– refer to Mobile phone178
– refer to separate Owner's
ManualCar radio, refer to Radio156
Car shampoo216
Car wash
– before driving into56
Catalytic converter, refer to
Hot exhaust system114
"Categories" for satellite
radio163
CBS Condition Based
Service212
"CD"152,165
CD changer165
– compressed audio files165
– controls152
– fast forward/reverse169
– installation location169
– playing a track167
– random order168
– repeating a track168
– selecting a CD165
– selecting a track166
– switching on/off152
– tone control153
– volume153
CD player165
– compressed audio files165
– controls152
– fast forward/reverse169
– playing a track167
– random order168
– repeating a track168
– selecting a track166
– switching on/off152
– tone control153
– volume153
Center armrest106
Center brake lamp, replacing
bulb226
Center console, refer to
Around the center
console14
"Central locking"
30
Central locking
– from inside32
– from outside29
Central locking system29
– convenient access35
– hotel function33
Page 251 of 266
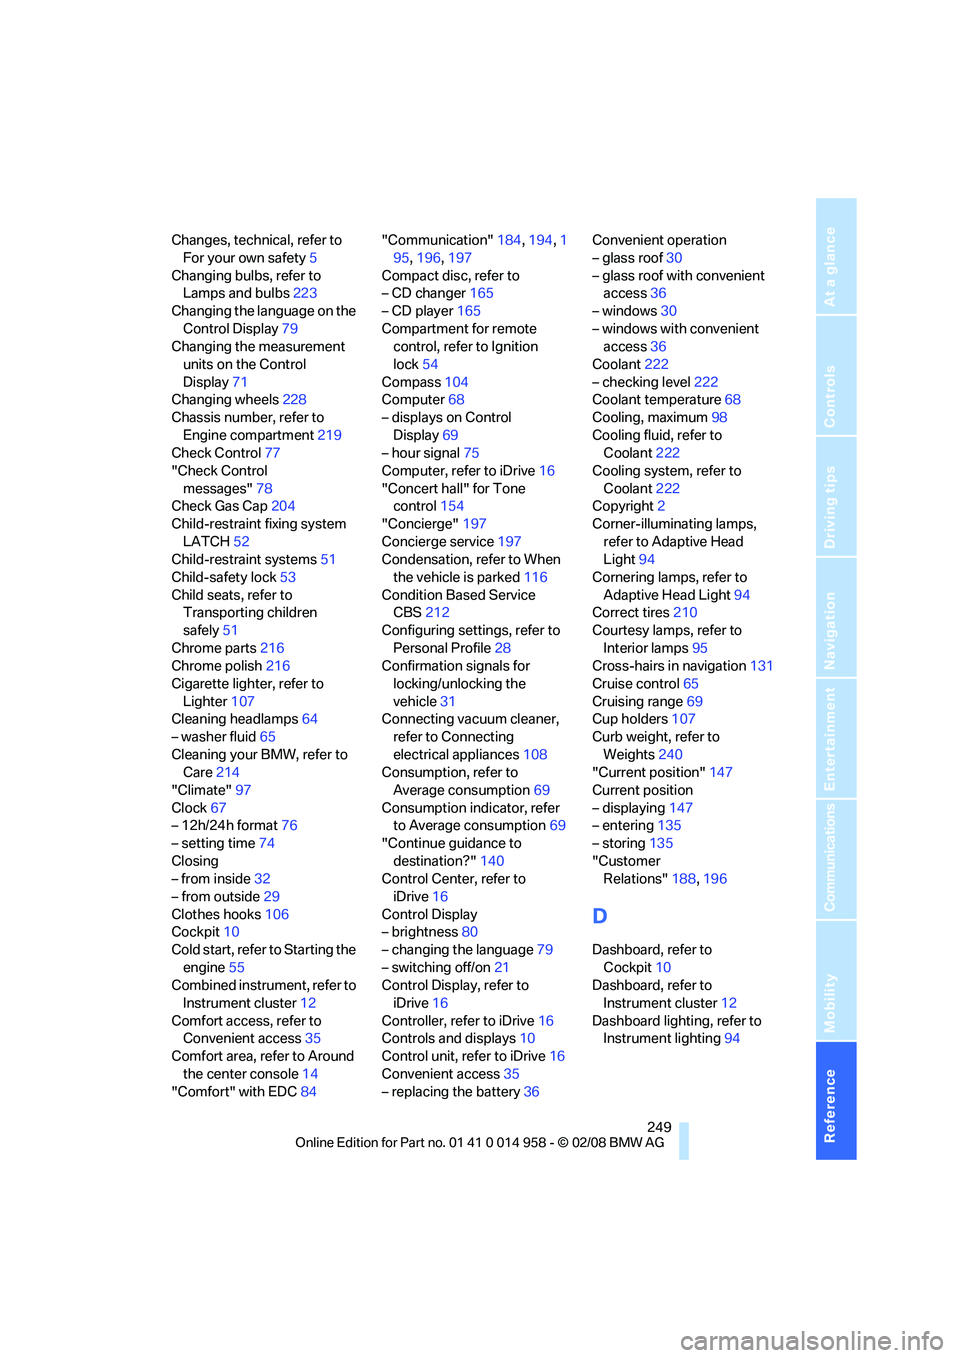
Reference 249
At a glance
Controls
Driving tips
Communications
Navigation
Entertainment
Mobility
Changes, technical, refer to
For your own safety5
Changing bulbs, refer to
Lamps and bulbs223
Changing the language on the
Control Display79
Changing the measurement
units on the Control
Display71
Changing wheels228
Chassis number, refer to
Engine compartment219
Check Control77
"Check Control
messages"78
Check Gas Cap204
Child-restraint fixing system
LATCH52
Child-restraint systems51
Child-safety lock53
Child seats, refer to
Transporting children
safely51
Chrome parts216
Chrome polish216
Cigarette lighter, refer to
Lighter107
Cleaning headlamps64
– washer fluid65
Cleaning your BMW, refer to
Care214
"Climate"97
Clock67
– 12h/24h format76
– setting time74
Closing
– from inside32
– from outside29
Clothes hooks106
Cockpit10
Cold start, refer to Starting the
engine55
Combined instrument, refer to
Instrument cluster12
Comfort access, refer to
Convenient access35
Comfort area, refer to Around
the center console14
"Comfort" with EDC84"Communication"184,194,1
95,196,197
Compact disc, refer to
– CD changer165
– CD player165
Compartment for remote
control, refer to Ignition
lock54
Compass
104
Computer68
– displays on Control
Display69
– hour signal75
Computer, refer to iDrive16
"Concert hall" for Tone
control154
"Concierge"197
Concierge service197
Condensation, refer to When
the vehicle is parked116
Condition Based Service
CBS212
Configuring settings, refer to
Personal Profile28
Confirmation signals for
locking/unlocking the
vehicle31
Connecting vacuum cleaner,
refer to Connecting
electrical appliances108
Consumption, refer to
Average consumption69
Consumption indicator, refer
to Average consumption69
"Continue guidance to
destination?"140
Control Center, refer to
iDrive16
Control Display
– brightness80
– changing the language79
– switching off/on21
Control Display, refer to
iDrive16
Controller, refer to iDrive16
Controls and displays10
Control unit, refer to iDrive16
Convenient access35
– replacing the battery36Convenient operation
– glass roof30
– glass roof with convenient
access36
– windows30
– windows with convenient
access36
Coolant222
– checking level222
Coolant temperature68
Cooling, maximum98
Cooling fluid, refer to
Coolant222
Cooling system, refer to
Coolant222
Copyright2
Corner-illuminating lamps,
refer to Adaptive Head
Light94
Cornering lamps, refer to
Adaptive Head Light94
Correct tires210
Courtesy lamps, refer to
Interior lamps95
Cross-hairs in navigation131
Cruise control65
Cruising range69
Cup holders107
Curb weight, refer to
Weights240
"Current position"147
Current position
– displaying147
– entering135
– storing135
"Customer
Relations"188,196
D
Dashboard, refer to
Cockpit10
Dashboard, refer to
Instrument cluster12
Dashboard lighting, refer to
Instrument lighting94