length BMW M3 2008 Owners Manual
[x] Cancel search | Manufacturer: BMW, Model Year: 2008, Model line: M3, Model: BMW M3 2008Pages: 266, PDF Size: 8.85 MB
Page 87 of 266
Controls
85Reference
At a glance
Driving tips
Communications
Navigation
Entertainment
Mobility
System limitations
The Flat Tire Monitor is unable to warn
the driver of sudden, severe tire damage
caused by external factors, nor can it identify
the gradual loss of pressure that will inevitably
occur in all four tires over a lengthy period of
time.<
In the following situations, the system could be
delayed or malfunction:
>System has not been initialized
>Driving on snowy or slippery road surface
>Performance-oriented style of driving: slip
in the drive wheels, high lateral acceleration
>Snow chains are attached
Initializing the system
The initialization is completed during driv-
ing, which can be interrupted at any time.
When driving resumes, the initialization is con-
tinued automatically.
Do not initialize the system while snow chains
are attached.<
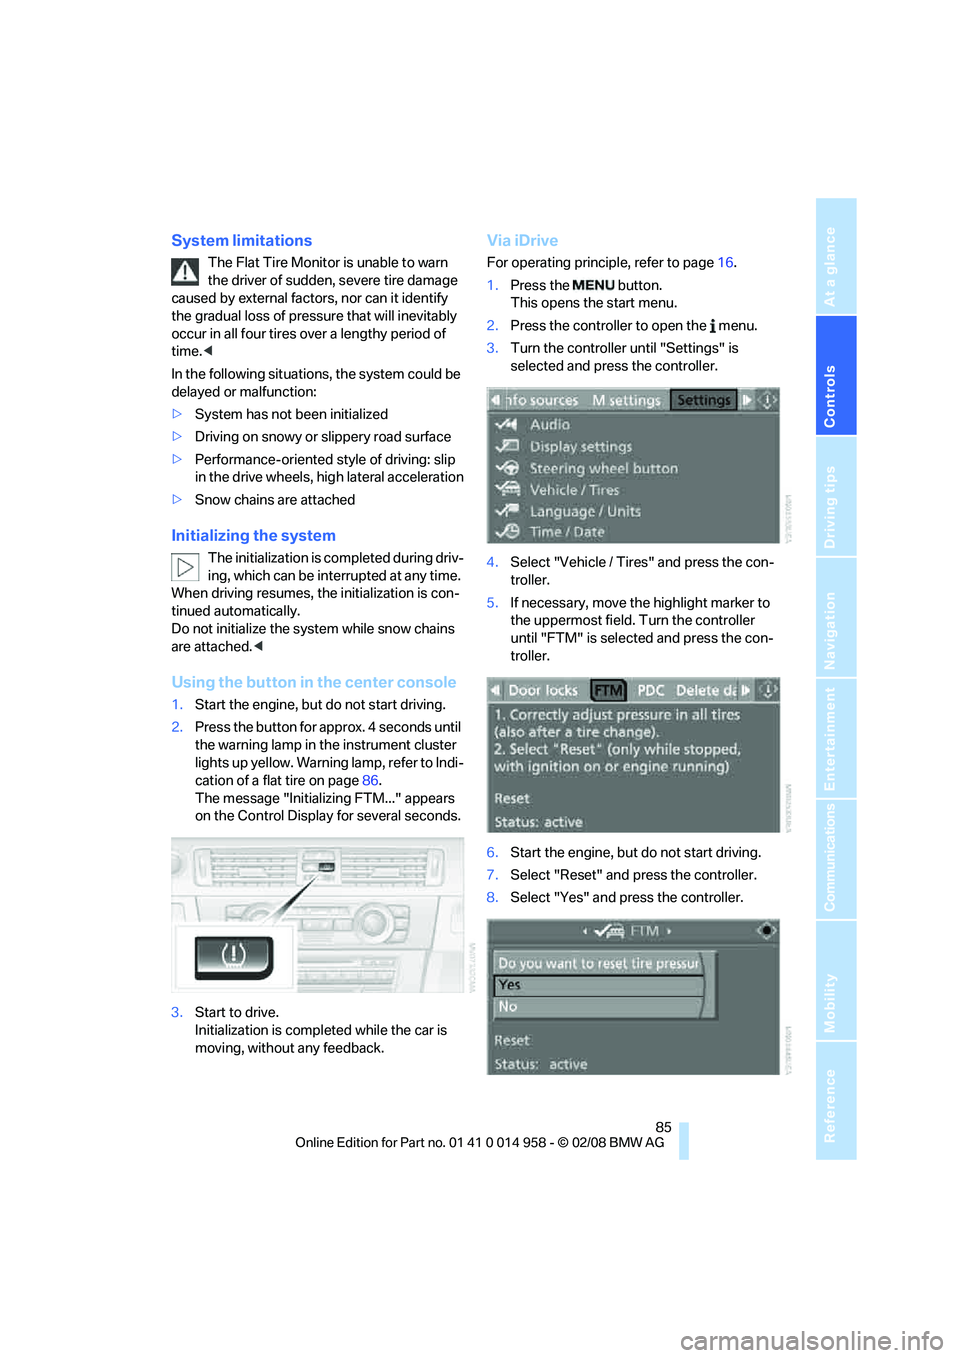
Using the button in the center console
1.Start the engine, but do not start driving.
2.Press the button for approx. 4 seconds until
the warning lamp in the instrument cluster
lights up yellow. Warning lamp, refer to Indi-
cation of a flat tire on page86.
The message "Initializing FTM..." appears
on the Control Display for several seconds.
3.Start to drive.
Initialization is completed while the car is
moving, without any feedback.
Via iDrive
For operating principle, refer to page16.
1.Press the button.
This opens the start menu.
2.Press the controller to open the menu.
3.Turn the controller until "Settings" is
selected and press the controller.
4.Select "Vehicle / Tires" and press the con-
troller.
5.If necessary, move the highlight marker to
the uppermost field. Turn the controller
until "FTM" is selected and press the con-
troller.
6.Start the engine, but do not start driving.
7.Select "Reset" and press the controller.
8.Select "Yes" and press the controller.
Page 101 of 266
Controls
99Reference
At a glance
Driving tips
Communications
Navigation
Entertainment
Mobility
it off while also increasing the air flow rate as
required.
The recirculated-air mode should not be used
continuously for lengthy periods, otherwise the
quality of the air inside the car will gradually
deteriorate.<
Via the button on the steering wheel
You can switch quickly between the recircu-
lated-air mode and the previous mode using an
individually programmable button
on the steer-
ing wheel, refer to page47.
Residual heat
The heat stored in the engine is
used to heat the passenger com-
partment, e.g. while stopped at a
school to pick up a child.
The function can be switched on when the fol-
lowing conditions are met:
>Up to 15 minutes after the engine has been
switched off
>While the engine is at operating tempera-
ture
>As long as battery voltage is sufficient
>At an outside temperature below 777/
256
The LED is lit when the function is on.
As of radio readiness, you can set the interior
temperature, the air flow rate and the air distri-
bution.
Defrosting windows and removing
condensation
Quickly removes ice and conden-
sation from the windshield and
front side windows.
Switch on the cooling function as well.
Switching cooling function on/off
The cooling function cools and
dehumidifies the incoming air
before reheating it as required,
according to the temperature setting. This
function is only available while the engine is
running.The cooling function helps prevent condensa-
tion on the windows or removes it quickly.
Depending on the weather, the windshield may
fog over briefly when the engine is started.
The cooling function is automatically switched
on along with the AUTO program.
Rear window defroster
The defroster is switched off auto-
matically after a certain time.
Depending on your vehicle's
equipment, the upper wires serve as an antenna
and are not part of the rear window defroster.
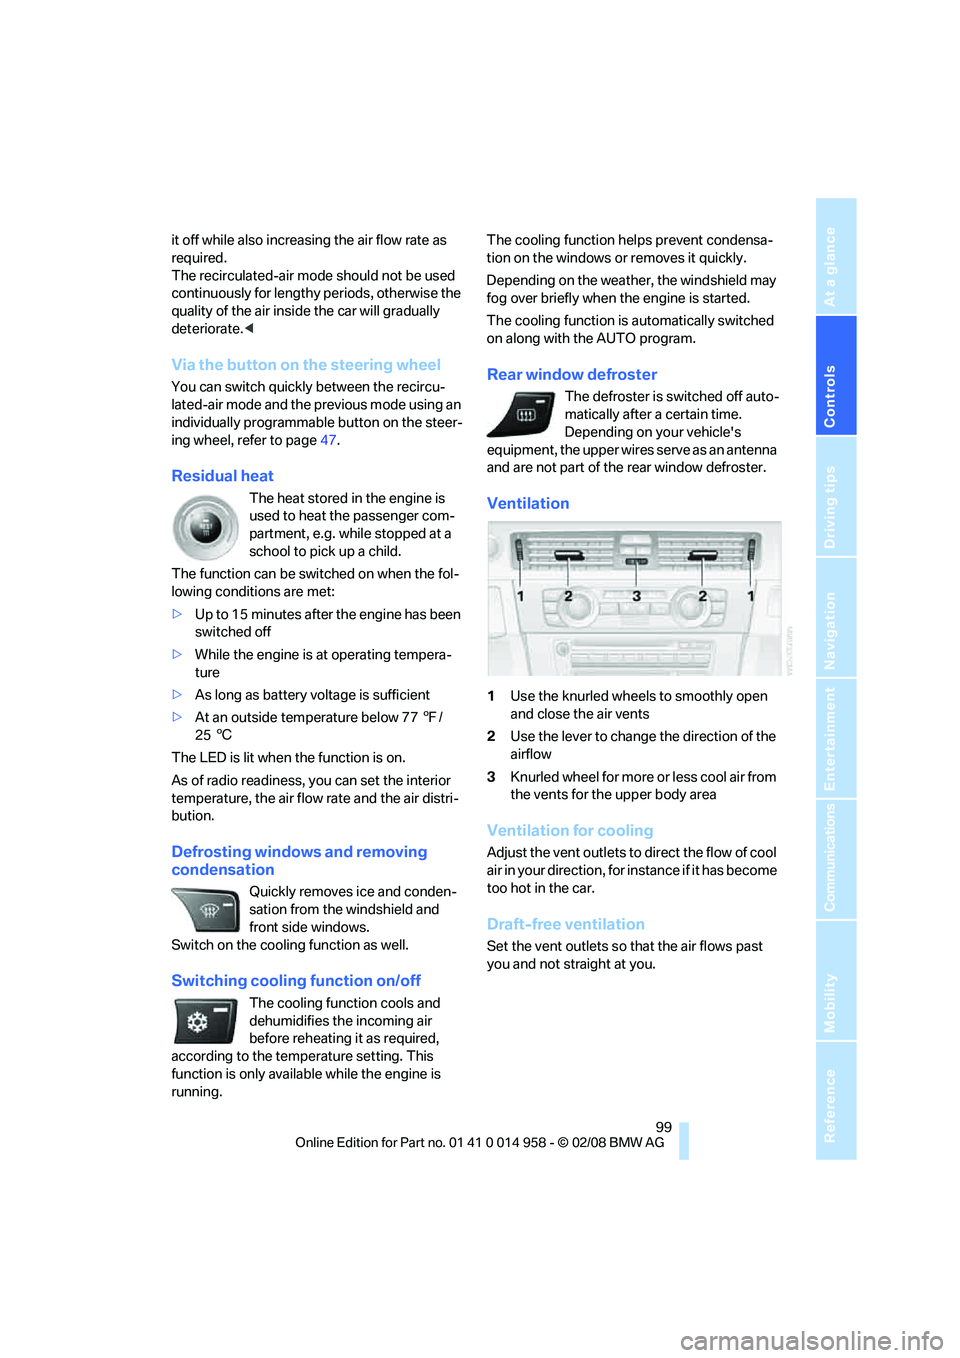
Ventilation
1Use the knurled wheels to smoothly open
and close the air vents
2Use the lever to change the direction of the
airflow
3Knurled wheel for more or less cool air from
the vents for the upper body area
Ventilation for cooling
Adjust the vent outlets to direct the flow of cool
air in your direction, for instance if it has become
too hot in the car.
Draft-free ventilation
Set the vent outlets so that the air flows past
you and not straight at you.
Page 112 of 266
Practical interior accessories
110 On uphill gradients, release the drawer with
caution, otherwise it could slide out on its own
and cause injury.
Do not exceed a maximum load of 11 lbs/5 kg
for the drawer, otherwise damage could
result.<
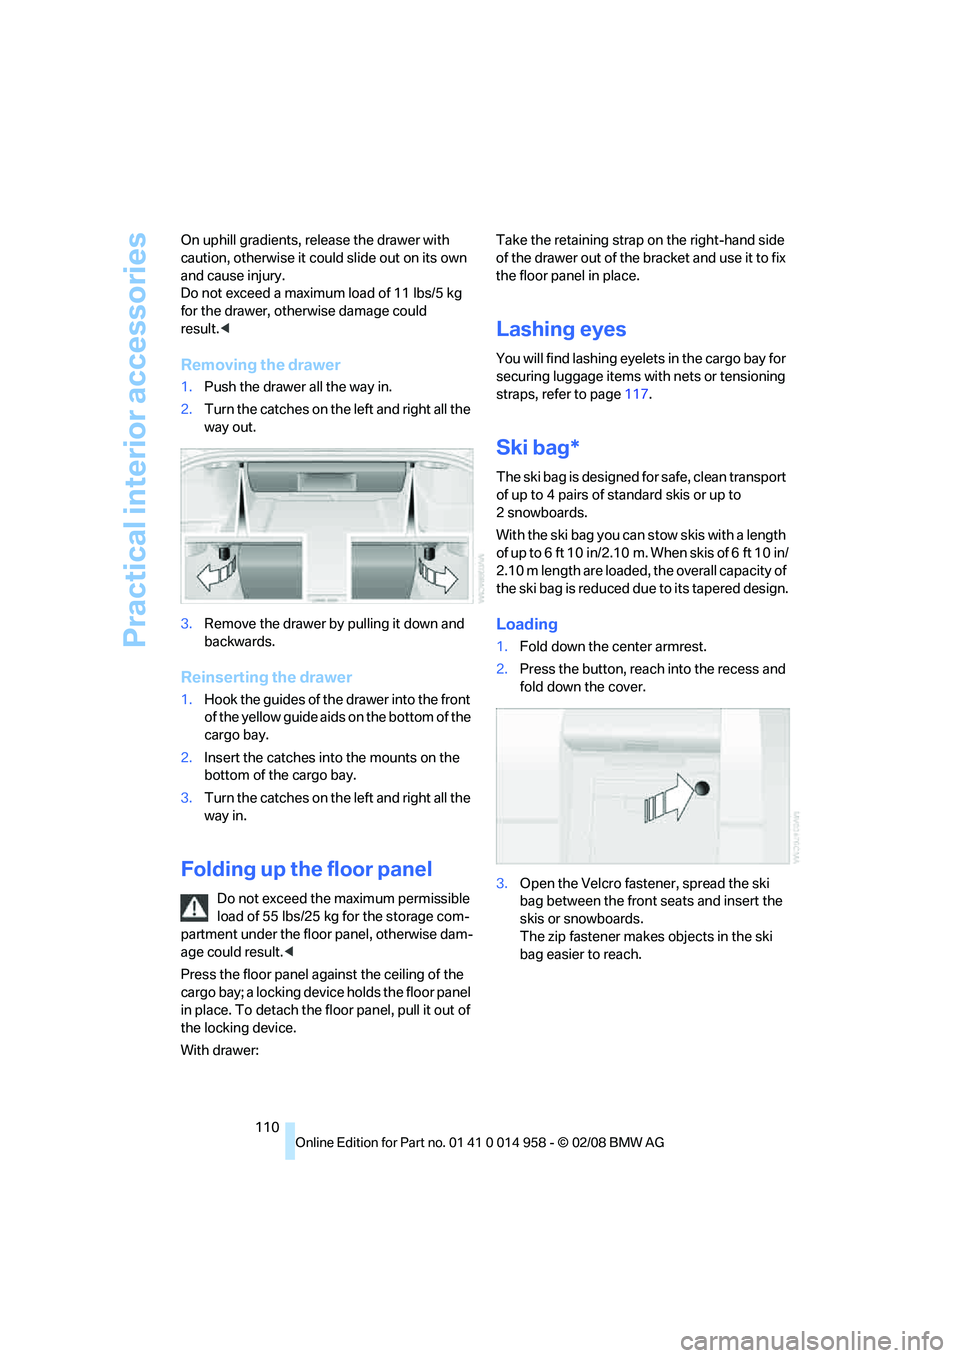
Removing the drawer
1.Push the drawer all the way in.
2.Turn the catches on the left and right all the
way out.
3.Remove the drawer by pulling it down and
backwards.
Reinserting the drawer
1.Hook the guides of the drawer into the front
of the yellow guide aids on the bottom of the
cargo bay.
2.Insert the catches into the mounts on the
bottom of the cargo bay.
3.Turn the catches on the left and right all the
way in.
Folding up the floor panel
Do not exceed the maximum permissible
load of 55 lbs/25 kg for the storage com-
partment under the floor panel, otherwise dam-
age could result.<
Press the floor panel against the ceiling of the
cargo bay; a locking device holds the floor panel
in place. To detach the floor panel, pull it out of
the locking device.
With drawer:Take the retaining strap on the right-hand side
of the drawer out of the bracket and use it to fix
the floor panel in place.
Lashing eyes
You will find lashing eyelets in the cargo bay for
securing luggage items with nets or tensioning
straps, refer to page117.
Ski bag*
The ski bag is designed for safe, clean transport
of up to 4 pairs of standard skis or up to
2snowboards.
With the ski bag you can stow skis with a length
of up to 6 ft 10 in/2.10 m. When skis of 6 ft 10 in/
2.10 m length are loaded, the overall capacity of
the ski bag is reduced due to its tapered design.
Loading
1.Fold down the center armrest.
2.Press the button, reach into the recess and
fold down the cover.
3.Open the Velcro fastener, spread the ski
bag between the front seats and insert the
skis or snowboards.
The zip fastener makes objects in the ski
bag easier to reach.
Page 117 of 266
Driving tips
115Reference
At a glance
Controls
Communications
Navigation
Entertainment
Mobility
ing, take care to avoid possible contact
between the hot exhaust system and any highly
flammable materials such as hay, leaves, grass,
etc. Such contact could lead to a fire, with the
risk of serious personal injuries and property
damage. Do not touch hot exhaust pipes, e. g.
when loading the cargo bay, otherwise there is a
risk of burn injuries.<
Hydroplaning
When driving on wet or slushy roads,
reduce road speed. If you do not, a wedge
of water can form between tires and road sur-
face. This situation, known as hydroplaning,
means that the tire can completely lose contact
with the road surface, so that neither the car can
be steered nor the brake be properly applied.<
The risk of hydroplaning increases with declin-
ing tread depth on the tires, refer also to Mini-
mum tread depth on page209.
Driving through water
Drive through water on the road only if it is
not deeper than 1 ft/30 cm, and then only
at walking speed at the most. Otherwise, the
vehicle's engine, the electrical systems and the
transmission may be damaged.<
Use the parking brake on inclines
On inclines, do not hold the vehicle for a
lengthy period using the clutch; use the
parking brake instead. Otherwise greater clutch
wear will result.<
For more information about the drive-off assis-
tant, refer to page84.
Braking safely
Your BMW is equipped with ABS as a standard
feature. Applying the brakes fully is the most
effective way of braking in situations in which
this is necessary. Since the vehicle maintains
steering responsiveness, you can still avoid
possible obstacles with a minimum of steering
effort.
Pulsation of the brake pedal, combined with
sounds from the hydraulic circuits, indicate that
ABS is in its active mode.
Driving in wet conditions
When roads are wet or there is heavy rain,
briefly exert gentle pressure on the brake pedal
every few miles. Monitor traffic conditions to
ensure that this maneuver does not endanger
other road users. The heat generated in this
process helps dry the pads and rotors to ensure
that full braking efficiency will then be available
when you need it.
Hills
To prevent overheating and the resulting
reduced efficiency of the brake system,
drive long or steep downhill gradients in the
gear in which the least braking is required. Even
light but consistent brake pressure can lead to
high temperatures, brake wear and possibly
even brake failure.<
You can increase the engine's braking effect by
shifting down, all the way to first gear if neces-
sary. This strategy helps you avoid placing
excessive loads on the brake system.
M dual clutch transmission: never drive
with the transmission in neutral or with
the engine switched off; otherwise, engine
braking action will not be present or there will be
no power assistance to the brakes or steering.
Manual transmission: never drive with the
clutch held down, with the transmission in neu-
tral or with the engine switched off; otherwise,
engine braking action will not be present or
there will be no power assistance to the brakes
or steering.
Never allow floor mats, carpets or any other
objects to protrude into the area around the
pedals, otherwise pedal function could be
impaired.<
Corrosion on brake rotors
When the vehicle is driven only occasionally,
during extended periods when the vehicle is not
used at all, and in operating conditions where
brake applications are less frequent, there is an
increased tendency for corrosion to form on
rotors, while contaminants accumulate on the
brake pads. This occurs because the minimum
pressure which must be exerted by the pads
Page 148 of 266
Destination guidance
146
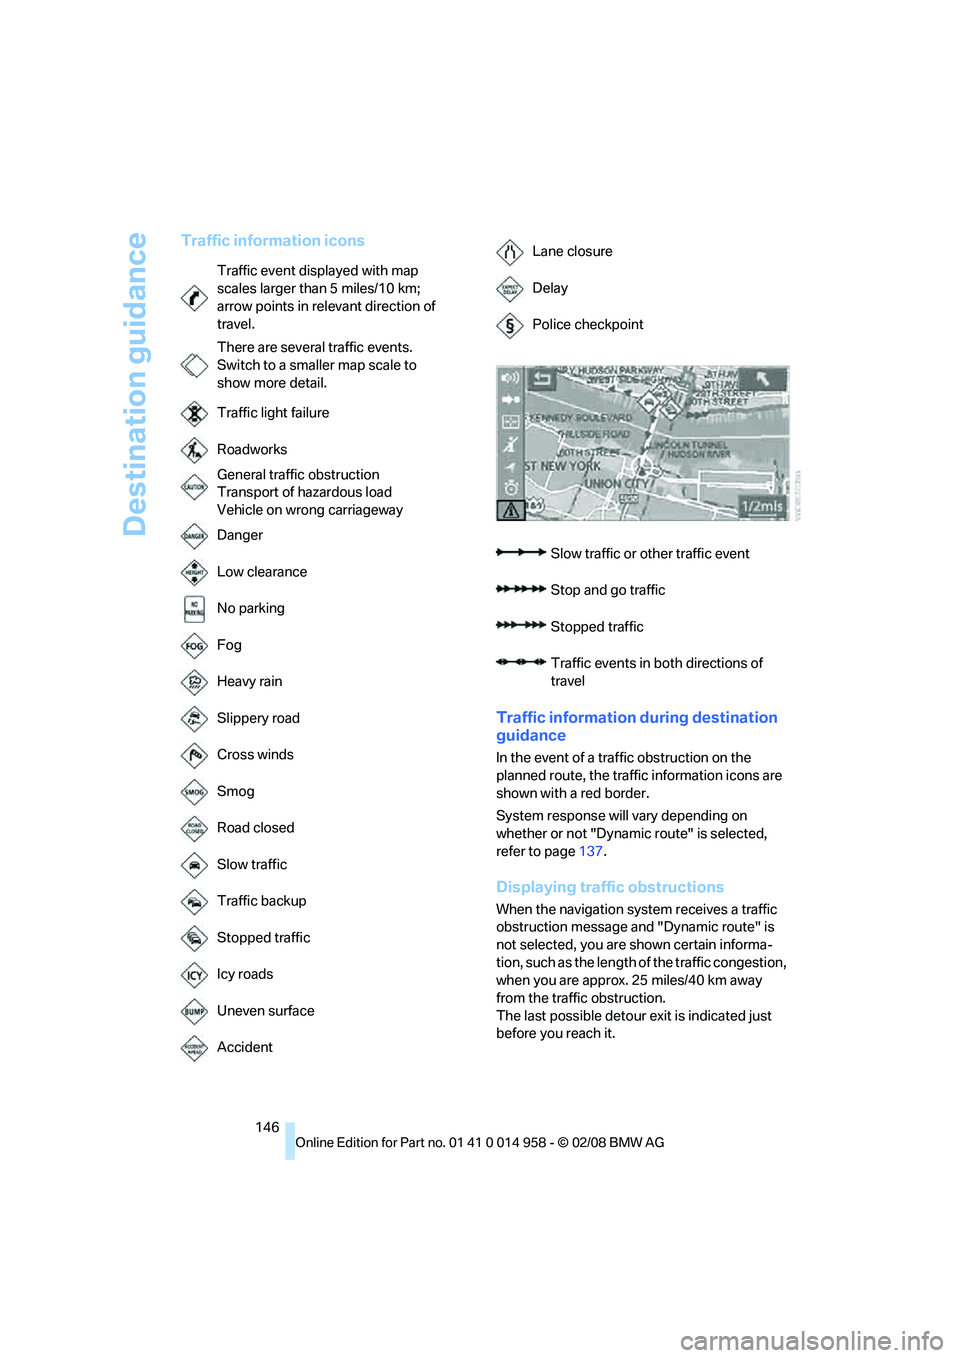
Traffic information icons
Traffic information during destination
guidance
In the event of a traffic obstruction on the
planned route, the traffic information icons are
shown with a red border.
System response will vary depending on
whether or not "Dynamic route" is selected,
refer to page137.
Displaying traffic obstructions
When the navigation system receives a traffic
obstruction message and "Dynamic route" is
not selected, you are shown certain informa-
tion, such as the length of the traffic congestion,
when you are approx. 25 miles/40 km away
from the traffic obstruction.
The last possible detour exit is indicated just
before you reach it. Traffic event displayed with map
scales larger than 5 miles/10 km;
arrow points in relevant direction of
travel.
There are several traffic events.
Switch to a smaller map scale to
show more detail.
Traffic light failure
Roadworks
General traffic obstruction
Transport of hazardous load
Vehicle on wrong carriageway
Danger
Low clearance
No parking
Fog
Heavy rain
Slippery road
Cross winds
Smog
Road closed
Slow traffic
Traffic backup
Stopped traffic
Icy roads
Uneven surface
Accident
Lane closure
Delay
Police checkpoint
Slow traffic or other traffic event
Stop and go traffic
Stopped traffic
Traffic events in both directions of
travel
Page 256 of 266
Everything from A - Z
254
J
Jacking points228
Joystick, refer to iDrive16
Jumpering, refer to Jump
starting231
Jump starting231
K
Key, refer to Remote
control28
Keyless go, refer to
Convenient access35
Keyless opening and closing,
refer to Convenient
access35
Key Memory, refer to Personal
Profile28
Knock control204
L
Lamps
– automatic headlamp
control92
– parking lamps/low beams92
Lamps and bulbs, replacing
bulbs223
"Language / Units"71
"Language / Units" in
navigation125,142
"Language" on the Control
Display79
"Languages" in
navigation125,142
Lap-and-shoulder belt, refer
to Safety belts44
Lashing eyes, refer to
Securing cargo117
Last destinations, refer to
Destination list133
"Last seat pos."44
LATCH child-restraint fixing
system52
Launch Control62
Leather care216
LED hand lamp106
LED light-emitting diodes223Length, refer to
Dimensions239
License plate lamp, replacing
bulb226
Light-alloy wheels215
Light-emitting diodes
LED223
Lighter107
– connecting electrical
appliances108
"Lighting"63
Lighting
– instruments94
– lamps and bulbs223
– vehicle, refer to Lamps92
Light switch92
"Limit"79
Limit, refer to Speed limit78
Load securing equipment,
refer to Securing cargo117
Lock buttons, doors, refer to
Locking32
Locking
– adjusting confirmation
signal31
– from inside32
– from outside30
– without remote control, refer
to Convenient access35
Locking and unlocking doors
– confirmation signals31
– from inside32
– from outside29
Low-beam headlamps
92
– automatic92
Lower back support, refer to
Lumbar support41
Luggage compartment lid33
– convenient access36
– emergency operation, refer
to Opening manually33
– emergency release34
– locking or unlocking
separately33
– opening from inside33
– opening from outside33
– opening manually33
– remote control30Luggage rack, refer to Roof-
mounted luggage rack117
Lumbar support41
M
M+S tires, refer to Winter
tires210
Maintenance, refer to Service
Booklet
Maintenance system212
Malfunction
– luggage compartment lid33
– tires86
Malfunction warnings, refer to
Check Control77
Manual
– BMW Teleservice Call195
Manual car wash215
"Manual" on the radio157
Manual operation
– door lock32
– driver's door32
– fuel filler door204
– glass roof39
– luggage compartment lid33
– transmission lock59
Manual transmission56
– tow-starting234
Map
– changing scale141
– destination entry131
"Map direction of travel"141
"Map facing north"141
Master key, refer to Remote
control28
Maximum cooling98
Maximum speed
– with winter tires210
"M DKG Drivelogic"48
MDM, refer to M Dynamic
Mode82
MDrive48