buttons BMW M3 2010 Owners Manual
[x] Cancel search | Manufacturer: BMW, Model Year: 2010, Model line: M3, Model: BMW M3 2010Pages: 196, PDF Size: 5.78 MB
Page 11 of 196
At a glance
This overview of buttons, switches and displays
is intended to familiarize you with your vehicle's
operating environment. The section will also
assist you in becoming acquainted with the
control concepts and options available for
operating the various systems.
At a glance
Page 13 of 196
At a glance
Controls
Driving tips
Mobility Reference
11
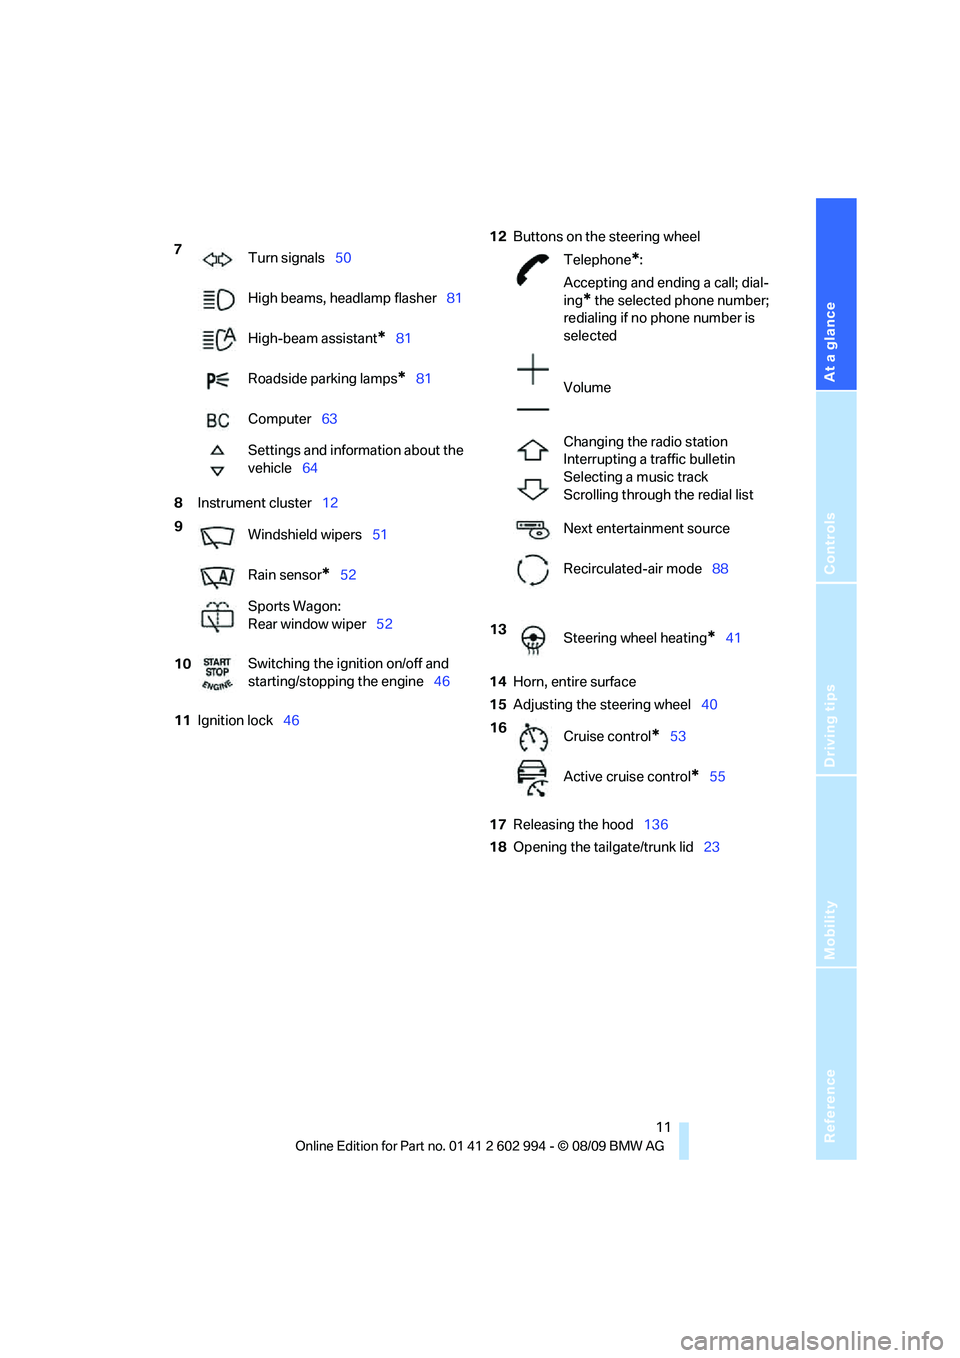
8Instrument cluster12
11Ignition lock4612Buttons on the steering wheel
14Horn, entire surface
15Adjusting the steering wheel40
17Releasing the hood136
18Opening the tailgate/trunk lid23 7
Turn signals50
High beams, headlamp flasher81
High-beam assistant
*81
Roadside parking lamps
*81
Computer63
Settings and information about the
vehicle64
9
Windshield wipers51
Rain sensor
*52
Sports Wagon:
Rear window wiper52
10Switching the ignition on/off and
starting/stopping the engine46
Telephone*:
Accepting and ending a call; dial-
ing
* the selected phone number;
redialing if no phone number is
selected
Volume
Changing the radio station
Interrupting a traffic bulletin
Selecting a music track
Scrolling through the redial list
Next entertainment source
Recirculated-air mode88
13
Steering wheel heating
*41
16
Cruise control
*53
Active cruise control
*55
Page 29 of 196
Reference
At a glance
Controls
Driving tips
Mobility
27
>The engine can only be started when the
vehicle detects that the remote control cur-
rently in use is inside the vehicle.
Comparison to the standard remote
control
In general, there is no difference between using
Comfort Access or pressing the buttons on the
remote control to carry out the functions men-
tioned above. You should therefore first famil-
iarize yourself with the instructions on opening
and closing starting on page18.
Special features regarding the use of Comfort
Access are described below.
If you notice a brief delay while opening or
closing windows or the glass roof/pan-
orama glass roof, the system is checking
whether a remote control is inside the vehicle.
Please repeat the opening or closing proce-
dure, if necessary.<
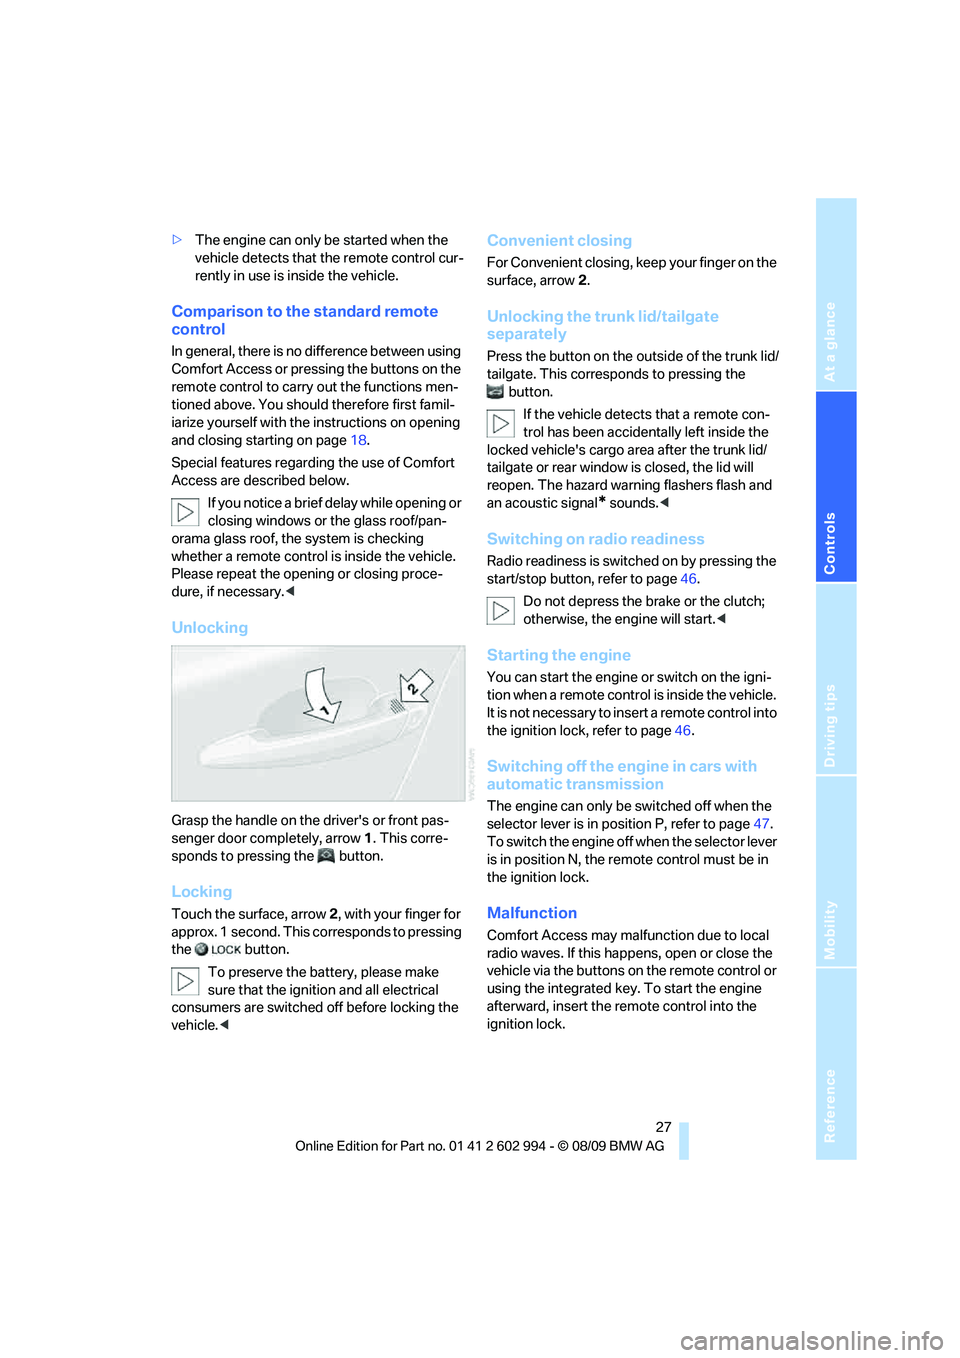
Unlocking
Grasp the handle on the driver's or front pas-
senger door completely, arrow 1. This corre-
sponds to pressing the button.
Locking
Touch the surface, arrow 2, with your finger for
approx. 1 second. This corresponds to pressing
the button.
To preserve the battery, please make
sure that the ignition and all electrical
consumers are switched off before locking the
vehicle.<
Convenient closing
For Convenient closing, keep your finger on the
surface, arrow 2.
Unlocking the trunk lid/tailgate
separately
Press the button on the outside of the trunk lid/
tailgate. This corresponds to pressing the
button.
If the vehicle detects that a remote con-
trol has been accidentally left inside the
locked vehicle's cargo area after the trunk lid/
tailgate or rear window is closed, the lid will
reopen. The hazard warning flashers flash and
an acoustic signal
* sounds.<
Switching on radio readiness
Radio readiness is switched on by pressing the
start/stop button, refer to page46.
Do not depress the brake or the clutch;
otherwise, the engine will start.<
Starting the engine
You can start the engine or switch on the igni-
tion when a remote control is inside the vehicle.
It is not necessary to insert a remote control into
the ignition lock, refer to page46.
Switching off the engine in cars with
automatic transmission
The engine can only be switched off when the
selector lever is in position P, refer to page47.
T o s w i t c h t h e e n g i n e o f f w h e n t h e s e l e c t o r l e v e r
is in position N, the remote control must be in
the ignition lock.
Malfunction
Comfort Access may malfunction due to local
radio waves. If this happens, open or close the
vehicle via the buttons on the remote control or
using the integrated key. To start the engine
afterward, insert the remote control into the
ignition lock.
Page 39 of 196
Reference
At a glance
Controls
Driving tips
Mobility
37
Depending on the equipment version, it may be
possible to fold down the outer rear head
restraints as well.
Only fold the head restraints down if no
passengers will be sitting in the rear. Fold
up the head restraints before transporting pas-
sengers in the rear.<
Heated seats*
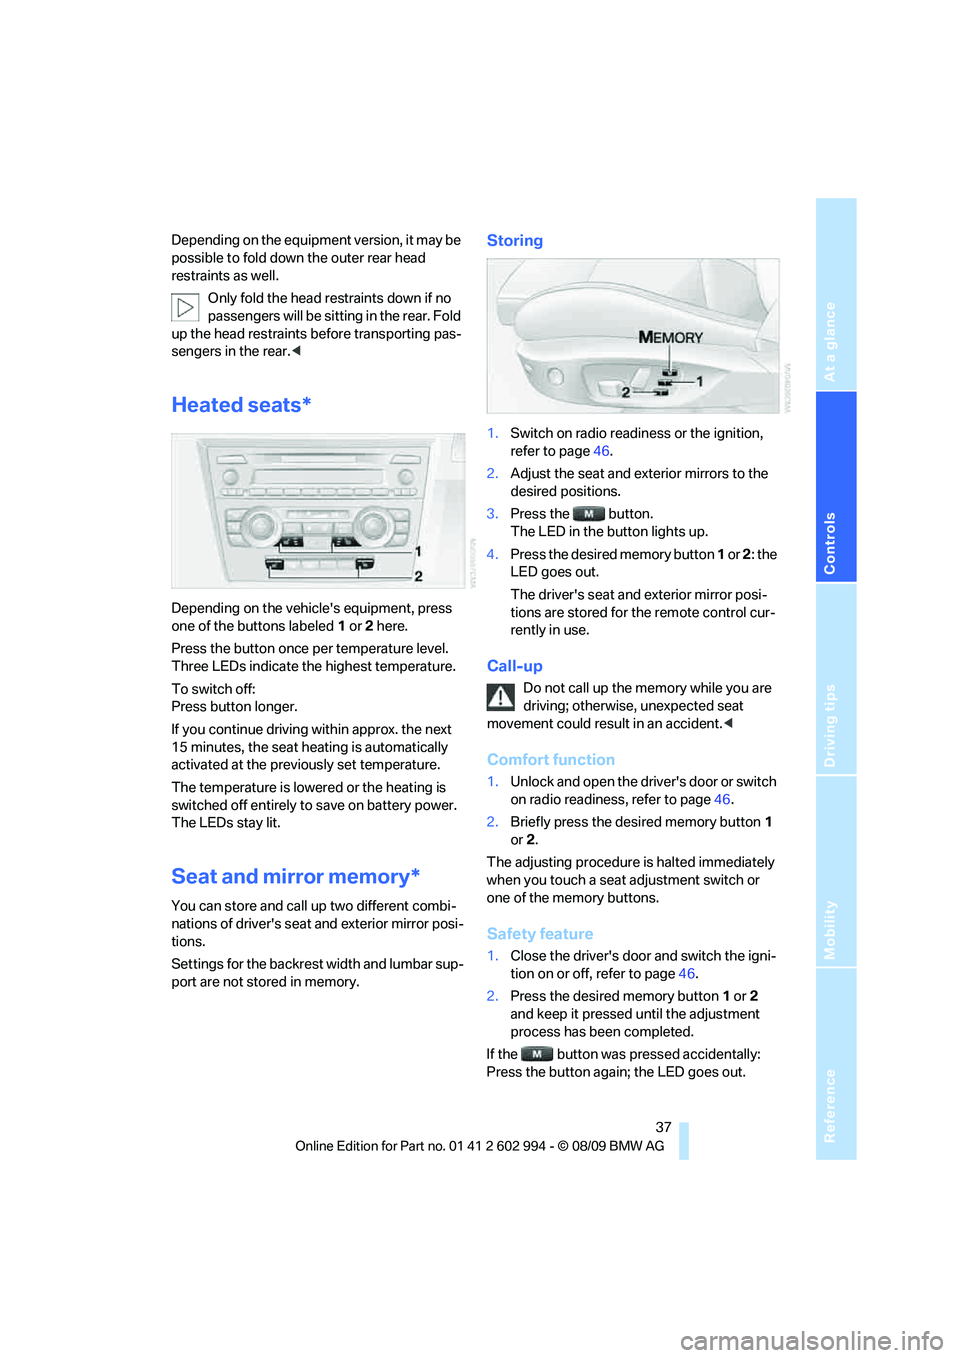
Depending on the vehicle's equipment, press
one of the buttons labeled1 or 2 here.
Press the button once per temperature level.
Three LEDs indicate the highest temperature.
To switch off:
Press button longer.
If you continue driving within approx. the next
15 minutes, the seat heating is automatically
activated at the previously set temperature.
The temperature is lowered or the heating is
switched off entirely to save on battery power.
The LEDs stay lit.
Seat and mirror memory*
You can store and call up two different combi-
nations of driver's seat and exterior mirror posi-
tions.
Settings for the backrest width and lumbar sup-
port are not stored in memory.
Storing
1.Switch on radio readiness or the ignition,
refer to page46.
2.Adjust the seat and exterior mirrors to the
desired positions.
3.Press the button.
The LED in the button lights up.
4.Press the desired memory button 1 or 2: the
LED goes out.
The driver's seat and exterior mirror posi-
tions are stored for the remote control cur-
rently in use.
Call-up
Do not call up the memory while you are
driving; otherwise, unexpected seat
movement could result in an accident.<
Comfort function
1.Unlock and open the driver's door or switch
on radio readiness, refer to page46.
2.Briefly press the desired memory button1
or 2.
The adjusting procedure is halted immediately
when you touch a seat adjustment switch or
one of the memory buttons.
Safety feature
1.Close the driver's door and switch the igni-
tion on or off, refer to page46.
2.Press the desired memory button1 or2
and keep it pressed until the adjustment
process has been completed.
If the button was pressed accidentally:
Press the button again; the LED goes out.
Page 40 of 196
Adjustments
38
Call-up with the remote control
The driver's seat position last set is stored for
the remote control currently in use.
You can select whether or not the seat is reset
to that position automatically.
When this Personal Profile function is
used, first make sure that the footwell
behind the driver's seat is free of obstacles.
Failure to do so could cause injury to persons or
damage to objects as a result of a rearward
movement of the seat.<
The adjusting procedure is halted immediately
when you touch a seat adjustment switch or
one of the memory buttons.
Activating/deactivating automatic call-
up
For operating principle refer to page64.
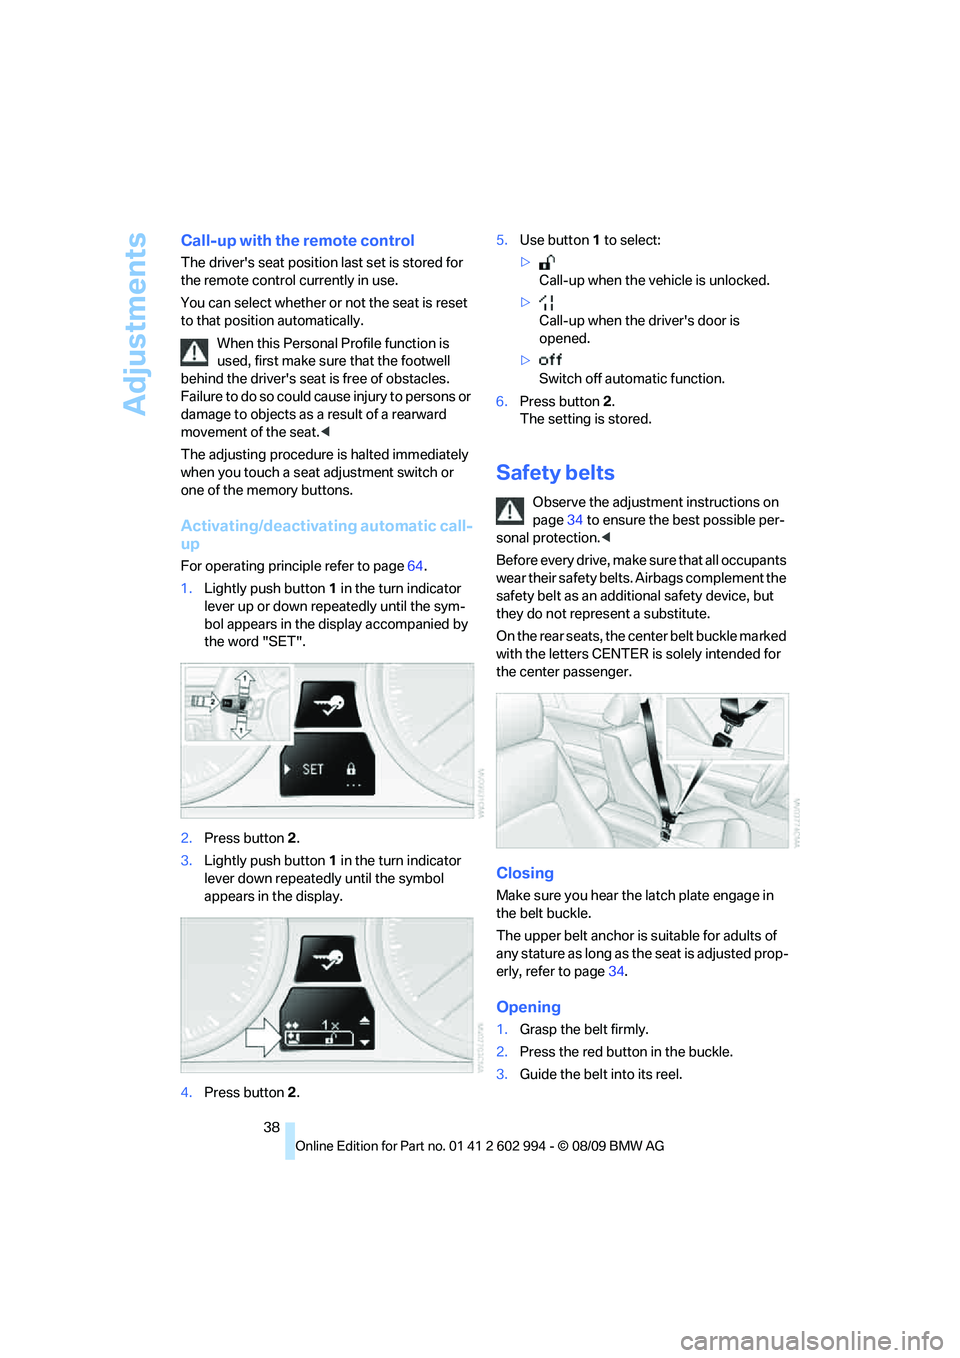
1.Lightly push button1 in the turn indicator
lever up or down repeatedly until the sym-
bol appears in the display accompanied by
the word "SET".
2.Press button 2.
3.Lightly push button1 in the turn indicator
lever down repeatedly until the symbol
appears in the display.
4.Press button 2.5.Use button 1 to select:
>
Call-up when the vehicle is unlocked.
>
Call-up when the driver's door is
opened.
>
Switch off automatic function.
6.Press button 2.
The setting is stored.
Safety belts
Observe the adjustment instructions on
page34 to ensure the best possible per-
sonal protection.<
Before every drive, make sure that all occupants
wear their safety belts. Airbags complement the
safety belt as an additional safety device, but
they do not represent a substitute.
On the rear seats, the center belt buckle marked
with the letters CENTER is solely intended for
the center passenger.
Closing
Make sure you hear the latch plate engage in
the belt buckle.
The upper belt anchor is suitable for adults of
any stature as long as the seat is adjusted prop-
erly, refer to page34.
Opening
1.Grasp the belt firmly.
2.Press the red button in the buckle.
3.Guide the belt into its reel.
Page 93 of 196
Reference
At a glance
Controls
Driving tips
Mobility
91
Practical interior accessories
Integrated universal remote
control*
The concept
The integrated universal remote control can
replace as many as three hand-held transmit-
ters for various remote-controlled devices,
such as garage doors and gates or lighting sys-
tems. The integrated universal remote control
registers and stores signals from the original
hand-held transmitters.
The signal of an original hand-held transmitter
can be programmed on one of the three mem-
ory buttons1. After this, the programmed
memory button1 will operate the system in
question. The LED2 flashes to confirm trans-
mission of the signal.
Should you sell your vehicle one day, be sure to
delete the stored programs beforehand for your
safety, refer to page92.
To prevent possible damage or injury,
before programming or using the inte-
grated universal remote control, always inspect
the immediate area to make certain that no peo-
ple, animals or objects are within the pivoting or
travel range of the device being operated. Com-
ply also with the safety instructions supplied
with the original hand-held transmitter.<
Checking compatibility
If this symbol appears on the package
or in the instructions supplied with the
original hand-held transmitter, you can
assume that the radio remote control device will
be compatible with the integrated universal
remote control.
For additional information, please contact your
BMW center or call: 1-800-355-3515.
You can also obtain information on the Internet
at:
www.bmwusa.com or
www.homelink.com. HomeLink is a registered trademark of Johnson
Controls, Inc.<
Programming
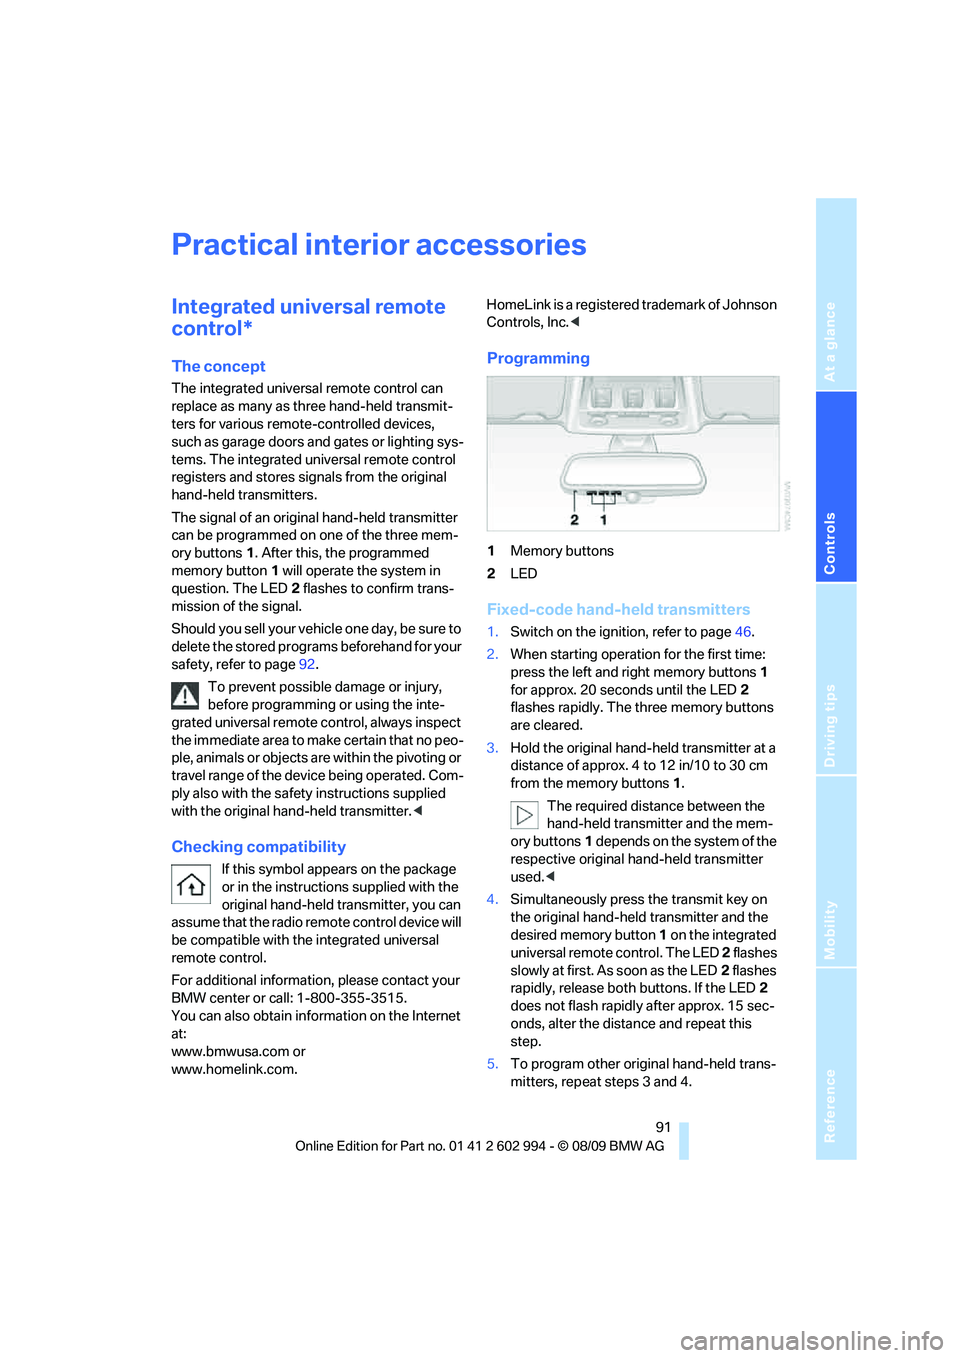
1Memory buttons
2LED
Fixed-code hand-held transmitters
1.Switch on the ignition, refer to page46.
2.When starting operation for the first time:
press the left and right memory buttons1
for approx. 20 seconds until the LED2
flashes rapidly. The three memory buttons
are cleared.
3.Hold the original hand-held transmitter at a
distance of approx. 4 to 12 in/10 to 30 cm
from the memory buttons1.
The required distance between the
hand-held transmitter and the mem-
ory buttons1 depends on the system of the
respective original hand-held transmitter
used.<
4.Simultaneously press the transmit key on
the original hand-held transmitter and the
desired memory button 1 on the integrated
universal remote control. The LED 2 flashes
slowly at first. As soon as the LED2 flashes
rapidly, release both buttons. If the LED2
does not flash rapidly after approx. 15 sec-
onds, alter the distance and repeat this
step.
5.To program other original hand-held trans-
mitters, repeat steps 3 and 4.
Page 94 of 196
Practical interior accessories
92 The corresponding memory button 1 is now
programmed with the signal of the original
hand-held transmitter.
You can operate the device while the ignition is
switched on.
If the device fails to function even after
repeated programming, check whether
the original hand-held transmitter uses an alter-
nating-code system. To do so, either read the
instructions for the original hand-held transmit-
ter or hold down the programmed memory
button1 of the integrated universal remote
control. If the LED2 on the integrated universal
remote control flashes rapidly and then remains
lit for about two seconds, the original hand-held
transmitter uses an alternating-code system. If
it uses an alternating-code system, program
the memory buttons1 as described under
Alternating-code hand-held transmitters.<
Alternating-code hand-held
transmitters
To program the integrated universal remote
control, consult the operating instructions for
the device to be set. You will find information
there on the possibilities for synchronization.
When programming hand-held transmitters
that employ an alternating code, please observe
the following supplementary instructions:
Programming will be easier with the aid of
a second person.<
1.Park your vehicle within the range of the
remote-controlled device.
2.Program the integrated universal remote
control as described above in the section
Fixed-code hand-held transmitters.
3.Locate the button on the receiver of the
device to be set, e.g. on the drive unit.
4.Press the button on the receiver of the
device to be set. After step 4, you have
approx. 30 seconds for step 5.
5.Press the programmed memory button1 of
the integrated universal remote control
three times.The corresponding memory button 1 is now
programmed with the signal of the original
hand-held transmitter.
If you have any questions, please contact
your BMW center.<
Deleting all stored programs
Press the left and right memory buttons1 for
approx. 20 seconds until the LED2 flashes rap-
idly: all stored programs are deleted.
Reassigning individual programs
1.Hold the original hand-held transmitter at a
distance of approx. 4 to 12 in/10 to 30 cm
from the memory buttons1.
The required distance between the
hand-held transmitter and the mem-
ory buttons1 depends on the system of the
respective original hand-held transmitter
used.<
2.Press the desired memory button1 of the
integrated universal remote control.
3.If the LED2 flashes slowly after approx.
20 seconds, press the transmit key of the
original hand-held transmitter. Release
both buttons as soon as the LED2 flashes
rapidly. If the LED2 does not flash rapidly
after approx. 15 seconds, alter the distance
and repeat this step.
Page 101 of 196
Reference
At a glance
Controls
Driving tips
Mobility
99
Raising the roller cover
Press the button: the roller cover is raised.
Before closing the rear window or tailgate,
press the roller cover downward until it
engages.
Expanding the cargo area
The rear seat backrest is divided. You can fold
down either division in order to expand the
cargo area.
Reach into the recess and pull forwards.
When folding the backrest back up, make
sure that the catch engages properly. If
you cannot see a red warning area in the recess,
the catch is properly engaged. Otherwise,
cargo can be thrown around inside the passen-
ger compartment and endanger the car's occu-
pants, e.g. in the case of braking or sudden
swerving.<
Observe the instructions concerning the
safety belt on page33 to ensure the best
possible personal protection.<
Partition net
Do not let the partition net retract; other-
wise, there is a risk of danger and the par-
tition net could be damaged.<
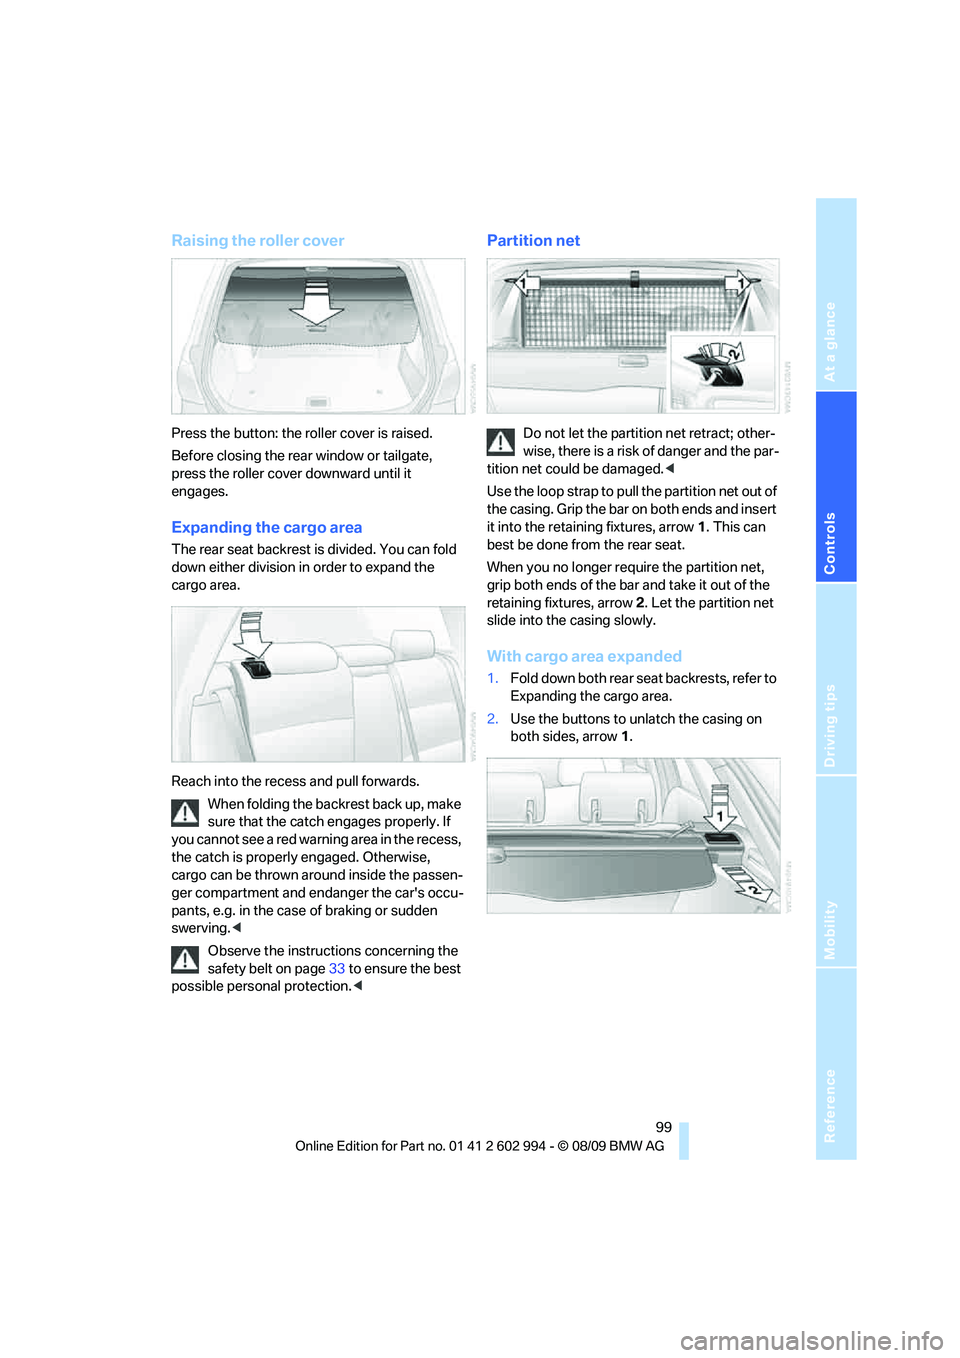
Use the loop strap to pull the partition net out of
the casing. Grip the bar on both ends and insert
it into the retaining fixtures, arrow 1. This can
best be done from the rear seat.
When you no longer require the partition net,
grip both ends of the bar and take it out of the
retaining fixtures, arrow 2. Let the partition net
slide into the casing slowly.
With cargo area expanded
1.Fold down both rear seat backrests, refer to
Expanding the cargo area.
2.Use the buttons to unlatch the casing on
both sides, arrow 1.
Page 183 of 196
Reference
At a glance
Controls
Driving tips
Mobility
181
B
Backrest contour, refer to
Lumbar support35
Backrests, refer to Seat
adjustment34
Backrest width adjustment35
Back seats
– refer to Rear seats36
Backup lamps
– replacing bulb151,152
Band-aids, refer to First aid
pouch155
Bar, refer to Towing
methods158
Base plate for telephone or
mobile phone
– refer to Snap-in adapter in
the center armrest storage
compartment95
Battery153
– charging153
– disposal28,153
– jump-starting156
– remote control18
– replacing153
– temporary power failure153
Battery renewal
– remote control28
– remote control for vehicle28
Being towed158
Belts, refer to Safety belts38
Belt tensioner, refer to Safety
belts38
Beverage holders, refer to
Cupholders95
Blower, refer to Air
volume85,88
Bluetooth, refer to separate
Owner's Manual
BMW
– car shampoo145
BMW Advanced Diesel116
BMW Homepage4
BMW Maintenance
System141
BMW webpage4
Bottle holders, refer to
Cupholders95Brake Assist, refer to Dynamic
Brake Control DBC70
Brake fluid, refer to Service
requirements65
Brake Force Display76
Brake lamps
– Brake Force Display76
– replacing bulb151,152
Brake pads106
– breaking in106
Brake rotors108
– brakes
106
– breaking in106
Brakes
– ABS70
– BMW Maintenance
System141
– Brake Force Display76
– breaking in106
– parking brake48
– service requirements65
Brakes, refer to Braking
safely108
Brake system106
– BMW Maintenance
System141
– breaking in106
– disc brakes108
Breakdown services, refer to
Roadside Assistance155
Breaking in the clutch106
Breaking in the differential,
refer to Engine and
differential106
Break-in period106
Bulb changing, refer to Lamps
and bulbs147
Button for starting the engine,
refer to Start/stop button46
Buttons on the steering
wheel11
C
California Proposition 65
warning5
Can holders, refer to
Cupholders95
Capacities178Capacity of the cargo area177
Car battery, refer to Vehicle
battery153
Car care, refer to Care143
Care143
– automatic car washes143
– care products143
– carpets145
– CD/DVD drives146
– chrome parts144
– displays145
– exterior143
– fine wood parts145
– headlamps144
– high-pressure washer143
– interior145
– leather145
– light-alloy wheels144
– paintwork144
– plastic parts145
– rubber seals144
– safety belts145
– sensors and cameras145
– upholstery and cloth
trim145
– washing the car
manually144
– windows144
Cargo, securing110
Cargo area98
– capacity177
– Comfort Access27
– folding up the floor
panel101
– lamp, refer to Interior
lamps83
– opening from inside23
– opening from outside23
– partition net99
– roller cover98
Cargo area lid, refer to Trunk
lid/tailgate23
Cargo area net, refer to
Partition net99
Cargo loading109
– securing cargo110
– stowing cargo109
– vehicle109
Page 188 of 196
Everything from A to Z
186 Jump-starting156
K
Key, refer to Integrated key/
remote control18
Keyless go, refer to Comfort
Access26
Keyless opening and closing,
refer to Comfort Access26
Key Memory, refer to Personal
Profile18
Kickdown49
– automatic transmission with
Steptronic49
Knock control115
L
Lamps
– automatic headlamp
control79
– parking lamps/low beams79
Lamps and bulbs, replacing
bulbs147
Lap-and-shoulder belt, refer
to Safety belts38
Lashing eyes, refer to
Securing cargo110
LATCH child restraint fixing
system43
Leather care145
LED Light-emitting
diodes148
Length, refer to
Dimensions175
License plate lamp, replacing
bulb152
Light
– high-beam assistant81
Light-alloy wheels144
Light-emitting diodes
LED148
Lighter96
– connecting electrical
appliances96Lighting
– instruments82
– lamps and bulbs147
– vehicle, refer to Lamps79
Light switch79
Load109
Load securing equipment,
refer to Securing cargo110
Lock buttons, doors, refer to
Locking23
Locking
– adjusting confirmation
signal20
– from inside23
– from outside20
– without remote control, refer
to Comfort Access26
Locking and unlocking doors
– confirmation signals20
– from inside22
– from outside19
Low beam control, refer to
High-beam assistant81
Low-beam headlamps79
– automatic79
– indicator lamp, defective
bulb169
– replacing bulbs149
Lower back support, refer to
Lumbar support35
Luggage rack, refer to Roof-
mounted luggage rack110
Lumbar support35
M
M+S tires, refer to Winter
tires135
Maintenance, refer to Service
Booklet
Maintenance system141
Malfunction
– automatic transmission with
Steptronic50
– tires73
– trunk lid24
Malfunction warnings, refer to
Check Control67
Manual air distribution85Manual car wash144
Manual mode, automatic
transmission with
Steptronic49
Manual operation
– door lock22
– driver's door22
– fuel filler flap114
– glass roof30
– panorama glass roof32
– transmission lock, automatic
transmission50
– trunk lid24
Manual transmission48
Master key, refer to Remote
control with integrated
key18
Maximum cooling87
Maximum speed
– with winter tires135
Measurements, refer to
Dimensions175
Memory, refer to Seat and
mirror memory37
Microfilter
– BMW Maintenance
System141
– for air conditioner86
– for automatic climate
control90
Microfilter/activated-charcoal
filter
– BMW Maintenance
System141
Microphone
– telephone14
Mirror dimming feature40
Mirrors39
– automatic curb monitor40
– exterior mirrors39
– heating40
– interior rearview mirror40
– memory, refer to Seat and
mirror memory37
Mirrors, folding in before
entering a car wash39