reset BMW M3 2010 Owners Manual
[x] Cancel search | Manufacturer: BMW, Model Year: 2010, Model line: M3, Model: BMW M3 2010Pages: 196, PDF Size: 5.78 MB
Page 14 of 196
Cockpit
12
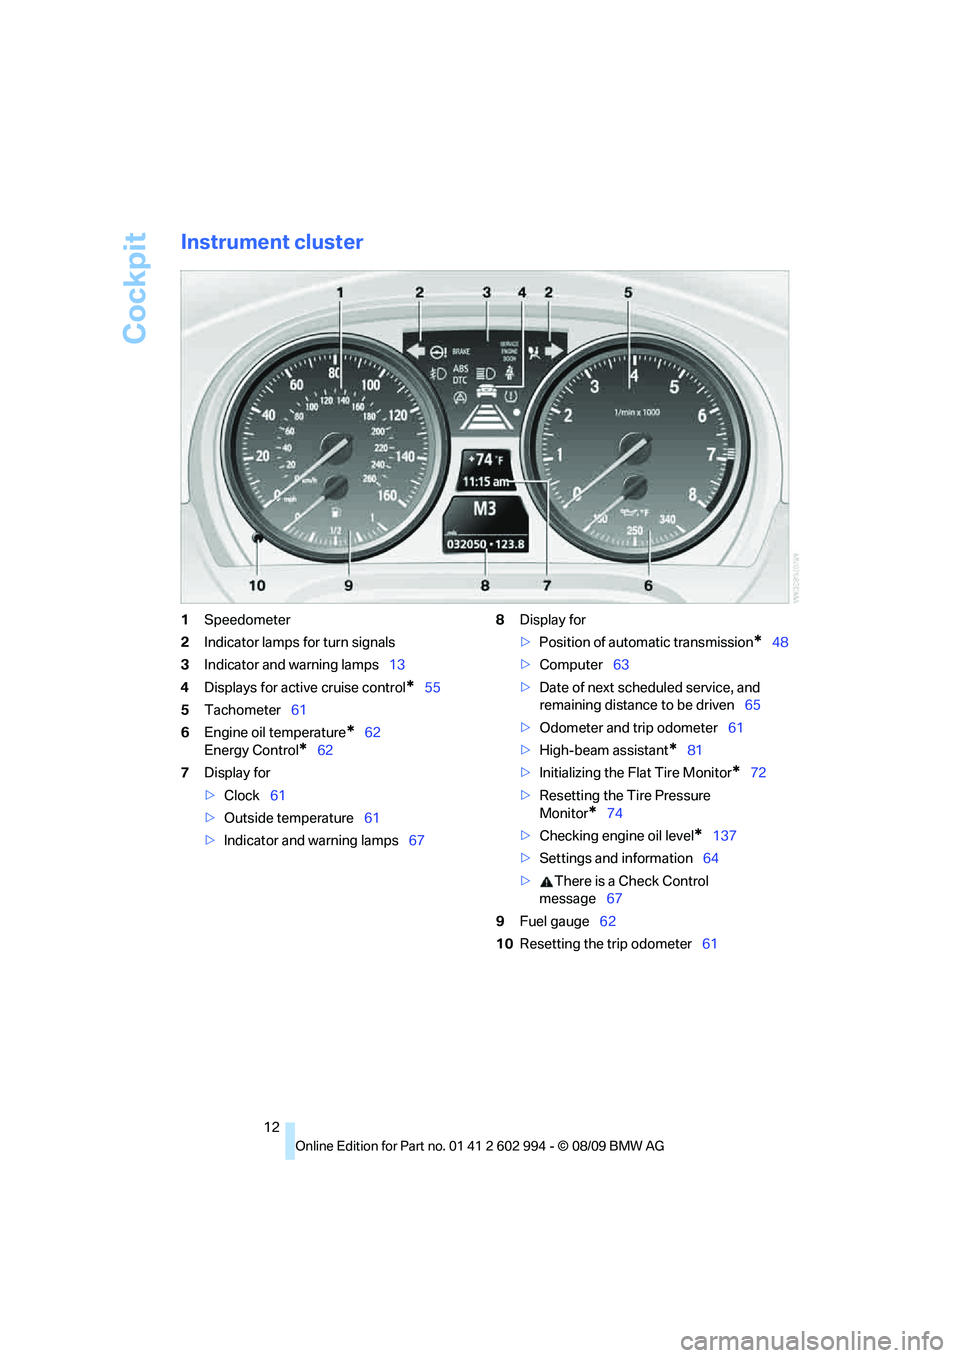
Instrument cluster
1Speedometer
2Indicator lamps for turn signals
3Indicator and warning lamps13
4Displays for active cruise control
*55
5Tachometer61
6Engine oil temperature
*62
Energy Control
*62
7Display for
>Clock61
>Outside temperature61
>Indicator and warning lamps678Display for
>Position of automatic transmission
*48
>Computer63
>Date of next scheduled service, and
remaining distance to be driven65
>Odometer and trip odometer61
>High-beam assistant
*81
>Initializing the Flat Tire Monitor
*72
>Resetting the Tire Pressure
Monitor
*74
>Checking engine oil level
*137
>Settings and information64
>There is a Check Control
message67
9Fuel gauge62
10Resetting the trip odometer61
Page 40 of 196
Adjustments
38
Call-up with the remote control
The driver's seat position last set is stored for
the remote control currently in use.
You can select whether or not the seat is reset
to that position automatically.
When this Personal Profile function is
used, first make sure that the footwell
behind the driver's seat is free of obstacles.
Failure to do so could cause injury to persons or
damage to objects as a result of a rearward
movement of the seat.<
The adjusting procedure is halted immediately
when you touch a seat adjustment switch or
one of the memory buttons.
Activating/deactivating automatic call-
up
For operating principle refer to page64.
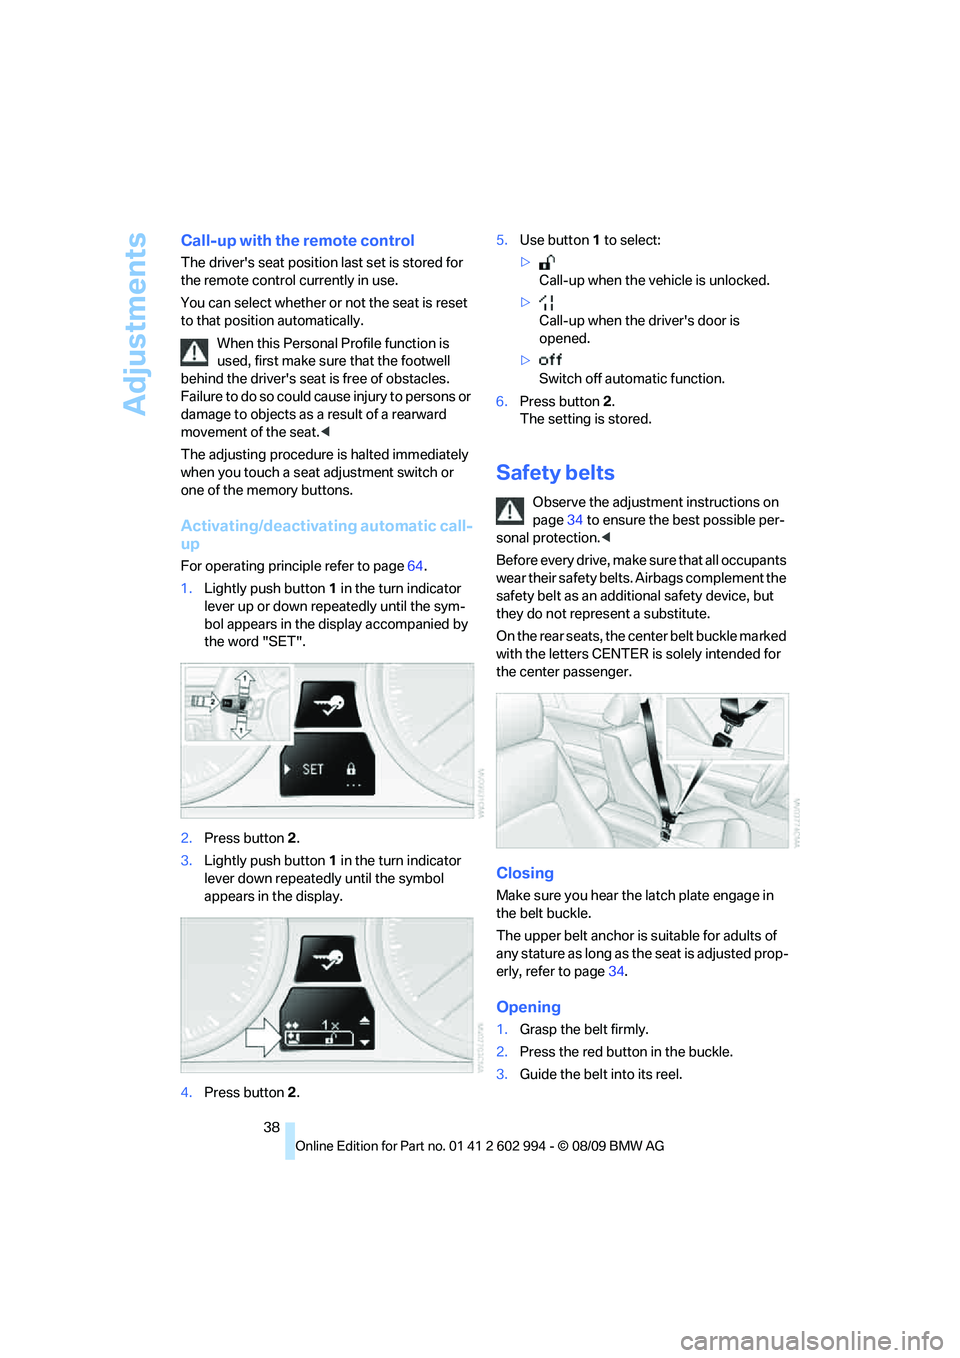
1.Lightly push button1 in the turn indicator
lever up or down repeatedly until the sym-
bol appears in the display accompanied by
the word "SET".
2.Press button 2.
3.Lightly push button1 in the turn indicator
lever down repeatedly until the symbol
appears in the display.
4.Press button 2.5.Use button 1 to select:
>
Call-up when the vehicle is unlocked.
>
Call-up when the driver's door is
opened.
>
Switch off automatic function.
6.Press button 2.
The setting is stored.
Safety belts
Observe the adjustment instructions on
page34 to ensure the best possible per-
sonal protection.<
Before every drive, make sure that all occupants
wear their safety belts. Airbags complement the
safety belt as an additional safety device, but
they do not represent a substitute.
On the rear seats, the center belt buckle marked
with the letters CENTER is solely intended for
the center passenger.
Closing
Make sure you hear the latch plate engage in
the belt buckle.
The upper belt anchor is suitable for adults of
any stature as long as the seat is adjusted prop-
erly, refer to page34.
Opening
1.Grasp the belt firmly.
2.Press the red button in the buckle.
3.Guide the belt into its reel.
Page 54 of 196
Driving
52
Intermittent wipe or rain sensor*
If the car is not equipped with a rain sensor, the
intermittent-wipe time is a preset.
If the car is equipped with a rain sensor, the time
between wipes is controlled automatically and
depends on the intensity of the rainfall. The rain
sensor is mounted on the windshield, directly in
front of the interior rearview mirror.
Activating intermittent wipe or rain
sensor
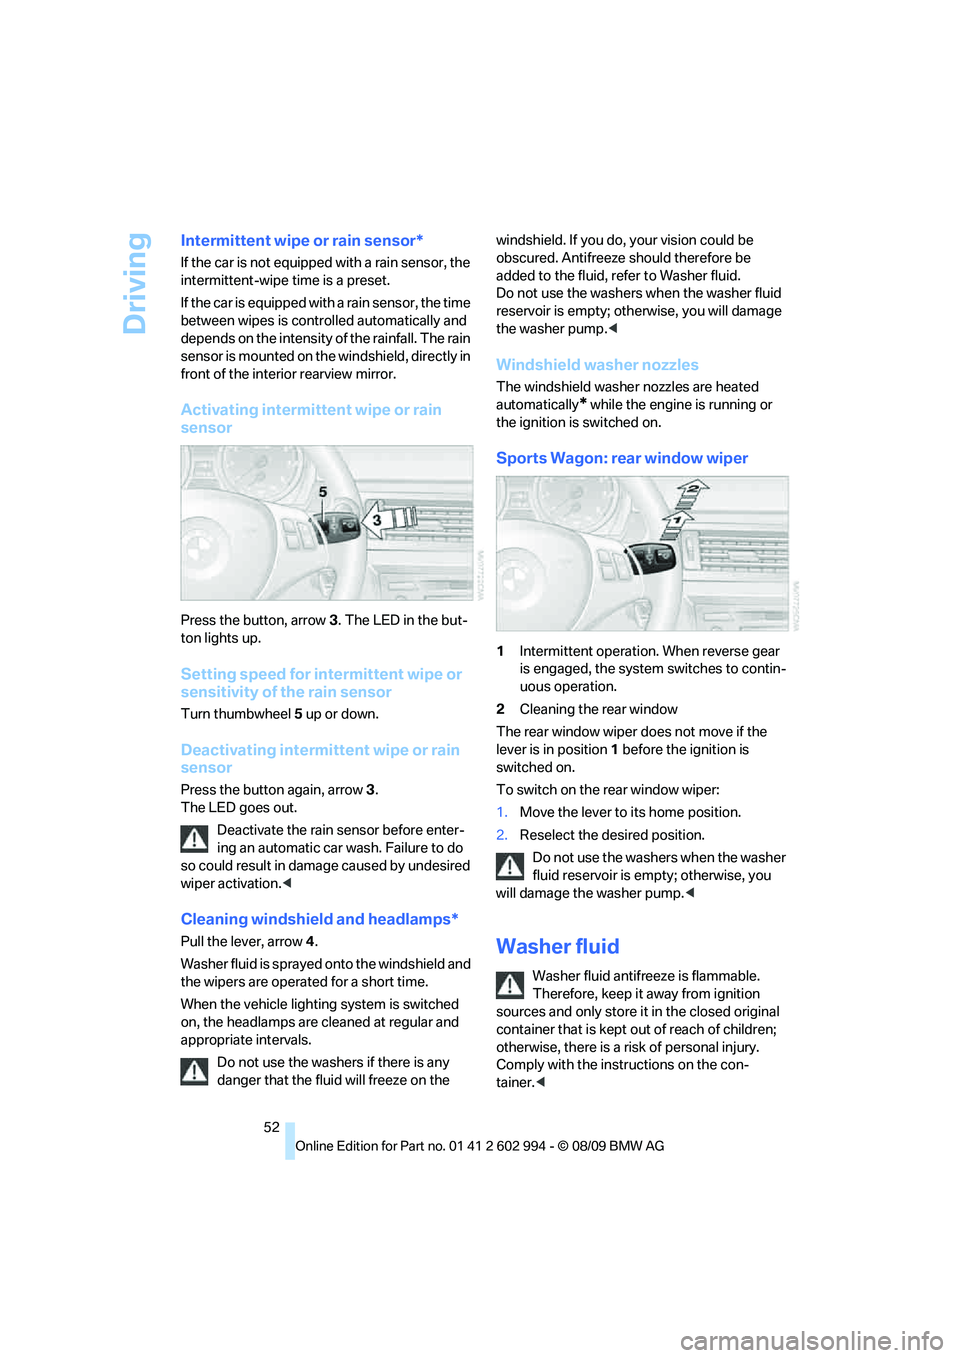
Press the button, arrow3. The LED in the but-
ton lights up.
Setting speed for intermittent wipe or
sensitivity of the rain sensor
Turn thumbwheel5 up or down.
Deactivating intermittent wipe or rain
sensor
Press the button again, arrow3.
The LED goes out.
Deactivate the rain sensor before enter-
ing an automatic car wash. Failure to do
so could result in damage caused by undesired
wiper activation.<
Cleaning windshield and headlamps*
Pull the lever, arrow 4.
Washer fluid is sprayed onto the windshield and
the wipers are operated for a short time.
When the vehicle lighting system is switched
on, the headlamps are cleaned at regular and
appropriate intervals.
Do not use the washers if there is any
danger that the fluid will freeze on the windshield. If you do, your vision could be
obscured. Antifreeze should therefore be
added to the fluid, refer to Washer fluid.
Do not use the washers when the washer fluid
reservoir is empty; otherwise, you will damage
the washer pump.<
Windshield washer nozzles
The windshield washer nozzles are heated
automatically
* while the engine is running or
the ignition is switched on.
Sports Wagon: rear window wiper
1Intermittent operation. When reverse gear
is engaged, the system switches to contin-
uous operation.
2Cleaning the rear window
The rear window wiper does not move if the
lever is in position1 before the ignition is
switched on.
To switch on the rear window wiper:
1.Move the lever to its home position.
2.Reselect the desired position.
Do not use the washers when the washer
fluid reservoir is empty; otherwise, you
will damage the washer pump.<
Washer fluid
Washer fluid antifreeze is flammable.
Therefore, keep it away from ignition
sources and only store it in the closed original
container that is kept out of reach of children;
otherwise, there is a risk of personal injury.
Comply with the instructions on the con-
tainer.<
Page 58 of 196
Driving
56
One lever for all functions
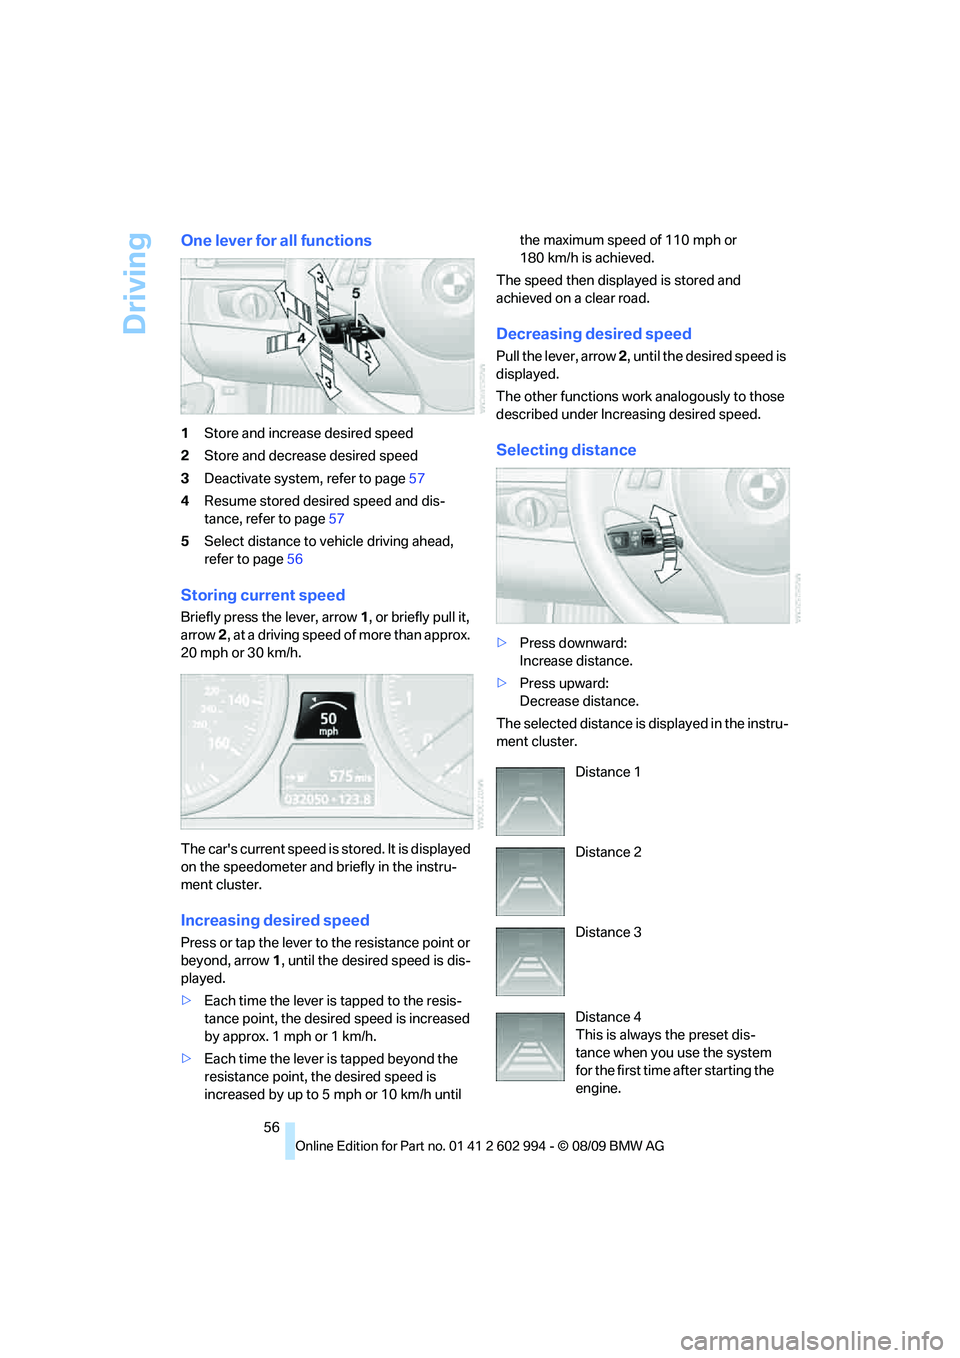
1Store and increase desired speed
2Store and decrease desired speed
3Deactivate system, refer to page57
4Resume stored desired speed and dis-
tance, refer to page57
5Select distance to vehicle driving ahead,
refer to page56
Storing current speed
Briefly press the lever, arrow 1, or briefly pull it,
arrow 2, at a driving speed of more than approx.
20 mph or 30 km/h.
The car's current speed is stored. It is displayed
on the speedometer and briefly in the instru-
ment cluster.
Increasing desired speed
Press or tap the lever to the resistance point or
beyond, arrow1, until the desired speed is dis-
played.
>Each time the lever is tapped to the resis-
tance point, the desired speed is increased
by approx. 1 mph or 1 km/h.
>Each time the lever is tapped beyond the
resistance point, the desired speed is
increased by up to 5 mph or 10 km/h until the maximum speed of 110 mph or
180 km/h is achieved.
The speed then displayed is stored and
achieved on a clear road.
Decreasing desired speed
Pull the lever, arrow 2, until the desired speed is
displayed.
The other functions work analogously to those
described under Increasing desired speed.
Selecting distance
>Press downward:
Increase distance.
>Press upward:
Decrease distance.
The selected distance is displayed in the instru-
ment cluster.
Distance 1
Distance 2
Distance 3
Distance 4
This is always the preset dis-
tance when you use the system
for the first time after starting the
engine.
Page 63 of 196
Reference
At a glance
Controls
Driving tips
Mobility
61
Controls overview
Odometer, outside
temperature display, clock
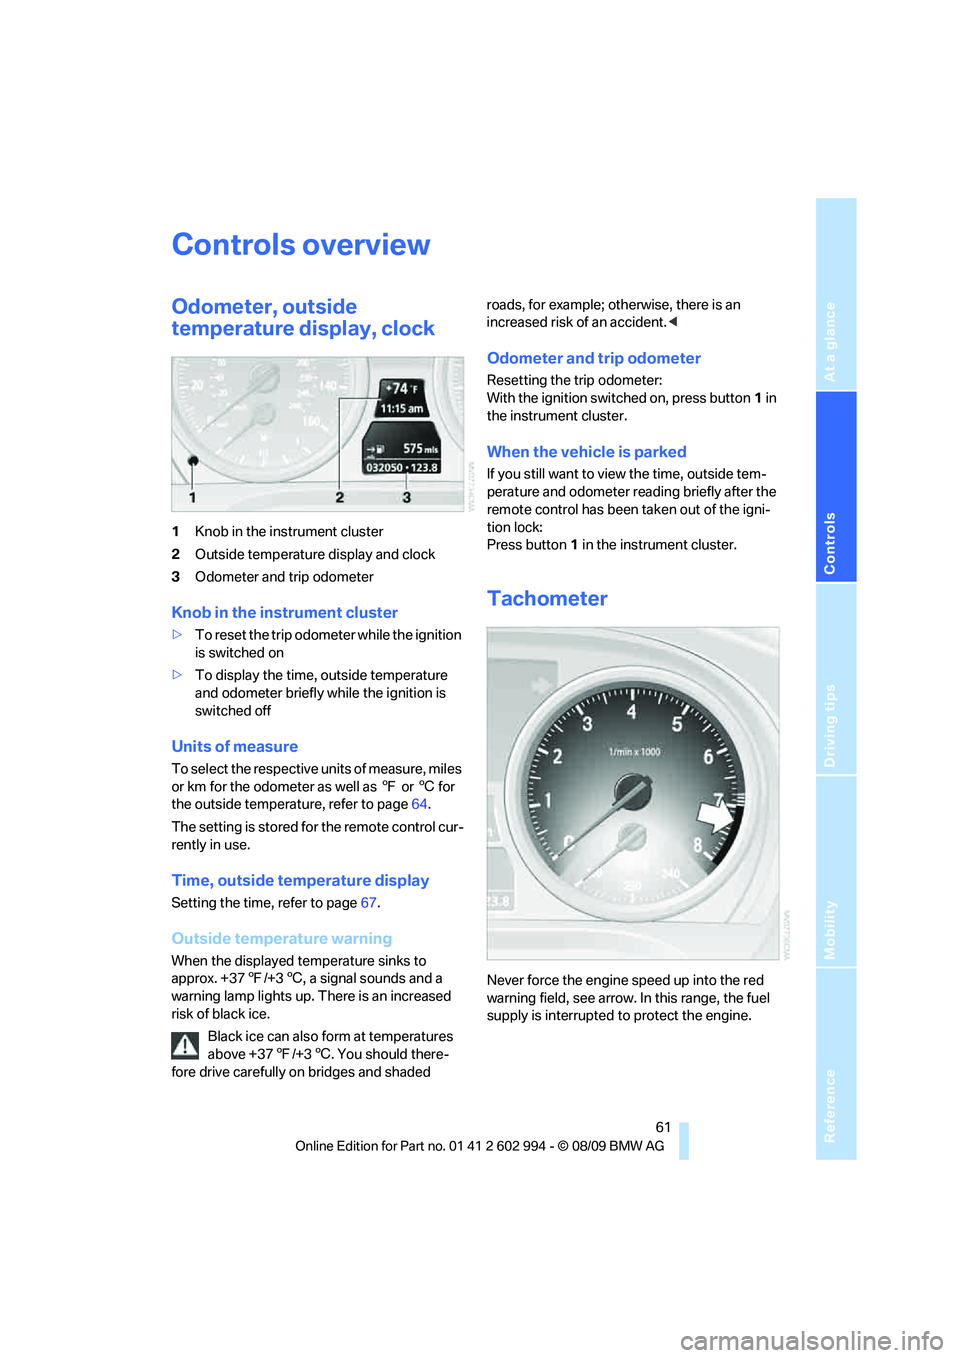
1Knob in the instrument cluster
2Outside temperature display and clock
3Odometer and trip odometer
Knob in the instrument cluster
>To reset the trip odometer while the ignition
is switched on
>To display the time, outside temperature
and odometer briefly while the ignition is
switched off
Units of measure
T o s e l e c t t h e r e s p e c t i v e u n i t s o f m e a s u r e , m i l e s
or km for the odometer as well as 7 or 6 for
the outside temperature, refer to page64.
The setting is stored for the remote control cur-
rently in use.
Time, outside temperature display
Setting the time, refer to page67.
Outside temperature warning
When the displayed temperature sinks to
approx. +377/+36, a signal sounds and a
warning lamp lights up. There is an increased
risk of black ice.
Black ice can also form at temperatures
above +377/+36. You should there-
fore drive carefully on bridges and shaded roads, for example; otherwise, there is an
increased risk of an accident.<
Odometer and trip odometer
Resetting the trip odometer:
With the ignition switched on, press button1 in
the instrument cluster.
When the vehicle is parked
If you still want to view the time, outside tem-
perature and odometer reading briefly after the
remote control has been taken out of the igni-
tion lock:
Press button 1 in the instrument cluster.
Tachometer
Never force the engine speed up into the red
warning field, see arrow. In this range, the fuel
supply is interrupted to protect the engine.
Page 65 of 196
Reference
At a glance
Controls
Driving tips
Mobility
63
Computer
Displays in the instrument cluster
Calling up information
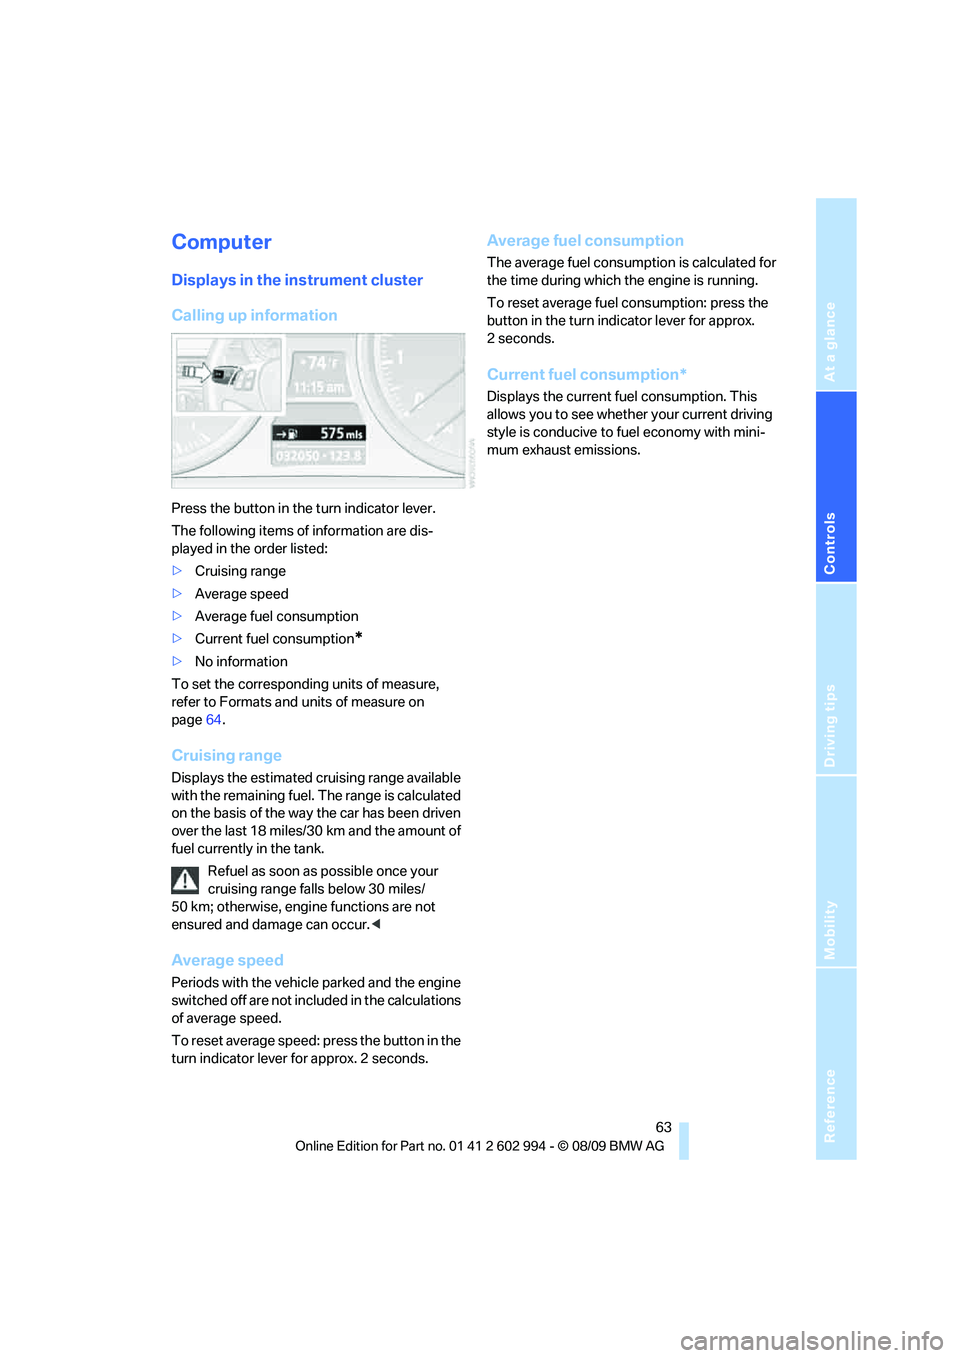
Press the button in the turn indicator lever.
The following items of information are dis-
played in the order listed:
>Cruising range
>Average speed
>Average fuel consumption
>Current fuel consumption
*
>No information
To set the corresponding units of measure,
refer to Formats and units of measure on
page64.
Cruising range
Displays the estimated cruising range available
with the remaining fuel. The range is calculated
on the basis of the way the car has been driven
over the last 18 miles/30 km and the amount of
fuel currently in the tank.
Refuel as soon as possible once your
cruising range falls below 30 miles/
50 km; otherwise, engine functions are not
ensured and damage can occur.<
Average speed
Periods with the vehicle parked and the engine
switched off are not included in the calculations
of average speed.
To reset average speed: press the button in the
turn indicator lever for approx. 2 seconds.
Average fuel consumption
The average fuel consumption is calculated for
the time during which the engine is running.
To reset average fuel consumption: press the
button in the turn indicator lever for approx.
2seconds.
Current fuel consumption*
Displays the current fuel consumption. This
allows you to see whether your current driving
style is conducive to fuel economy with mini-
mum exhaust emissions.
Page 66 of 196
Controls overview
64
Settings and information
Operating principle
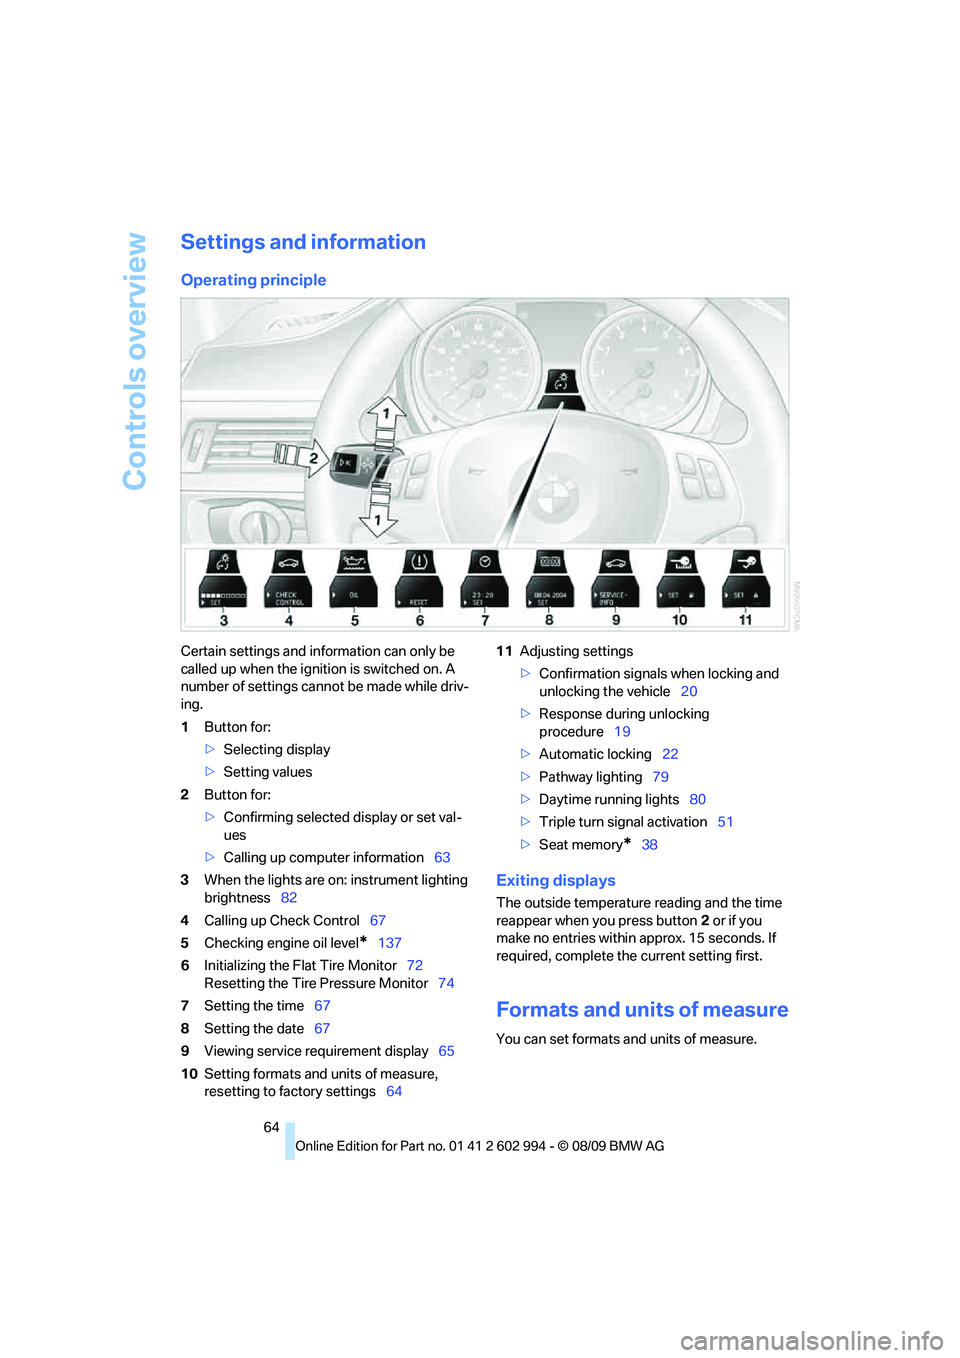
Certain settings and information can only be
called up when the ignition is switched on. A
number of settings cannot be made while driv-
ing.
1Button for:
>Selecting display
>Setting values
2Button for:
>Confirming selected display or set val-
ues
>Calling up computer information63
3When the lights are on: instrument lighting
brightness82
4Calling up Check Control67
5Checking engine oil level
*137
6Initializing the Flat Tire Monitor72
Resetting the Tire Pressure Monitor74
7Setting the time67
8Setting the date67
9Viewing service requirement display65
10Setting formats and units of measure,
resetting to factory settings6411Adjusting settings
>Confirmation signals when locking and
unlocking the vehicle20
>Response during unlocking
procedure19
>Automatic locking22
>Pathway lighting79
>Daytime running lights80
>Triple turn signal activation51
>Seat memory
*38
Exiting displays
The outside temperature reading and the time
reappear when you press button2 or if you
make no entries within approx. 15 seconds. If
required, complete the current setting first.
Formats and units of measure
You can set formats and units of measure.
Page 67 of 196
Reference
At a glance
Controls
Driving tips
Mobility
65
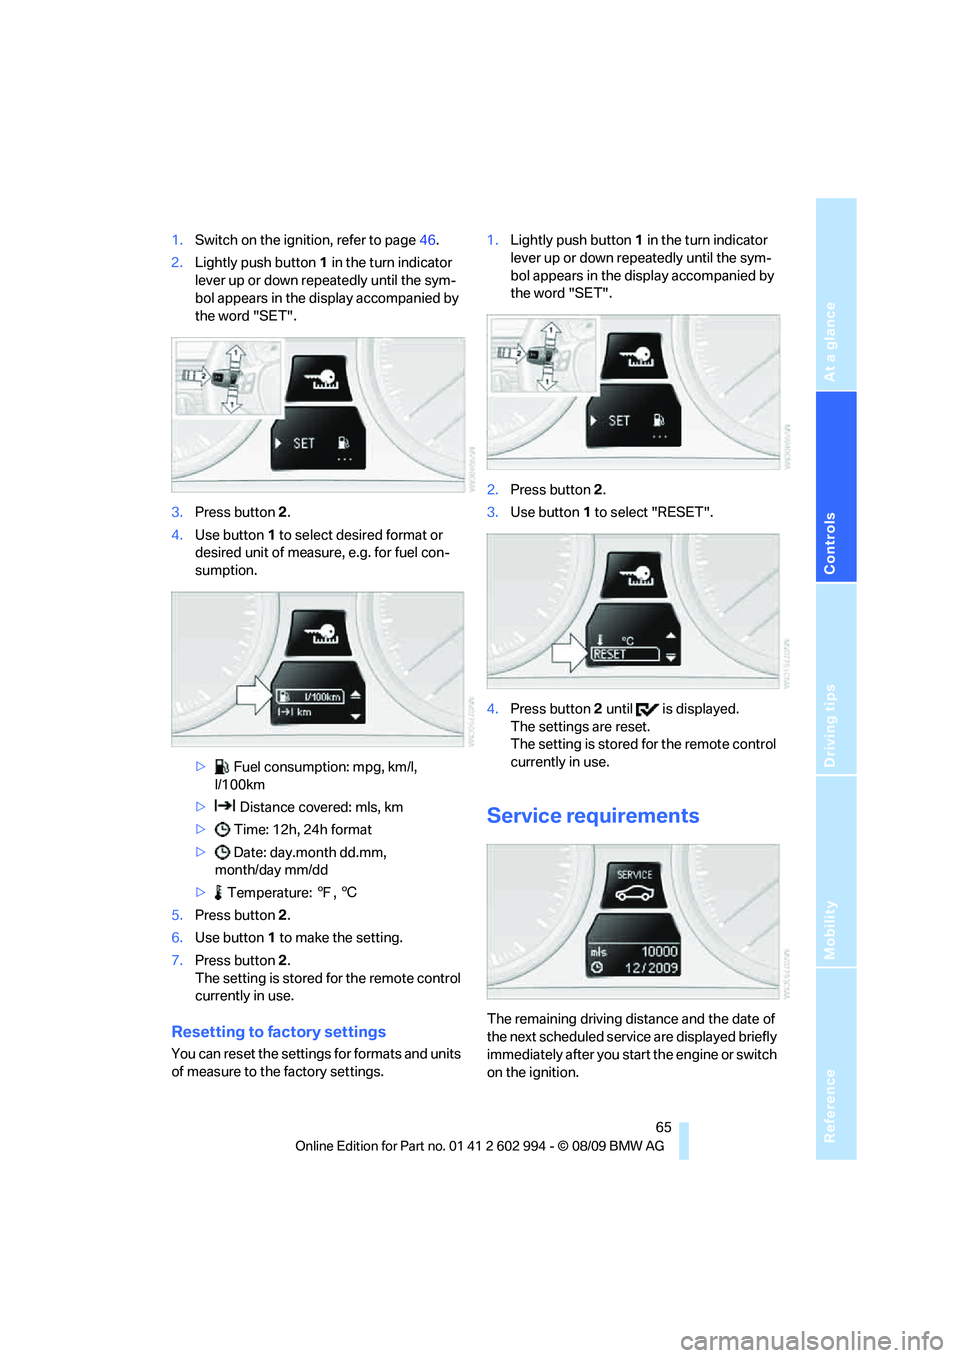
1.Switch on the ignition, refer to page46.
2.Lightly push button1 in the turn indicator
lever up or down repeatedly until the sym-
bol appears in the display accompanied by
the word "SET".
3.Press button 2.
4.Use button 1 to select desired format or
desired unit of measure, e.g. for fuel con-
sumption.
> Fuel consumption: mpg, km/l,
l/100km
> Distance covered: mls, km
> Time: 12h, 24h format
> Date: day.month dd.mm,
month/day mm/dd
> Temperature: 7, 6
5.Press button 2.
6.Use button 1 to make the setting.
7.Press button 2.
The setting is stored for the remote control
currently in use.
Resetting to factory settings
You can reset the settings for formats and units
of measure to the factory settings.1.Lightly push button1 in the turn indicator
lever up or down repeatedly until the sym-
bol appears in the display accompanied by
the word "SET".
2.Press button 2.
3.Use button1 to select "RESET".
4.Press button 2 until is displayed.
The settings are reset.
The setting is stored for the remote control
currently in use.
Service requirements
The remaining driving distance and the date of
the next scheduled service are displayed briefly
immediately after you start the engine or switch
on the ignition.
Page 75 of 196
Reference
At a glance
Controls
Driving tips
Mobility
73
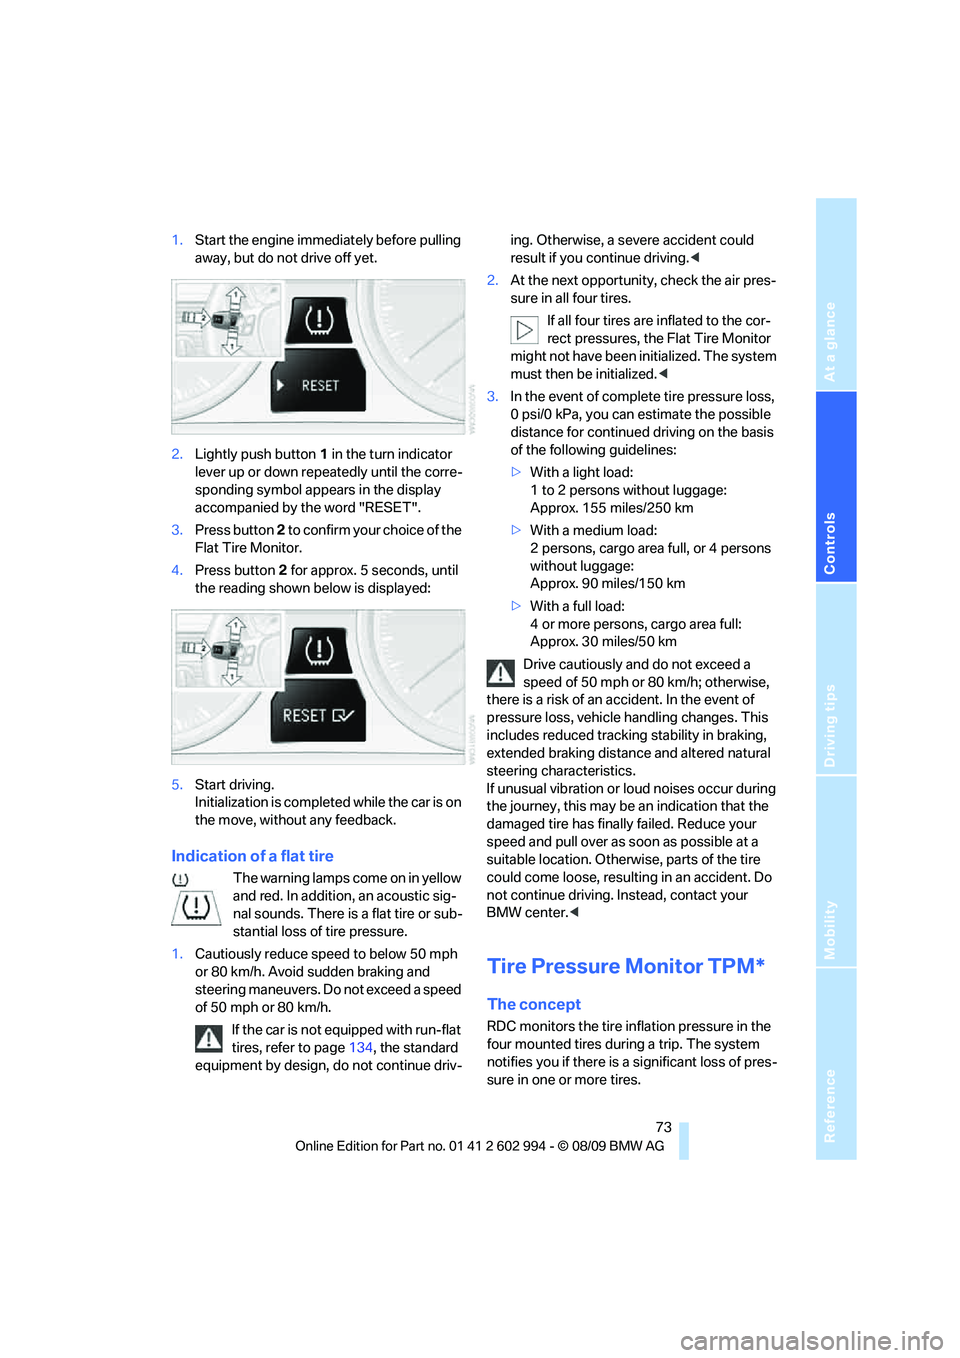
1.Start the engine immediately before pulling
away, but do not drive off yet.
2.Lightly push button 1 in the turn indicator
lever up or down repeatedly until the corre-
sponding symbol appears in the display
accompanied by the word "RESET".
3.Press button 2 to confirm your choice of the
Flat Tire Monitor.
4.Press button 2 for approx. 5 seconds, until
the reading shown below is displayed:
5.Start driving.
Initialization is completed while the car is on
the move, without any feedback.
Indication of a flat tire
The warning lamps come on in yellow
and red. In addition, an acoustic sig-
nal sounds. There is a flat tire or sub-
stantial loss of tire pressure.
1.Cautiously reduce speed to below 50 mph
or 80 km/h. Avoid sudden braking and
steering maneuvers. Do not exceed a speed
of 50 mph or 80 km/h.
If the car is not equipped with run-flat
tires, refer to page134, the standard
equipment by design, do not continue driv-ing. Otherwise, a severe accident could
result if you continue driving.<
2.At the next opportunity, check the air pres-
sure in all four tires.
If all four tires are inflated to the cor-
rect pressures, the Flat Tire Monitor
might not have been initialized. The system
must then be initialized.<
3.In the event of complete tire pressure loss,
0 psi/0 kPa, you can estimate the possible
distance for continued driving on the basis
of the following guidelines:
>With a light load:
1 to 2 persons without luggage:
Approx. 155 miles/250 km
>With a medium load:
2 persons, cargo area full, or 4 persons
without luggage:
Approx. 90 miles/150 km
>With a full load:
4 or more persons, cargo area full:
Approx. 30 miles/50 km
Drive cautiously and do not exceed a
speed of 50 mph or 80 km/h; otherwise,
there is a risk of an accident. In the event of
pressure loss, vehicle handling changes. This
includes reduced tracking stability in braking,
extended braking distance and altered natural
steering characteristics.
If unusual vibration or loud noises occur during
the journey, this may be an indication that the
damaged tire has finally failed. Reduce your
speed and pull over as soon as possible at a
suitable location. Otherwise, parts of the tire
could come loose, resulting in an accident. Do
not continue driving. Instead, contact your
BMW center.<
Tire Pressure Monitor TPM*
The concept
RDC monitors the tire inflation pressure in the
four mounted tires during a trip. The system
notifies you if there is a significant loss of pres-
sure in one or more tires.
Page 76 of 196
Technology for driving comfort and safety
74
Functional requirement
In order to assure the reliable reporting of a flat
tire, the system must be reset while all tire infla-
tion pressures are correct.
Always use wheels with TPM electronics. Oth-
erwise, the system may malfunction.
Each time a tire inflation pressure has
been corrected or a wheel or tire has been
changed, reset the system.<
System limitations
TPM cannot warn you in advance of sud-
den severe tire damage caused by out-
side influences.<
The system does not work correctly if it has not
been reset; for example, a flat tire may be indi-
cated even though the tire inflation pressures
are correct.
The system is inactive and cannot indicate a flat
tire if a wheel without TPM electronics, such as
a compact spare wheel, has been mounted, or if
TPM is temporarily malfunctioning due to other
systems or devices using the same radio fre-
quency.
Resetting the system
Each time a tire inflation pressure has
been corrected or a wheel or tire has been
changed, reset the system.<
For operating principle refer to page64.
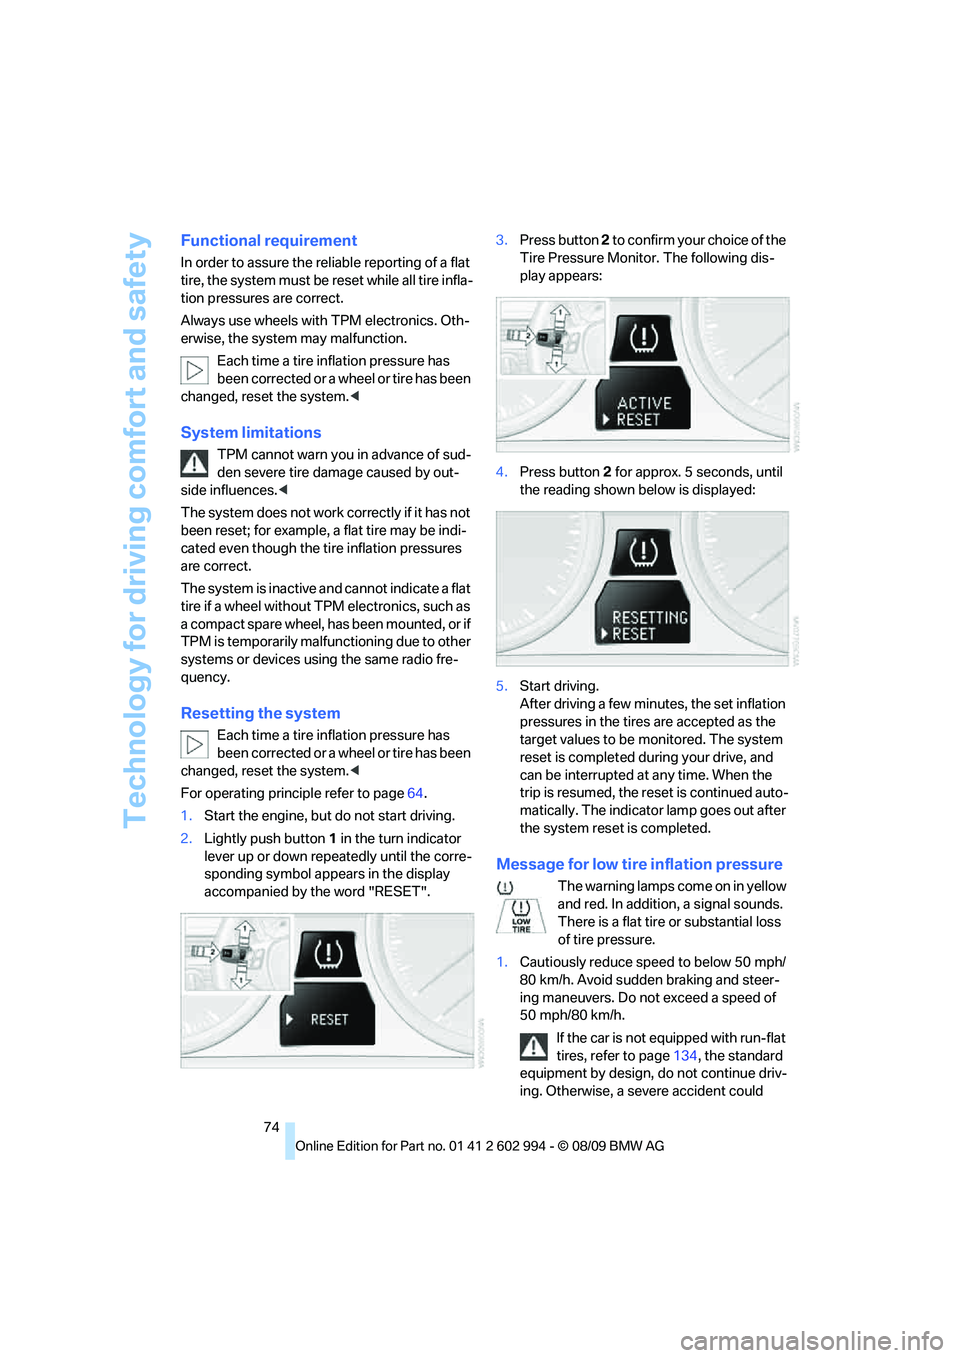
1.Start the engine, but do not start driving.
2.Lightly push button 1 in the turn indicator
lever up or down repeatedly until the corre-
sponding symbol appears in the display
accompanied by the word "RESET".3.Press button 2 to confirm your choice of the
Tire Pressure Monitor. The following dis-
play appears:
4.Press button 2 for approx. 5 seconds, until
the reading shown below is displayed:
5.Start driving.
After driving a few minutes, the set inflation
pressures in the tires are accepted as the
target values to be monitored. The system
reset is completed during your drive, and
can be interrupted at any time. When the
trip is resumed, the reset is continued auto-
matically. The indicator lamp goes out after
the system reset is completed.
Message for low tire inflation pressure
The warning lamps come on in yellow
and red. In addition, a signal sounds.
There is a flat tire or substantial loss
of tire pressure.
1.Cautiously reduce speed to below 50 mph/
80 km/h. Avoid sudden braking and steer-
ing maneuvers. Do not exceed a speed of
50 mph/80 km/h.
If the car is not equipped with run-flat
tires, refer to page134, the standard
equipment by design, do not continue driv-
ing. Otherwise, a severe accident could