clock BMW M3 CONVERTIBLE 2001 E46 Owner's Manual
[x] Cancel search | Manufacturer: BMW, Model Year: 2001, Model line: M3 CONVERTIBLE, Model: BMW M3 CONVERTIBLE 2001 E46Pages: 195, PDF Size: 1.96 MB
Page 10 of 195
Contents
Overview
Controls and features
Cockpit16
Instrument cluster18
Indicator and warning lamps20
Multifunction steering wheel
(MFL)24
Hazard warning flashers25
Warning triangle25
Refueling26
Fuel specifications27
Tire inflation pressures27
Opening and closing:
Keys32
Electronic vehicle
immobilizer33
Central locking system33
Opening and closing – via the
door lock34
Opening and closing – via the
remote control35
Opening and closing – from
inside38
Luggage compartment lid39
Luggage compartment40
Alarm system42
Electric power windows44
Convertible top45
Adjustments:
Seats48
Mirrors52
Seat and mirror memory54
Steering wheel55
Car Memory, Key Memory55
Passenger safety systems:
Safety belts57
Transporting children safely58
Airbags61
Rollover protection system64
Driving:
Steering/Ignition lock66
Starting the engine66
Switching off the engine67
Parking brake67
Manual transmission68
Turn signal indicator/Headlamp
flasher69
Washer/Wiper system69
Rear window defroster71
Cruise control71
Everything under control:
Odometer73
Tachometer73
Engine oil temperature gauge73
Fuel gauge74
Coolant temperature gauge74
Service Interval Display75
Check Control76
Clock76
Computer77
Technology for safety and
convenience:
Park Distance Control (PDC)79
Dynamic Stability Control
(DSC)80
Tire Pressure Warning (RDW)81
M Engine dynamics control83
Contents
Page 19 of 195
19n
IndexDataTechnologyRepairsCar careControlsOverview
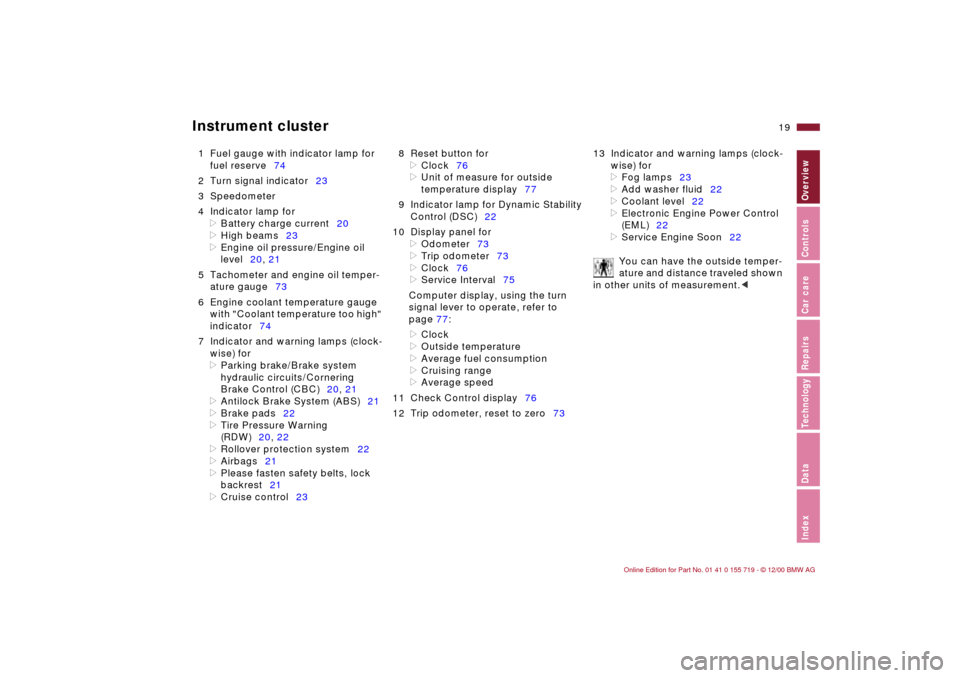
Instrument cluster
1 Fuel gauge with indicator lamp for
fuel reserve74
2 Turn signal indicator23
3 Speedometer
4 Indicator lamp for
>
Battery charge current20
>
High beams23
>
Engine oil pressure/Engine oil
level20, 21
5 Tachometer and engine oil temper-
ature gauge73
6 Engine coolant temperature gauge
with "Coolant temperature too high"
indicator74
7 Indicator and warning lamps (clock-
wise) for
>
Parking brake/Brake system
hydraulic circuits/Cornering
Brake Control (CBC)20, 21
>
Antilock Brake System (ABS)21
>
Brake pads22
>
Tire Pressure Warning
(RDW)20, 22
>
Rollover protection system22
>
Airbags21
>
Please fasten safety belts, lock
backrest21
>
Cruise control238 Reset button for
>
Clock76
>
Unit of measure for outside
temperature display77
9 Indicator lamp for Dynamic Stability
Control (DSC)22
10 Display panel for
>
Odometer73
>
Trip odometer73
>
Clock76
>
Service Interval75
Computer display, using the turn
signal lever to operate, refer to
page 77:
>
Clock
>
Outside temperature
>
Average fuel consumption
>
Cruising range
>
Average speed
11 Check Control display76
12 Trip odometer, reset to zero7313 Indicator and warning lamps (clock-
wise) for
>
Fog lamps23
>
Add washer fluid22
>
Coolant level22
>
Electronic Engine Power Control
(EML)22
>
Service Engine Soon22
You can have the outside temper-
ature and distance traveled shown
in other units of measurement.
<
Page 31 of 195
Overview
Controls and features
Operation, care
and maintenance
Owner service procedures
Technical data
Index Advanced technology
31n
IndexDataTechnologyRepairsCar careControlsOverview
Driving:
Steering/Ignition lock66
Starting the engine66
Switching off the engine67
Parking brake67
Manual transmission68
Turn signal indicator/Headlamp
flasher69
Washer/Wiper system69
Rear window defroster71
Cruise control71
Everything under control:
Odometer73
Tachometer73
Engine oil temperature gauge73
Fuel gauge74
Coolant temperature gauge74
Service Interval Display75
Check Control76
Clock76
Computer77
Technology for driving comfort
and safety:
Park Distance Control (PDC)79
Dynamic Stability Control
(DSC)80
Tire Pressure Warning (RDW)81
M Engine dynamics control83Lamps:
Side lamps/Low beam
headlamps84
Instrument lighting84
High beams/Parking lamps85
Fog lamps85
Interior lamps86
Reading lamps86
Controlling the climate
for pleasant driving:
Automatic climate control88
Heated seats93
Cabin convenience:
Glove compartment94
Storage compartments95
Cellular phone96
Ashtray, front96
Cigarette lighter97
Ashtray, rear97
Loading and transporting
cargo:
Ski bag98
Cargo loading100
Roof-mounted luggage rack for
the hardtop101
Page 62 of 195

62n
AirbagsSitting correctly with airbags
For your safety, comply with the
following instructions for the
airbags. If you do not, the airbags may
not be able to provide their maximum
protection. All passengers in the vehicle
should be aware of and comply with
this information:
The airbags are supplemental restraint
devices designed to provide extra
protection; they are not a substitute for
safety belts. Wear your safety belt at all
times. The airbags will not be triggered
in the event of a minor accident, a
vehicle rollover, or collisions from the
rear. In these instances, the safety belt
provides optimal protection.
Airbags are located under cover panels
in the steering wheel, in the instrument
panel and in the side trim panels in the
front and rear
*.
Adjust your seat to a position that
provides maximum distance between
you and the steering wheel, the instru-
ment panel and the door while still
allowing comfortable and safe access
to all vehicle controls.
To avoid sustaining hand and arm inju-
ries, always grasp the steering wheel
on the rim with the hands at the 9 and
3 o'clock positions. Do not place your
hands on the center pad.
Never allow any objects to obstruct the
area between the airbag and an occu-
pant.
Do not use the cover panel above the
passenger side airbag as a storage
area.
Do not apply adhesive materials to the
cover panels of the airbags, cover them
or modify them in any other way.
Do not install a rear-facing child
restraint system in the front passenger
seat of this vehicle.
Children under 13 years of age and
children less than 5 feet (150 cm) tall
should ride only in the rear seat.
Infants or small children should never
be held on the lap of a passenger.
If your vehicle is equipped with side
airbags in the rear passenger area
*, be
sure that child restraints are mounted
correctly and provided with the
greatest-possible distance between the
airbags in the side trim panels. Do not
allow children to lean out of the child's
seat in the direction of the side trim
panels. If they do so, serious injuries
can occur if the airbag is triggered.
(infants and small children in appro-
priate child restraint systems; larger
children and adults using the safety
belts). Never let an occupant's head
rest near or on a side airbag because
the inflating airbag could cause a
serious or fatal injury. Please note that
the word "Airbag" imprinted on the door
trim panel indicates the airbag's loca-
tion.
Accident research shows that the
safest place for children in an automo-
bile is in the rear seat. However, a child
sitting in the rear seat and not properly
restrained may place his or her head on
or near the airbag, if so equipped. For
example, a child — even though belted
— may fall asleep with his or her head
against the side airbag. It may be diffi-
cult for a driver to ensure that children
in the rear seat will remain properly
positioned at all times and not place
their heads on or near the side airbag.
Therefore, we recommend that the rear
seat side airbags, if so equipped, be
deactivated if children will travel in the
rear seat.
The rear seat side airbags may already
have been deactivated, either at the
time of manufacture or by a BMW
Page 76 of 195
76n
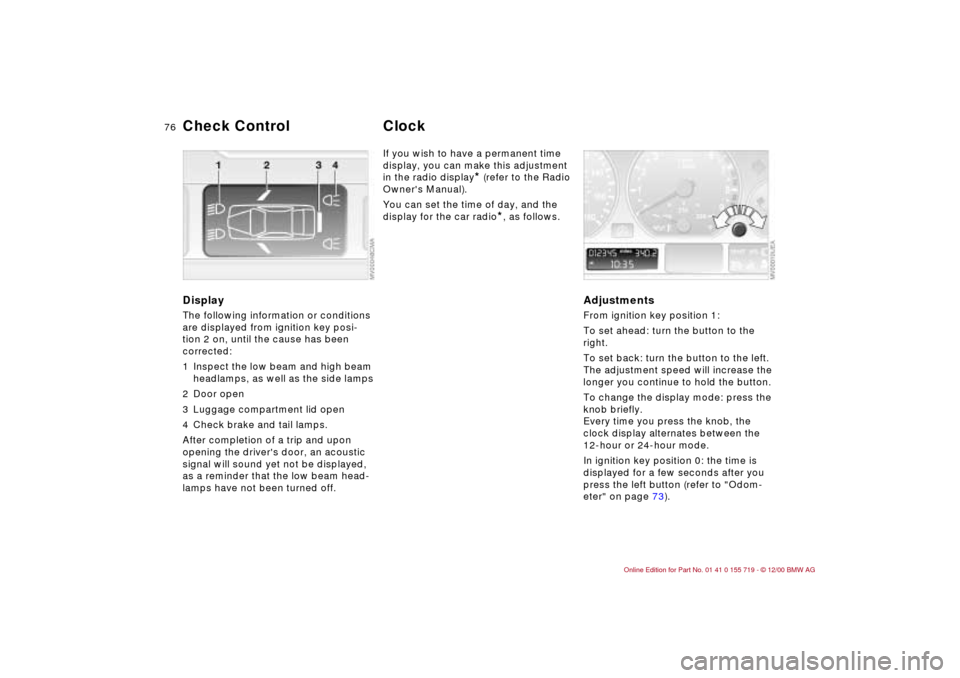
DisplayThe following information or conditions
are displayed from ignition key posi-
tion 2 on, until the cause has been
corrected:
1 Inspect the low beam and high beam
headlamps, as well as the side lamps
2 Door open
3 Luggage compartment lid open
4 Check brake and tail lamps.
After completion of a trip and upon
opening the driver's door, an acoustic
signal will sound yet not be displayed,
as a reminder that the low beam head-
lamps have not been turned off.
If you wish to have a permanent time
display, you can make this adjustment
in the radio display
* (refer to the Radio
Owner's Manual).
You can set the time of day, and the
display for the car radio
*, as follows.
Adjustments From ignition key position 1:
To set ahead: turn the button to the
right.
To set back: turn the button to the left.
The adjustment speed will increase the
longer you continue to hold the button.
To change the display mode: press the
knob briefly.
Every time you press the knob, the
clock display alternates between the
12-hour or 24-hour mode.
In ignition key position 0: the time is
displayed for a few seconds after you
press the left button (refer to "Odom-
eter" on page 73).
Check Control
Clock
Page 129 of 195

129n
IndexDataTechnologyRepairsCar careControlsOverview
Coolant
Do not add coolant to the cooling
system when the engine is hot. If
you do, escaping coolant can cause
scalds.
To avoid the possibility of damage later
on, never use anything other than
factory-approved, nitrite and amino-
free extended-duty antifreeze with
corrosion inhibitor. Your BMW center is
familiar with the official specifications.
Antifreeze and anticorrosion agents are
hazardous to health. You should always
store it in its original container and in a
location which is out of reach of chil-
dren. Extended-duty antifreeze with
corrosion inhibitor contains ethylene
glycol, a flammable substance. For this
reason, do not spill long-life antifreeze
with corrosion inhibitor on hot engine
parts. It could catch fire and cause
serious burns.<
Checking the coolant level and
adding coolant
Check the coolant level when the
engine is cold (approx. 68 7 or
+20 6). The coolant gauge needle in
the instrument cluster must be located
in the blue field; otherwise you could be
scalded when adding more fluid.
1 Open the cap for the expansion tank
by turning it slightly counterclockwise
to allow accumulated pressure to
escape. Then open.
2 The coolant level is correct whenever
the upper end of the red float rod is
aligned with the upper edge of the
filler neck (refer to the arrow in the
illustration and the schematic
diagram next to the filler neck as
well).
3 If necessary, add coolant. If the
coolant is low, slowly add coolant
until the correct level is reached – do
not overfill.
The coolant is a mixture of water and
extended-duty antifreeze with corrosion
inhibitor. Always maintain the pres-
cribed all-season 50:50 mixture ratio for
year-round protection against internal
corrosion. No other additives are
required. Change the coolantReplace the coolant every three years.
Comply with the applicable envi-
ronmental laws regulating the
disposal of extended-duty antifreeze
with corrosion inhibitor.<
Page 162 of 195
162n
Convertible top Closing manually in event of
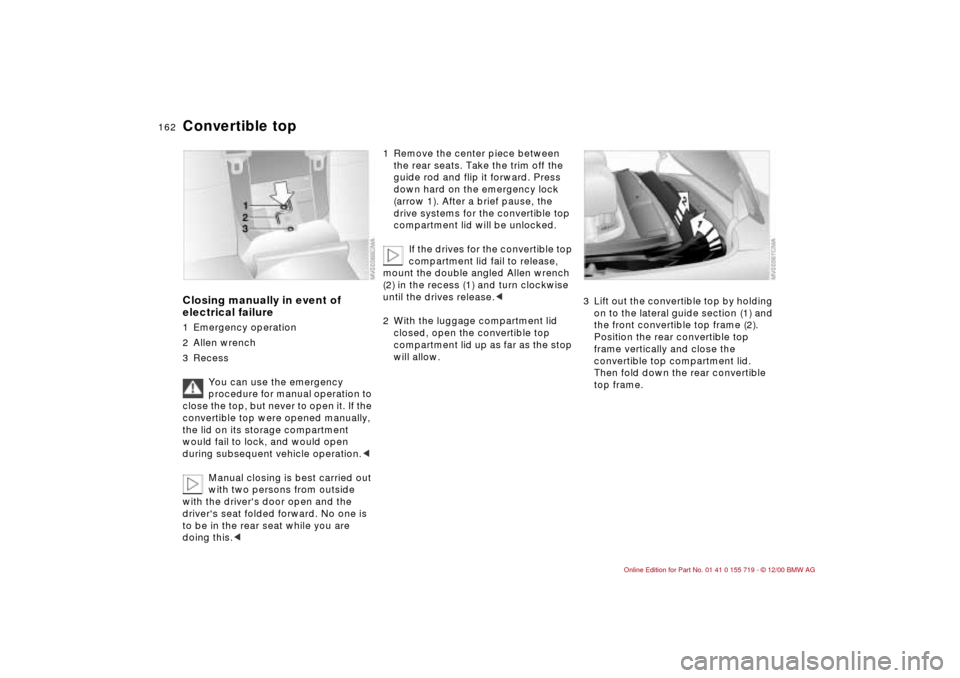
electrical failure1 Emergency operation
2 Allen wrench
3 Recess
You can use the emergency
procedure for manual operation to
close the top, but never to open it. If the
convertible top were opened manually,
the lid on its storage compartment
would fail to lock, and would open
during subsequent vehicle operation.<
Manual closing is best carried out
with two persons from outside
with the driver's door open and the
driver's seat folded forward. No one is
to be in the rear seat while you are
doing this.<
1 Remove the center piece between
the rear seats. Take the trim off the
guide rod and flip it forward. Press
down hard on the emergency lock
(arrow 1). After a brief pause, the
drive systems for the convertible top
compartment lid will be unlocked.
If the drives for the convertible top
compartment lid fail to release,
mount the double angled Allen wrench
(2) in the recess (1) and turn clockwise
until the drives release.c
2 With the luggage compartment lid
closed, open the convertible top
compartment lid up as far as the stop
will allow.
3 Lift out the convertible top by holding
on to the lateral guide section (1) and
the front convertible top frame (2).
Position the rear convertible top
frame vertically and close the
convertible top compartment lid.
Then fold down the rear convertible
top frame.
Page 163 of 195
163n
IndexDataTechnologyRepairsCar careControlsOverview
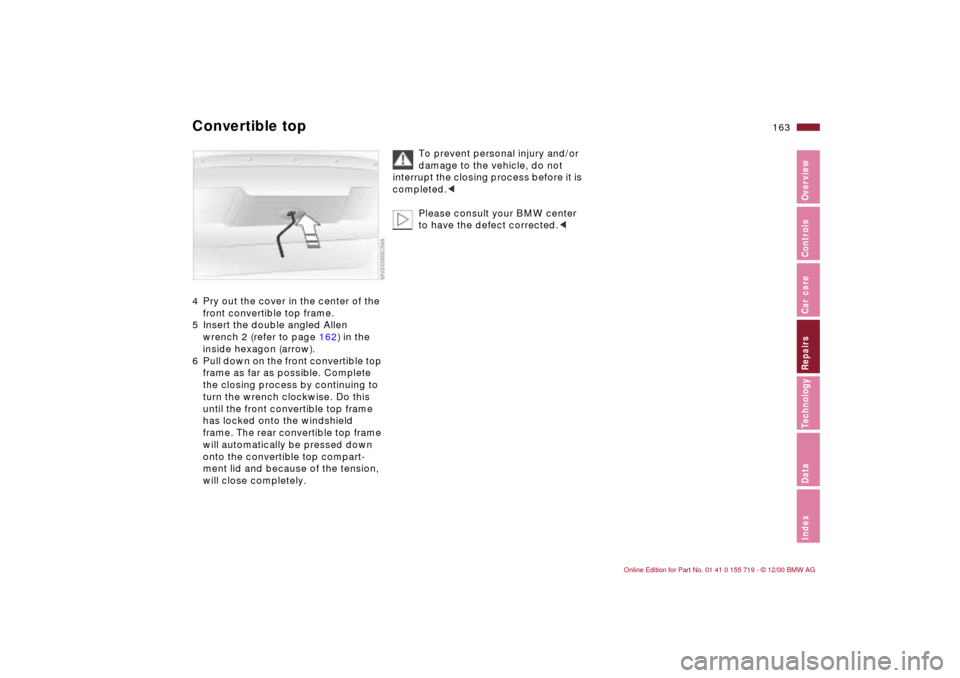
Convertible top4 Pry out the cover in the center of the
front convertible top frame.
5 Insert the double angled Allen
wrench 2 (refer to page 162) in the
inside hexagon (arrow).
6 Pull down on the front convertible top
frame as far as possible. Complete
the closing process by continuing to
turn the wrench clockwise. Do this
until the front convertible top frame
has locked onto the windshield
frame. The rear convertible top frame
will automatically be pressed down
onto the convertible top compart-
ment lid and because of the tension,
will close completely.
To prevent personal injury and/or
damage to the vehicle, do not
interrupt the closing process before it is
completed.<
Please consult your BMW center
to have the defect corrected.<
Page 186 of 195
Everything from A to ZAABS (Antilock Brake
System)21, 106
Acceleration181
Accessories6
Activated-charcoal filter92
replacing161t
Adding
brake fluid125t, 130t
coolant129t
engine oil127t
washer fluid126t, 181
Adjusting
clock76
head restraints50
interior temperature90
steering wheel55
thigh support area49
Adjusting seats
lumbar support49
Air conditioner91
Air distribution,
automatic90
Air outlets88
Air pressure115
Air supply91
recirculated air mode91
vents91
Airbags61, 139, 168
warning lamp21, 22Alarm system42
avoiding unintentional
alarms43
indicator lamp43
interior motion sensor42
tilt sensor alarm
system42
Alcantara care136
Antenna112
Antenna, Diversity169
Antifreeze129
radiator110
Antilock Brake System
(ABS)21, 106
Anti-theft alarm system42
Anti-theft protection33
Approved wheel and tire
specifications120
Aquaplaning105, 115
Armrest95
Ashtray
front96
rear97
AUC (Automatic recirculated
air control)91
Automatic climate
control88
Automatic cruise
control71
Automatic recirculated air
control (AUC)91Automatic windshield
washer70
Auxiliary terminal for jump-
starting125t
Average fuel
consumption78
Average speed78
Axle loads180
BBackrest
releasing51
Backup lamps68
replacing bulb149t
Battery157, 182
add distilled water157t
capacity182
charging159t
current check lamp20
removal and
installation158
symbols158
Belts57
Beverage holder95
BMW High Performance
Synthetic Oils128
BMW Maintenance
System131
BMW Sports seat49
Bore178Bottle holder, refer to
Beverage holder
Brake system20, 109
ABS21t, 106
brake faults109t
brake fluid change75
brake fluid level, warning
lamp20, 109
brake lamp, center151
brake lamps, replacing
bulb149t
brake pads, indicator
lamp22, 109
disc brakes108
driving notes105
warning lamp20, 109
Break-in procedure104
Bulbs and lamps146
CCalifornia Proposition
65 Warning141
Can holder, refer to
Beverage holder
Capacities181
Car battery182
Car Memory55
Car radio112
reception113, 169
refer also to the separate
Owner's Manual
Page 187 of 195
Everything from A to Z
187n
IndexDataTechnologyRepairsCar careControlsOverview
Car telephone96
Car wash132
Care
convertible top137
exterior133
interior134
upholstery135
wool velour135
Cargo loading100
Cassette operation, refer to
the radio Owner's Manual
Catalytic converter105
starting problems105
CBC (Cornering Brake
Control)107
warning lamp21
CD operation, refer to the
radio Owner's Manual
Cellular phone96, 112
refer also to the separate
Owner's Manual
Center armrest95
Center brake lamp151
Central locking system33
key38
Check Control76t
Checking brake fluid
level130t
Checking coolant
level129t
Checking engine oil
level127tChild restraint systems58
Child seat security60
Cigarette lighter97
Cleaning headlamps71
Cleaning windshield70
Clock76
refer to the "Radio and
Information Systems"
Owner's Manual or to the
"Onboard Computer"
Owner's Manual
Cockpit16
Code, refer also to the radio
Owner's Manual
Coin holder95
Combination switch69
Compression178
Computer77
refer to the "Onboard
Computer" Owner's
Manual
Configuring settings
car memory, key
memory55
Connecting portable vacuum
cleaner97
Consumption78
Consumption display74
Convertible top
compartment panel41
electrical defect162tfold down convertible top
compartment base41
operation45
Coolant110, 125t, 129
antifreeze110
temperature gauge74
Cooling system181
Copyright4
Cornering Brake Control
(CBC)107
warning lamp21
Cruise control71
Cruising range78
Cup holder, refer to
Beverage holder
Curb weight180
DDash panel lighting84
Dashboard16
Data
dimensions179
engine178
technical178
vehicle performance181
weights180
Data link connector for
onboard diagnosis142
Daylight driving lamps
switch84
Deep water105
Defrost position91tDefrostable rear window92
Defrosting, windows91t
Difficult steering112t
Digital clock76
Dimensions179
Dipstick127
Disarm tilt alarm
sensor43t
Disc brakes108
Displacement178
Display lighting84
Displays18
Disposal of used
batteries159t
Disposal of used engine
oil128t
Distance warning79
Diversity Antenna169
Door locks, care110
Doors
emergency lock
operation34t
keys32
manual opening and
closing34
opening and closing via
remote control35
unlocking and locking35
DOT Quality Grades116
Draft-free ventilation92
Drive belts182
Driving in winter110