set clock BMW M3 CONVERTIBLE 2002 E46 Owner's Manual
[x] Cancel search | Manufacturer: BMW, Model Year: 2002, Model line: M3 CONVERTIBLE, Model: BMW M3 CONVERTIBLE 2002 E46Pages: 159, PDF Size: 2.19 MB
Page 15 of 159

15n
OverviewControlsMaintenanceRepairsDataIndex
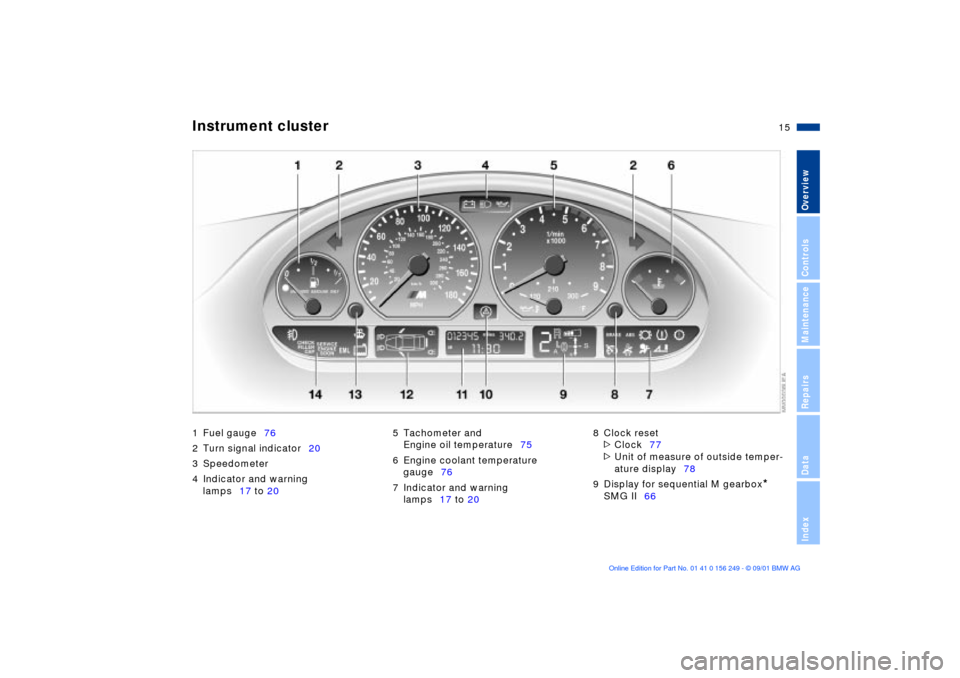
Instrument cluster
1 Fuel gauge76
2 Turn signal indicator20
3 Speedometer
4 Indicator and warning
lamps17 to 205 Tachometer and
Engine oil temperature75
6 Engine coolant temperature
gauge76
7 Indicator and warning
lamps17 to 208 Clock reset
>
Clock77
>
Unit of measure of outside temper-
ature display78
9 Display for sequential M gearbox
*
SMG II66
Page 16 of 159

16n
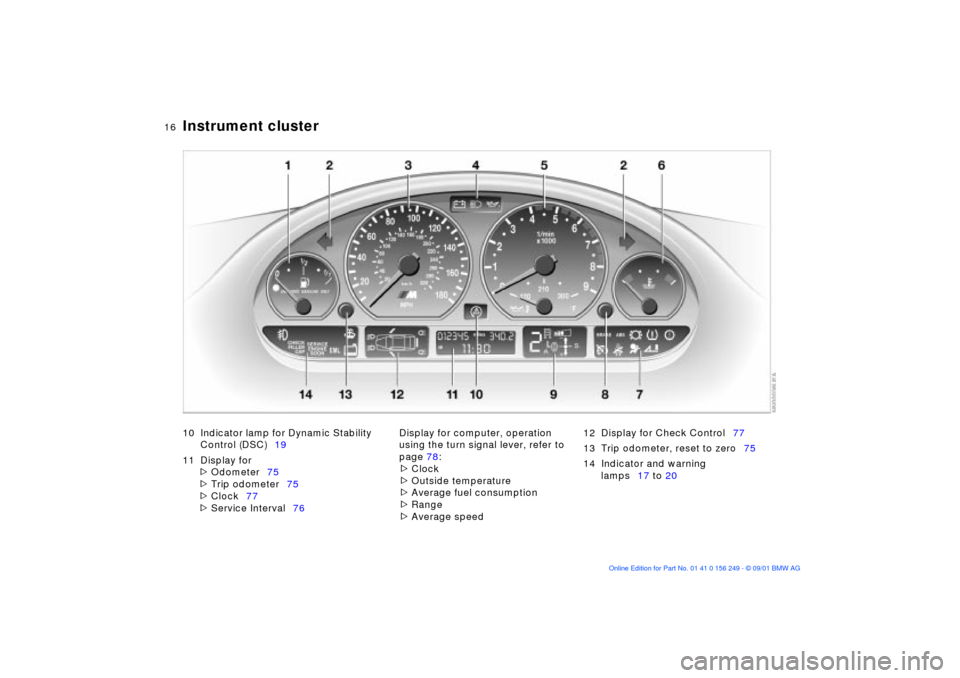
Instrument cluster
10 Indicator lamp for Dynamic Stability
Control (DSC)19
11 Display for
>
Odometer75
>
Trip odometer75
>
Clock77
>
Service Interval76Display for computer, operation
using the turn signal lever, refer to
page 78:
>
Clock
>
Outside temperature
>
Average fuel consumption
>
Range
>
Average speed12 Display for Check Control77
13 Trip odometer, reset to zero75
14 Indicator and warning
lamps17 to 20
Page 77 of 159

77n
OverviewControlsMaintenanceRepairsDataIndex
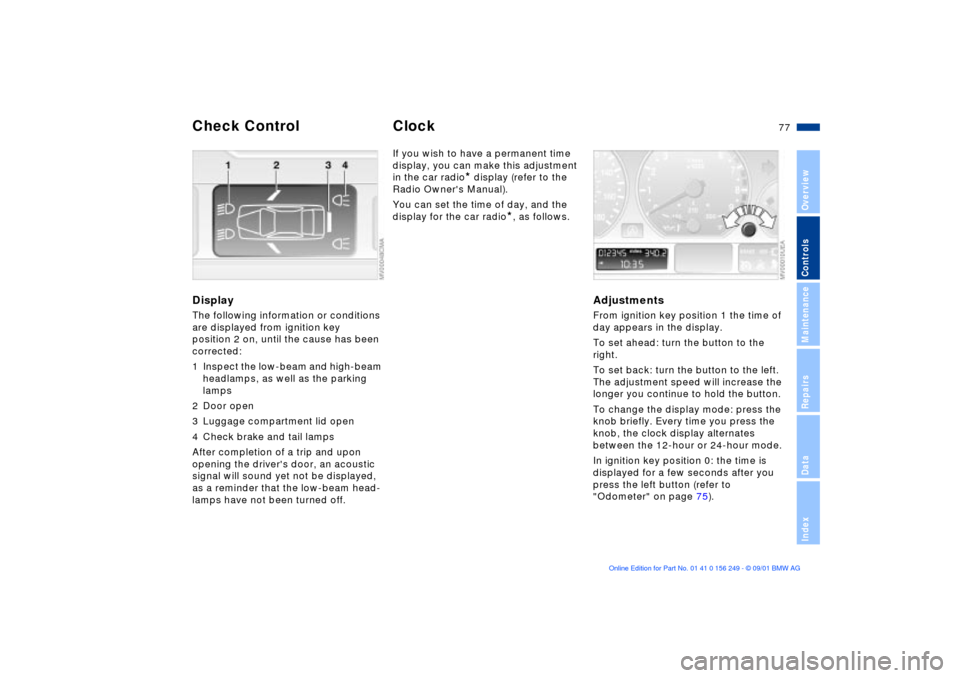
DisplayThe following information or conditions
are displayed from ignition key
position 2 on, until the cause has been
corrected:
1 Inspect the low-beam and high-beam
headlamps, as well as the parking
lamps
2 Door open
3 Luggage compartment lid open
4 Check brake and tail lamps
After completion of a trip and upon
opening the driver's door, an acoustic
signal will sound yet not be displayed,
as a reminder that the low-beam head-
lamps have not been turned off.
If you wish to have a permanent time
display, you can make this adjustment
in the car radio
* display (refer to the
Radio Owner's Manual).
You can set the time of day, and the
display for the car radio
*, as follows.
Adjustments From ignition key position 1 the time of
day appears in the display.
To set ahead: turn the button to the
right.
To set back: turn the button to the left.
The adjustment speed will increase the
longer you continue to hold the button.
To change the display mode: press the
knob briefly. Every time you press the
knob, the clock display alternates
between the 12-hour or 24-hour mode.
In ignition key position 0: the time is
displayed for a few seconds after you
press the left button (refer to
"Odometer" on page 75).
Check Control
Clock
Page 151 of 159

Everything from A to Z
151n
OverviewControlsMaintenanceRepairsDataIndex
Car wash systems, refer to
the "Caring for your
vehicle" manual
Cargo loading100
CBC (Cornering Brake
Control)105
Cellular phone96
hands-free system96
speaker96
Center (high-mount) brake
lamp131
Center armrest96
Central locking system28
Check Control77
Checking engine coolant
level118t
Checking engine oil
level116t
Child Seat Safety57
Child-restraint systems54
Cigarette lighter97
Clean the headlamps72
Cleaning windshield72
Clock77
also refer to the "Radio
Owner's Manual" or to the
"Onboard Computer
Owner's Manual" Cockpit14
Coin box96
Combination switch70
Compression ratio144
Computer
also refer to the "Onboard
Computer Owner's
Manual"78
Configure personal settings,
Vehicle Memory, Key
Memory60
Connecting electrical
appliances97
Connecting vacuum
cleaner97
Consumption display76
Consumption, fuel79
Control elements14
Convertible top
electrical
malfunction42t
Coolant118, 147
Coolant temperature
gauge76
Cooling system,
capacities147
Copyright4 Cornering Brake Control
(CBC)105
Correct sitting position44
Cruise control73
Cruising range79
Cup holder, refer to
beverage holder96
Curb weight146
D
Dashboard
lighting86
Data
dimensions145
engine144
technical144
weights146
Daytime driving lamps85
Deep water105
Defroster, rear window89
Defrosting the windows92
Digital clock77
also refer to the "Radio
Owner's Manual"
Dimensions145 Dimming inside rearview
mirror51
Dipstick, engine oil116
Disc brakes106
Displacement144
Display lighting86
Displays15
Distance warning80
Door key28
Door mirror50
Doors
electrical
malfunction29t
manual operation29t
remote control30
unlocking and locking29
Draft-free ventilation90, 94
Driving lamps85
Driving notes
aquaplaning105
brakes105
disc brakes106
in general105
DSC (Dynamic Stability
Control)81
Dynamic Stability Control
(DSC)81
indicator lamp19
Page 155 of 159

Everything from A to Z
155n
OverviewControlsMaintenanceRepairsDataIndex
Refueling22
Releasing
fuel filler door following an
electrical
malfunction22t
Remote control30
Removing condensation
from the windows92
Replace windshield wiper
blades126t
Replacement key28
Replacing bulbs126t
Reporting safety defects11
Restraint system54
Rims111
Rollover protection
system58
indicator lamp20
lowering58t
Roof load capacity146
Roof-mounted luggage
rack101 S
Safety belts47, 48
Safety buttons33
Seat adjustment
lumbar support45
thigh support45
Seat heating49
Seat memory48
Seat-integrated safety belts
(SGS)47
Seats
adjusting44, 45
Secure glove compartment
and luggage compartment
separately34
Securing cargo100
Securing cargo in luggage
compartment101
Sequential M gearbox
SMG II64
Service and Warranty
Information Booklet120
Service Interval
Display76, 120
Set clock77
Set interior temperature92
SGS (Seat-integrated safety
belts)47 Side airbags52
Side impact Head Protection
System52
Side turn signals
bulb replacement128t
Ski bag98
Snow chains112
Spare key28
Speedometer15
Sport-mode
identification84
Standing lamps86
Starting problems62t
Steering lock61
Steering wheel with
multifunction buttons21
Steering wheel,
adjusting50
Stopping the vehicle62
Storage areas96
Storage compartments96
Stowing cargo100
Stroke144
Summer tires111
Switching off the engine62
Symbols, used8 T
Tachometer75
Tail lamps129
bulb replacement129t
Tank capacity147
Technical data144
Technical
modifications10, 121
Telephone hookup96
Temperature display
ice warning78
interior temperature92
outside temperature78
Temperature gauge
engine coolant76
Temperature
layering90, 94
Temperature, adjusting89
Thigh support, adjusting45
Third brake lamp131
Tilt alarm sensor38
deactivate31
remote control31
Tire inflation
pressures24, 25, 109
Tire wear indicator109