change wheel BMW M3 CONVERTIBLE 2012 Owners Manual
[x] Cancel search | Manufacturer: BMW, Model Year: 2012, Model line: M3 CONVERTIBLE, Model: BMW M3 CONVERTIBLE 2012Pages: 255, PDF Size: 6.32 MB
Page 33 of 255
32
ControlsOpening and closing
Closing
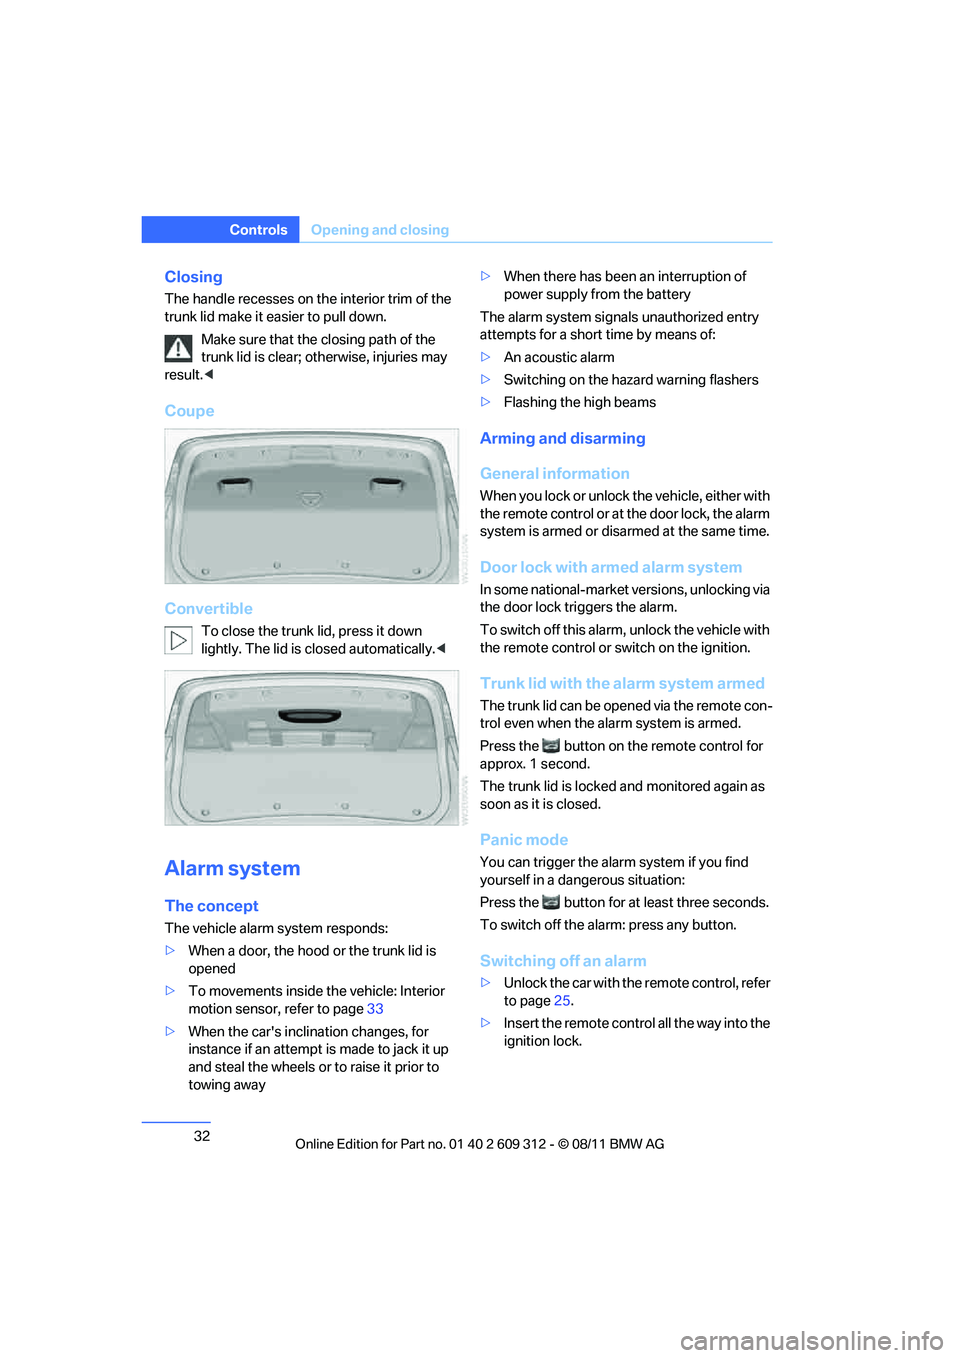
The handle recesses on th e interior trim of the
trunk lid make it easier to pull down.
Make sure that the closing path of the
trunk lid is clear; otherwise, injuries may
result. <
Coupe
Convertible
To close the trunk lid, press it down
lightly. The lid is closed automatically. <
Alarm system
The concept
The vehicle alarm system responds:
>When a door, the hood or the trunk lid is
opened
> To movements inside the vehicle: Interior
motion sensor, refer to page 33
> When the car's inclination changes, for
instance if an attempt is made to jack it up
and steal the wheels or to raise it prior to
towing away >
When there has been an interruption of
power supply from the battery
The alarm system signals unauthorized entry
attempts for a short time by means of:
> An acoustic alarm
> Switching on the haza rd warning flashers
> Flashing the high beams
Arming and disarming
General information
When you lock or unlock the vehicle, either with
the remote control or at the door lock, the alarm
system is armed or disarmed at the same time.
Door lock with armed alarm system
In some national-market versions, unlocking via
the door lock triggers the alarm.
To switch off this alarm, unlock the vehicle with
the remote control or sw itch on the ignition.
Trunk lid with the alarm system armed
The trunk lid can be open ed via the remote con-
trol even when the alarm system is armed.
Press the button on th e remote control for
approx. 1 second.
The trunk lid is locked and monitored again as
soon as it is closed.
Panic mode
You can trigger the alarm system if you find
yourself in a dangerous situation:
Press the button for at least three seconds.
To switch off the alarm: press any button.
Switching off an alarm
> Unlock the car with the remote control, refer
to page 25.
> Insert the remote contro l all the way into the
ignition lock.
Online Edition for Part no. 01 40 2 609 312 - \251 08/11 BMW AG
Page 62 of 255
61
Driving
Controls
R Reverse
Select this only when th
e vehicle is stationary.
N Neutral
You can select this in a car wash, for example.
The vehicle can roll.
D Drive, automatic position
Position for normal vehicle operation. All for-
ward gears are selected automatically.
Under normal operating conditions, fuel con-
sumption is lowest when you are driving in posi-
tion D.
Kickdown
Kickdown enables you to achieve maximum
performance.
Press the accelerator pedal beyond the full-
throttle resistance point.
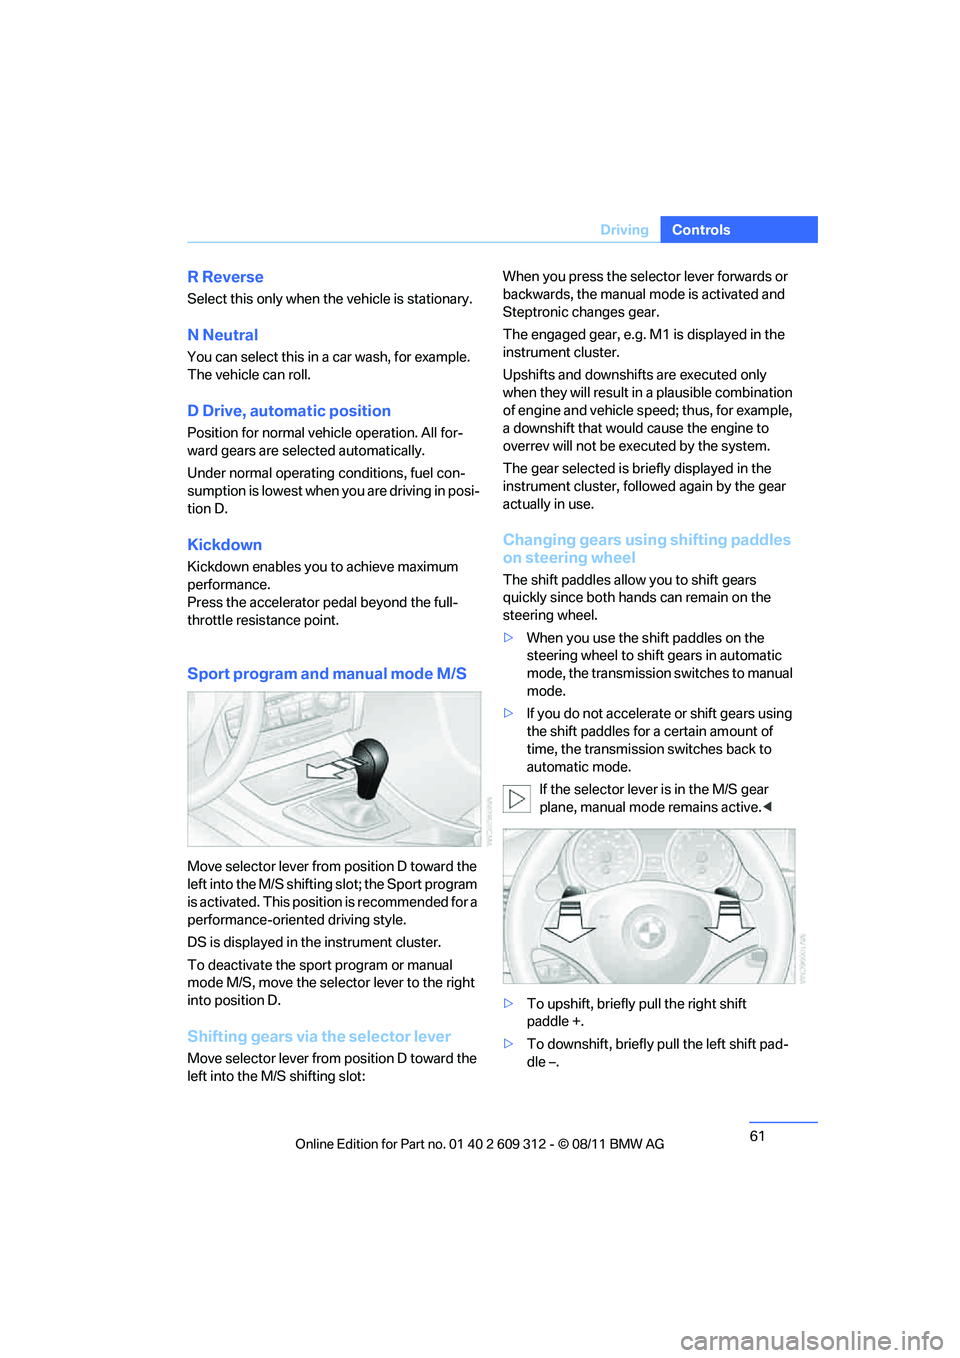
Sport program and manual mode M/S
Move selector lever from position D toward the
left into the M/S shifting slot; the Sport program
is activated. This positi on is recommended for a
performance-oriented driving style.
DS is displayed in the instrument cluster.
To deactivate the spor t program or manual
mode M/S, move the sele ctor lever to the right
into position D.
Shifting gears via the selector lever
Move selector lever from position D toward the
left into the M/S shifting slot: When you press the selector lever forwards or
backwards, the manual
mode is activated and
Steptronic changes gear.
The engaged gear, e.g. M1 is displayed in the
instrument cluster.
Upshifts and downshifts are executed only
when they will result in a plausible combination
of engine and vehicle speed; thus, for example,
a downshift that would cause the engine to
overrev will not be executed by the system.
The gear selected is br iefly displayed in the
instrument cluster, follo wed again by the gear
actually in use.
Changing gears using shifting paddles
on steering wheel
The shift paddles allow you to shift gears
quickly since both hand s can remain on the
steering wheel.
> When you use the shift paddles on the
steering wheel to shift gears in automatic
mode, the transmission switches to manual
mode.
> If you do not accelerate or shift gears using
the shift paddles for a certain amount of
time, the transmission switches back to
automatic mode.
If the selector lever is in the M/S gear
plane, manual mode remains active. <
> To upshift, briefly pull the right shift
paddle +.
> To downshift, briefly pull the left shift pad-
dle –.
Online Edition for Part no. 01 40 2 609 312 - \251 08/11 BMW AG
Page 65 of 255
64
ControlsDriving
D Drive mode
In Drive mode, all forward gears are shifted
automatically.
Kickdown
For sudden acceleration maneuvers such as
passing, depress the accelerator past the resis-
tance point. This prov ides maximum accelera-
tion.
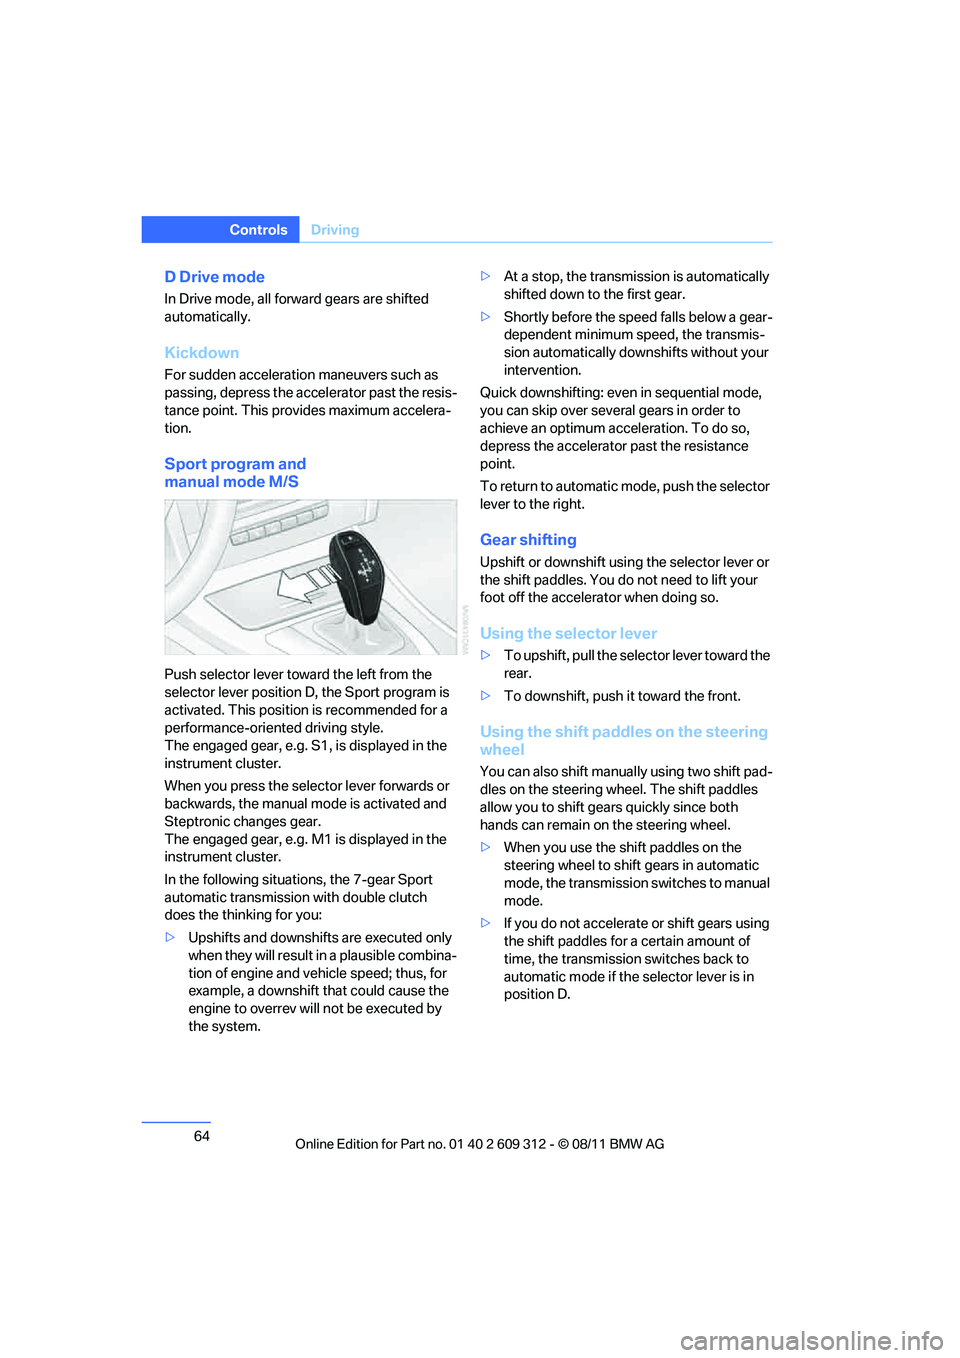
Sport program and
manual mode M/S
Push selector lever towa rd the left from the
selector lever position D, the Sport program is
activated. This position is recommended for a
performance-oriented driving style.
The engaged gear, e.g. S1, is displayed in the
instrument cluster.
When you press the selector lever forwards or
backwards, the manual mode is activated and
Steptronic changes gear.
The engaged gear, e.g. M1 is displayed in the
instrument cluster.
In the following situat ions, the 7-gear Sport
automatic transmission with double clutch
does the thinking for you:
> Upshifts and downshifts are executed only
when they will result in a plausible combina-
tion of engine and vehicle speed; thus, for
example, a downshift that could cause the
engine to overrev will not be executed by
the system. >
At a stop, the transmission is automatically
shifted down to the first gear.
> Shortly before the spee d falls below a gear-
dependent minimum speed, the transmis-
sion automatically down shifts without your
intervention.
Quick downshifting: even in sequential mode,
you can skip over several gears in order to
achieve an optimum acceleration. To do so,
depress the accelerator past the resistance
point.
To return to automatic mode, push the selector
lever to the right.
Gear shifting
Upshift or downshift usin g the selector lever or
the shift paddles. You do not need to lift your
foot off the accelerator when doing so.
Using the selector lever
> To upshift, pull the sele ctor lever toward the
rear.
> To downshift, push it toward the front.
Using the shift paddl es on the steering
wheel
You can also shift manua lly using two shift pad-
dles on the steering wheel. The shift paddles
allow you to shift gear s quickly since both
hands can remain on the steering wheel.
> When you use the shift paddles on the
steering wheel to shift gears in automatic
mode, the transmission switches to manual
mode.
> If you do not accelerate or shift gears using
the shift paddles for a certain amount of
time, the transmission switches back to
automatic mode if the selector lever is in
position D.
Online Edition for Part no. 01 40 2 609 312 - \251 08/11 BMW AG
Page 66 of 255
65
Driving
Controls
>
To upshift, briefly pull the right shift
paddle +.
> To downshift, briefly pull the left shift pad-
dle –.
Driving dynamics control
The driving dynamics control permits you, at
the push of a button, to have your BMW react in
an even more sporty fashion when driving:
> Optimal use is made of the engine's speed
range.
> Gear changes occur more quickly.
> The engine reacts more spontaneously to
accelerator pe dal movements.
Activating the system
Press the SPORT button.
The LED in the button lights up and SPORT
appears in the info display.
Deactivating the system
>Press the SPORT button again.
> Switch off the engine.
The LED in the button goes out and SPORT
disappears from the info display.
Manually unlocking parking lock
In the event of a power supply interrup-
tion such as a discharged or discon-
nected battery or an elec trical malfunction, the
parking lock must be ma nually unlocked; other-
wise, the rear wheels are immobilized and the
vehicle cannot be towed. <
Only unlock the parking lock manually for tow-
ing and make sure to set the parking brake
forcefully beforehand so that the vehicle cannot
roll. Lock the parking lock again after the vehicle
is parked.
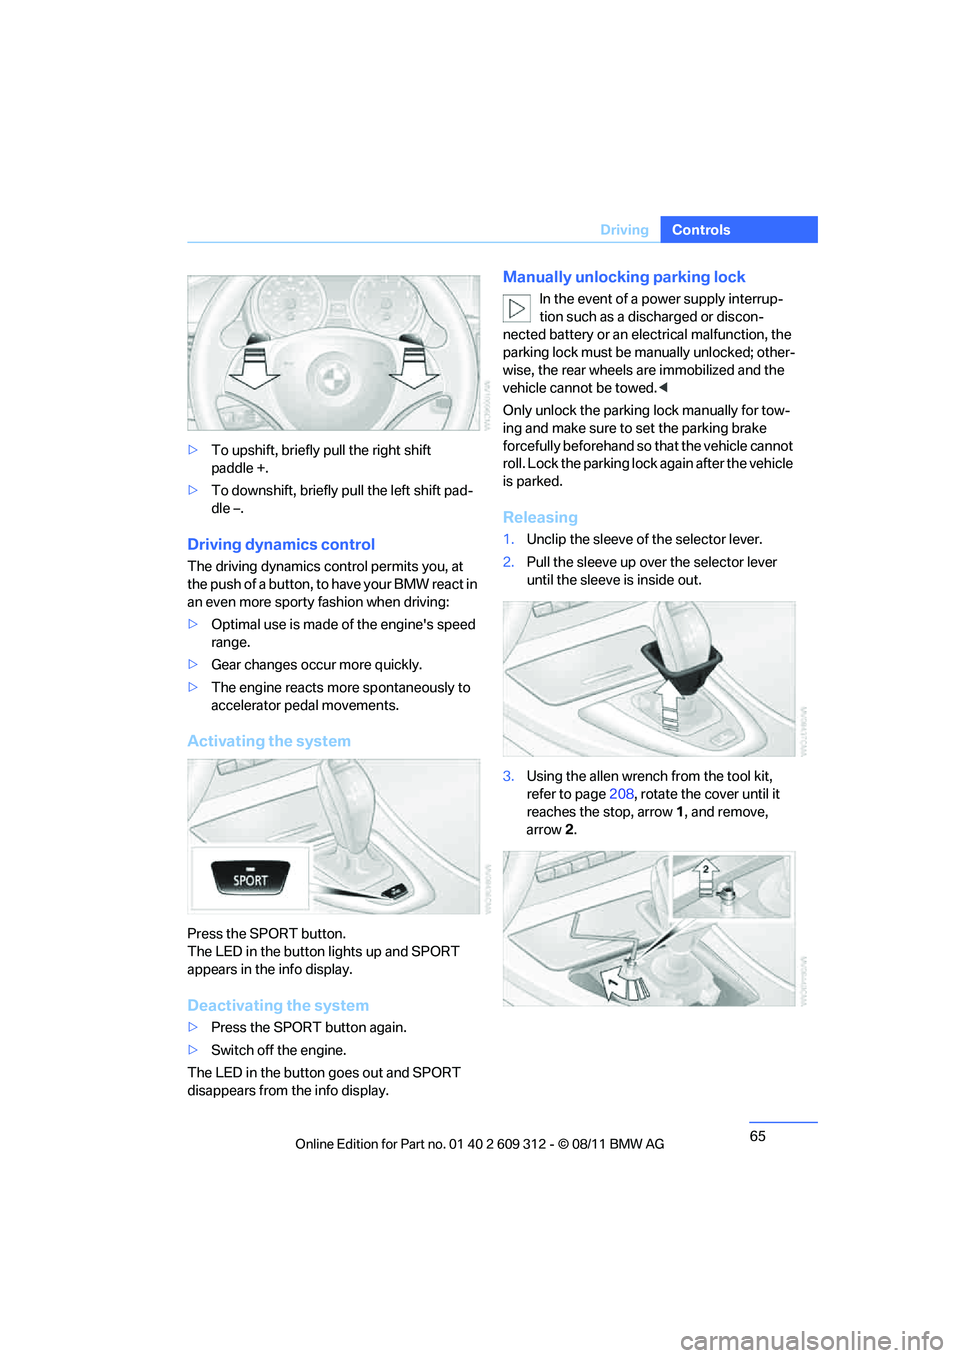
Releasing
1. Unclip the sleeve of the selector lever.
2. Pull the sleeve up over the selector lever
until the sleeve is inside out.
3. Using the allen wrench from the tool kit,
refer to page 208, rotate the cover until it
reaches the stop, arrow 1, and remove,
arrow 2.
Online Edition for Part no. 01 40 2 609 312 - \251 08/11 BMW AG
Page 93 of 255
92
ControlsTechnology for driving comfort and safety
xDrive
xDrive is your BMW's four-wheel-drive system.
The combined efforts of xDrive and DSC help to
further optimize traction and driving dynamics.
The xDrive four-wheel-drive system distributes
driving power variably to the front and rear axles
depending on the drivin g situation and road
conditions.
Hill Descent Control HDC
HDC is a downhill driving assistant that controls
your speed on steep downhill gradients and
makes it even easier to control your BMW's
handling under these conditions. The vehicle
then moves slightly faster than double walking
speed without the driver needing to intervene.
HDC can be activated as long as you are driving
under approx. 20 mph or 35 km/h. When driving
downhill at a speed of under approx. 20 mph or
35 km/h, the vehicle's speed is automatically
reduced to slightly more than double walking
speed and maintained.
Increasing or de creasing speed
By accelerating or braking you can change this
speed within a range from approx. 3 to 15 mph,
approx. 5 to 25 km/h.
You can specify a target speed within the same
range by using the lever of the cruise control.
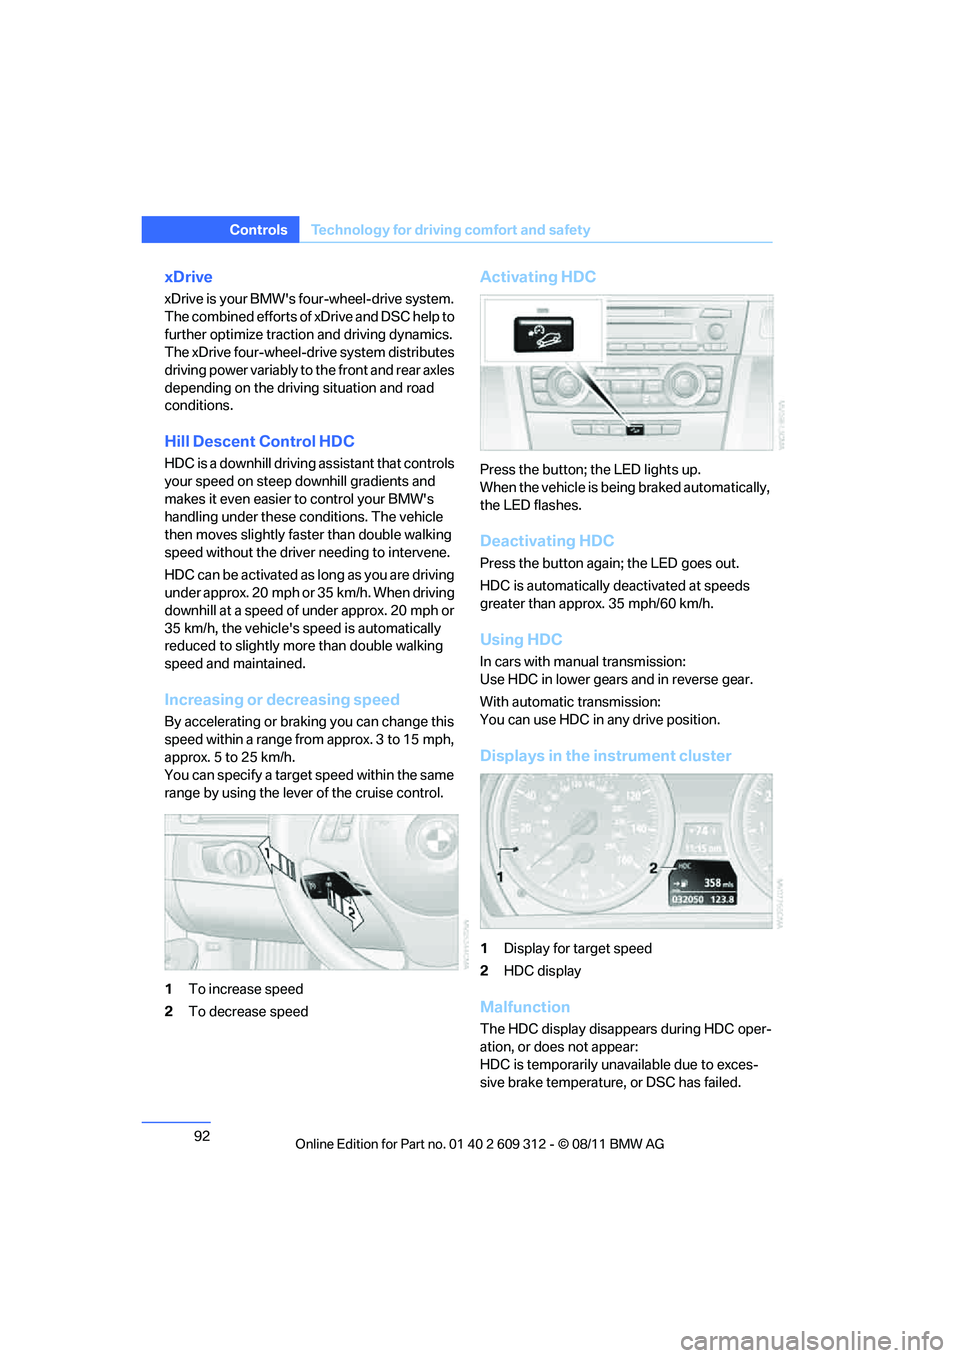
1To increase speed
2 To decrease speed
Activating HDC
Press the button; the LED lights up.
When the vehicle is being braked automatically,
the LED flashes.
Deactivating HDC
Press the button again; the LED goes out.
HDC is automatically deactivated at speeds
greater than approx. 35 mph/60 km/h.
Using HDC
In cars with manual transmission:
Use HDC in lower gears and in reverse gear.
With automatic transmission:
You can use HDC in any drive position.
Displays in the instrument cluster
1Display for target speed
2 HDC display
Malfunction
The HDC display disappe ars during HDC oper-
ation, or does not appear:
HDC is temporarily unavailable due to exces-
sive brake temperature, or DSC has failed.
Online Edition for Part no. 01 40 2 609 312 - \251 08/11 BMW AG
Page 94 of 255
93
Technology for driving comfort and safety
Controls
Drive-off assistant
The drive-off assistant enables you to drive off
smoothly on uphill gradients. It is not necessary
to use the parking brake for this.
1.
Hold the car in place by depressing the
brake.
2. Release the brake and drive off without
delay.
The drive-off assistant holds the car in
place for approx. 2 seconds after the
brake is released. Drive off without delay after
releasing the brake. Ot herwise, the drive-off
assistant will no longer hold the car in place
after approx. 2 seconds an d the car will start to
roll backwards. <
Flat Tire Monitor FTM
The concept
The system does not measure the actual infla-
tion pressure in the tires.
The system detects a pressure loss in a tire by
comparing the rotational speeds of the individ-
ual wheels while moving.
In the event of a pressure loss, the diameter and
therefore the rotational speed of the corre-
sponding wheel change. This is detected and
reported as a flat tire.
Functional requirement
The system must have be en initialized while the
tire inflation pressure was correct; otherwise,
reliable signaling of a flat tire is not ensured.
Each time a tire inflation pressure has been cor-
rected or a wheel or tire has been changed,
reinitialize the system.
System limitations
Sudden serious tire damage caused by
external influences ca nnot be indicated in
advance.<
A natural, steady pressure loss in all four tires is
not detected. Therefore, check the tire inflation
pressure regularly.
In the following situations, the system could be
delayed or malfunction:
> System has not been initialized
> Driving on snowy or slippery road surface
> Performance-oriented style of driving: slip
in the drive wheels, hi gh lateral acceleration
> Snow chains are attached
Initialization
The initialization process adopts the set infla-
tion tire pressures as reference values for the
detection of a flat tire. Initialization is started by
confirming the inflation pressures.
Do not initialize the system when driving with
snow chains.
For operating principle refer to page 82.
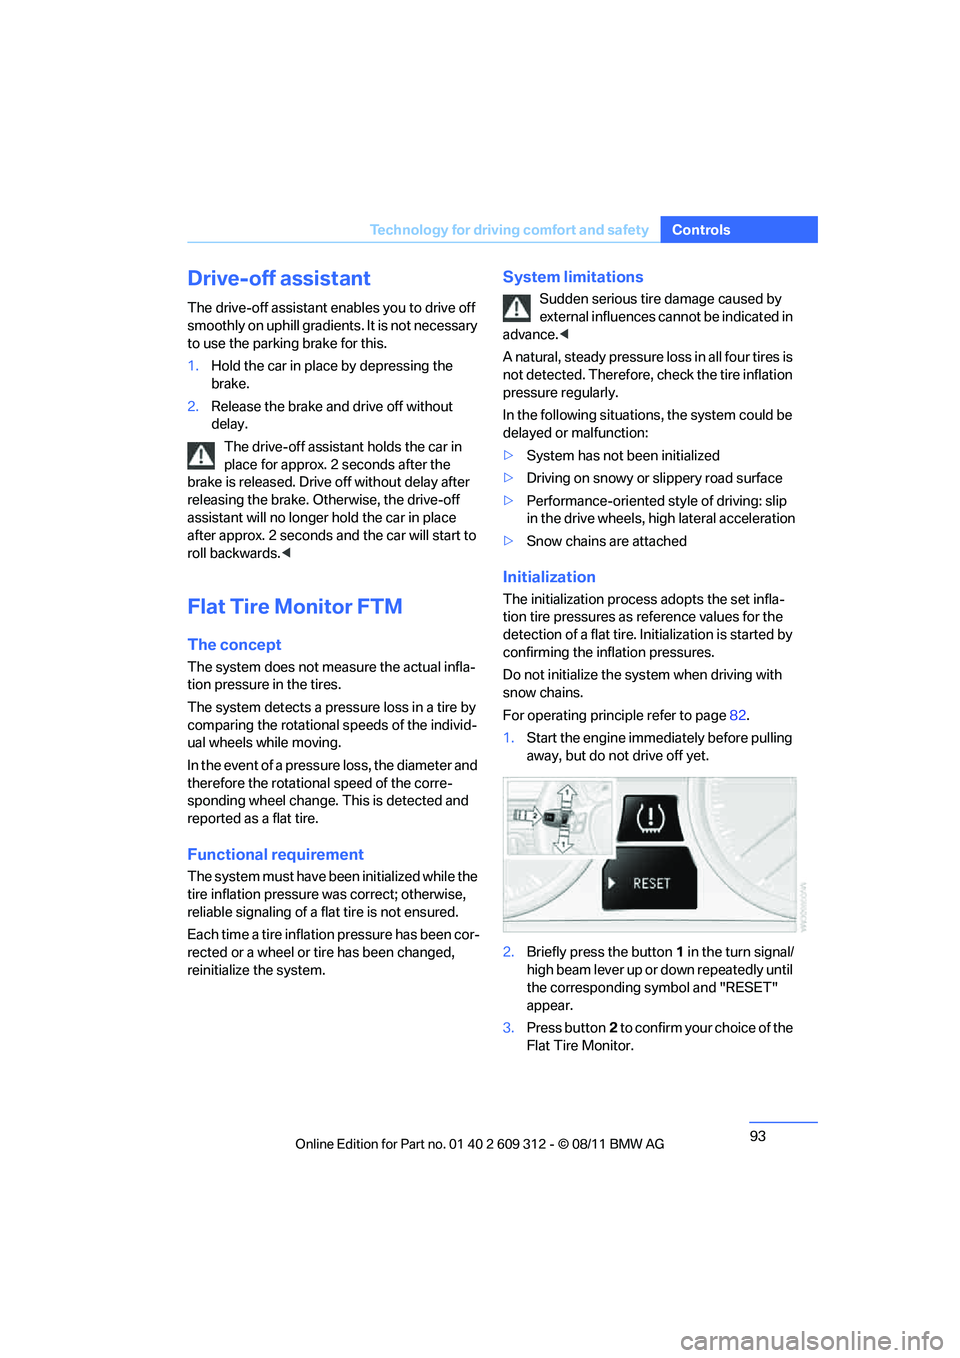
1. Start the engine imme diately before pulling
away, but do not drive off yet.
2. Briefly press the button 1 in the turn signal/
high beam lever up or down repeatedly until
the corresponding symbol and "RESET"
appear.
3. Press button 2 to confirm your choice of the
Flat Tire Monitor.
Online Edition for Part no. 01 40 2 609 312 - \251 08/11 BMW AG
Page 96 of 255
95
Technology for driving comfort and safety
Controls
Tire Pressure Monitor TPM
The concept
Check the inflation pressure
in the four installed
tires. The system notifies you if there is a signif-
icant loss of pressure in one or more tires.
Functional requirement
The system must have been reset while the
inflation pressure was co rrect; otherwise, reli-
able signaling of a flat tire is not ensured.
Always use wheels with TPM electronics to
ensure that the system will operate properly.
Each time a tire inflation pressure has been cor-
rected or a wheel or tire has been changed,
reset the system.
System limitations
Sudden serious tire damage caused by
external influences ca nnot be indicated in
advance.<
The system does not function correctly if it has
not been reset. For example, a flat tire may be
indicated even though the tire inflation pres-
sures are correct.
The system is inactive and cannot indicate a flat
tire:
> When a wheel without TPM electronics is
installed.
> Interference with TPM by other systems or
devices with the same transmission fre-
quency.
Resetting the system
Each time a tire inflation pressure has been cor-
rected or a wheel or tire has been changed,
reset the system.
For operating principle refer to page 82.
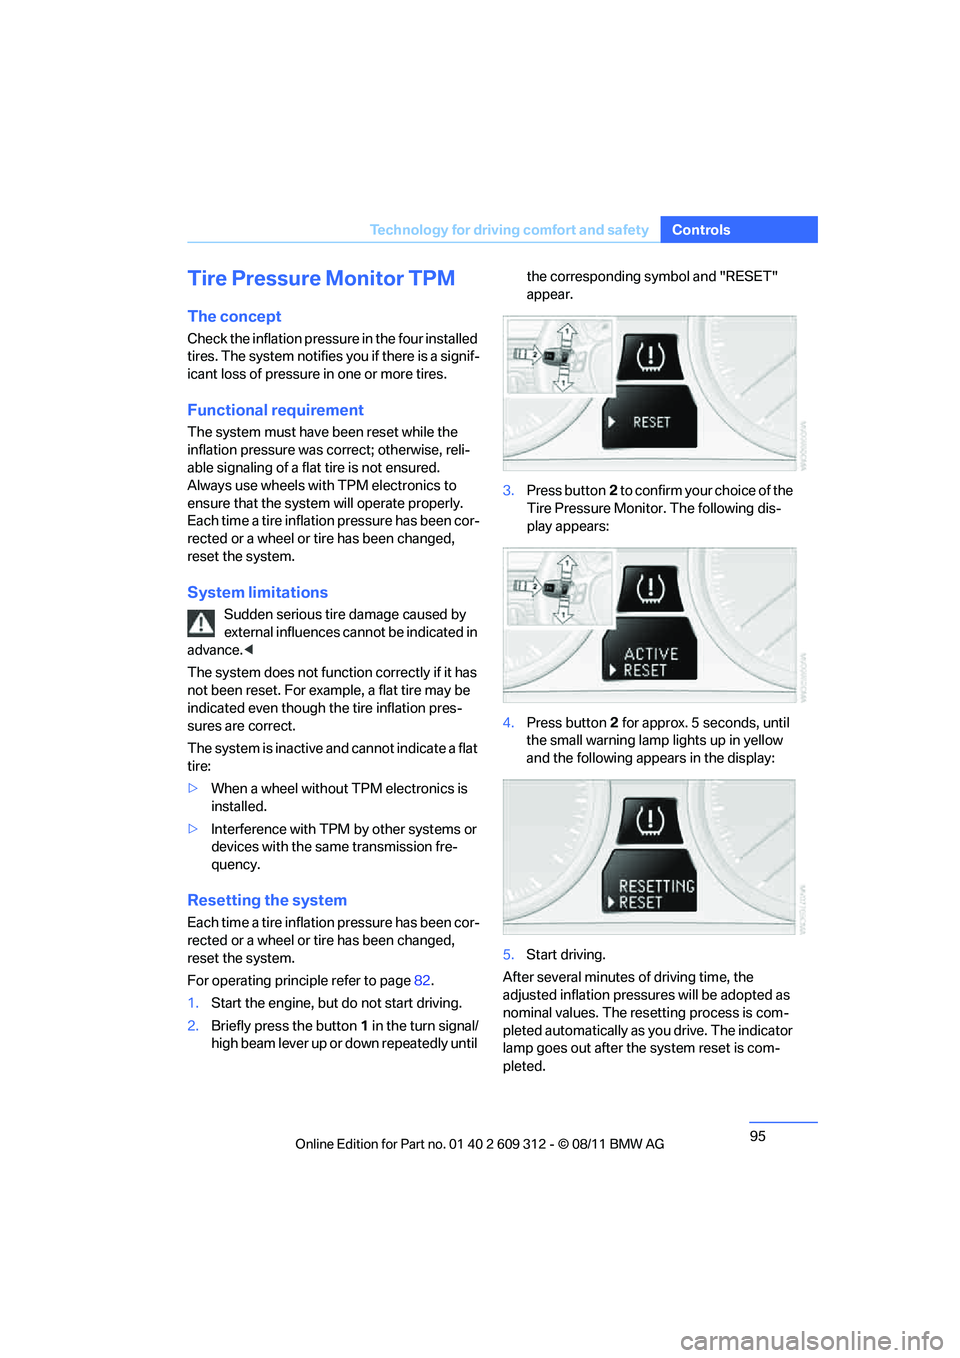
1. Start the engine, but do not start driving.
2. Briefly press the button 1 in the turn signal/
high beam lever up or down repeatedly until the corresponding symbol and "RESET"
appear.
3. Press button 2 to confirm your choice of the
Tire Pressure Monitor. The following dis-
play appears:
4. Press button 2 for approx. 5 seconds, until
the small warning lamp lights up in yellow
and the following appears in the display:
5. Start driving.
After several minutes of driving time, the
adjusted inflation pressures will be adopted as
nominal values. The resetting process is com-
pleted automatically as you drive. The indicator
lamp goes out after the system reset is com-
pleted.
Online Edition for Part no. 01 40 2 609 312 - \251 08/11 BMW AG
Page 97 of 255
96
ControlsTechnology for driving comfort and safety
The trip can be interrupted at any time. When
driving resumes, resetting continues automati-
cally.
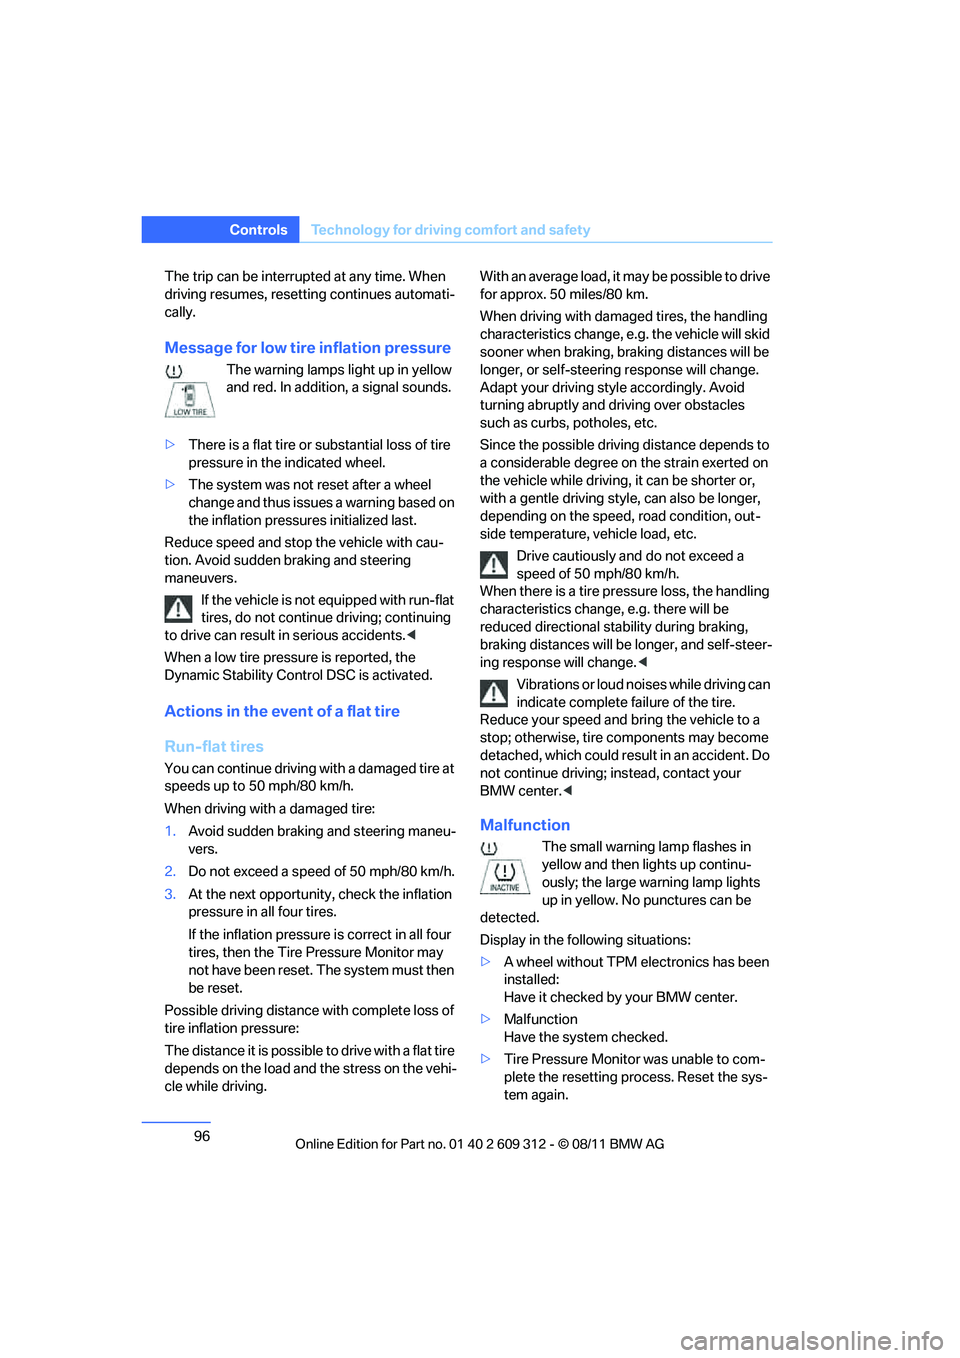
Message for low tire inflation pressure
The warning lamps light up in yellow
and red. In addition, a signal sounds.
> There is a flat tire or substantial loss of tire
pressure in the indicated wheel.
> The system was not reset after a wheel
change and thus issues a warning based on
the inflation pressure s initialized last.
Reduce speed and stop the vehicle with cau-
tion. Avoid sudden braking and steering
maneuvers. If the vehicle is not equipped with run-flat
tires, do not continue driving; continuing
to drive can result in serious accidents. <
When a low tire pressure is reported, the
Dynamic Stability Control DSC is activated.
Actions in the event of a flat tire
Run-flat tires
You can continue driving with a damaged tire at
speeds up to 50 mph/80 km/h.
When driving with a damaged tire:
1. Avoid sudden braking and steering maneu-
vers.
2. Do not exceed a speed of 50 mph/80 km/h.
3. At the next opportunity, check the inflation
pressure in all four tires.
If the inflation pressure is correct in all four
tires, then the Tire Pressure Monitor may
not have been reset. The system must then
be reset.
Possible driving distance with complete loss of
tire inflation pressure:
The distance it is possible to drive with a flat tire
depends on the load and the stress on the vehi-
cle while driving. With an average load, it may be possible to drive
for approx. 50 miles/80 km.
When driving with damaged tires, the handling
characteristics ch
ange, e.g. the vehicle will skid
sooner when braking, braking distances will be
longer, or self-steerin g response will change.
Adapt your driving style accordingly. Avoid
turning abruptly and driving over obstacles
such as curbs, potholes, etc.
Since the possible driving distance depends to
a considerable degree on the strain exerted on
the vehicle while driving, it can be shorter or,
with a gentle driving style, can also be longer,
depending on the speed, road condition, out-
side temperature, vehicle load, etc.
Drive cautiously an d do not exceed a
speed of 50 mph/80 km/h.
When there is a tire pressure loss, the handling
characteristics change , e.g. there will be
reduced directional stability during braking,
braking distances will be longer, and self-steer-
ing response will change. <
Vibrations or loud noises while driving can
indicate complete fa ilure of the tire.
Reduce your speed and bring the vehicle to a
stop; otherwise, tire components may become
detached, which could result in an accident. Do
not continue driving; instead, contact your
BMW center. <
Malfunction
The small warning lamp flashes in
yellow and then lights up continu-
ously; the large warning lamp lights
up in yellow. No punctures can be
detected.
Display in the follo wing situations:
> A wheel without TPM electronics has been
installed:
Have it checked by your BMW center.
> Malfunction
Have the system checked.
> Tire Pressure Monitor was unable to com-
plete the resetting process. Reset the sys-
tem again.
Online Edition for Part no. 01 40 2 609 312 - \251 08/11 BMW AG
Page 112 of 255
111
Climate
Controls
switch the system back on and increase the air
volume.<
Switching cooling function on/off
The cooling function cools and
dehumidifies the incoming air
before reheating it according to the
temperature setting. This function
is only available while the engine is running.
The cooling function helps prevent condensa-
tion on the windows or removes it quickly.
The cooling effect can be intensified by activat-
ing recirculated air mode.
Depending on the weathe r, the windshield may
fog over briefly when the engine is started.
Rear window defroster
The defroster is switched off auto-
matically after a certain time.
Depending on your vehicle's
equipment, the upper wires serve
as an antenna and are not part of the rear win-
dow defroster.
Temperature
To increase the temperature, turn
the rotary switch clockwise
towards red.
For a lower temperature, turn the
rotary switch counterc lockwise towards blue.
Defrosting windows and removing
condensation
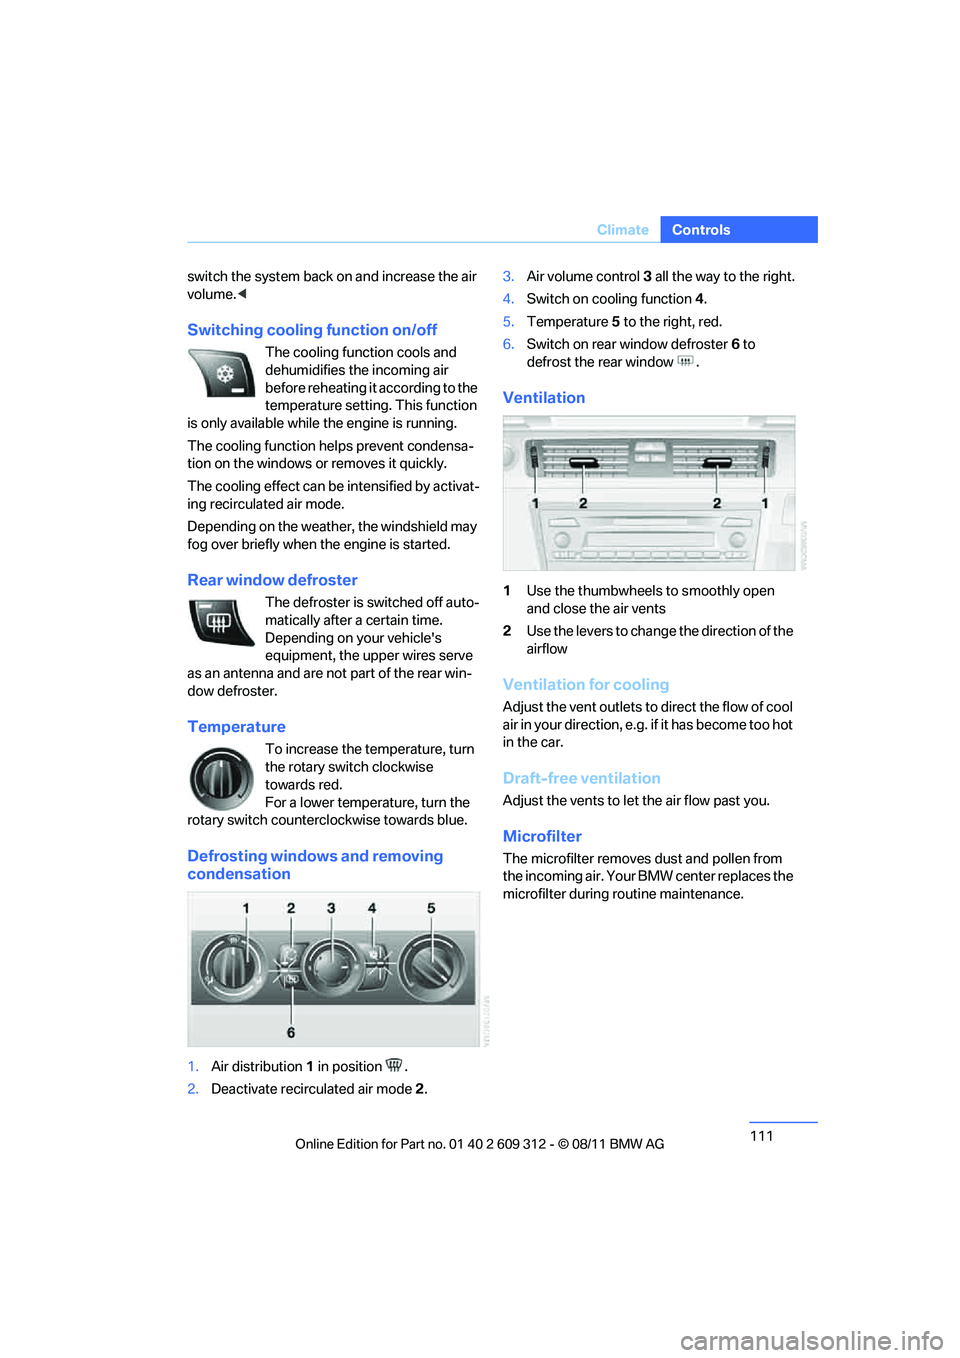
1.Air distribution 1 in position .
2. Deactivate recirculated air mode 2. 3.
Air volume control 3 all the way to the right.
4. Switch on cooling function 4.
5. Temperature 5 to the right, red.
6. Switch on rear window defroster 6 to
defrost the rear window .
Ventilation
1 Use the thumbwheels to smoothly open
and close the air vents
2 Use the levers to change the direction of the
airflow
Ventilation for cooling
Adjust the vent outlets to direct the flow of cool
air in your direction, e.g. if it has become too hot
in the car.
Draft-free ventilation
Adjust the vents to let the air flow past you.
Microfilter
The microfilter removes dust and pollen from
the incoming air. Your BMW center replaces the
microfilter during routine maintenance.
Online Edition for Part no. 01 40 2 609 312 - \251 08/11 BMW AG
Page 115 of 255
114
ControlsClimate
The recirculated air mode should not be
used over an extended period of time;
otherwise, the air quality inside the car will dete-
riorate continuously. <
Via the button on the steering wheel
You can switch quickly between the recircu-
lated air mode and the previous mode using a
button on the steering wheel, refer to page 11.
ALL program
Press the button.
The current temperature setting
on the driver's side is transferred to
the front passenger side.
If the temperature setting on the driver's side is
changed, the temperature on the front passen-
ger side is changed as well.
The program is switched off when the setting is
adjusted on the front passenger side or the but-
ton is pressed again.
Defrosting windows and removing
condensation
Press the button.
Quickly removes ice and conden-
sation from the windshield and
front side windows.
For this purpose, also switch on the cooling
function.
Switching cooling function on/off
The passenger compartment can only be
cooled while the engine is running.
Press the button.
The air is cooled and dehumidified
and – depending on the tempera-
ture setting – warmed again.
Depending on the weather, the windshield may
fog up briefly when the engine is started.
Pressing the AUTO button automatically
switches on the cooling function.
Rear window defroster
Press the button.
The defroster is switched off auto-
matically after a certain time.
Depending on your vehicle's equipment, the
upper wires serve as an antenna and are not
part of the rear window defroster.
Switching the system on/off
Switching off
With the blower at its lowest set-
ting, press the left side of the but-
ton to switch off the automatic cli-
mate control.
All displays are cleared except for the rear win-
dow defroster if it is switched on.
The outside air supply is blocked when
the automatic climate control is switched
off. If the air quality deteriorates or the window
fogs over, switch the system back on and
increase the air volume. <
Switching on
Press any button except the ALL or the rear
window defroster button to reactivate the auto-
matic climate control.
Ventilation
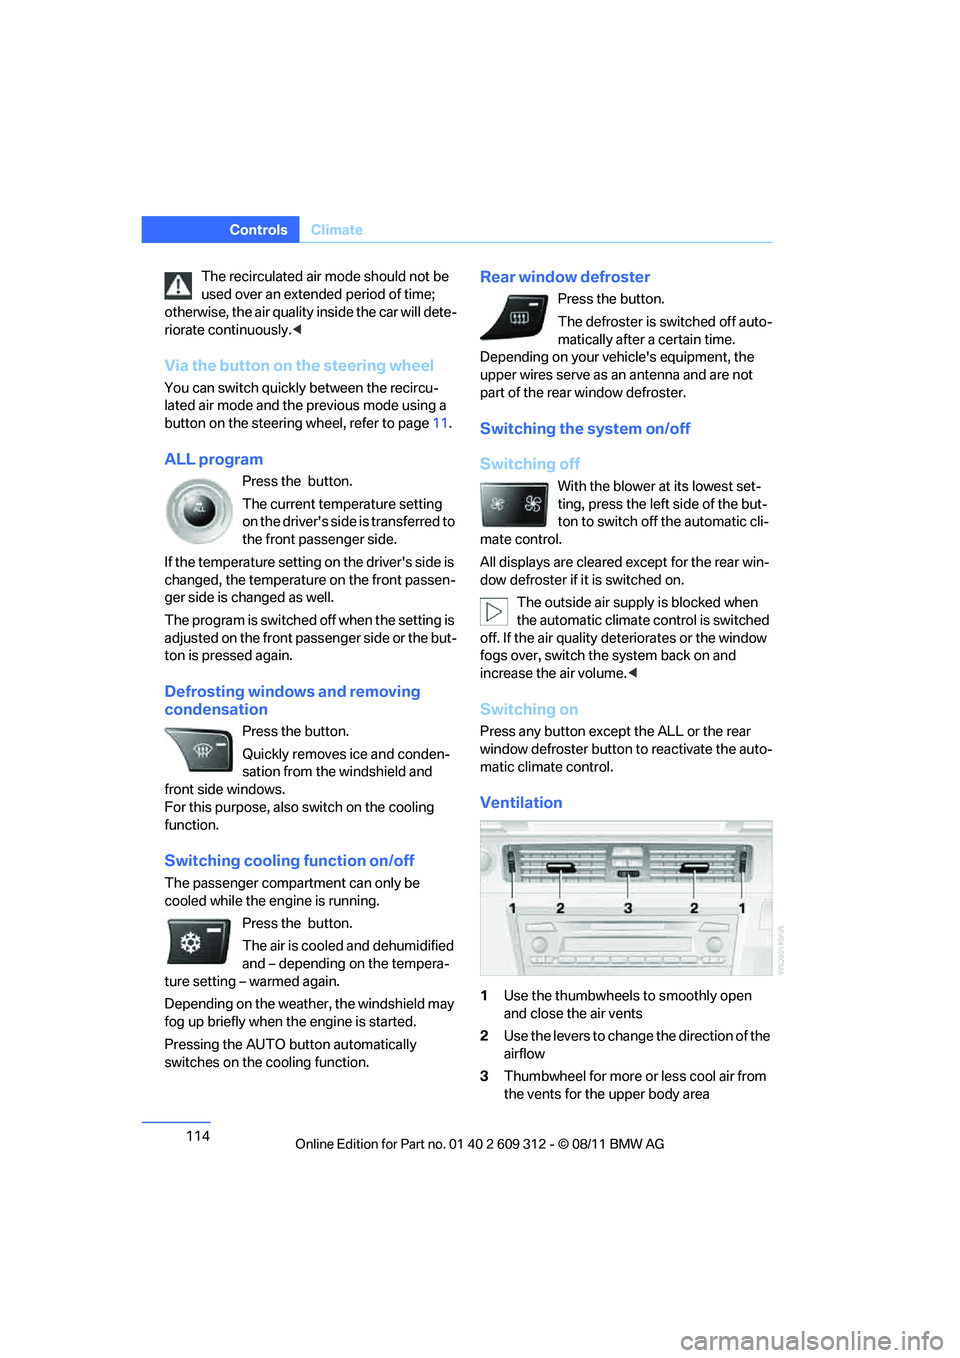
1 Use the thumbwheels to smoothly open
and close the air vents
2 Use the levers to change the direction of the
airflow
3 Thumbwheel for more or less cool air from
the vents for the upper body area
Online Edition for Part no. 01 40 2 609 312 - \251 08/11 BMW AG