malfunction BMW M3 COUPE 2008 E92 User Guide
[x] Cancel search | Manufacturer: BMW, Model Year: 2008, Model line: M3 COUPE, Model: BMW M3 COUPE 2008 E92Pages: 172, PDF Size: 5.29 MB
Page 74 of 172
Technology for driving comfort and safety
72 dling and stopping ability. Please note that the
TPMS is not a substitute for proper tire mainte-
nance, and it is the driver’s responsibility to
maintain correct tire pressure, even if underin-
flation has not reached the level at which the
TPMS low tire pressure telltale illuminates.
The TPMS malfunction indicator is combined
with the low tire pressure telltale. When the sys-
tem detects a malfunction, the telltale will flash
for approximately one minute and then remain
continuously lit. This sequence will continue
upon subsequent vehicle startups as long as
the malfunction exists. When the malfunction
indicator is illuminated, the system may not be
able to detect or signal low tire pressure as
intended. TPMS malfunctions may occur for a
variety of reasons, including the installation of
replacement or alternate tires or wheels on the
vehicle that prevent the TPMS from functioning
properly. Always check the TPMS malfunction
telltale after replacing one or more tires or
wheels on your vehicle to ensure that the
replacement or alternate tires and wheels allow
the TPMS to continue to function properly.
Servotronic
"Servotronic" varies the steering force required
to turn the wheels depending on the speed at
which you are driving.
At low speeds, steering is assisted strongly, i. e.
less effort is required to turn the vehicle. Steer-
ing assistance lessens with increasing speed.
Brake Force Display
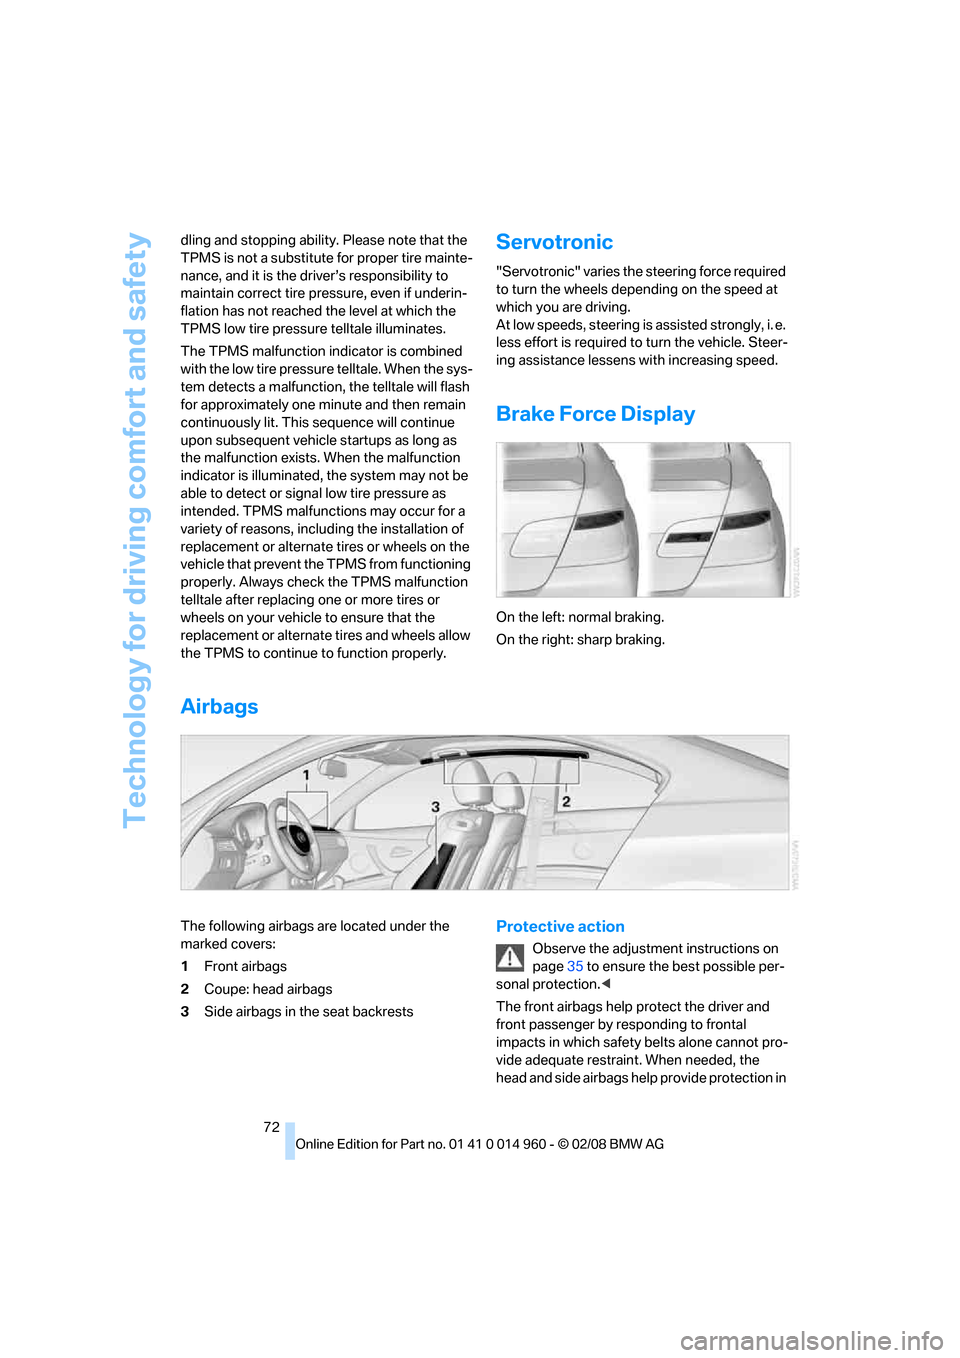
On the left: normal braking.
On the right: sharp braking.
Airbags
The following airbags are located under the
marked covers:
1Front airbags
2Coupe: head airbags
3Side airbags in the seat backrestsProtective action
Observe the adjustment instructions on
page35 to ensure the best possible per-
sonal protection.<
The front airbags help protect the driver and
front passenger by responding to frontal
impacts in which safety belts alone cannot pro-
vide adequate restraint. When needed, the
head and side airbags help provide protection in
Page 75 of 172
Reference
At a glance
Controls
Driving tips
Mobility
73
the event of side impact. The relevant side air-
bag supports the side upper body area. The
head air bag supports the head.
The airbags have been designed to not be trig-
gered in every collision situation, e.g. not in
minor accidents or rear-end collisions.
Do not apply adhesive materials to the
cover panels of the airbags, cover them or
modify them in any other way. Do not attach
seat covers, cushions or other objects not spe-
cifically approved for seats with integral side air-
bags to the front seats. Do not hang items of
clothing such as coats or jackets over the back-
rests. Do not attempt to remove the airbag
retention system from the vehicle. Do not mod-
ify the individual components of the system or
its wiring in any way. This includes the uphol-
stered covers on the steering wheel, instrument
panel, seats and roof posts, as well as the sides
of the roof lining. Do not attempt to remove or
dismantle the steering wheel.
Do not touch the individual components imme-
diately after the system has been triggered,
because there is a danger of burns.
In the event of malfunctions, deactivation or
triggering of the airbag restraint system, have
the testing, repair, removal and disposal of air-
bag generators executed only by a BMW center
or a workshop that works according to repair
procedures of BMW with correspondingly
trained personnel and that has the required
explosives licenses. Unprofessional attempts to
work on the system could lead to failure in an
emergency or to undesired airbag activation,
either of which could result in personal injury.<
Warning notices and information about the air-
bags can also be found on the sun visors.
Automatic deactivation of the front
passenger airbags
An analysis of the impression in the front pas-
senger seat cushion determines whether and
how the seat is occupied. The front and side air-
bags for the front passenger are activated or
deactivated by the system accordingly.
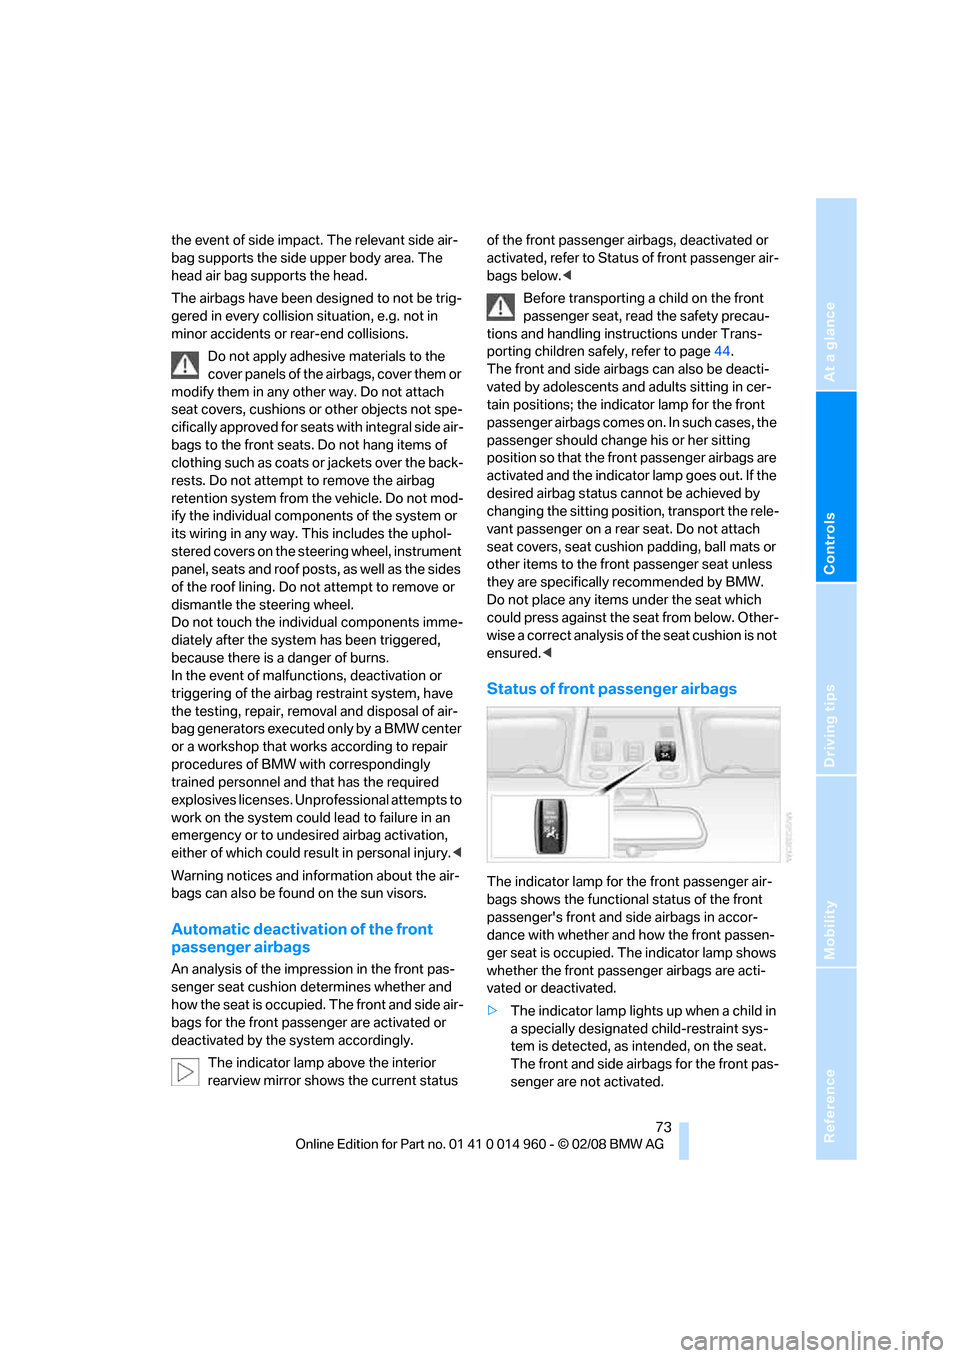
The indicator lamp above the interior
rearview mirror shows the current status of the front passenger airbags, deactivated or
activated, refer to Status of front passenger air-
bags below.<
Before transporting a child on the front
passenger seat, read the safety precau-
tions and handling instructions under Trans-
porting children safely, refer to page44.
The front and side airbags can also be deacti-
vated by adolescents and adults sitting in cer-
tain positions; the indicator lamp for the front
passenger airbags comes on. In such cases, the
passenger should change his or her sitting
position so that the front passenger airbags are
activated and the indicator lamp goes out. If the
desired airbag status cannot be achieved by
changing the sitting position, transport the rele-
vant passenger on a rear seat. Do not attach
seat covers, seat cushion padding, ball mats or
other items to the front passenger seat unless
they are specifically recommended by BMW.
Do not place any items under the seat which
could press against the seat from below. Other-
wise a correct analysis of the seat cushion is not
ensured.<
Status of front passenger airbags
The indicator lamp for the front passenger air-
bags shows the functional status of the front
passenger's front and side airbags in accor-
dance with whether and how the front passen-
ger seat is occupied. The indicator lamp shows
whether the front passenger airbags are acti-
vated or deactivated.
>The indicator lamp lights up when a child in
a specially designated child-restraint sys-
tem is detected, as intended, on the seat.
The front and side airbags for the front pas-
senger are not activated.
Page 76 of 172
Technology for driving comfort and safety
74 Most child seats are detected by the
system, especially child seats
required by the NHTSA at the time of vehi-
cle production. After mounting a child seat,
ensure that the indicator lamp for the front
passenger airbag is lit. It indicates that the
child seat has been detected and that the
front passenger airbags are deactivated.<
>The indicator lamp does not come on as
long as a person of sufficient size and in a
correct sitting position is detected on the
seat.
The front and side airbags for the front pas-
senger are activated.
>The indicator lamp does not come on if the
seat is empty.
The front and side airbags for the front pas-
senger are not activated.
Operational readiness of airbag system
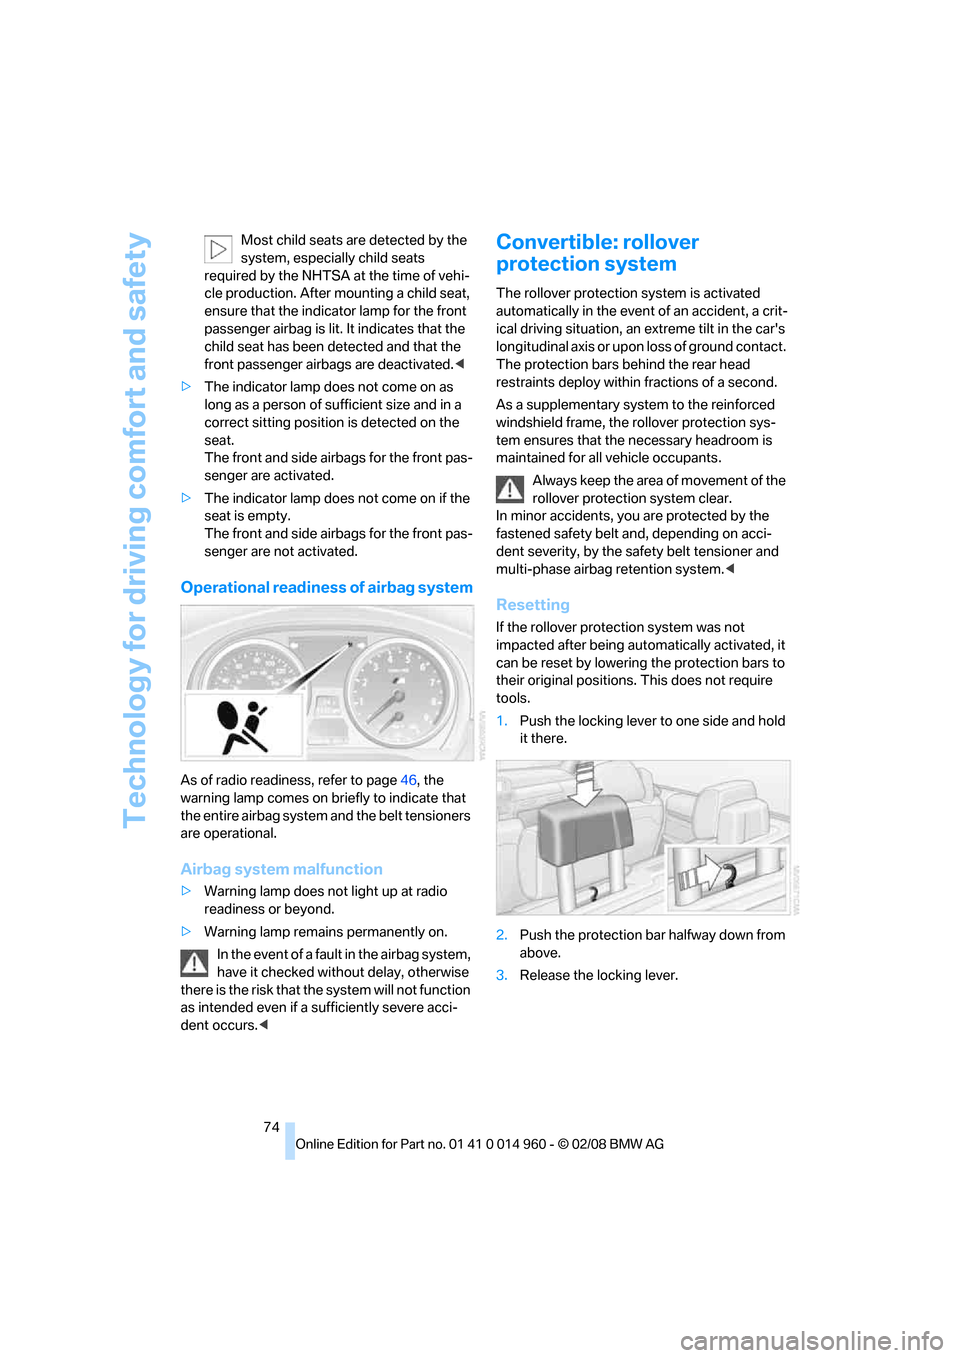
As of radio readiness, refer to page46, the
warning lamp comes on briefly to indicate that
the entire airbag system and the belt tensioners
are operational.
Airbag system malfunction
>Warning lamp does not light up at radio
readiness or beyond.
>Warning lamp remains permanently on.
In the event of a fault in the airbag system,
have it checked without delay, otherwise
there is the risk that the system will not function
as intended even if a sufficiently severe acci-
dent occurs.<
Convertible: rollover
protection system
The rollover protection system is activated
automatically in the event of an accident, a crit-
ical driving situation, an extreme tilt in the car's
longitudinal axis or upon loss of ground contact.
The protection bars behind the rear head
restraints deploy within fractions of a second.
As a supplementary system to the reinforced
windshield frame, the rollover protection sys-
tem ensures that the necessary headroom is
maintained for all vehicle occupants.
Always keep the area of movement of the
rollover protection system clear.
In minor accidents, you are protected by the
fastened safety belt and, depending on acci-
dent severity, by the safety belt tensioner and
multi-phase airbag retention system.<
Resetting
If the rollover protection system was not
impacted after being automatically activated, it
can be reset by lowering the protection bars to
their original positions. This does not require
tools.
1.Push the locking lever to one side and hold
it there.
2.Push the protection bar halfway down from
above.
3.Release the locking lever.
Page 80 of 172
Lamps
78 angle and other parameters, the light from the
headlamp follows the course of the road.
In tight curves at speeds up to 40 mph/70 km/h,
e.g. on mountainous roads or when turning, an
additional, corner-illuminating lamp is switched
on that lights up the inside area of the curve.
Activating Adaptive Head Light
With the ignition switched on, turn the light
switch to position 3, refer to page76.
The corner-illuminating lamp is switched on
automatically, depending on the steering wheel
angle or turn signal indicator.
To avoid blinding oncoming traffic, the Adaptive
Head Light directs light towards the front pas-
senger side when the vehicle is at a standstill.
When you are reversing, only the corner-illumi-
nating lamps are active and switched on on
both sides.
Malfunction
The LED next to the symbol for automatic head-
lamp control flashes. Adaptive Head Light is
malfunctioning or has failed. Have the system
checked as soon as possible.
High beams/roadside parking
lamps
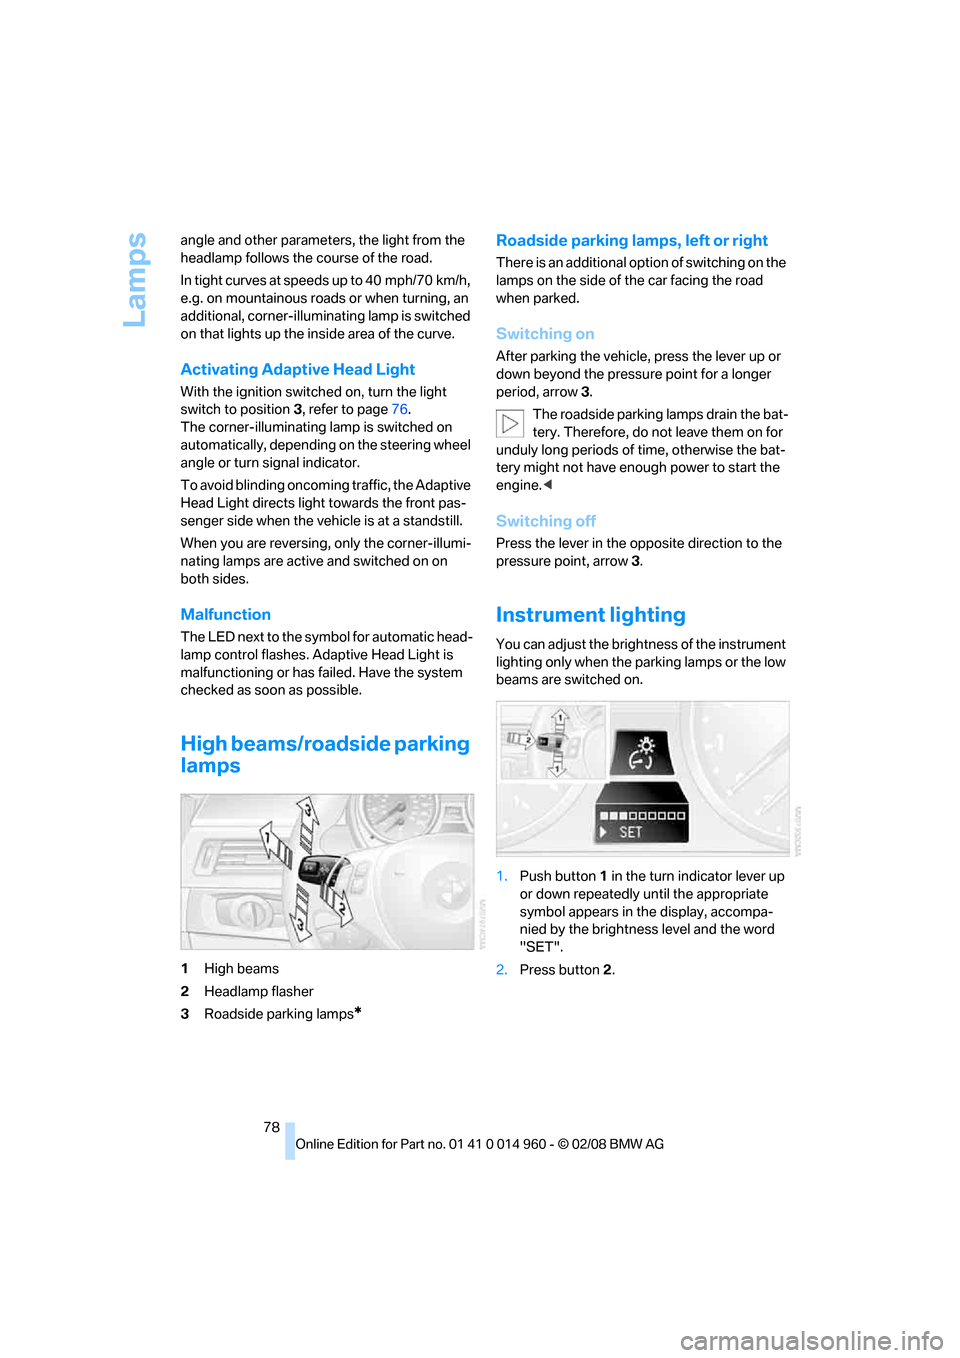
1High beams
2Headlamp flasher
3Roadside parking lamps
*
Roadside parking lamps, left or right
There is an additional option of switching on the
lamps on the side of the car facing the road
when parked.
Switching on
After parking the vehicle, press the lever up or
down beyond the pressure point for a longer
period, arrow 3.
The roadside parking lamps drain the bat-
tery. Therefore, do not leave them on for
unduly long periods of time, otherwise the bat-
tery might not have enough power to start the
engine.<
Switching off
Press the lever in the opposite direction to the
pressure point, arrow 3.
Instrument lighting
You can adjust the brightness of the instrument
lighting only when the parking lamps or the low
beams are switched on.
1.Push button 1 in the turn indicator lever up
or down repeatedly until the appropriate
symbol appears in the display, accompa-
nied by the brightness level and the word
"SET".
2.Press button 2.
Page 110 of 172
Refueling
108
Refueling
Always switch off the engine before refu-
eling, otherwise, fuel cannot be added to
the tank and a message will be displayed.<
Take all precautionary measures and
observe all applicable regulations when
handling fuel. Do not carry any spare fuel con-
tainers in your vehicle. They can develop a leak
and cause an explosion or cause a fire in the
event of an accident.<
Fuel filler door
Opening
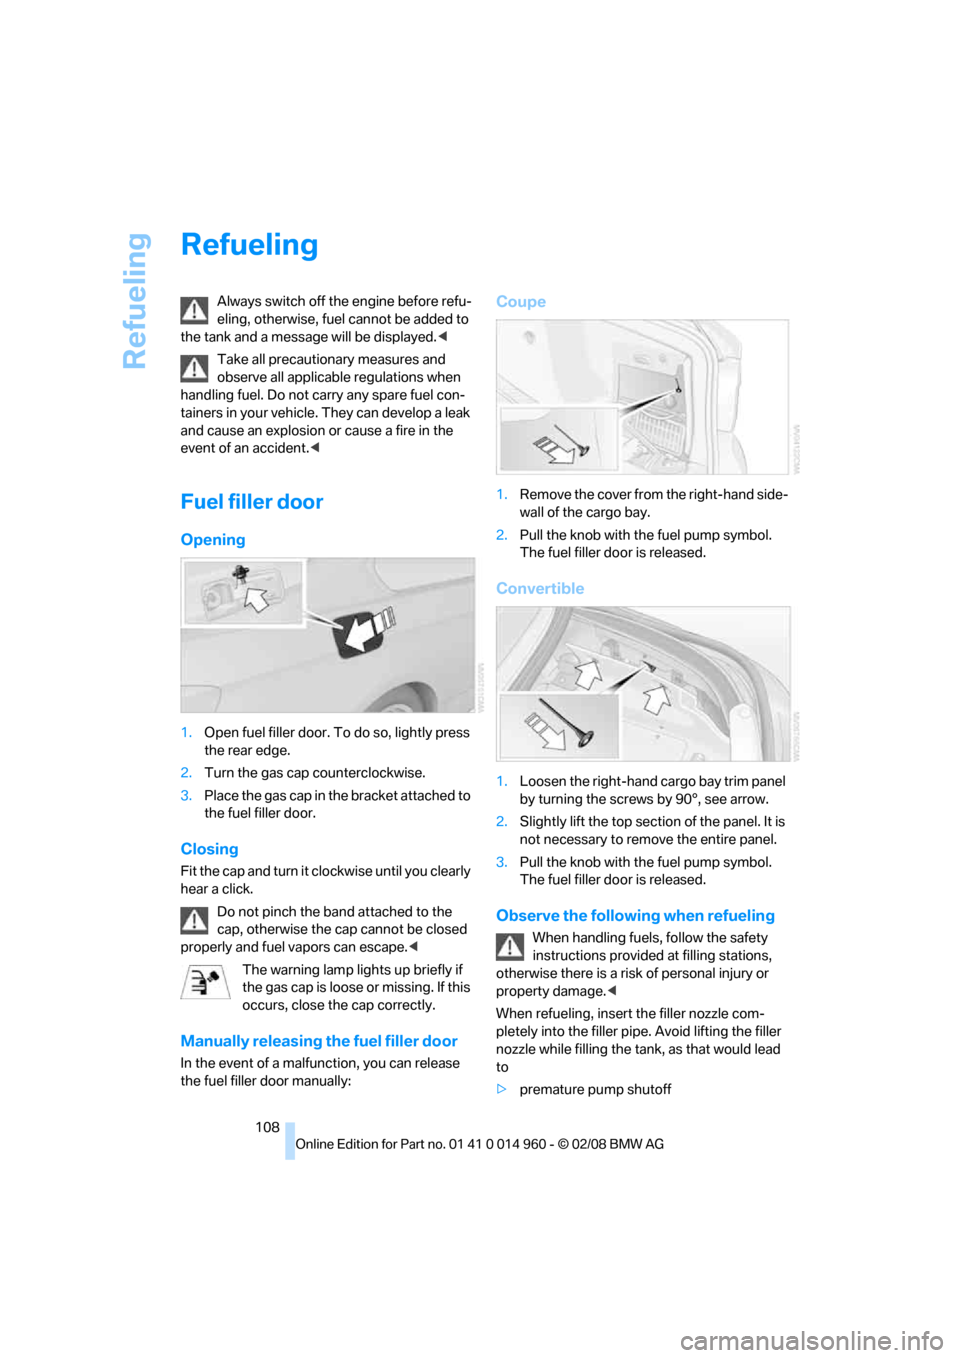
1.Open fuel filler door. To do so, lightly press
the rear edge.
2.Turn the gas cap counterclockwise.
3.Place the gas cap in the bracket attached to
the fuel filler door.
Closing
Fit the cap and turn it clockwise until you clearly
hear a click.
Do not pinch the band attached to the
cap, otherwise the cap cannot be closed
properly and fuel vapors can escape.<
The warning lamp lights up briefly if
the gas cap is loose or missing. If this
occurs, close the cap correctly.
Manually releasing the fuel filler door
In the event of a malfunction, you can release
the fuel filler door manually:
Coupe
1.Remove the cover from the right-hand side-
wall of the cargo bay.
2.Pull the knob with the fuel pump symbol.
The fuel filler door is released.
Convertible
1.Loosen the right-hand cargo bay trim panel
by turning the screws by 90°, see arrow.
2.Slightly lift the top section of the panel. It is
not necessary to remove the entire panel.
3.Pull the knob with the fuel pump symbol.
The fuel filler door is released.
Observe the following when refueling
When handling fuels, follow the safety
instructions provided at filling stations,
otherwise there is a risk of personal injury or
property damage.<
When refueling, insert the filler nozzle com-
pletely into the filler pipe. Avoid lifting the filler
nozzle while filling the tank, as that would lead
to
>premature pump shutoff
Page 131 of 172
Reference
At a glance
Controls
Driving tips
Mobility
129
3.Push the wire bracket out of the anchor
towards the right and fold it up.
4.Disconnect the plug, change the bulb and
reconnect the plug.
5.Insert the bulb.
6.Fold the wire bracket down and engage it.
7.Reattach the cover.
Turn signals, front
PY24W Silver Vision bulb, 24 watts
The turn signal bulb can be changed via a cover
in the wheel arch.
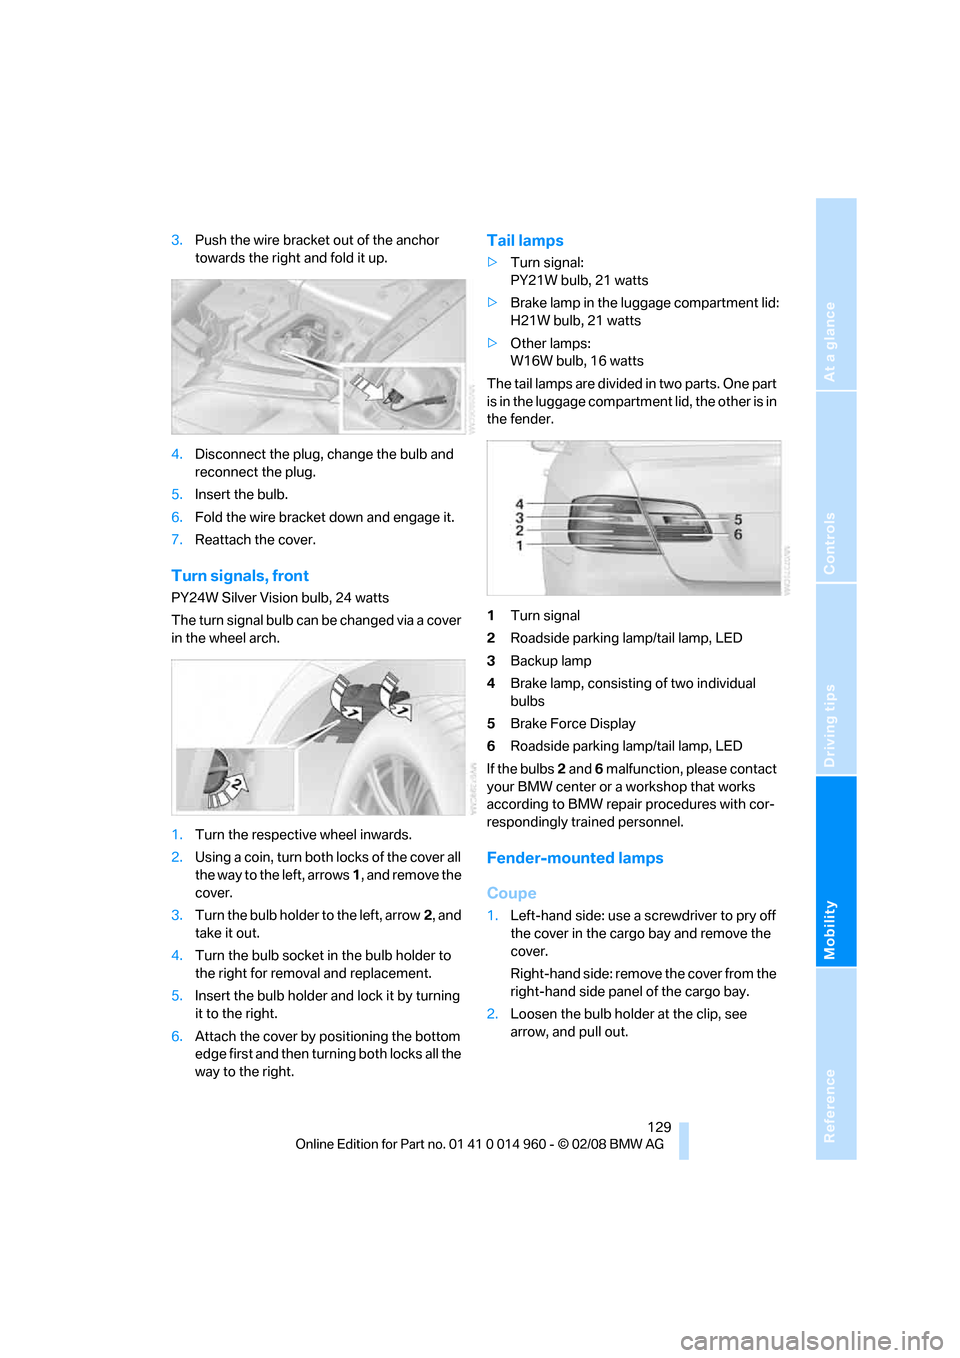
1.Turn the respective wheel inwards.
2.Using a coin, turn both locks of the cover all
the way to the left, arrows 1, and remove the
cover.
3.Turn the bulb holder to the left, arrow2, and
take it out.
4.Turn the bulb socket in the bulb holder to
the right for removal and replacement.
5.Insert the bulb holder and lock it by turning
it to the right.
6.Attach the cover by positioning the bottom
edge first and then turning both locks all the
way to the right.
Tail lamps
>Turn signal:
PY21W bulb, 21 watts
>Brake lamp in the luggage compartment lid:
H21W bulb, 21 watts
>Other lamps:
W16W bulb, 16 watts
The tail lamps are divided in two parts. One part
is in the luggage compartment lid, the other is in
the fender.
1Turn signal
2Roadside parking lamp/tail lamp, LED
3Backup lamp
4Brake lamp, consisting of two individual
bulbs
5Brake Force Display
6Roadside parking lamp/tail lamp, LED
If the bulbs 2 and 6 malfunction, please contact
your BMW center or a workshop that works
according to BMW repair procedures with cor-
respondingly trained personnel.
Fender-mounted lamps
Coupe
1.Left-hand side: use a screwdriver to pry off
the cover in the cargo bay and remove the
cover.
Right-hand side: remove the cover from the
right-hand side panel of the cargo bay.
2.Loosen the bulb holder at the clip, see
arrow, and pull out.
Page 133 of 172
Reference
At a glance
Controls
Driving tips
Mobility
131
License plate lamp, center brake lamp,
rear lamps and side turn signal
indicators
These lamps use LED technology for operation.
In the event of a malfunction, please contact
your BMW center or a workshop that works
according to BMW repair procedures with cor-
respondingly trained personnel.
Repairing a flat tire with the
M Mobility System
To repair a flat tire, your BMW M3 includes an
M Mobility System. With this system you can
apply a sealant to the inside of the tire to seal
the damaged section, restore the tire inflation
pressure and continue on your trip.
Safety measures in the event of a flat tire:
Park the vehicle as far away from moving
traffic as possible and on a firm surface. Switch
on the hazard warning flashers.
Apply the parking brake and engage first gear
or reverse. Have all occupants leave the vehicle
and move beyond the danger zone, e. g. behind
the guard rails.
If necessary, erect a warning triangle
* or warn-
ing flasher
* at a suitable distance. Adhere to
country-specific regulations.<
Preparations
The M Mobility System is located in the cargo
bay under the floor board.
If possible, leave any foreign bodies that have
penetrated the tire in place.
Instructions on how to use the M Mobility
System can also be found on the device
itself.
tle.<
Remove the label with the speed restriction
from the sealant bottle and apply it to the steer-
ing wheel.
Please note the expiry date on the sealant
bottle.<
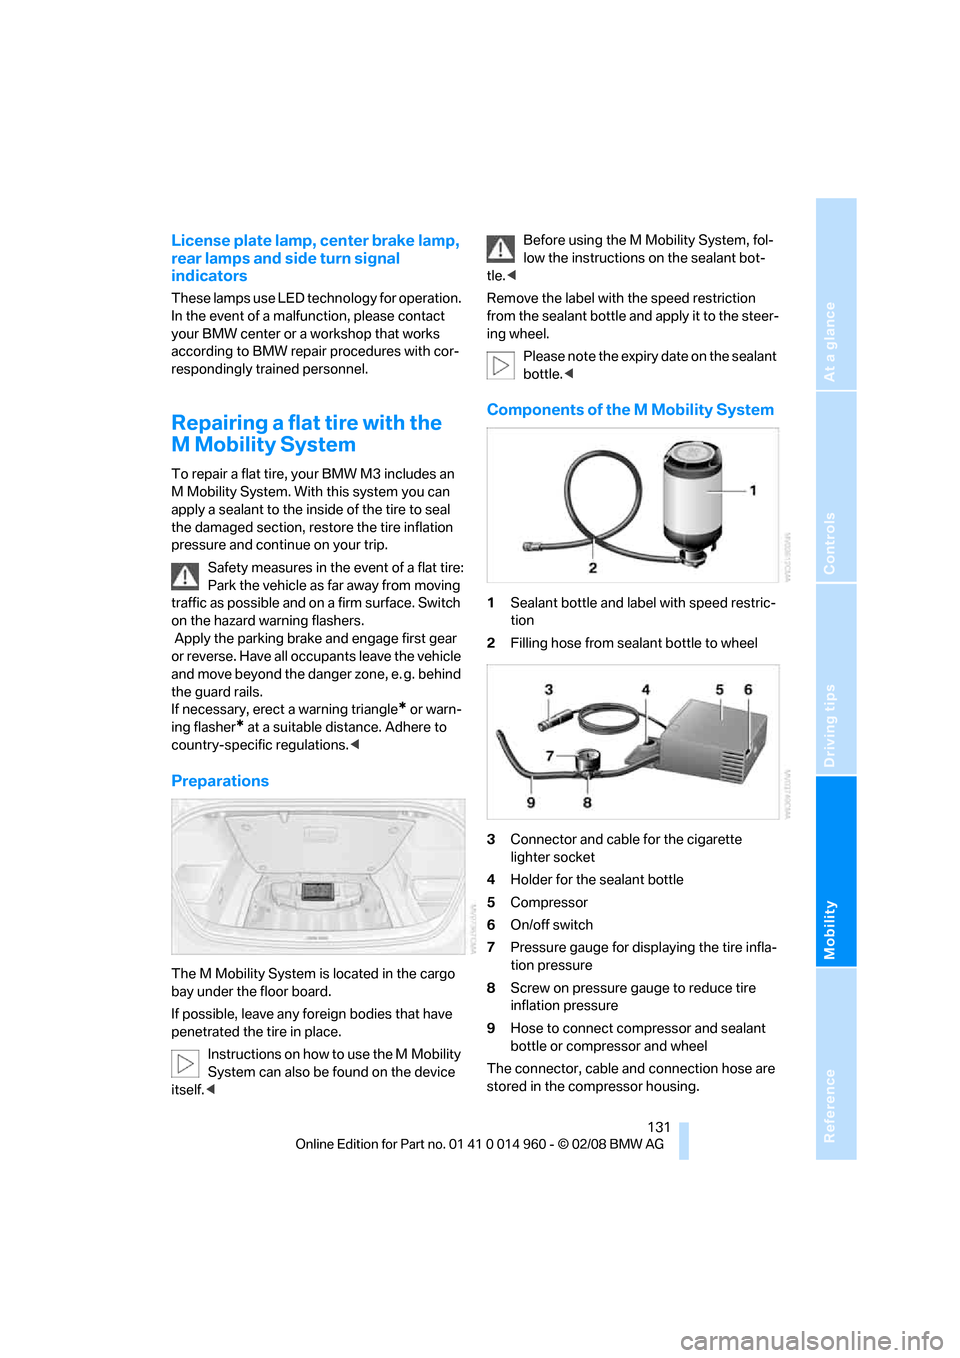
Components of the M Mobility System
1Sealant bottle and label with speed restric-
tion
2Filling hose from sealant bottle to wheel
3Connector and cable for the cigarette
lighter socket
4Holder for the sealant bottle
5Compressor
6On/off switch
7Pressure gauge for displaying the tire infla-
tion pressure
8Screw on pressure gauge to reduce tire
inflation pressure
9Hose to connect compressor and sealant
bottle or compressor and wheel
The connector, cable and connection hose are
stored in the compressor housing.
Page 137 of 172
Reference
At a glance
Controls
Driving tips
Mobility
135
Giving and receiving assistance
Emergency Request*
Conditions for an Emergency Request:
>Equipment version with full preparation
package mobile phone. This equipment
makes it possible to send an Emergency
Request even if no mobile phone is paired
with the vehicle.
>BMW Assist is activated. Activating
BMW Assist, refer to separate Owner's
Manual.
>Radio readiness is on.
>The BMW Assist system is logged on to a
mobile phone network.
>The Emergency Request system is opera-
ble.
Once your service contract for BMW Assist
expires, the BMW Assist system can be deacti-
vated by a BMW center without you having to
visit a workshop. Once the BMW Assist system
has been deactivated, Emergency Requests
are not possible. The BMW Assist system can
be reactivated by a BMW center after a new
contract has been signed.
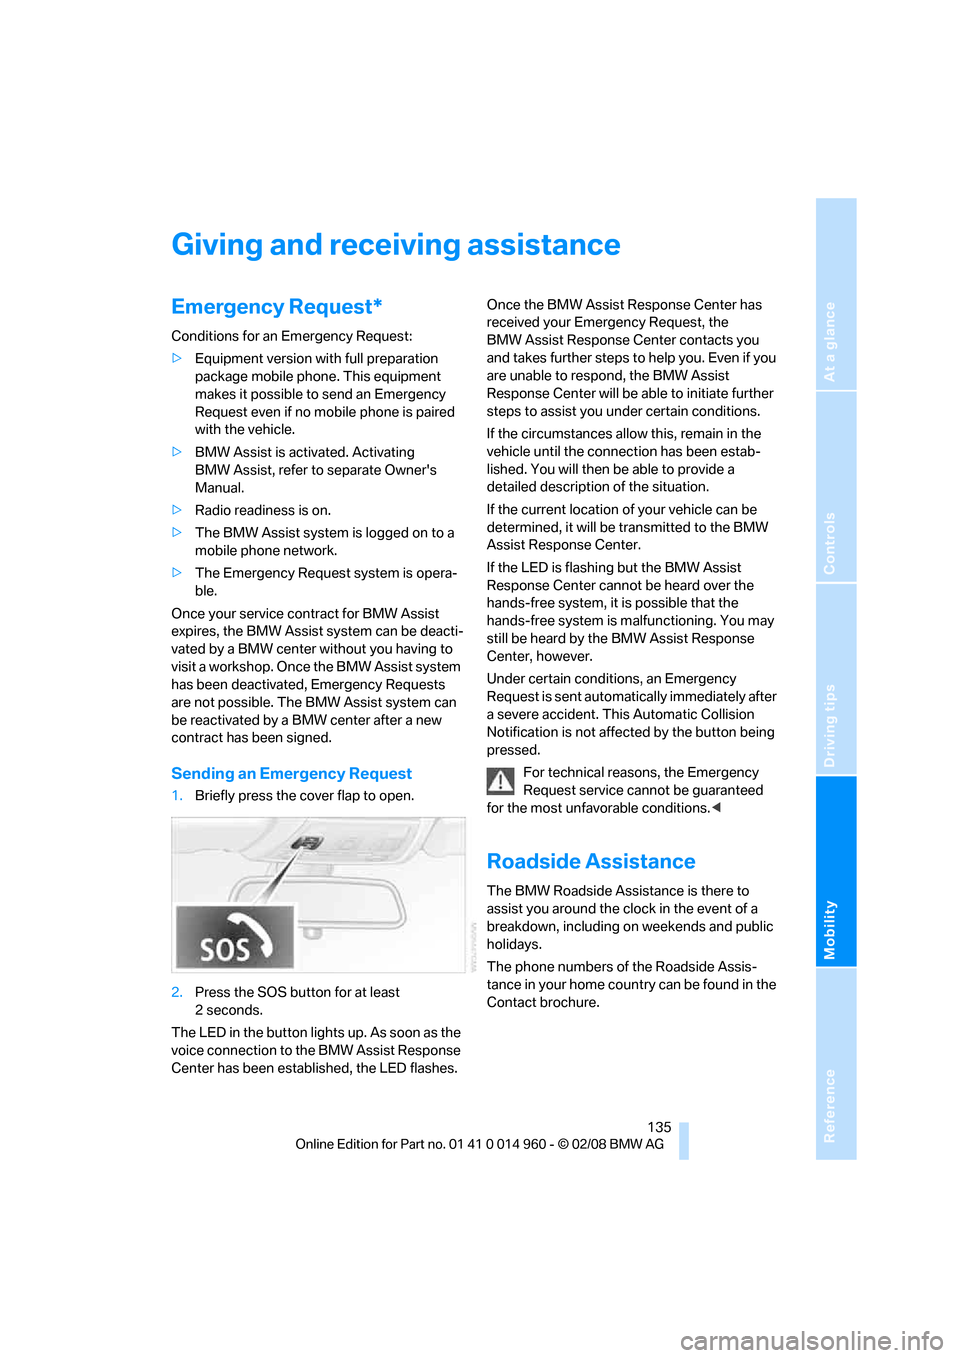
Sending an Emergency Request
1.Briefly press the cover flap to open.
2.Press the SOS button for at least
2seconds.
The LED in the button lights up. As soon as the
voice connection to the BMW Assist Response
Center has been established, the LED flashes.Once the BMW Assist Response Center has
received your Emergency Request, the
BMW Assist Response Center contacts you
and takes further steps to help you. Even if you
are unable to respond, the BMW Assist
Response Center will be able to initiate further
steps to assist you under certain conditions.
If the circumstances allow this, remain in the
vehicle until the connection has been estab-
lished. You will then be able to provide a
detailed description of the situation.
If the current location of your vehicle can be
determined, it will be transmitted to the BMW
Assist Response Center.
If the LED is flashing but the BMW Assist
Response Center cannot be heard over the
hands-free system, it is possible that the
hands-free system is malfunctioning. You may
still be heard by the BMW Assist Response
Center, however.
Under certain conditions, an Emergency
Request is sent automatically immediately after
a severe accident. This Automatic Collision
Notification is not affected by the button being
pressed.
For technical reasons, the Emergency
Request service cannot be guaranteed
for the most unfavorable conditions.<
Roadside Assistance
The BMW Roadside Assistance is there to
assist you around the clock in the event of a
breakdown, including on weekends and public
holidays.
The phone numbers of the Roadside Assis-
tance in your home country can be found in the
Contact brochure.
Page 140 of 172
Giving and receiving assistance
138
Using a tow fitting
The screw-in tow fitting must always be carried
in the car. It can be screwed in at the front or
rear of the BMW.
Coupe: it is stored in the onboard tool kit under-
neath the cover on the right-hand side of the
cargo bay, refer to page127.
Convertible: it is stored in the onboard tool kit
underneath the cargo bay floor, refer to
page127.
Use only the tow fitting provided with the
vehicle and screw it all the way in. Use the
tow fitting for towing on paved roads only. Avoid
lateral loading of the tow fitting, e.g. do not lift
the vehicle by the tow fitting. Otherwise the tow
fitting and the vehicle could be damaged.<
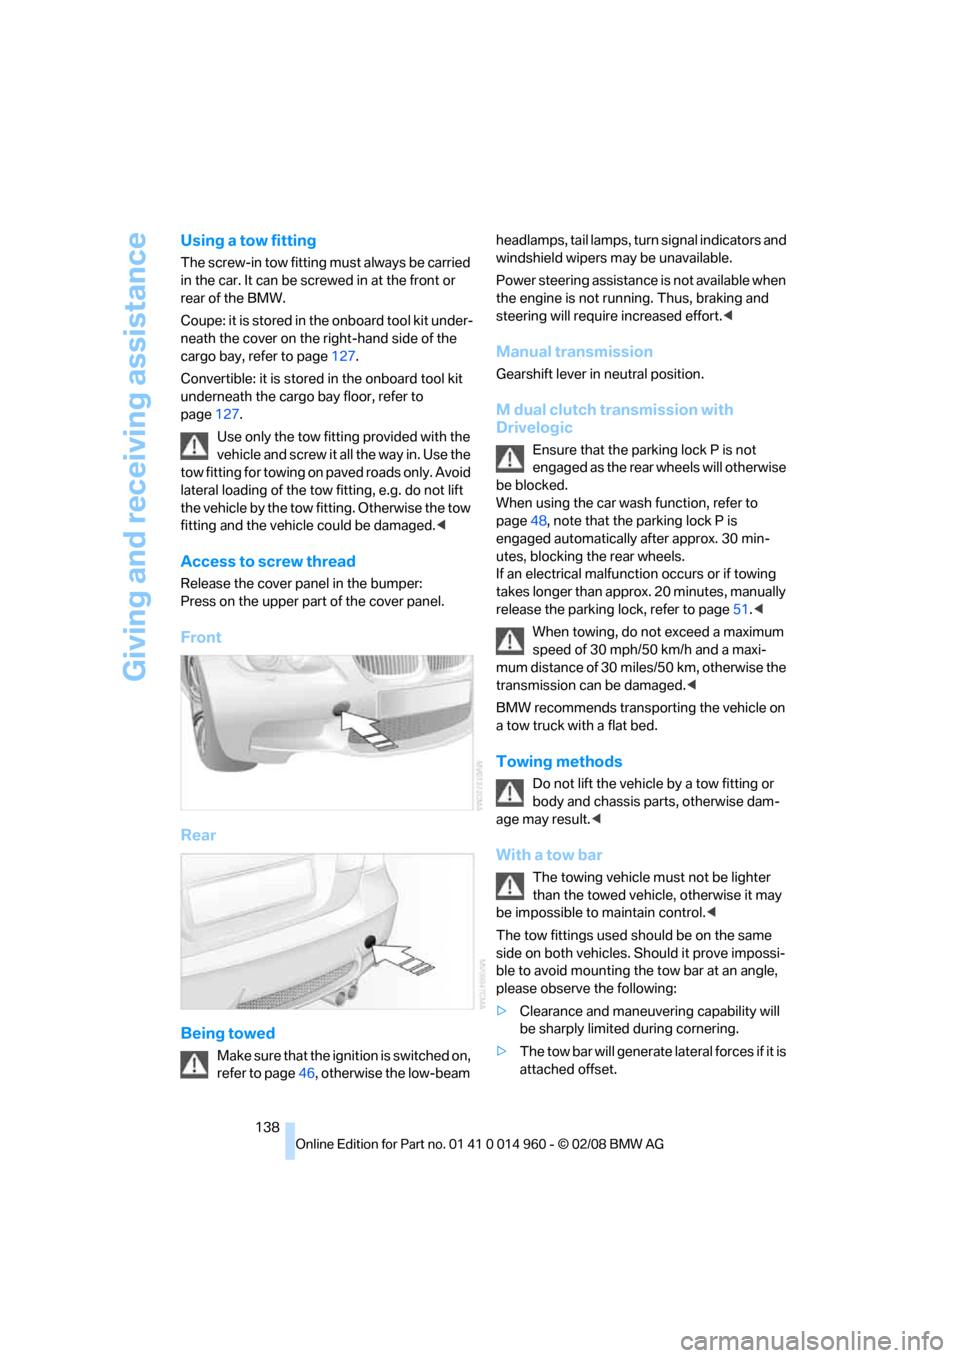
Access to screw thread
Release the cover panel in the bumper:
Press on the upper part of the cover panel.
Front
Rear
Being towed
Make sure that the ignition is switched on,
refer to page46, otherwise the low-beam headlamps, tail lamps, turn signal indicators and
windshield wipers may be unavailable.
Power steering assistance is not available when
the engine is not running. Thus, braking and
steering will require increased effort.<
Manual transmission
Gearshift lever in neutral position.
M dual clutch transmission with
Drivelogic
Ensure that the parking lock P is not
engaged as the rear wheels will otherwise
be blocked.
When using the car wash function, refer to
page48, note that the parking lock P is
engaged automatically after approx. 30 min-
utes, blocking the rear wheels.
If an electrical malfunction occurs or if towing
takes longer than approx. 20 minutes, manually
release the parking lock, refer to page51.<
When towing, do not exceed a maximum
speed of 30 mph/50 km/h and a maxi-
mum distance of 30 miles/50 km, otherwise the
transmission can be damaged.<
BMW recommends transporting the vehicle on
a tow truck with a flat bed.
Towing methods
Do not lift the vehicle by a tow fitting or
body and chassis parts, otherwise dam-
age may result.<
With a tow bar
The towing vehicle must not be lighter
than the towed vehicle, otherwise it may
be impossible to maintain control.<
The tow fittings used should be on the same
side on both vehicles. Should it prove impossi-
ble to avoid mounting the tow bar at an angle,
please observe the following:
>Clearance and maneuvering capability will
be sharply limited during cornering.
>The tow bar will generate lateral forces if it is
attached offset.
Page 143 of 172
Reference
At a glance
Controls
Driving tips
Mobility
141
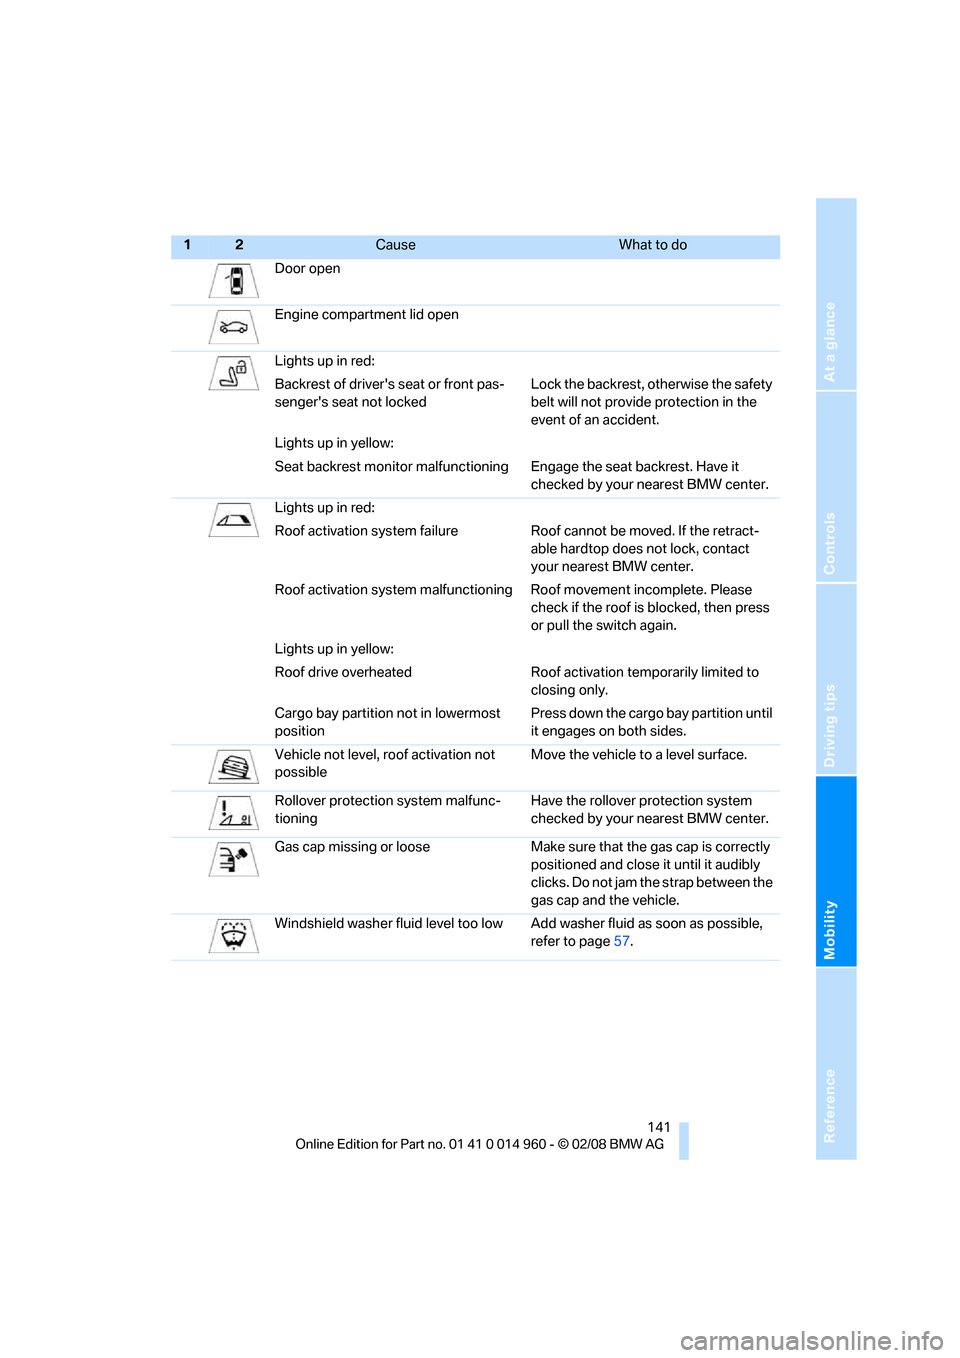
Door open
Engine compartment lid open
Lights up in red:
Backrest of driver's seat or front pas-
senger's seat not lockedLock the backrest, otherwise the safety
belt will not provide protection in the
event of an accident.
Lights up in yellow:
Seat backrest monitor malfunctioningEngage the seat backrest. Have it
checked by your nearest BMW center.
Lights up in red:
Roof activation system failure Roof cannot be moved. If the retract-
able hardtop does not lock, contact
your nearest BMW center.
Roof activation system malfunctioning Roof movement incomplete. Please
check if the roof is blocked, then press
or pull the switch again.
Lights up in yellow:
Roof drive overheated Roof activation temporarily limited to
closing only.
Cargo bay partition not in lowermost
positionPress down the cargo bay partition until
it engages on both sides.
Vehicle not level, roof activation not
possibleMove the vehicle to a level surface.
Rollover protection system malfunc-
tioningHave the rollover protection system
checked by your nearest BMW center.
Gas cap missing or loose Make sure that the gas cap is correctly
positioned and close it until it audibly
clicks. Do not jam the strap between the
gas cap and the vehicle.
Windshield washer fluid level too low Add washer fluid as soon as possible,
refer to page57.
12Cause What to do