navigation system BMW M3 COUPE 2009 E92 User Guide
[x] Cancel search | Manufacturer: BMW, Model Year: 2009, Model line: M3 COUPE, Model: BMW M3 COUPE 2009 E92Pages: 256, PDF Size: 12.03 MB
Page 41 of 256
Controls
39Reference
At a glance
Driving tips
Communications
Navigation
Entertainment
Mobility
from the cargo bay beforehand to avoid
water stains or soiling.
Do not place any objects on the retract-
able hardtop or on the luggage compart-
ment lid, otherwise they could fall during move-
ments of the retractable hardtop and cause
damage or injury.
Never move the retractable hardtop when the
rollover protection system is in the activated
position.
Driving when the hardtop is not fully opened or
closed may result in damage or injury.
Do not reach into the mechanism while the
hardtop is opening or closing. Keep children
away from the swiveling area of the retractable
hardtop.<
The retractable hardtop cannot be moved
at temperatures below + 147/–106. A
message appears on the Control Display.<
The retractable hardtop can only be
opened and closed when the vehicle is
stationary. To avoid causing damage, do not
drive off until the hardtop has stopped mov-
ing.<
Before opening and closing
>Comply with the safety precautions
described above.
>Ensure that the cargo bay partition is folded
down and engaged on both sides, refer to
page108, otherwise it will not be possible
to open the retractable hardtop.
>Do not place any objects next to or on the
cargo bay partition and close the storage
compartment on the left side of the cargo
bay.
>Do not exceed the maximum loading height
under the cargo bay partition; refer to the
label in the cargo bay showing a line indicat-
ing the maximum height.
>Ensure that the luggage compartment lid is
closed.
>The vehicle should be parked on fairly level
ground. Excessive angle is indicated by a
lamp.
Opening and closing
When the vehicle is stationary and at radio
readiness or beyond, refer to page55:
If possible, conserve the battery by only
operating the retractable hardtop when
the engine is running.
Before closing the retractable hardtop, remove
all foreign objects from the windshield frame as
these could prevent the hardtop from closing
properly.<
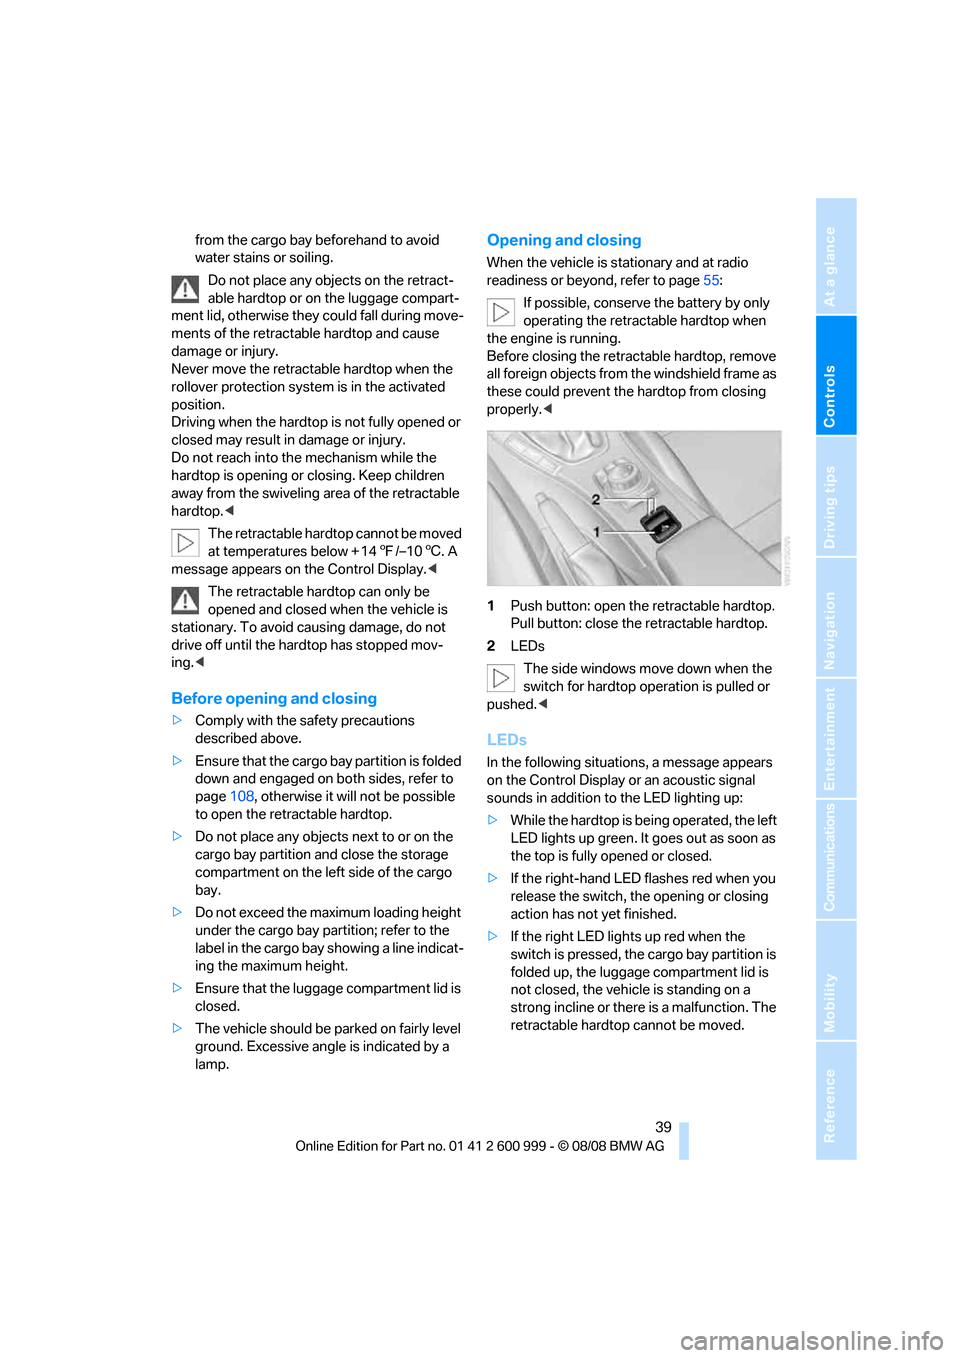
1Push button: open the retractable hardtop.
Pull button: close the retractable hardtop.
2LEDs
The side windows move down when the
switch for hardtop operation is pulled or
pushed.<
LEDs
In the following situations, a message appears
on the Control Display or an acoustic signal
sounds in addition to the LED lighting up:
>While the hardtop is being operated, the left
LED lights up green. It goes out as soon as
the top is fully opened or closed.
>If the right-hand LED flashes red when you
release the switch, the opening or closing
action has not yet finished.
>If the right LED lights up red when the
switch is pressed, the cargo bay partition is
folded up, the luggage compartment lid is
not closed, the vehicle is standing on a
strong incline or there is a malfunction. The
retractable hardtop cannot be moved.
ba8_E9293M3_cic.book Seite 39 Dienstag, 19. August 2008 12:01 12
Page 51 of 256
Controls
49Reference
At a glance
Driving tips
Communications
Navigation
Entertainment
Mobility
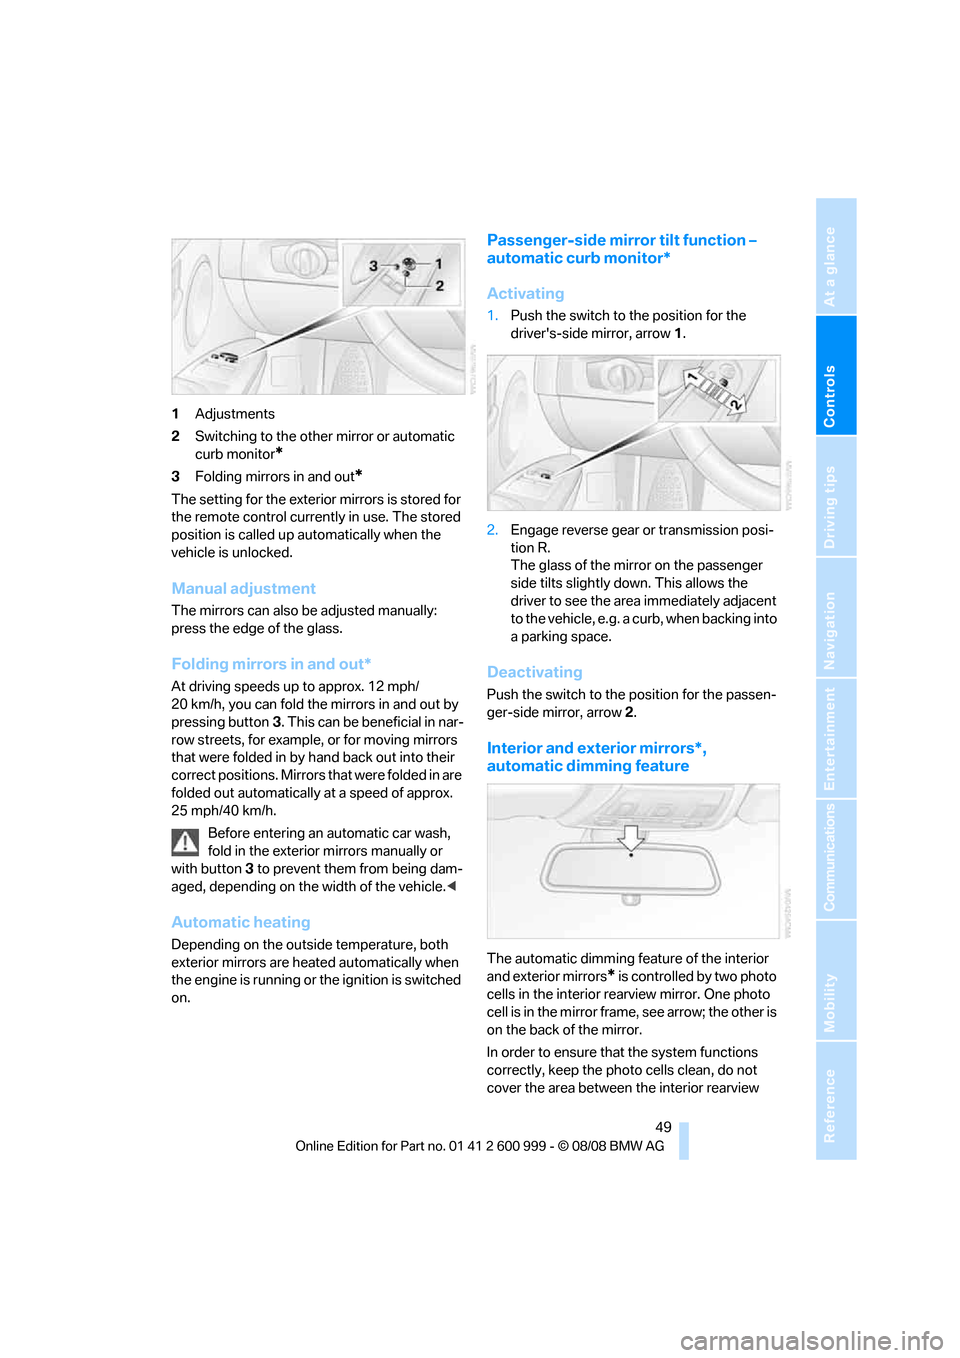
1Adjustments
2Switching to the other mirror or automatic
curb monitor
*
3Folding mirrors in and out*
The setting for the exterior mirrors is stored for
the remote control currently in use. The stored
position is called up automatically when the
vehicle is unlocked.
Manual adjustment
The mirrors can also be adjusted manually:
press the edge of the glass.
Folding mirrors in and out*
At driving speeds up to approx. 12 mph/
20 km/h, you can fold the mirrors in and out by
pressing button3. This can be beneficial in nar-
row streets, for example, or for moving mirrors
that were folded in by hand back out into their
correct positions. Mirrors that were folded in are
folded out automatically at a speed of approx.
25 mph/40 km/h.
Before entering an automatic car wash,
fold in the exterior mirrors manually or
with button3 to prevent them from being dam-
aged, depending on the width of the vehicle.<
Automatic heating
Depending on the outside temperature, both
exterior mirrors are heated automatically when
the engine is running or the ignition is switched
on.
Passenger-side mirror tilt function –
automatic curb monitor*
Activating
1.Push the switch to the position for the
driver's-side mirror, arrow 1.
2.Engage reverse gear or transmission posi-
tion R.
The glass of the mirror on the passenger
side tilts slightly down. This allows the
driver to see the area immediately adjacent
to the vehicle, e.g. a curb, when backing into
a parking space.
Deactivating
Push the switch to the position for the passen-
ger-side mirror, arrow 2.
Interior and exterior mirrors*,
automatic dimming feature
The automatic dimming feature of the interior
and exterior mirrors
* is controlled by two photo
cells in the interior rearview mirror. One photo
cell is in the mirror frame, see arrow; the other is
on the back of the mirror.
In order to ensure that the system functions
correctly, keep the photo cells clean, do not
cover the area between the interior rearview
ba8_E9293M3_cic.book Seite 49 Dienstag, 19. August 2008 12:01 12
Page 53 of 256
Controls
51Reference
At a glance
Driving tips
Communications
Navigation
Entertainment
Mobility
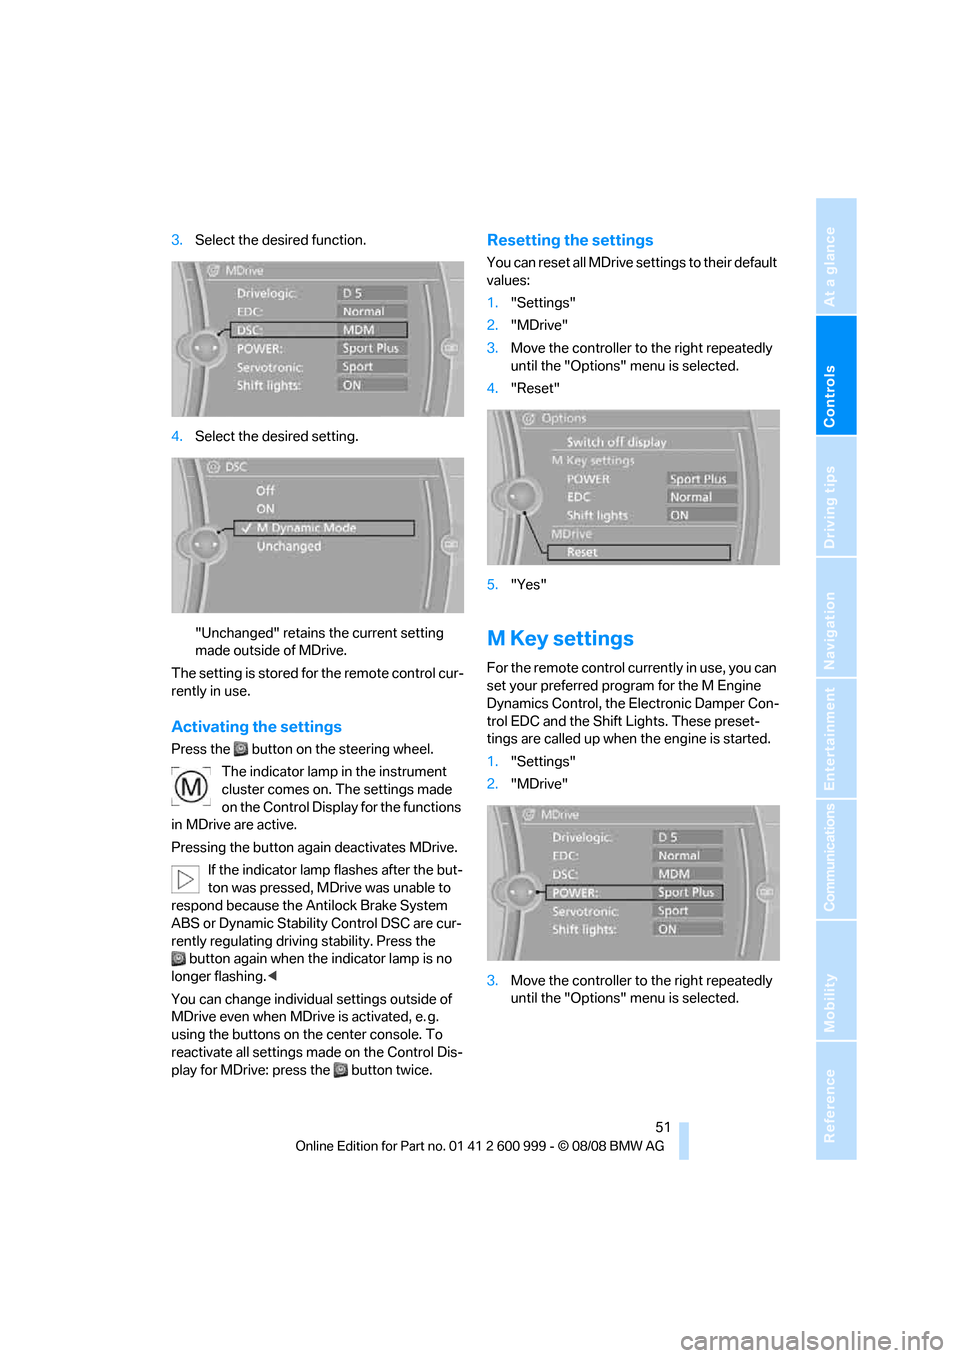
3.Select the desired function.
4.Select the desired setting.
"Unchanged" retains the current setting
made outside of MDrive.
The setting is stored for the remote control cur-
rently in use.
Activating the settings
Press the button on the steering wheel.
The indicator lamp in the instrument
cluster comes on. The settings made
on the Control Display for the functions
in MDrive are active.
Pressing the button again deactivates MDrive.
If the indicator lamp flashes after the but-
ton was pressed, MDrive was unable to
respond because the Antilock Brake System
ABS or Dynamic Stability Control DSC are cur-
rently regulating driving stability. Press the
button again when the indicator lamp is no
longer flashing.<
You can change individual settings outside of
MDrive even when MDrive is activated, e. g.
using the buttons on the center console. To
reactivate all settings made on the Control Dis-
play for MDrive: press the button twice.
Resetting the settings
You can reset all MDrive settings to their default
values:
1."Settings"
2."MDrive"
3.Move the controller to the right repeatedly
until the "Options" menu is selected.
4."Reset"
5."Yes"
M Key settings
For the remote control currently in use, you can
set your preferred program for the M Engine
Dynamics Control, the Electronic Damper Con-
trol EDC and the Shift Lights. These preset-
tings are called up when the engine is started.
1."Settings"
2."MDrive"
3.Move the controller to the right repeatedly
until the "Options" menu is selected.
ba8_E9293M3_cic.book Seite 51 Dienstag, 19. August 2008 12:01 12
Page 55 of 256
Controls
53Reference
At a glance
Driving tips
Communications
Navigation
Entertainment
Mobility
Transporting children safely
The right place for children
Do not leave children unattended in the
vehicle, otherwise they could endanger
themselves and/or other persons by opening
the doors, for example.<
Children always in the rear
Accident research has shown that the safest
place for children is on the rear seat.
Children under the age of 13 or smaller
than 5 ft/150 cm may be transported only
in the rear in suitable child-restraint systems
appropriate for their age, weight and size. Oth-
erwise there is an increased risk of injury in the
event of an accident.<
Children 13 years of age or older must be buck-
led in with a safety belt as soon as there no
longer is any child-restraint system that is
appropriate for their age, size and weight.
Exception for front passenger seat
Should it be necessary to use a child-
restraint system on the front passenger
seat, the front and side airbags for the front pas-
senger must be deactivated. Otherwise, a child
traveling on that seat will face a significant risk
of injury if the airbags are triggered off, even
with a child-restraint system.<
For more information on automatic deactivation
of the front passenger airbags refer to page89.
Installing child-restraint
systems
Observe the child-restraint system man-
ufacturer's instructions when selecting,
installing and using child-restraint systems.
Otherwise the protective effect may be dimin-
ished.<
Standard child-restraint systems are designed
to be secured with a lap belt or with the lap-belt
section of a lap-and-shoulder belt. Incorrectly or improperly installed child-restraint systems
can increase the risk of injury to children.
Always follow the installation instructions for
the system with the greatest care.
On the front passenger seat
After installing a child-restraint system on
the front passenger seat, make sure that
the front and side airbags for the front passen-
ger are deactivated, otherwise there is an
increased risk of injury if the airbags deploy.<
Backrest width*
The backrest width of the front passen-
ger's seat must be at its widest possible
setting. Do not change the setting after install-
ing the child seat. Otherwise the child seat's
stability on the front passenger's seat is lim-
ited.<
1.Adjust the backrest width to its widest set-
ting, refer to page44.
2.Install the child seat.
Child seat security
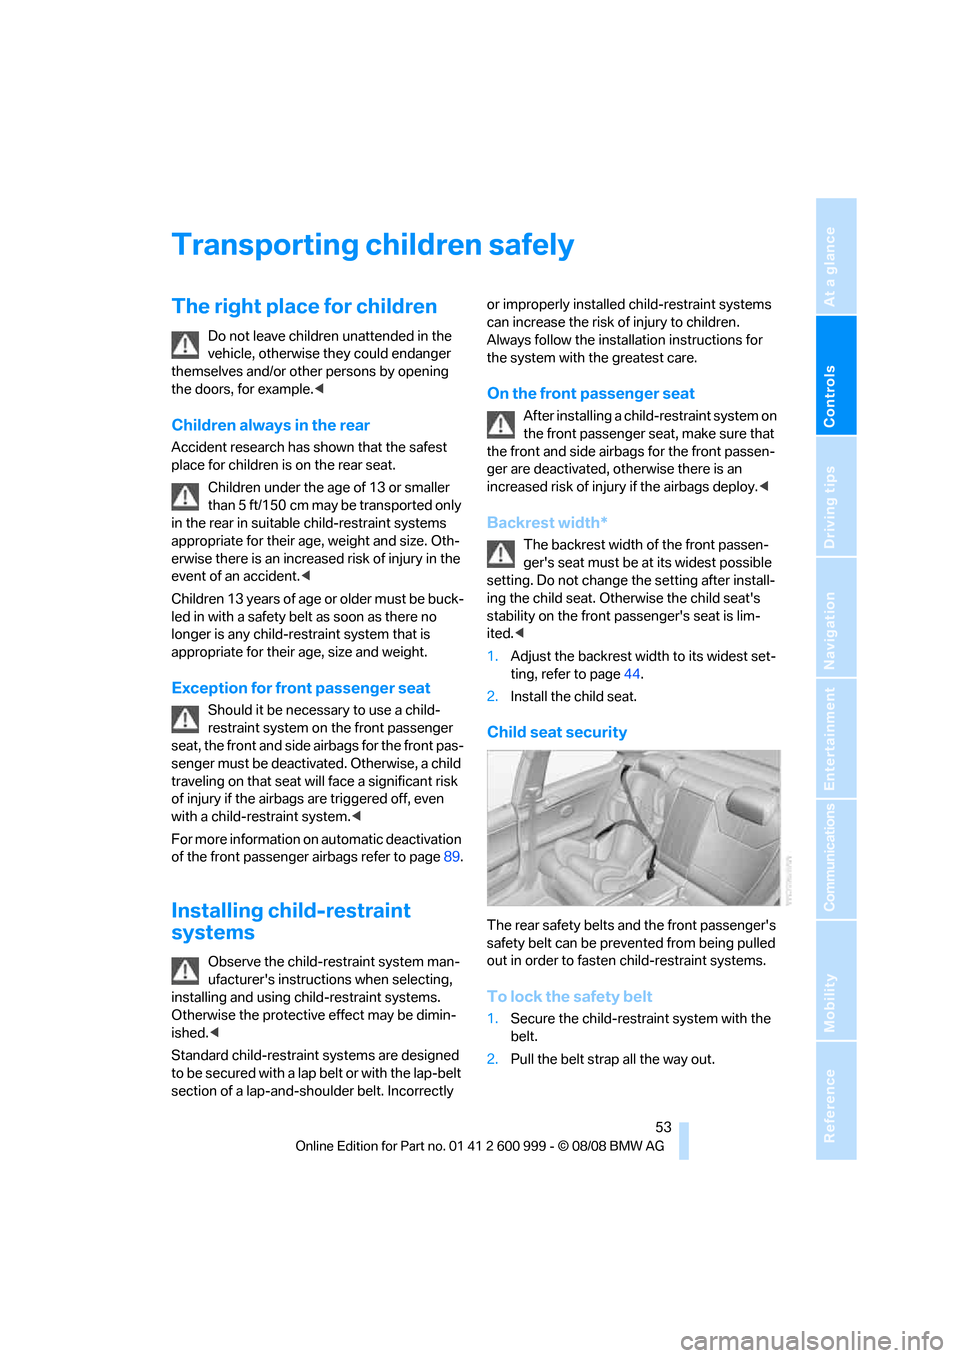
The rear safety belts and the front passenger's
safety belt can be prevented from being pulled
out in order to fasten child-restraint systems.
To lock the safety belt
1.Secure the child-restraint system with the
belt.
2.Pull the belt strap all the way out.
ba8_E9293M3_cic.book Seite 53 Dienstag, 19. August 2008 12:01 12
Page 61 of 256
Controls
59Reference
At a glance
Driving tips
Communications
Navigation
Entertainment
Mobility
>Β: middle position
>N: neutral
>+: shift up manually
>–: shift down manually
>D/S: change between drive mode and
sequential mode
Push or pull the selector lever in the required
direction to engage the desired transmission
position.
When you release the selector lever, it returns
to its center position. The selector lever locks in
position R.
The transmission position currently engaged is
indicated in the instrument cluster and by LEDs
on the selector lever.
Shiftlock
When the vehicle is stationary, press the brake
pedal before shifting out of N, otherwise the
desired gear will not be engaged.
R Reverse
Select this only when the vehicle is stationary.
N Neutral
If the driving situation demands, e.g. when
downshifting on a slippery road, the M dual
clutch transmission automatically disengages
and engages the clutch.
N engages when you open the driver's
door while the engine is running, your
safety belt is not fastened and you activate nei-
ther the brake pedal nor the accelerator. To
drive off after closing the driver's door and fas-
tening your safety belt, move the selector lever
to position N first and then to the desired drive
position.<
N remains engaged even after the engine
is switched off if you leave the remote
control in the ignition lock. This function can be
used in an automatic car wash, for example,
refer to page57.<
S sequential mode
Shift up or down using the shift paddles or the
selector lever. You do not need to lift your foot
off the accelerator when doing so.
Shift from sequential mode to drive mode:
press the selector lever to the right in the D/S
direction.
Shift back to sequential mode: shift using the
shift paddles or the selector lever, or press the
selector level to the right in the D/S direction
again.
On a level road, you can drive off in second gear,
e.g. on slippery roads.
The M dual clutch transmission assists you in
the following situations:
>Upshifts and downshifts are executed only
when they will result in a plausible combina-
tion of engine and vehicle speed; thus, for
example, a downshift that would cause the
engine to overrev will not be executed by
the system.
>When the vehicle stops, the transmission
automatically shifts down to first gear.
>Shortly before the vehicle slows down to
below the minimum speed of the gear cur-
rently engaged, the transmission automati-
cally shifts down without requiring your
intervention.
Rapid downshifting: in sequential mode, you
can skip several gears to achieve optimal accel-
eration. To do so, press the accelerator past the
resistance point and pull the left shift paddle
once or press the selector lever forward once.
D drive mode
In drive mode, all forward gears are shifted auto-
matically.
Shift from drive mode to sequential mode: shift
using the shift paddles or the selector lever, or
press the selector level to the right in the D/S
direction.
Shift back to drive mode: press the selector
lever to the right in the D/S direction again.
Kick-down: to accelerate rapidly, e.g. when
passing, press the accelerator down past the
ba8_E9293M3_cic.book Seite 59 Dienstag, 19. August 2008 12:01 12
Page 67 of 256
Controls
65Reference
At a glance
Driving tips
Communications
Navigation
Entertainment
Mobility
3."Triple turn signal"
Triple turn signal activation is activated and
is stored for the remote control currently in use.
Wiper system
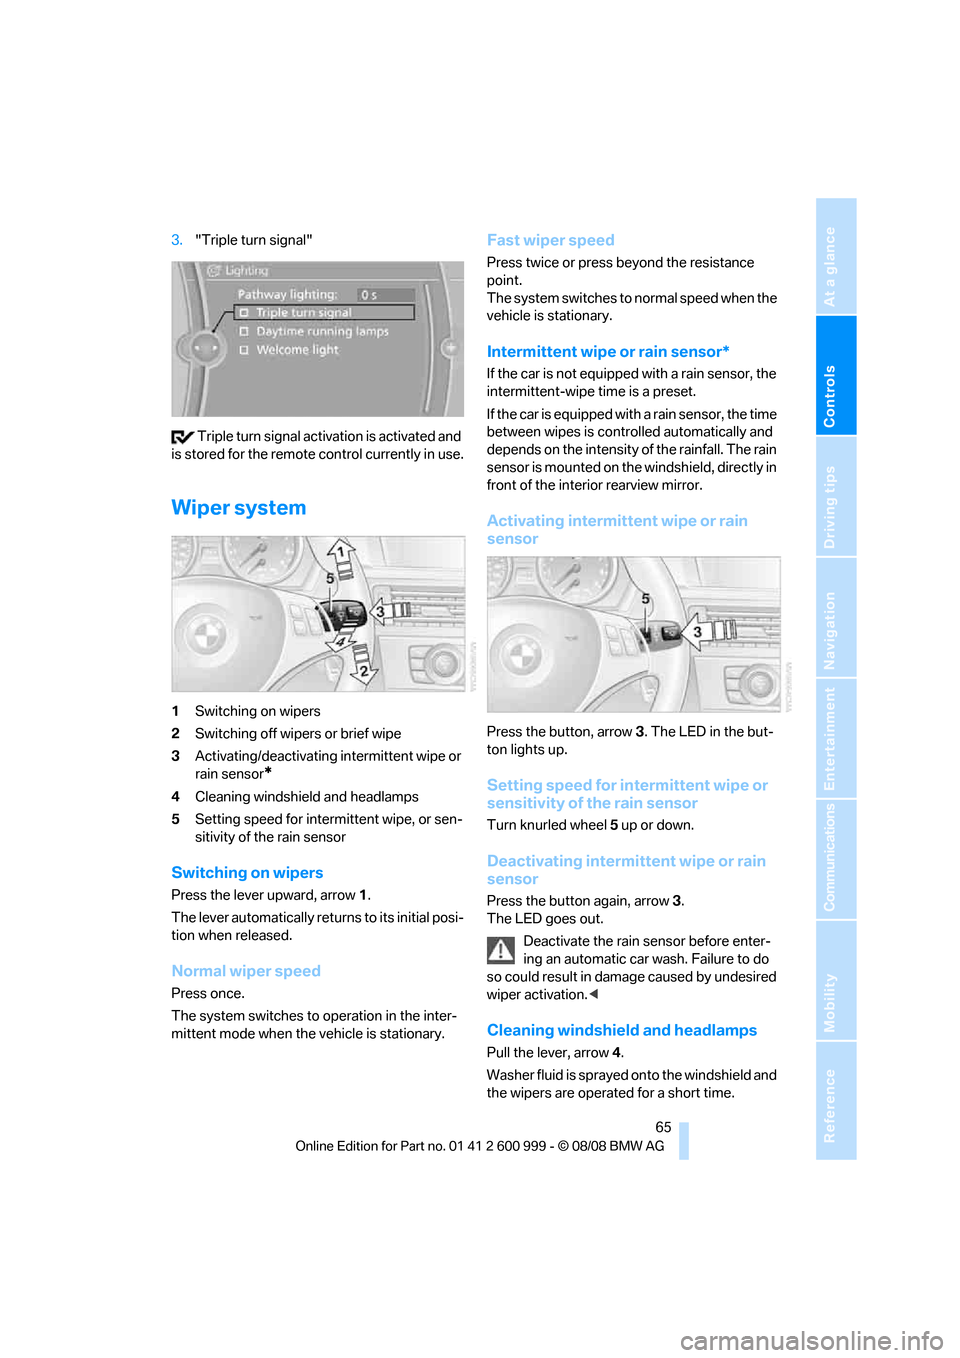
1Switching on wipers
2Switching off wipers or brief wipe
3Activating/deactivating intermittent wipe or
rain sensor
*
4Cleaning windshield and headlamps
5Setting speed for intermittent wipe, or sen-
sitivity of the rain sensor
Switching on wipers
Press the lever upward, arrow 1.
The lever automatically returns to its initial posi-
tion when released.
Normal wiper speed
Press once.
The system switches to operation in the inter-
mittent mode when the vehicle is stationary.
Fast wiper speed
Press twice or press beyond the resistance
point.
The system switches to normal speed when the
vehicle is stationary.
Intermittent wipe or rain sensor*
If the car is not equipped with a rain sensor, the
intermittent-wipe time is a preset.
If the car is equipped with a rain sensor, the time
between wipes is controlled automatically and
depends on the intensity of the rainfall. The rain
sensor is mounted on the windshield, directly in
front of the interior rearview mirror.
Activating intermittent wipe or rain
sensor
Press the button, arrow3. The LED in the but-
ton lights up.
Setting speed for intermittent wipe or
sensitivity of the rain sensor
Turn knurled wheel5 up or down.
Deactivating intermittent wipe or rain
sensor
Press the button again, arrow3.
The LED goes out.
Deactivate the rain sensor before enter-
ing an automatic car wash. Failure to do
so could result in damage caused by undesired
wiper activation.<
Cleaning windshield and headlamps
Pull the lever, arrow 4.
Washer fluid is sprayed onto the windshield and
the wipers are operated for a short time.
ba8_E9293M3_cic.book Seite 65 Dienstag, 19. August 2008 12:01 12
Page 69 of 256
Controls
67Reference
At a glance
Driving tips
Communications
Navigation
Entertainment
Mobility
On uphill gradients, it may prove impossible to
maintain the set speed if current engine power
output is insufficient. If engine braking power is
insufficient on a downhill grade, the stored
speed may be exceeded.
Increasing desired speed
Repeatedly press the lever to the resistance
point or beyond, arrow1, until the desired
speed is reached.
>Each time the lever is pressed lightly to the
resistance point, the desired speed is
increased by approx. 1 mph or 1 km/h.
>Each time the lever is pressed beyond the
resistance point, the desired speed is
increased by up to 5 mph or 10 km/h.
The system stores and maintains the speed.
Accelerating using the lever
Accelerate slightly, increase speed steadily:
Press the lever to the resistance point, arrow 1,
until the desired speed is reached.
Accelerate strongly, increase speed in intervals
of 10:
Press the lever beyond the resistance point,
arrow 1, until the desired speed is reached.
The vehicle accelerates without pressure on
the accelerator pedal. The system stores and
maintains the speed.
Decreasing speed
Repeatedly pull the lever to the resistance point
or beyond, arrow 2, until the desired speed is
displayed.
>Each time the lever is pulled to the resis-
tance point, the desired speed is decreased
by approx. 1 mph or 1 km/h.
>Each time the lever is pulled beyond the
resistance point, the desired speed is
re duc e d by up to 5 mph or 10 k m/h until the
minimum speed of 20 mph or 30 km/h is
achieved.
The system stores and maintains the speed.
Deactivating cruise control
Tap the lever upwards or downwards, arrow3.
The displays on the speedometer disappear.
In addition, the system is automatically deacti-
vated:
>When you brake the vehicle
>When you shift or depress the clutch
>When you deactivate DSC
>When DSC or ABS is intervening
Cruise control is not deactivated by depressing
the accelerator pedal. Once the accelerator
pedal is released, the stored speed is achieved
again and maintained.
Resuming a speed stored beforehand
Press the button, arrow4.
The stored speed is resumed and maintained.
When the ignition is switched off, the stored
speed value is cleared and can no longer be
called up.
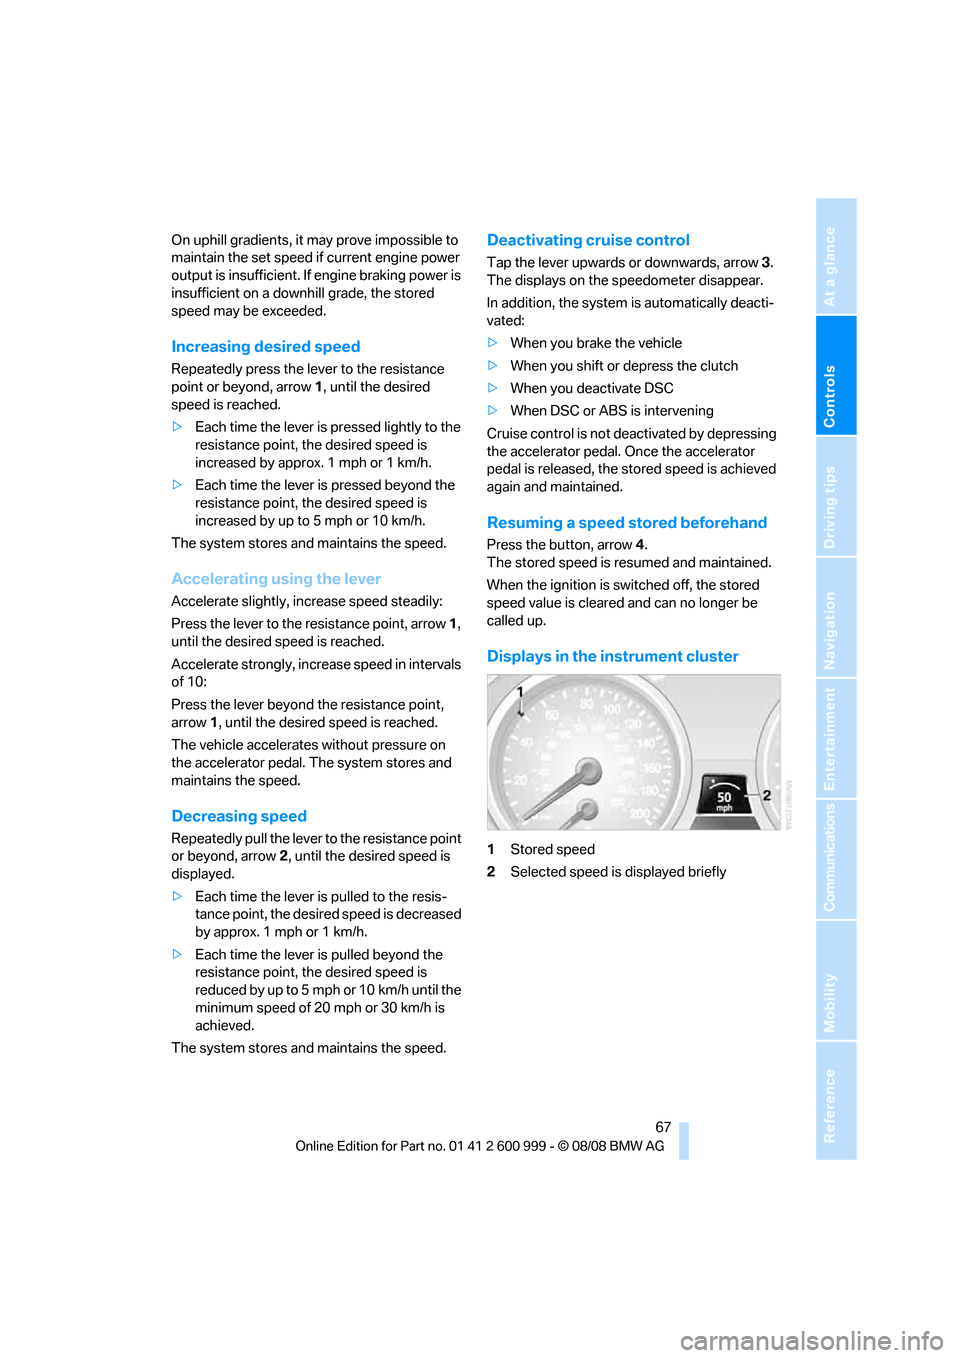
Displays in the instrument cluster
1Stored speed
2Selected speed is displayed briefly
ba8_E9293M3_cic.book Seite 67 Dienstag, 19. August 2008 12:01 12
Page 77 of 256
Controls
75Reference
At a glance
Driving tips
Communications
Navigation
Entertainment
Mobility
symbol appears in the display, accompa-
nied by the time and the word "SET".
2.Press button 2.
3.Use button 1 to set the hours.
4.Press button 2 to confirm the entry.
5.Use button 1 to set the minutes.
6.Press button 2 to confirm the entry.
7.Press button 2.
The system accepts the new time.
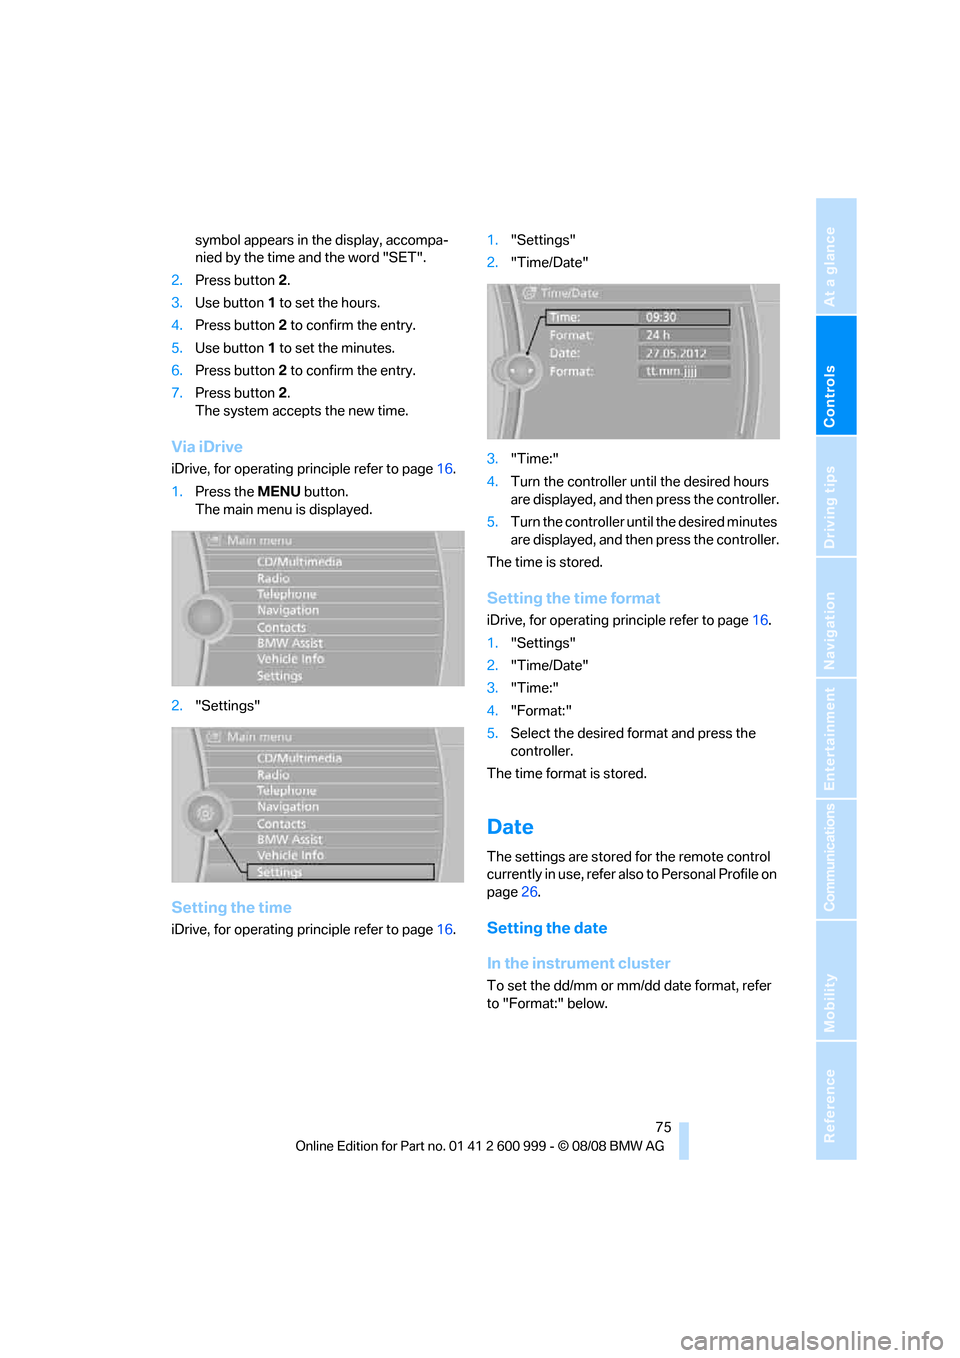
Via iDrive
iDrive, for operating principle refer to page16.
1.Press the MENU button.
The main menu is displayed.
2."Settings"
Setting the time
iDrive, for operating principle refer to page16.1."Settings"
2."Time/Date"
3."Time:"
4.Turn the controller until the desired hours
are displayed, and then press the controller.
5.Turn the controller until the desired minutes
are displayed, and then press the controller.
The time is stored.
Setting the time format
iDrive, for operating principle refer to page16.
1."Settings"
2."Time/Date"
3."Time:"
4."Format:"
5.Select the desired format and press the
controller.
The time format is stored.
Date
The settings are stored for the remote control
currently in use, refer also to Personal Profile on
page26.
Setting the date
In the instrument cluster
To set the dd/mm or mm/dd date format, refer
to "Format:" below.
ba8_E9293M3_cic.book Seite 75 Dienstag, 19. August 2008 12:01 12
Page 83 of 256
Controls
81Reference
At a glance
Driving tips
Communications
Navigation
Entertainment
Mobility
Technology for driving comfort and safety
Park Distance Control PDC*
The concept
The PDC assists you with maneuvering in tight
parking spaces. Acoustic signals and a visual
indicator
warn you of the presence of an object
behind your vehicle. To measure the distance,
there are four ultrasonic sensors in the
bumpers.
These sensors have a range of approx. 6.5 ft/
2 m. However, an acoustic warning does not
sound until an object is approx. 24 in/60 cm
from the corner sensors, or approx. 5 ft/1.50 m
from the center sensors.
PDC is a parking aid that can indicate
objects when they are approached
slowly, as is usually the case when parking.
Avoid approaching an objec t a t h i g h s p e e d , o t h -
erwise physical circumstances may lead to the
system warning being issued too late.<
Switching on automatically
With the engine running or the ignition switched
on, the system is activated after approx. 1 sec-
ond when you engage reverse gear. Wait this
short period before driving.
Switching off automatically
After approx. 165 ft/50 m of driving or over
approx. 20 mph/30 km/h, the system switches
off and the LED goes out.
Signal tones
When nearing an object, its position is indicated
correspondingly by an interval tone. As the dis-
tance between vehicle and object decreases,
the intervals between the tones become
shorter. If the distance to the nearest object
falls to below roughly 1 ft/30 cm, then a contin-
uous tone sounds.
An interval tone is interrupted after approx.
3seconds>i f y o u s t o p i n f r o n t o f a n o b j e c t t h a t h a s b e e n
detected by only one of the corner sensors
>if you are driving parallel to a wall.
Malfunction
The indicator lamp in the instrument
cluster comes on. PDC is malfunc-
tioning. A message appears on the
Control Display. Have the system checked.
To avoid this problem, keep the sensors clean
and free of ice or snow in order to ensure that
they will continue to operate effectively. When
using a high-pressure cleaner, do not spray the
sensors for extended periods of time and only
from a distance of at least 4 in/10 cm.
PDC with visual warning
The approach of the vehicle to an object is
shown on the Control Display. Objects that are
farther away are displayed on the Control Dis-
play before a signal tone sounds. The display
appears on the Control Display as soon as PDC
is activated.
System limitations
Even with PDC, final responsibility for
estimating the distance between the
vehicle and any obstructions always remains
with the driver. Even when sensors are pro-
vided, there is a blind spot in which objects can
no longer be detected. The system is also sub-
ject to the physical limits that apply to all forms
of ultrasonic measurement, such as those
encountered with trailer towbars and hitches,
thin or wedge-shaped objects, etc. Low objects
that have already been displayed, e. g. curbs,
can disappear again from the detection area of
the sensors before or after a continuous tone
sounds. Higher, protruding objects, e.g. ledges,
cannot be detected. Loud sound sources out-
side or inside the car can drown out the PDC
signal. Therefore, always drive cautiously, oth-
erwise there is a risk of personal injury or prop-
erty damage.<
ba8_E9293M3_cic.book Seite 81 Dienstag, 19. August 2008 12:01 12
Page 87 of 256
Controls
85Reference
At a glance
Driving tips
Communications
Navigation
Entertainment
Mobility
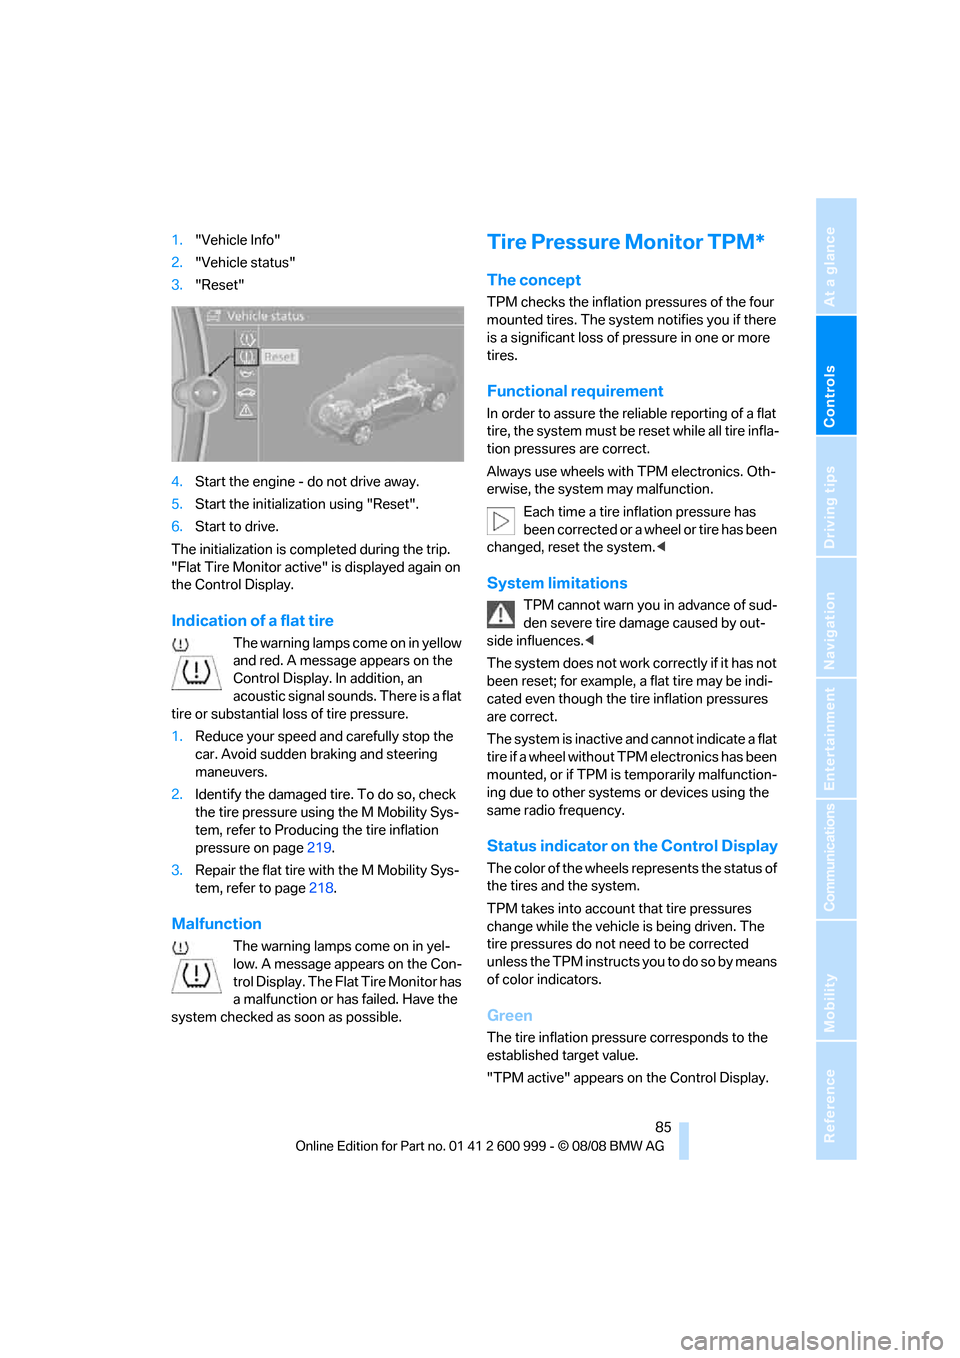
1."Vehicle Info"
2."Vehicle status"
3."Reset"
4.Start the engine - do not drive away.
5.Start the initialization using "Reset".
6.Start to drive.
The initialization is completed during the trip.
"Flat Tire Monitor active" is displayed again on
the Control Display.
Indication of a flat tire
The warning lamps come on in yellow
and red. A message appears on the
Control Display. In addition, an
acoustic signal sounds. There is a flat
tire or substantial loss of tire pressure.
1.Reduce your speed and carefully stop the
car. Avoid sudden braking and steering
maneuvers.
2.Identify the damaged tire. To do so, check
the tire pressure using the M Mobility Sys-
tem, refer to Producing the tire inflation
pressure on page219.
3.Repair the flat tire with the M Mobility Sys-
tem, refer to page218.
Malfunction
The warning lamps come on in yel-
low. A message appears on the Con-
t r o l D i s p l a y . T h e F l a t T i r e M o n i t o r h a s
a malfunction or has failed. Have the
system checked as soon as possible.
Tire Pressure Monitor TPM*
The concept
TPM checks the inflation pressures of the four
mounted tires. The system notifies you if there
is a significant loss of pressure in one or more
tires.
Functional requirement
In order to assure the reliable reporting of a flat
tire, the system must be reset while all tire infla-
tion pressures are correct.
Always use wheels with TPM electronics. Oth-
erwise, the system may malfunction.
Each time a tire inflation pressure has
been corrected or a wheel or tire has been
changed, reset the system.<
System limitations
TPM cannot warn you in advance of sud-
den severe tire damage caused by out-
side influences.<
The system does not work correctly if it has not
been reset; for example, a flat tire may be indi-
cated even though the tire inflation pressures
are correct.
The system is inactive and cannot indicate a flat
tire if a wheel without TPM electronics has been
mounted, or if TPM is temporarily malfunction-
ing due to other systems or devices using the
same radio frequency.
Status indicator on the Control Display
The color of the wheels represents the status of
the tires and the system.
TPM takes into account that tire pressures
change while the vehicle is being driven. The
tire pressures do not need to be corrected
unless the TPM instructs you to do so by means
of color indicators.
Green
The tire inflation pressure corresponds to the
established target value.
"TPM active" appears on the Control Display.
ba8_E9293M3_cic.book Seite 85 Dienstag, 19. August 2008 12:01 12