warning light BMW M3 COUPE 2013 E92 Owner's Manual
[x] Cancel search | Manufacturer: BMW, Model Year: 2013, Model line: M3 COUPE, Model: BMW M3 COUPE 2013 E92Pages: 311, PDF Size: 6.89 MB
Page 20 of 311
15
Dashboard
At a glance
Indicator and warning lamps
The concept
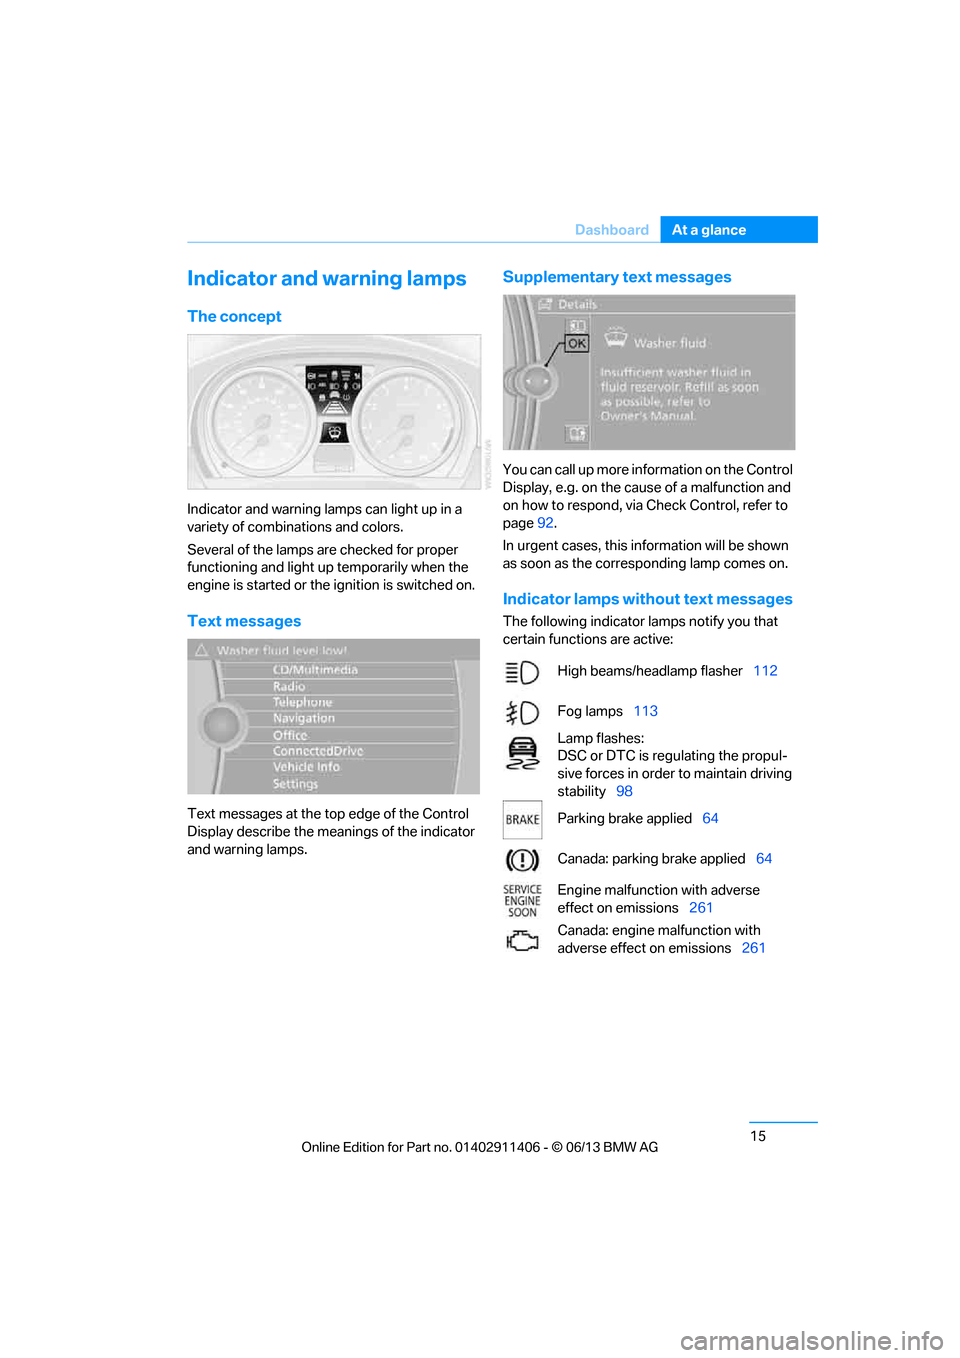
Indicator and warning lamps can light up in a
variety of combinations and colors.
Several of the lamps are checked for proper
functioning and light up temporarily when the
engine is started or the ignition is switched on.
Text messages
Text messages at the to
p edge of the Control
Display describe the mean ings of the indicator
and warning lamps.
Supplementary text messages
You can call up more information on the Control
Display, e.g. on the cause of a malfunction and
on how to respond, via Check Control, refer to
page 92.
In urgent cases, this information will be shown
as soon as the corresponding lamp comes on.
Indicator lamps without text messages
The following indicator lamps notify you that
certain functions are active:
High beams/headlamp flasher 112
Fog lamps 113
Lamp flashes:
DSC or DTC is regulating the propul-
sive forces in order to maintain driving
stability 98
Parking brake applied 64
Canada: parking brake applied 64
Engine malfunction with adverse
effect on emissions 261
Canada: engine malfunction with
adverse effect on emissions 261
00320051004F004C00510048000300280047004C0057004C005200510003
Page 38 of 311
33
Opening and closing
Controls
Personal Profile settings
For more information on
specific settings, refer
to the specified pages.
> Assignment of programmable memory
keys, refer to page 25
> Response of the central locking system
when the car is unlocked, refer to page 34
> Automatic locking of th e vehicle, refer to
page 36
> Automatic call-up of the driver's seat
position, refer to page 53
> Triple turn signal activation, refer to
page 72
> Settings for the display on the Control
Display and in the instrument cluster:
>12h/24h format of the clock, refer to
page 91
> Date format, refer to page 92
> Brightness of the Control Display, refer
to page 95
> Language on the Control Display, refer
to page 95
> Units of measure, refer to page 88
> Show visual warning for Park Distance
Control PDC, refer to page 97
> Light settings:
>Welcome lamps, refer to page 111
> Pathway lighting, refer to page 111
> Daytime running lights, refer to
page 111
> High-beam Assistant, refer to page 112
> Automatic climate control: activating/deac-
tivating AUTO program, air conditioning
and automatic recirculated air control,
setting temperature, air volume and
distribution, refer to page 116 ff
> Entertainment:
>Setting tone controls, refer to page 167
> Speed-dependent volume control, refer
to page 168
Central locking system
The concept
The central locking system functions when the
driver's door is closed.
The system simultaneously engages and
releases the locks on the following:
>Doors
> Trunk lid
> Fuel filler flap
> Convertible: glove compartment
Operating from outside
>Via the remote control
> Using the door lock
> In cars with Comfort Access, via the handles
on the driver's door and the front passenger
door
At the same time as locking and unlocking via
the remote control:
> Welcome lights, the inte rior light, and the
courtesy lighting are switched on and off.
> Alarm system, refer to page 38, is armed or
disarmed.
Operating from inside
By means of the button fo r central locking, refer
to page 36.
In the event of a sufficiently severe accident,
the central locking syst em unlocks automati-
cally. In addition, the hazard warning flashers
and interior lamps come on.
Opening and closing:
Using the remote control
Persons or animals in a parked vehicle
could lock the doors from the inside. You
should therefore take th e remote control with
you when you leave the ve hicle so that the latter
can be opened from outside. <
00320051004F004C00510048000300280047004C0057004C005200510003
Page 43 of 311
38
ControlsOpening and closing
Locking separately
Push the switch in the direction of arrow 1 .
The trunk lid is locked and cannot be unlocked
using the central locking system.
If you give the remote control without the inte-
grated key to someone else while the glove
compartment is locked, the trunk lid cannot be
opened. This is an advantage when valet park-
ing, for example. Locking the glove compart-
ment, refer to page 124.
Unlocking separately
Push the switch in the direction of arrow 2 .
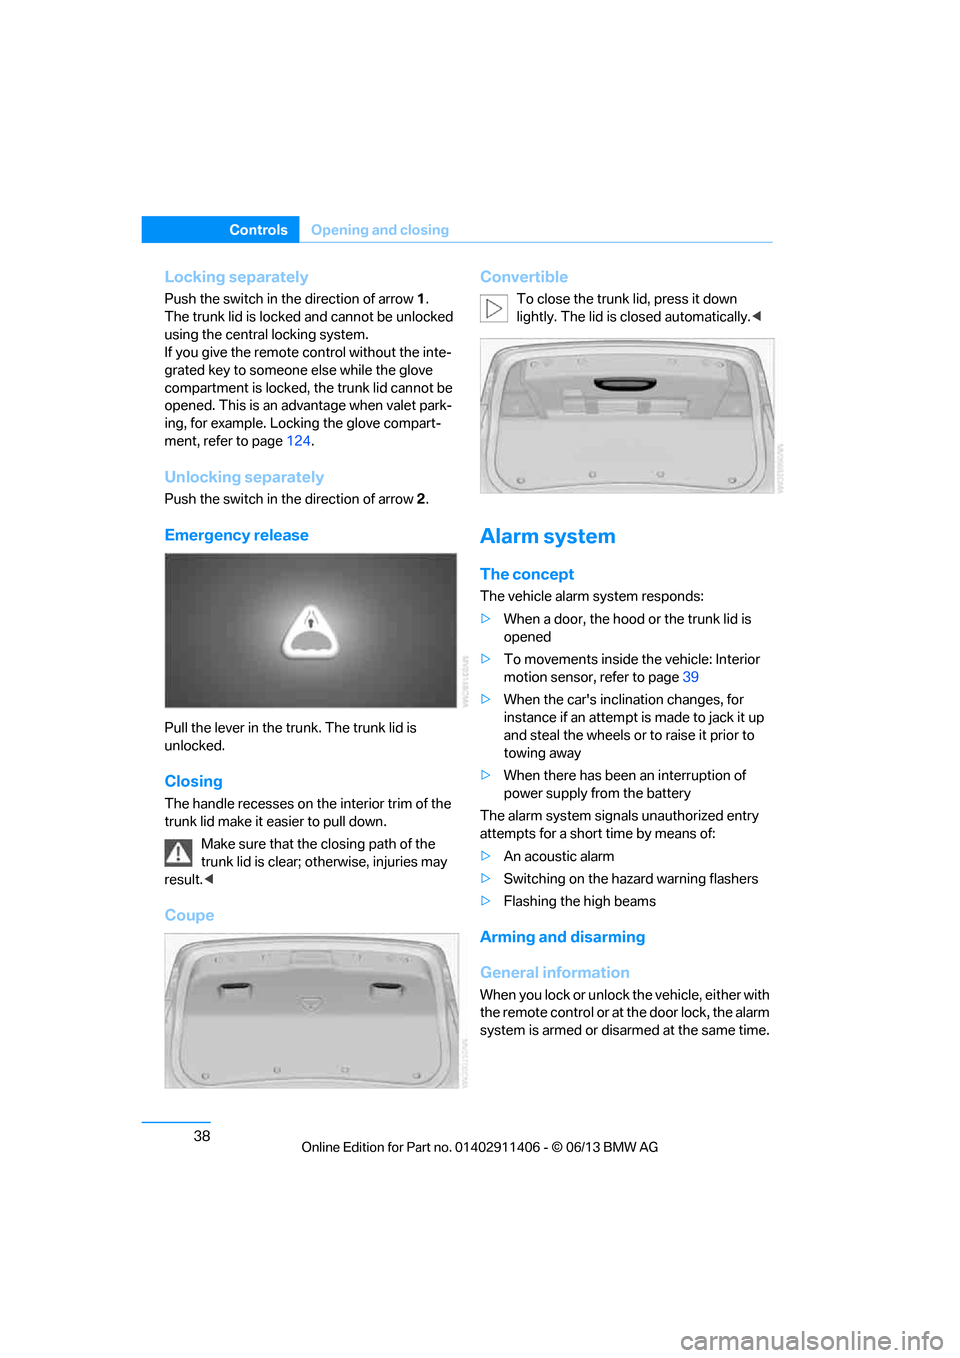
Emergency release
Pull the lever in the trunk. The trunk lid is
unlocked.
Closing
The handle recesses on the interior trim of the
trunk lid make it easier to pull down.
Make sure that the closing path of the
trunk lid is clear; otherwise, injuries may
result. <
Coupe Convertible
To close the trunk lid, press it down
lightly. The lid is closed automatically.<
Alarm system
The concept
The vehicle alarm system responds:
>
When a door, the hood or the trunk lid is
opened
> To movements inside the vehicle: Interior
motion sensor, refer to page 39
> When the car's inclination changes, for
instance if an attempt is made to jack it up
and steal the wheels or to raise it prior to
towing away
> When there has been an interruption of
power supply from the battery
The alarm system signals unauthorized entry
attempts for a short time by means of:
> An acoustic alarm
> Switching on the haza rd warning flashers
> Flashing the high beams
Arming and disarming
General information
When you lock or unlock the vehicle, either with
the remote control or at the door lock, the alarm
system is armed or disarmed at the same time.
00320051004F004C00510048000300280047004C0057004C005200510003
Page 46 of 311
41
Opening and closing
Controls
Unlocking the trunk lid separately
Press the button on the ou
tside of the trunk lid.
This corresponds to pressing the button.
If the vehicle detects that a remote
control has been accide ntally left inside
the locked vehicle's trunk after the trunk lid is
closed, the lid will reopen. The hazard warning
flashers flash and a signal sounds. <
Switching on radio readiness
Pressing the Start/Stop button switches on
radio readiness.
Do not depress the brake or the clutch; other-
wise, the engine will start immediately.
Starting the engine
The engine can be started or the ignition can be
switched on when a remote control is inside the
vehicle. It is not necessa ry to insert a remote
control into the ignition lock, refer to page 62.
Switching off the engine in cars with
automatic transmission
The engine can only be switched off when the
selector lever is in po sition P, refer to page 64.
To switch the engine off when the selector lever
is in position N, the remote control must be in
the ignition lock.
Malfunction
Local radio waves can in terfere with the func-
tion of Comfort Access, for example when a
mobile phone is in the immediate vicinity of the
remote control or by when a mobile phone is
being charged in the vehicle.
If this happens, open or close the vehicle via the
buttons on the remote co ntrol or using the inte-
grated key. To start the engine afterward, insert
the remote control into the ignition lock.
Warning lamps
The warning lamp in the instrument
cluster lights up when you attempt to
start the engine: the engine cannot
be started. The remote co ntrol is not inside the
vehicle or is malfunctioning. Take the remote contro
l with you inside the
vehicle or have it checked. If necessary, insert
another remote control in to the ignition lock.
The warning lamp in the instrument
cluster lights up wh ile the engine is
running: the remote control is no
longer inside the vehicle. After the engine is
switched off, the engine can only be restarted
within approx. 10 seconds.
The indicator lamp in the instrument
cluster lights up and a message
appears on the Control Display:
replace the battery in the remote control.
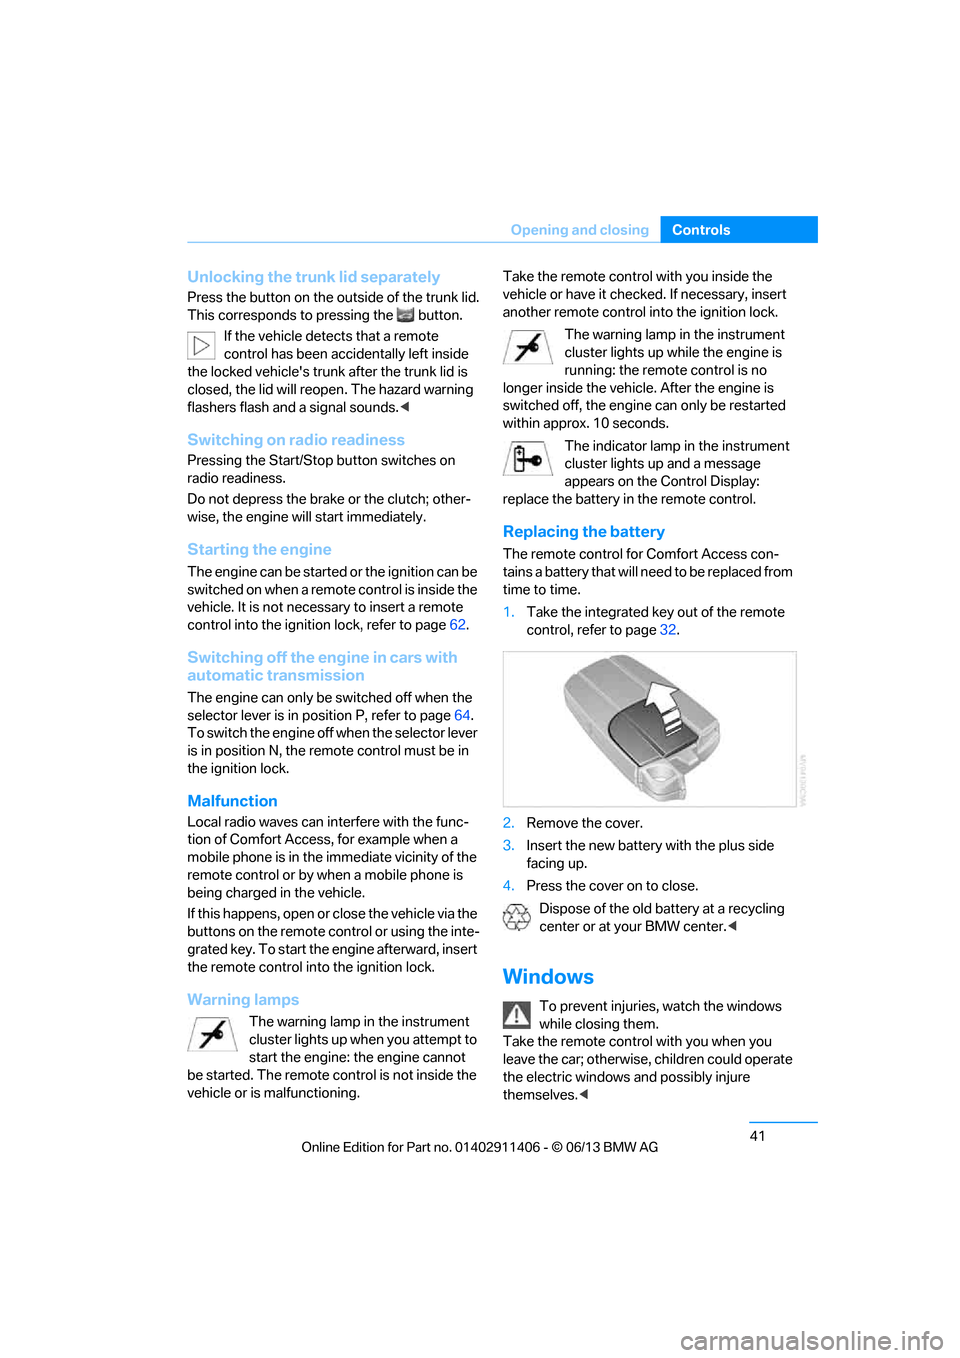
Replacing the battery
The remote control for Comfort Access con-
tains a battery that will need to be replaced from
time to time.
1. Take the integrated ke y out of the remote
control, refer to page 32.
2. Remove the cover.
3. Insert the new battery with the plus side
facing up.
4. Press the cover on to close.
Dispose of the old battery at a recycling
center or at your BMW center. <
Windows
To prevent injuries, watch the windows
while closing them.
Take the remote contro l with you when you
leave the car; otherwise, children could operate
the electric windows and possibly injure
themselves. <
00320051004F004C00510048000300280047004C0057004C005200510003
Page 57 of 311
52
ControlsAdjustments
Do not insert objects behind the head
cushion; otherwise, the head restraint
may not function properly. <
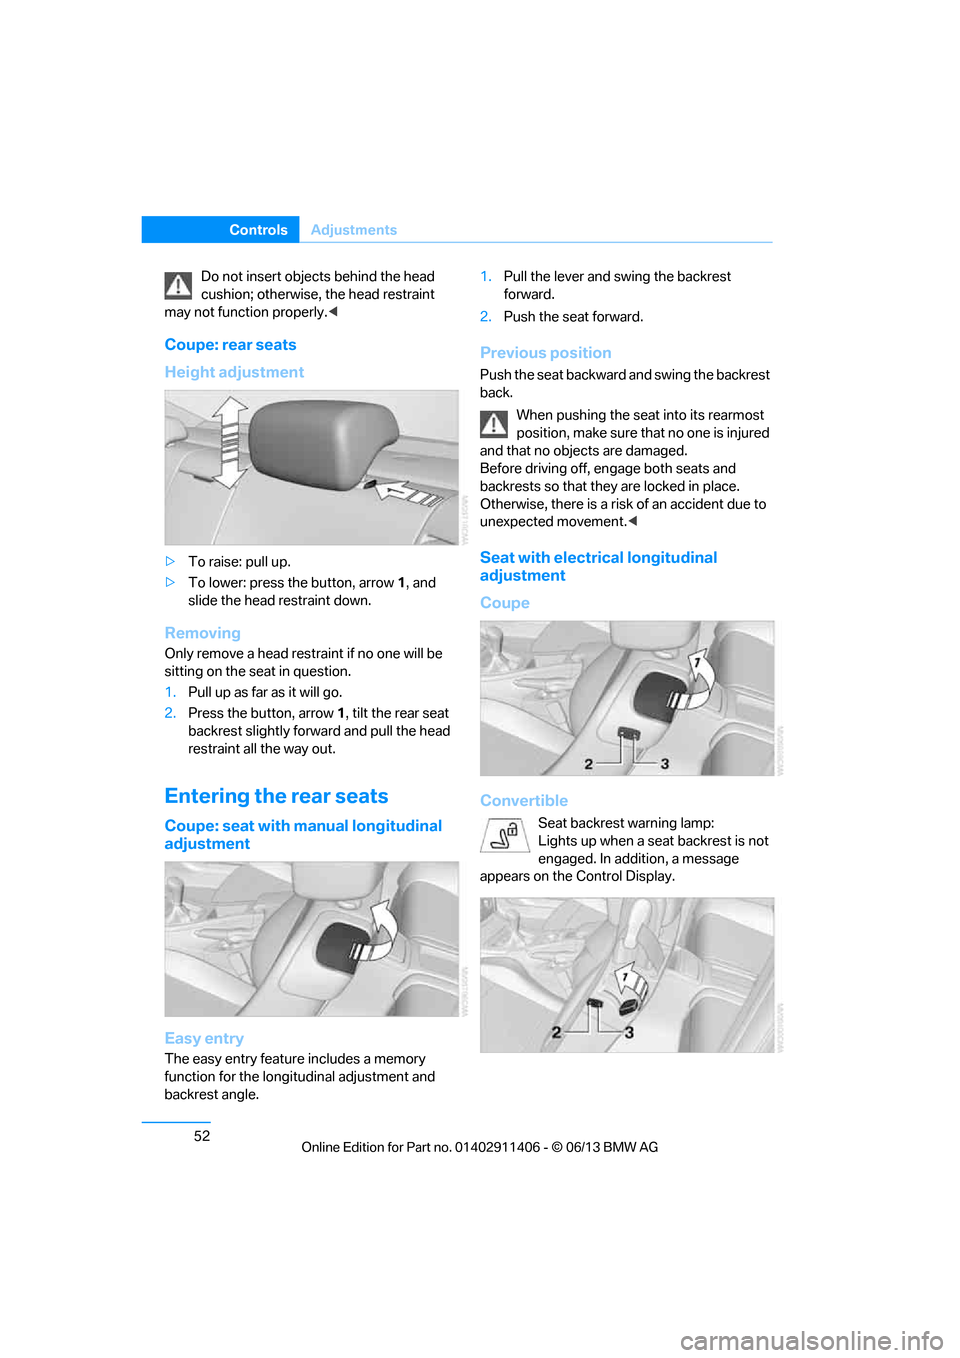
Coupe: rear seats
Height adjustment
>To raise: pull up.
> To lower: press the button, arrow 1, and
slide the head restraint down.
Removing
Only remove a head rest raint if no one will be
sitting on the seat in question.
1. Pull up as far as it will go.
2. Press the button, arrow 1, tilt the rear seat
backrest slightly forward and pull the head
restraint all the way out.
Entering the rear seats
Coupe: seat with manual longitudinal
adjustment
Easy entry
The easy entry feature includes a memory
function for the longitudinal adjustment and
backrest angle. 1.
Pull the lever and swing the backrest
forward.
2. Push the seat forward.
Previous position
Push the seat backward and swing the backrest
back.
When pushing the seat into its rearmost
position, make sure that no one is injured
and that no objects are damaged.
Before driving off, en gage both seats and
backrests so that they are locked in place.
Otherwise, there is a risk of an accident due to
unexpected movement. <
Seat with electrical longitudinal
adjustment
Coupe
Convertible
Seat backrest warning lamp:
Lights up when a seat backrest is not
engaged. In addition, a message
appears on the Control Display.
00320051004F004C00510048000300280047004C0057004C005200510003
Page 81 of 311
76
ControlsDriving
Cruise control is not deactivated by depressing
the accelerator pedal. Once the accelerator
pedal is released, the stored speed is achieved
again and maintained.
Warning lamp
The warning lamp lights up when
cruise control is deactivated due to
control intervention by the DSC, for
example. A message appears on the Control
Display.
Resuming a previously stored speed
Press the button, arrow 4.
The last stored speed is resumed and
maintained.
In the following instance s, the stored speed is
deleted and can no longer be resumed:
> When driving stability control systems are
intervening.
> In cars with manual transmission: when you
shift gears very slowly or shift to neutral.
> In cars with automati c transmission: when
you engage selector lever position N.
> In cars with Sport automatic transmission
with double clutch: when you engage
selector lever position N.
> When the ignition is switched off
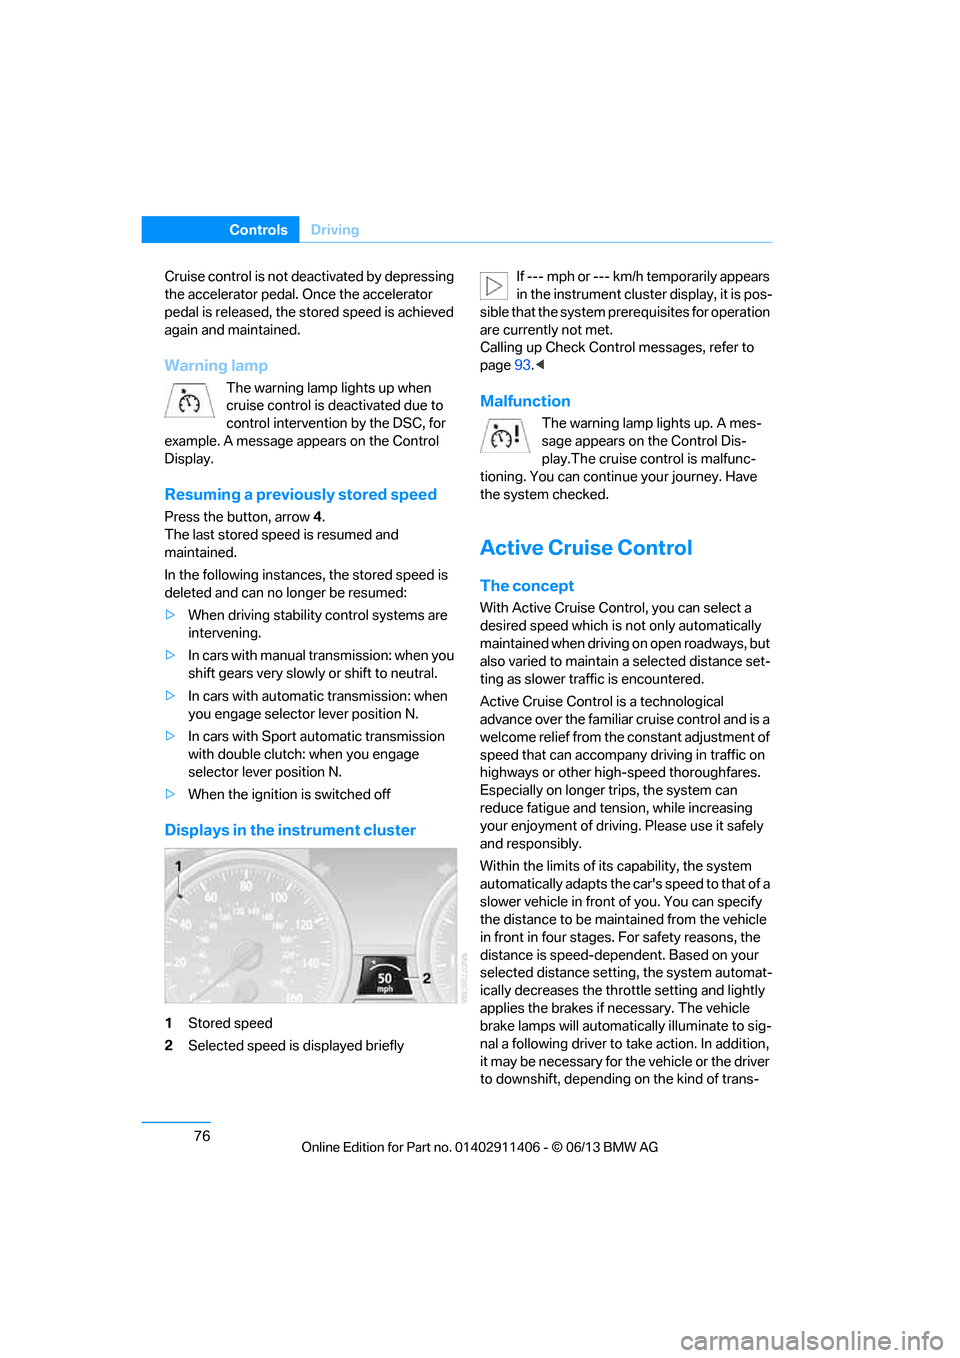
Displays in the instrument cluster
1Stored speed
2 Selected speed is displayed briefly If --- mph or --- km/h temporarily appears
in the instrument cluster display, it is pos-
sible that the system prerequisites for operation
are currently not met.
Calling up Check Contro l messages, refer to
page 93.<
Malfunction
The warning lamp lights up. A mes-
sage appears on the Control Dis-
play.The cruise control is malfunc-
tioning. You can continue your journey. Have
the system checked.
Active Cruise Control
The concept
With Active Cruise Cont rol, you can select a
desired speed which is not only automatically
maintained when driving on open roadways, but
also varied to maintain a select ed distance set-
ting as slower traffic is encountered.
Active Cruise Control is a technological
advance over the familiar cruise control and is a
welcome relief from the constant adjustment of
speed that can accompany driving in traffic on
highways or other high-speed thoroughfares.
Especially on longer trips, the system can
reduce fatigue and tens ion, while increasing
your enjoyment of driving. Please use it safely
and responsibly.
Within the limits of its capability, the system
automatically adapts the ca r's speed to that of a
slower vehicle in front of you. You can specify
the distance to be main tained from the vehicle
in front in four stages. For safety reasons, the
distance is speed-depe ndent. Based on your
selected distance setting, the system automat-
ically decreases the thro ttle setting and lightly
applies the brakes if necessary. The vehicle
brake lamps will automati cally illuminate to sig-
nal a following driver to take action. In addition,
it may be necessary for the vehicle or the driver
to downshift, depending on the kind of trans-
00320051004F004C00510048000300280047004C0057004C005200510003
Page 84 of 311
79
Driving
Controls
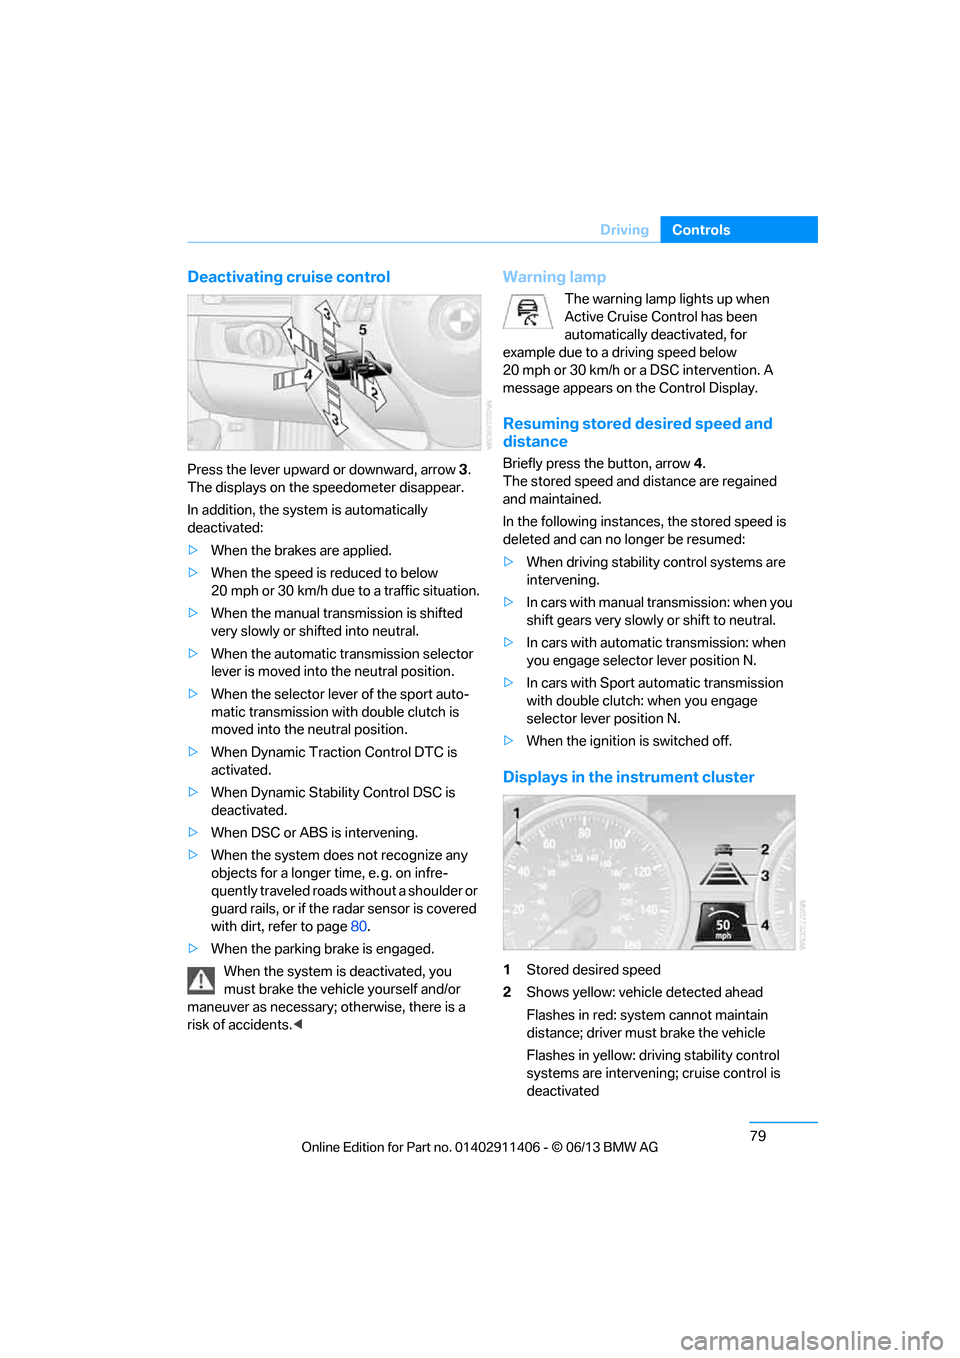
Deactivating cruise control
Press the lever upward or downward, arrow
3.
The displays on the speedometer disappear.
In addition, the system is automatically
deactivated:
> When the brakes are applied.
> When the speed is reduced to below
20 mph or 30 km/h due to a traffic situation.
> When the manual transmission is shifted
very slowly or shifted into neutral.
> When the automatic transmission selector
lever is moved into the neutral position.
> When the selector lever of the sport auto-
matic transmission with double clutch is
moved into the neutral position.
> When Dynamic Traction Control DTC is
activated.
> When Dynamic Stability Control DSC is
deactivated.
> When DSC or ABS is intervening.
> When the system does not recognize any
objects for a longer time, e. g. on infre-
quently traveled roads without a shoulder or
guard rails, or if the ra dar sensor is covered
with dirt, refer to page 80.
> When the parking brake is engaged.
When the system is deactivated, you
must brake the vehicle yourself and/or
maneuver as necessary; otherwise, there is a
risk of accidents. <
Warning lamp
The warning lamp lights up when
Active Cruise Control has been
automatically deactivated, for
example due to a driving speed below
20 mph or 30 km/h or a DSC intervention. A
message appears on the Control Display.
Resuming stored desired speed and
distance
Briefly press the button, arrow 4.
The stored speed and distance are regained
and maintained.
In the following instances, the stored speed is
deleted and can no longer be resumed:
> When driving stability control systems are
intervening.
> In cars with manual transmission: when you
shift gears very slowly or shift to neutral.
> In cars with automatic transmission: when
you engage selector lever position N.
> In cars with Sport au tomatic transmission
with double clutch: when you engage
selector lever position N.
> When the ignition is switched off.
Displays in the instrument cluster
1Stored desired speed
2 Shows yellow: vehicle detected ahead
Flashes in red: system cannot maintain
distance; driver must brake the vehicle
Flashes in yellow: driving stability control
systems are intervening; cruise control is
deactivated
00320051004F004C00510048000300280047004C0057004C005200510003
Page 85 of 311
80
ControlsDriving
3Selected distance to vehicle ahead
The indicator lights up as soon as the
system is activated.
4 Selected desired speed is temporarily
displayed
If --- mph or --- km/h temporarily appears
in the instrument cluster display, it is pos-
sible that the system prerequisites for operation
are currently not met. Calling up Check Control
messages, refer to page 93.<
Warning lamps
The indicator 2 flashes in red; a
signal sounds.
The system indicates that you
must brake and/or maneuver the
vehicle yourself. Active Cruise
Control cannot automatically restore the dis-
tance to the vehicle ahead.
This indicator does not release you from your
responsibility to adapt your desired speed and
driving style to prevailing driving conditions.
The indicator 2 flashes in yellow.
The prerequisites for operating
Active Cruise Control are not met,
e.g. as a result of ABS or DSC
interventions. Active Cruise Con-
trol is deactivated. Yo u can reactivate the sys-
tem, if desired, by briefly pressing or pulling the
lever when road and traffic conditions permit. It
is not possible to resume a stored speed.
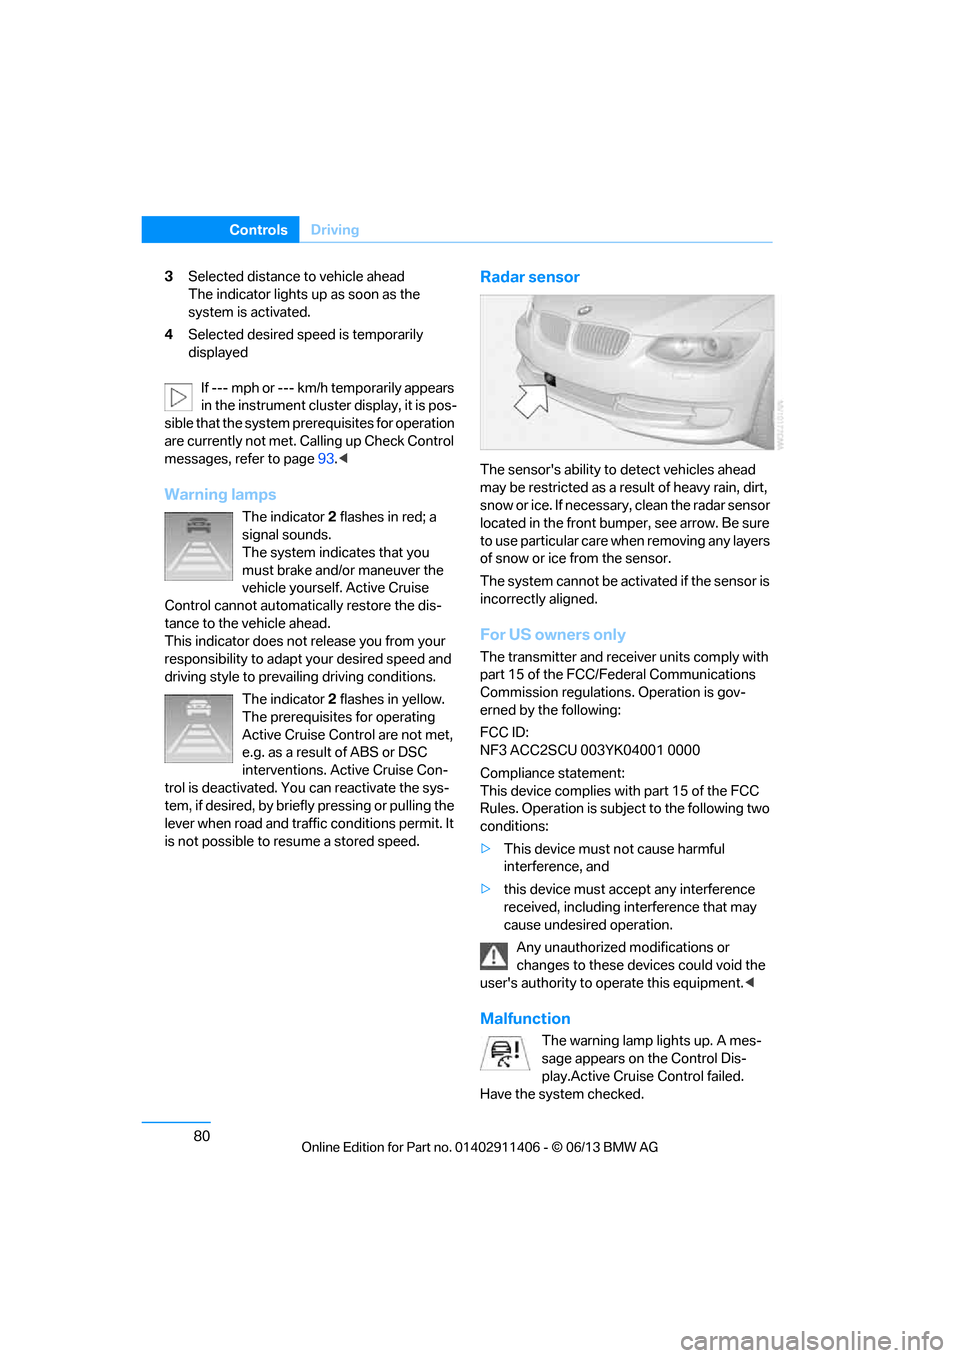
Radar sensor
The sensor's ability to detect vehicles ahead
may be restricted as a result of heavy rain, dirt,
snow or ice. If necessary, clean the radar sensor
located in the front bump er, see arrow. Be sure
to use particular care when removing any layers
of snow or ice from the sensor.
The system cannot be acti vated if the sensor is
incorrectly aligned.
For US owners only
The transmitter and receiver units comply with
part 15 of the FCC/Federal Communications
Commission regulations. Operation is gov-
erned by the following:
FCC ID:
NF3 ACC2SCU 003YK04001 0000
Compliance statement:
This device complies wi th part 15 of the FCC
Rules. Operation is subj ect to the following two
conditions:
> This device must not cause harmful
interference, and
> this device must accept any interference
received, including in terference that may
cause undesired operation.
Any unauthorized modifications or
changes to these devi ces could void the
user's authority to operate this equipment. <
Malfunction
The warning lamp lights up. A mes-
sage appears on the Control Dis-
play.Active Cruise Control failed.
Have the system checked.
00320051004F004C00510048000300280047004C0057004C005200510003
Page 86 of 311
81
Driving
Controls
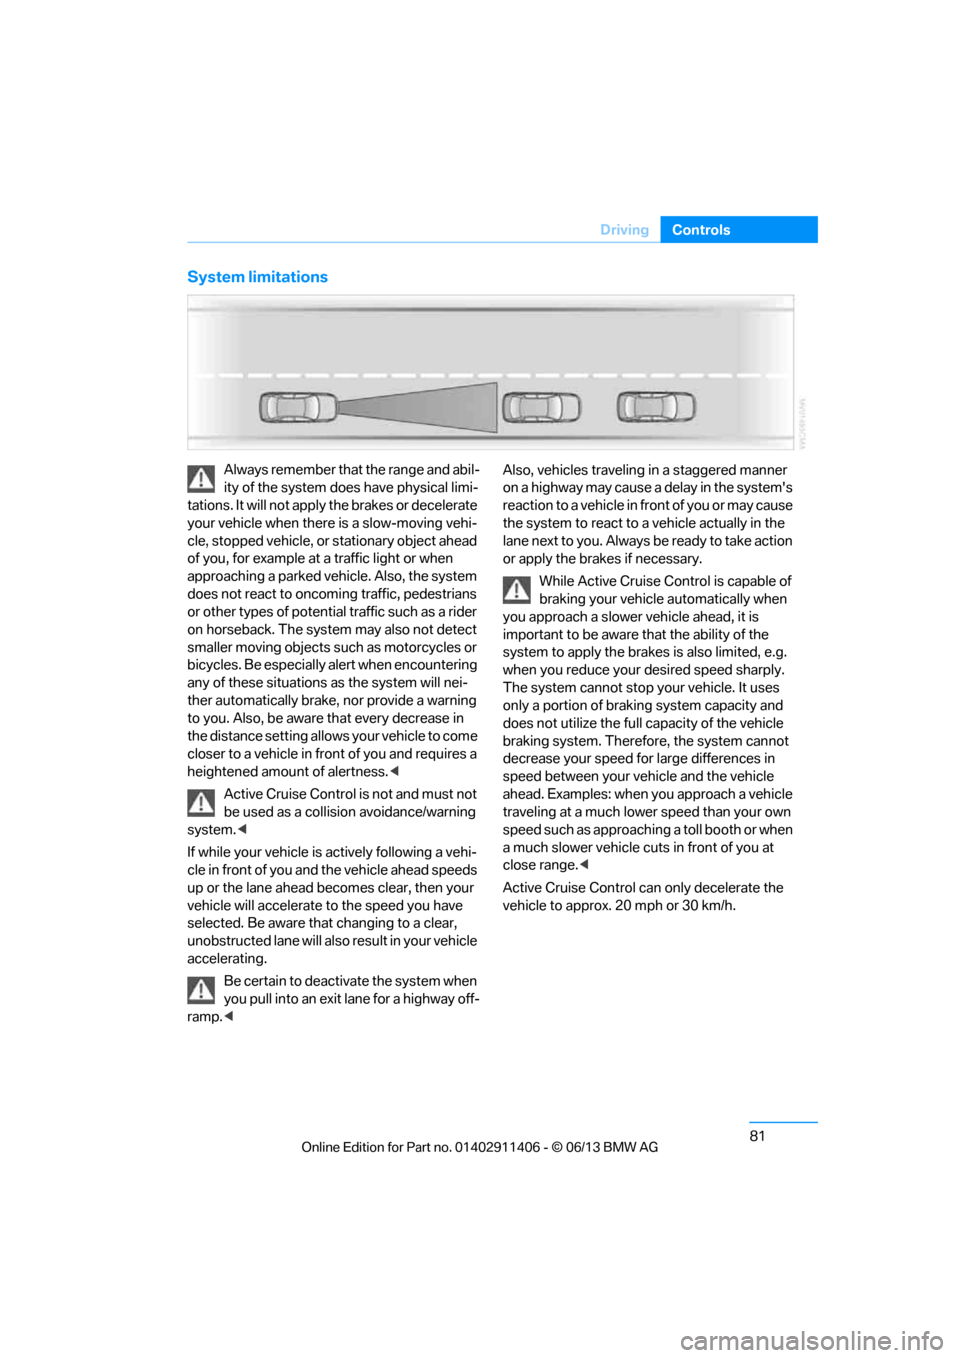
System limitations
Always remember that the range and abil-
ity of the system does have physical limi-
tations. It will not apply the brakes or decelerate
your vehicle when there is a slow-moving vehi-
cle, stopped vehicle, or stationary object ahead
of you, for example at a traffic light or when
approaching a parked vehicle. Also, the system
does not react to oncoming traffic, pedestrians
or other types of potential traffic such as a rider
on horseback. The system may also not detect
smaller moving objects such as motorcycles or
bicycles. Be especially alert when encountering
any of these situations as the system will nei-
ther automatically brake, nor provide a warning
to you. Also, be aware that every decrease in
the distance setting allows your vehicle to come
closer to a vehicle in front of you and requires a
heightened amount of alertness. <
Active Cruise Control is not and must not
be used as a collision avoidance/warning
system. <
If while your vehicle is actively following a vehi-
cle in front of you and the vehicle ahead speeds
up or the lane ahead becomes clear, then your
vehicle will accelerate to the speed you have
selected. Be aware that changing to a clear,
unobstructed lane will also result in your vehicle
accelerating.
Be certain to deactiva te the system when
you pull into an exit lane for a highway off-
ramp. < Also, vehicles travelin
g in a staggered manner
on a highway may cause a delay in the system's
reaction to a vehicle in front of you or may cause
the system to react to a vehicle actually in the
lane next to you. Always be ready to take action
or apply the brakes if necessary.
While Active Cruise Control is capable of
braking your vehicle automatically when
you approach a slower vehicle ahead, it is
important to be aware that the ability of the
system to apply the brakes is also limited, e.g.
when you reduce your desired speed sharply.
The system cannot stop your vehicle. It uses
only a portion of braking system capacity and
does not utilize the full capacity of the vehicle
braking system. Therefore, the system cannot
decrease your speed for large differences in
speed between your vehicle and the vehicle
ahead. Examples: when you approach a vehicle
traveling at a much lower speed than your own
speed such as approaching a toll booth or when
a much slower vehicle cuts in front of you at
close range. <
Active Cruise Control ca n only decelerate the
vehicle to approx. 20 mph or 30 km/h.
00320051004F004C00510048000300280047004C0057004C005200510003
Page 88 of 311
83
Controls overview
Controls
Controls overview
Vehicle equipment
In this chapter, all production, country, and
optional equipment that is offered in the model
range is described. For this reason, descrip-
tions will be given of some equipment that may
not be available in a vehi
cle, for example due to
the special options or national-market version
selected. This also app lies to safety related
functions and systems.
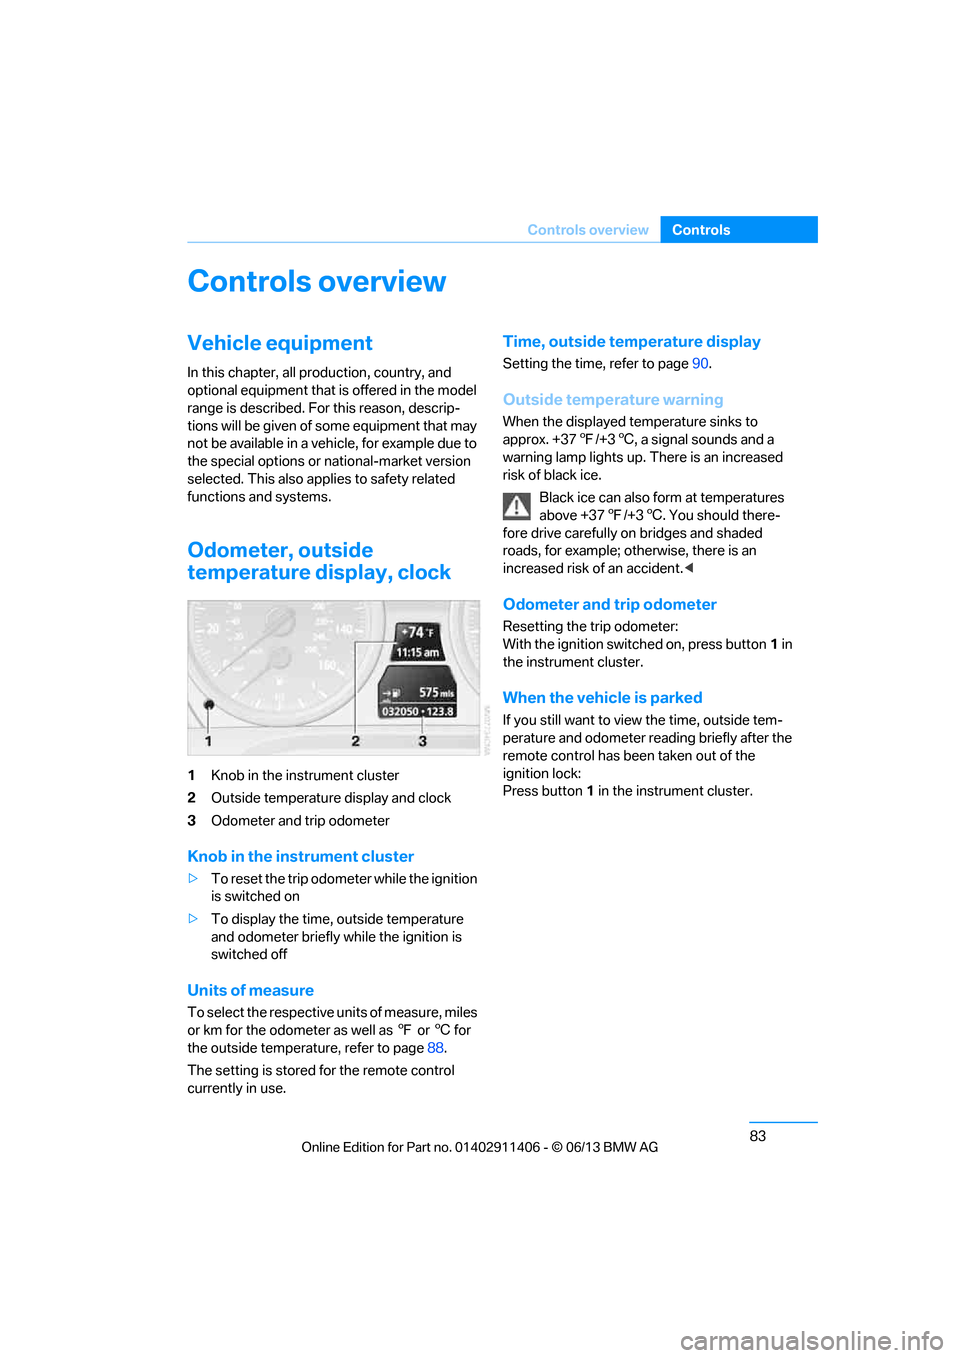
Odometer, outside
temperature display, clock
1 Knob in the instrument cluster
2 Outside temperature display and clock
3 Odometer and trip odometer
Knob in the instrument cluster
>To reset the trip odomet er while the ignition
is switched on
> To display the time, outside temperature
and odometer briefly while the ignition is
switched off
Units of measure
To select the respective units of measure, miles
or km for the odometer as well as 7 or 6 for
the outside temperature, refer to page 88.
The setting is stored for the remote control
currently in use.
Time, outside temperature display
Setting the time, refer to page 90.
Outside temperature warning
When the displayed temperature sinks to
approx. +377/+3 6, a signal sounds and a
warning lamp lights up. There is an increased
risk of black ice.
Black ice can also form at temperatures
above +37 7/+3 6. You should there-
fore drive carefully on bridges and shaded
roads, for example; otherwise, there is an
increased risk of an accident. <
Odometer and trip odometer
Resetting the trip odometer:
With the ignition switched on, press button 1 in
the instrument cluster.
When the vehicle is parked
If you still want to view the time, outside tem-
perature and odometer reading briefly after the
remote control has be en taken out of the
ignition lock:
Press button 1 in the instrument cluster.
00320051004F004C00510048000300280047004C0057004C005200510003