instrument cluster BMW M3 SEDAN 2010 E90 Owner's Guide
[x] Cancel search | Manufacturer: BMW, Model Year: 2010, Model line: M3 SEDAN, Model: BMW M3 SEDAN 2010 E90Pages: 274, PDF Size: 8.68 MB
Page 86 of 274
Technology for driving comfort and safety
84
Activating HDC
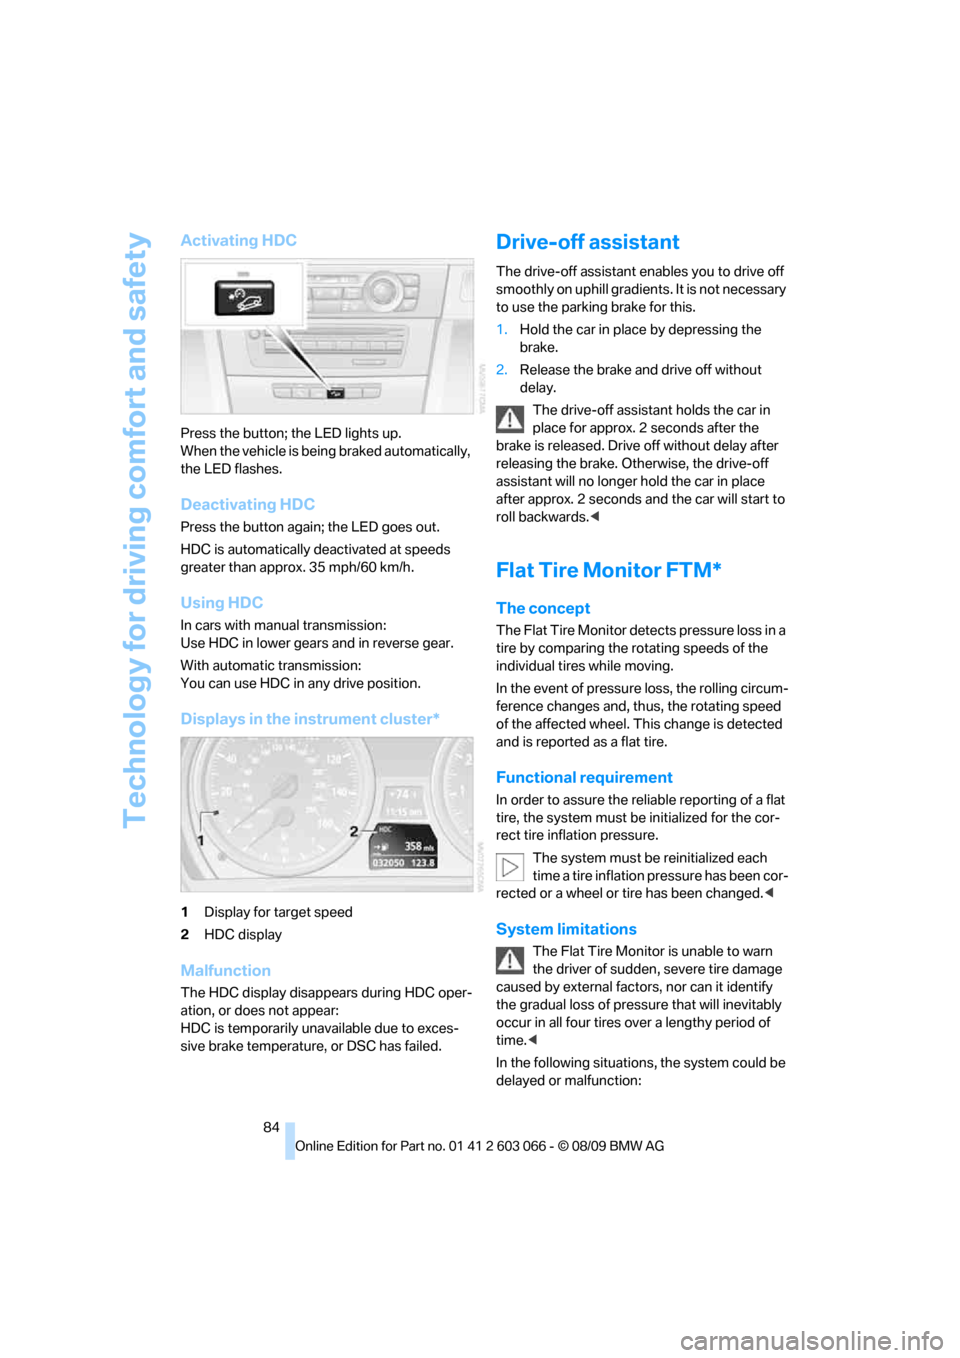
Press the button; the LED lights up.
When the vehicle is being braked automatically,
the LED flashes.
Deactivating HDC
Press the button again; the LED goes out.
HDC is automatically deactivated at speeds
greater than approx. 35 mph/60 km/h.
Using HDC
In cars with manual transmission:
Use HDC in lower gears and in reverse gear.
With automatic transmission:
You can use HDC in any drive position.
Displays in the instrument cluster*
1Display for target speed
2HDC display
Malfunction
The HDC display disappears during HDC oper-
ation, or does not appear:
HDC is temporarily unavailable due to exces-
sive brake temperature, or DSC has failed.
Drive-off assistant
The drive-off assistant enables you to drive off
smoothly on uphill gradients. It is not necessary
to use the parking brake for this.
1.Hold the car in place by depressing the
brake.
2.Release the brake and drive off without
delay.
The drive-off assistant holds the car in
place for approx. 2 seconds after the
brake is released. Drive off without delay after
releasing the brake. Otherwise, the drive-off
assistant will no longer hold the car in place
after approx. 2 seconds and the car will start to
roll backwards.<
Flat Tire Monitor FTM*
The concept
The Flat Tire Monitor detects pressure loss in a
tire by comparing the rotating speeds of the
individual tires while moving.
In the event of pressure loss, the rolling circum-
ference changes and, thus, the rotating speed
of the affected wheel. This change is detected
and is reported as a flat tire.
Functional requirement
In order to assure the reliable reporting of a flat
tire, the system must be initialized for the cor-
rect tire inflation pressure.
The system must be reinitialized each
time a tire inflation pressure has been cor-
rected or a wheel or tire has been changed.<
System limitations
The Flat Tire Monitor is unable to warn
the driver of sudden, severe tire damage
caused by external factors, nor can it identify
the gradual loss of pressure that will inevitably
occur in all four tires over a lengthy period of
time.<
In the following situations, the system could be
delayed or malfunction:
Page 96 of 274
Lamps
94
High beams/roadside parking
lamps
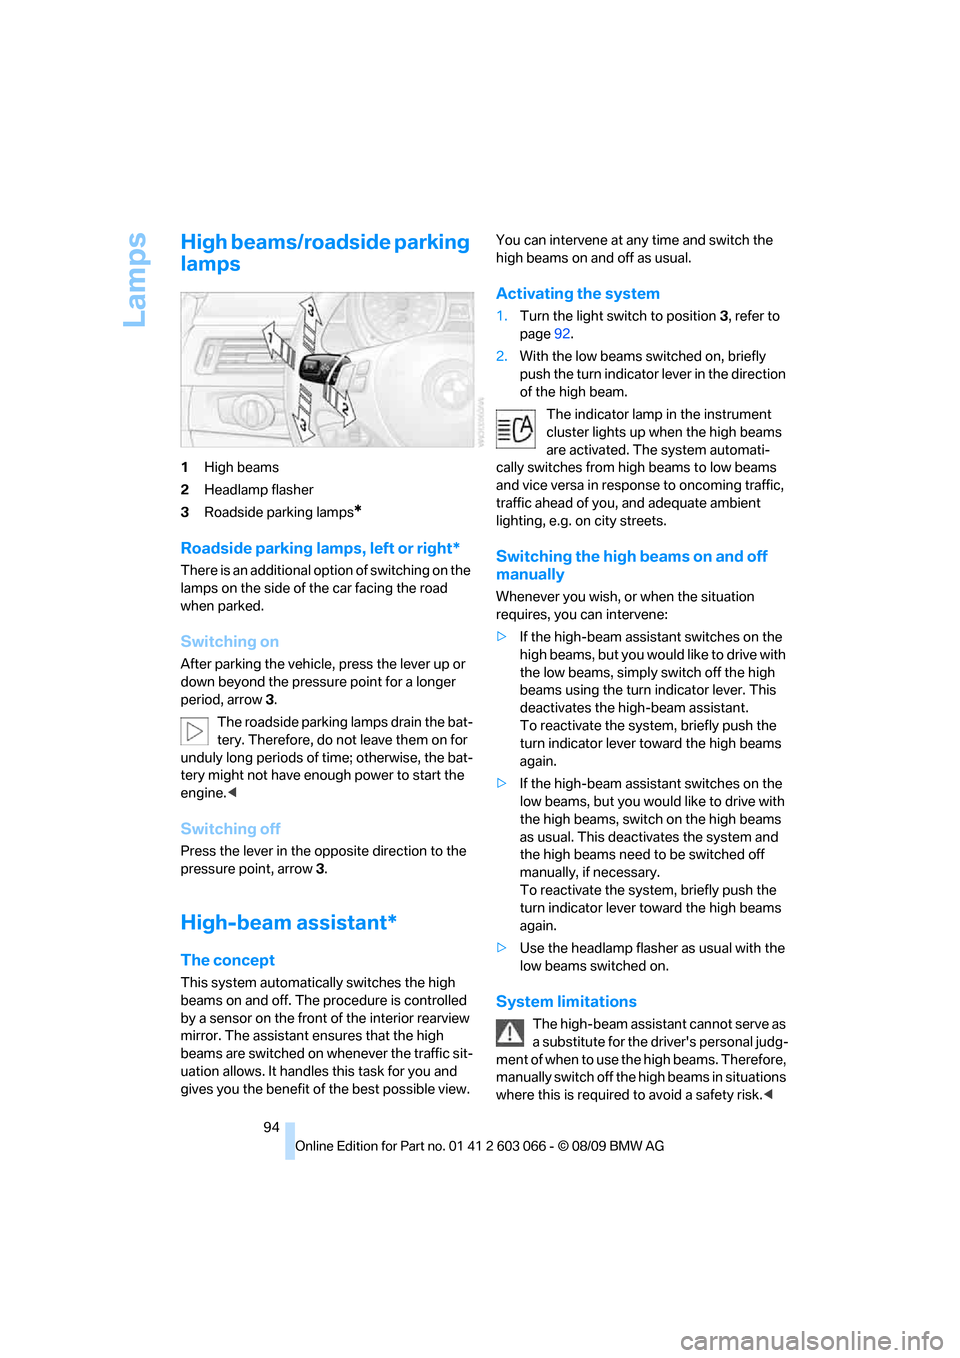
1High beams
2Headlamp flasher
3Roadside parking lamps
*
Roadside parking lamps, left or right*
There is an additional option of switching on the
lamps on the side of the car facing the road
when parked.
Switching on
After parking the vehicle, press the lever up or
down beyond the pressure point for a longer
period, arrow 3.
The roadside parking lamps drain the bat-
tery. Therefore, do not leave them on for
unduly long periods of time; otherwise, the bat-
tery might not have enough power to start the
engine.<
Switching off
Press the lever in the opposite direction to the
pressure point, arrow 3.
High-beam assistant*
The concept
This system automatically switches the high
beams on and off. The procedure is controlled
by a sensor on the front of the interior rearview
mirror. The assistant ensures that the high
beams are switched on whenever the traffic sit-
uation allows. It handles this task for you and
gives you the benefit of the best possible view. You can intervene at any time and switch the
high beams on and off as usual.
Activating the system
1.Turn the light switch to position3, refer to
page92.
2.With the low beams switched on, briefly
push the turn indicator lever in the direction
of the high beam.
The indicator lamp in the instrument
cluster lights up when the high beams
are activated. The system automati-
cally switches from high beams to low beams
and vice versa in response to oncoming traffic,
traffic ahead of you, and adequate ambient
lighting, e.g. on city streets.
Switching the high beams on and off
manually
Whenever you wish, or when the situation
requires, you can intervene:
>If the high-beam assistant switches on the
high beams, but you would like to drive with
the low beams, simply switch off the high
beams using the turn indicator lever. This
deactivates the high-beam assistant.
To reactivate the system, briefly push the
turn indicator lever toward the high beams
again.
>If the high-beam assistant switches on the
low beams, but you would like to drive with
the high beams, switch on the high beams
as usual. This deactivates the system and
the high beams need to be switched off
manually, if necessary.
To reactivate the system, briefly push the
turn indicator lever toward the high beams
again.
>Use the headlamp flasher as usual with the
low beams switched on.
System limitations
The high-beam assistant cannot serve as
a substitute for the driver's personal judg-
ment of when to use the high beams. Therefore,
manually switch off the high beams in situations
where this is required to avoid a safety risk.<
Page 97 of 274
Controls
95Reference
At a glance
Driving tips
Communications
Navigation
Entertainment
Mobility
The system is not fully functional in situations
such as the following, and driver intervention
may be necessary:
>In very unfavorable weather conditions,
such as fog or heavy precipitation
>In detecting poorly-lit road users, such as
pedestrians, cyclists, horseback riders and
wagons; when driving close to train or ship
traffic; and at animal crossings
>In tight curves, on hilltops or in depressions,
in cross traffic or half-obscured oncoming
traffic on highways
>In poorly lit towns and cities and in the pres-
ence of highly reflective signs
>At low speeds
>When the windshield in front of the interior
rearview mirror is fogged over, dirty or cov-
ered with stickers, etc.
>If the sensor is dirty. Clean the sensor on
the front of the interior rearview mirror using
a cloth moistened with a small amount of
glass cleaner.
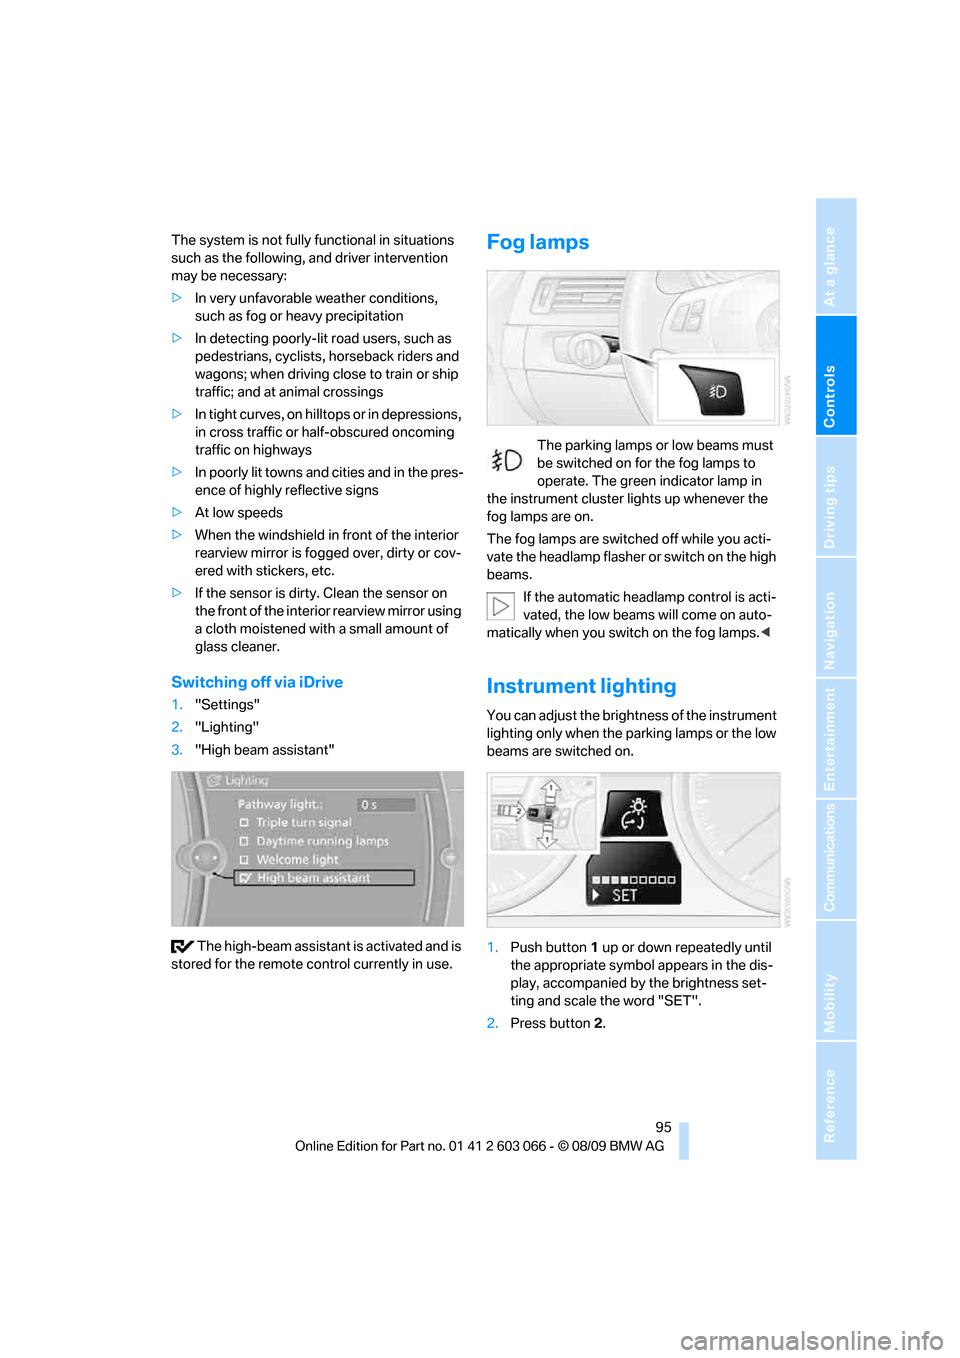
Switching off via iDrive
1."Settings"
2."Lighting"
3."High beam assistant"
The high-beam assistant is activated and is
stored for the remote control currently in use.
Fog lamps
The parking lamps or low beams must
be switched on for the fog lamps to
operate. The green indicator lamp in
the instrument cluster lights up whenever the
fog lamps are on.
The fog lamps are switched off while you acti-
vate the headlamp flasher or switch on the high
beams.
If the automatic headlamp control is acti-
vated, the low beams will come on auto-
matically when you switch on the fog lamps.<
Instrument lighting
You can adjust the brightness of the instrument
lighting only when the parking lamps or the low
beams are switched on.
1.Push button 1 up or down repeatedly until
the appropriate symbol appears in the dis-
play, accompanied by the brightness set-
ting and scale the word "SET".
2.Press button 2.
Page 200 of 274
Refueling
198 If you have refueled with the wrong fuel, contact
your BMW center.
The filler neck is designed for refueling at
diesel fuel pumps.
If the filler nozzle cannot be inserted into your
BMW's filler pipe, please ensure that you are
refueling at a diesel fuel pump and that it is
equipped with a diesel filler nozzle.<
In the event the Ultra-Low Sulfur Diesel
fuel cannot be fully inserted into the fuel
filler neck, please contact BMW Roadside
Assistance for instructions on how to add fuel.
For more information on BMW Roadside Assis-
tance, refer to page237.<
Winter diesel
To ensure that the diesel engine remains oper-
ational in the winter, please use winter diesel,
which is available at gas stations during winter
months. The fuel filter heating system, included
a s a s t a n d a r d f e a t u r e , p r e v e n t s d i s r u p t i o n o f t h e
fuel supply while driving.
Do not add additives, including gasoline;
otherwise, engine damage may occur.<
BMW Advanced Diesel
The concept
BMW Advanced Diesel reduces nitrogen oxide
in the diesel emissions of your vehicle by means
of a mechanism that injects diesel exhaust fluid,
a reduction agent, into the exhaust tract. A
chemical reaction occurs in the catalytic con-
verter that minimizes the nitrogen oxide con-
tent.
To be able to start the engine as usual, a suffi-
cient amount of diesel exhaust fluid must be
present in a separate reservoir.
Warming the system
To warm the system to its operating tempera-
ture after starting with a cold engine, the auto-
matic transmission delays shifting to the next
higher gear, if necessary.
Reserve display
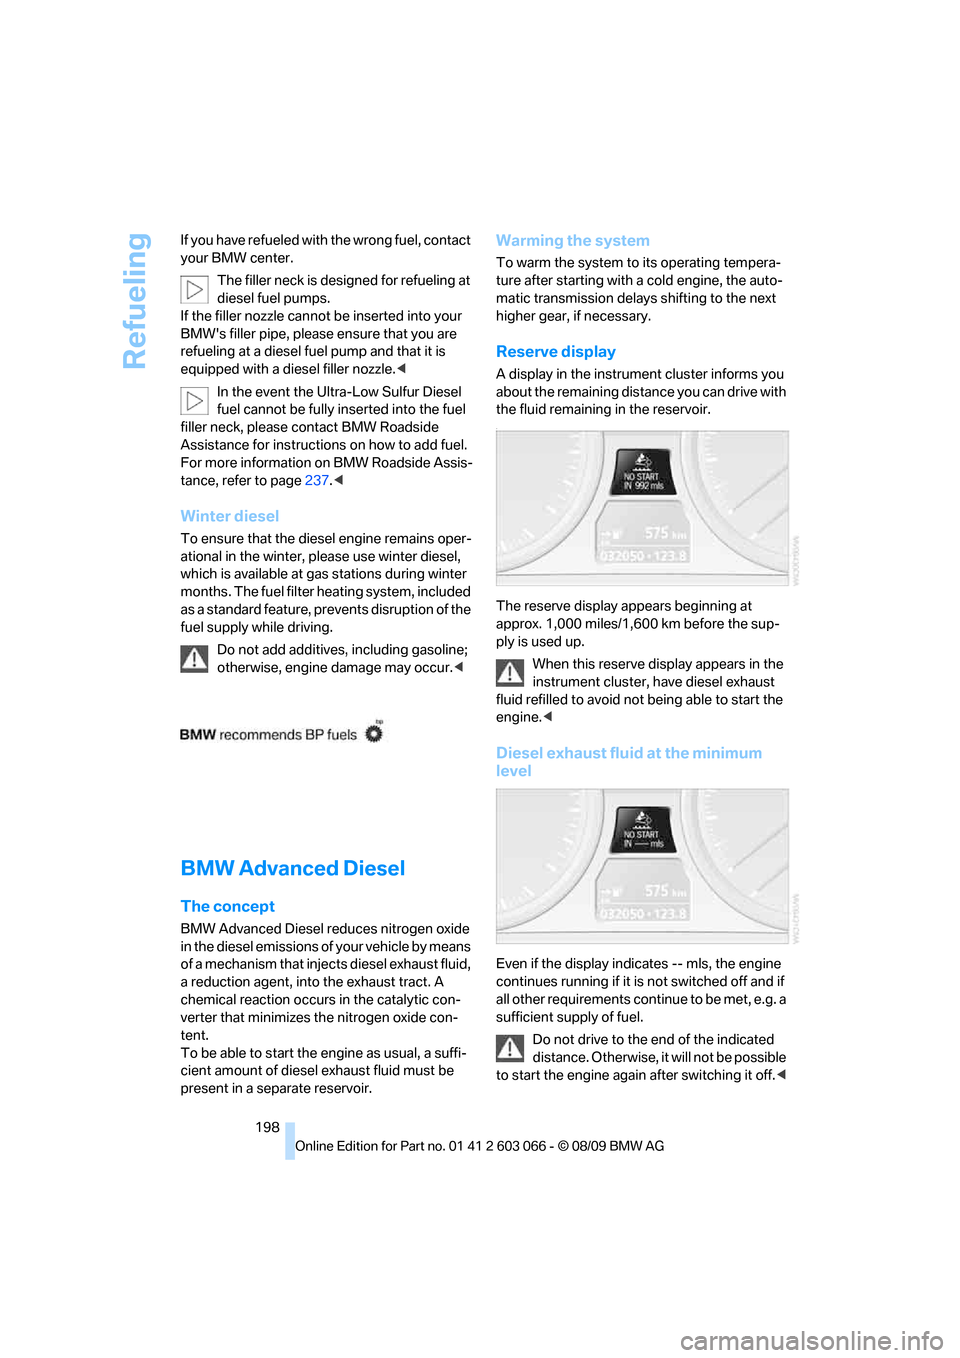
A display in the instrument cluster informs you
about the remaining distance you can drive with
the fluid remaining in the reservoir.
-
The reserve display appears beginning at
approx. 1,000 miles/1,600 km before the sup-
ply is used up.
When this reserve display appears in the
instrument cluster, have diesel exhaust
fluid refilled to avoid not being able to start the
engine.<
Diesel exhaust fluid at the minimum
level
Even if the display indicates -- mls, the engine
continues running if it is not switched off and if
all other requirements continue to be met, e.g. a
sufficient supply of fuel.
Do not drive to the end of the indicated
distance. Otherwise, it will not be possible
to start the engine again after switching it off.<
Page 201 of 274
Mobility
199Reference
At a glance
Controls
Driving tips
Communications
Navigation
Entertainment
Wrong fluid
A warning lamp lights up:
The wrong fluid was filled into the res-
ervoir.
Please contact your BMW center.
Having the diesel exhaust fluid refilled
Diesel exhaust fluid is refilled by your BMW
center during regular service. If the service
intervals are adhered to, it generally does not
need to be refilled between service appoint-
ments.
Under certain conditions, e.g. especially fre-
quent accelerations or operation of the vehicle
at high altitudes, it may become necessary to
refill the fluid between service appointments.
When this reserve display appears in the instru-
ment cluster, have diesel exhaust fluid refilled to
avoid not being able to start the engine.
You can have the fluid refilled by a BMW center.
Diesel exhaust fluid at low
temperatures
Because of its physical properties, it may
be necessary to refill diesel exhaust fluid
between regular service appointments at tem-
peratures below +237/-56.
The need to add fluid is indicated by the reserve
display in the instrument cluster, refer to
page198.<
Refilling diesel exhaust fluid in
exceptional cases
To be able to reach the next BMW center, you
can refill diesel exhaust fluid yourself while
adhering to the following warnings.
Do not come into contact with diesel
exhaust fluid as it can lead to skin or eye
irritations. Wear goggles and gloves, if neces-
sary. Follow the safety instructions on the bot-
tle.
Vapors with a sharp odor can escape from the
bottle or container when it is opened. Before
refilling, completely close the windows and
doors of the vehicle to prevent the vapors from
intruding into the interior. If handling diesel exhaust fluid in an enclosed area, ensure that
the room is well ventilated.
After handling diesel exhaust fluid, wash your
hands thoroughly; otherwise, for example, inad-
vertently touching your eyes may lead to eye
irritations.
If eye irritations occur, rinse the eyes thoroughly
with water and consult a physician if necessary.
If diesel exhaust fluid comes into contact with
the surface of your vehicle, rinse the affected
areas with water to prevent surface damage.
Keep diesel exhaust fluid away from children.<
Suitable diesel exhaust fluid
>Preferred: BMW Diesel Exhaust Fluid.
Diesel exhaust fluid can be refilled conve-
niently with this bottle and its special
adapter.
>Alternatively: NOx reduction agent AUS 32
You can obtain diesel exhaust fluid from your
BMW center.
Refilling quantity
Refilling quantity when the reserve display first
appears:
Approx. 1 US gallon/3.7 liters
Opening the diesel exhaust fluid
reservoir
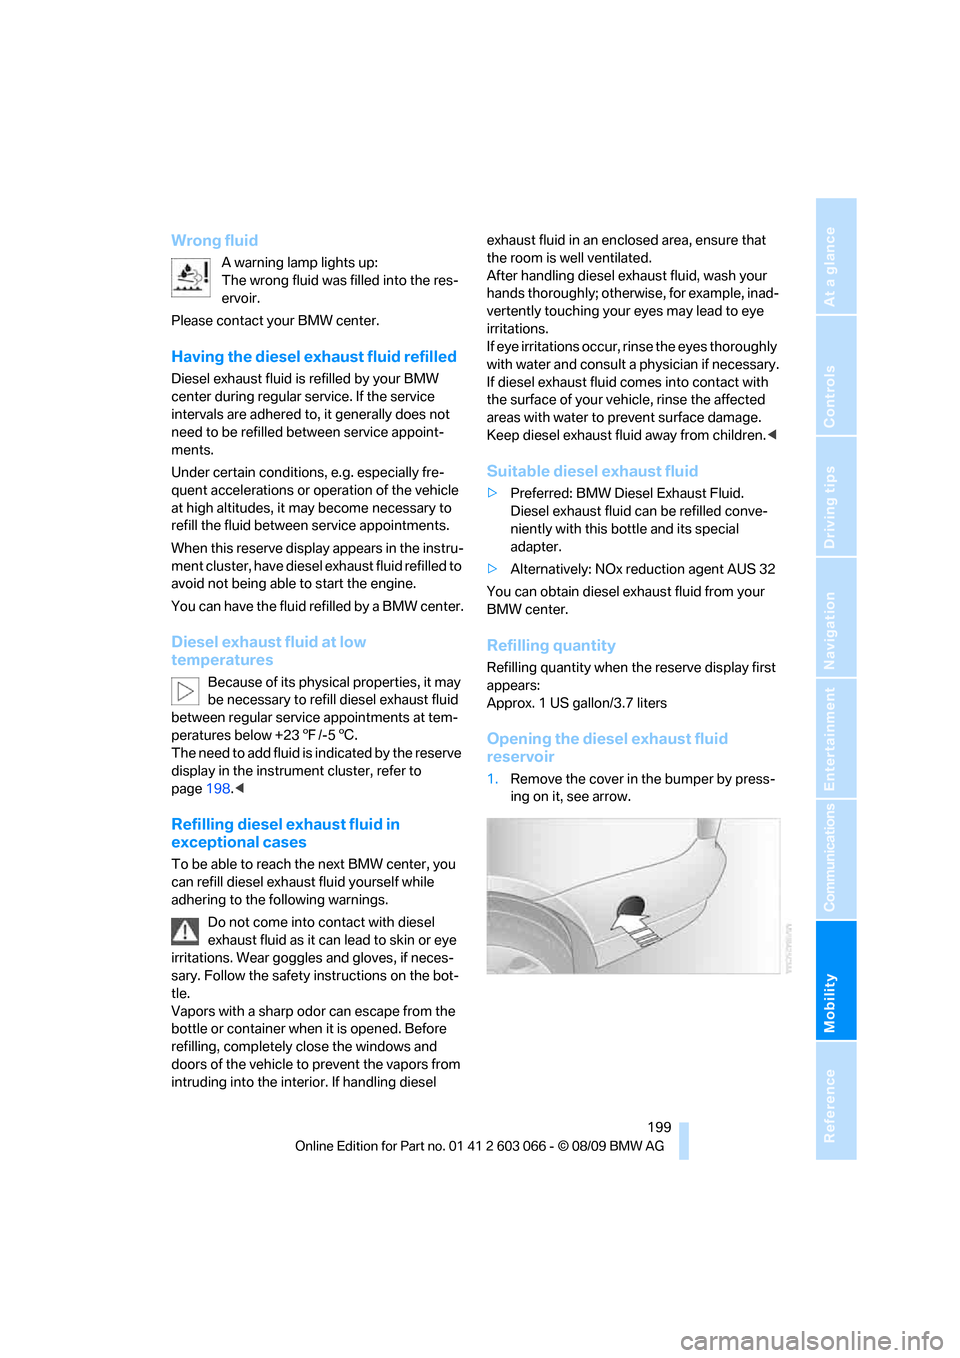
1.Remove the cover in the bumper by press-
ing on it, see arrow.
Page 222 of 274
Under the hood
220 The oil level must not be above the upper
marking of the dipstick. Too much oil will
harm the engine.<
Checking the engine oil level
electronically*
Your car is equipped with an electronic oil-level
monitor.
For a precise measurement and display of the
oil level, it is necessary that the engine be at
operating temperature, i.e. after uninterrupted
driving for at least approx. 6.5 miles/10 km. You
can have the oil level displayed while you are
driving, or while the vehicle is at a standstill on a
level surface and the engine is running.
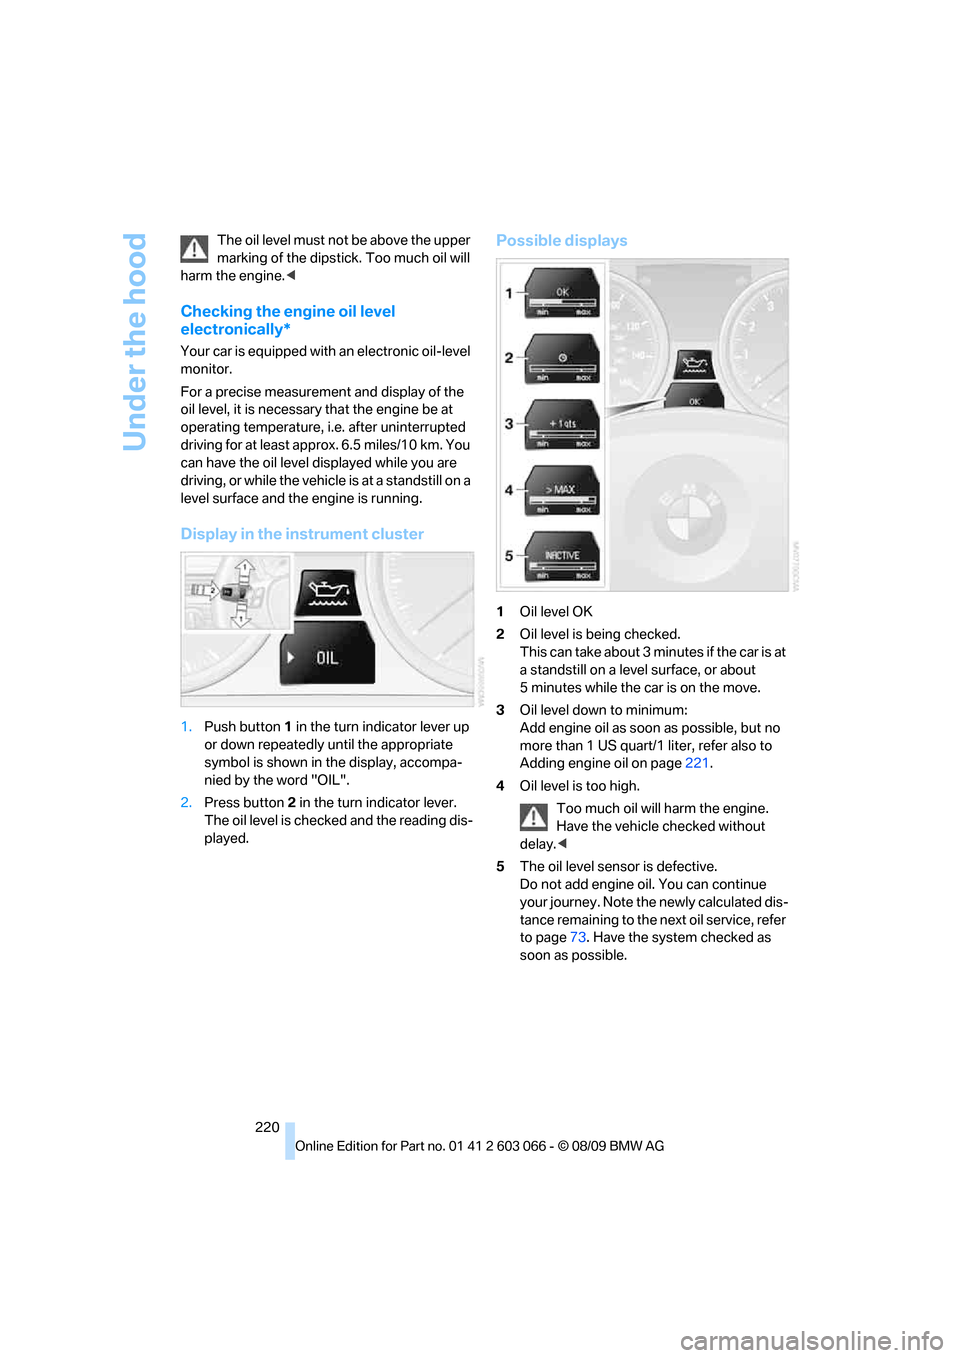
Display in the instrument cluster
1.Push button 1 in the turn indicator lever up
or down repeatedly until the appropriate
symbol is shown in the display, accompa-
nied by the word "OIL".
2.Press button 2 in the turn indicator lever.
The oil level is checked and the reading dis-
played.
Possible displays
1Oil level OK
2Oil level is being checked.
This can take about 3 minutes if the car is at
a standstill on a level surface, or about
5 minutes while the car is on the move.
3Oil level down to minimum:
Add engine oil as soon as possible, but no
more than 1 US quart/1 liter, refer also to
Adding engine oil on page221.
4Oil level is too high.
Too much oil will harm the engine.
Have the vehicle checked without
delay.<
5The oil level sensor is defective.
Do not add engine oil. You can continue
your journey. Note the newly calculated dis-
tance remaining to the next oil service, refer
to page73. Have the system checked as
soon as possible.
Page 229 of 274
Mobility
227Reference
At a glance
Controls
Driving tips
Communications
Navigation
Entertainment
Outside sensors/cameras
Keep the sensors and cameras on the
outside of the vehicle, e.g. those for Park
Distance Control, clean and free of ice to ensure
that they remain fully functional.<
Interior care
Upholstery fabrics/cloth trims/
Alcantara fabrics
Vacuum regularly with a vacuum cleaner to
remove superficial dirt.
To remove severe spots such as stains from
beverages, use a soft sponge or lint-free
microfiber cloth and suitable interior cleaners.
Follow the instructions on the packaging.
Clean the upholstery down to the seams
using a sweeping motion. Avoid strong
rubbing.<
Opened Velcro fasteners on pants or
other articles of clothing can damage the
seat covers. Ensure that Velcro fasteners are
closed.<
Leather/leather trim
The leather used by BMW is a high quality
natural product. Slight irregularities in the
leather are a typical characteristic of natural
leather.<
Dust and road grit in the pores and folds of the
leather have an abrasive effect, leading to
increased wear and causing the leather surface
to become brittle prematurely. Therefore, fre-
quently clean the leather of dust using a cloth or
vacuum cleaner.
Clean light-colored leather more frequently as
dust and dirt are more noticeable.
Treat the leather at least once every two
months using a leather lotion as dirt and grease
will gradually attack the leather's protective
layer.
Carpets/cargo area
You can vacuum the carpets and floor mats or
clean them with interior cleaner if heavily soiled.The floor mats can be removed for cleaning.
When replacing the mats, ensure that the seat
rails do not extend over the floor mats, as this
may damage the mats.
Lint on the floor mats occurs for technical rea-
sons and can be removed by vacuuming
repeatedly.
Interior plastic parts
>Imitation leather surfaces
>Lamp glasses
>Display pane of instrument cluster
>Matte parts
Clean with water and solvent-free plastic
cleaner if necessary.
Fine wood parts
Clean fine wood trim and fine wood parts with a
damp cloth. Wipe dry with a soft cloth.
Safety belts
Dirty belt straps impede the reeling action and
thus have a negative impact on safety.
Do not clean chemically, as this may
destroy the webbing.<
Interior sensors/cameras
To clean interior sensors and cameras, e.g. of
the high-beam assistant, use a lint-free cloth
moistened with glass cleaner.
Displays
To clean displays, e.g. of the radio or instrument
cluster, use a cleaning cloth for displays or a
soft, non-abrasive, lint-free cloth.
Avoid applying excessive pressure when
cleaning the displays; otherwise, damage
may occur.<
Do not use chemical or abrasive house-
hold cleaning agents. Keep all types of
fluid away from the device. Otherwise, surfaces
or electrical components may be corroded or
damaged.<
Page 258 of 274
Everything from A - Z
256 Care225
– automatic car washes225
– care products225
– carpets227
– CD/DVD drives228
– chrome parts226
– displays227
– exterior225
– fine wood parts227
– headlamps226
– high-pressure washer225
– interior227
– leather227
– light-alloy wheels226
– paintwork226
– plastic parts227
– rubber seals226
– safety belts227
– sensors and cameras227
– upholstery and cloth
trim227
– washing the car
manually226
– windows226
Cargo, securing120
Cargo area110
– capacity247
– Comfort Access35
– folding up the floor
panel112
– lamp, refer to Interior
lamps96
– opening from inside30
– opening from outside31
– partition net111
– roller cover110
Cargo area lid, refer to Trunk
lid/tailgate30
Cargo area net, refer to
Partition net111
Cargo loading119
– securing cargo120
– stowing cargo119
– vehicle119
Car jack
– jacking points235
Car key, refer to Integrated
key/remote control26Car phone
– installation location, refer to
Center armrest106
– refer to separate Owner's
Manual
Car phone, refer to
Telephone174
Car radio, refer to Radio147
Car shampoo
227
Catalytic converter, refer to
Hot exhaust system117
CD, audio playback155
CD changer155,159
– controls144
– fast forward/reverse157
– filling or emptying the
magazine160
– random play sequence156
– selecting a track155
– switching on/off144
– tone control144
– volume144
CD player155
– controls144
– fast forward/reverse157
– random play sequence156
– selecting a track155
– switching on/off144
– tone control144
– volume144
Center armrest106
Center brake lamp
– replacing bulb235
Center console, refer to
Around the center
console14
Central locking
– from inside30
– from outside27
Central locking system27
– Comfort Access34
– hotel function31
– setting unlocking
characteristics27
Changes, technical, refer to
For your own safety5
Changing bulbs, refer to
Lamps and bulbs229Changing the language on the
Control Display79
Changing the measurement
units on the Control
Display73
Changing wheels235
Chassis number, refer to
Engine compartment219
Check Control77
Check Gas Cap196
Child restraint fixing system
LATCH51
Child restraint systems50
Child safety locks53
Child seats, refer to
Transporting children
safely50
Chrome parts227
Chrome polish227
Cigarette lighter, refer to
Lighter108
Cleaning headlamps60
– washer fluid60
Cleaning your BMW, refer to
Care225
Clock69
– 12h/24h mode76
– setting the time and date76
– setting time75
Closing
– from inside30
– from outside27
Clothes hooks107
Cockpit10
Cold start, refer to Starting the
engine55
Combined instrument, refer to
Instrument cluster12
Comfort Access34
– replacing the battery35
Comfort access, refer to
Comfort Access34
Comfort area, refer to Around
the center console14
Compartment for remote
control, refer to Ignition
lock54
Compass104
Page 259 of 274
Reference 257
At a glance
Controls
Driving tips
Communications
Navigation
Entertainment
Mobility
Computer71
– displays on Control
Display71
Computer, refer to iDrive16
Concierge service189
Condensation, refer to When
the vehicle is parked119
Condition Based Service
CBS223
Configuring settings, refer to
Personal Profile26
Confirmation signals for
locking/unlocking the
vehicle28
Congestion
– refer to Route, bypassing
sections135
Connecting vacuum cleaner,
refer to Connecting
electrical appliances108
Consumption, refer to
Average consumption71
Consumption display
– average consumption71
– Energy Control70
Contacts
– creating186
Control Center, refer to
iDrive16
Control Display, refer to
iDrive16
– adjusting brightness80
– switching on/off19
Controller, refer to iDrive16
Controls and displays10
Control unit, refer to iDrive16
Convenient operation
– glass roof28
– windows28
Coolant222
– checking level222
Coolant temperature70
Cooling, maximum98
Cooling fluid, refer to
Coolant222
Cooling system, refer to
Coolant222
Copyright2Corner-illuminating lamps
– replacing bulbs231
Corner-illuminating lamps,
refer to Adaptive light
control93
Cornering lamps, refer to
Adaptive light control93
Correct tires216
Country codes DVD157
Courtesy lamps, refer to
Interior lamps96
Criteria for route134
Cross-hairs in navigation130
Cruise control61
– active62
– malfunction62
Cruising range71
Cupholders107
Curb weight, refer to
Weights247
Current fuel consumption,
refer to Energy Control70
Current playback
– external devices169
– of music collection164
Customer Relations191
D
Dashboard, refer to
Cockpit10
Dashboard, refer to
Instrument cluster12
Dashboard lighting, refer to
Instrument lighting95
Data, technical244
– capacities248
– dimensions245
– engine244
– weights247
Data transfer192
Date
– date format77
– setting76
Daytime running lights93
– replacing bulbs230
DBC Dynamic Brake
Control82Deactivating front passenger
airbags90
Deadlocking, refer to
Locking28
Defect
– door lock29
– fuel filler flap196
– glass roof37
– panorama glass roof39
Destination, entering by town/
city name125
Destination address
– entering125,131
Destination entry via BMW
Assist129
Destination for navigation
– entering by voice131
– entering via map130
– entry125
– home address128
– manual entry125
Destination guidance134
– bypassing a route
section135
– changing specified
route134
– continuing134
– starting134
– voice instructions135
– volume of voice
instructions136
Diesel exhaust fluid199
Diesel fuel197
Diesel particulate filter117
Digital clock69
Digital compass104
Digital radio, refer to HD
Radio148
Dimensions245
Dipstick, engine oil219
Directional indicators, refer to
Turn signals58
Direction instructions, refer to
Voice instructions135
Directory for navigation, refer
to Address book127
Displacement, refer to Engine
data244
Page 260 of 274
Everything from A - Z
258 Display, refer to iDrive
controls16
Display lighting, refer to
Instrument lighting95
Displays
– on the Control Display16
Displays, refer to Instrument
cluster12
Displays and controls10
Disposal
– coolant222
– remote control battery35
– vehicle battery236
Distance control, refer to
Active cruise control62
Distance remaining to service,
refer to Service
requirements73
Distance warning, refer to
Park Distance Control
PDC81
Door key, refer to Remote
control with integrated
key26
Door lock29
Doors, emergency
operation29
DOT Quality Grades214
Draft-free ventilation100
Drinks holders, refer to
Cupholders107
Drive-off assistance, refer to
Dynamic Stability Control
DSC82
Drive-off assistant84
Driving lamps, refer to Parking
lamps/low beams92
Driving notes116
Driving off on hills, refer to
Drive-off assistant84
Driving stability control
systems82
Driving through water118
Driving tips, refer to Driving
notes116
Dry air, refer to Cooling
function99
DSC Dynamic Stability
Control82DTC Dynamic Traction
Control82
– indicator/warning lamp82
DVD
– country codes157
– settings158
– video playback157
DVD menu158
DVD player, refer to CD
player155
DVD video157
Dynamic Brake Control
DBC82
Dynamic destination
guidance135
Dynamic Stability Control
DSC82
– indicator/warning lamp82
Dynamic Traction Control
DTC
– indicator/warning lamp83
E
EBV Electronic brake-force
distribution82
Eject button, refer to Buttons
on the CD/DVD player144
Electrical malfunction
– door lock29
– driver's door29
– fuel filler flap196
– glass roof37
– panorama glass roof39
– trunk lid31
Electric seat adjustment42
Electric steering wheel lock
– with Comfort Access34
Electronic brake-force
distribution EBV82
Electronic oil level check220
Electronic Stability Program
ESP, refer to Dynamic
Stability Control DSC82
Emergency actuation,
automatic transmission,
refer to Overriding selector
lever lock58Emergency operation
– fuel filler flap, manual
release196
Emergency operation, refer to
Closing manually
– glass roof37
– panorama glass roof39
Emergency operation, refer to
Manual operation
– door lock29
Emergency release
– trunk lid from inside32
Emergency Request237
Emergency services, refer to
Roadside Assistance237
Energy, saving
– saving fuel116
Energy-conscious driving,
refer to Energy Control70
Energy Control70
Engine
– breaking in116
– data244
– overheated, refer to Coolant
temperature70
– speed244
– starting55
– starting, Comfort Access34
– switching off55
Engine compartment219
Engine coolant, refer to
Coolant222
Engine oil
– adding221
– alternative oil types222
– BMW Maintenance
System223
– capacity248
– checking level219
– dipstick219
– intervals between changes,
refer to Service
requirements73
Engine output, refer to Engine
data244
Engine speed, refer to Engine
data244
Engine starting, refer to
Starting the engine55