lumbar support BMW M4 2016 Owners Manual
[x] Cancel search | Manufacturer: BMW, Model Year: 2016, Model line: M4, Model: BMW M4 2016Pages: 228, PDF Size: 4.88 MB
Page 48 of 228
AdjustingVehicle equipment
This chapter describes all standard, national
and special equipment provided in the model
series. Equipment not available in the vehicle is
therefore also described, for example the se‐
lected special equipment or national version.
This also applies to safety-relevant functions
and systems. Comply with the relevant na‐
tional regulations when using the correspond‐
ing functions and systems.
Safe seated position A seated position that suitably reflects your re‐
quirements is a vital condition of relaxed driv‐
ing with a minimum of fatigue.
In the event of an accident, the seated position
plays an important role together with:▷Seat belts, see page 52.▷Head restraints, see page 54.▷Airbags, see page 104.
Seats
Notes WARNING
Seat adjustment during the journey can
lead to unexpected seat movements. You
could lose control of the vehicle. Danger of ac‐
cidents. Only adjust the seat on the driver side
when at a standstill.◀
WARNING
If the seat backrest is angled back too
far, the protective effect of the seat belt will no
longer be guaranteed. There is a danger of
slipping under the seat belt in the event of an
accident. Danger of injury or life. Set the seat
before starting the journey. Place the seat
backrest in the most upright possible position,
and do not change it during the journey.◀
WARNING
Danger of trapping when moving the
seats. Danger of injury or damage to property.
Before making the setting, make sure that the
movement area of the seat is clear.◀
Manually adjustable seats
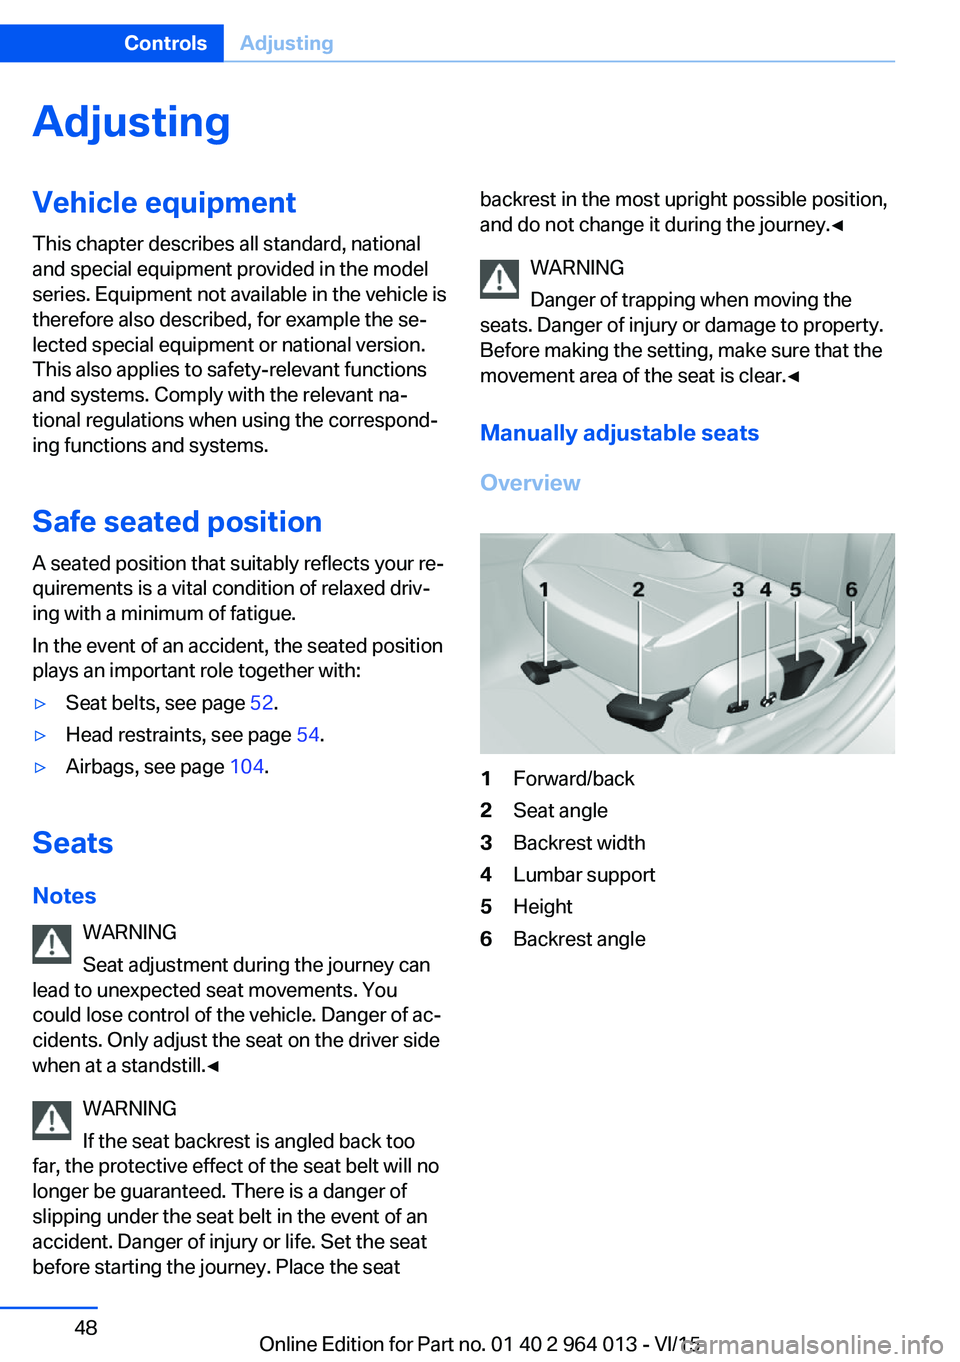
Overview1Forward/back2Seat angle3Backrest width4Lumbar support5Height6Backrest angleSeite 48ControlsAdjusting48
Online Edition for Part no. 01 40 2 964 013 - VI/15
Page 49 of 228
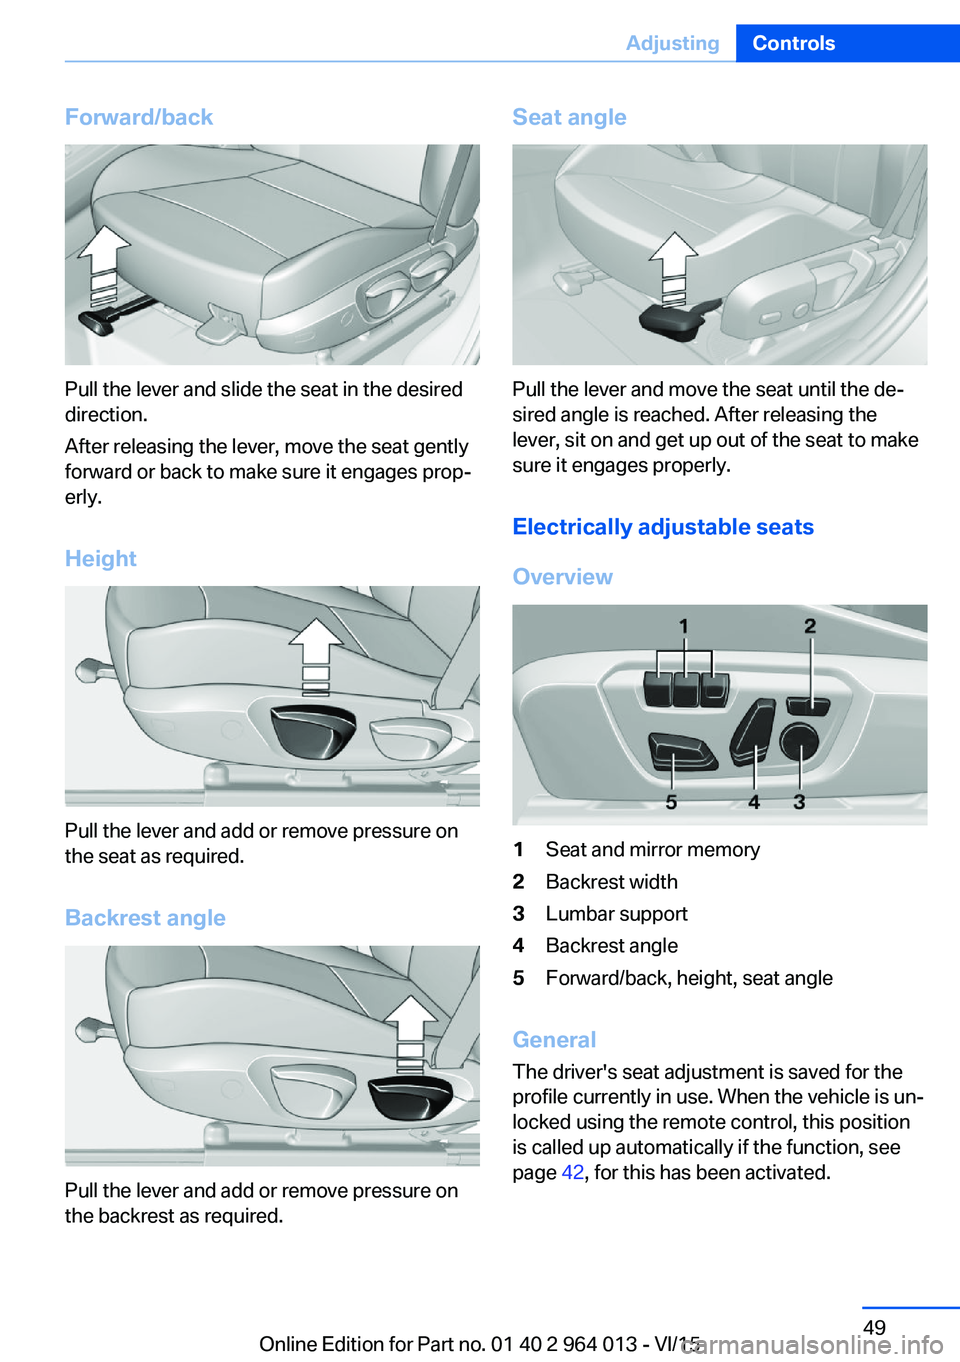
Forward/back
Pull the lever and slide the seat in the desired
direction.
After releasing the lever, move the seat gently
forward or back to make sure it engages prop‐
erly.
Height
Pull the lever and add or remove pressure on
the seat as required.
Backrest angle
Pull the lever and add or remove pressure on
the backrest as required.
Seat angle
Pull the lever and move the seat until the de‐
sired angle is reached. After releasing the
lever, sit on and get up out of the seat to make
sure it engages properly.
Electrically adjustable seats
Overview
1Seat and mirror memory2Backrest width3Lumbar support4Backrest angle5Forward/back, height, seat angle
General The driver's seat adjustment is saved for the
profile currently in use. When the vehicle is un‐
locked using the remote control, this position is called up automatically if the function, see
page 42, for this has been activated.
Seite 49AdjustingControls49
Online Edition for Part no. 01 40 2 964 013 - VI/15
Page 50 of 228
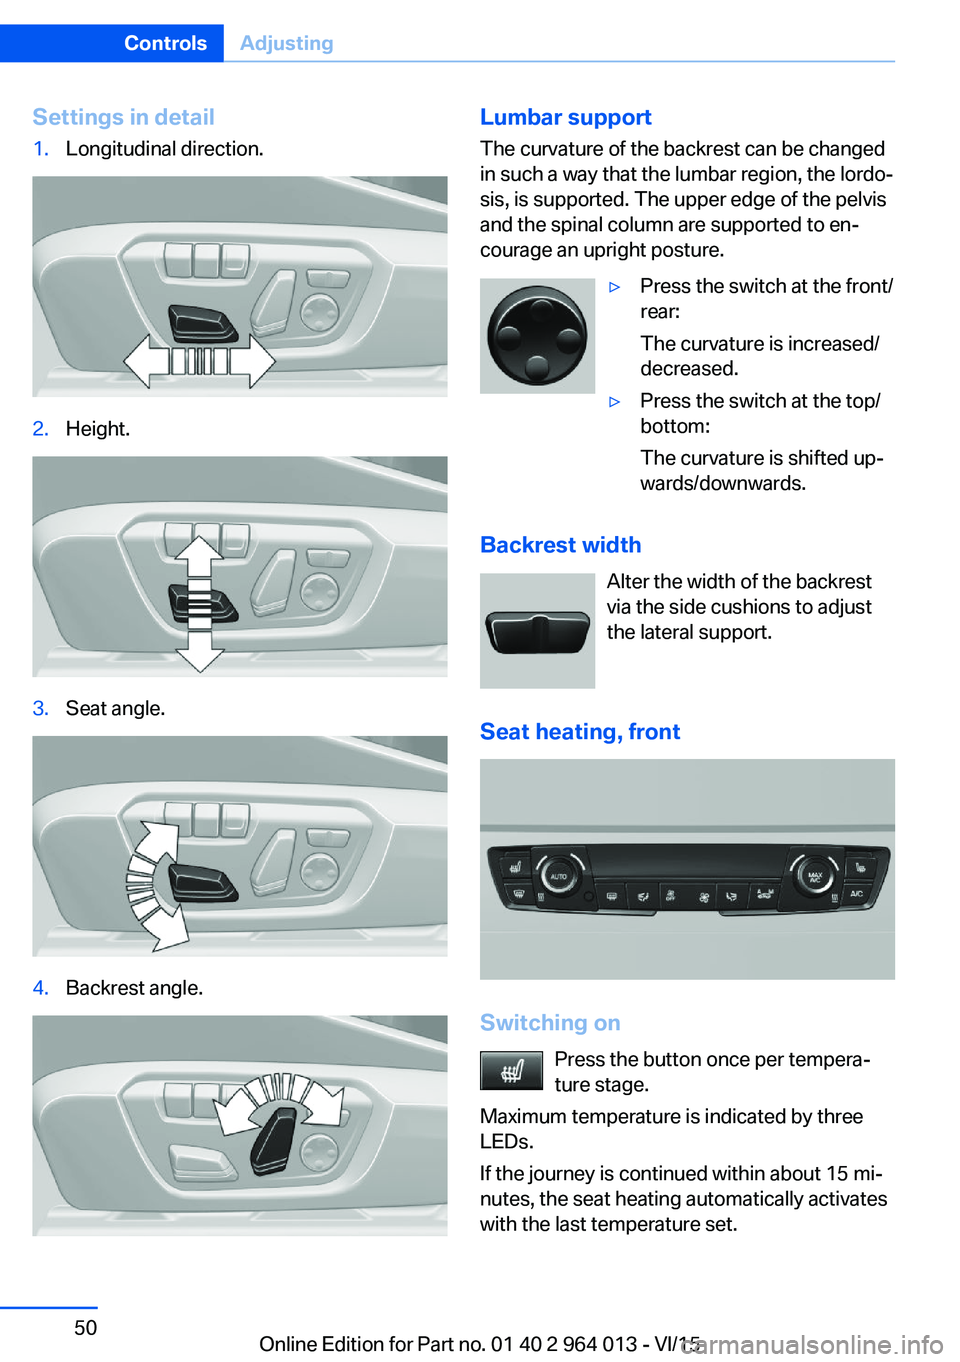
Settings in detail1.Longitudinal direction.2.Height.3.Seat angle.4.Backrest angle.Lumbar support
The curvature of the backrest can be changed
in such a way that the lumbar region, the lordo‐
sis, is supported. The upper edge of the pelvis
and the spinal column are supported to en‐
courage an upright posture.▷Press the switch at the front/
rear:
The curvature is increased/
decreased.▷Press the switch at the top/
bottom:
The curvature is shifted up‐
wards/downwards.
Backrest width
Alter the width of the backrest
via the side cushions to adjust
the lateral support.
Seat heating, front
Switching on Press the button once per tempera‐
ture stage.
Maximum temperature is indicated by three
LEDs.
If the journey is continued within about 15 mi‐
nutes, the seat heating automatically activates
with the last temperature set.
Seite 50ControlsAdjusting50
Online Edition for Part no. 01 40 2 964 013 - VI/15
Page 54 of 228
clean. After an accident, have the seat belts in‐
spected at a Service Partner or a qualified spe‐
cialist workshop.◀
In the event of stress due to an accident or
damage:
Replace the belt system, including the seat
belt tensioner, and have the belt anchorage
checked.
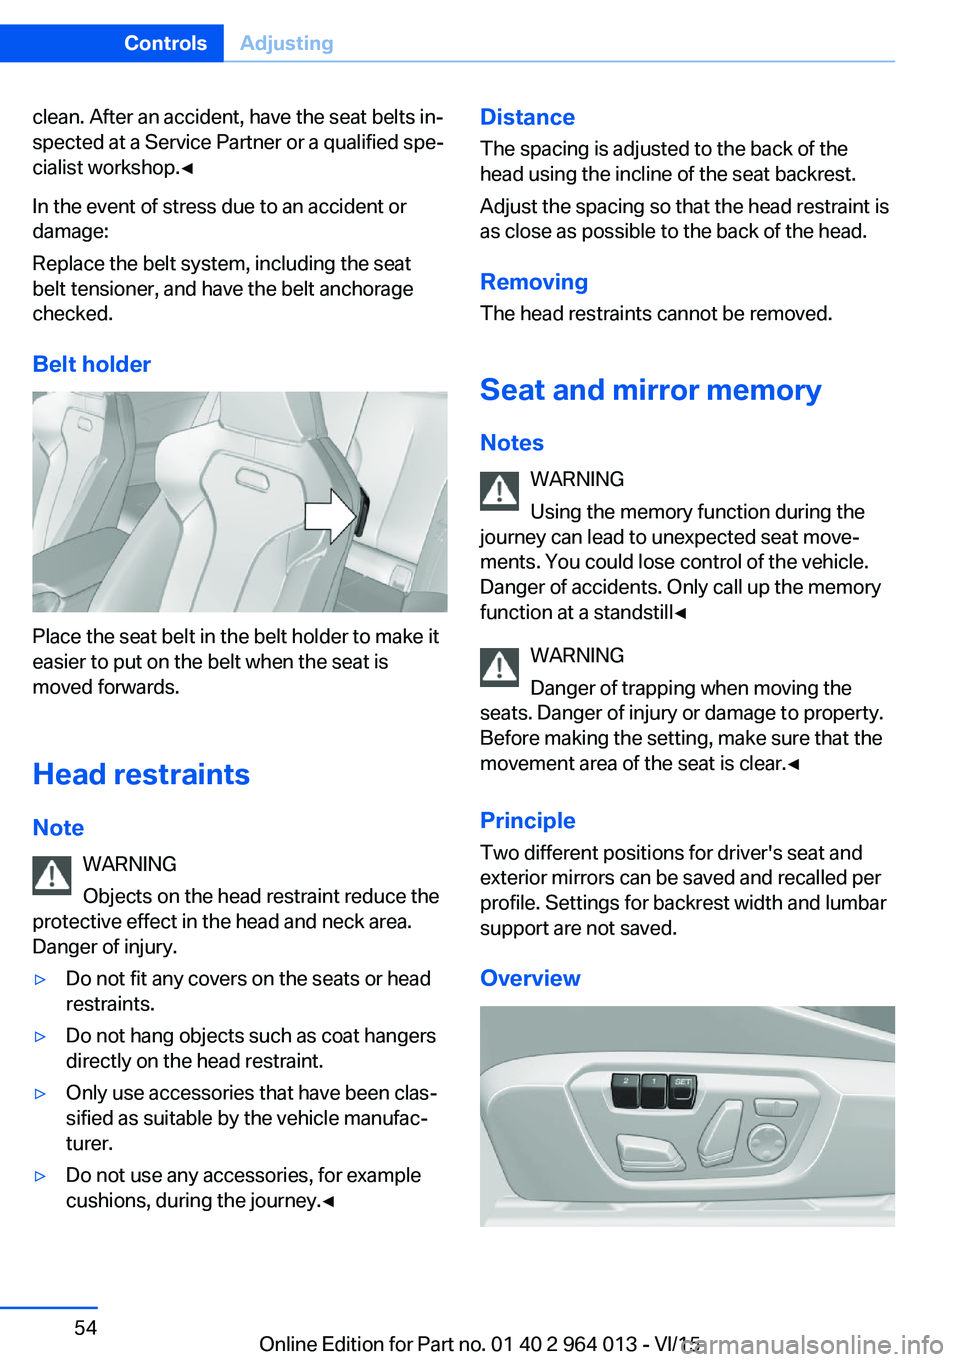
Belt holder
Place the seat belt in the belt holder to make it
easier to put on the belt when the seat is
moved forwards.
Head restraints Note WARNING
Objects on the head restraint reduce the
protective effect in the head and neck area.
Danger of injury.
▷Do not fit any covers on the seats or head
restraints.▷Do not hang objects such as coat hangers
directly on the head restraint.▷Only use accessories that have been clas‐
sified as suitable by the vehicle manufac‐
turer.▷Do not use any accessories, for example
cushions, during the journey.◀Distance
The spacing is adjusted to the back of the
head using the incline of the seat backrest.
Adjust the spacing so that the head restraint is
as close as possible to the back of the head.
RemovingThe head restraints cannot be removed.
Seat and mirror memory
Notes WARNING
Using the memory function during the
journey can lead to unexpected seat move‐
ments. You could lose control of the vehicle.
Danger of accidents. Only call up the memory
function at a standstill◀
WARNING
Danger of trapping when moving the
seats. Danger of injury or damage to property.
Before making the setting, make sure that the
movement area of the seat is clear.◀
Principle Two different positions for driver's seat and
exterior mirrors can be saved and recalled per
profile. Settings for backrest width and lumbar
support are not saved.
OverviewSeite 54ControlsAdjusting54
Online Edition for Part no. 01 40 2 964 013 - VI/15
Page 222 of 228
Journey computer 92
Jump-starting connection, starting assistance 204
Jump starting, see starting assistance 203
K
Key/remote control 32
Keyless Go, see Comfort Ac‐ cess 39
Key memory, see Personal Profile 33
Key switch for front passen‐ ger airbags 106
L
Labelling of recommended tyres 177
Lane boundary, warning 115
Lane change warning 117
Lane departure warning 115
Language, on the control dis‐ play 94
Lashing eyes, securing load 166
Lashing straps, securing load 166
Launch Control 77
Laying up out of use 211
Laying up, vehicle 211
Leather, care 210
LED light, replacing the bulbs 195
LEDs, light-emitting di‐ odes 194
Left-hand traffic, light set‐ ting 102
Lenses of camera, care 211
Light alloy wheels, care 210
Light-emitting diodes, LEDs 194
Lighter 149
Lighting 98 Light in the exterior mirror,
see Lane Change Warn‐
ing 117
Lights 98
Lights and light bulbs 193
Light switch 98
LIM button, see Manual Speed Limiter 119
Load 166
Loads 166
Lock, door 37
Locking/unlocking using door lock 37
Locking/unlocking with re‐ mote control 35
Locking, automatic 42
Locking settings 41
Locking via the boot lid 38
Lock, wheel studs 199
Low-beam headlights 98
Lower back support 50
Low Speed Assistant 74
Luggage rack, see Roof rack 167
Lumbar support 50
M
Maintenance 191
Maintenance require‐ ment 191
Maintenance, service require‐ ment 87
Maintenance System BMW 191
Malfunction displays, see Check control 80
Manual air distribution 146
Manual air flow 146
Manual gearbox 73
Manual operation, door lock 37
Manual operation, exterior mirrors 56
Manual operation, fuel filler flap 172 Manual operation, Park Dis‐
tance Control, PDC 132
Manual operation, rear-view camera 134
Manual operation, Side View 137
Manual operation, Top View 138
Manual Speed Limiter 119
Maximum cooling effect 145
Maximum speed range 165
Maximum speed, winter tyres 177
M Carbon ceramic brakes 160
M compound brakes 160
M differential, active 126
MDM, M Dynamic Mode 125
M double clutch transmis‐ sion 74
M Drive 123
M Driver's Package, driving instructions 165
M Dynamic Mode MDM 125
Memory, seat, mirror 54
M Engine Dynamics Con‐ trol 78
Menu in the instrument clus‐ ter 90
Menus, see iDrive operating principle 18
Message of a flat tyre 108, 109
Messages, see Check con‐ trol 80
Microfilter 146
Minimum tread depth, tyres 176
Mirror, memory 54
Mirrors 55
Mobile communication equip‐ ment 163
Mobility system 178
Moisture in the headlight 194
Monitor, see Control Dis‐ play 16 Seite 222ReferenceEverything from A to Z222
Online Edition for Part no. 01 40 2 964 013 - VI/15