instrument cluster BMW M5 2006 User Guide
[x] Cancel search | Manufacturer: BMW, Model Year: 2006, Model line: M5, Model: BMW M5 2006Pages: 231, PDF Size: 8.44 MB
Page 78 of 231
Technology for comfort, convenience and safety
76 To maintain vehicle stability, always drive
with the system switched on when possi-
ble.<
Reactivating DSC
Press the DSC button; the indicator lamp in the
instrument cluster goes out.
You can also activate and deactivate DSC with
the button on the steering wheel, refer to
MDrive on page48.
EDC Electronic Damping
Control
The concept
If the influencing variables such as road surface
quality or operating conditions such as steer-
ing, braking etc. change, the damping automat-
ically adjusts to the new conditions within a
fraction of a second.
You can choose from three programs.
"Comfort" program
Select the "Comfort" program if you want com-
fort-oriented coordination of shock absorbers
and steering.
"Normal" program
The "Normal" program offers a balanced mix-
ture of the comfort and the sport program.
"Sport" program
Select the "Sport" program if you want a con-
sistently sporty coordination of shock absorb-
ers and steering.
Selecting program
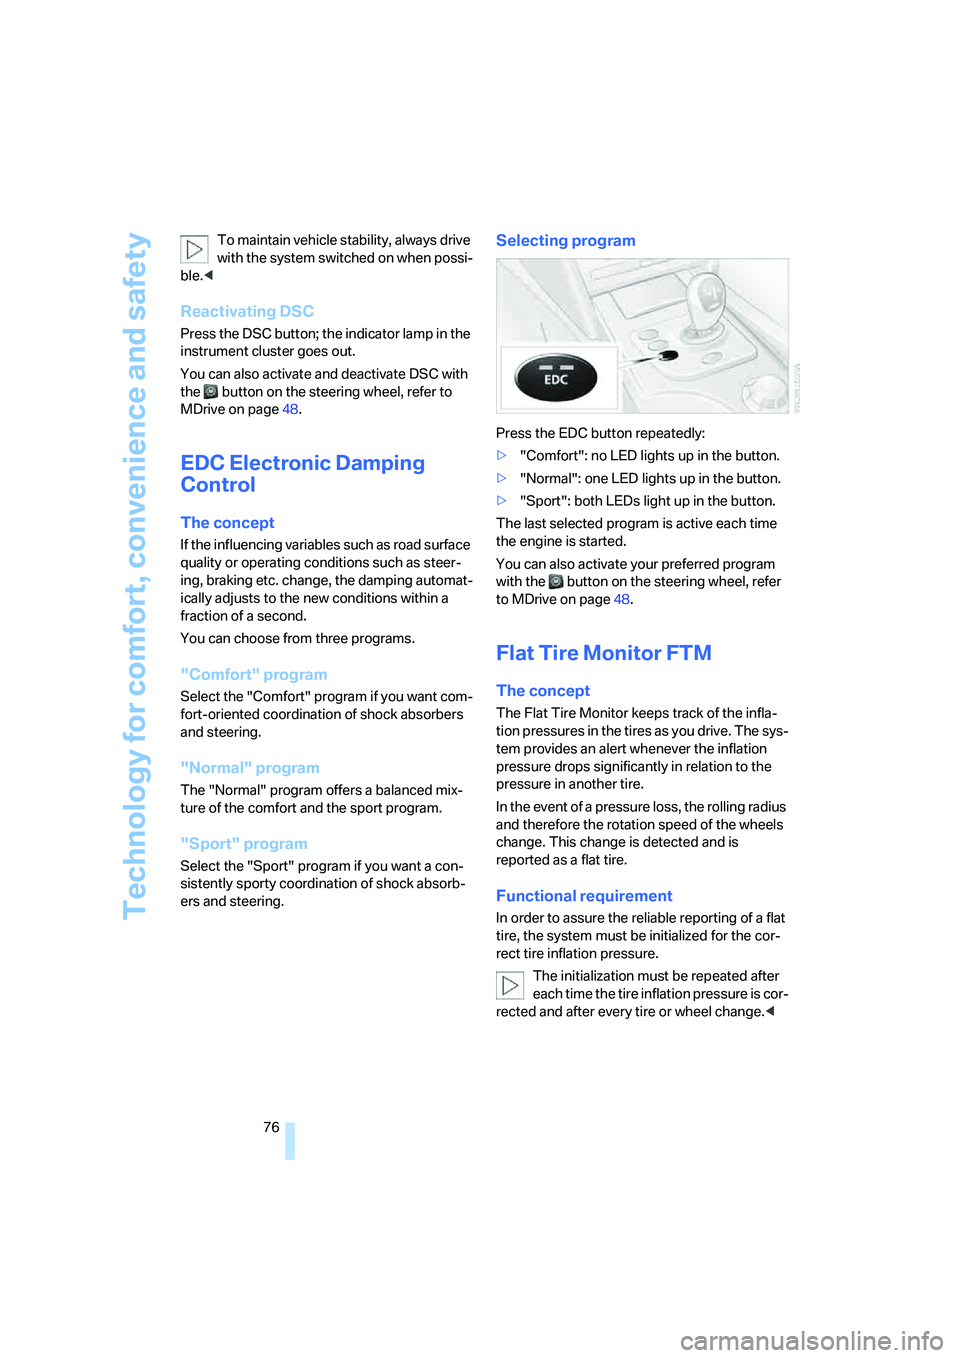
Press the EDC button repeatedly:
>"Comfort": no LED lights up in the button.
>"Normal": one LED lights up in the button.
>"Sport": both LEDs light up in the button.
The last selected program is active each time
the engine is started.
You can also activate your preferred program
with the button on the steering wheel, refer
to MDrive on page48.
Flat Tire Monitor FTM
The concept
The Flat Tire Monitor keeps track of the infla-
tion pressures in the tires as you drive. The sys-
tem provides an alert whenever the inflation
pressure drops significantly in relation to the
pressure in another tire.
In the event of a pressure loss, the rolling radius
and therefore the rotation speed of the wheels
change. This change is detected and is
reported as a flat tire.
Functional requirement
In order to assure the reliable reporting of a flat
tire, the system must be initialized for the cor-
rect tire inflation pressure.
The initialization must be repeated after
each time the tire inflation pressure is cor-
rected and after every tire or wheel change.<
Page 79 of 231
Controls
77Reference
At a glance
Driving tips
Communications
Navigation
Entertainment
Mobility
System limits
The Flat Tire Monitor cannot indicate
sudden severe tire damage caused by
outside factors and does not detect a natural,
even pressure drop in all four tires.<
In the following situations, the system could be
delayed or malfunction:
>System has not been initialized
>Driving on snowy or slippery road surface
>Sporty driving style: slip in the drive wheels,
high lateral acceleration
>Driving with snow chains
*
Initializing system
The initialization finishes during driving,
which can be interrupted at any time.
When driving resumes, the initialization is con-
tinued automatically. Do not initialize the sys-
tem when driving with snow chains.<
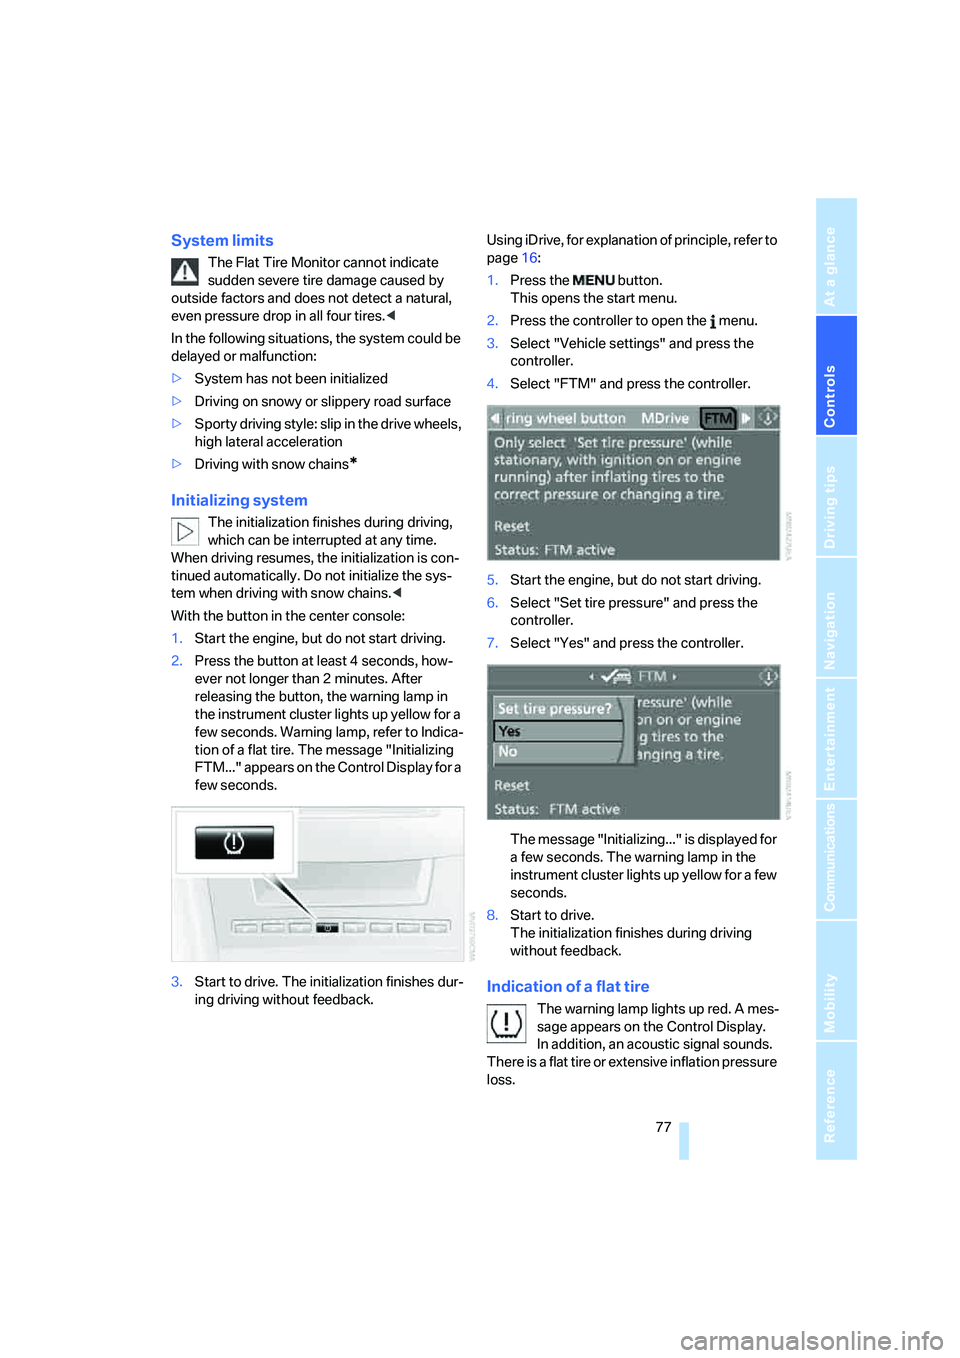
With the button in the center console:
1.Start the engine, but do not start driving.
2.Press the button at least 4 seconds, how-
ever not longer than 2 minutes. After
releasing the button, the warning lamp in
the instrument cluster lights up yellow for a
few seconds. Warning lamp, refer to Indica-
tion of a flat tire. The message "Initializing
FTM..." appears on the Control Display for a
few seconds.
3.Start to drive. The initialization finishes dur-
ing driving without feedback.Using iDrive, for explanation of principle, refer to
page16:
1.Press the button.
This opens the start menu.
2.Press the controller to open the menu.
3.Select "Vehicle settings" and press the
controller.
4.Select "FTM" and press the controller.
5.Start the engine, but do not start driving.
6.Select "Set tire pressure" and press the
controller.
7.Select "Yes" and press the controller.
The message "Initializing..." is displayed for
a few seconds. The warning lamp in the
instrument cluster lights up yellow for a few
seconds.
8.Start to drive.
The initialization finishes during driving
without feedback.
Indication of a flat tire
The warning lamp lights up red. A mes-
sage appears on the Control Display.
In addition, an acoustic signal sounds.
There is a flat tire or extensive inflation pressure
loss.
Page 87 of 231
Controls
85Reference
At a glance
Driving tips
Communications
Navigation
Entertainment
Mobility
any time and switch the high beams on and off
in the accustomed manner.
Activating high-beam assistant
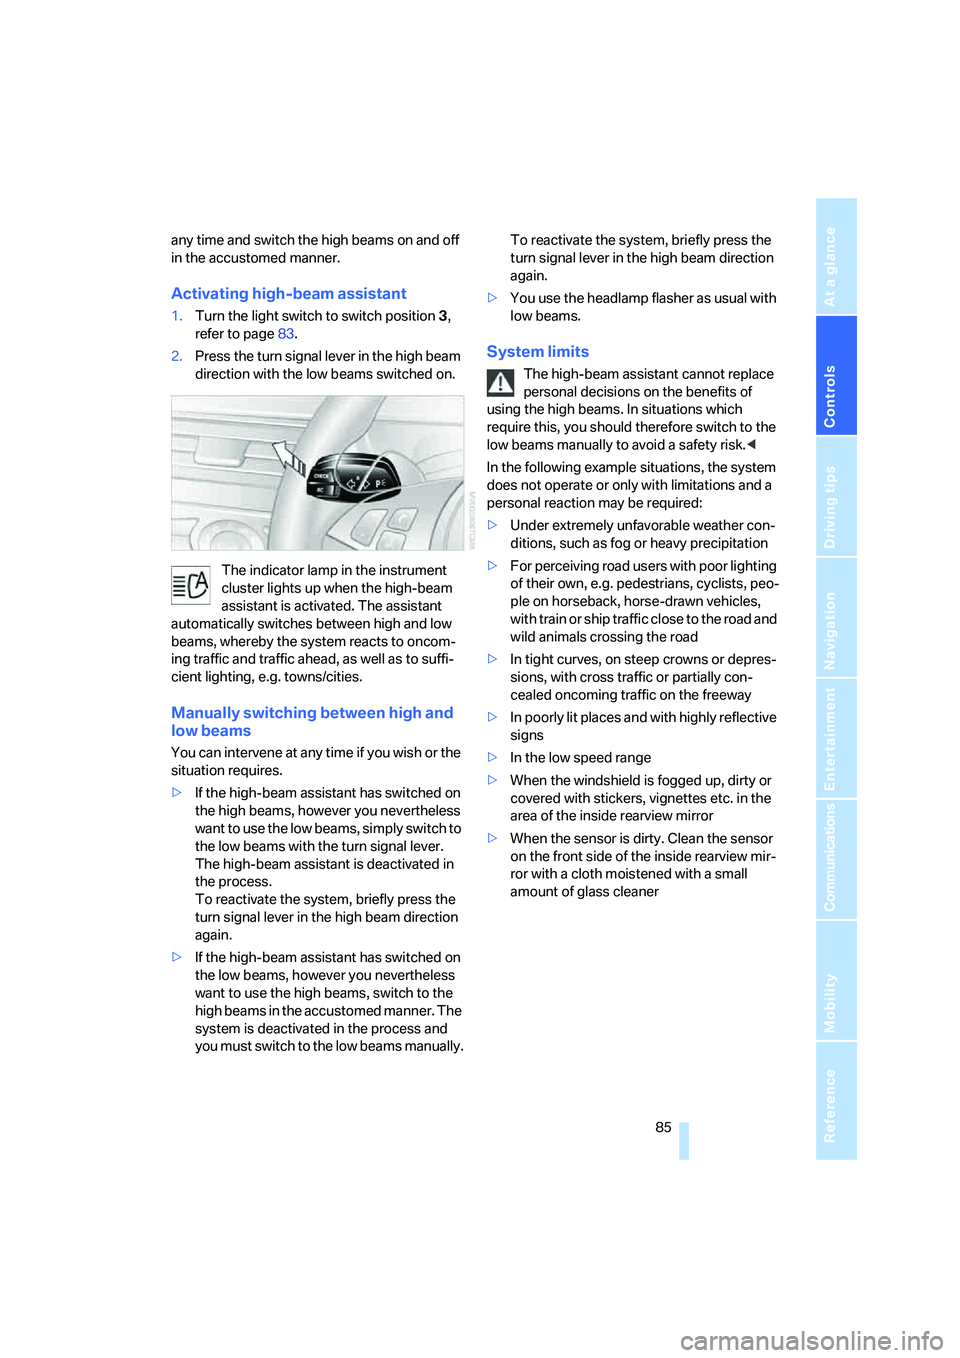
1.Turn the light switch to switch position3,
refer to page83.
2.Press the turn signal lever in the high beam
direction with the low beams switched on.
The indicator lamp in the instrument
cluster lights up when the high-beam
assistant is activated. The assistant
automatically switches between high and low
beams, whereby the system reacts to oncom-
ing traffic and traffic ahead, as well as to suffi-
cient lighting, e.g. towns/cities.
Manually switching between high and
low beams
You can intervene at any time if you wish or the
situation requires.
>If the high-beam assistant has switched on
the high beams, however you nevertheless
want to use the low beams, simply switch to
the low beams with the turn signal lever.
The high-beam assistant is deactivated in
the process.
To reactivate the system, briefly press the
turn signal lever in the high beam direction
again.
>If the high-beam assistant has switched on
the low beams, however you nevertheless
want to use the high beams, switch to the
high beams in the accustomed manner. The
system is deactivated in the process and
you must switch to the low beams manually.To reactivate the system, briefly press the
turn signal lever in the high beam direction
again.
>You use the headlamp flasher as usual with
low beams.
System limits
The high-beam assistant cannot replace
personal decisions on the benefits of
using the high beams. In situations which
require this, you should therefore switch to the
low beams manually to avoid a safety risk.<
In the following example situations, the system
does not operate or only with limitations and a
personal reaction may be required:
>Under extremely unfavorable weather con-
ditions, such as fog or heavy precipitation
>For perceiving road users with poor lighting
of their own, e.g. pedestrians, cyclists, peo-
ple on horseback, horse-drawn vehicles,
with train or ship traffic close to the road and
wild animals crossing the road
>In tight curves, on steep crowns or depres-
sions, with cross traffic or partially con-
cealed oncoming traffic on the freeway
>In poorly lit places and with highly reflective
signs
>In the low speed range
>When the windshield is fogged up, dirty or
covered with stickers, vignettes etc. in the
area of the inside rearview mirror
>When the sensor is dirty. Clean the sensor
on the front side of the inside rearview mir-
ror with a cloth moistened with a small
amount of glass cleaner
Page 184 of 231
Under the hood
182
Engine compartment
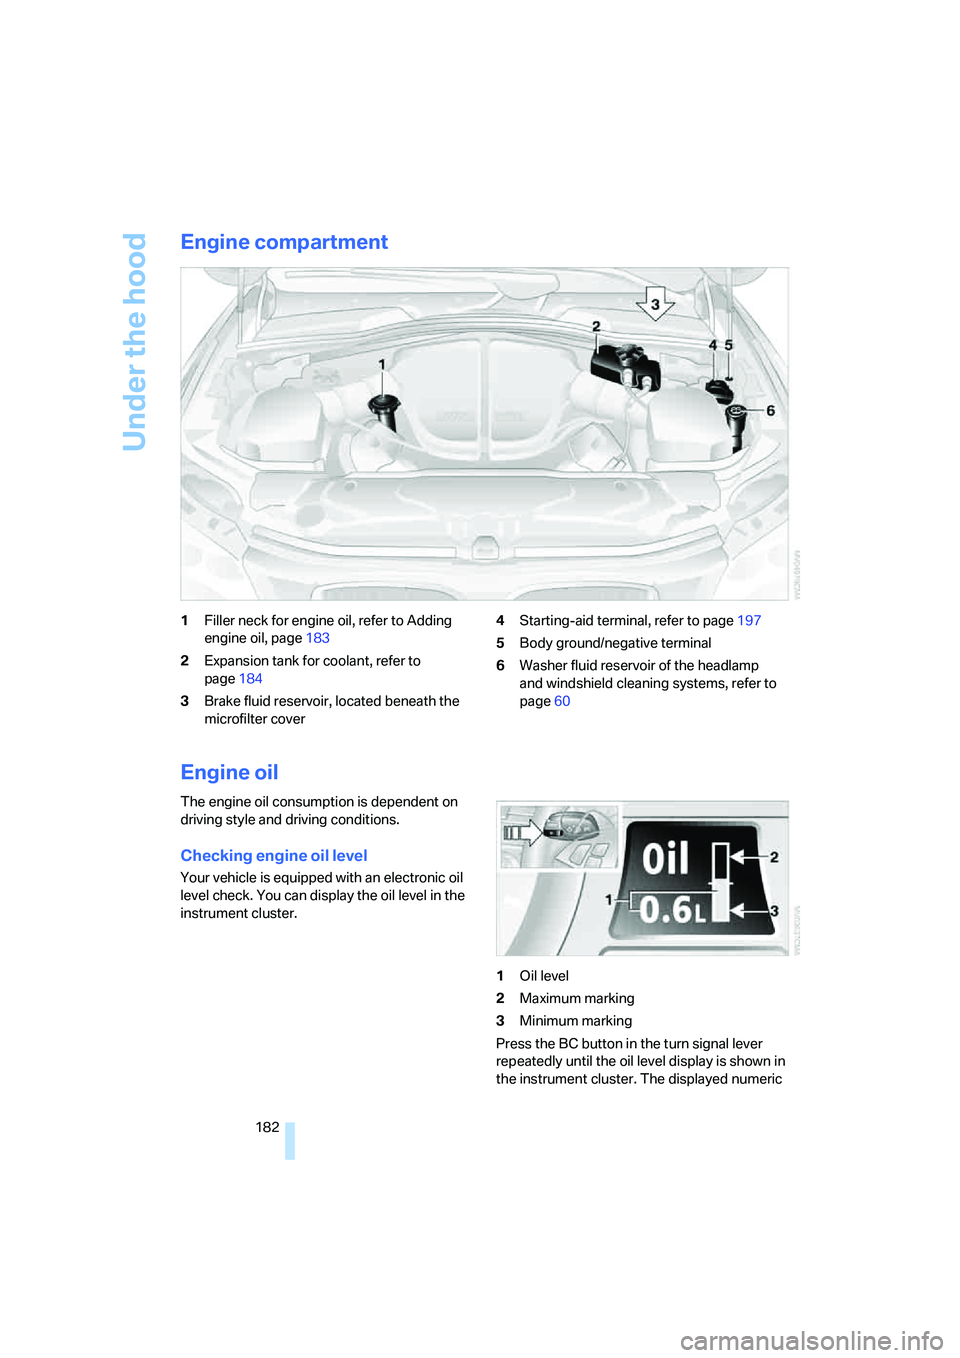
1Filler neck for engine oil, refer to Adding
engine oil, page183
2Expansion tank for coolant, refer to
page184
3Brake fluid reservoir, located beneath the
microfilter cover4Starting-aid terminal, refer to page197
5Body ground/negative terminal
6Washer fluid reservoir of the headlamp
and windshield cleaning systems, refer to
page60
Engine oil
The engine oil consumption is dependent on
driving style and driving conditions.
Checking engine oil level
Your vehicle is equipped with an electronic oil
level check. You can display the oil level in the
instrument cluster.
1Oil level
2Maximum marking
3Minimum marking
Press the BC button in the turn signal lever
repeatedly until the oil level display is shown in
the instrument cluster. The displayed numeric
Page 185 of 231
Mobility
183Reference
At a glance
Controls
Driving tips
Communications
Navigation
Entertainment
value indicates the current oil level in liters
above Minimum.
After starting the engine, the last determined
value is displayed.
The oil level must be between the two marks.
Exact measurement
The oil level is measured continuously while
driving or when stopped with the engine run-
ning.
The determination of a new value can take
30 minutes or longer.
If only dashes are shown in the display, it
was not possible to determine a new
value. This can, for example, be the case when
driving short distances or with a sporty driving
style.<
Fast measurement
In addition to the continuous measurement, you
can also quickly determine the current oil level,
e.g. after adding engine oil, however with a low
measuring accuracy.
1.With the engine at operating temperature,
i.e. after at least 6 miles/10 km of uninter-
rupted driving, park the vehicle in a horizon-
tal position.
2.Allow the engine to run at idle.
3.Press the BC button in the turn signal lever
repeatedly until the oil level display is
shown in the instrument cluster.
4.Press the BC button in the turn signal lever
for at least 2 seconds.
The oil level is determined. A clock symbol
is displayed during the measurement.
5.After approx. 1 minute the current oil level is
displayed.
If not all measuring conditions are met,
e.g. with the engine cold, "-.-" is dis-
played. The requested measurement is carried
out as soon as possible.<
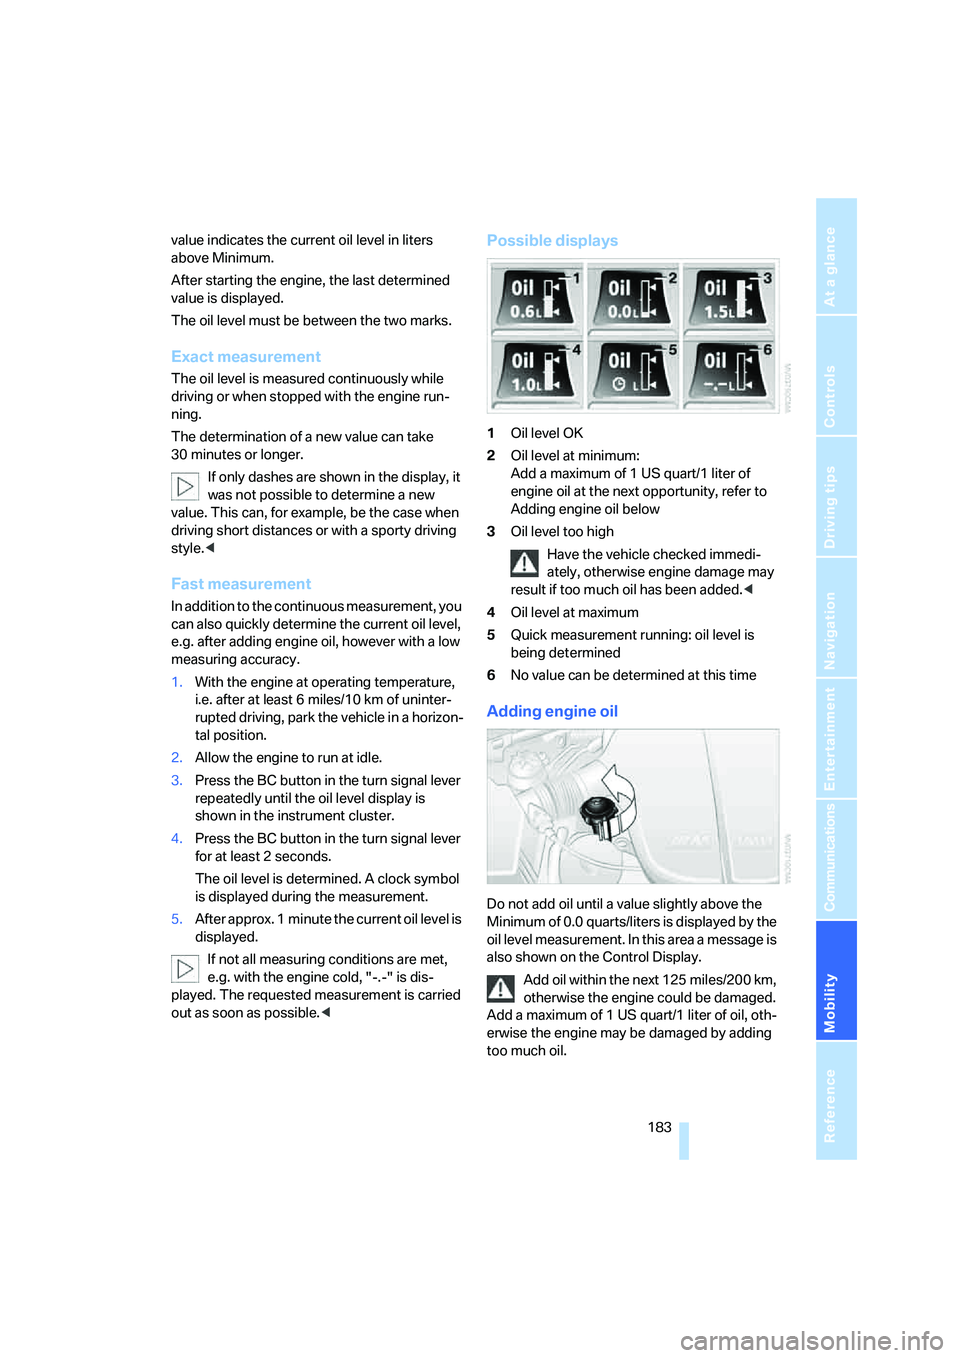
Possible displays
1Oil level OK
2Oil level at minimum:
Add a maximum of 1 US quart/1 liter of
engine oil at the next opportunity, refer to
Adding engine oil below
3Oil level too high
Have the vehicle checked immedi-
ately, otherwise engine damage may
result if too much oil has been added.<
4Oil level at maximum
5Quick measurement running: oil level is
being determined
6No value can be determined at this time
Adding engine oil
Do not add oil until a value slightly above the
Minimum of 0.0 quarts/liters is displayed by the
oil level measurement. In this area a message is
also shown on the Control Display.
Add oil within the next 125 miles/200 km,
otherwise the engine could be damaged.
Add a maximum of 1 US quart/1 liter of oil, oth-
erwise the engine may be damaged by adding
too much oil.
Page 216 of 231

Everything from A to Z
214 "Delete address book" for
navigation system122
"Delete all numbers" for
mobile phone161
"Delete data" for navigation
system122
"Delete" for mobile
phone161
Destination address
– deleting121
– entering113,116
Destination for navigation
– destination list119
– entering via voice116
– entry113
– selecting from address
book121
– selecting using
information118
– storing120
Destination guidance124
– bypassing route
sections128
– canceling voice
instructions47
– changing specified
route122
– displaying routes125
– distance and arrival124
– interrupting124
– starting124
– terminating/continuing124
– voice instructions127
– volume of voice
instructions127
Destination list for
navigation119
Destinations recently driven
to119
"Details" in audio mode147
"Dial" for mobile phone159
"Dial number"159
Digital clock63
Digital radio, refer to High
Definition Radio140
Dimensions203
Directional indicators, refer to
Turn signals59Direction announcements,
refer to Voice
instructions127
Direction instructions, refer to
Voice instructions127
Directory for navigation, refer
to Address book120
Displacement, refer to Engine
data202
"Display"72
Display, refer to iDrive16
Display lighting, refer to
Instrument lighting
86
"Display off"21
Displays, refer to Instrument
cluster12
"Display settings"71
Displays on the windshield,
refer to Head-Up Display80
Disposal
– battery of remote control
with comfort access37
– vehicle battery195
Distance, refer to
Computer64
"Distance to dest."65
Distance to destination, refer
to Computer64
Distance warning, refer to
PDC Park Distance
Control73
Divided rear seat back, refer to
Through-loading system98
Door entry lighting86
Door key, refer to Keys/
remote control28
Door lock32
Door locking, acknowl-
edgment signals31
"Door locks"30
Doors
– manual operation32
– remote control30
DOT Quality Grades178
Draft-free ventilation90
Drinks holder, refer to Cup
holders96
Drivelogic57
Drive mode56"Driver's door only"30
Driving lamps, refer to Parking
lamps/low beams83
Driving notes104
Driving programs, refer to
Drivelogic57
Driving route, refer to
Displaying route125
Driving stability control
systems74
Driving through water105
Driving tips, refer to Driving
notes104
Dry air, refer to Cooling
function89
Drying the air, refer to Cooling
function89
"DSC"48,75
DSC Dynamic Stability
Control74
– indicator lamp13,75
DVD for navigation112
Dynamic Brake Control
DBC74
Dynamic Stability Control
DSC74
– M Dynamic Mode MDM75
E
Easy entry/exit47
– backrest width42
"EDC"48
EDC Electronic Damping
Control76
– "Comfort"76
– "Normal"76
– "Sport"76
Eject button, refer to Buttons
on CD player132
Electrical malfunction
– door lock32
– driver's door32
– fuel filler door174
– glass sunroof, electric39
– luggage compartment lid34
Electric steering wheel
adjustment47
Page 218 of 231
Everything from A to Z
216 Footbrake, refer to Braking
safely106
Footwell lamps86
Forward, fast
– CD changer149
– CD player149
For your own safety5
Freeway, refer to Route
criteria122
Front airbags78
Front armrest, refer to Center
armrest, front95
Front passenger airbags,
deactivating79
Front seat adjustment40
"FTM"77
FTM, refer to Flat Tire
Monitor76
Fuel175
– capacity204
– display63
– high-quality brands175
– quality175
– specifications175
Fuel clock, refer to Fuel
gauge63
Fuel consumption display,
refer to Computer, average
fuel consumption64
Fuel display, refer to Fuel
gauge63
Fuel filler door174
– releasing in the event of
electrical malfunction174
Fuses195
G
Garage door opener, refer to
Integrated universal remote
control93
Gasoline, refer to Required
fuel175
Gasoline display, refer to Fuel
gauge63
Gear changes56
Gear display, refer to Displays
in instrument cluster56
General driving notes104Glass sunroof, electric38
– auto-remote operation from
outside32
– comfort operation with
comfort access36
– moving manually39
– remote control30
Glove compartment95
– lighting95
– rechargeable flashlight95
GPS navigation, refer to
Navigation system112
Grills, refer to Ventilation90
Gross vehicle weight, refer to
Weights204
Ground clearance106
H
Handbrake55
– indicator lamp13,55
Hand lamp, refer to
Rechargeable flashlight95
Hands-free system, refer to
Microphone14
Hazard warning flashers15
HD, refer to High Definition
Radio140
Head airbags78
Headlamp control,
automatic83
Headlamp flasher59
Headlamps83
– care, refer to Caring for your
vehicle brochure
– cleaning, refer to Wiper
system60
Head Light, refer to Adaptive
Head Light84
Head restraints43
– front head restraints,
active43
– sitting safely40
"Head-Up Display"48,80,82
Head-Up Display80
– default view81
– M view80
– shift lights58Heated
– mirrors46
– rear window89
– seats45
Heating
– exterior mirrors46
– interior87
– rear window89
– residual heat90
– seats45
Heating with engine switched
off, refer to Residual heat90
Heavy cargo, refer to Securing
cargo108
Height, refer to
Dimensions203
Height adjustment
– seats41
– steering wheel47
High-beam assistant84
High beams84
– headlamp flasher84
– indicator lamp13
High Definition Radio140
High water, refer to Driving
through water105
Hills106
Holder for cups
96
"Home address" for
navigation system122
Homepage4
Hood181
Horn10
Hot exhaust system104
"Hour memo"71
"House number" for desti-
nation entry116
Hydraulic brake assistant,
refer to DBC Dynamic Brake
Control74
Hydroplaning105
I
IBOC, refer to High Definition
Radio140
Ice, refer to Outside
temperature63
Page 219 of 231
Reference 217
At a glance
Controls
Driving tips
Communications
Navigation
Entertainment
Mobility
ID3 tag, refer to Information on
track147
Idle56
iDrive16
– assistance window20
– automatic climate control
with expanded scope88
– changing date and time71
– changing language72
– changing menu page19
– changing settings70
– changing units of measure
and display type72
– confirming selection or
entry19
– controller16
– controls16
– displays, menus17
– selecting menu item19
– setting brightness72
– start menu17
– status information20
– symbols18
Ignition53
– switched off53
– switched on53
Ignition key, refer to Keys/
remote control28
Ignition key position 1, refer to
Radio readiness53
Ignition key position 2, refer to
Ignition on53
Ignition lock53
– starting engine with comfort
access37
Independent ventilation, refer
to Parked car ventilation91
Indicator/warning lamps
– airbags80
– brake fluid185
– brake pads185
– DSC13,75
– Flat Tire Monitor77
– high beams13
– MDrive13,49
– M Dynamic Mode13,75
– parking lamps/low beams13
– safety belt warning44Indicator and warning
lamps13
Individual air distribution89
Individually programmable
button on steering wheel47
Individual settings, refer to
MDrive
48
Individual settings, refer to
Personal Profile29
Inflation pressure, refer to Tire
inflation pressure176
Inflation pressure monitoring,
refer to Flat Tire Monitor76
Information
– on another location118
– on current position118
– on destination location118
"Information" for navigation
system118
"Information on
destination"120
"Initializing..."77
Initializing
– Flat Tire Monitor77
– radio, refer to Storing
stations138
– refer to Power failure195
– refer to Setting time and
date71
– seat, mirror and steering
wheel memory42
"Input map"118
Installation location
– CD changer149
– mobile phone95
– navigation drive112
Instructions for navigation
system, refer to Voice
instructions127
Instrument cluster12
Instrument illumination, refer
to Instrument lighting86
Instrument lighting86
Instrument panel
– refer to Cockpit10
– refer to Instrument
cluster12
Integrated key28Integrated universal remote
control93
Interesting destination for
navigation118
"Interim time"70
Interior lamps86
– switching on with remote
control31
Interior motion sensor35
– switching off35
Interior rearview mirror46
– automatic dimming
feature105
Intermittent mode of the
wipers59
J
Jacking points193
Joystick, refer to iDrive16
Jumpering, refer to Jump
starting197
Jump starting197
K
Keyless-Go, refer to Comfort
access36
Keyless opening and closing,
refer to Comfort access36
Key Memory, refer to Personal
Profile29
"Keypad"162
Keys28
– key-related settings, refer to
Personal Profile29
Knock control175
L
Lamps, refer to Parking lamps/
low beams83
Lamps and bulbs188
"Languages"72
– for navigation system127
Lashing eyes, refer to
Securing cargo108