automatic transmission BMW M5 2007 Owners Manual
[x] Cancel search | Manufacturer: BMW, Model Year: 2007, Model line: M5, Model: BMW M5 2007Pages: 253, PDF Size: 8.57 MB
Page 17 of 253
At a glance
15Reference
Controls
Driving tips
Communications
Navigation
Entertainment
Mobility
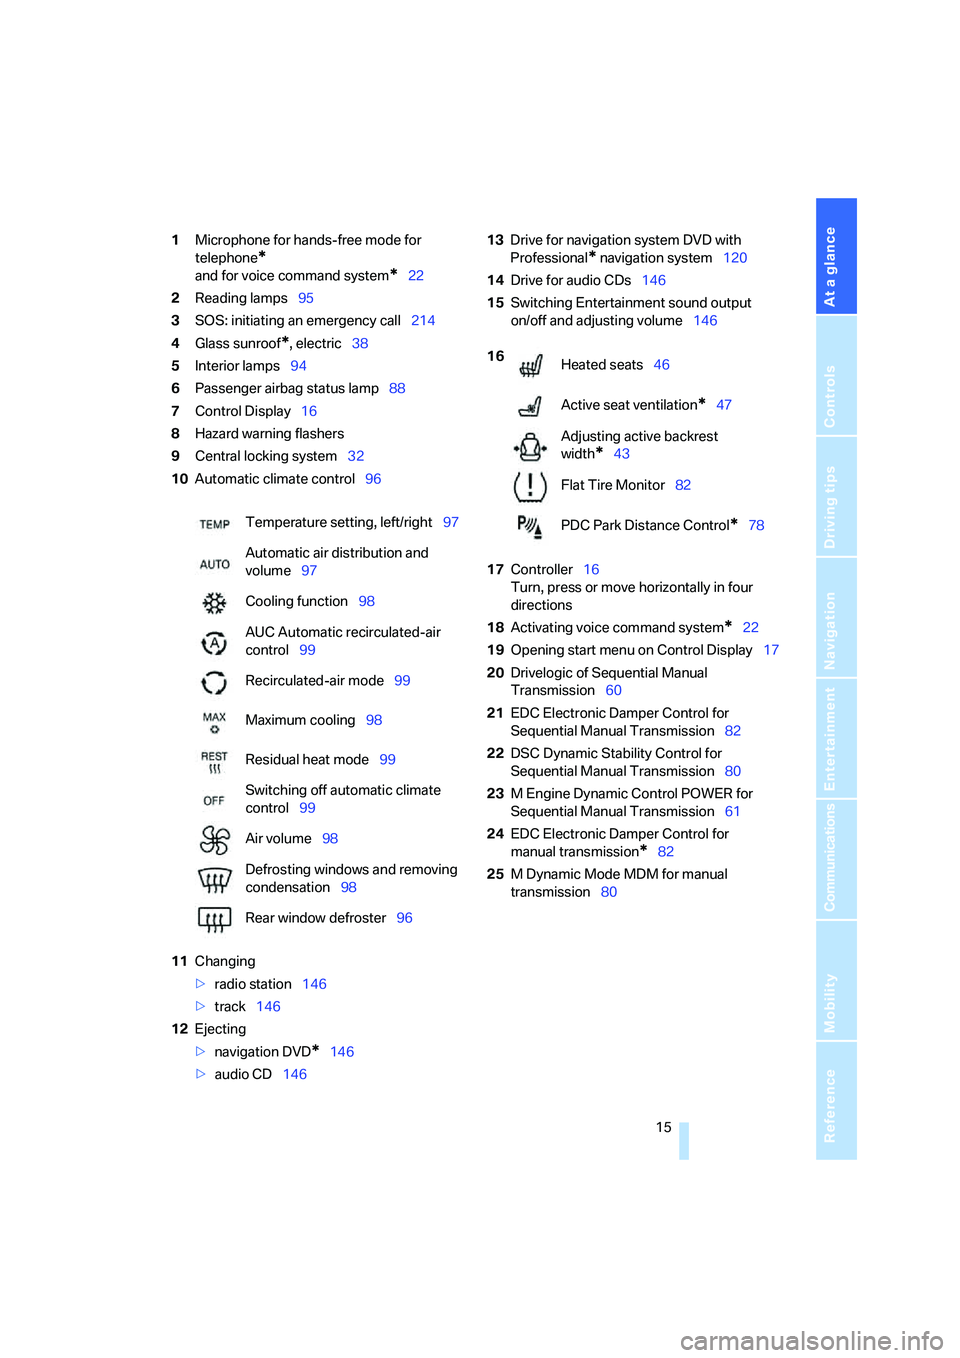
1Microphone for hands-free mode for
telephone
*
and for voice command system*22
2Reading lamps95
3SOS: initiating
an emergency call214
4Glass sunroof
*, electric38
5Interior lamps94
6Passenger airbag status lamp88
7Control Display16
8Hazard warning flashers
9Central locking system32
10Automatic climate control96
11Changing
>radio station146
>track146
12Ejecting
>navigation DVD
*146
>audio CD14613Drive for navigation system DVD with
Professional
* navigation system120
14Drive for audio CDs146
15Switching Entertainment sound output
on/off and adjusting volume146
17Controller16
Turn, press or move horizontally in four
directions
18Activating voice command system
*22
19Opening start menu on Control Display17
20Drivelogic of Sequential Manual
Transmission60
21EDC Electronic Damper Control for
Sequential Manual Transmission82
22DSC Dynamic Stability Control for
Sequential Manual Transmission80
23M Engine Dynamic Control POWER for
Sequential Manual Transmission61
24EDC Electronic Damper Control for
manual transmission
*82
25M Dynamic Mode MDM for manual
transmission80 Temperature setting, left/right97
Automatic air distribution and
volume97
Cooling function98
AUC Automatic recirculated-air
control99
Recirculated-air mode99
Maximum cooling98
Residual heat mode99
Switching off automatic climate
control99
Air volume98
Defrosting windows and removing
condensation98
Rear window defroster96
16
Heated seats46
Active seat ventilation
*47
Adjusting active backrest
width
*43
Flat Tire Monitor82
PDC Park Distance Control
*78
Page 57 of 253
Controls
55Reference
At a glance
Driving tips
Communications
Navigation
Entertainment
Mobility
Driving
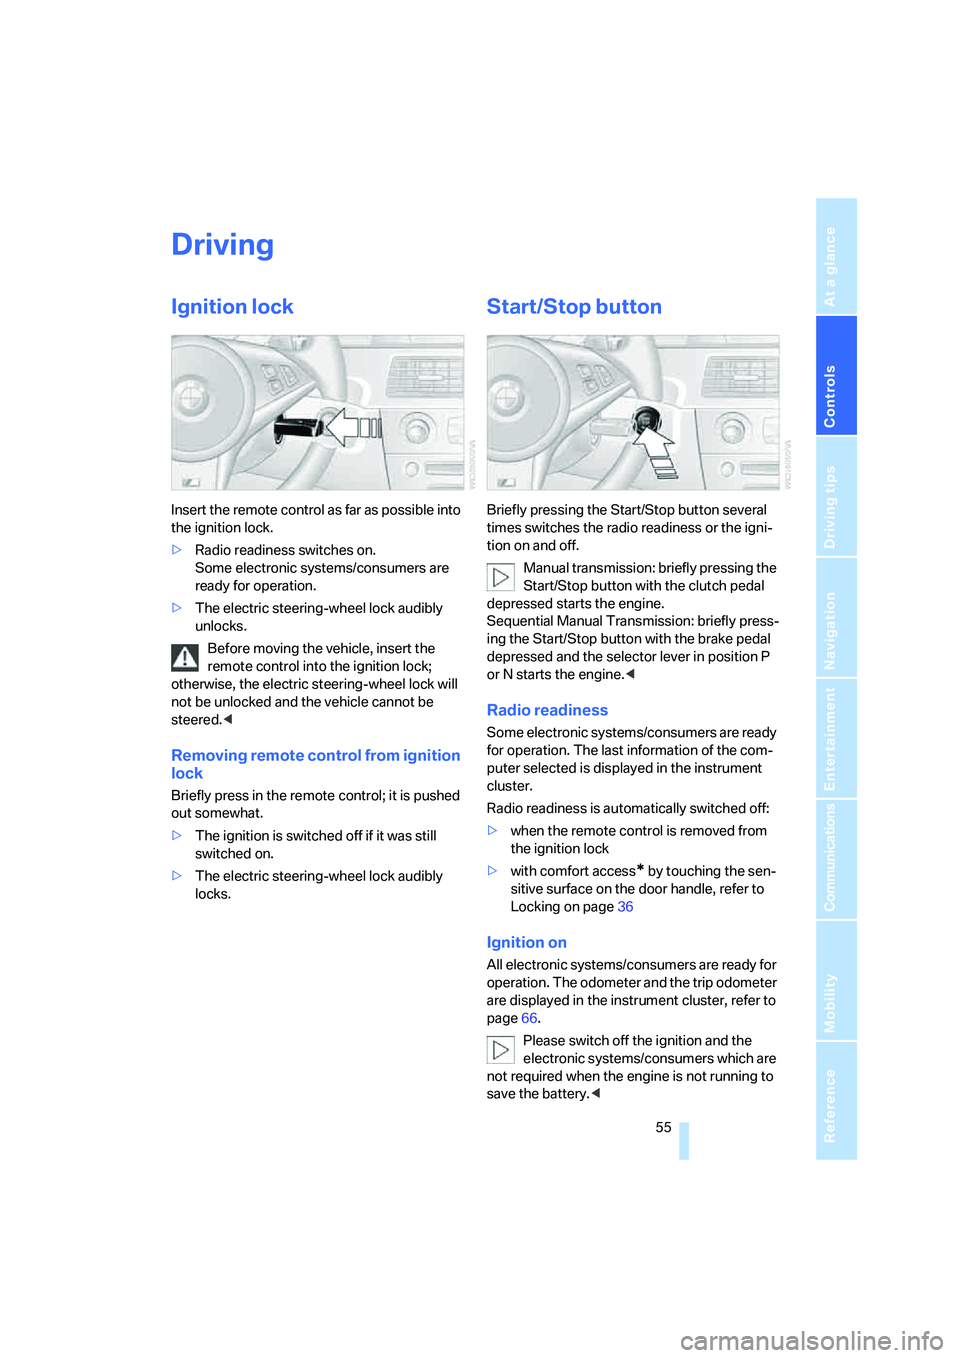
Ignition lock
Insert the remote control as far as possible into
the ignition lock.
>Radio readiness switches on.
Some electronic systems/consumers are
ready for operation.
>The electric steering-wheel lock audibly
unlocks.
Before moving the vehicle, insert the
remote control into the ignition lock;
otherwise, the electric steering-wheel lock will
not be unlocked and the vehicle cannot be
steered.<
Removing remote control from ignition
lock
Briefly press in the remote control; it is pushed
out somewhat.
>The ignition is switched off if it was still
switched on.
>The electric steering-wheel lock audibly
locks.
Start/Stop button
Briefly pressing the Start/Stop button several
times switches the radio readiness or the igni-
tion on and off.
Manual transmission: briefly pressing the
Start/Stop button with the clutch pedal
depressed starts the engine.
Sequential Manual Transmission: briefly press-
ing the Start/Stop button with the brake pedal
depressed and the selector lever in position P
or N starts the engine.<
Radio readiness
Some electronic systems/consumers are ready
for operation. The last information of the com-
puter selected is displayed in the instrument
cluster.
Radio readiness is automatically switched off:
>when the remote control is removed from
the ignition lock
>with comfort access
* by touching the sen-
sitive surface on the door handle, refer to
Locking on page36
Ignition on
All electronic systems/consumers are ready for
operation. The odometer and the trip odometer
are displayed in the instrument cluster, refer to
page66.
Please switch off the ignition and the
electronic systems/consumers which are
not required when the engine is not running to
save the battery.<
Page 58 of 253
Driving
56
Radio readiness and ignition switched
off
All indicator and warning lamps in the instru-
ment cluster go out.
Starting engine
Do not run the engine in closed rooms,
otherwise the inhalation of toxic exhaust
gases can cause unconsciousness and death.
The exhaust gases contain carbon monoxide,
an odorless and colorless, but highly toxic gas.
Never leave an unattended vehicle with the
engine running, as such a vehicle represents a
potential safety hazard.
Before leaving the vehicle with the engine run-
ning, shift into neutral
* or move the selector
lever into the N position and set the handbrake,
otherwise the vehicle can begin to roll.<
When starting the engine, do not press the
accelerator pedal.
Do not allow the engine to warm up by leaving it
running while the vehicle remains stationary.
Instead, begin to drive at a moderate engine
speed.
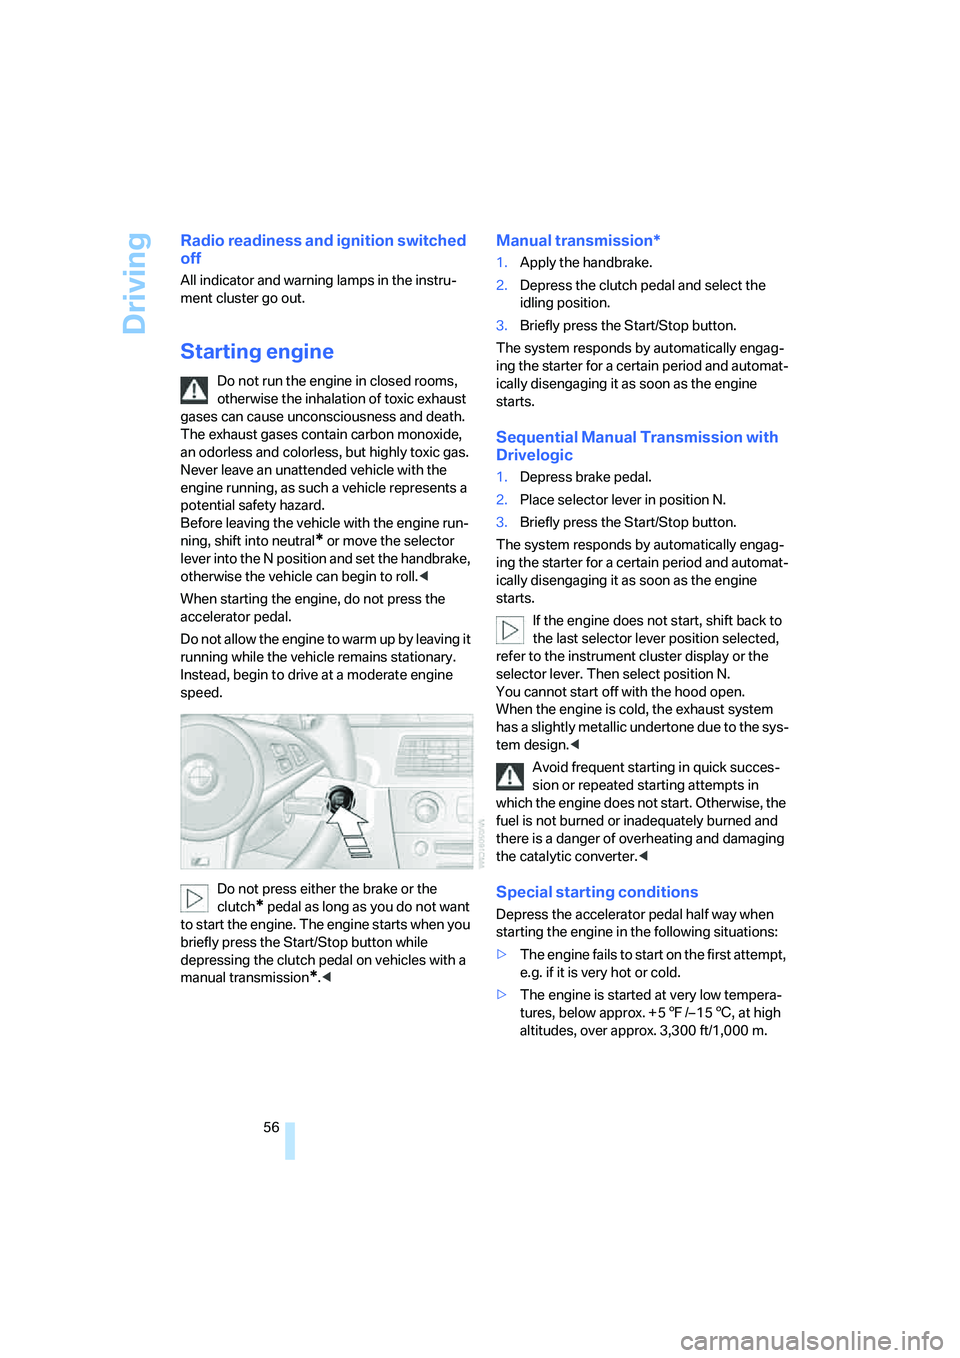
Do not press either the brake or the
clutch
* pedal as long as you do not want
to start the engine. The engine starts when you
briefly press the Start/Stop button while
depressing the clutch pedal on vehicles with a
manual transmission
*.<
Manual transmission*
1.Apply the handbrake.
2.Depress the clutch pedal and select the
idling position.
3.Briefly press the Start/Stop button.
The system responds by automatically engag-
ing the starter for a certain period and automat-
ically disengaging it as soon as the engine
starts.
Sequential Manual Transmission with
Drivelogic
1.Depress brake pedal.
2.Place selector lever in position N.
3.Briefly press the Start/Stop button.
The system responds by automatically engag-
ing the starter for a certain period and automat-
ically disengaging it as soon as the engine
starts.
If the engine does not start, shift back to
the last selector lever position selected,
refer to the instrument cluster display or the
selector lever. Then select position N.
You cannot start off with the hood open.
When the engine is cold, the exhaust system
has a slightly metallic undertone due to the sys-
tem design.<
Avoid frequent starting in quick succes-
sion or repeated starting attempts in
which the engine does not start. Otherwise, the
fuel is not burned or inadequately burned and
there is a danger of overheating and damaging
the catalytic converter.<
Special starting conditions
Depress the accelerator pedal half way when
starting the engine in the following situations:
>The engine fails to start on the first attempt,
e.g. if it is very hot or cold.
>The engine is started at very low tempera-
tures, below approx. + 57/– 156, at high
altitudes, over approx. 3,300 ft/1,000 m.
Page 59 of 253
Controls
57Reference
At a glance
Driving tips
Communications
Navigation
Entertainment
Mobility
Switching off engine
Do not remove the remote control from
the ignition lock while the vehicle is roll-
ing, otherwise the steering-wheel lock would
engage while steering.
When leaving the vehicle, always take the
remote control with you.
When parking on a downhill incline, apply the
handbrake, otherwise the vehicle could roll
away.<
Manual transmission*
1.Briefly press the Start/Stop button with the
vehicle stopped.
2.Shift into first gear or reverse.
3.Apply the handbrake.
Sequential Manual Transmission with
Drivelogic
1.Apply the handbrake.
2.Engage a driving position.
3.Briefly press the Start/Stop button.
If N is engaged when switching off the
engine, this will be pointed out to you opti-
cally and acoustically.
Handbrake
The handbrake is primarily intended to prevent
the vehicle from rolling while parked; it brakes
the rear wheels.
Indicator lamp
The indicator lamp lights up, and a sig-
nal also sounds when starting off. The
handbrake is applied.
Indicator lamp for Canadian models.
Engaging
The lever locks in position automatically.
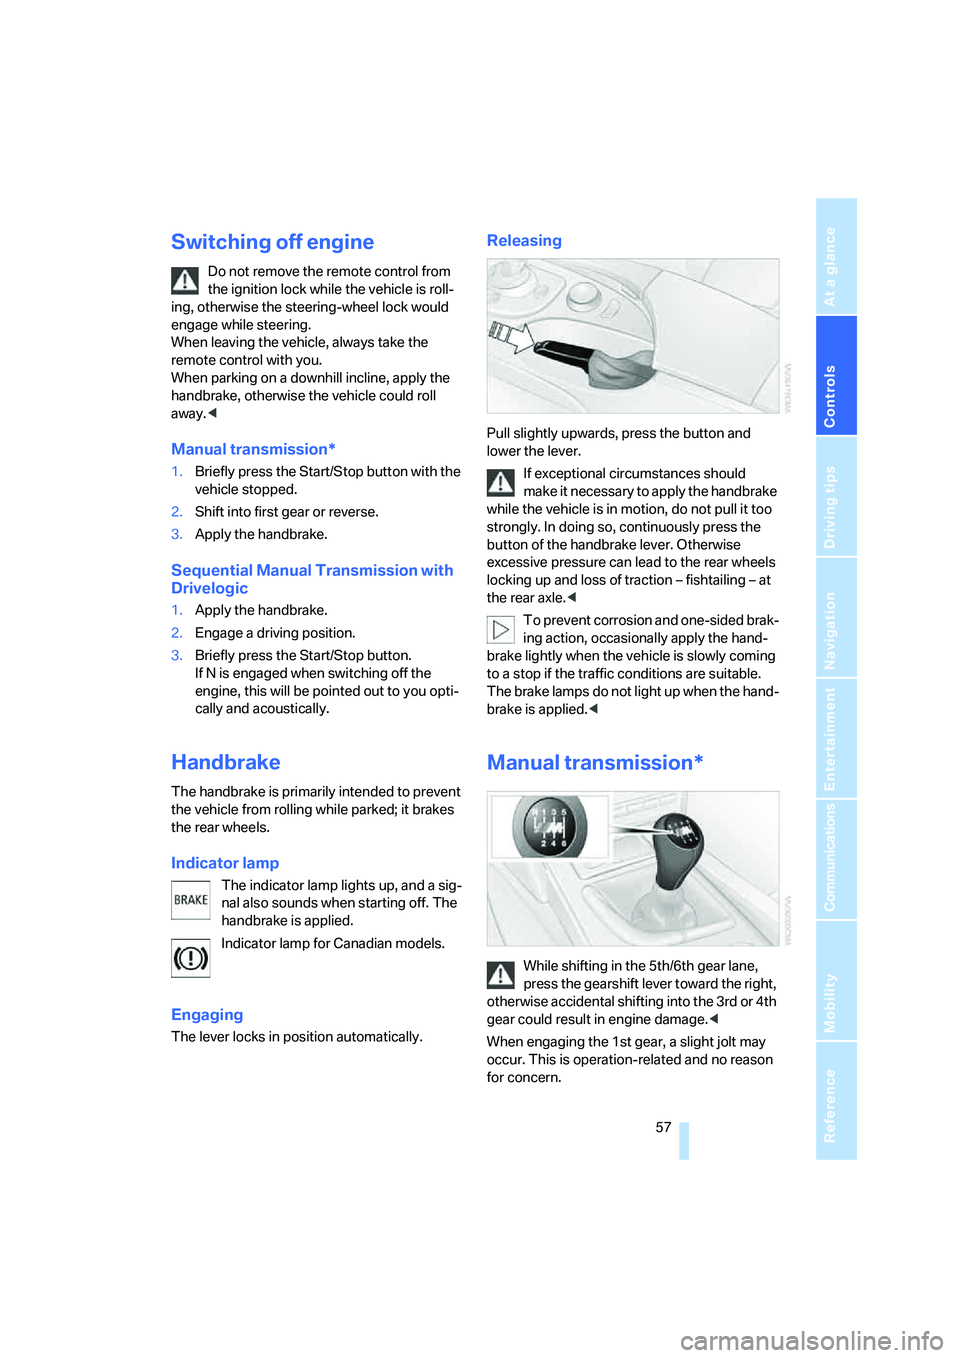
Releasing
Pull slightly upwards, press the button and
lower the lever.
If exceptional circumstances should
make it necessary to apply the handbrake
while the vehicle is in motion, do not pull it too
strongly. In doing so, continuously press the
button of the handbrake lever. Otherwise
excessive pressure can lead to the rear wheels
locking up and loss of traction – fishtailing – at
the rear axle.<
To prevent corrosion and one-sided brak-
ing action, occasionally apply the hand-
brake lightly when the vehicle is slowly coming
to a stop if the traffic conditions are suitable.
The brake lamps do not light up when the hand-
brake is applied.<
Manual transmission*
While shifting in the 5th/6th gear lane,
press the gearshift lever toward the right,
otherwise accidental shifting into the 3rd or 4th
gear could result in engine damage.<
When engaging the 1st gear, a slight jolt may
occur. This is operation-related and no reason
for concern.
Page 60 of 253
Driving
58
Reverse gear
Select only when the vehicle is stationary.
When pressing the gearshift lever to the left,
overcome some resistance.
Shift lights
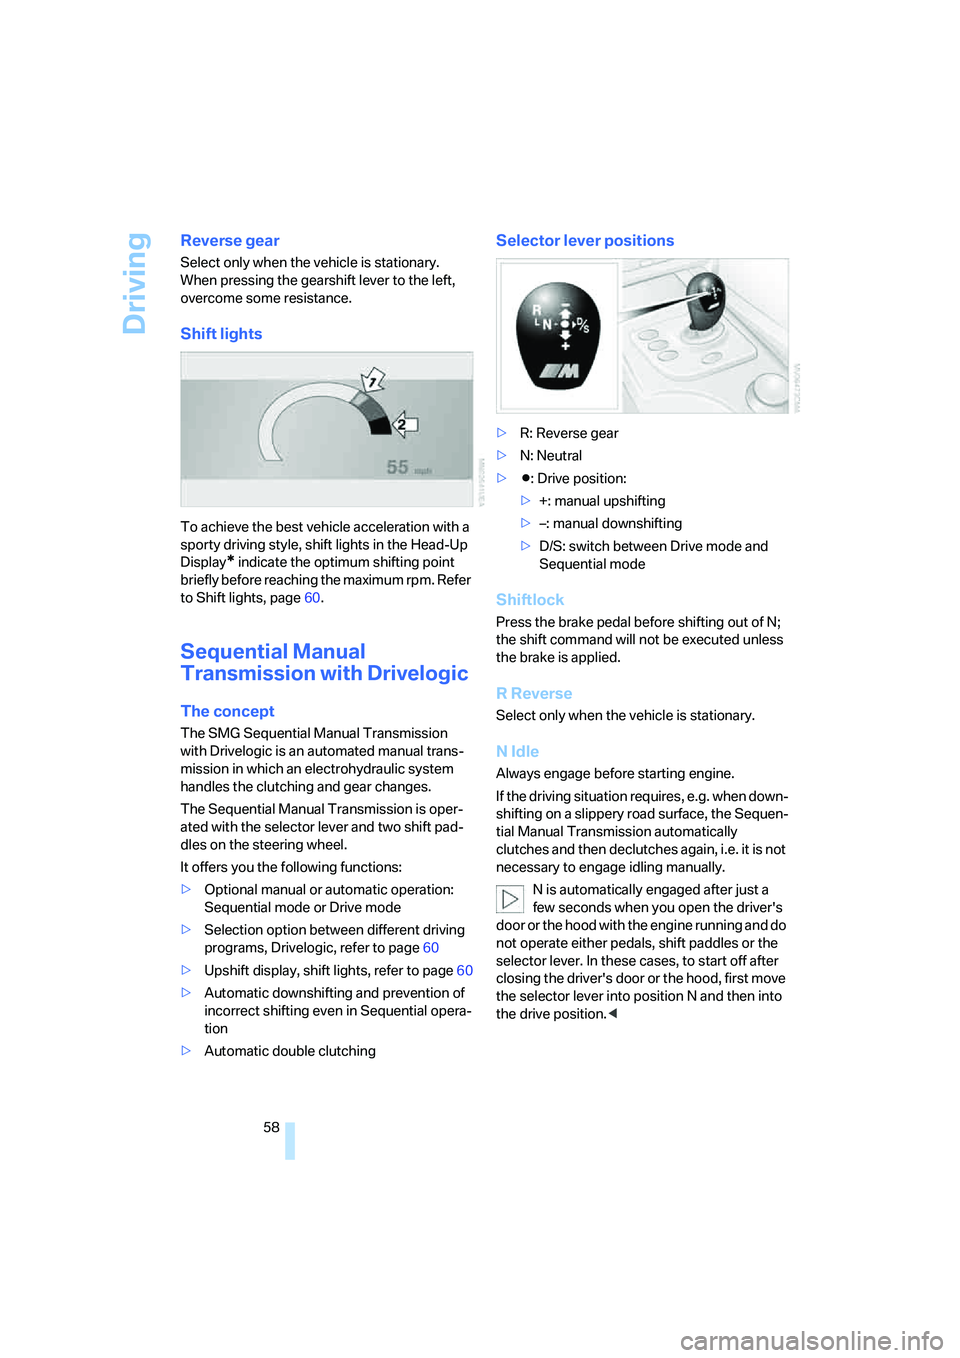
To achieve the best vehicle acceleration with a
sporty driving style, shift lights in the Head-Up
Display
* indicate the optimum shifting point
briefly before reaching the maximum rpm. Refer
to Shift lights, page60.
Sequential Manual
Transmission with Drivelogic
The concept
The SMG Sequential Manual Transmission
with Drivelogic is an automated manual trans-
mission in which an electrohydraulic system
handles the clutching and gear changes.
The Sequential Manual Transmission is oper-
ated with the selector lever and two shift pad-
dles on the steering wheel.
It offers you the following functions:
>Optional manual or automatic operation:
Sequential mode or Drive mode
>Selection option between different driving
programs, Drivelogic, refer to page60
>Upshift display, shift lights, refer to page60
>Automatic downshifting and prevention of
incorrect shifting even in Sequential opera-
tion
>Automatic double clutching
Selector lever positions
>R: Reverse gear
>N: Neutral
>Β: Drive position:
>+: manual upshifting
>–: manual downshifting
>D/S: switch between Drive mode and
Sequential mode
Shiftlock
Press the brake pedal before shifting out of N;
the shift command will not be executed unless
the brake is applied.
R Reverse
Select only when the vehicle is stationary.
N Idle
Always engage before starting engine.
If the driving situation requires, e.g. when down-
shifting on a slippery road surface, the Sequen-
tial Manual Transmission automatically
clutches and then declutches again, i.e. it is not
necessary to engage idling manually.
N is automatically engaged after just a
few seconds when you open the driver's
door or the hood with the engine running and do
not operate either pedals, shift paddles or the
selector lever. In these cases, to start off after
closing the driver's door or the hood, first move
the selector lever into position N and then into
the drive position.<
Page 61 of 253
Controls
59Reference
At a glance
Driving tips
Communications
Navigation
Entertainment
Mobility
S Sequential mode
You can shift up and down using the shift pad-
dles or the selector lever. You do not need to
remove your foot from the accelerator to do so.
After every engine start, as soon as the selector
lever is pushed to the right into the drive posi-
tionΒ and the brake pedal is pressed, the
Sequential mode is activated.
Starting off is also possible on a level road sur-
face in second gear, e.g. in case of ice.
In the following situations, the Sequential Man-
ual Transmission thinks for you:
>Upshifts and downshifts are executed only
when they will result in a plausible combina-
tion of engine and vehicle speed; thus, for
example, a downshift that would cause the
engine to overrev will not be executed by
the system.
>When the vehicle is stationary, the trans-
mission automatically downshifts into first
gear.
>Shortly before dropping below a gear-
dependent minimum speed, the transmis-
sion downshifts automatically even without
your intervention.
D Drive mode
In the Drive mode, all forward gears are shifted
automatically.
Shifting from Sequential mode to Drive mode:
press selector lever to the right toward D/S.
To switch back into the Sequential mode: press
selector lever to the right again toward D/S or
shift using the shift paddles or the selector
lever.
Kick-down: for rapid acceleration, e. g. when
passing, press the accelerator pedal as far
down as it will go. You achieve maximum accel-
eration.
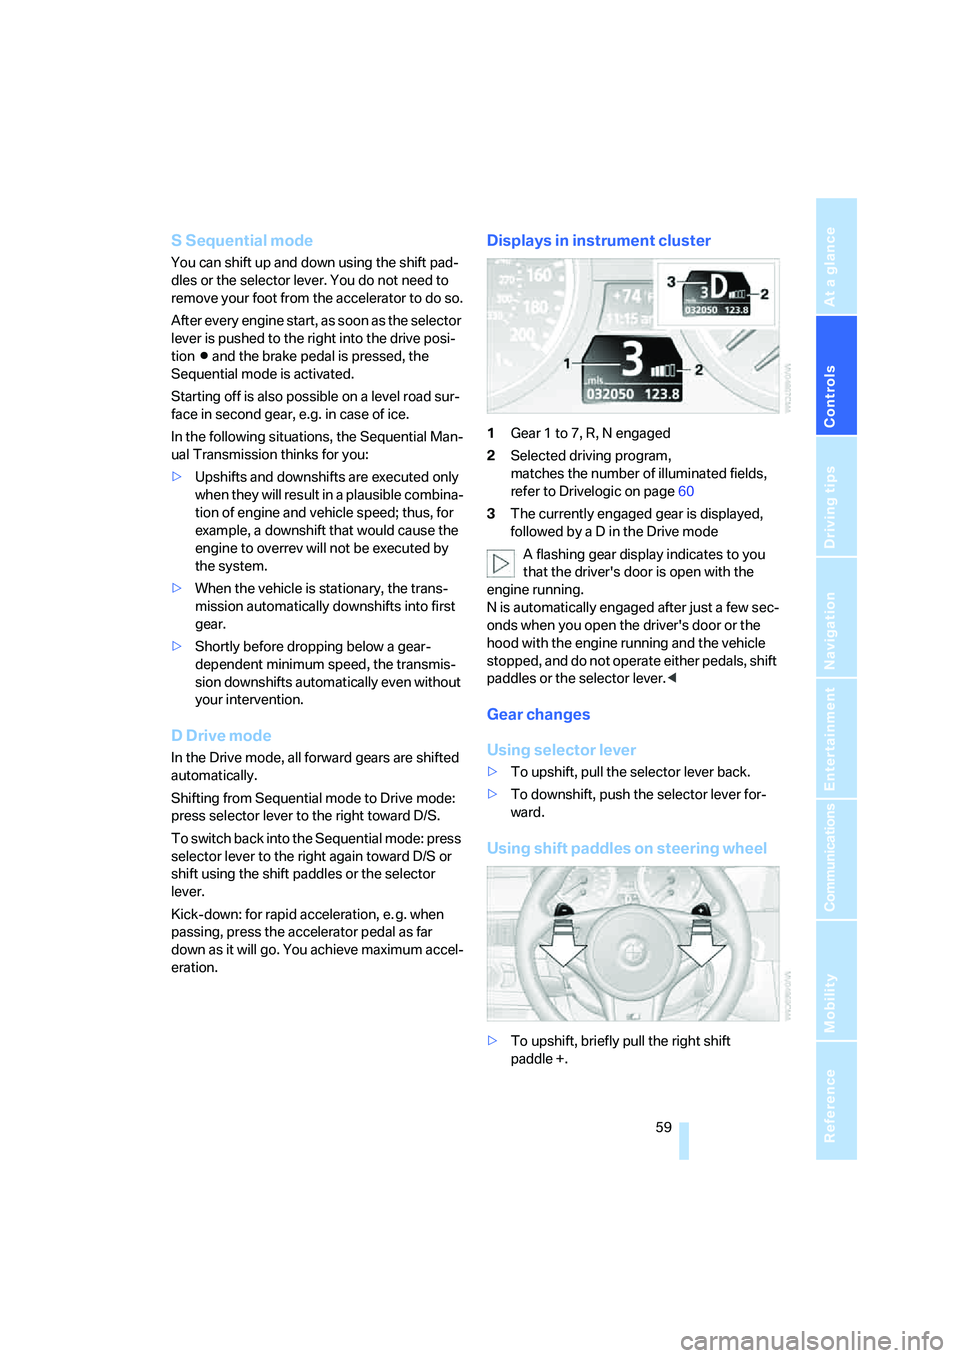
Displays in instrument cluster
1Gear 1 to 7, R, N engaged
2Selected driving program,
matches the number of illuminated fields,
refer to Drivelogic on page60
3The currently engaged gear is displayed,
followed by a D in the Drive mode
A flashing gear display indicates to you
that the driver's door is open with the
engine running.
N is automatically engaged after just a few sec-
onds when you open the driver's door or the
hood with the engine running and the vehicle
stopped, and do not operate either pedals, shift
paddles or the selector lever.<
Gear changes
Using selector lever
>To upshift, pull the selector lever back.
>To downshift, push the selector lever for-
ward.
Using shift paddles on steering wheel
>To upshift, briefly pull the right shift
paddle +.
Page 85 of 253
Controls
83Reference
At a glance
Driving tips
Communications
Navigation
Entertainment
Mobility
The initialization must be repeated after
each time the tire inflation pressure is cor-
rected and after every tire or wheel change.<
System limits
The Flat Tire Monitor cannot indicate
sudden severe tire damage caused by
outside factors and does not detect a natural,
even pressure drop in all four tires.<
In the following situations, the system could be
delayed or malfunction:
>System has not been initialized
>Driving on snowy or slippery road surface
>Sporty driving style: slip in the drive wheels,
high lateral acceleration
>Driving with snow chains
*
Initializing system
The initialization finishes during driving,
which can be interrupted at any time.
When driving resumes, the initialization is con-
tinued automatically. Do not initialize the sys-
tem when driving with snow chains.<
With Sequential Manual Transmission via the
button in the center console:
1.Start the engine, but do not start driving.
2.Press the button at least 4 seconds, how-
ever not longer than 2 minutes. After
releasing the button, the warning lamp in
the instrument cluster lights up yellow for a
few seconds. Warning lamp, refer to Indica-
tion of a flat tire. The message "Initializing
FTM ..." appears on the Control Display for
a few seconds.
3.Start to drive. The initialization finishes dur-
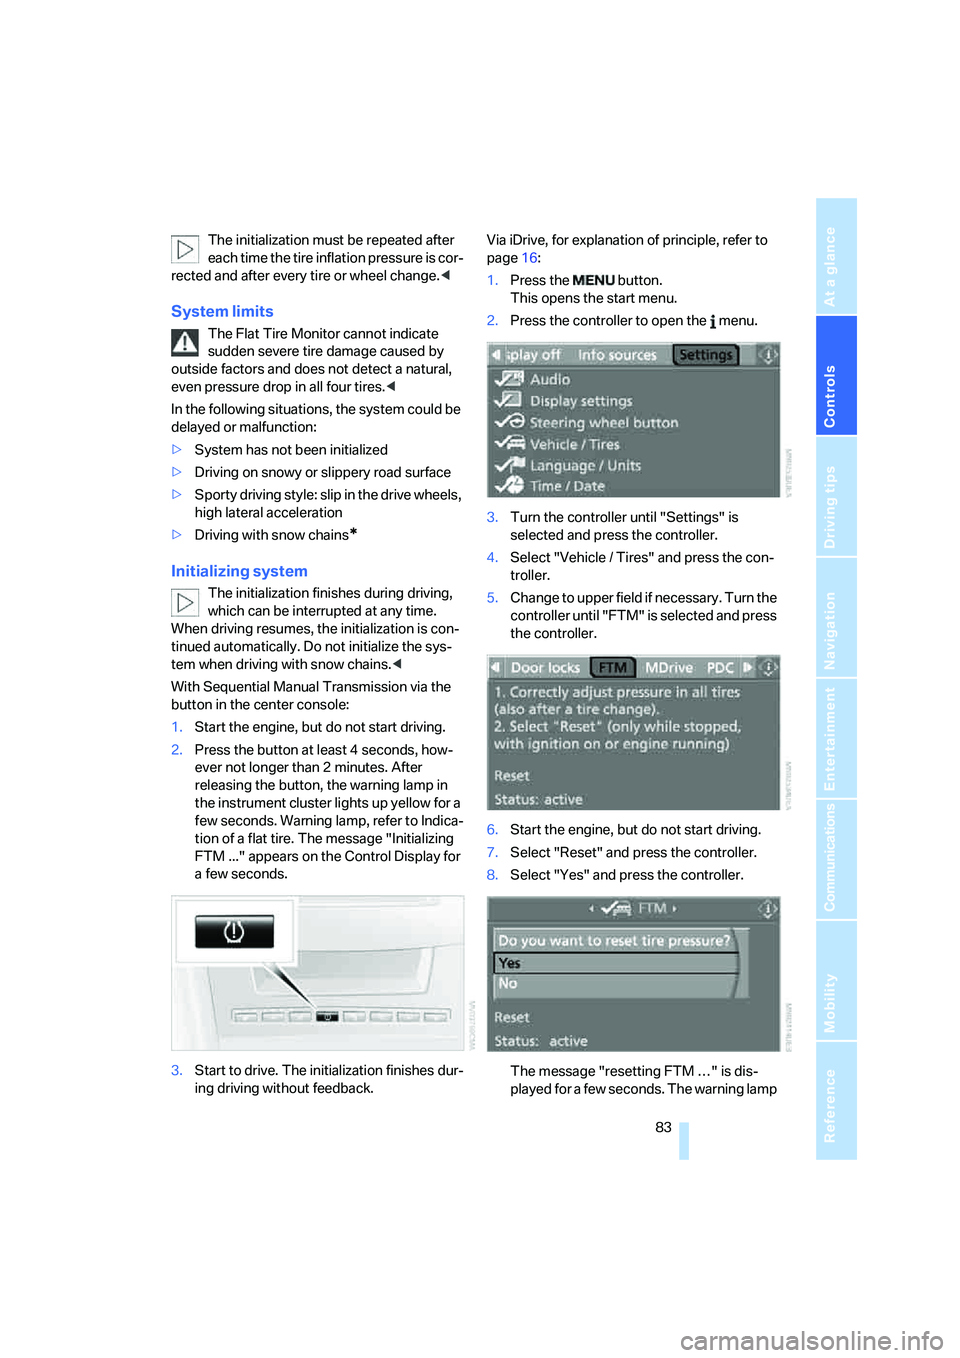
ing driving without feedback.Via iDrive, for explanation of principle, refer to
page16:
1.Press the button.
This opens the start menu.
2.Press the controller to open the menu.
3.Turn the controller until "Settings" is
selected and press the controller.
4.Select "Vehicle / Tires" and press the con-
troller.
5.Change to upper field if necessary. Turn the
controller until "FTM" is selected and press
the controller.
6.Start the engine, but do not start driving.
7.Select "Reset" and press the controller.
8.Select "Yes" and press the controller.
The message "resetting FTM …" is dis-
played for a few seconds. The warning lamp
Page 114 of 253
Things to remember when driving
112
Things to remember when driving
Break-in period
Moving parts need breaking-in time to adjust to
each other. To ensure that your vehicle contin-
ues to provide optimized economy of operation
throughout an extended service life, we request
that you devote careful attention to the follow-
ing section.
Do not use the driving programs 5 and 6, refer
to Drivelogic on page60, during break-in.
Engine and differential
Always obey all official speed limits.
Up to 1,200 miles/2,000 km
Drive at changing engine and driving speeds,
however do not exceed 5,500 rpm or 105 mph/
170 km/h.
Avoid full-throttle operation and use of the
transmission's kick-down mode during these
initial miles.
From 1,200 miles/2,000 km to
3,000 miles/5,000 km
The engine and driving speed can gradually be
increased up to a continuous vehicle speed of
135 mph/220 km/h. Only drive at top speed
briefly, e.g. when passing.
Transmission
The function of the transmission is only at its
optimized level after driving a distance of
approx. 300 miles/500 km. Do not exceed
engine speeds of 5,500 rpm during this time.
Tires
Due to technical factors associated with their
manufacture, tires do not achieve their full trac-
tion potential until after an initial break-in
period. Therefore, drive reservedly during the
first 200 miles/300 km.
Brake system
Brakes require an initial break-in period of
approx. 300 miles/500 km to achieve optimized
contact and wear patterns between brake pads
and rotors. Drive in a reserved manner during
this break-in period.
Clutch
The function of the clutch is only at its opti-
mized level after a distance driven of approx.
300 miles/500 km. With manual transmission:
during this break-in period, engage the clutch
gently.
Following part replacement
Observe the break-in instructions again if com-
ponents mentioned above must be replaced
after subsequent driving operation.
General driving notes
Closing luggage compartment lid
Operate the vehicle only when the lug-
gage compartment lid is completely
closed. Otherwise, exhaust fumes could pene-
trate into the passenger compartment.<
If special circumstances should make it abso-
lutely necessary to operate the vehicle with the
luggage compartment lid open:
1.Close all windows and the glass sunroof.
2.Increase the air volume of the automatic cli-
mate control to a high level, refer to
page98.
Hot exhaust system
As in all vehicles, extremely high temper-
atures are generated on the exhaust sys-
tem. Do not remove the heat shields installed
adjacent to it, and never apply undercoating to
them. When driving, standing at idle and while
parking take care to avoid possible contact
between the hot exhaust system and any highly
Page 153 of 253
Navigation
Entertainment
Driving tips
151Reference
At a glance
Controls
Communications
Mobility
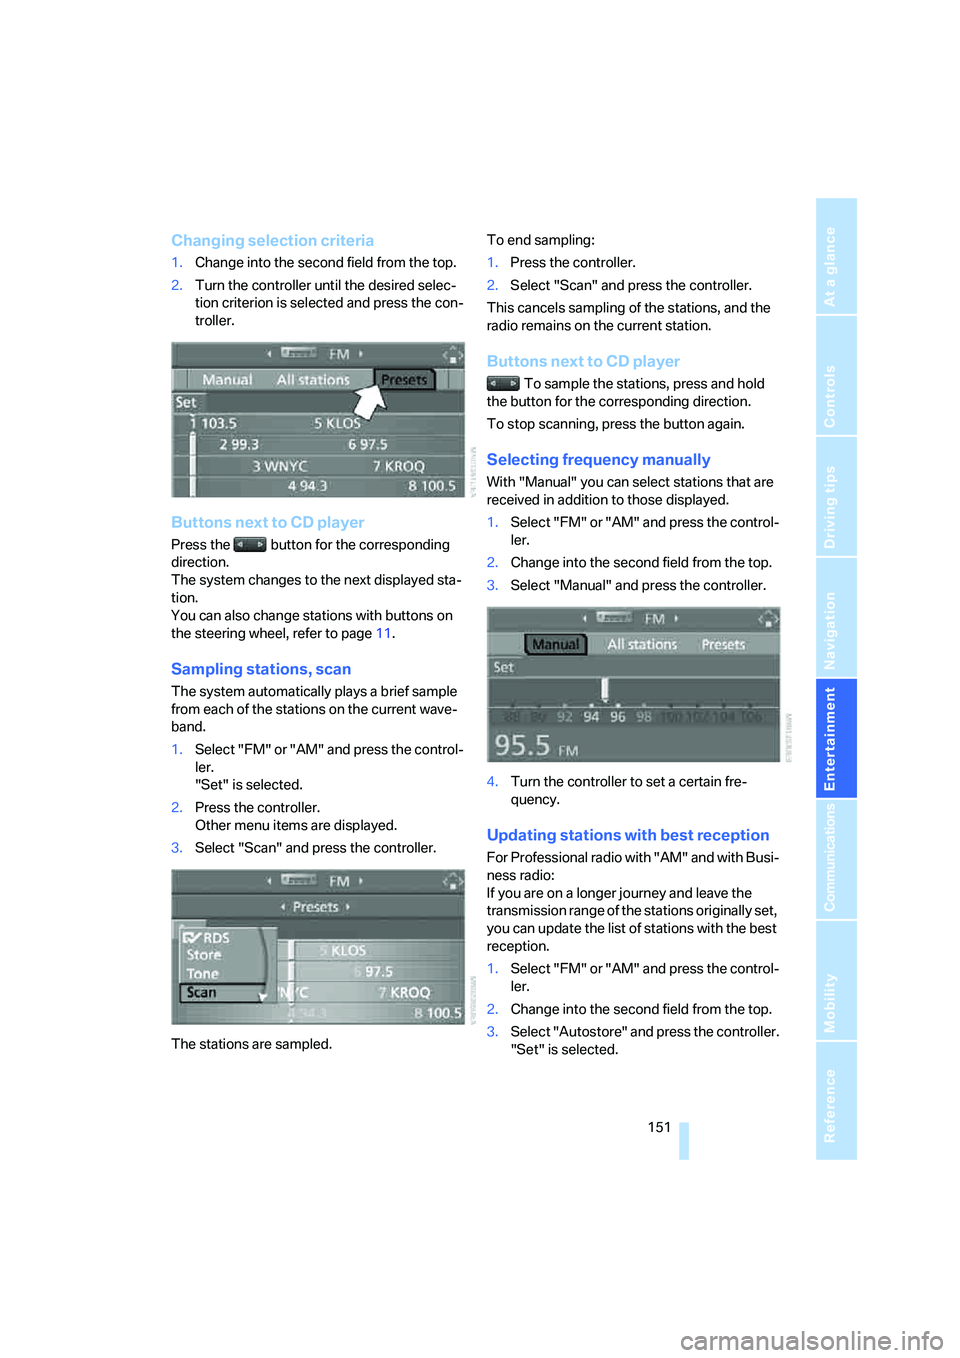
Changing selection criteria
1.Change into the second field from the top.
2.Turn the controller until the desired selec-
tion criterion is selected and press the con-
troller.
Buttons next to CD player
Press the button for the corresponding
direction.
The system changes to the next displayed sta-
tion.
You can also change stations with buttons on
the steering wheel, refer to page11.
Sampling stations, scan
The system automatically plays a brief sample
from each of the stations on the current wave-
band.
1.Select "FM" or "AM" and press the control-
ler.
"Set" is selected.
2.Press the controller.
Other menu items are displayed.
3.Select "Scan" and press the controller.
The stations are sampled.To end sampling:
1.Press the controller.
2.Select "Scan" and press the controller.
This cancels sampling of the stations, and the
radio remains on the current station.
Buttons next to CD player
To sample the stations, press and hold
the button for the corresponding direction.
To stop scanning, press the button again.
Selecting frequency manually
With "Manual" you can select stations that are
received in addition to those displayed.
1.Select "FM" or "AM" and press the control-
ler.
2.Change into the second field from the top.
3.Select "Manual" and press the controller.
4.Turn the controller to set a certain fre-
quency.
Updating stations with best reception
For Professional radio with "AM" and with Busi-
ness radio:
If you are on a longer journey and leave the
transmission range of the stations originally set,
you can update the list of stations with the best
reception.
1.Select "FM" or "AM" and press the control-
ler.
2.Change into the second field from the top.
3.Select "Autostore" and press the controller.
"Set" is selected.
Page 170 of 253
Telephoning
168
Telephoning
The concept
Your BMW is equipped with a full mobile phone
preparation package. After logging on a suitable
mobile phone on the vehicle once, you can
operate the mobile phone via iDrive, with the
buttons on the steering wheel and by voice.
A mobile phone that has been logged on once is
automatically detected again with the engine
running or the ignition switched on as soon as
it is in the vehicle interior. The logon data of up
to four mobile phones can be stored simulta-
neously. If several mobile phones are detected
simultaneously, the respective last mobile
phone logged on can be operated via the vehi-
cle.
Using a phone in your vehicle
Using snap-in adapter*
The so-called snap-in adapter, a mobile phone
cradle, enables the battery to be charged and
the mobile phone to be connected to the exter-
nal antenna of your vehicle. This ensures
improved network reception and a consistent
voice reproduction quality. Ask your BMW cen-
ter which mobile phones snap-in adapters are
offered for.
BMW discourages the use of mobile
phones or other mobile communications
devices inside the vehicle without a direct con-
nection to an outside antenna. Otherwise, the
vehicle electronics and mobile communication
device can influence one another. In addition,
there is no assurance that the radiation which
results from transmission will be dissipated
from the vehicle interior.<
Avoid operating a mobile phone detected by
the vehicle with the keypad of the mobile
phone, otherwise malfunctions can occur.
For your safety
A car phone makes life more convenient in
many ways, and can even save lives in an emer-
gency. While you should consult your mobile
phone's separate operating instructions for a
detailed description of safety precautions and
information, we request that you direct your
particular attention to the following:
Only make entries when the traffic situa-
tion allows you to do so. Do not hold the
mobile phone in your hand while you are driving;
use the hands-free system instead. If you do
not observe this precaution, your being dis-
tracted can endanger vehicle occupants and
other road users.<
Suitable mobile phones
Ask your BMW center which mobile phones
with a Bluetooth interface are supported by the
mobile phone preparation package or which
mobile phones snap-in adapters are available
for. These mobile phones support the functions
described in this Owner's Manual with a certain
software version. Malfunctions can occur with
other mobile phones.
Care instructions
You can find what you need to know about car-
ing for your mobile phone in the separate Caring
for your vehicle brochure and in the mobile
phone operating instructions.
Operating options
You can operate the mobile phone* using:
>The steering wheel, refer to page11
>iDrive, refer to page16
>Voice commands, refer to page177
*