change wheel BMW M5 2008 Owners Manual
[x] Cancel search | Manufacturer: BMW, Model Year: 2008, Model line: M5, Model: BMW M5 2008Pages: 260, PDF Size: 6.66 MB
Page 5 of 260

Reference
At a glance
Controls
Driving tips
Communications
Navigation
Entertainment
Mobility
Contents
The fastest way to find specific topics is to use
the index, refer to page238.
Using this Owner's Manual
4Notes
7Reporting safety defects
At a glance
10Cockpit
16iDrive
23Voice command system
Controls
28Opening and closing
41Adjusting
53Transporting children safely
56Driving
66Everything under control
78Technology for comfort, convenience
and safety
92Lamps
97Climate
104Practical interior accessories
Driving tips
114Things to remember when driving
119BMW M5 Engineering
Navigation
122Starting navigation system
124Destination entry
136Destination guidance
145What to do if …
Entertainment
148On/off and tone
152Radio
159Satellite radio
162CD player and CD changer
168AUX-In connection
169USB/audio interface
Communications
174Telephoning
189BMW Assist
Mobility
198Refueling
200Wheels and tires
206Under the hood
212Maintenance
214Replacing components
223Giving and receiving assistance
Reference
230Technical data
233Short commands of voice command
system
238Everything from A to Z
Page 26 of 260
Voice command system
24 If no other commands are possible, then oper-
ate the equipment via iDrive.
Terminating or canceling voice
command system
Press the button on the steering wheel
or
Commands
Having possible commands read aloud
You can have the system read aloud the possi-
ble commands related to the selected menu
item on the Control Display.
To have the system list the possible com-
mands:
For example, if you have selected "CD", the
system will read aloud the possible commands
for operating the CD player and the CD
changer
*.
Opening help
Using alternative commands
There are often a number of commands to run a
function, e.g.:
Running functions directly with short
commands
With short commands you can run certain func-
tions directly, regardless of which menu item is
selected, refer to page233.
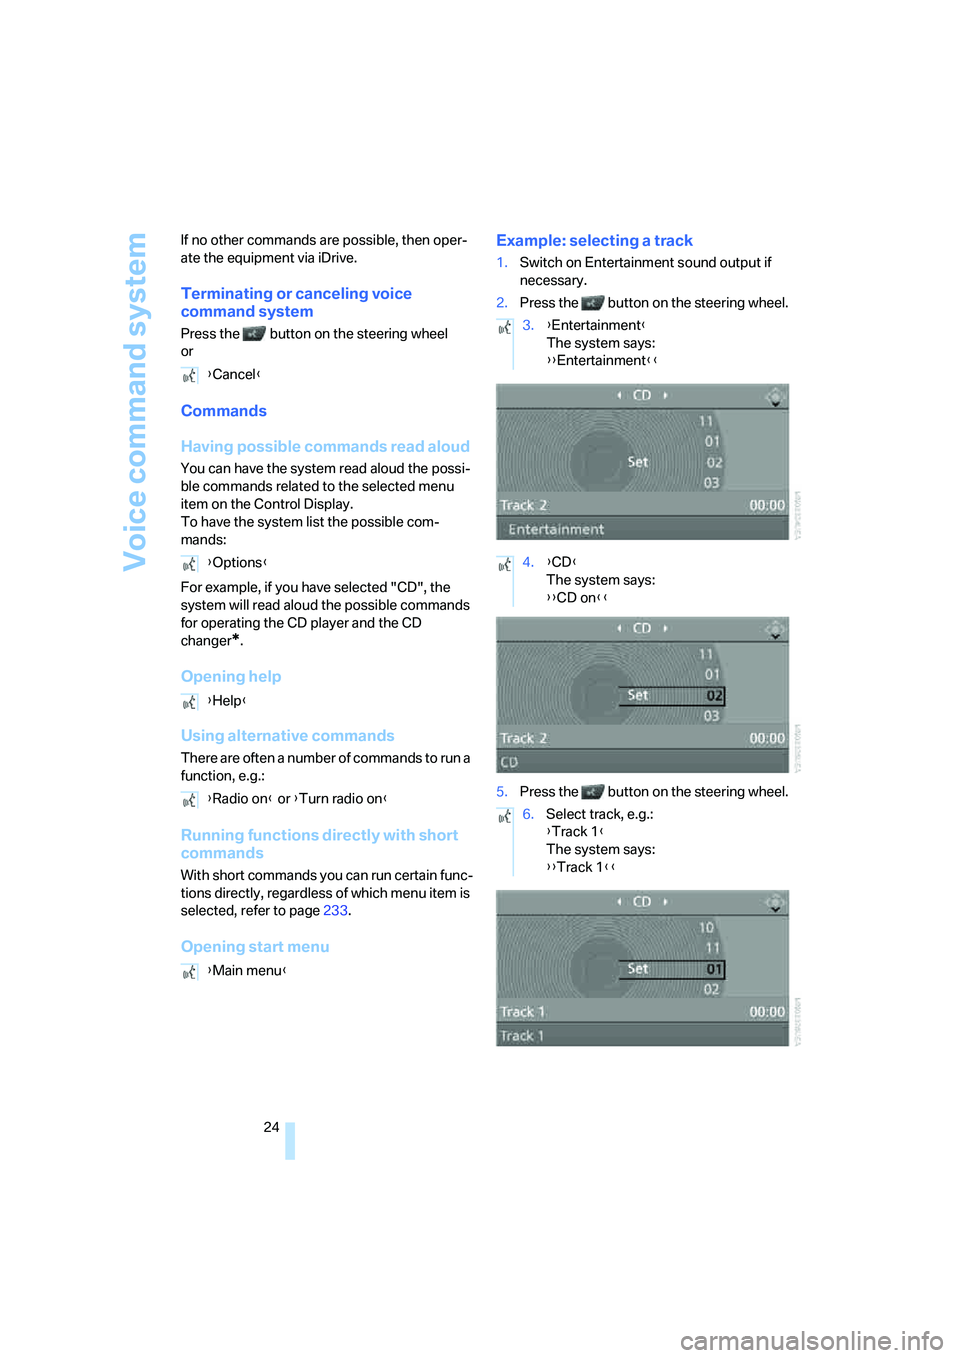
Opening start menuExample: selecting a track
1.Switch on Entertainment sound output if
necessary.
2.Press the button on the steering wheel.
5.Press the button on the steering wheel. {Cancel}
{Options}
{Help}
{Radio on} or {Turn radio on}
{Main menu}
3.{Entertainment}
The system says:
{{Entertainment}}
4.{CD}
The system says:
{{CD on}}
6.Select track, e.g.:
{Track 1}
The system says:
{{Track 1}}
Page 37 of 260
Controls
35Reference
At a glance
Driving tips
Communications
Navigation
Entertainment
Mobility
Alarm system
The concept
The vehicle alarm system responds:
>When a door, the hood, or the luggage com-
partment lid are opened
>To movements in the vehicle: interior
motion sensor, refer to page35
>To changes in the vehicle's tilt if someone
attempts to steal the wheels or tow the
vehicle
>To interruptions in battery voltage
Unauthorized operations are briefly signaled by
the alarm system:
>with an acoustic alarm
>by switching on
the hazard warning flashers
>by flashing the high beams
Arming and disarming alarm system
When you lock or unlock the vehicle, either with
the remote control or at the door lock, the alarm
system is armed or disarmed at the same time.
The luggage compartment lid can also be
opened with the system armed with the but-
ton on the remote control, refer to page33.
When the luggage compartment lid is closed, it
is locked and monitored again.
Switching off alarm
>Unlock the vehicle using the remote control,
refer to page30.
>Insert the remote control all the way into the
ignition lock.
Indicator lamp displays
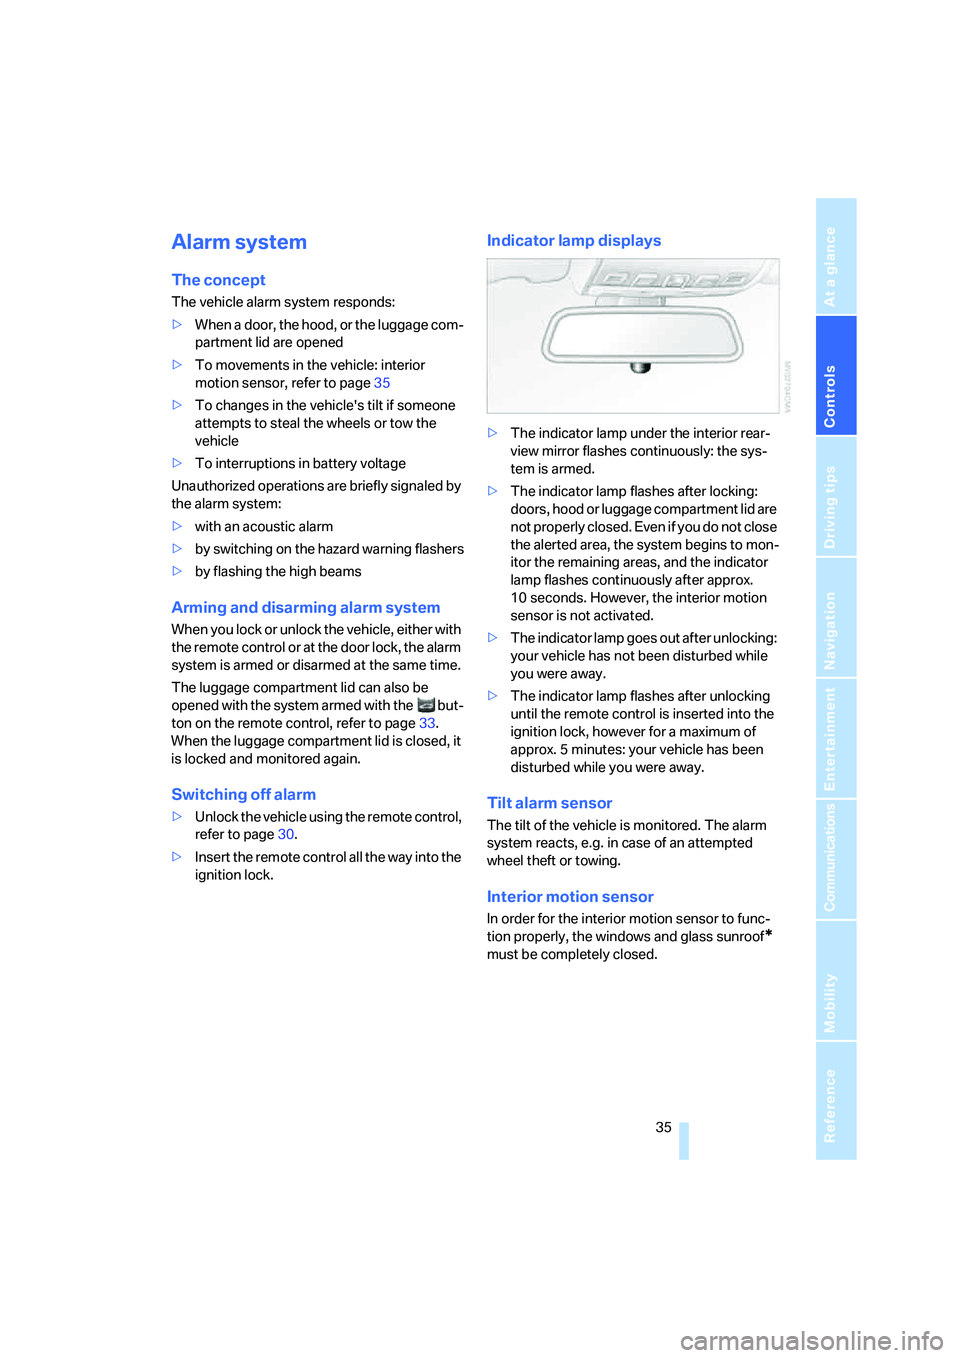
>The indicator lamp under the interior rear-
view mirror flashes continuously: the sys-
tem is armed.
>The indicator lamp flashes after locking:
doors, hood or luggage compartment lid are
not properly closed. Even if you do not close
the alerted area, the system begins to mon-
itor the remaining areas, and the indicator
lamp flashes continuously after approx.
10 seconds. However, the interior motion
sensor is not activated.
>The indicator lamp goes out after unlocking:
your vehicle has not been disturbed while
you were away.
>The indicator lamp flashes after unlocking
until the remote control is inserted into the
ignition lock, however for a maximum of
approx. 5 minutes: your vehicle has been
disturbed while you were away.
Tilt alarm sensor
The tilt of the vehicle is monitored. The alarm
system reacts, e.g. in case of an attempted
wheel theft or towing.
Interior motion sensor
In order for the interior motion sensor to func-
tion properly, the windows and glass sunroof
*
must be completely closed.
Page 46 of 260
Adjusting
44
Safety feature
1.Close the driver's door and switch the igni-
tion on or off.
2.Press the desired memory button1 or2
and maintain pressure until the adjustment
process has been completed.
If the button was pressed inadvertently:
press the button again; the LED goes out.
Requesting with remote control
The last positions of the driver's seat, the exte-
rior rearview mirrors, and steering wheel are
stored for the remote control currently in use.
You can choose when the position is requested:
>Request when unlocking vehicle
>Request when opening driver's door
When using this feature, always make
sure that the footwell behind the driver's
seat is empty and unobstructed. Failure to do
so could cause injury to persons or damage to
objects behind the seat as a result of a rearward
movement of the seat.<
The system cancels the adjustment procedure
when you briefly press one of the seat adjust-
ment switches or one of the memory buttons.
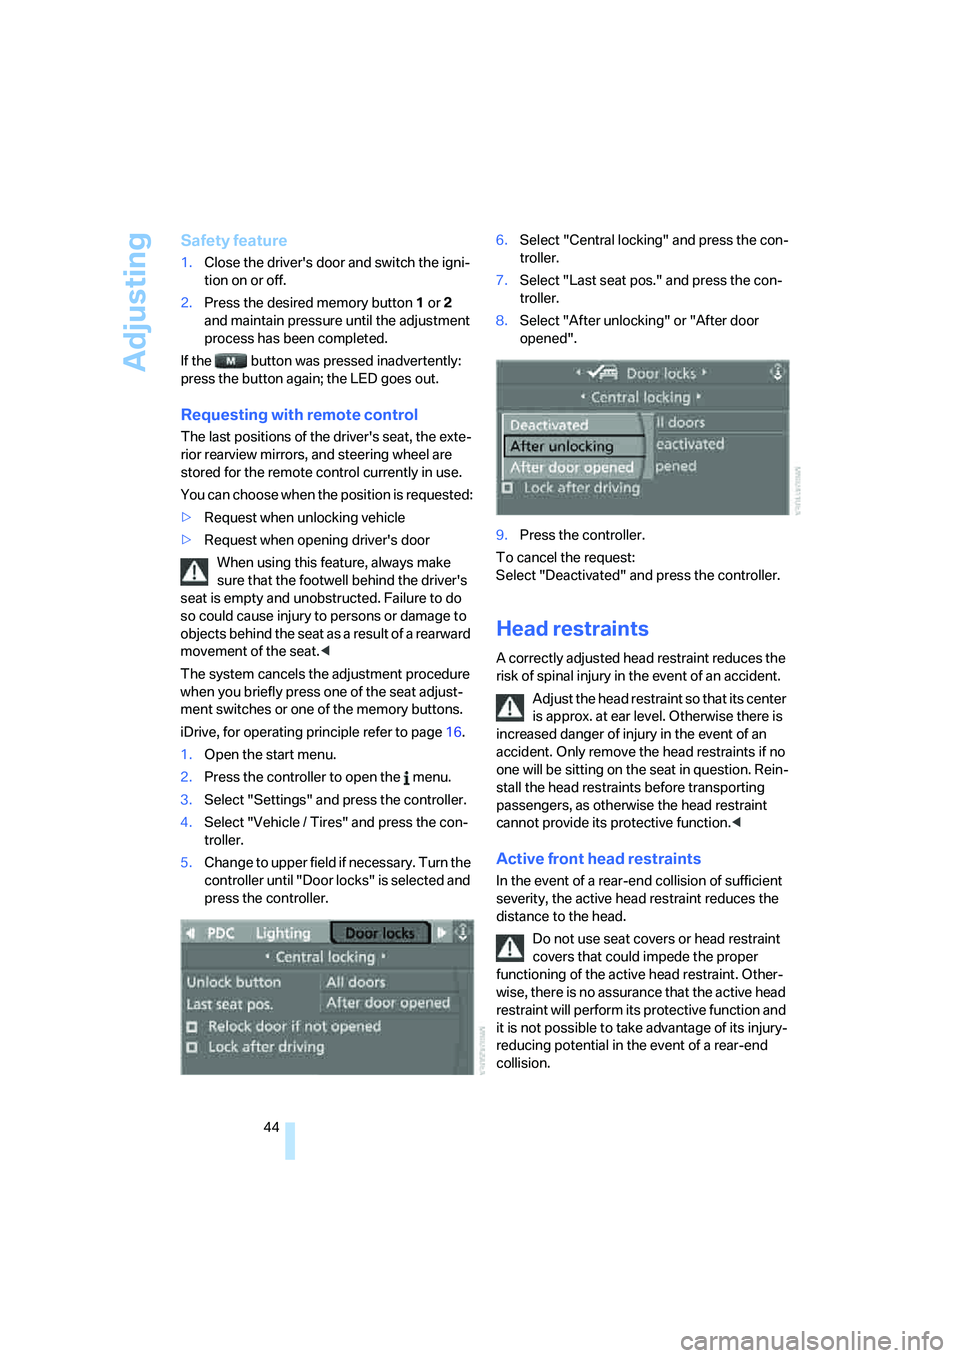
iDrive, for operating principle refer to page16.
1.Open the start menu.
2.Press the controller to open the menu.
3.Select "Settings" and press the controller.
4.Select "Vehicle / Tires" and press the con-
troller.
5.Change to upper field if necessary. Turn the
controller until "Door locks" is selected and
press the controller.6.Select "Central locking" and press the con-
troller.
7.Select "Last seat pos." and press the con-
troller.
8.Select "After unlocking" or "After door
opened".
9.Press the controller.
To cancel the request:
Select "Deactivated" and press the controller.
Head restraints
A correctly adjusted head restraint reduces the
risk of spinal injury in the event of an accident.
Adjust the head restraint so that its center
is approx. at ear level. Otherwise there is
increased danger of injury in the event of an
accident. Only remove the head restraints if no
one will be sitting on the seat in question. Rein-
stall the head restraints before transporting
passengers, as otherwise the head restraint
cannot provide its protective function.<
Active front head restraints
In the event of a rear-end collision of sufficient
severity, the active head restraint reduces the
distance to the head.
Do not use seat covers or head restraint
covers that could impede the proper
functioning of the active head restraint. Other-
wise, there is no assurance that the active head
restraint will perform its protective function and
it is not possible to take advantage of its injury-
reducing potential in the event of a rear-end
collision.
Page 52 of 260
Adjusting
50
Programmable button on steering
wheel
You can program the button individually.
The setting is stored for the remote control cur-
rently in use.
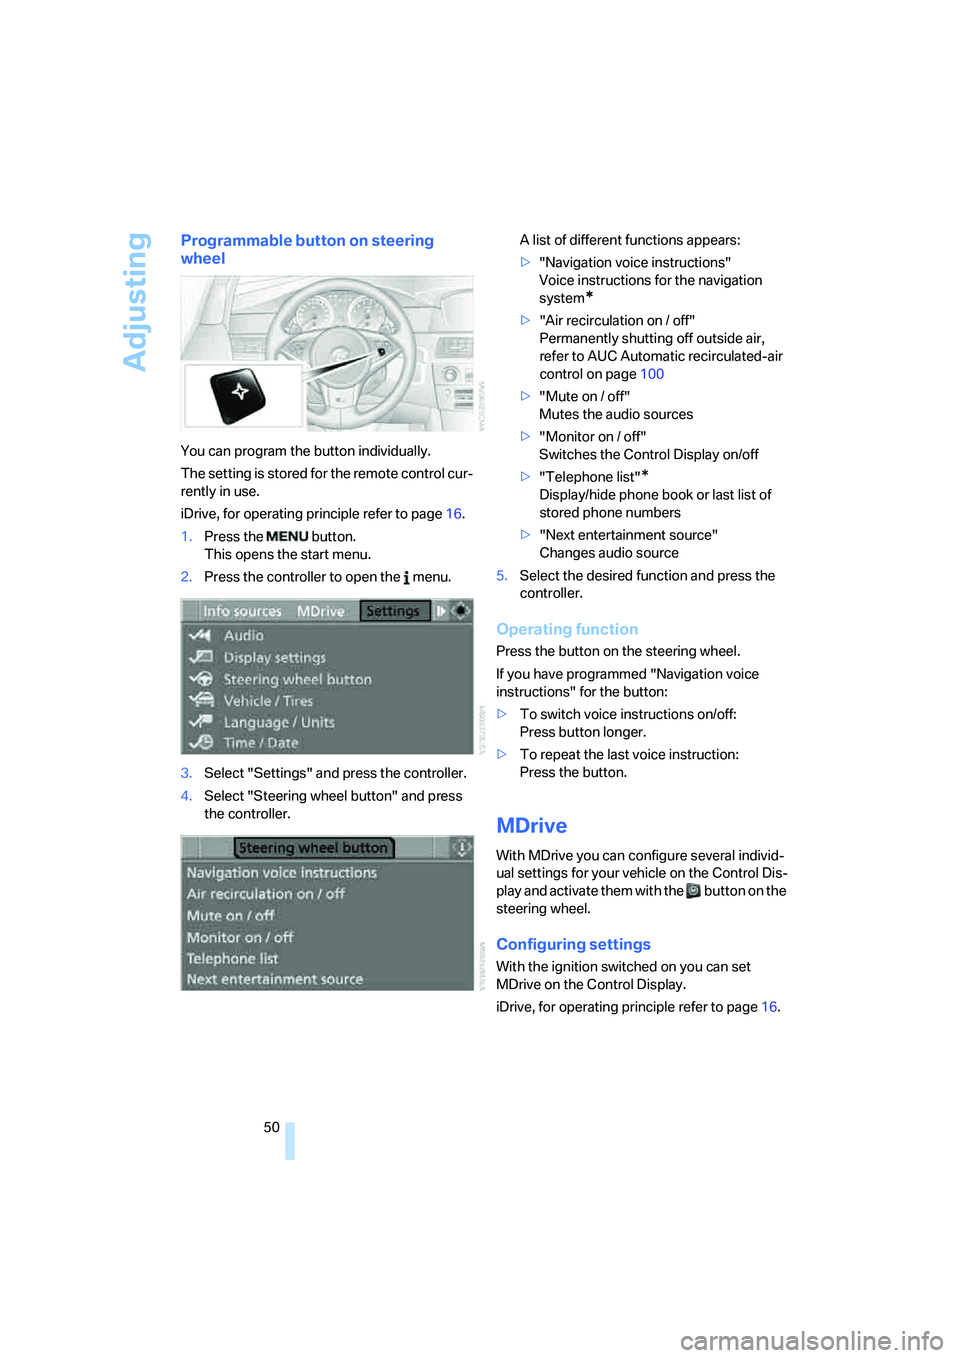
iDrive, for operating principle refer to page16.
1.Press the button.
This opens the start menu.
2.Press the controller to open the menu.
3.Select "Settings" and press the controller.
4.Select "Steering wheel button" and press
the controller.A list of different functions appears:
>"Navigation voice instructions"
Voice instructions for the navigation
system
*
>"Air recirculation on / off"
Permanently shutting off outside air,
refer to AUC Automatic recirculated-air
control on page100
>"Mute on / off"
Mutes the audio sources
>"Monitor on / off"
Switches the Control Display on/off
>"Telephone list"
*
Display/hide phone book or last list of
stored phone numbers
>"Next entertainment source"
Changes audio source
5.Select the desired function and press the
controller.
Operating function
Press the button on the steering wheel.
If you have programmed "Navigation voice
instructions" for the button:
>To switch voice instructions on/off:
Press button longer.
>To repeat the last voice instruction:
Press the button.
MDrive
With MDrive you can configure several individ-
ual settings for your vehicle on the Control Dis-
play and activate them with the button on the
steering wheel.
Configuring settings
With the ignition switched on you can set
MDrive on the Control Display.
iDrive, for operating principle refer to page16.
Page 53 of 260
Controls
51Reference
At a glance
Driving tips
Communications
Navigation
Entertainment
Mobility
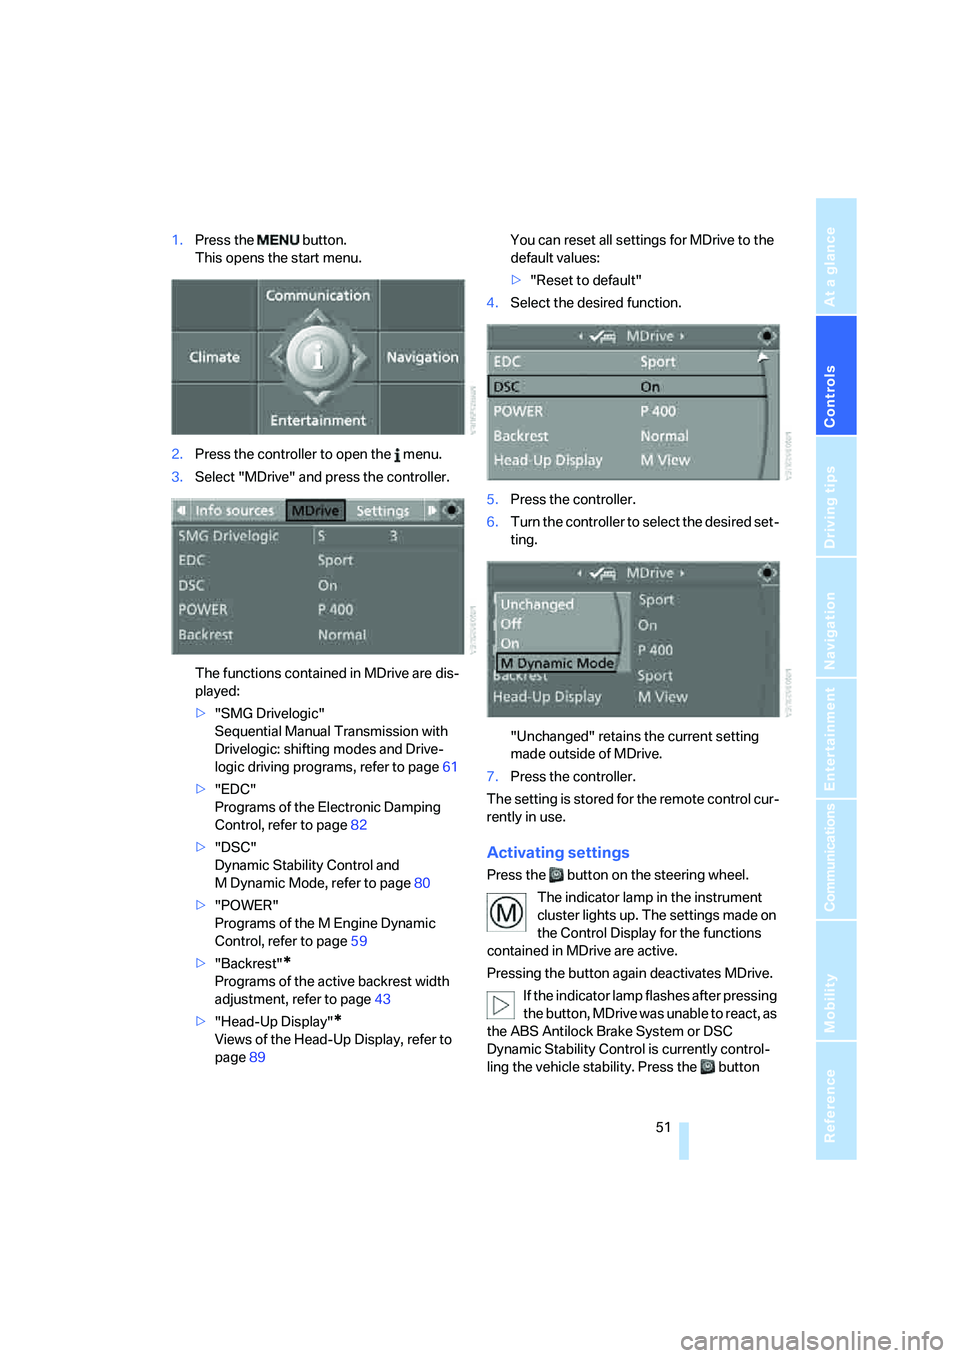
1.Press the button.
This opens the start menu.
2.Press the controller to open the menu.
3.Select "MDrive" and press the controller.
The functions contained in MDrive are dis-
played:
>"SMG Drivelogic"
Sequential Manual Transmission with
Drivelogic: shifting modes and Drive-
logic driving programs, refer to page61
>"EDC"
Programs of the Electronic Damping
Control, refer to page82
>"DSC"
Dynamic Stability Control and
M Dynamic Mode, refer to page80
>"POWER"
Programs of the M Engine Dynamic
Control, refer to page59
>"Backrest"
*
Programs of the active backrest width
adjustment, refer to page43
>"Head-Up Display"
*
Views of the Head-Up Display, refer to
page89You can reset all settings for MDrive to the
default values:
>"Reset to default"
4.Select the desired function.
5.Press the controller.
6.Turn the controller to select the desired set-
ting.
"Unchanged" retains the current setting
made outside of MDrive.
7.Press the controller.
The setting is stored for the remote control cur-
rently in use.
Activating settings
Press the button on the steering wheel.
The indicator lamp in the instrument
cluster lights up. The settings made on
the Control Display for the functions
contained in MDrive are active.
Pressing the button again deactivates MDrive.
If the indicator lamp flashes after pressing
the button, MDrive was unable to react, as
the ABS Antilock Brake System or DSC
Dynamic Stability Control is currently control-
ling the vehicle stability. Press the button
Page 61 of 260
Controls
59Reference
At a glance
Driving tips
Communications
Navigation
Entertainment
Mobility
M Engine Dynamic Control
With M Engine Dynamic Control you can influ-
ence how sporty the reaction of your vehicle to
accelerator pedal movements is to be. Three
programs are available to you.
"P 400" program
In the "P 400" program the engine reacts gently
to movements of the accelerator pedal. This is,
for example, ideal for city driving or driving on
snow. In the process, the fuel consumption is
minimal and the engine output is reduced.
"P 500" program
The "P 500" program provides maximum per-
formance and more spontaneous reaction of
the engine to accelerator pedal movements.
"P 500 Sport" program
In the "P 500 Sport" program the engine reacts
especially spontaneously and uncompromis-
ingly sporty with maximum performance to
accelerator pedal movements.
Selecting program
Sequential Manual Transmission with
Drivelogic
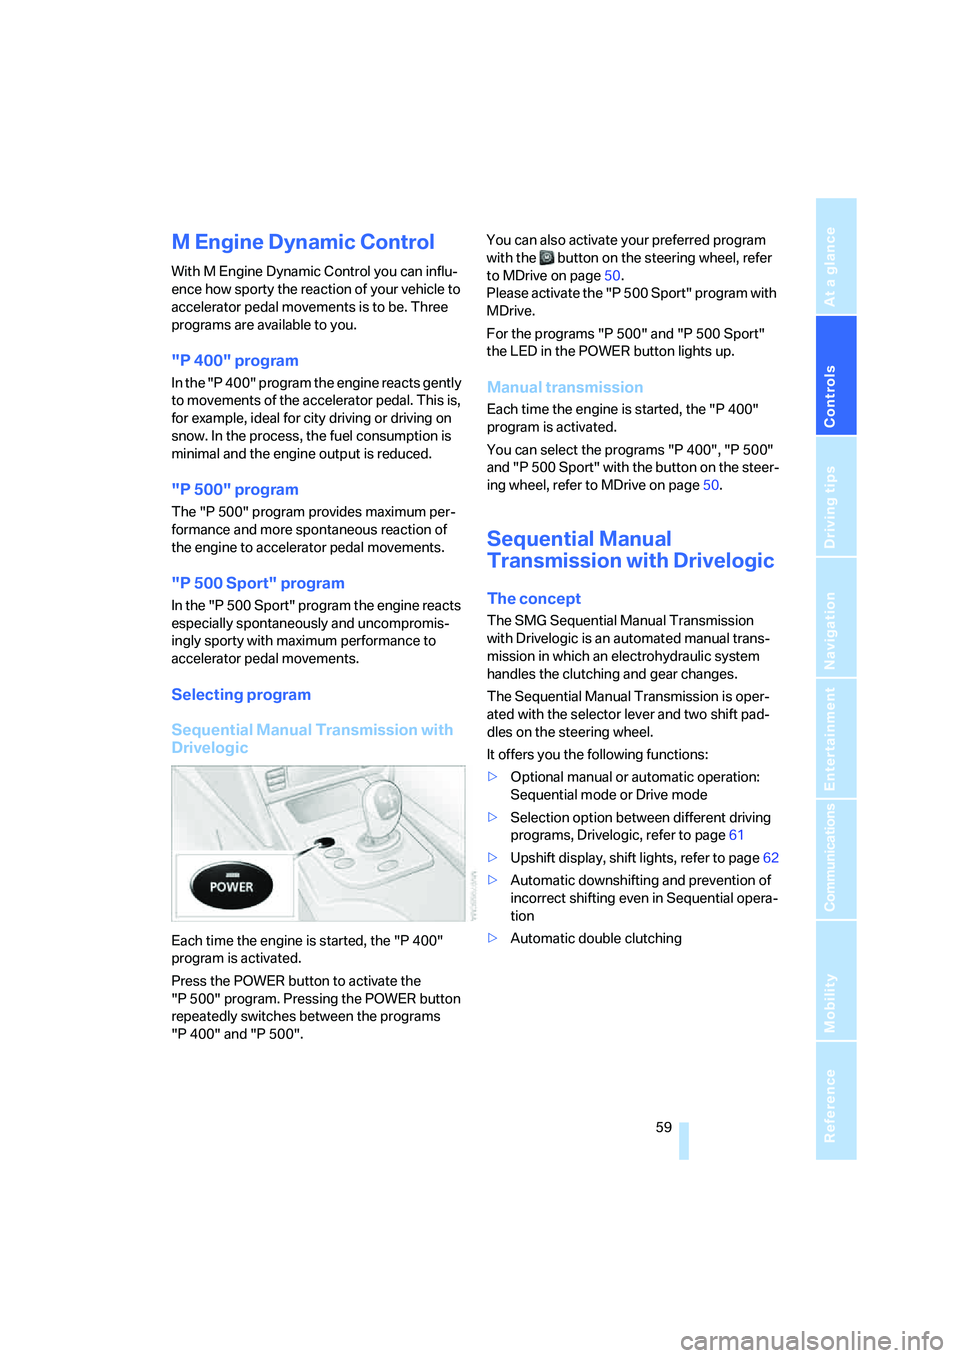
Each time the engine is started, the "P 400"
program is activated.
Press the POWER button to activate the
"P 500" program. Pressing the POWER button
repeatedly switches between the programs
"P 400" and "P 500".You can also activate your preferred program
with the button on the steering wheel, refer
to MDrive on page50.
Please activate the "P 500 Sport" program with
MDrive.
For the programs "P 500" and "P 500 Sport"
the LED in the POWER button lights up.
Manual transmission
Each time the engine is started, the "P 400"
program is activated.
You can select the programs "P 400", "P 500"
and "P 500 Sport" with the button on the steer-
ing wheel, refer to MDrive on page50.
Sequential Manual
Transmission with Drivelogic
The concept
The SMG Sequential Manual Transmission
with Drivelogic is an automated manual trans-
mission in which an electrohydraulic system
handles the clutching and gear changes.
The Sequential Manual Transmission is oper-
ated with the selector lever and two shift pad-
dles on the steering wheel.
It offers you the following functions:
>Optional manual or automatic operation:
Sequential mode or Drive mode
>Selection option between different driving
programs, Drivelogic, refer to page61
>Upshift display, shift lights, refer to page62
>Automatic downshifting and prevention of
incorrect shifting even in Sequential opera-
tion
>Automatic double clutching
Page 63 of 260
Controls
61Reference
At a glance
Driving tips
Communications
Navigation
Entertainment
Mobility
Displays in instrument cluster
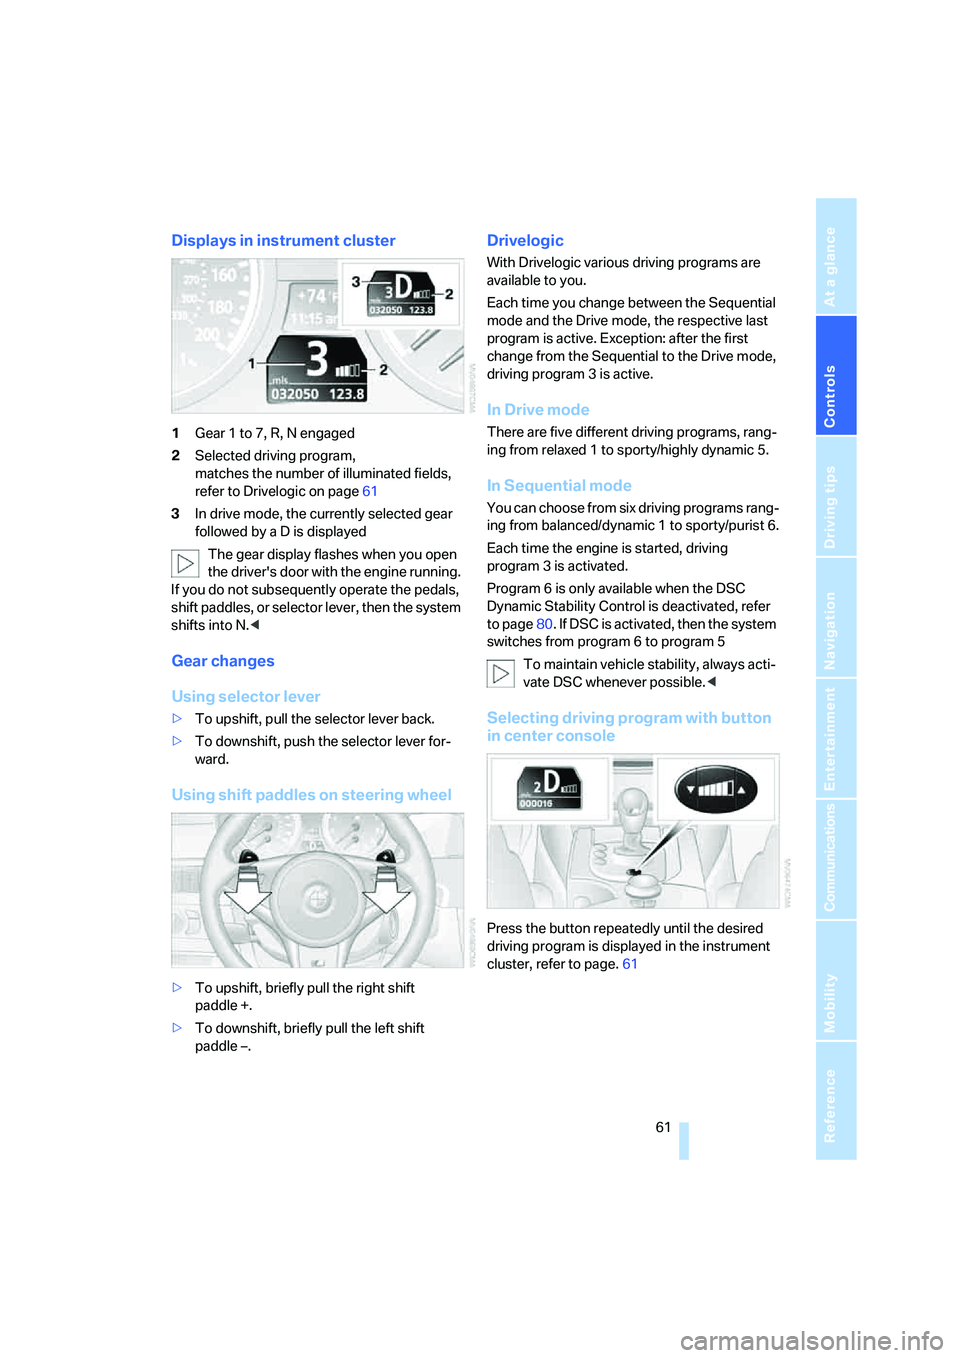
1Gear 1 to 7, R, N engaged
2Selected driving program,
matches the number of illuminated fields,
refer to Drivelogic on page61
3In drive mode, the currently selected gear
followed by a D is displayed
The gear display flashes when you open
the driver's door with the engine running.
If you do not subsequently operate the pedals,
shift paddles, or selector lever, then the system
shifts into N.<
Gear changes
Using selector lever
>To upshift, pull the selector lever back.
>To downshift, push the selector lever for-
ward.
Using shift paddles on steering wheel
>To upshift, briefly pull the right shift
paddle +.
>To downshift, briefly pull the left shift
paddle –.
Drivelogic
With Drivelogic various driving programs are
available to you.
Each time you change between the Sequential
mode and the Drive mode, the respective last
program is active. Exception: after the first
change from the Sequential to the Drive mode,
driving program 3 is active.
In Drive mode
There are five different driving programs, rang-
ing from relaxed 1 to sporty/highly dynamic 5.
In Sequential mode
You can choose from six driving programs rang-
ing from balanced/dynamic 1 to sporty/purist 6.
Each time the engine is started, driving
program 3 is activated.
Program 6 is only available when the DSC
Dynamic Stability Control is deactivated, refer
to page80. If DSC is activated, then the system
switches from program 6 to program 5
To maintain vehicle stability, always acti-
vate DSC whenever possible.<
Selecting driving program with button
in center console
Press the button repeatedly until the desired
driving program is displayed in the instrument
cluster, refer to page.61
Page 64 of 260
Driving
62
Selecting driving program via button
on steering wheel
You can also activate your preferred driving pro-
gram with the button on the steering wheel,
refer to MDrive on page50.
With the ignition switched on you can set
MDrive on the Control Display.
iDrive, for operating principle refer to page16.
1.Open the start menu.
2.Press the controller to open the menu.
3.Select "MDrive" and press the controller.
4.Select "SMG Drivelogic" and press the con-
troller. The first setting is selected.
5.Turn controller to set Drive mode or
Sequential mode.
"Unchanged" retains the current settings
made outside of MDrive.
6.Press controller to select driving programs.
7.Turn controller to set driving program.
8.Press the controller.
Shift lights
To achieve the best vehicle acceleration with a
sporty driving style in the Sequential mode,
shift lights in the Head-Up Display
* indicate the
optimum shifting point briefly before reaching
the maximum rpm.
1.Switch on Head-Up Display, refer to Head-
Up Display on page89.
2.Select display "M View" on Head-Up Dis-
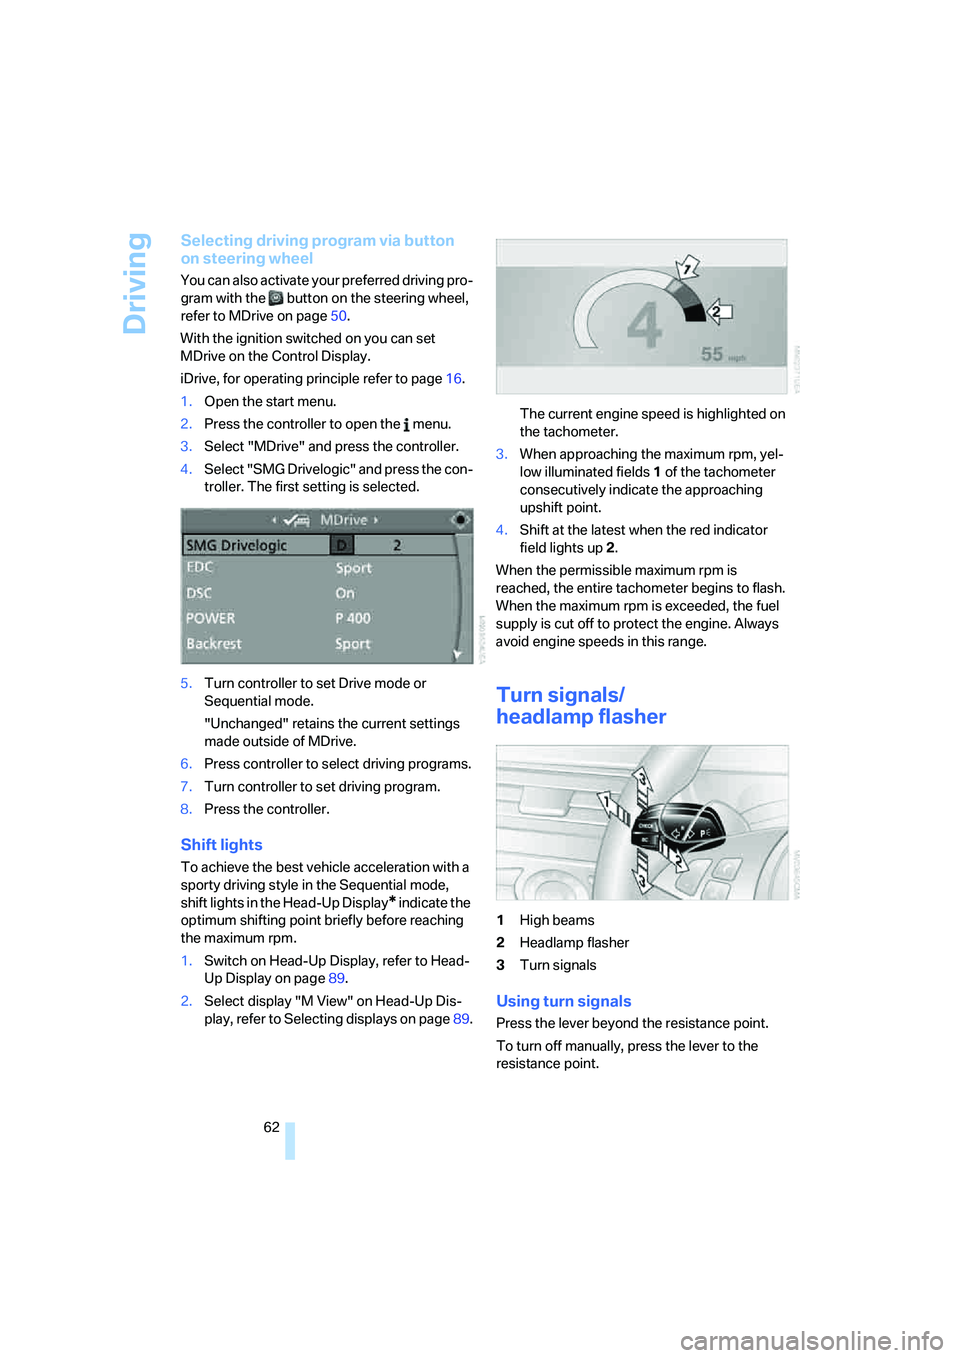
play, refer to Selecting displays on page89.The current engine speed is highlighted on
the tachometer.
3.When approaching the maximum rpm, yel-
low illuminated fields1 of the tachometer
consecutively indicate the approaching
upshift point.
4.Shift at the latest when the red indicator
field lights up2.
When the permissible maximum rpm is
reached, the entire tachometer begins to flash.
When the maximum rpm is exceeded, the fuel
supply is cut off to protect the engine. Always
avoid engine speeds in this range.
Turn signals/
headlamp flasher
1High beams
2Headlamp flasher
3Turn signals
Using turn signals
Press the lever beyond the resistance point.
To turn off manually, press the lever to the
resistance point.
Page 81 of 260
Controls
79Reference
At a glance
Driving tips
Communications
Navigation
Entertainment
Mobility
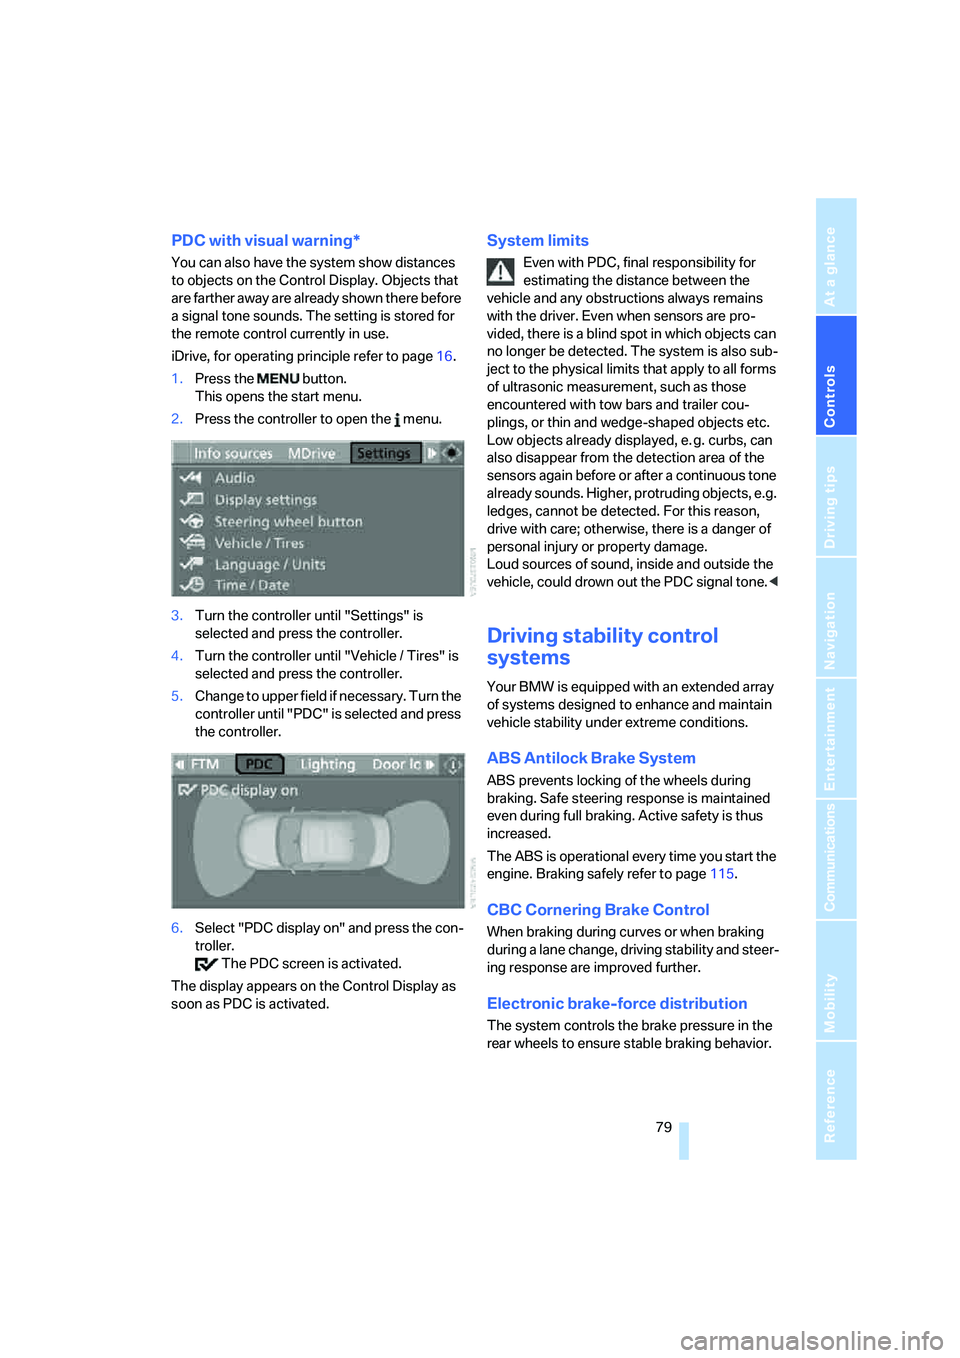
PDC with visual warning*
You can also have the system show distances
to objects on the Control Display. Objects that
are farther away are already shown there before
a signal tone sounds. The setting is stored for
the remote control currently in use.
iDrive, for operating principle refer to page16.
1.Press the button.
This opens the start menu.
2.Press the controller to open the menu.
3.Turn the controller until "Settings" is
selected and press the controller.
4.Turn the controller until "Vehicle / Tires" is
selected and press the controller.
5.Change to upper field if necessary. Turn the
controller until "PDC" is selected and press
the controller.
6.Select "PDC display on" and press the con-
troller.
The PDC screen is activated.
The display appears on the Control Display as
soon as PDC is activated.
System limits
Even with PDC, final responsibility for
estimating the distance between the
vehicle and any obstructions always remains
with the driver. Even when sensors are pro-
vided, there is a blind spot in which objects can
no longer be detected. The system is also sub-
ject to the physical limits that apply to all forms
of ultrasonic measurement, such as those
encountered with tow bars and trailer cou-
plings, or thin and wedge-shaped objects etc.
Low objects already displayed, e. g. curbs, can
also disappear from the detection area of the
sensors again before or after a continuous tone
already sounds. Higher, protruding objects, e.g.
ledges, cannot be detected. For this reason,
drive with care; otherwise, there is a danger of
personal injury or property damage.
Loud sources of sound, inside and outside the
vehicle, could drown out the PDC signal tone.<
Driving stability control
systems
Your BMW is equipped with an extended array
of systems designed to enhance and maintain
vehicle stability under extreme conditions.
ABS Antilock Brake System
ABS prevents locking of the wheels during
braking. Safe steering response is maintained
even during full braking. Active safety is thus
increased.
The ABS is operational every time you start the
engine. Braking safely refer to page115.
CBC Cornering Brake Control
When braking during curves or when braking
during a lane change, driving stability and steer-
ing response are improved further.
Electronic brake-force distribution
The system controls the brake pressure in the
rear wheels to ensure stable braking behavior.