reset BMW M5 2008 Owners Manual
[x] Cancel search | Manufacturer: BMW, Model Year: 2008, Model line: M5, Model: BMW M5 2008Pages: 260, PDF Size: 6.66 MB
Page 14 of 260
Cockpit
12
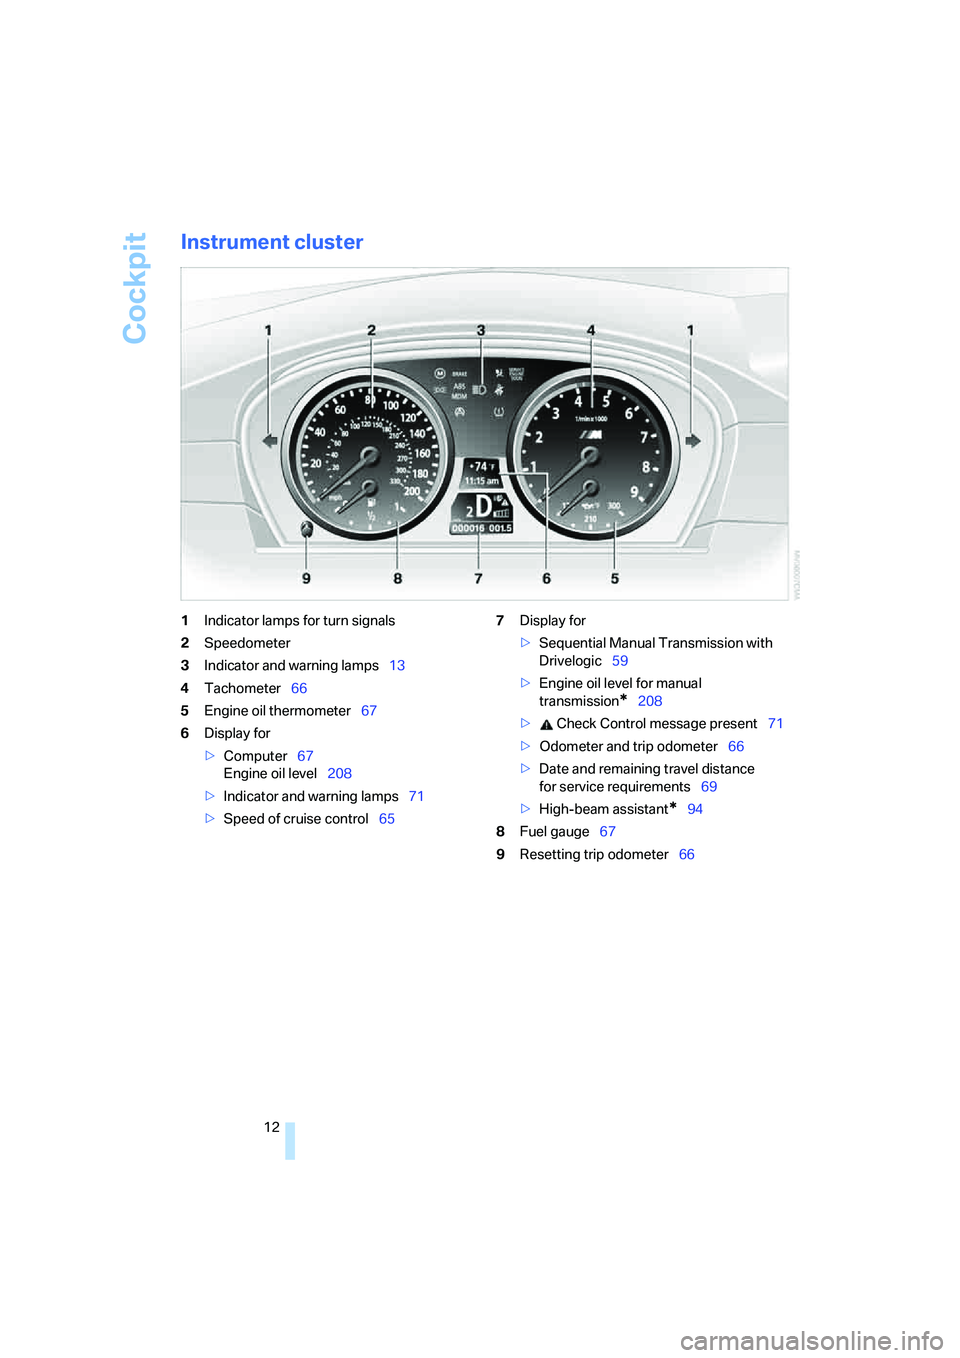
Instrument cluster
1Indicator lamps for turn signals
2Speedometer
3Indicator and warning lamps13
4Tachometer66
5Engine oil thermometer67
6Display for
>Computer67
Engine oil level208
>Indicator and warning lamps71
>Speed of cruise control657Display for
>Sequential Manual Transmission with
Drivelogic59
>Engine oil level for manual
transmission
*208
> Check Control message present71
>Odometer and trip odometer66
>Date and remaining travel distance
for service requirements69
>High-beam assistant
*94
8Fuel gauge67
9Resetting trip odometer66
Page 47 of 260
Controls
45Reference
At a glance
Driving tips
Communications
Navigation
Entertainment
Mobility
Have the active head restraints reset after they
are triggered in a rear-end collision. Only have
this work carried out by a BMW center or a
workshop that works according to BMW repair
procedures with correspondingly trained per-
sonnel. Otherwise, this safety equipment will
not function properly.<
Please contact a BMW center if you wish
to have the front head restraints removed
and installed.<
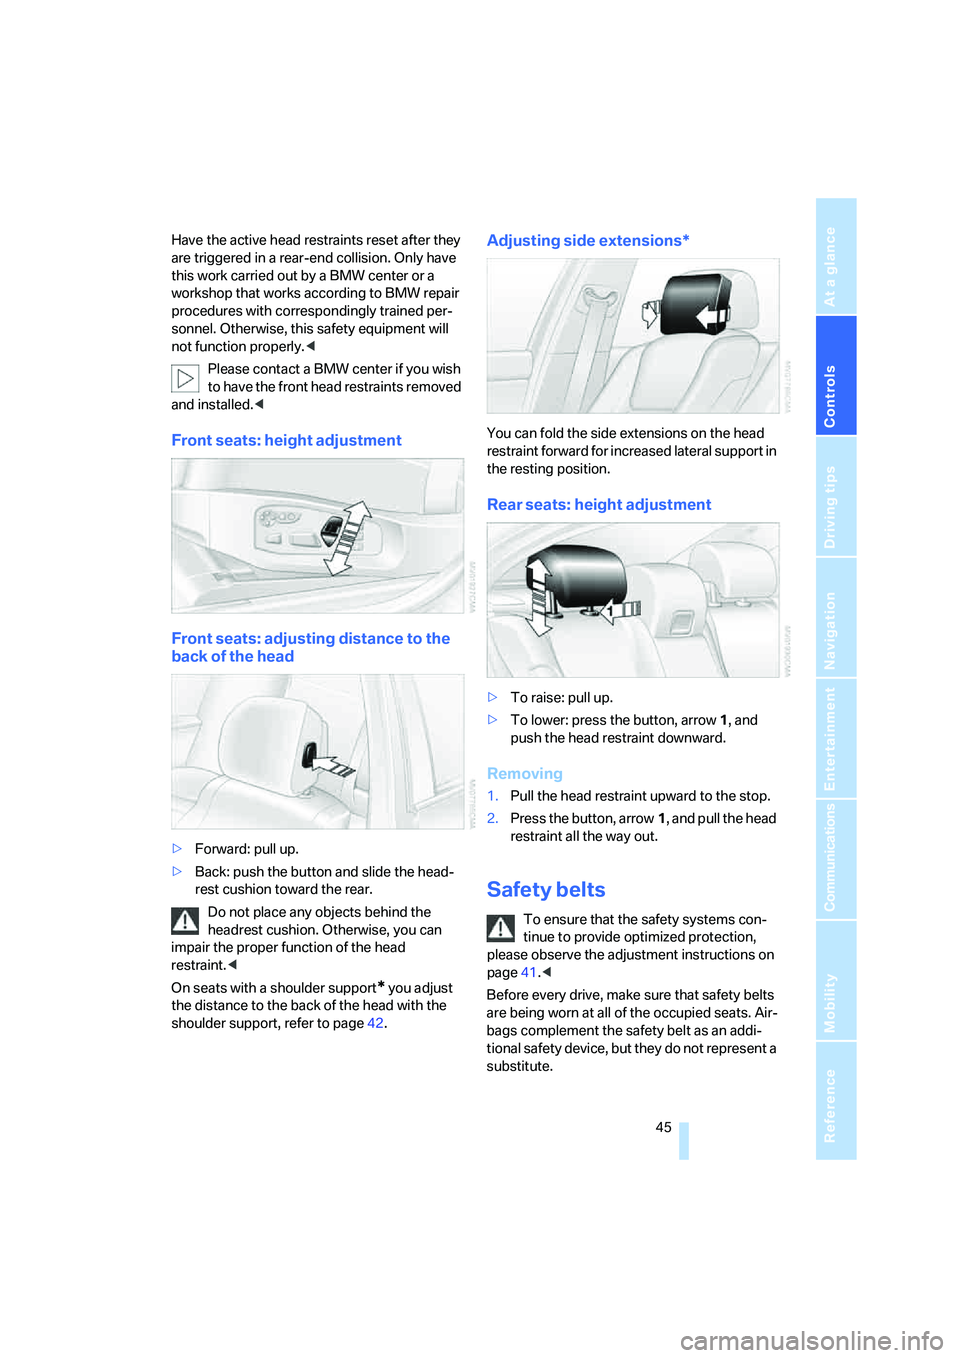
Front seats: height adjustment
Front seats: adjusting distance to the
back of the head
>Forward: pull up.
>Back: push the button and slide the head-
rest cushion toward the rear.
Do not place any objects behind the
headrest cushion. Otherwise, you can
impair the proper function of the head
restraint.<
On seats with a shoulder support
* you adjust
the distance to the back of the head with the
shoulder support, refer to page42.
Adjusting side extensions*
You can fold the side extensions on the head
restraint forward for increased lateral support in
the resting position.
Rear seats: height adjustment
>To raise: pull up.
>To lower: press the button, arrow1, and
push the head restraint downward.
Removing
1.Pull the head restraint upward to the stop.
2.Press the button, arrow1, and pull the head
restraint all the way out.
Safety belts
To ensure that the safety systems con-
tinue to provide optimized protection,
please observe the adjustment instructions on
page41.<
Before every drive, make sure that safety belts
are being worn at all of the occupied seats. Air-
bags complement the safety belt as an addi-
tional safety device, but they do not represent a
substitute.
Page 53 of 260
Controls
51Reference
At a glance
Driving tips
Communications
Navigation
Entertainment
Mobility
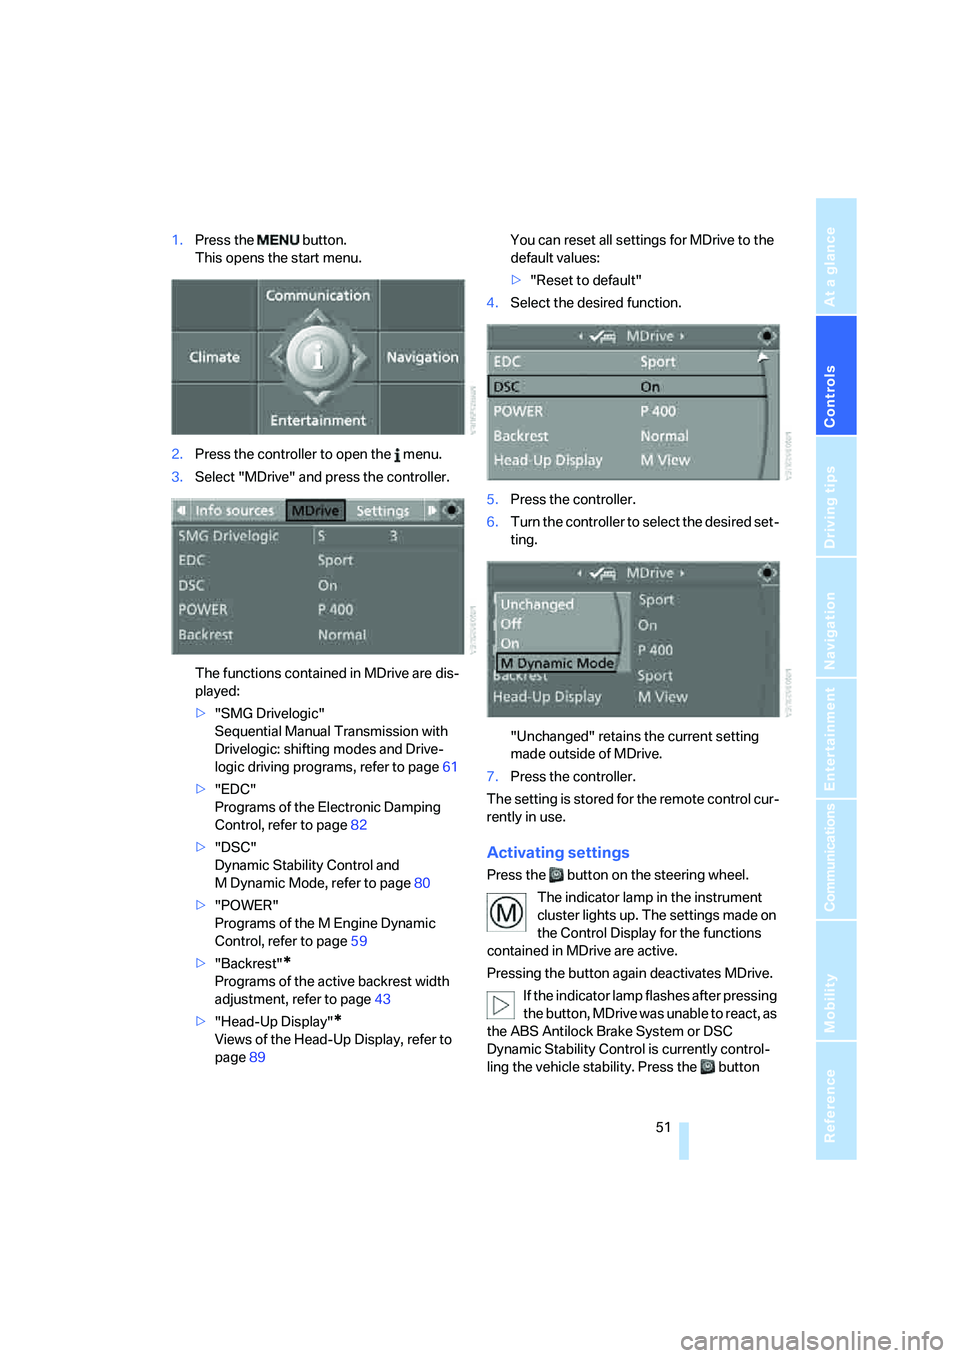
1.Press the button.
This opens the start menu.
2.Press the controller to open the menu.
3.Select "MDrive" and press the controller.
The functions contained in MDrive are dis-
played:
>"SMG Drivelogic"
Sequential Manual Transmission with
Drivelogic: shifting modes and Drive-
logic driving programs, refer to page61
>"EDC"
Programs of the Electronic Damping
Control, refer to page82
>"DSC"
Dynamic Stability Control and
M Dynamic Mode, refer to page80
>"POWER"
Programs of the M Engine Dynamic
Control, refer to page59
>"Backrest"
*
Programs of the active backrest width
adjustment, refer to page43
>"Head-Up Display"
*
Views of the Head-Up Display, refer to
page89You can reset all settings for MDrive to the
default values:
>"Reset to default"
4.Select the desired function.
5.Press the controller.
6.Turn the controller to select the desired set-
ting.
"Unchanged" retains the current setting
made outside of MDrive.
7.Press the controller.
The setting is stored for the remote control cur-
rently in use.
Activating settings
Press the button on the steering wheel.
The indicator lamp in the instrument
cluster lights up. The settings made on
the Control Display for the functions
contained in MDrive are active.
Pressing the button again deactivates MDrive.
If the indicator lamp flashes after pressing
the button, MDrive was unable to react, as
the ABS Antilock Brake System or DSC
Dynamic Stability Control is currently control-
ling the vehicle stability. Press the button
Page 68 of 260
Everything under control
66
Everything under control
Odometer, outside
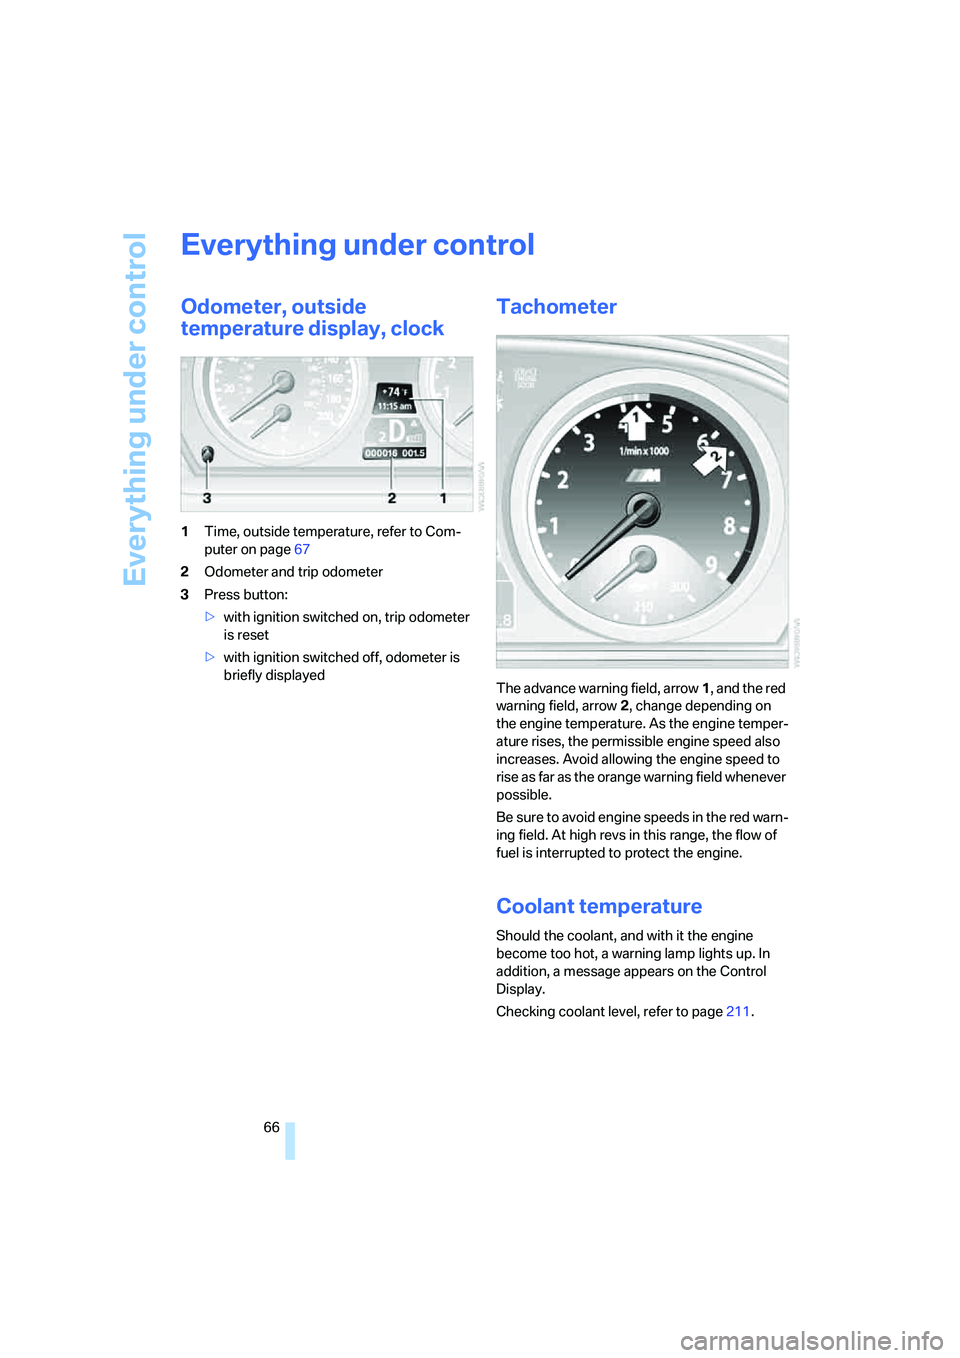
temperature display, clock
1Time, outside temperature, refer to Com-
puter on page67
2Odometer and trip odometer
3Press button:
>with ignition switched on, trip odometer
is reset
>with ignition switched off, odometer is
briefly displayed
Tachometer
The advance warning field, arrow1, and the red
warning field, arrow2, change depending on
the engine temperature. As the engine temper-
ature rises, the permissible engine speed also
increases. Avoid allowing the engine speed to
rise as far as the orange warning field whenever
possible.
Be sure to avoid engine speeds in the red warn-
ing field. At high revs in this range, the flow of
fuel is interrupted to protect the engine.
Coolant temperature
Should the coolant, and with it the engine
become too hot, a warning lamp lights up. In
addition, a message appears on the Control
Display.
Checking coolant level, refer to page211.
Page 70 of 260
Everything under control
68
Cruising range
Displays the estimated cruising range available
with the remaining fuel. The range is projected
based on the driving style over the last 20 miles/
30 km.
Refuel as soon as possible once your
cruising range falls below 30 miles/
50 km, otherwise engine functions are not
ensured and damage can occur.<
Average fuel consumption
The average fuel consumption is calculated for
the time during which the engine is running.
To reset average fuel consumption: press BC
button on turn signal lever for approx. 2 sec-
onds.
For different routes
You can display the average speed for two dif-
ferent routes on the Control Display, refer to the
following and to Trip computer
*.
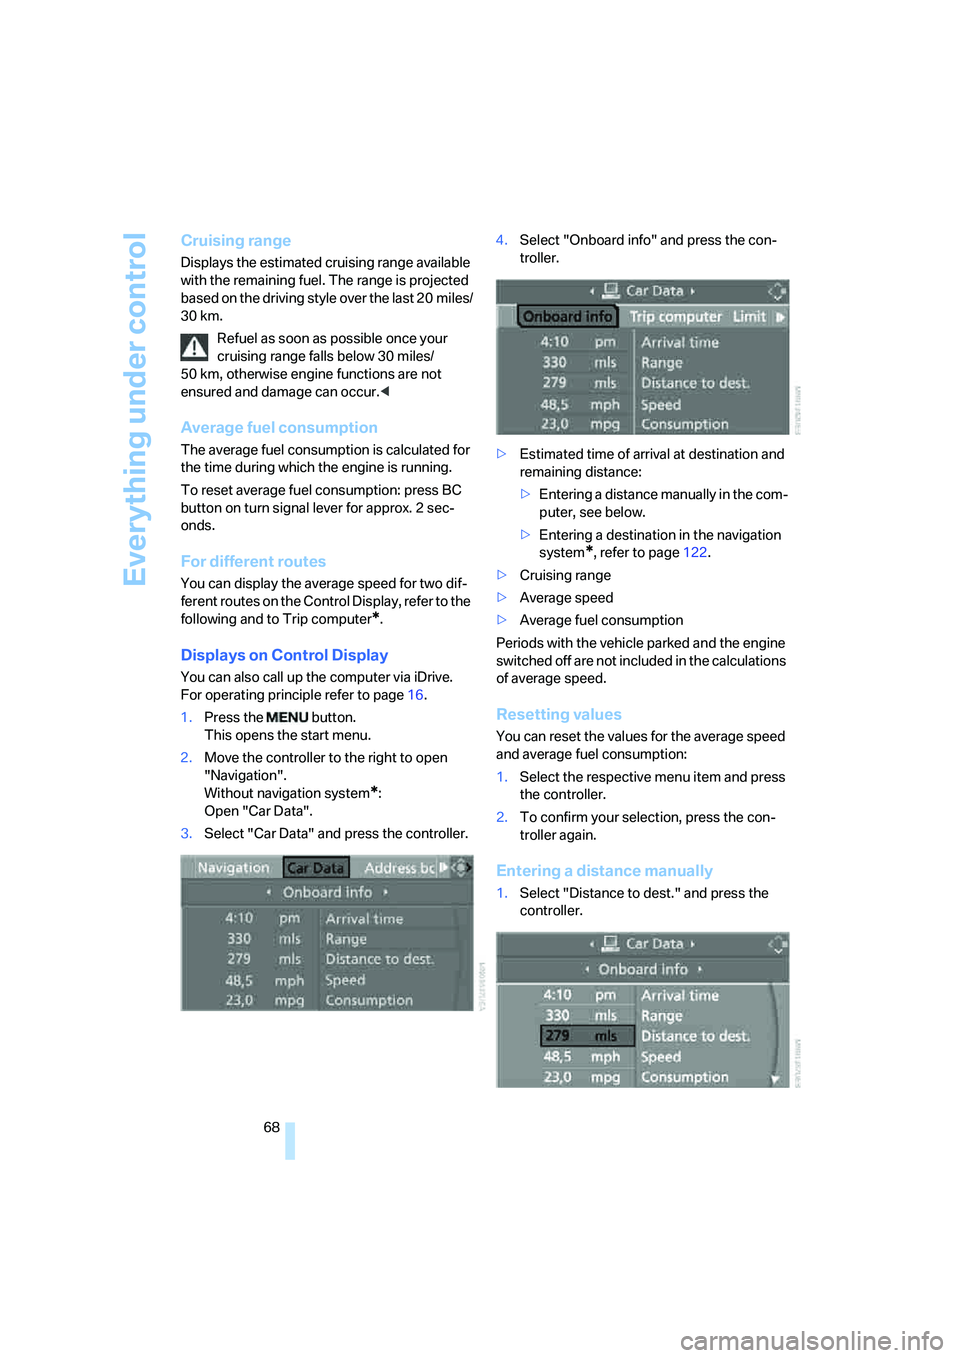
Displays on Control Display
You can also call up the computer via iDrive.
For operating principle refer to page16.
1.Press the button.
This opens the start menu.
2.Move the controller to the right to open
"Navigation".
Without navigation system
*:
Open "Car Data".
3.Select "Car Data" and press the controller.4.Select "Onboard info" and press the con-
troller.
>Estimated time of arrival at destination and
remaining distance:
>Entering a distance manually in the com-
puter, see below.
>Entering a destination in the navigation
system
*, refer to page122.
>Cruising range
>Average speed
>Average fuel consumption
Periods with the vehicle parked and the engine
switched off are not included in the calculations
of average speed.
Resetting values
You can reset the values for the average speed
and average fuel consumption:
1.Select the respective menu item and press
the controller.
2.To confirm your selection, press the con-
troller again.
Entering a distance manually
1.Select "Distance to dest." and press the
controller.
Page 71 of 260
Controls
69Reference
At a glance
Driving tips
Communications
Navigation
Entertainment
Mobility
2.Turn the controller to select the distance to
your destination. If needed, hold it against a
slight resistance to enter a larger differ-
ence.
3.Press the controller to apply the setting.
The distance is automatically preset during the
destination guidance of the navigation sys-
tem
*.
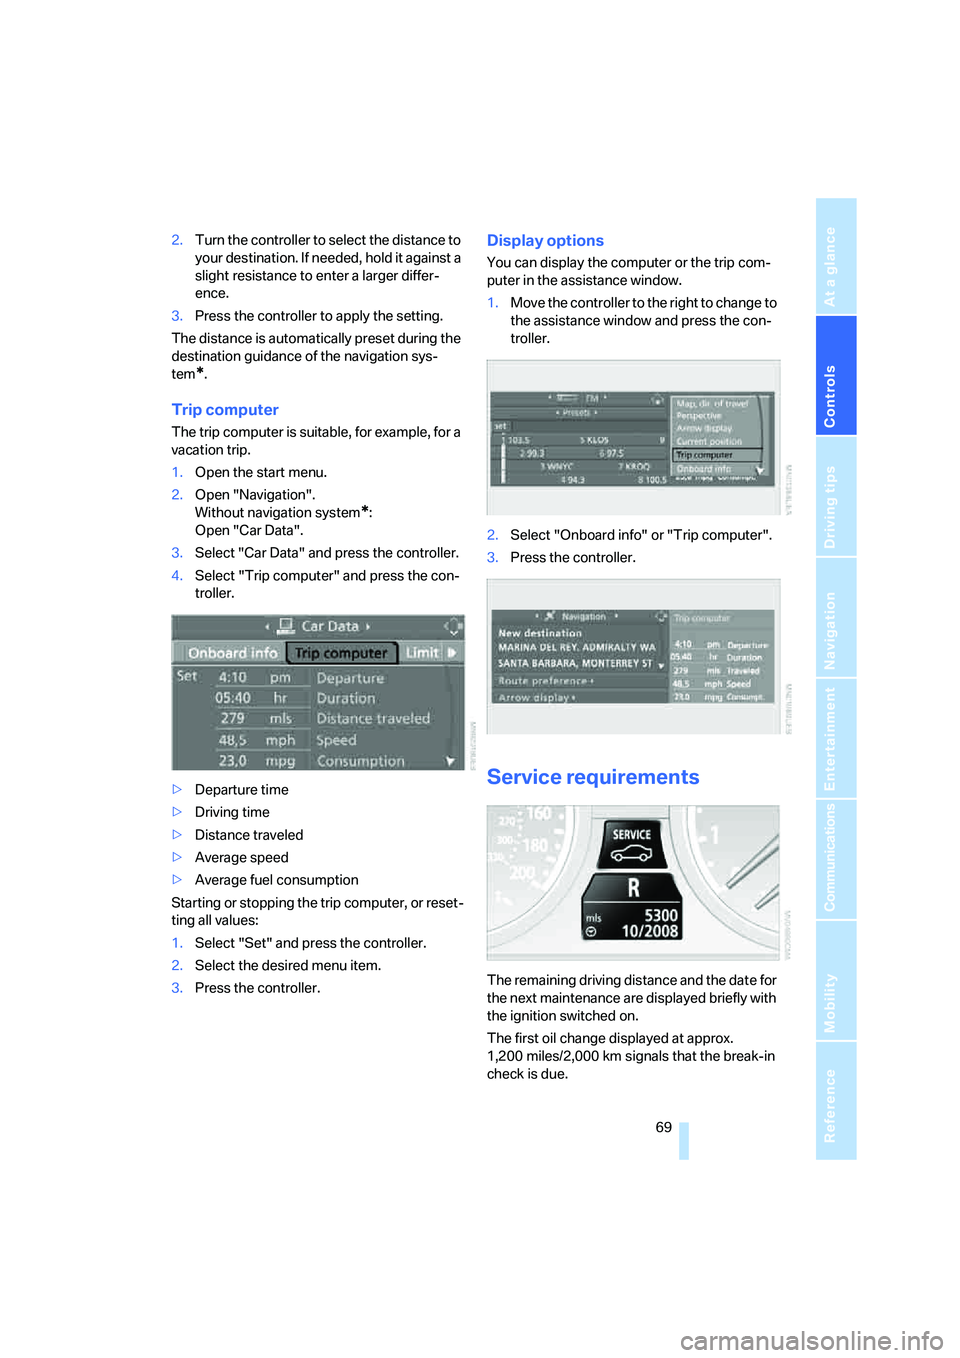
Trip computer
The trip computer is suitable, for example, for a
vacation trip.
1.Open the start menu.
2.Open "Navigation".
Without navigation system
*:
Open "Car Data".
3.Select "Car Data" and press the controller.
4.Select "Trip computer" and press the con-
troller.
>Departure time
>Driving time
>Distance traveled
>Average speed
>Average fuel consumption
Starting or stopping the trip computer, or reset-
ting all values:
1.Select "Set" and press the controller.
2.Select the desired menu item.
3.Press the controller.
Display options
You can display the computer or the trip com-
puter in the assistance window.
1.Move the controller to the right to change to
the assistance window and press the con-
troller.
2.Select "Onboard info" or "Trip computer".
3.Press the controller.
Service requirements
The remaining driving distance and the date for
the next maintenance are displayed briefly with
the ignition switched on.
The first oil change displayed at approx.
1,200 miles/2,000 km signals that the break-in
check is due.
Page 76 of 260
Everything under control
74 5.Select the speed value and press the con-
troller.
6.Turn the controller to set the limit. If
needed, hold it against a slight resistance
to enter a larger difference.
7.Press the controller to apply the setting.
The limit is automatically activated.
Applying your current speed as limit
Select "Select current speed" and press the
controller. The system adopts your current
speed as the limit.
Activating limit
Select "On" and press the controller.
Limit is automatically activated.
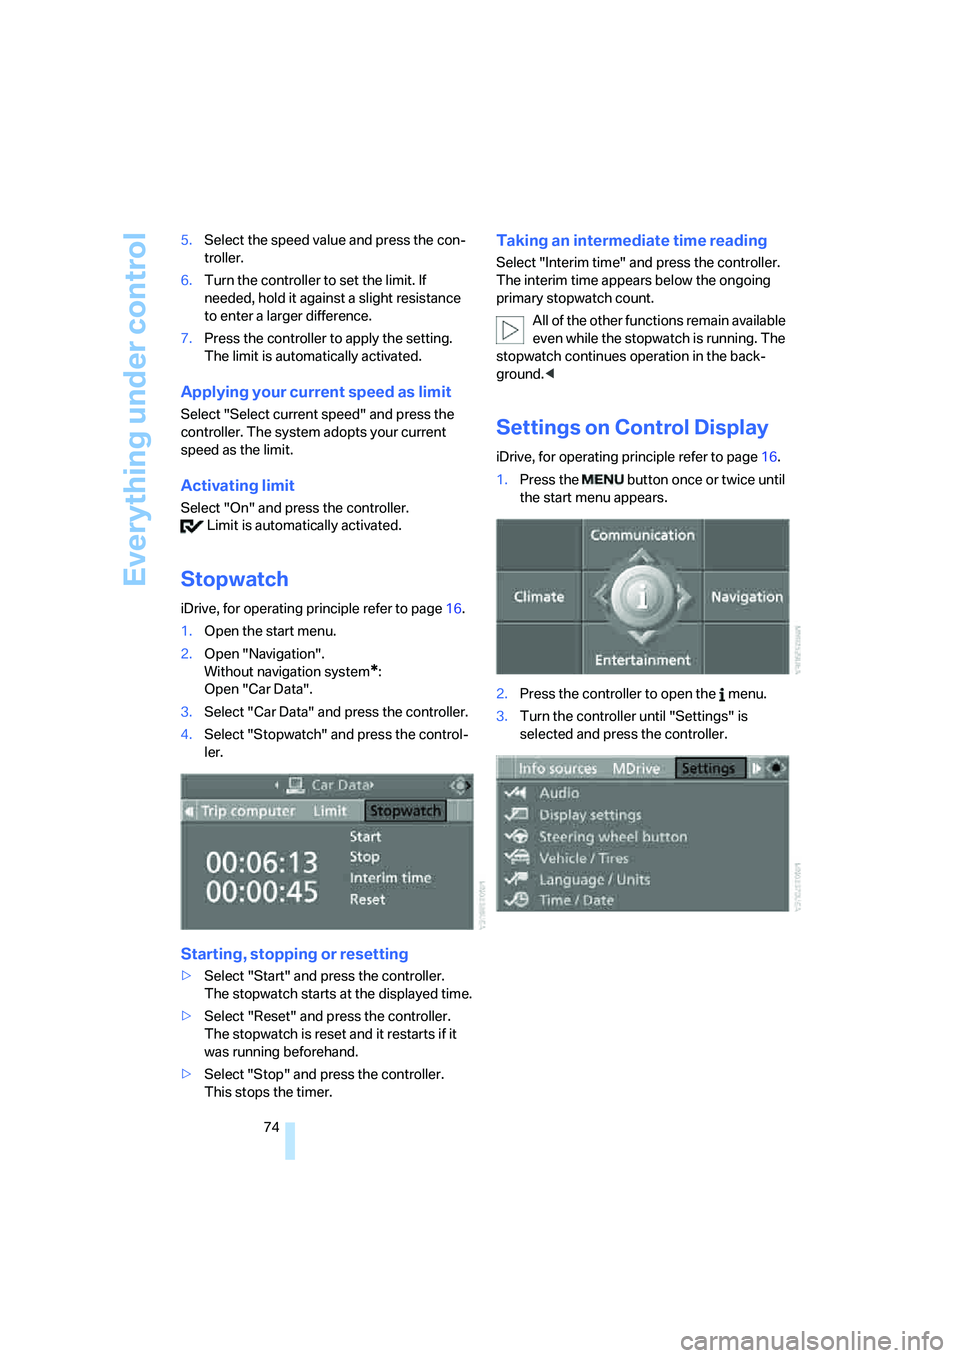
Stopwatch
iDrive, for operating principle refer to page16.
1.Open the start menu.
2.Open "Navigation".
Without navigation system
*:
Open "Car Data".
3.Select "Car Data" and press the controller.
4.Select "Stopwatch" and press the control-
ler.
Starting, stopping or resetting
>Select "Start" and press the controller.
The stopwatch starts at the displayed time.
>Select "Reset" and press the controller.
The stopwatch is reset and it restarts if it
was running beforehand.
>Select "Stop" and press the controller.
This stops the timer.
Taking an intermediate time reading
Select "Interim time" and press the controller.
The interim time appears below the ongoing
primary stopwatch count.
All of the other functions remain available
even while the stopwatch is running. The
stopwatch continues operation in the back-
ground.<
Settings on Control Display
iDrive, for operating principle refer to page16.
1.Press the button once or twice until
the start menu appears.
2.Press the controller to open the menu.
3.Turn the controller until "Settings" is
selected and press the controller.
Page 86 of 260
Technology for comfort, convenience and safety
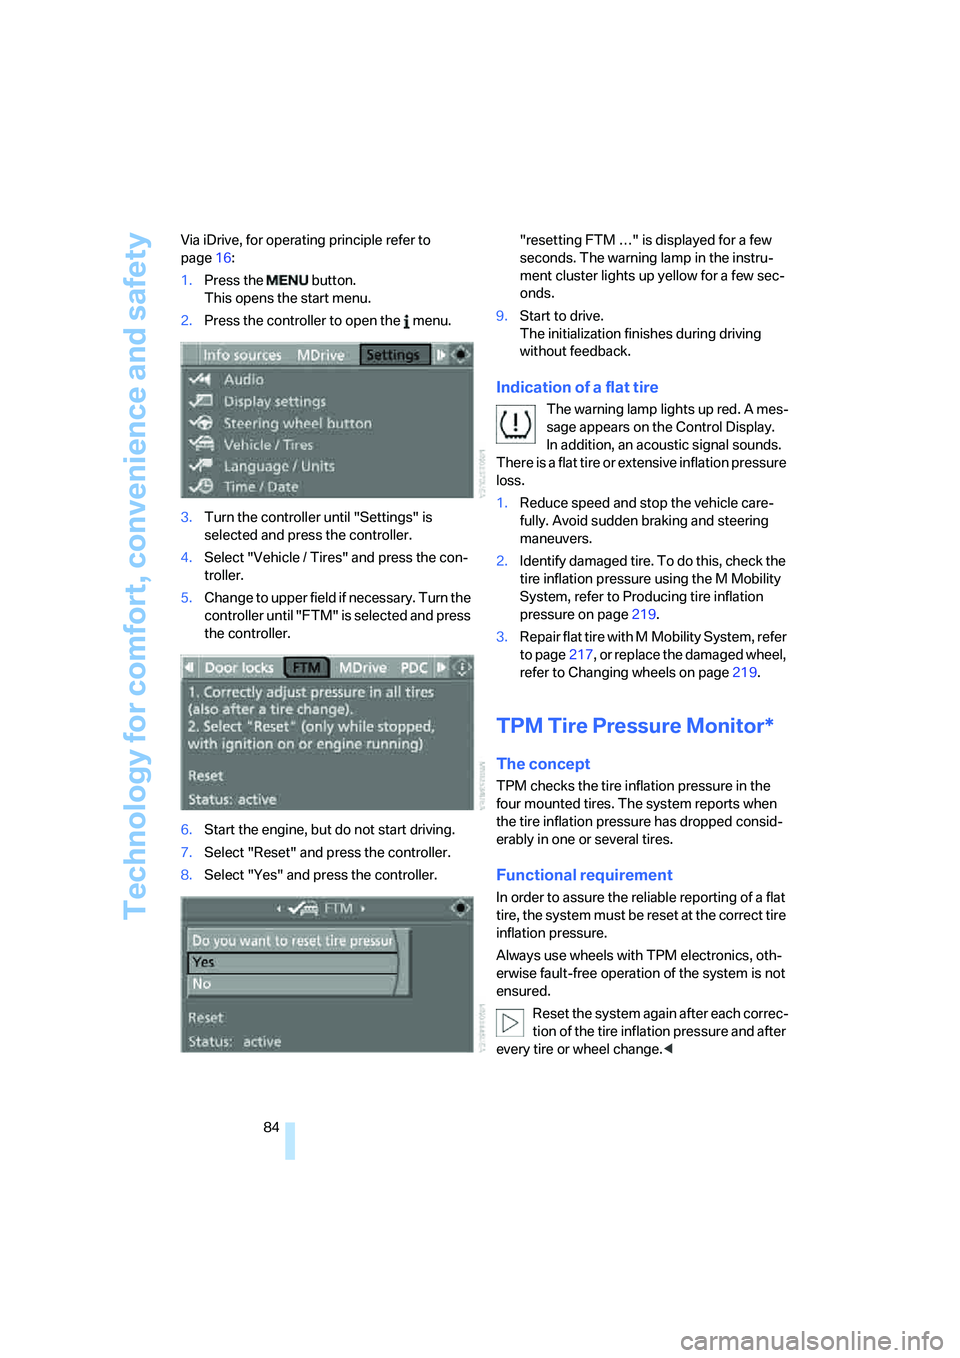
84 Via iDrive, for operating principle refer to
page16:
1.Press the button.
This opens the start menu.
2.Press the controller to open the menu.
3.Turn the controller until "Settings" is
selected and press the controller.
4.Select "Vehicle / Tires" and press the con-
troller.
5.Change to upper field if necessary. Turn the
controller until "FTM" is selected and press
the controller.
6.Start the engine, but do not start driving.
7.Select "Reset" and press the controller.
8.Select "Yes" and press the controller."resetting FTM …" is displayed for a few
seconds. The warning lamp in the instru-
ment cluster lights up yellow for a few sec-
onds.
9.Start to drive.
The initialization finishes during driving
without feedback.
Indication of a flat tire
The warning lamp lights up red. A mes-
sage appears on the Control Display.
In addition, an acoustic signal sounds.
There is a flat tire or extensive inflation pressure
loss.
1.Reduce speed and stop the vehicle care-
fully. Avoid sudden braking and steering
maneuvers.
2.Identify damaged tire. To do this, check the
tire inflation pressure using the M Mobility
System, refer to Producing tire inflation
pressure on page219.
3.Repair flat tire with M Mobility System, refer
to page217, or replace the damaged wheel,
refer to Changing wheels on page219.
TPM Tire Pressure Monitor*
The concept
TPM checks the tire inflation pressure in the
four mounted tires. The system reports when
the tire inflation pressure has dropped consid-
erably in one or several tires.
Functional requirement
In order to assure the reliable reporting of a flat
tire, the system must be reset at the correct tire
inflation pressure.
Always use wheels with TPM electronics, oth-
erwise fault-free operation of the system is not
ensured.
Reset the system again after each correc-
tion of the tire inflation pressure and after
every tire or wheel change.<
Page 87 of 260
Controls
85Reference
At a glance
Driving tips
Communications
Navigation
Entertainment
Mobility
System limits
TPM cannot announce sudden serious tire
damage caused by external influences.
The system does not function properly if it has
not been reset, e.g. a flat tire is reported despite
correct tire inflation pressures.
The system is inactive and cannot display a flat
tire if a wheel has been mounted without TPM
electronics, or if TPM is temporarily interfered
with by other systems or devices which use the
same radio frequency.
Status display on Control Display
The tire and system status is indicated by the
color of the tires.
TPM takes the fact that the tire pressure
changes during driving into account. A correc-
tion is only required if requested by TPM with
the color.
Green
The tire pressure matches the learned set state.
"TPM active" is displayed on the Control Dis-
play.
One wheel is yellow
Flat tire or a major drop in inflation pressure in
the indicated tire. A message appears on the
Control Display.
All wheels are yellow
Flat tire or a major drop in inflation pressure in
several tires. A message appears on the Control
Display.
Gray
The system cannot detect a flat tire.
Reasons for this can be:
>TPM is being reset
>Temporary interference due to systems
or devices which use the same radio fre-
quency
>Malfunction
Resetting system
Reset the system again after each correc-
tion of the tire inflation pressure and after
every tire or wheel change.<
Resetting finishes during driving, which can be
interrupted at any time. When driving resumes,
resetting is continued automatically.
iDrive, for operating principle refer to page16.
1.Press the button.
This opens the start menu.
2.Press the controller to open the menu.
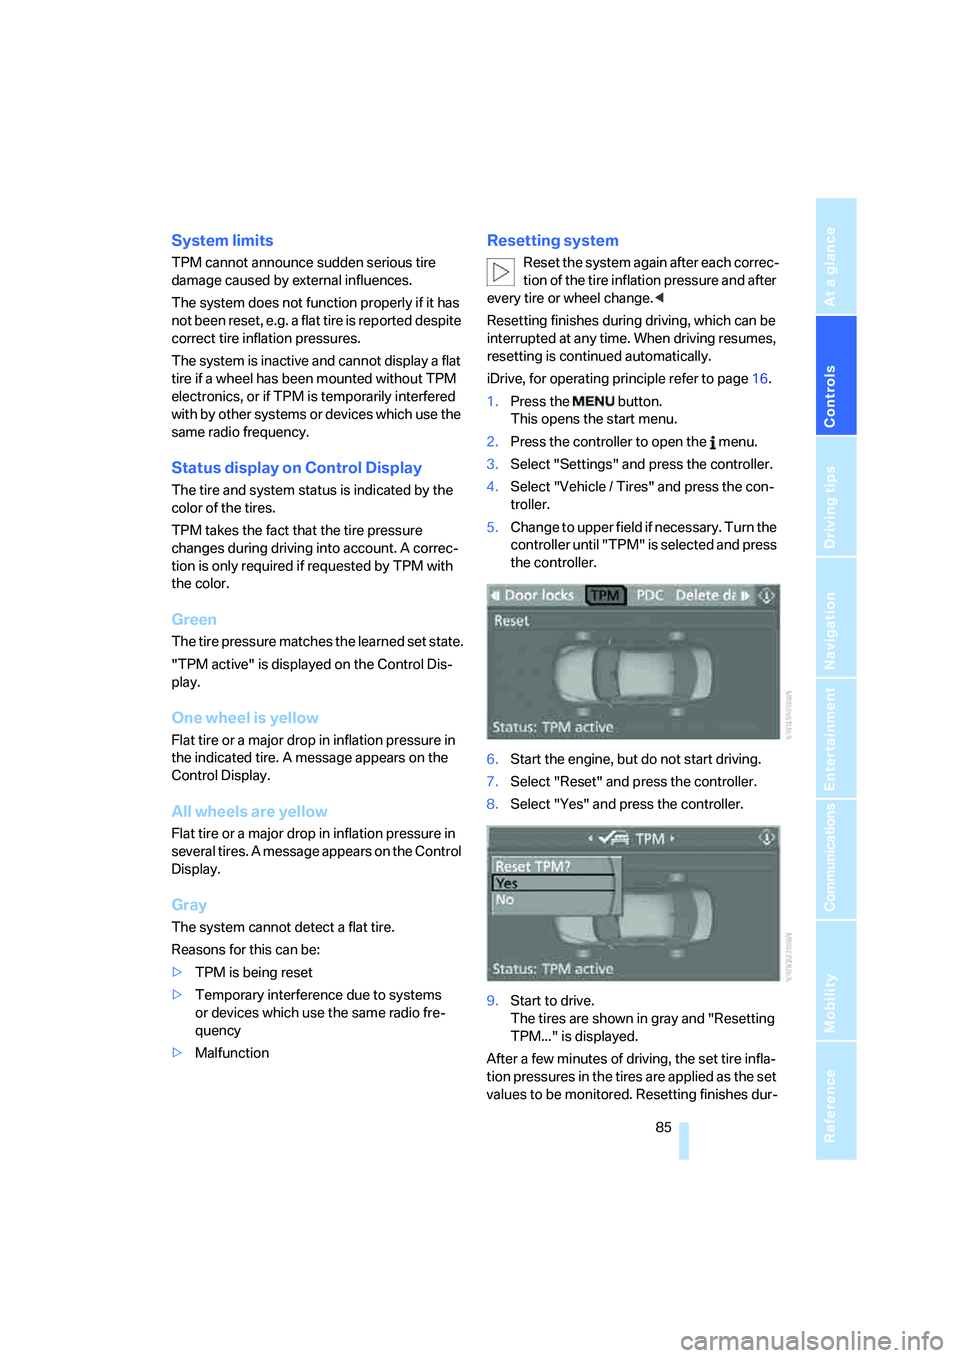
3.Select "Settings" and press the controller.
4.Select "Vehicle / Tires" and press the con-
troller.
5.Change to upper field if necessary. Turn the
controller until "TPM" is selected and press
the controller.
6.Start the engine, but do not start driving.
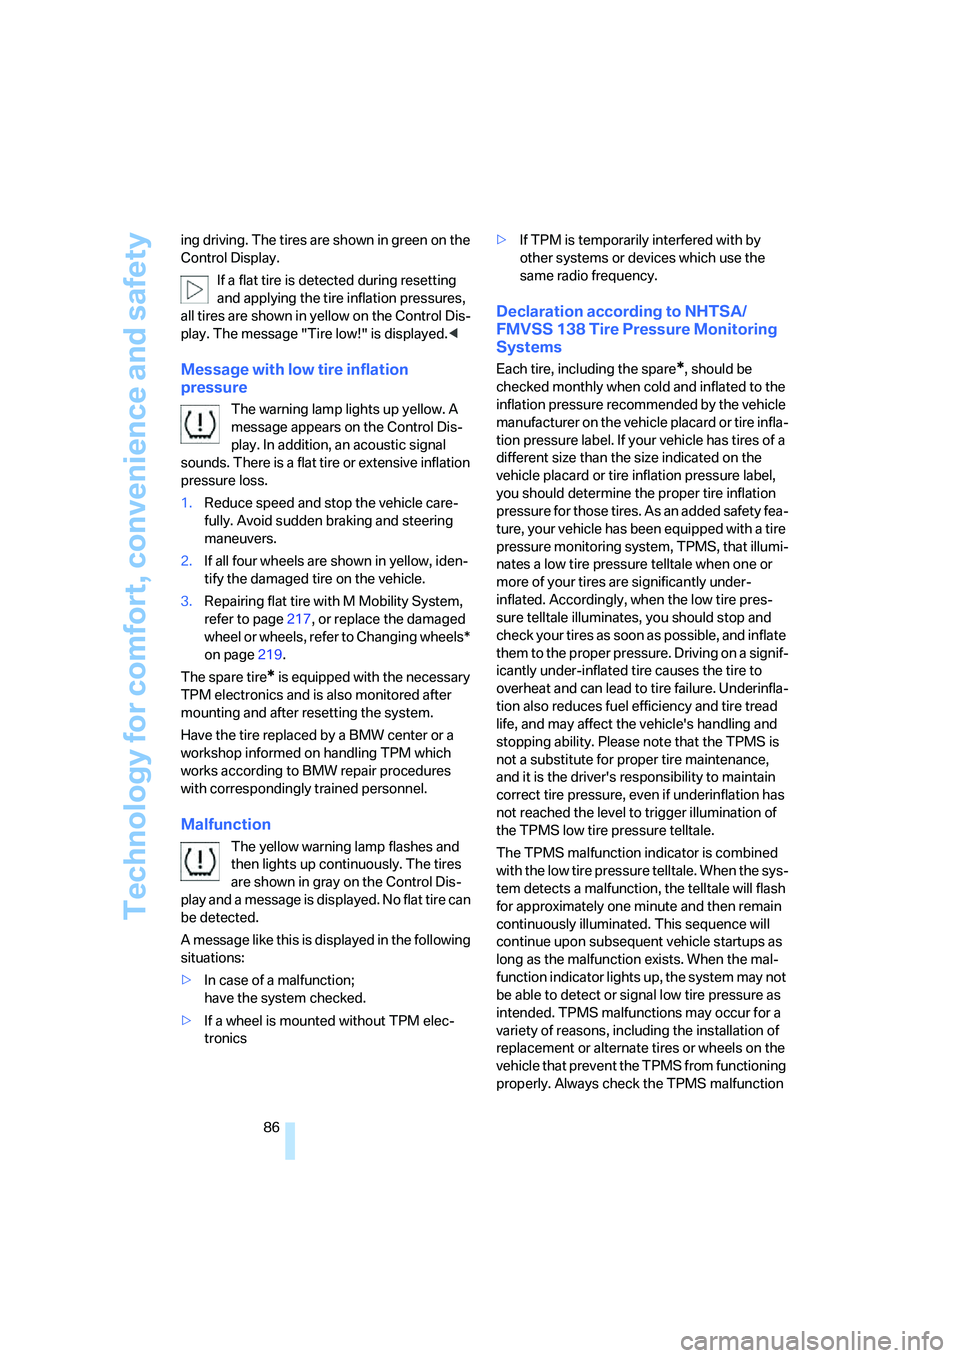
7.Select "Reset" and press the controller.
8.Select "Yes" and press the controller.
9.Start to drive.
The tires are shown in gray and "Resetting
TPM..." is displayed.
After a few minutes of driving, the set tire infla-
tion pressures in the tires are applied as the set
values to be monitored. Resetting finishes dur-
Page 88 of 260
Technology for comfort, convenience and safety
86 ing driving. The tires are shown in green on the
Control Display.
If a flat tire is detected during resetting
and applying the tire inflation pressures,
all tires are shown in yellow on the Control Dis-
play. The message "Tire low!" is displayed.<
Message with low tire inflation
pressure
The warning lamp lights up yellow. A
message appears on the Control Dis-
play. In addition, an acoustic signal
sounds. There is a flat tire or extensive inflation
pressure loss.
1.Reduce speed and stop the vehicle care-
fully. Avoid sudden braking and steering
maneuvers.
2.If all four wheels are shown in yellow, iden-
tify the damaged tire on the vehicle.
3.Repairing flat tire with M Mobility System,
refer to page217, or replace the damaged
wheel or wheels, refer to Changing wheels*
on page219.
The spare tire
* is equipped with the necessary
TPM electronics and is also monitored after
mounting and after resetting the system.
Have the tire replaced by a BMW center or a
workshop informed on handling TPM which
works according to BMW repair procedures
with correspondingly trained personnel.
Malfunction
The yellow warning lamp flashes and
then lights up continuously. The tires
are shown in gray on the Control Dis-
play and a message is displayed. No flat tire can
be detected.
A message like this is displayed in the following
situations:
>In case of a malfunction;
have the system checked.
>If a wheel is mounted without TPM elec-
tronics>If TPM is temporarily interfered with by
other systems or devices which use the
same radio frequency.
Declaration according to NHTSA/
FMVSS 138 Tire Pressure Monitoring
Systems
Each tire, including the spare*, should be
checked monthly when cold and inflated to the
inflation pressure recommended by the vehicle
manufacturer on the vehicle placard or tire infla-
tion pressure label. If your vehicle has tires of a
different size than the size indicated on the
vehicle placard or tire inflation pressure label,
you should determine the proper tire inflation
pressure for those tires. As an added safety fea-
ture, your vehicle has been equipped with a tire
pressure monitoring system, TPMS, that illumi-
nates a low tire pressure telltale when one or
more of your tires are significantly under-
inflated. Accordingly, when the low tire pres-
sure telltale illuminates, you should stop and
check your tires as soon as possible, and inflate
them to the proper pressure. Driving on a signif-
icantly under-inflated tire causes the tire to
overheat and can lead to tire failure. Underinfla-
tion also reduces fuel efficiency and tire tread
life, and may affect the vehicle's handling and
stopping ability. Please note that the TPMS is
not a substitute for proper tire maintenance,
and it is the driver's responsibility to maintain
correct tire pressure, even if underinflation has
not reached the level to trigger illumination of
the TPMS low tire pressure telltale.
The TPMS malfunction indicator is combined
with the low tire pressure telltale. When the sys-
tem detects a malfunction, the telltale will flash
for approximately one minute and then remain
continuously illuminated. This sequence will
continue upon subsequent vehicle startups as
long as the malfunction exists. When the mal-
function indicator lights up, the system may not
be able to detect or signal low tire pressure as
intended. TPMS malfunctions may occur for a
variety of reasons, including the installation of
replacement or alternate tires or wheels on the
vehicle that prevent the TPMS from functioning
properly. Always check the TPMS malfunction