buttons BMW M5 2013 F10 User Guide
[x] Cancel search | Manufacturer: BMW, Model Year: 2013, Model line: M5, Model: BMW M5 2013 F10Pages: 230, PDF Size: 6.34 MB
Page 43 of 230
Emergency unlocking
Pull the handle inside the cargo area.
The trunk lid unlocks.
Comfort Access
The concept The vehicle can be accessed without activat‐
ing the remote control.
All you need to do is to have the remote con‐ trol with you, e.g., in your jacket pocket.
The vehicle automatically detects the remote
control when it is nearby or in the passenger
compartment.
Comfort Access supports the following func‐
tions:
▷Unlocking/locking of the vehicle.▷Convenient closing.▷Unlocking of the trunk lid separately.▷Open/close trunk lid with no-touch activa‐
tion.▷Start the engine.
Functional requirements
▷There are no external sources of interfer‐
ence nearby.▷To lock the vehicle, the remote control
must be located outside of the vehicle.▷The next unlocking and locking cycle is not
possible until after approx. 2 seconds.▷The engine can only be started if the re‐
mote control is inside the vehicle.
Comparison with ordinary remote
control
The functions can be controlled by pressing the buttons of the remote control or Comfort
Access.
Unlocking
Fully grasp a door handle, arrow 1.
This corresponds to pressing the
button
on the remote control.
Locking
Press the area on the door handle, arrow 2,
with your finger for approx. 1 second.
This corresponds to pressing the
button
on the remote control.
To save battery power, ensure that the ignition
and all electronic systems and/or power con‐
sumers are switched off before locking the ve‐
hicle.
Seite 39Opening and closingControls39
Online Edition for Part no. 01 40 2 909 953 - VI/13
Page 45 of 230
Keep the closing path clear
Make sure that the closing path of the
trunk lid is clear; otherwise, injuries may re‐
sult.◀
Do not place the remote control in the
cargo area
Take the remote control with you and do not
leave it in the cargo area; otherwise, the re‐
mote control is locked inside the vehicle when
the trunk lid is closed.◀
Malfunction
Comfort Access may not function properly if it
experiences interference from external sour‐
ces such as mobile phones, metal objects,
overhead power lines, transmission towers,
etc.
In this case, open or close the vehicle using the
buttons on the remote control or use the
integrated key in the door lock.
If there is a malfunction, open the trunk lid with
the remote control button or with the button on
the trunk lid.
Adjusting
Unlocking The setting is stored for the remote control
currently in use.1."Settings"2."Doors/key"3. Select symbol or "Unlock button:"4.Select the desired function:▷"Driver's door only"
Only the driver's door and the fuel filler
flap are unlocked. Pressing again un‐
locks the entire vehicle.▷"All doors"
The entire vehicle is unlocked.Depending on how the vehicle is equipped or
the country-specific variant, you can set
whether the doors are also unlocked with the
button on the remote control.
Confirmation signals from the vehicle
1."Settings"2."Doors/key"3.Deactivate or activate the desired confir‐
mation signals.▷"Acoustic sig. lock/unlock"▷"Flash when lock/unlock"
Automatic locking
The setting is stored for the remote control
currently in use.
1."Settings"2."Doors/key"3.Select the desired function:▷"Lock if no door opened"
The vehicle locks automatically after a
short period of time if a door is not
opened.▷"Lock after start driving"
The vehicle locks automatically after
you drive away.
Retrieving the seat, mirror, and
steering wheel settings
The driver's seat, exterior mirror, and steering
wheel positions selected last are stored for the
currently used remote control.
When the vehicle is unlocked, these positions
are automatically retrieved if this function was
activated.
Pinch hazard when moving back the seat
If this function is used, first make sure
that the footwell behind the driver's seat is
empty. Otherwise, people can be injured or ob‐
jects damaged when the seat is moved back.◀
The adjustment procedure is interrupted:
Seite 41Opening and closingControls41
Online Edition for Part no. 01 40 2 909 953 - VI/13
Page 58 of 230
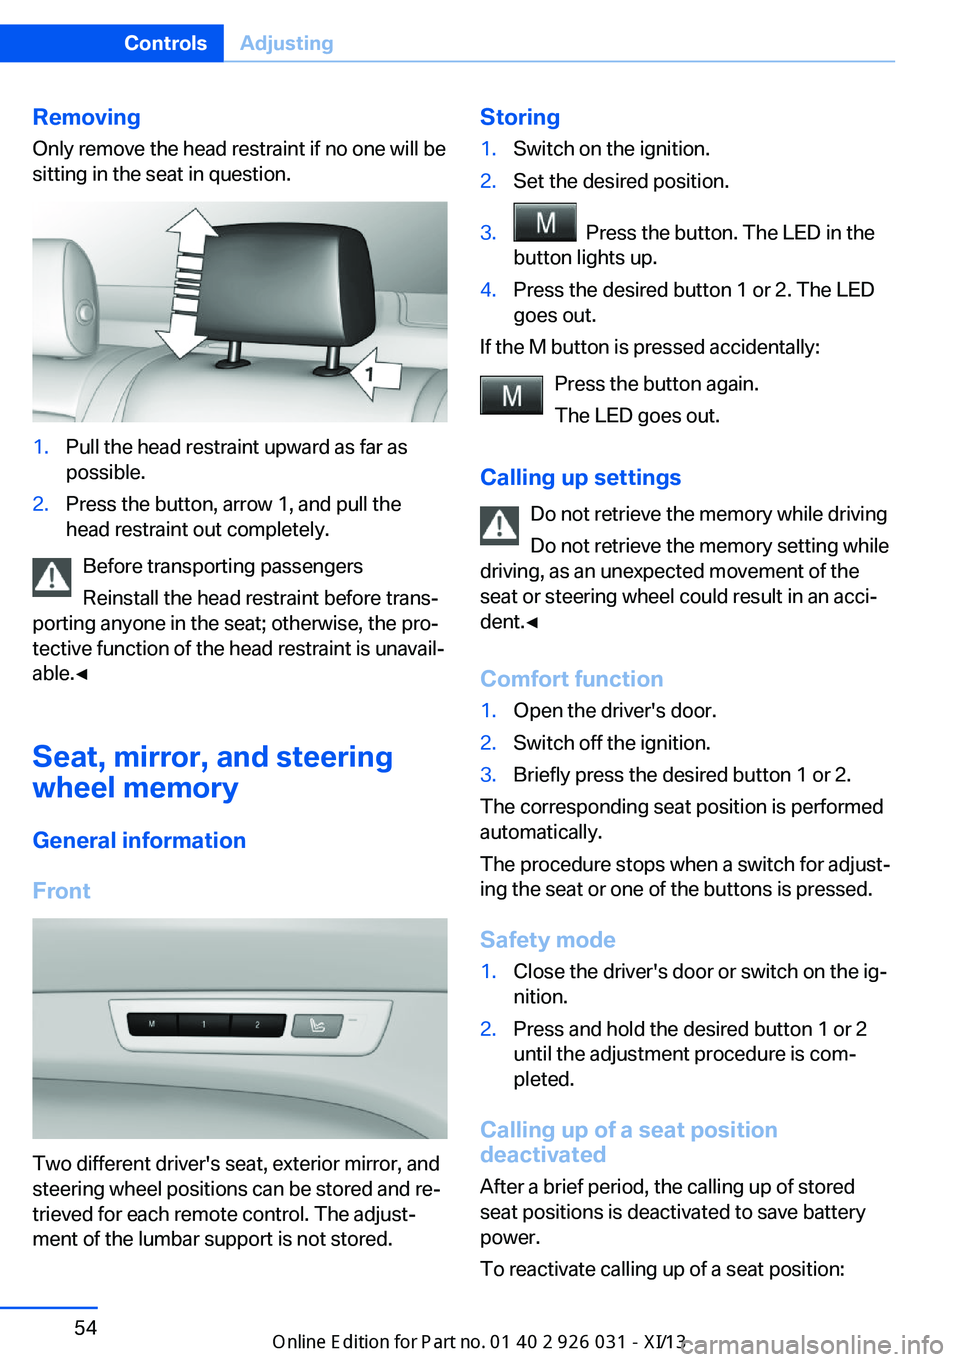
RemovingOnly remove the head restraint if no one will be
sitting in the seat in question.1.Pull the head restraint upward as far as
possible.2.Press the button, arrow 1, and pull the
head restraint out completely.
Before transporting passengers
Reinstall the head restraint before trans‐
porting anyone in the seat; otherwise, the pro‐
tective function of the head restraint is unavail‐
able.◀
Seat, mirror, and steering
wheel memory
General information
Front
Two different driver's seat, exterior mirror, and
steering wheel positions can be stored and re‐
trieved for each remote control. The adjust‐
ment of the lumbar support is not stored.
Storing1.Switch on the ignition.2.Set the desired position.3. Press the button. The LED in the
button lights up.4.Press the desired button 1 or 2. The LED
goes out.
If the M button is pressed accidentally:
Press the button again.
The LED goes out.
Calling up settings Do not retrieve the memory while driving
Do not retrieve the memory setting while
driving, as an unexpected movement of the
seat or steering wheel could result in an acci‐
dent.◀
Comfort function
1.Open the driver's door.2.Switch off the ignition.3.Briefly press the desired button 1 or 2.
The corresponding seat position is performed
automatically.
The procedure stops when a switch for adjust‐
ing the seat or one of the buttons is pressed.
Safety mode
1.Close the driver's door or switch on the ig‐
nition.2.Press and hold the desired button 1 or 2
until the adjustment procedure is com‐
pleted.
Calling up of a seat position
deactivated
After a brief period, the calling up of stored
seat positions is deactivated to save battery
power.
To reactivate calling up of a seat position:
Seite 54ControlsAdjusting54
Online Edition for Part no. 01 40 2 909 953 - VI/13
Page 62 of 230
Activating/deactivating M Drive
Activating Press the corresponding button on the steer‐
ing wheel:▷Activate M Drive 1.▷Activate M Drive 2.
If DSC OFF or MDM is set in M Drive, a mes‐
sage appears in the instrument cluster. This
message is confirmed by pressing the button
again.
Deactivating Press the corresponding button on the steer‐
ing wheel.
Indicator lamps
▷Indicator lamp comes on: corre‐
sponding M Drive is activated.▷Indicator lamp flashes: M Drive
could not be activated. Antilock
braking system ABS or Dynamic
Stability Control DSC directly regu‐
late the driving stability.
Reactivate M Drive if indicator lamp
is no longer flashing.
Notes
If M Drive is activated, individual settings can also be modified outside of M Drive, e. g. using
the buttons in the center console. This deacti‐
vates M Drive.
To reactivate all settings made for M Drive on
the Control Display, briefly press one of the fol‐
lowing buttons:
▷▷
To adopt the changed settings in M Drive,
press and hold the corresponding button.
Resetting M Drive
Individual settings can be reset to default val‐
ues.1."Settings"2."M Drive 1" or"M Drive 2"3."Reset M Drive 1" or"Reset M Drive 2"4."Yes"
To cancel resetting: "No"
Seite 58ControlsAdjusting58
Online Edition for Part no. 01 40 2 909 953 - VI/13
Page 113 of 230
ent light, the image is only displayed when the
low beams are switched on.
A still image is displayed at regular intervals for
a fraction of a second.
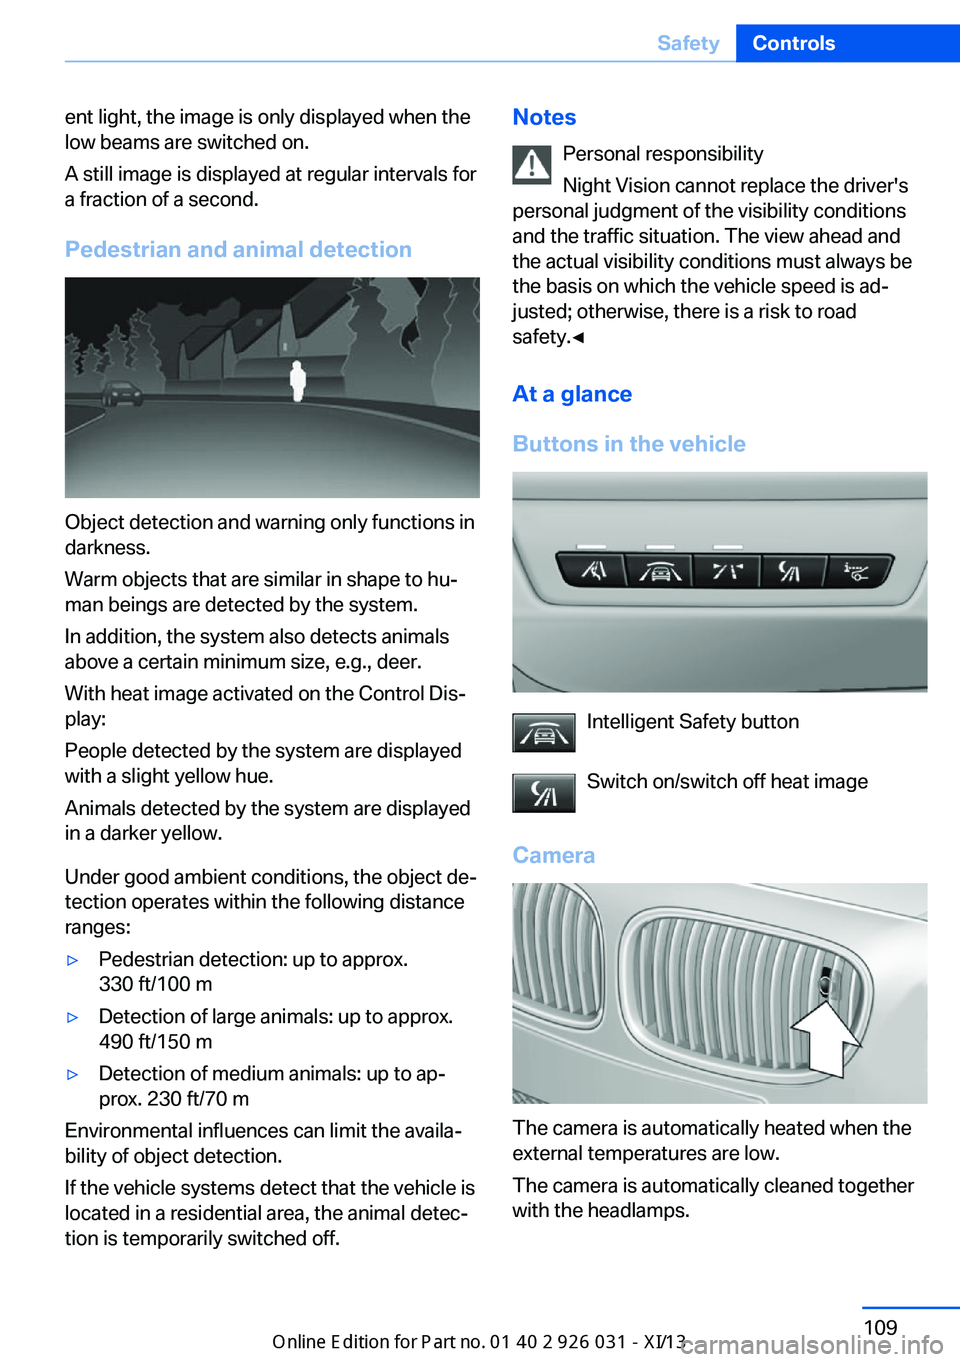
Pedestrian and animal detection
Object detection and warning only functions in
darkness.
Warm objects that are similar in shape to hu‐
man beings are detected by the system.
In addition, the system also detects animals
above a certain minimum size, e.g., deer.
With heat image activated on the Control Dis‐
play:
People detected by the system are displayed
with a slight yellow hue.
Animals detected by the system are displayed
in a darker yellow.
Under good ambient conditions, the object de‐
tection operates within the following distance
ranges:
▷Pedestrian detection: up to approx.
330 ft/100 m▷Detection of large animals: up to approx.
490 ft/150 m▷Detection of medium animals: up to ap‐
prox. 230 ft/70 m
Environmental influences can limit the availa‐
bility of object detection.
If the vehicle systems detect that the vehicle is
located in a residential area, the animal detec‐
tion is temporarily switched off.
Notes
Personal responsibility
Night Vision cannot replace the driver's
personal judgment of the visibility conditions
and the traffic situation. The view ahead and the actual visibility conditions must always be
the basis on which the vehicle speed is ad‐ justed; otherwise, there is a risk to road
safety.◀
At a glance
Buttons in the vehicle
Intelligent Safety button
Switch on/switch off heat image
Camera
The camera is automatically heated when the
external temperatures are low.
The camera is automatically cleaned together
with the headlamps.
Seite 109SafetyControls109
Online Edition for Part no. 01 40 2 909 953 - VI/13
Page 125 of 230
Driving comfortVehicle equipment
All standard, country-specific and optional
equipment that is offered in the model series is
described in this chapter. Therefore, equip‐
ment is also described that is not available in a
vehicle, e. g., because of the selected optional
equipment or country variant. This also applies
for safety-related functions and systems.
Cruise control The concept
The system is functional at speeds beginning at approx. 20 mph/30 km/h.
It maintains the speed that was set using the
control elements on the steering wheel.
The system brakes on downhill gradients if en‐
gine braking action is insufficient.
Unfavorable conditions
Do not use the system if unfavorable
conditions make it impossible to drive at a con‐
stant speed, for instance:▷On curvy roads.▷In heavy traffic.▷On slippery roads, in fog, snow or rain, or
on a loose road surface.
Otherwise, you could lose control of the vehi‐
cle and cause an accident.◀
Controls
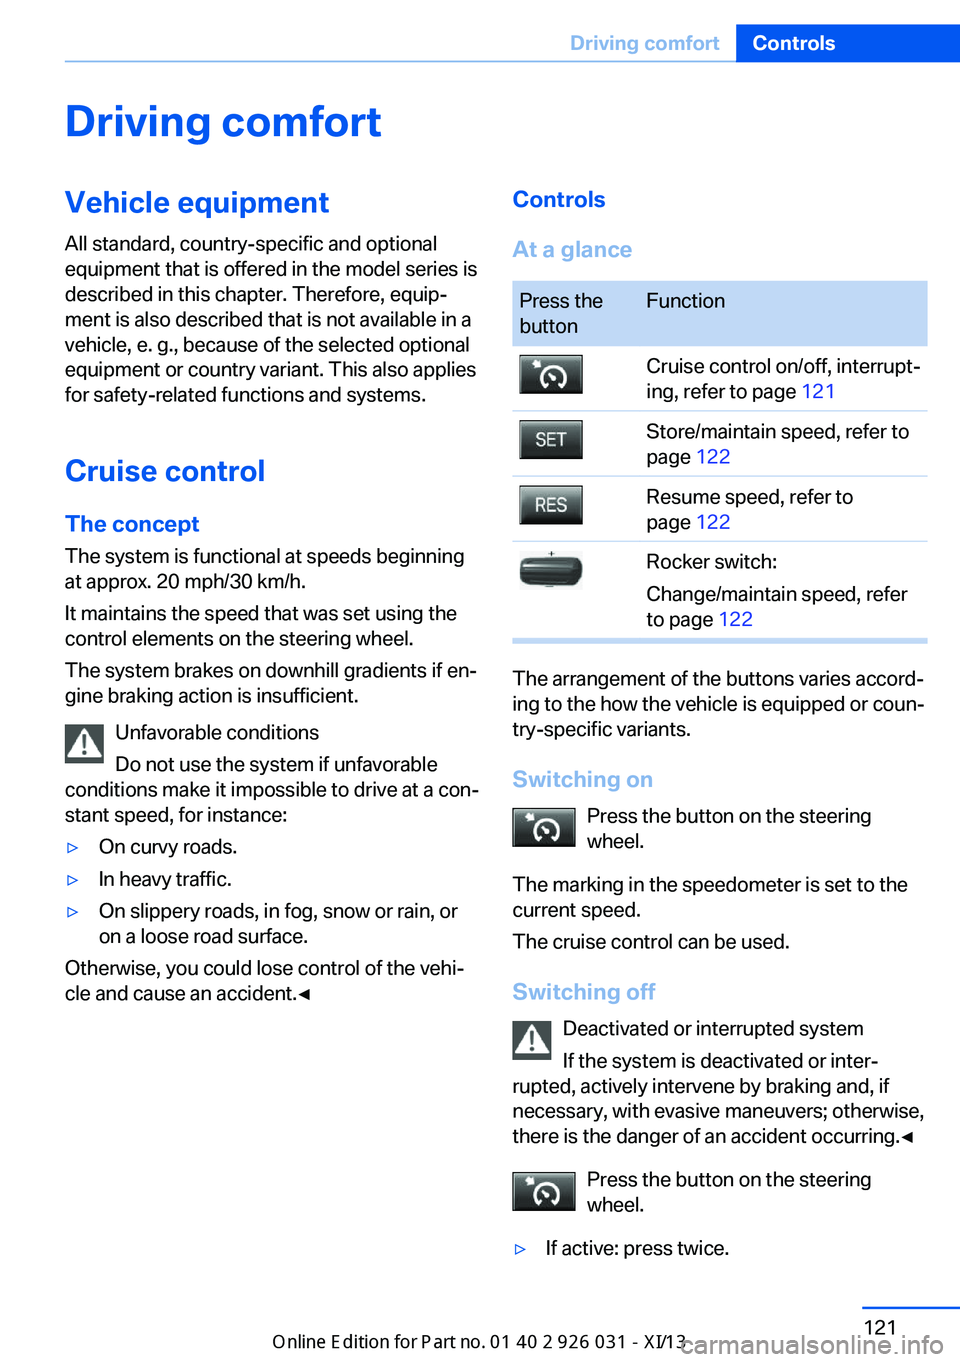
At a glancePress the
buttonFunctionCruise control on/off, interrupt‐
ing, refer to page 121Store/maintain speed, refer to
page 122Resume speed, refer to
page 122Rocker switch:
Change/maintain speed, refer
to page 122
The arrangement of the buttons varies accord‐
ing to the how the vehicle is equipped or coun‐
try-specific variants.
Switching on Press the button on the steering
wheel.
The marking in the speedometer is set to the
current speed.
The cruise control can be used.
Switching off Deactivated or interrupted system
If the system is deactivated or inter‐
rupted, actively intervene by braking and, if
necessary, with evasive maneuvers; otherwise,
there is the danger of an accident occurring.◀
Press the button on the steering
wheel.
▷If active: press twice.Seite 121Driving comfortControls121
Online Edition for Part no. 01 40 2 909 953 - VI/13
Page 145 of 230
Interior equipmentVehicle equipmentAll standard, country-specific and optional
equipment that is offered in the model series is
described in this chapter. Therefore, equip‐
ment is also described that is not available in a
vehicle, e. g., because of the selected optional
equipment or country variant. This also applies
for safety-related functions and systems.
Integrated universal remote
control
The conceptThe integrated universal remote control can
operate up to 3 functions of remote-controlled
systems such as garage door drives or lighting
systems. The integrated universal remote con‐
trol replaces up to 3 different hand-held trans‐
mitters. To operate the remote control, the
buttons on the interior rearview mirror must be
programmed with the desired functions. The
hand-held transmitter for the particular system
is required in order to program the remote con‐
trol.
During programming
During programming and before activat‐
ing a device using the integrated universal re‐
mote control, ensure that there are no people,
animals, or objects in the range of movement
of the remote-controlled device; otherwise,
there is a risk of injury or damage.
Also follow the safety instructions of the hand-
held transmitter.◀
Before selling the vehicle, delete the stored
functions for the sake of security.Compatibility
If this symbol is printed on the packag‐
ing or in the instructions of the system
to be controlled, the system is gener‐
ally compatible with the integrated universal
remote control.
If you have any questions, please contact:▷Your service center.▷www.homelink.com on the Internet.
HomeLink is a registered trademark of John‐
son Controls, Inc.
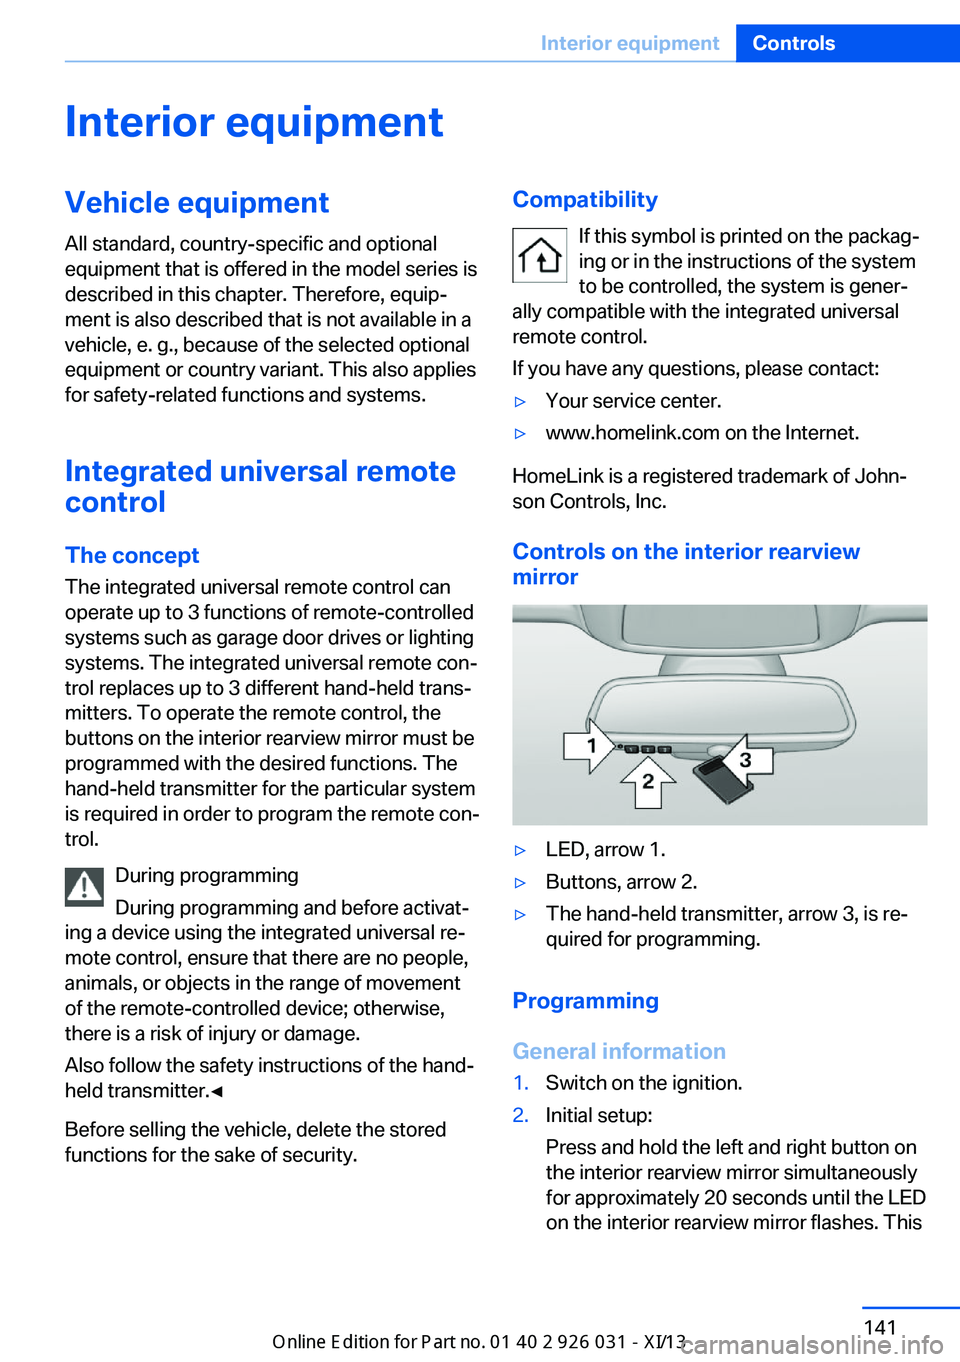
Controls on the interior rearview
mirror
▷LED, arrow 1.▷Buttons, arrow 2.▷The hand-held transmitter, arrow 3, is re‐
quired for programming.
Programming
General information
1.Switch on the ignition.2.Initial setup:
Press and hold the left and right button on
the interior rearview mirror simultaneously
for approximately 20 seconds until the LED
on the interior rearview mirror flashes. ThisSeite 141Interior equipmentControls141
Online Edition for Part no. 01 40 2 909 953 - VI/13
Page 146 of 230
erases all programming of the buttons on
the interior rearview mirror.3.Hold the hand-held transmitter for the sys‐
tem to be controlled approx. 1 to 3 in/2.5 to
8 cm away from the buttons on the interior
rearview mirror. The required distance de‐
pends on the manual transmitter.4.Simultaneously press and hold the button
of the desired function on the hand-held
transmitter and the button to be program‐
med on the interior rearview mirror. The
LED on the interior rearview mirror will be‐
gin flashing slowly.5.Release both buttons as soon as the LED
flashes more rapidly. When the LED is
flashing faster, this indicates that the but‐
ton on the interior rearview mirror has been
programmed.
If the LED does not flash faster after at
least 60 seconds, change the distance be‐
tween the interior rearview mirror and the
hand-held transmitter and repeat the step.
Several more attempts at different distan‐
ces may be necessary. Wait at least
15 seconds between attempts.
Canada: if programming with the hand-
held transmitter was interrupted, hold
down the interior rearview mirror button
and repeatedly press and release the
hand-held transmitter button for 2 sec‐
onds.6.To program other functions on other but‐
tons, repeat steps 3 to 5.
The systems can be controlled using the inte‐
rior rearview mirror buttons.
Special feature of the alternating-
code wireless system
If you are unable to operate the system after
repeated programming, please check if the
system to be controlled features an alternat‐
ing-code system.
Read the system's operating manual, or press
the programmed button on the interior rear‐
view mirror longer. If the LED on the interior
rearview mirror starts flashing rapidly and then
stays lit constantly for 2 seconds, the system
features an alternating-code system. Flashing
and continuous illumination of the LED will re‐
peat for approximately 20 seconds.
For systems with an alternating-code system,
the integrated universal remote control and the
system also have to be synchronized.
Please read the operating manual of the sys‐
tem being set up for information on how to
synchronize the system.
Synchronizing is easier with the aid of a sec‐
ond person.
To synchronize:1.Park the vehicle within range of the re‐
mote-controlled system.2.Program the relevant button on the interior
rearview mirror as described.3.Locate and press the synchronizing button
on the system being programmed. You
have approx. 30 seconds for the next step.4.Hold down the programmed button on the
interior rearview mirror for approximately
3 seconds and then release it. If necessary,
repeat this work step up to three times in
order to finish synchronization. Once syn‐
chronization is complete, the programmed
function will be carried out.
Reprogramming individual buttons
1.Switch on the ignition.2.Press and hold the interior rearview mirror
button to be programmed.3.As soon as the interior rearview mirror LED
starts flashing slowly, hold the hand-held
transmitter for the system to be controlled
approx. 1 to 3 in/2.5 to 8 cm away from the
buttons on the interior rearview mirror. The
required distance depends on the manual
transmitter.Seite 142ControlsInterior equipment142
Online Edition for Part no. 01 40 2 909 953 - VI/13
Page 147 of 230
4.Likewise, press and hold the button of the
desired function on the hand-held trans‐
mitter.5.Release both buttons as soon as the inte‐
rior rearview mirror LED flashes more rap‐
idly. When the LED is flashing faster, this
indicates that the button on the interior
rearview mirror has been programmed.
The system can then be controlled by the
button on the interior rearview mirror.
If the LED does not flash faster after at
least 60 seconds, change the distance and
repeat the step. Several more attempts at
different distances may be necessary. Wait
at least 15 seconds between attempts.
Canada: if programming with the hand-
held transmitter was interrupted, hold
down the interior rearview mirror button
and repeatedly press and release the
hand-held transmitter button for 2 sec‐
onds.
Controls
Before operation
Before operating a system using the
integrated universal remote control, ensure
that there are no people, animals, or objects
within the range of movement of the remote- controlled system; otherwise, there is a risk of
injury or damage.
Also follow the safety instructions of the hand-
held transmitter.◀
The system, such as the garage door, can be
operated using the button on the interior rear‐
view mirror while the engine is running or when
the ignition is started. To do this, hold down
the button within receiving range of the system
until the function is activated. The interior rear‐ view mirror LED stays lit while the wireless sig‐
nal is being transmitted.
Deleting stored functions Press and hold the left and right button on the
interior rearview mirror simultaneously for ap‐
proximately 20 seconds until the LED flashes
rapidly. All stored functions are deleted. The
functions cannot be deleted individually.
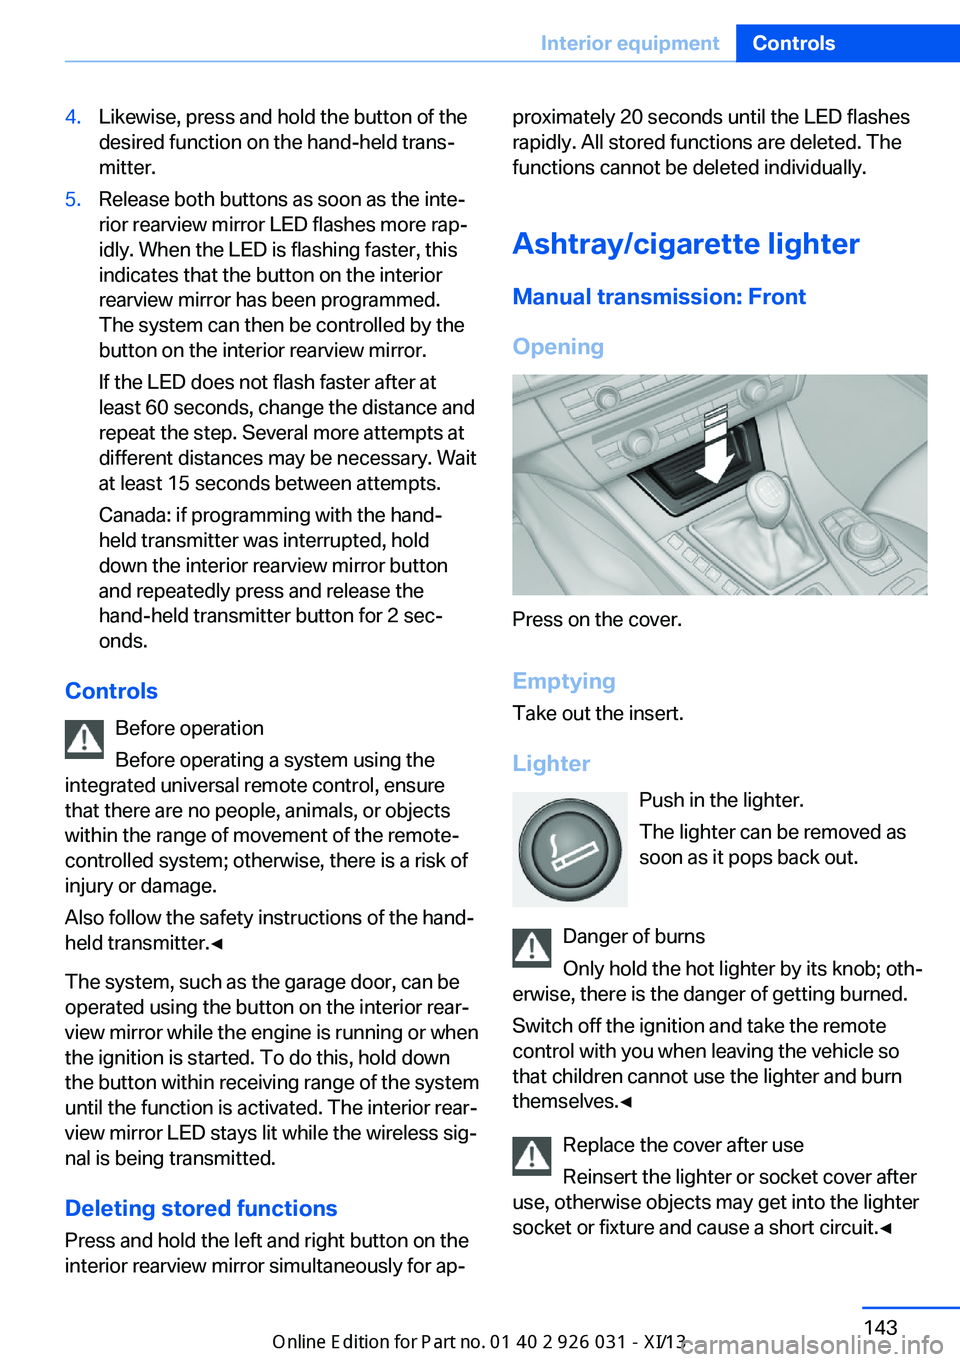
Ashtray/cigarette lighter Manual transmission: Front
Opening
Press on the cover.
Emptying Take out the insert.
Lighter Push in the lighter.
The lighter can be removed as
soon as it pops back out.
Danger of burns
Only hold the hot lighter by its knob; oth‐
erwise, there is the danger of getting burned.
Switch off the ignition and take the remote
control with you when leaving the vehicle so
that children cannot use the lighter and burn
themselves.◀
Replace the cover after use
Reinsert the lighter or socket cover after
use, otherwise objects may get into the lighter
socket or fixture and cause a short circuit.◀
Seite 143Interior equipmentControls143
Online Edition for Part no. 01 40 2 909 953 - VI/13
Page 225 of 230
Manual brake, refer to Parkingbrake 67
Manual operation, backup camera 126
Manual operation, door lock 36
Manual operation, exterior mirrors 55
Manual operation, fuel filler flap 172
Manual operation, Park Dis‐ tance Control PDC 124
Manual operation, Side View 131
Manual operation, Top View 129
Manual transmission 77
Marking on approved tires 179
Massage seat, front 49
Master key, refer to Remote control 30
Maximum cooling 136
Maximum speed, display 86
Maximum speed, winter tires 180
M carbon ceramic brake 158
M Compound brake 158
M differential, active 119
MDM, M Dynamic Mode 118
M double-clutch transmis‐ sion 72
M Drive 57
M Driver's Package, driving instructions 163
M Driving Dynamics Con‐ trol 76
M Dynamic Mode MDM 118
Measure, units of 91
Medical kit 200
Memory for seat, mirrors, steering wheel 54
Menu in instrument clus‐ ter 88
Menus, operating, iDrive 16 Menus, refer to iDrive operat‐
ing concept 17
Messages, refer to Check Control 79
Microfilter 137
Minimum tread, tires 178
Mirror 55
Mirror memory 54
Mobile communication devi‐ ces in the vehicle 161
Mobility System 180
Modifications, technical, refer to Safety 7
Moisture in headlamp 193
Monitor, refer to Control Dis‐ play 16
Mounting of child restraint fix‐ ing systems 59
M technology 158
Multifunction steering wheel, buttons 12
M view, head-up display 132
N
Navigation, see user's manual for Navigation, Entertain‐
ment and Communication
Neck restraints, front, refer to Head restraints 52
Neck restraints, rear, refer to Head restraints 53
Neutral cleaner, see wheel cleaner 207
New wheels and tires 179
Night Vision with pedestrian detection 108
No Passing Information 86
Nylon rope for tow-starting/ towing 203
O OBD Onboard Diagnosis 191
OBD, see OBD Onboard Di‐ agnosis 191 Obstacle marking, rearview
camera 127
Octane rating, refer to Gaso‐ line quality 174
Odometer 82
Office, see user's manual for Navigation, Entertainment
and Communication
Oil 186
Oil, adding 187
Oil additives 187
Oil change 188
Oil change interval, service requirements 84
Oil filler neck 187
Oil types, alternative 187
Oil types, approved 187
Old batteries, disposal 197
Onboard monitor, refer to Control Display 16
Onboard vehicle tool kit 192
Opening/closing the trunk lid with no-touch activation 40
Opening and closing 30
Opening and closing, from in‐ side 36
Opening and closing via door lock 35
Opening and closing, with re‐ mote control 34
Operating concept, iDrive 16
Optional equipment, standard equipment 6
Outside air, refer to Auto‐ matic recirculated-air con‐
trol 136
Overheating of engine, refer to Coolant temperature 82
Overtaking prohibitions 86
P Paint, vehicle 206
Park Distance Control PDC 123
Parked-car ventilation 139 Seite 221Everything from A to ZReference221
Online Edition for Part no. 01 40 2 909 953 - VI/13