BMW M5 SEDAN 2003 Owners Manual
Manufacturer: BMW, Model Year: 2003, Model line: M5 SEDAN, Model: BMW M5 SEDAN 2003Pages: 155, PDF Size: 1.87 MB
Page 101 of 155

101n
OverviewControlsMaintenanceRepairsDataIndex
Ski bag
*
Loading1. Press the release button (arrow 1):
the cover panel in the luggage com-
partment is unlocked
2. Press the detent levers (arrows 2)
inward and fold the cover to the front
3. Extend the ski bag between the front
seats. The zipper provides conve-
nient access to stored items. It may
be opened to allow the ski bag to dry394de749
4. Use the magnetic retainers to attach
the cover panel to the upper surface
(metal surface below rear tray) of the
luggage compartment.
To store the ski bag, perform the above
steps in reverse sequence.
An unsecured ski bag could lead
to loss of vehicle control and in
case of an accident to personal injury.< 394de750
Securing the load
Secure the bag's contents by
tightening down the retaining
strap at the buckle.<
Please be sure that the skis are clean
before loading them into the bag. Be
careful to avoid damage from sharp
edges.
530de284
Page 102 of 155
102n
Ski bag
*
Cargo loading
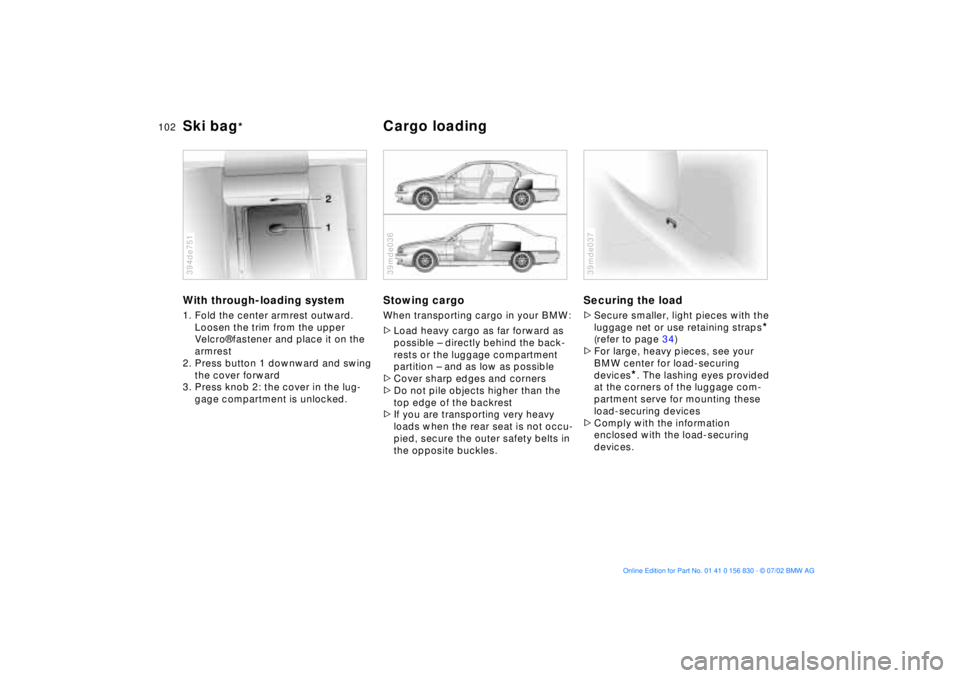
With through-loading system1. Fold the center armrest outward.
Loosen the trim from the upper
Velcro¨ fastener and place it on the
armrest
2. Press button 1 downward and swing
the cover forward
3. Press knob 2: the cover in the lug-
gage compartment is unlocked. 394de751
Stowing cargo When transporting cargo in your BMW:
>Load heavy cargo as far forward as
possible Ð directly behind the back-
rests or the luggage compartment
partition Ð and as low as possible
>Cover sharp edges and corners
>Do not pile objects higher than the
top edge of the backrest
>If you are transporting very heavy
loads when the rear seat is not occu-
pied, secure the outer safety belts in
the opposite buckles.39mde036
Securing the load >Secure smaller, light pieces with the
luggage net or use retaining straps
*
(refer to page 34)
>For large, heavy pieces, see your
BMW center for load-securing
devices
*. The lashing eyes provided
at the corners of the luggage com-
partment serve for mounting these
load-securing devices
>Comply with the information
enclosed with the load-securing
devices.
39mde037
Page 103 of 155
103n
OverviewControlsMaintenanceRepairsDataIndex
Cargo loading Roof-mounted luggage rack
*
Always position and secure the
load correctly. If you do not, it can
endanger the passengers during
braking or evasive maneuvers.
Never exceed either the approved
gross vehicle weight or the approved
loads for either of the axles (refer to
page 142), as overloading the vehicle
beyond the legally approved levels can
severely compromise its operating
safety.
Do not carry hard or heavy objects
unsecured in the passenger compart-
ment. If you do so, they may be pro-
jected through the air during braking
and evasive maneuvers, thus endan-
gering vehicle occupants.<
A special roof-rack system is available
as an optional extra for your BMW.
Please observe the precautions
included with the installation instruc-
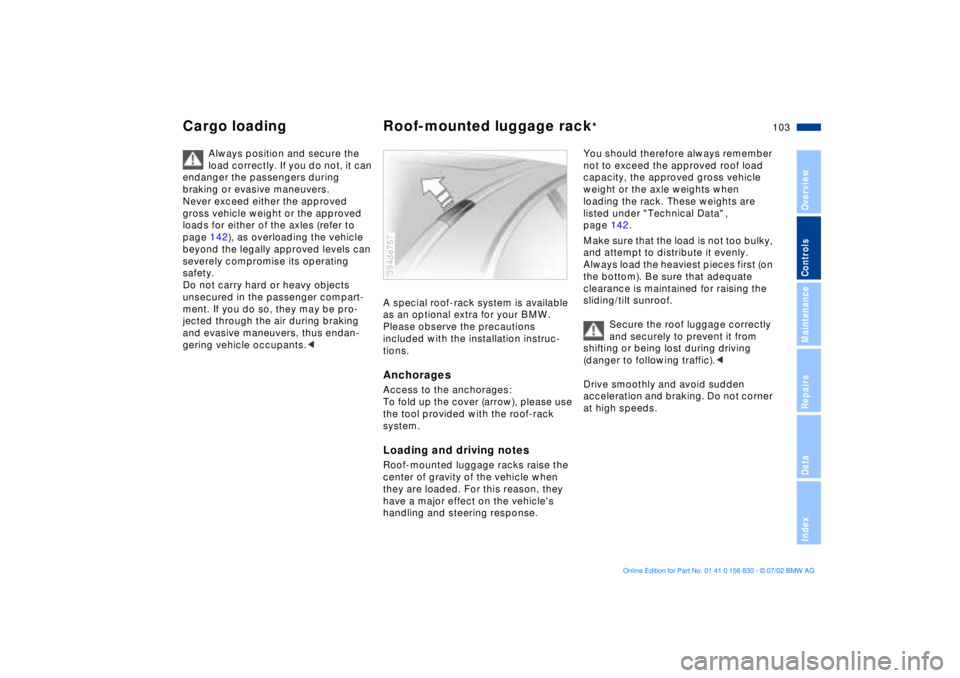
tions.AnchoragesAccess to the anchorages:
To fold up the cover (arrow), please use
the tool provided with the roof-rack
system.Loading and driving notesRoof-mounted luggage racks raise the
center of gravity of the vehicle when
they are loaded. For this reason, they
have a major effect on the vehicle's
handling and steering response.394de757
You should therefore always remember
not to exceed the approved roof load
capacity, the approved gross vehicle
weight or the axle weights when
loading the rack. These weights are
listed under "Technical Data" ,
page 142.
Make sure that the load is not too bulky,
and attempt to distribute it evenly.
Always load the heaviest pieces first (on
the bottom). Be sure that adequate
clearance is maintained for raising the
sliding/tilt sunroof.
Secure the roof luggage correctly
and securely to prevent it from
shifting or being lost during driving
(danger to following traffic).<
Drive smoothly and avoid sudden
acceleration and braking. Do not corner
at high speeds.
Page 104 of 155
104n
Page 105 of 155
105n
OverviewControlsMaintenanceRepairsDataIndex
Overview
Controls and features
Operation, maintenance
Owner service procedures
Index Technical data
Mainte-
Page 106 of 155

106n
To ensure that your vehicle provides
maximum economy throughout a long
service life, we request that you
observe the following.
Your BMW M5 is a masterpiece of
superlative technology. To ensure
that you derive maximum satisfaction
from its extensive array of advanced
features while simultaneously creating
the basis for many years of driving plea-
sure, we urge you to observe the fol-
lowing precautions during the initial
period of operation.<
Engine and differentialUp to 1,200 miles (2,000 km):
Drive at varying engine speeds and
road speeds, but do not exceed
5,500 rpm or 105 mph (170 km/h)
during this period.
Comply with all official speed limits.
Do not depress the accelerator pedal to
the full-throttle position.
Following the Break-in inspection at
1,200 miles (2,000 km), you can gradu-
ally increase engine or road speeds.
You should also comply with these
break-in procedures if the engine or dif-
ferential is replaced later in the course
of the vehicle service life.
TiresOwing to technical factors associated
with their manufacture, tires do not
achieve their full traction potential until
an initial break-in period has elapsed.
Thus drive with extra care during the
initial 200 miles (300 km).
Comply with all official speed limits.
When the vehicle is operated on
wet or slushy roads, a wedge of
water may from between the tire and
the road surface. This phenomenon is
referred to as aquaplaning, or hydro-
planing, and can lead to partial or com-
plete loss of traction, vehicle control
and braking effectiveness. Reduce your
speed on wet roads.<
Brake systemApproximately 300 miles (500 km) must
elapse before the brake pads and
rotors achieve the optimal pad-surface
and wear patterns required for trouble-
free operation and long service life later
on.
To break-in the separate parking brake
drums, apply the parking brake lightly
when coasting to a standstill (at a traffic
signal, for instance), provided that
traffic conditions allow you to do so. To
avoid corrosion, repeat this procedure
from time to time.
The brake lamps do not come on
when the parking brake is applied.
Vacuum for the brake system servo unit
on your BMW is available only when the
engine is running. When you move the
vehicle with the engine shut off Ð when
towing, for instance Ð substantially
higher levels of pedal force will be
required to brake the vehicle.
(500 km). Engage the gears carefully
during the break-in period.
Break-in procedures
Page 107 of 155

107n
OverviewControlsMaintenanceRepairsDataIndex
Driving notes Antilock Brake System
Brakes:
Do not rest your foot on the brake
pedal while driving. Even light but con-
sistent pedal pressure can lead to high
temperatures, brake wear and possibly
even brake failure.
Hydroplaning:
When driving on wet or slushy roads,
reduce vehicle speed. If you do not,
a wedge of water may form between
the tires and the road surface. This phe-
nomenon is referred to as aquaplaning,
or hydroplaning, and can lead to partial
or complete loss of traction, vehicle
control and braking effectiveness.
Driving through water:
When there is water on the roads, do
not drive in it if it is deeper than 1 ft
(30 cm). If the water is at that depth,
drive only at walking speed, otherwise
the vehicle can sustain damage to the
engine, the electrical systems and the
transmission.
Rear parcel tray:
Do not place heavy or hard objects on
the rear parcel tray. If you do so, they
could pose a danger to vehicle occu-
pants during a braking or evasive
maneuver.
Clothes hooks:
When suspending clothing from the
hooks, ensure that they will not obstruct
the driver's vision. Do not hang any
heavy objects on the hooks, otherwise,
passengers could be injured e.g. during
any hard braking or evasive maneuvers,
or during an accident.<
The conceptThe Antilock Brake System (ABS) keeps
the wheels from locking during braking,
thereby enhancing active driving safety.
With ABS, the shortest possible braking
distances are achieved under most
conditions (on straight-aways and in
curves, on asphalt, ice, wet road sur-
faces, etc.).Braking with ABSIf you are in a situation that requires
full braking, you will exploit the full ben-
efits of the ABS system if you apply
maximum pedal pressure ("panic stop").
Pulsation at the brake pedal combined
with sounds from the hydraulic circuits
indicates to the driver that ABS is in its
active mode.
Page 108 of 155

108n
Brake systemBrake fluid level If the brake fluid level is too low and
brake pedal travel has become notice-
ably longer, there may be a defect in
one of the two brake system's hydraulic
circuits.
Proceed to the nearest BMW
center. Higher brake application
pressure may be necessary under these
conditions, and the vehicle may exhibit
a slight tendency to pull to one side
when the brakes are applied. Braking
distances may also be longer. Please
remember to adapt your driving style
accordingly.<
Disc brakesLimited vehicle use, extended periods
with the vehicle parked or in storage,
and operating conditions in which
braking is restricted to gentle, low-
pressure applications will all increase
the tendency for corrosion to form on
the rotors; this is often accompanied
by a simultaneous accumulation of con-
tamination on the brake pads. The pads
must exert a certain minimal level of
pressure against the rotors for the disc
brakes' inherent self-cleaning effect to
remain effective; the pressure available
under the above conditions may not
provide adequate cleansing.
If the brake rotors are corroded, they
will tend to respond to braking with a
pulsating effect that even extended
brake applications will fail to cure.
When driving in heavy rain and on wet
roads it is a good idea to apply light
pressure to the brake pedal every few
miles. Monitor traffic conditions to
ensure that this maneuver does not
pose a hazard to you or to other road
users. The heat generated in this pro-
cess helps dry the pads and rotors to
ensure that your brake system will
respond with undiminished efficiency
when you need it.When descending steep hills and
extended grades, downshift to a gear
that will allow you to continue safely
with only a minimal amount of braking.
By minimizing the loads placed on the
brake system, this strategy helps
ensure that optimal brake system
response will remain available at all
times.
Do not coast with the clutch
depressed or with the transmis-
sion or gearshift lever in Neutral. Do not
coast with the engine shut off. The
engine provides no braking effect when
the clutch is depressed and there is no
power-assist for braking or steering
when the engine is not running.
Never allow floor mats, carpets or any
other objects to protrude into the area
around the accelerator, clutch and
brake pedals and obstruct their move-
ment.<
Brake pads
For your own safety: use only
brake pads that BMW has
approved for your particular vehicle
model. BMW cannot evaluate non-
approved brake pads to determine if
they are suited for use, and therefore
cannot ensure the operating safety of
the vehicle if they are installed.<
Page 109 of 155
109n
OverviewControlsMaintenanceRepairsDataIndex
Information for your safetyThe factory-approved radial tires are
matched to the vehicle and have been
selected to provide optimum safety and
driving comfort on your vehicle.
It is not merely the tire's service life,
but also driving comfort and Ð above
all else Ð driving safety that depend on
the condition of the tires and the main-
tenance of the specified tire inflation
pressure.
Incorrect inflation pressures are
a frequent cause of tire problems
and flat tires. Tire pressure also has a
major effect on your BMW's handling
response. Check tire inflation pressures
on a regular basis (refer to page 22), at
least every two weeks and before every
long trip. If you fail to observe these
precautions, incorrect tire pressures
can cause driving instability and tire
damage, ultimately resulting in an
accident.<
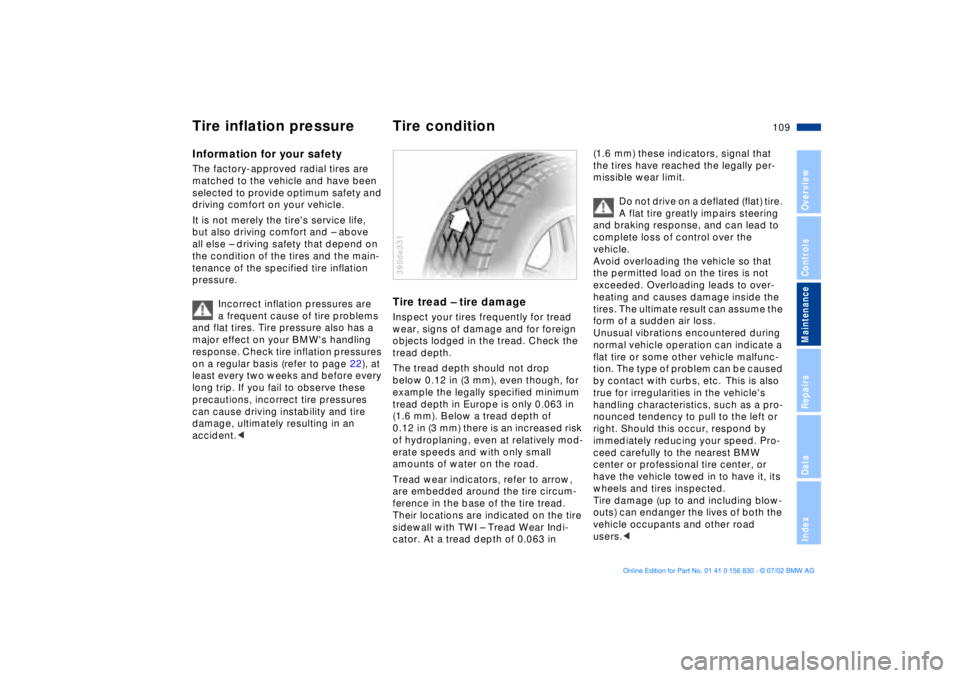
Tire tread Ð tire damageInspect your tires frequently for tread
wear, signs of damage and for foreign
objects lodged in the tread. Check the
tread depth.
The tread depth should not drop
below 0.12 in (3 mm), even though, for
example the legally specified minimum
tread depth in Europe is only 0.063 in
(1.6 mm). Below a tread depth of
0.12 in (3 mm) there is an increased risk
of hydroplaning, even at relatively mod-
erate speeds and with only small
amounts of water on the road.
Tread wear indicators, refer to arrow,
are embedded around the tire circum-
ference in the base of the tire tread.
Their locations are indicated on the tire
sidewall with TWI Ð Tread Wear Indi-
cator. At a tread depth of 0.063 in 390de331
(1.6 mm) these indicators, signal that
the tires have reached the legally per-
missible wear limit.
Do not drive on a deflated (flat) tire.
A flat tire greatly impairs steering
and braking response, and can lead to
complete loss of control over the
vehicle.
Avoid overloading the vehicle so that
the permitted load on the tires is not
exceeded. Overloading leads to over-
heating and causes damage inside the
tires. The ultimate result can assume the
form of a sudden air loss.
Unusual vibrations encountered during
normal vehicle operation can indicate a
flat tire or some other vehicle malfunc-
tion. The type of problem can be caused
by contact with curbs, etc. This is also
true for irregularities in the vehicle's
handling characteristics, such as a pro-
nounced tendency to pull to the left or
right. Should this occur, respond by
immediately reducing your speed. Pro-
ceed carefully to the nearest BMW
center or professional tire center, or
have the vehicle towed in to have it, its
wheels and tires inspected.
Tire damage (up to and including blow-
outs) can endanger the lives of both the
vehicle occupants and other road
users.<
Tire inflation pressure Tire condition
Page 110 of 155

110n
Tire replacementTo maintain good handling and vehicle
response, use only tires of a single
tread configuration from a single manu-
facturer. BMW tests wheel and tire
combinations and approves them.DOT Quality GradesTreadwear
Traction AA A B C
Temperature A B C
All passenger car tires must con-
form to Federal Safety Require-
ments in addition to these grades.
when tested under controlled condi-
tions on a specified government test
course.
For example, a tire graded 150 would
wear one and one-half (1g) times as
well on the government course as a tire
graded 100. The relative performance
of tires depends upon the actual condi-
tions of their use, however, and may
depart significantly from the norm due
to variations in driving habits, service
practices and differences in road char-
acteristics and climate.
TractionThe traction grades, from highest to
lowest, are AA, A, B and C.
Those grades represent the tire's ability
to stop on wet pavement as measured
under controlled conditions on speci-
fied government test surfaces of
asphalt and concrete. A tire marked C
may have poor traction performance.
The traction grade assigned to
this tire is based on straight-
ahead braking traction tests, and does
not include acceleration, cornering,
hydroplaning, or peak traction charac-
teristics.
tire's resistance to the generation of
heat and its ability to dissipate heat
when tested under controlled condi-
tions on a specified indoor laboratory
test wheel.
Sustained high temperature can cause
the material of the tire to degenerate
and reduce tire life, and excessive tem-
perature can lead to a sudden flat tire.
The grade C corresponds to a level of
performance which all passenger car
tires must meet under the Federal
Motor Car Safety Standard No. 109.
Grades B and A represent higher levels
of performance on the laboratory test
wheel than the minimum required by
law.
The temperature grade for this tire
is established for a tire that is
properly inflated and not overloaded.
Excessive speed, underinflation, or
excessive loading, either separately or
in combination, can cause heat buildup
and possible tire failure.
tread shoulder and maximum section
width. For example:
Treadwear 200
Traction AA
Temperature A