BMW M6 2008 E63 Owner's Manual
Manufacturer: BMW, Model Year: 2008, Model line: M6, Model: BMW M6 2008 E63Pages: 262, PDF Size: 8.86 MB
Page 221 of 262
Mobility
219Reference
At a glance
Controls
Driving tips
Communications
Navigation
Entertainment
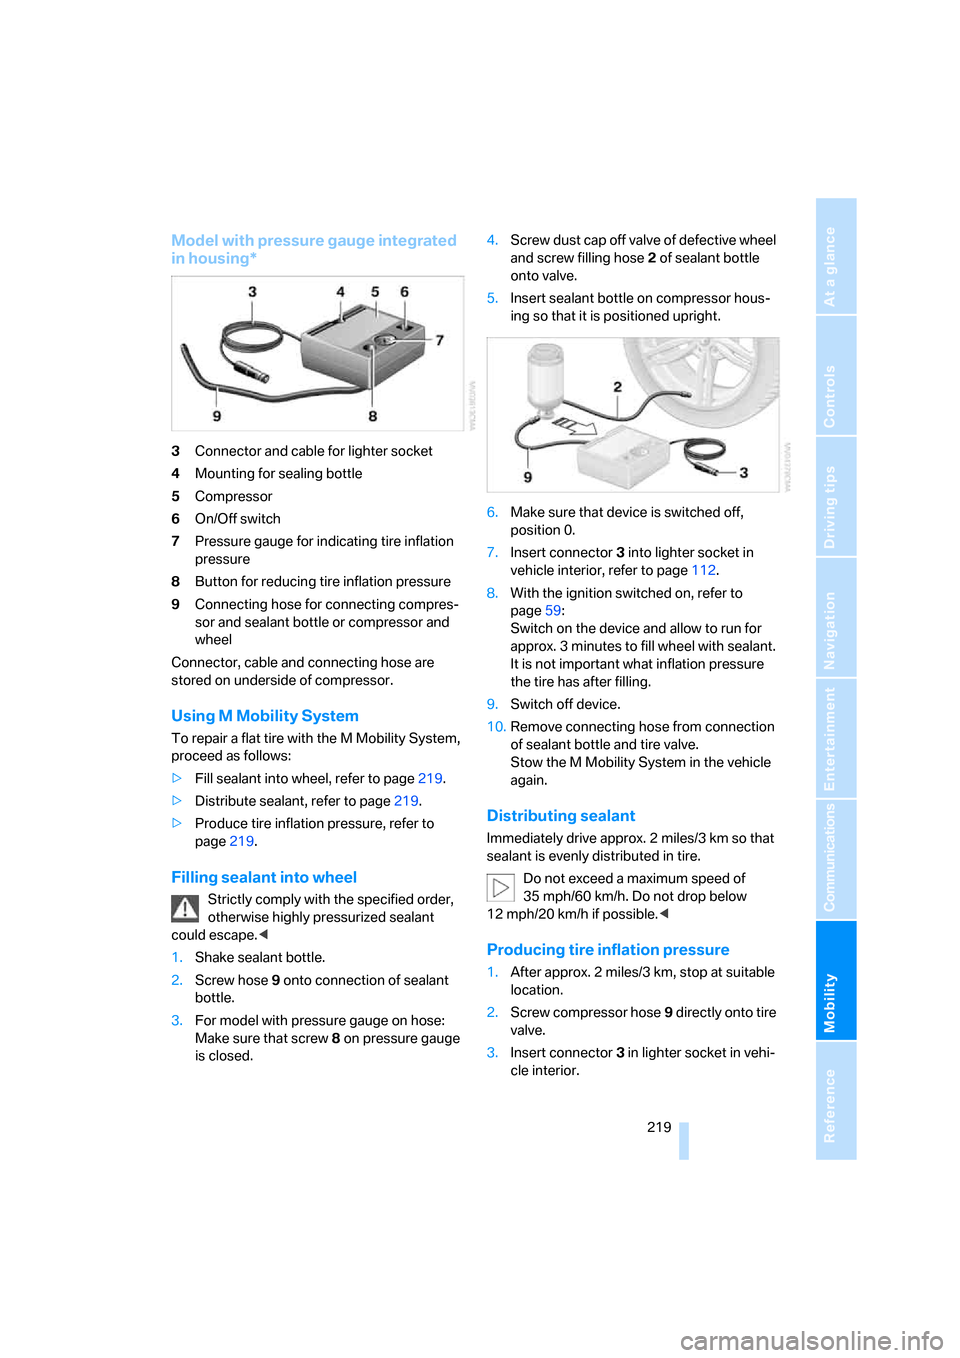
Model with pressure gauge integrated
in housing*
3Connector and cable for lighter socket
4Mounting for sealing bottle
5Compressor
6On/Off switch
7Pressure gauge for indicating tire inflation
pressure
8Button for reducing tire inflation pressure
9Connecting hose for connecting compres-
sor and sealant bottle or compressor and
wheel
Connector, cable and connecting hose are
stored on underside of compressor.
Using M Mobility System
To repair a flat tire with the M Mobility System,
proceed as follows:
>Fill sealant into wheel, refer to page219.
>Distribute sealant, refer to page219.
>Produce tire inflation pressure, refer to
page219.
Filling sealant into wheel
Strictly comply with the specified order,
otherwise highly pressurized sealant
could escape.<
1.Shake sealant bottle.
2.Screw hose9 onto connection of sealant
bottle.
3.For model with pressure gauge on hose:
Make sure that screw8 on pressure gauge
is closed.4.Screw dust cap off valve of defective wheel
and screw filling hose2 of sealant bottle
onto valve.
5.Insert sealant bottle on compressor hous-
ing so that it is positioned upright.
6.Make sure that device is switched off,
position 0.
7.Insert connector3 into lighter socket in
vehicle interior, refer to page112.
8.With the ignition switched on, refer to
page59:
Switch on the device and allow to run for
approx. 3 minutes to fill wheel with sealant.
It is not important what inflation pressure
the tire has after filling.
9.Switch off device.
10.Remove connecting hose from connection
of sealant bottle and tire valve.
Stow the M Mobility System in the vehicle
again.
Distributing sealant
Immediately drive approx. 2 miles/3 km so that
sealant is evenly distributed in tire.
Do not exceed a maximum speed of
35 mph/60 km/h. Do not drop below
12 mph/20 km/h if possible.<
Producing tire inflation pressure
1.After approx. 2 miles/3 km, stop at suitable
location.
2.Screw compressor hose9 directly onto tire
valve.
3.Insert connector 3 in lighter socket in vehi-
cle interior.
Page 222 of 262
Replacing components
220 4.Correct tire inflation pressure to 29 psi/
200 kPa. With the ignition switched on:
>Increase inflation pressure: switch on
device, position I. To check currently set
inflation pressure, briefly switch off
device.
Do not allow compressor to run
longer than 10 minutes, otherwise
the device will overheat and may be dam-
aged.<
>Reduce inflation pressure: press
button8 or turn screw8 on pressure
gauge.
If the inflation pressure is not held, drive
the vehicle again, refer to Distributing
sealant. Then repeat steps 1 to 4 once.
Using the M Mobility System can be ineffective
with tire damage from a size of approx. 0.16 in/
4 mm. Please contact the nearest BMW center,
refer to page225, or a workshop that works
according to BMW repair procedures with cor-
respondingly trained personnel if the tire can-
not be made ready for driving with the
M Mobility System.<
The tire inflation pressure must be at least
29 psi/200 kPa. Otherwise, do not con-
tinue driving.<
Continue driving
Do not exceed the permissible maximum
speed of 50 mph/80 km/h, otherwise
accidents can occur.<
Reinitialize the Flat Tire Monitor.
For details, refer to page86.
Have the defective tire and the sealant bottle of
the M Mobility System replaced as soon as
possible.<
Changing wheels*
Safety precautions in the event of a flat
tire or wheel change: park the vehicle as
far as possible from passing traffic and on solid
ground. Switch on the hazard warning flashers.
Apply the handbrake and shift into first gear or
reverse with the manual transmission, or move the selector lever into a drive position with the
sequential transmission.
Have all vehicle occupants get out of the vehicle
and ensure that they remain outside the imme-
diate area in a safe place, such as behind a
guardrail.
If a warning triangle
* or portable hazard warning
lamp
* is required, set it up on the roadside at an
appropriate distance from the rear of the vehi-
cle. Comply with all safety guidelines and regu-
lations.
Change the wheel only on a level, firm surface
which is not slippery. The vehicle or the jack
could slip to the side if you attempt to raise the
vehicle on a soft or slippery surface such as
snow, ice, tiles, etc.
Position the jack on a firm support surface.
Do not use a wooden block or similar object as a
support base for the jack, as this would prevent
it from extending to its full support height and
reduce its load-carrying capacity.
To avoid serious or fatal injury: never lie under
the vehicle, and never start the engine while it is
supported by the jack.<
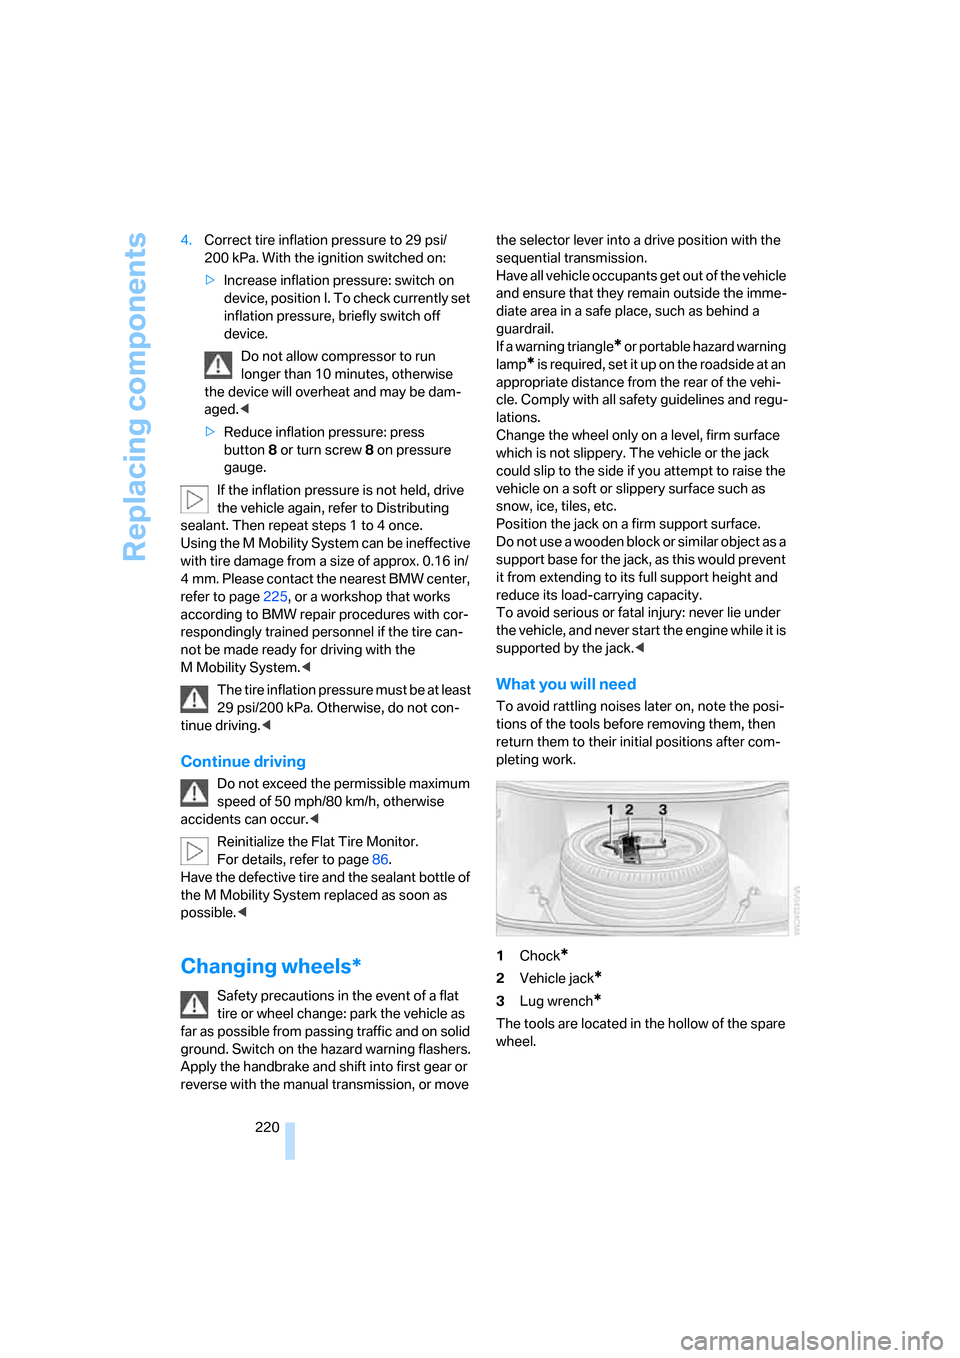
What you will need
To avoid rattling noises later on, note the posi-
tions of the tools before removing them, then
return them to their initial positions after com-
pleting work.
1Chock
*
2Vehicle jack*
3Lug wrench*
The tools are located in the hollow of the spare
wheel.
Page 223 of 262
Mobility
221Reference
At a glance
Controls
Driving tips
Communications
Navigation
Entertainment
Spare wheel*
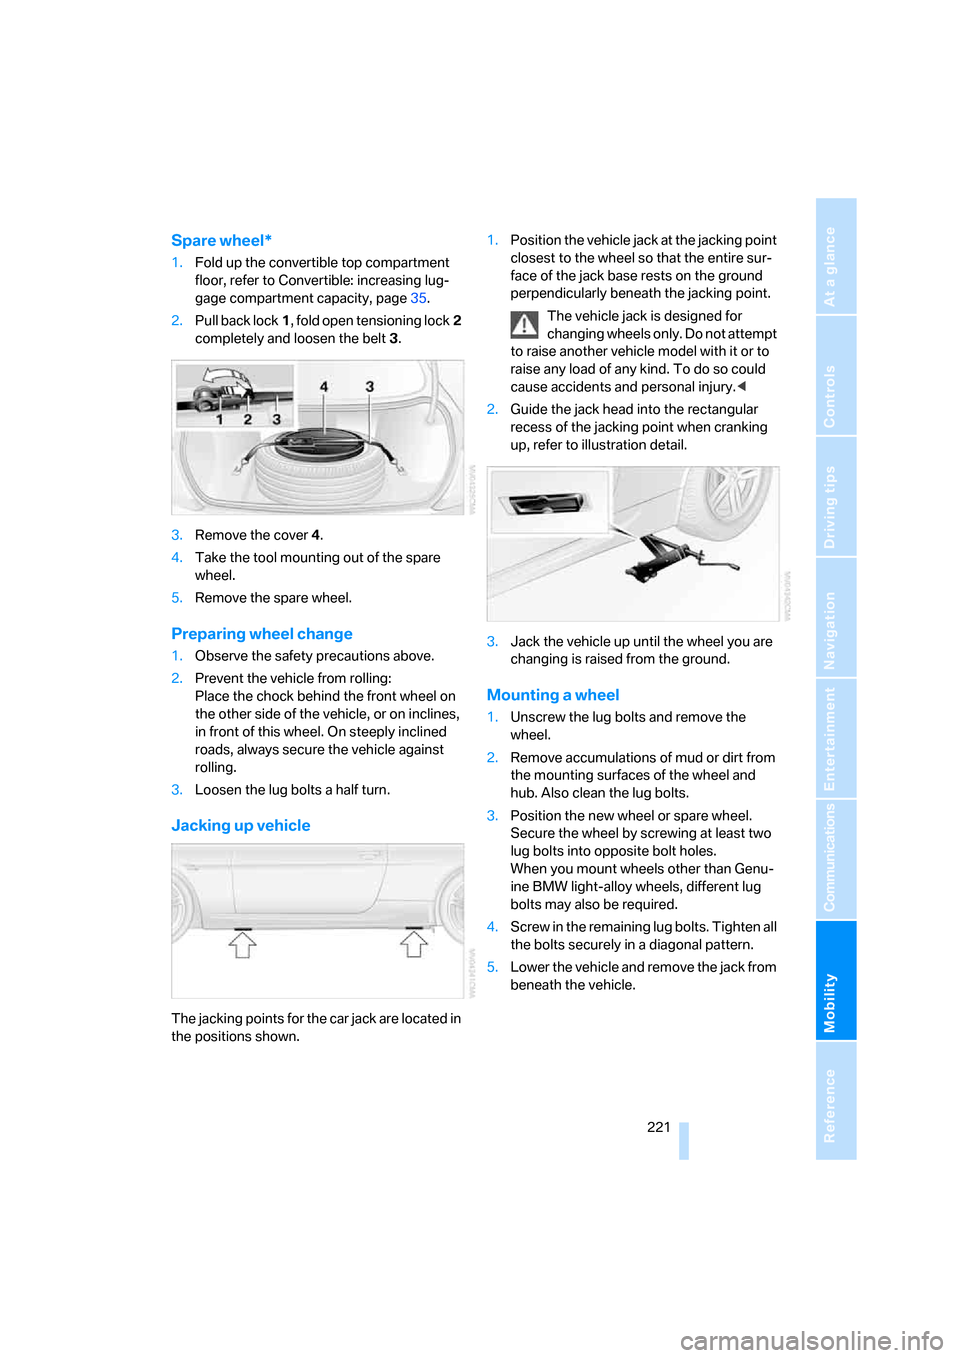
1.Fold up the convertible top compartment
floor, refer to Convertible: increasing lug-
gage compartment capacity, page35.
2.Pull back lock1, fold open tensioning lock2
completely and loosen the belt3.
3.Remove the cover4.
4.Take the tool mounting out of the spare
wheel.
5.Remove the spare wheel.
Preparing wheel change
1.Observe the safety precautions above.
2.Prevent the vehicle from rolling:
Place the chock behind the front wheel on
the other side of the vehicle, or on inclines,
in front of this wheel. On steeply inclined
roads, always secure the vehicle against
rolling.
3.Loosen the lug bolts a half turn.
Jacking up vehicle
The jacking points for the car jack are located in
the positions shown.1.Position the vehicle jack at the jacking point
closest to the wheel so that the entire sur-
face of the jack base rests on the ground
perpendicularly beneath the jacking point.
The vehicle jack is designed for
changing wheels only. Do not attempt
to raise another vehicle model with it or to
raise any load of any kind. To do so could
cause accidents and personal injury.<
2.Guide the jack head into the rectangular
recess of the jacking point when cranking
up, refer to illustration detail.
3.Jack the vehicle up until the wheel you are
changing is raised from the ground.
Mounting a wheel
1.Unscrew the lug bolts and remove the
wheel.
2.Remove accumulations of mud or dirt from
the mounting surfaces of the wheel and
hub. Also clean the lug bolts.
3.Position the new wheel or spare wheel.
Secure the wheel by screwing at least two
lug bolts into opposite bolt holes.
When you mount wheels other than Genu-
ine BMW light-alloy wheels, different lug
bolts may also be required.
4.Screw in the remaining lug bolts. Tighten all
the bolts securely in a diagonal pattern.
5.Lower the vehicle and remove the jack from
beneath the vehicle.
Page 224 of 262
Replacing components
222
After mounting
1.Tighten the lug bolts in a diagonal pattern.
To ensure safety, always have the
lug bolts checked with a calibrated
torque wrench as soon as possible to
ensure that they are tightened to the speci-
fied torque. Otherwise, incorrectly tight-
ened lug bolts are a hidden safety risk. The
tightening torque is 88.5 lb ft/120 Nm.<
2.Check and correct the tire inflation pressure
at the earliest opportunity.
Protect valve stems with valve stem
seal caps against dirt and contamina-
tion. Dirt in valve stems is a frequent source
of gradual air loss.<
3.Initialize the Flat Tire Monitor, refer to
page86, and the Sequential Manual Trans-
mission, refer to After changing wheels/
tires on page207.
4.Replace the damaged tire as soon as possi-
ble and have the new wheel/tire balanced.
Stowing wheel and tools
Convertible: a rear wheel can only be
transported with the convertible top com-
partment floor folded up.<
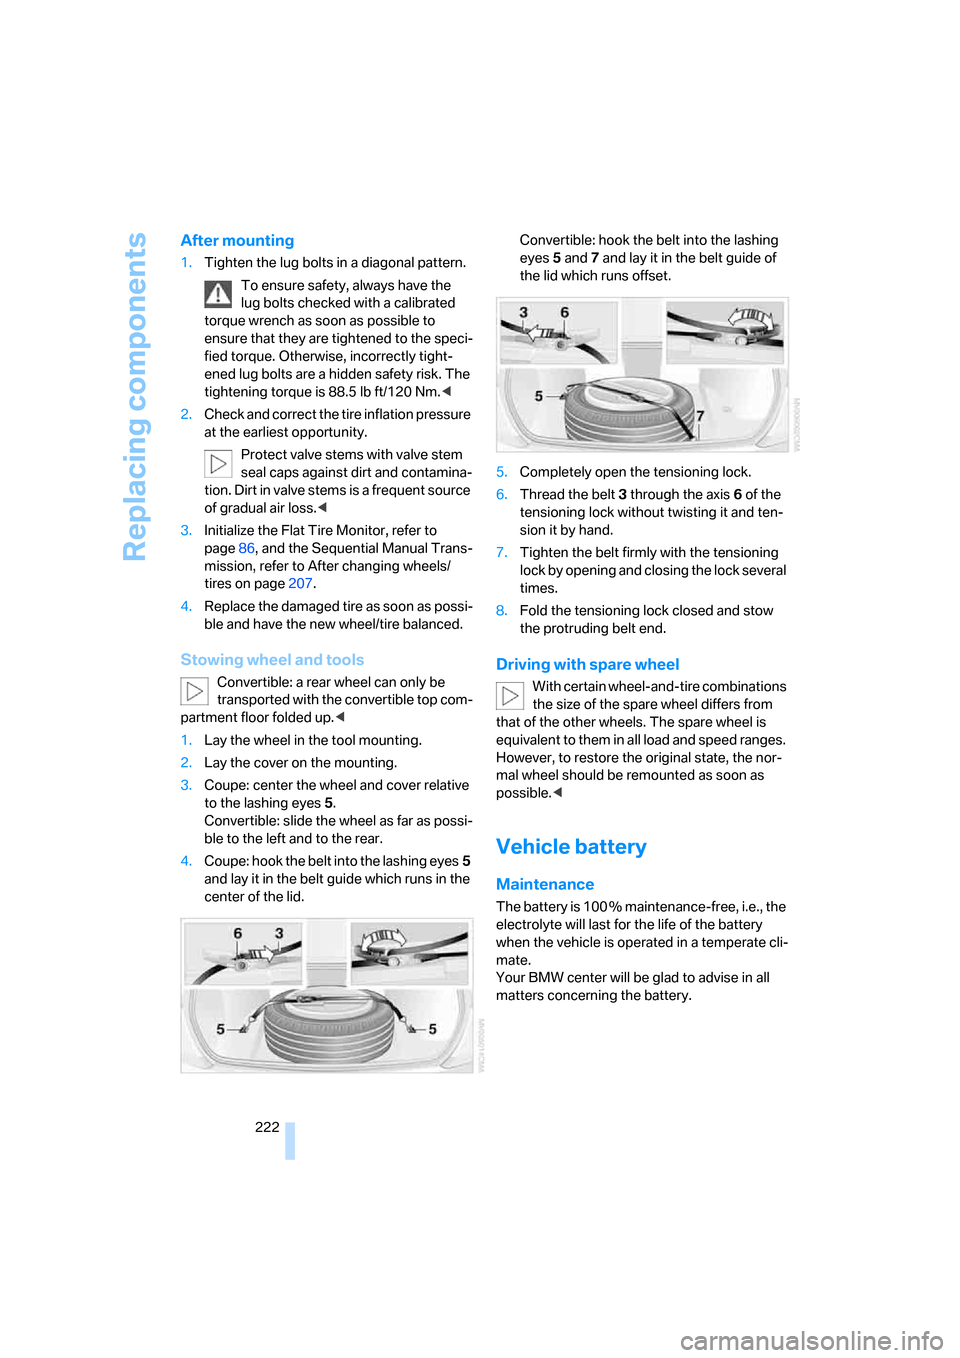
1.Lay the wheel in the tool mounting.
2.Lay the cover on the mounting.
3.Coupe: center the wheel and cover relative
to the lashing eyes5.
Convertible: slide the wheel as far as possi-
ble to the left and to the rear.
4.Coupe: hook the belt into the lashing eyes5
and lay it in the belt guide which runs in the
center of the lid.Convertible: hook the belt into the lashing
eyes5 and7 and lay it in the belt guide of
the lid which runs offset.
5.Completely open the tensioning lock.
6.Thread the belt3 through the axis6 of the
tensioning lock without twisting it and ten-
sion it by hand.
7.Tighten the belt firmly with the tensioning
lock by opening and closing the lock several
times.
8.Fold the tensioning lock closed and stow
the protruding belt end.
Driving with spare wheel
With certain wheel-and-tire combinations
the size of the spare wheel differs from
that of the other wheels. The spare wheel is
equivalent to them in all load and speed ranges.
However, to restore the original state, the nor-
mal wheel should be remounted as soon as
possible.<
Vehicle battery
Maintenance
The battery is 100 % maintenance-free, i.e., the
electrolyte will last for the life of the battery
when the vehicle is operated in a temperate cli-
mate.
Your BMW center will be glad to advise in all
matters concerning the battery.
Page 225 of 262
Mobility
223Reference
At a glance
Controls
Driving tips
Communications
Navigation
Entertainment
Charging battery
Only charge the battery in the vehicle via the
terminals in the engine compartment with the
engine switched off. For the connections, refer
to Jump starting on page225.
Disposal
After replacement, have old batteries dis-
posed of by your BMW center or deposit
them at a recycling center. Maintain the battery
in an upright position for transport and storage.
Always secure the battery to prevent it from tip-
ping over during transport.<
Power failure
After a temporary power supply interruption,
some settings are lost. Take the following
steps:
>Seat, mirror and steering wheel memory
Store the positions again, refer to page47.
>Time and date
Reset, refer to text starting on page77.
>Radio
Store stations again, refer to page156.
>Navigation system
Wait until the system starts, refer to
page124.
Fuses
Never attempt to repair a blown fuse, and
do not replace a defective fuse with a sub-
stitute of another color or amperage rating, as
this could lead to overloading of the wiring, ulti-
mately resulting in a fire in the vehicle.<
Spare fuses and a pair of plastic tweezers are
located in the compartment for the onboard tool
kit, refer to page216.
Information on fuse allocation is located below
the bracket for the onboard tool kit, see below.
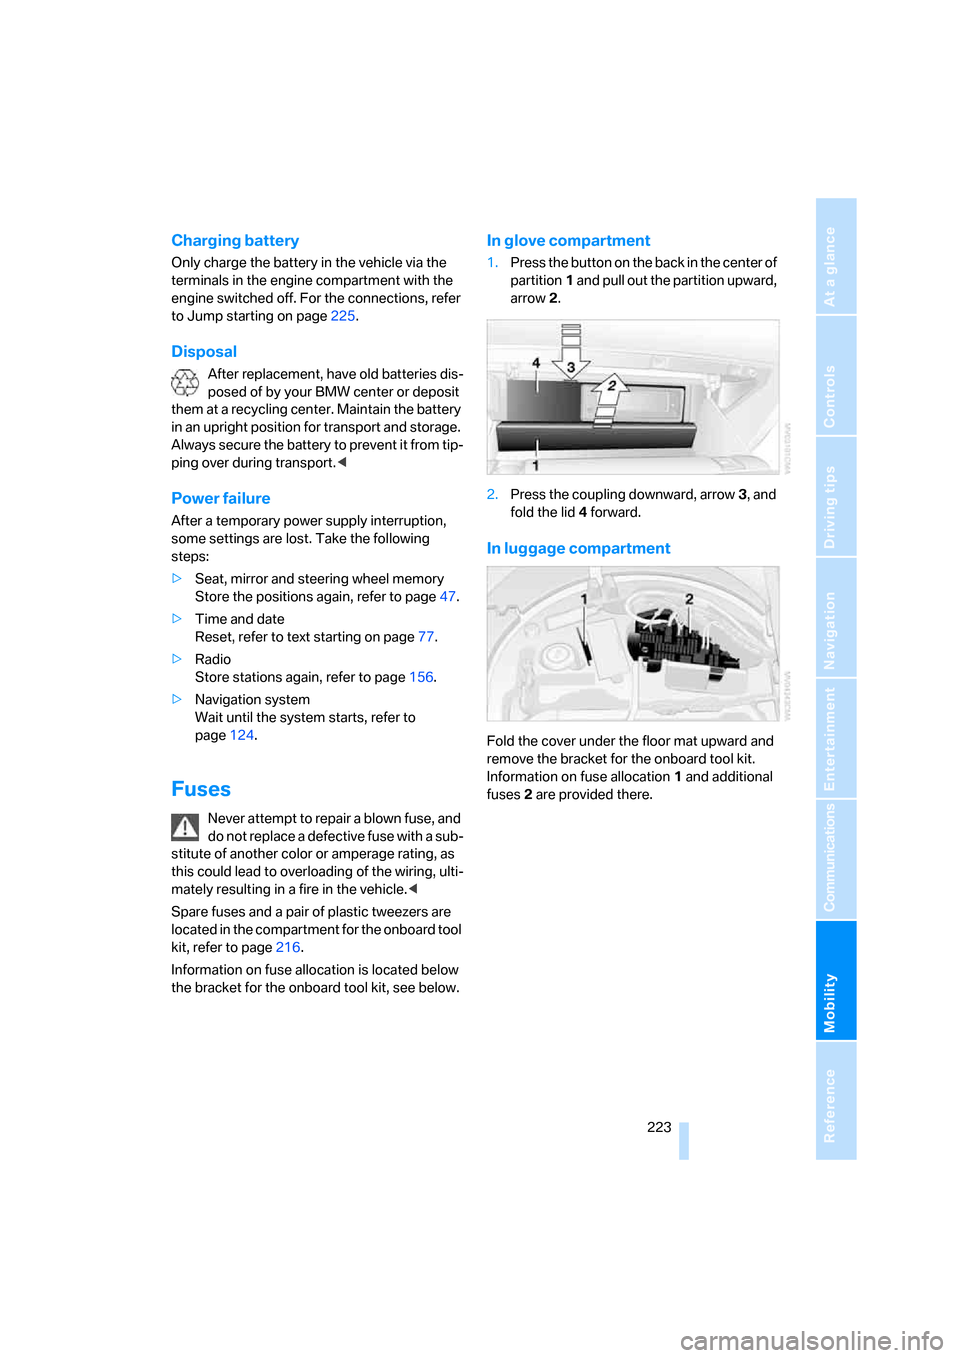
In glove compartment
1.Press the button on the back in the center of
partition1 and pull out the partition upward,
arrow2.
2.Press the coupling downward, arrow3, and
fold the lid 4 forward.
In luggage compartment
Fold the cover under the floor mat upward and
remove the bracket for the onboard tool kit.
Information on fuse allocation1 and additional
fuses2 are provided there.
Page 226 of 262
Giving and receiving assistance
224
Giving and receiving assistance
Emergency request
Conditions for an emergency request:
>Full preparation package mobile phone.
With this equipment, an emergency request
is still possible when no mobile phone is
paired in the vehicle.
>BMW Assist is activated.
Activating BMW Assist, refer to page196.
>Radio readiness is activated.
>The BMW Assist system is logged on to a
mobile phone network.
>The emergency request system is opera-
ble.
Once your service contract for BMW Assist
expires, the BMW Assist system can be deacti-
vated by a BMW center without you having to
visit a workshop. Following deactivation of the
BMW Assist system, no emergency requests
can be made. The BMW Assist system can be
reactivated after concluding a new agreement
at a BMW center.
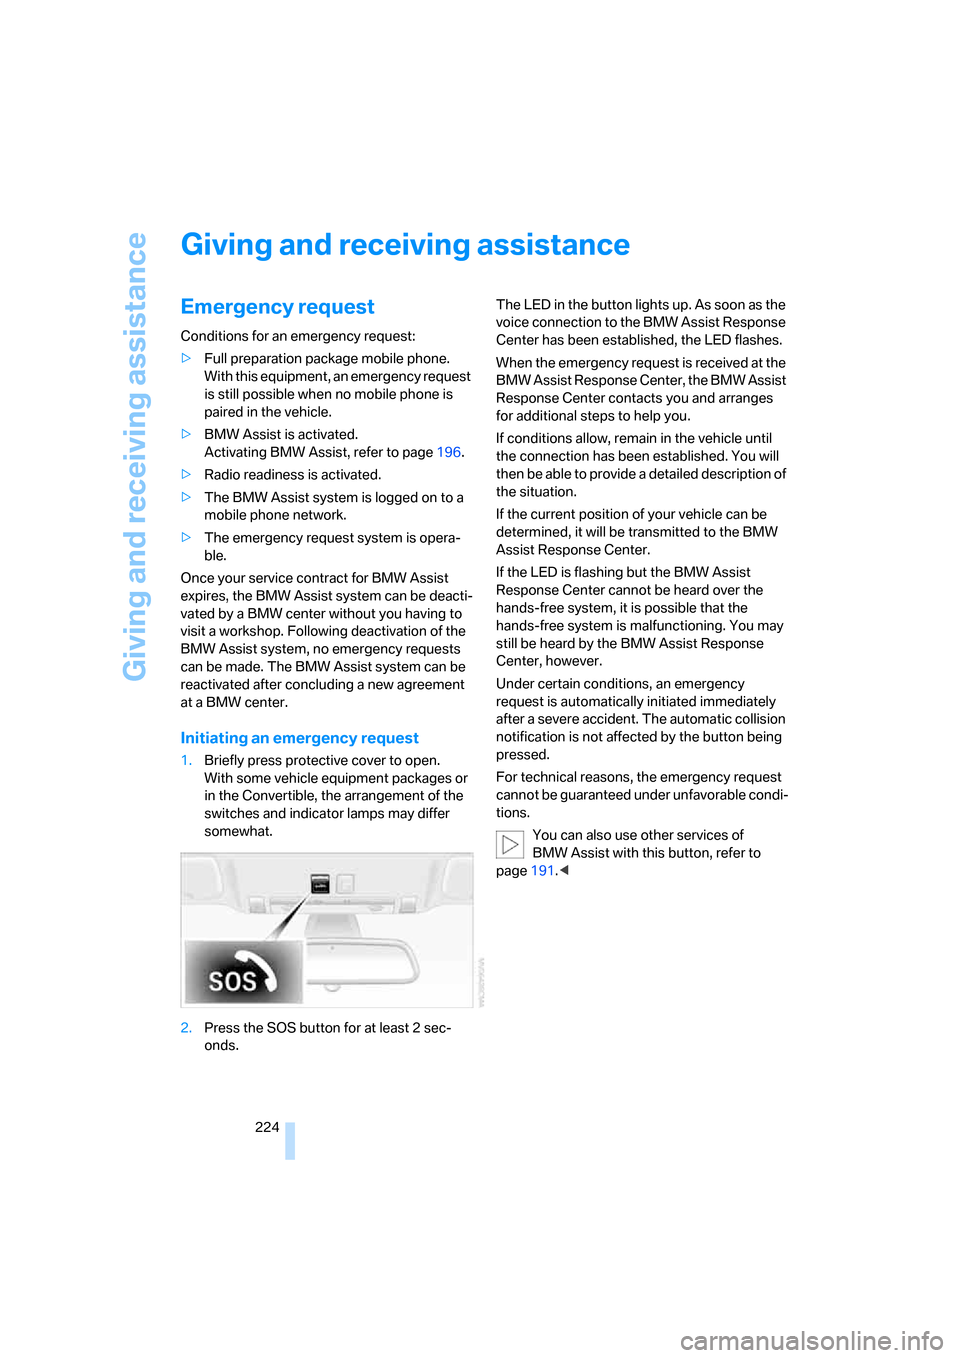
Initiating an emergency request
1.Briefly press protective cover to open.
With some vehicle equipment packages or
in the Convertible, the arrangement of the
switches and indicator lamps may differ
somewhat.
2.Press the SOS button for at least 2 sec-
onds.The LED in the button lights up. As soon as the
voice connection to the BMW Assist Response
Center has been established, the LED flashes.
When the emergency request is received at the
BMW Assist Response Center, the BMW Assist
Response Center contacts you and arranges
for additional steps to help you.
If conditions allow, remain in the vehicle until
the connection has been established. You will
then be able to provide a detailed description of
the situation.
If the current position of your vehicle can be
determined, it will be transmitted to the BMW
Assist Response Center.
If the LED is flashing but the BMW Assist
Response Center cannot be heard over the
hands-free system, it is possible that the
hands-free system is malfunctioning. You may
still be heard by the BMW Assist Response
Center, however.
Under certain conditions, an emergency
request is automatically initiated immediately
after a severe accident. The automatic collision
notification is not affected by the button being
pressed.
For technical reasons, the emergency request
cannot be guaranteed under unfavorable condi-
tions.
You can also use other services of
BMW Assist with this button, refer to
page191.<
Page 227 of 262
Mobility
225Reference
At a glance
Controls
Driving tips
Communications
Navigation
Entertainment
Warning triangle*
The warning triangle is located on the left-hand
side in the luggage compartment.
First-aid kit*
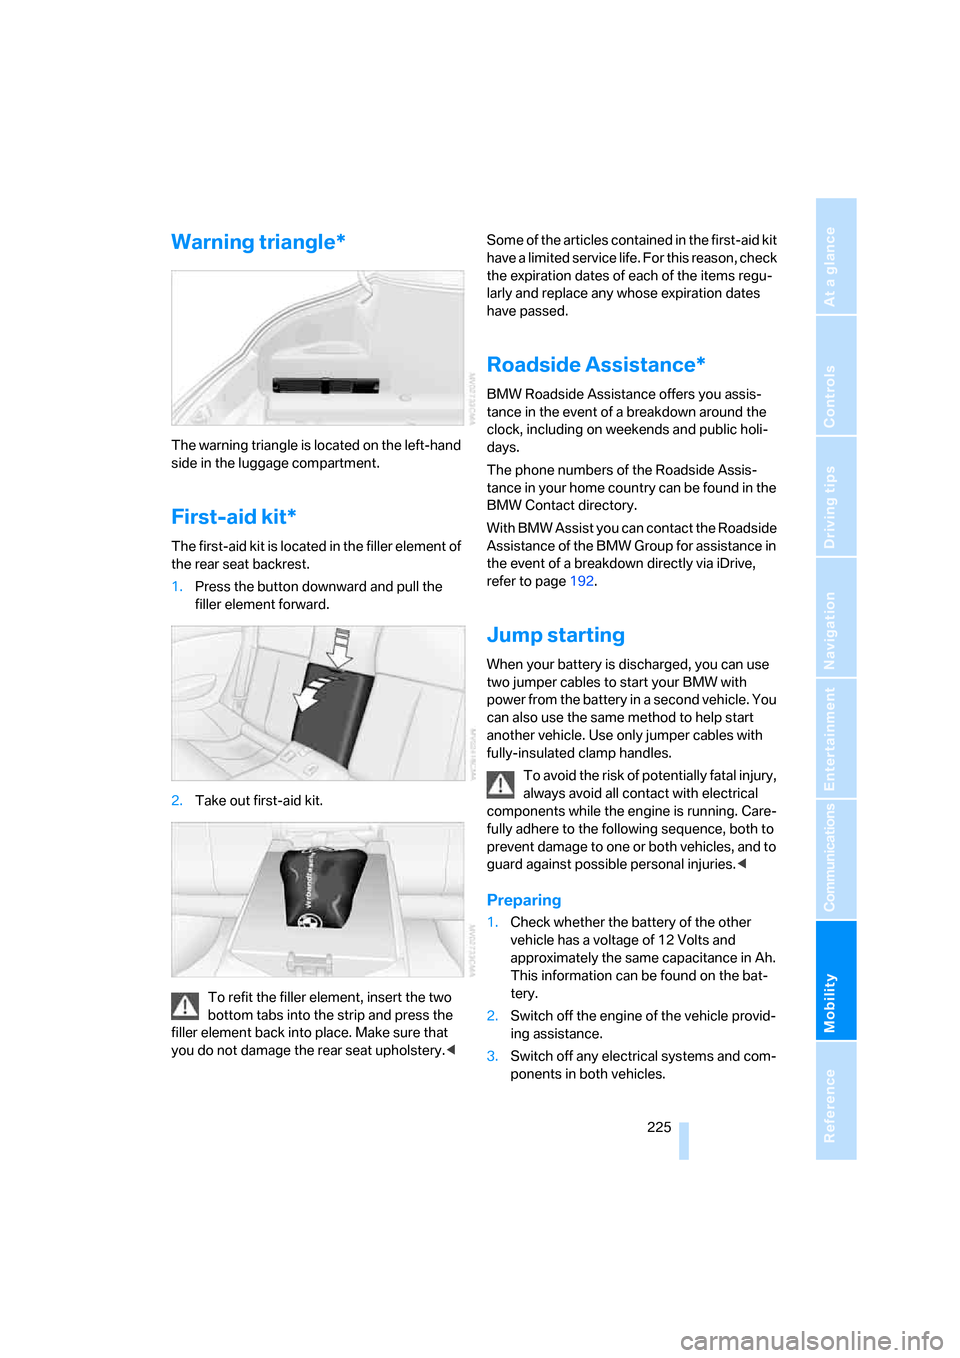
The first-aid kit is located in the filler element of
the rear seat backrest.
1.Press the button downward and pull the
filler element forward.
2.Take out first-aid kit.
To refit the filler element, insert the two
bottom tabs into the strip and press the
filler element back into place. Make sure that
you do not damage the rear seat upholstery.
the expiration dates of each of the items regu-
larly and replace any whose expiration dates
have passed.
Roadside Assistance*
BMW Roadside Assistance offers you assis-
tance in the event of a breakdown around the
clock, including on weekends and public holi-
days.
The phone numbers of the Roadside Assis-
tance in your home country can be found in the
BMW Contact directory.
With BMW Assist you can contact the Roadside
Assistance of the BMW Group for assistance in
the event of a breakdown directly via iDrive,
refer to page192.
Jump starting
When your battery is discharged, you can use
two jumper cables to start your BMW with
power from the battery in a second vehicle. You
can also use the same method to help start
another vehicle. Use only jumper cables with
fully-insulated clamp handles.
To avoid the risk of potentially fatal injury,
always avoid all contact with electrical
components while the engine is running. Care-
fully adhere to the following sequence, both to
prevent damage to one or both vehicles, and to
guard against possible personal injuries.<
Preparing
1.Check whether the battery of the other
vehicle has a voltage of 12 Volts and
approximately the same capacitance in Ah.
This information can be found on the bat-
tery.
2.Switch off the engine of the vehicle provid-
ing assistance.
3.Switch off any electrical systems and com-
ponents in both vehicles.
Page 228 of 262
Giving and receiving assistance
226 There must not be any contact between
the bodies of the two vehicles; otherwise,
there is a danger of short circuiting.<
Connecting jumper cables
To avoid personal injury from sparks,
follow this sequence when connecting
jumper cables.<
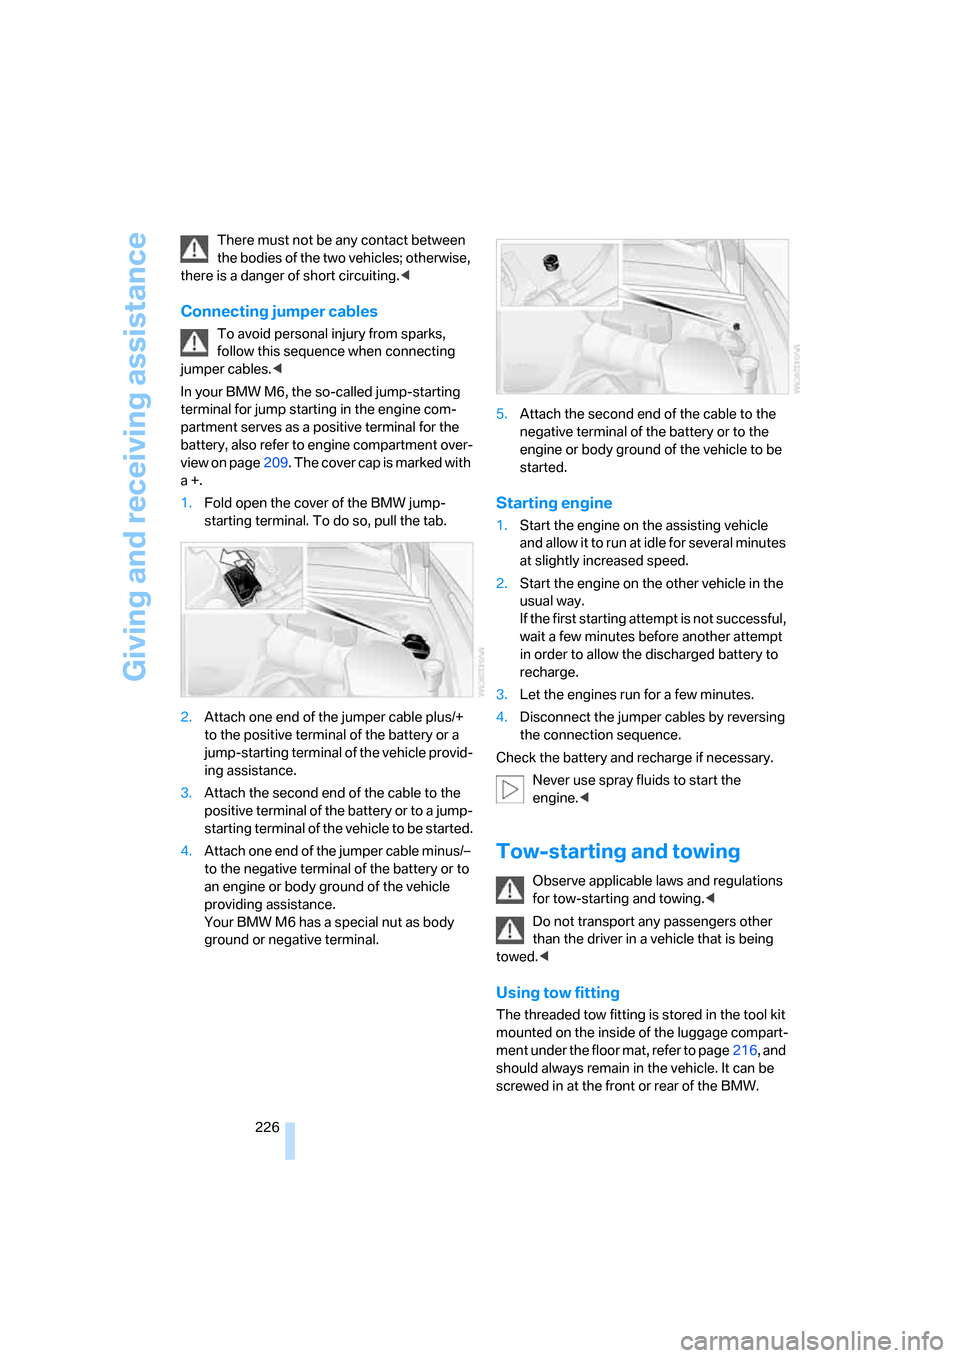
In your BMW M6, the so-called jump-starting
terminal for jump starting in the engine com-
partment serves as a positive terminal for the
battery, also refer to engine compartment over-
view on page209. The cover cap is marked with
a+.
1.Fold open the cover of the BMW jump-
starting terminal. To do so, pull the tab.
2.Attach one end of the jumper cable plus/+
to the positive terminal of the battery or a
jump-starting terminal of the vehicle provid-
ing assistance.
3.Attach the second end of the cable to the
positive terminal of the battery or to a jump-
starting terminal of the vehicle to be started.
4.Attach one end of the jumper cable minus/–
to the negative terminal of the battery or to
an engine or body ground of the vehicle
providing assistance.
Your BMW M6 has a special nut as body
ground or negative terminal.5.Attach the second end of the cable to the
negative terminal of the battery or to the
engine or body ground of the vehicle to be
started.
Starting engine
1.Start the engine on the assisting vehicle
and allow it to run at idle for several minutes
at slightly increased speed.
2.Start the engine on the other vehicle in the
usual way.
If the first starting attempt is not successful,
wait a few minutes before another attempt
in order to allow the discharged battery to
recharge.
3.Let the engines run for a few minutes.
4.Disconnect the jumper cables by reversing
the connection sequence.
Check the battery and recharge if necessary.
Never use spray fluids to start the
engine.<
Tow-starting and towing
Observe applicable laws and regulations
for tow-starting and towing.<
Do not transport any passengers other
than the driver in a vehicle that is being
towed.<
Using tow fitting
The threaded tow fitting is stored in the tool kit
mounted on the inside of the luggage compart-
ment under the floor mat, refer to page216, and
should always remain in the vehicle. It can be
screwed in at the front or rear of the BMW.
Page 229 of 262
Mobility
227Reference
At a glance
Controls
Driving tips
Communications
Navigation
Entertainment
Only use the tow fitting that comes with
the vehicle and screw it in as far as possi-
ble. Use the tow fitting for towing only on roads.
Avoid lateral loading of the tow fitting, e.g. do
not lift the vehicle by the tow fitting. Otherwise,
the tow fitting and vehicle can be damaged.<
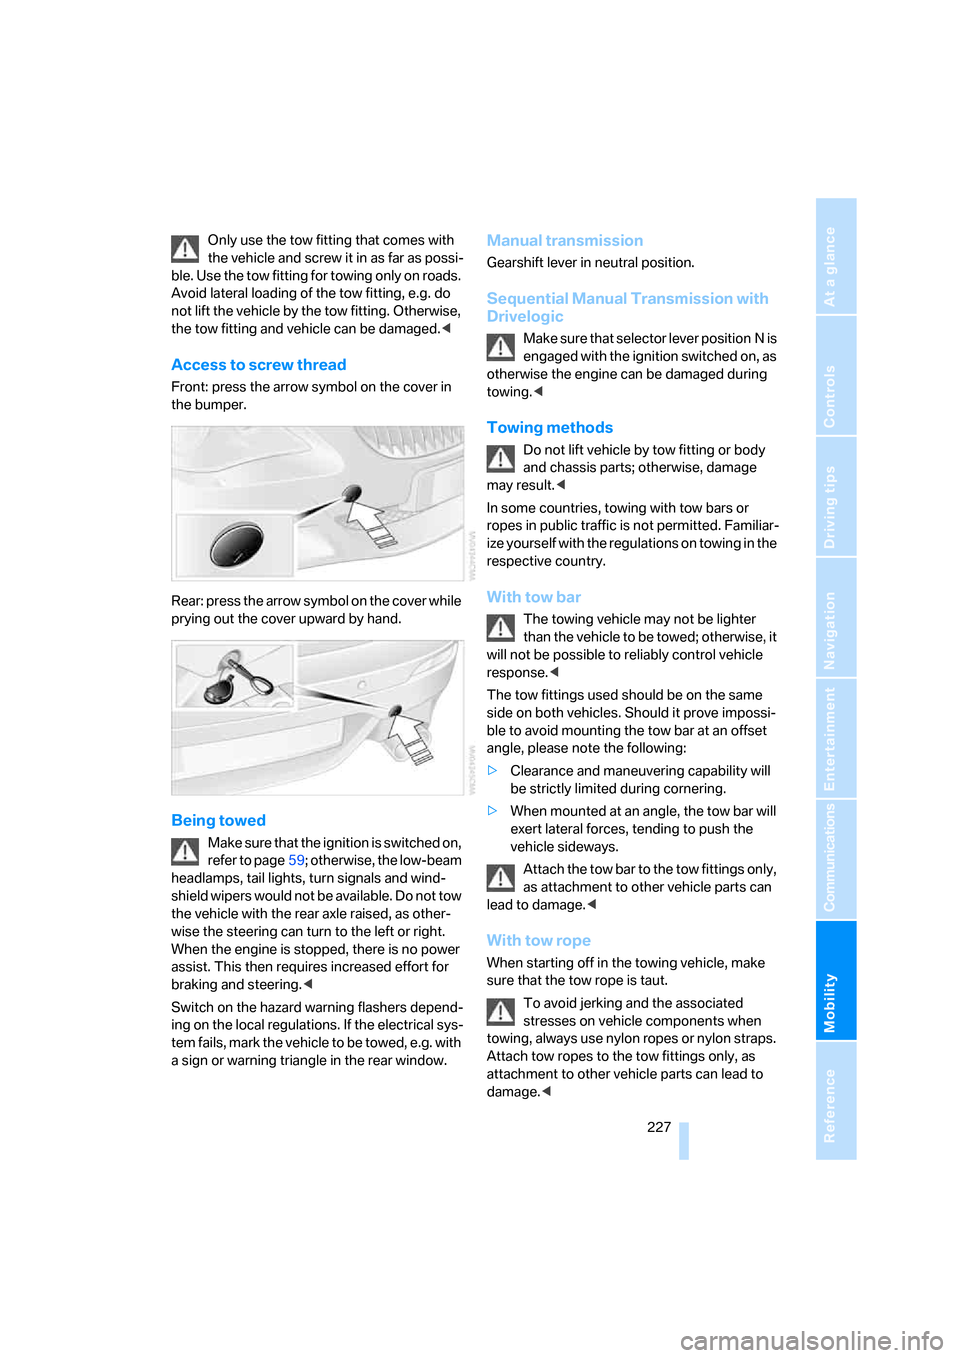
Access to screw thread
Front: press the arrow symbol on the cover in
the bumper.
Rear: press the arrow symbol on the cover while
prying out the cover upward by hand.
Being towed
Make sure that the ignition is switched on,
refer to page59; otherwise, the low-beam
headlamps, tail lights, turn signals and wind-
shield wipers would not be available. Do not tow
the vehicle with the rear axle raised, as other-
wise the steering can turn to the left or right.
When the engine is stopped, there is no power
assist. This then requires increased effort for
braking and steering.<
Switch on the hazard warning flashers depend-
ing on the local regulations. If the electrical sys-
tem fails, mark the vehicle to be towed, e.g. with
a sign or warning triangle in the rear window.
Manual transmission
Gearshift lever in neutral position.
Sequential Manual Transmission with
Drivelogic
Make sure that selector lever position N is
engaged with the ignition switched on, as
otherwise the engine can be damaged during
towing.<
Towing methods
Do not lift vehicle by tow fitting or body
and chassis parts; otherwise, damage
may result.<
In some countries, towing with tow bars or
ropes in public traffic is not permitted. Familiar-
ize yourself with the regulations on towing in the
respective country.
With tow bar
The towing vehicle may not be lighter
than the vehicle to be towed; otherwise, it
will not be possible to reliably control vehicle
response.<
The tow fittings used should be on the same
side on both vehicles. Should it prove impossi-
ble to avoid mounting the tow bar at an offset
angle, please note the following:
>Clearance and maneuvering capability will
be strictly limited during cornering.
>When mounted at an angle, the tow bar will
exert lateral forces, tending to push the
vehicle sideways.
Attach the tow bar to the tow fittings only,
as attachment to other vehicle parts can
lead to damage.<
With tow rope
When starting off in the towing vehicle, make
sure that the tow rope is taut.
To avoid jerking and the associated
stresses on vehicle components when
towing, always use nylon ropes or nylon straps.
Attach tow ropes to the tow fittings only, as
attachment to other vehicle parts can lead to
damage.<
Page 230 of 262
Giving and receiving assistance
228
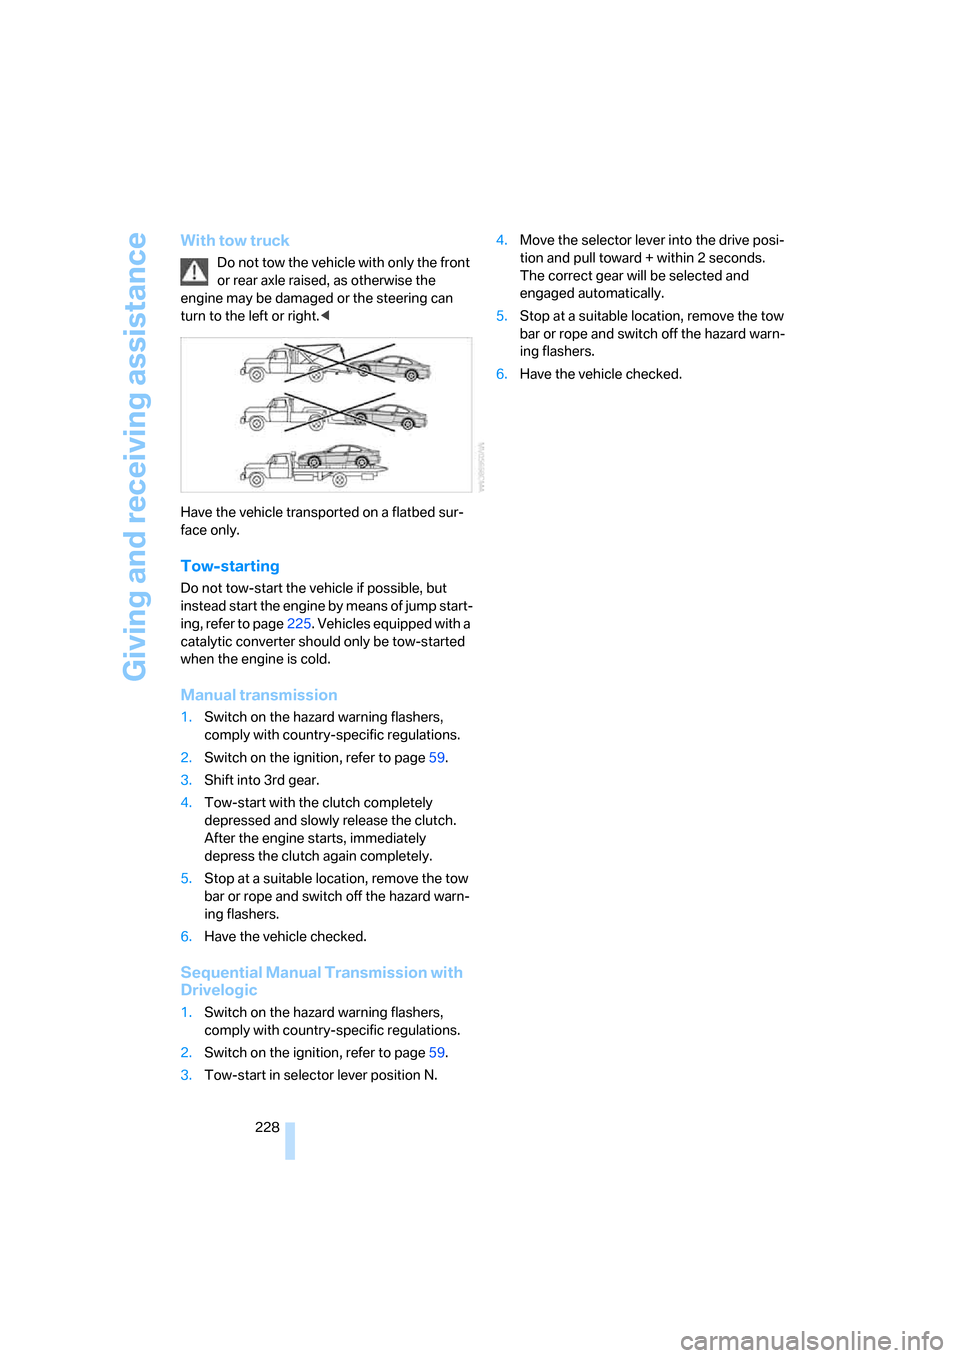
With tow truck
Do not tow the vehicle with only the front
or rear axle raised, as otherwise the
engine may be damaged or the steering can
turn to the left or right.<
Have the vehicle transported on a flatbed sur-
face only.
Tow-starting
Do not tow-start the vehicle if possible, but
instead start the engine by means of jump start-
ing, refer to page225. Vehicles equipped with a
catalytic converter should only be tow-started
when the engine is cold.
Manual transmission
1.Switch on the hazard warning flashers,
comply with country-specific regulations.
2.Switch on the ignition, refer to page59.
3.Shift into 3rd gear.
4.Tow-start with the clutch completely
depressed and slowly release the clutch.
After the engine starts, immediately
depress the clutch again completely.
5.Stop at a suitable location, remove the tow
bar or rope and switch off the hazard warn-
ing flashers.
6.Have the vehicle checked.
Sequential Manual Transmission with
Drivelogic
1.Switch on the hazard warning flashers,
comply with country-specific regulations.
2.Switch on the ignition, refer to page59.
3.Tow-start in selector lever position N.4.Move the selector lever into the drive posi-
tion and pull toward + within 2 seconds.
The correct gear will be selected and
engaged automatically.
5.Stop at a suitable location, remove the tow
bar or rope and switch off the hazard warn-
ing flashers.
6.Have the vehicle checked.