transmission may be damaged BMW M6 2008 E63 Owner's Manual
[x] Cancel search | Manufacturer: BMW, Model Year: 2008, Model line: M6, Model: BMW M6 2008 E63Pages: 262, PDF Size: 8.86 MB
Page 118 of 262
Things to remember when driving
116
Things to remember when driving
Breaking-in
Moving parts need time to adjust to one
another. To ensure that your vehicle continues
to provide optimized economy of operation
throughout an extended service life, we request
that you devote careful attention to the follow-
ing section.
Do not use the driving programs 5 and 6, refer
to Drivelogic on page63, during break-in.
Engine and differential
Always obey all official speed limits.
Up to 1,200 miles/2,000 km
Drive at changing engine and driving speeds,
however do not exceed 5,500 rpm or 105 mph/
170 km/h.
Avoid full-throttle operation and use of the
transmission's kick-down mode during these
initial miles.
From 1,200 miles/2,000 km to
3,000 miles/5,000 km
The engine and driving speeds can gradually be
increased up to a continuous vehicle speed of
135 mph/220 km/h. Only drive at top speed
briefly, e.g. when passing.
Transmission
The function of the transmission is only at its
optimized level after driving a distance of
approx. 300 miles/500 km. Do not exceed
engine speeds of 5,500 rpm during this time.
Tires
Due to technical factors associated with their
manufacture, tires do not achieve their full trac-
tion potential until after an initial break-in
period. Therefore, drive reservedly during the
first 200 miles/300 km.
Brake system
Brakes require an initial break-in period of
approx. 300 miles/500 km to achieve optimized
contact and wear patterns between brake pads
and rotors. Drive in a reserved manner during
this break-in period.
Clutch
The function of the clutch is only at its opti-
mized level after a distance driven of approx.
300 miles/500 km. With manual transmission:
During this break-in period, engage the clutch
gently.
Following part replacement
Observe the break-in instructions again if com-
ponents mentioned above must be replaced
after subsequent driving operation.
General driving notes
Ground clearance
Ensure that sufficient ground clearance
is available. To drive down curbs, select
the "Sport" program of the EDC Electronic
Damping Control, refer to page85, to keep the
ground clearance as uniform as possible. Oth-
erwise, the vehicle may be damaged.<
Closing luggage compartment lid
Only drive with the luggage compartment
lid completely closed, otherwise exhaust
can penetrate into the passenger compart-
ment.<
If it is absolutely necessary to drive with the lug-
gage compartment lid open:
1.Coupe: close both windows.
Convertible: with closed top, close all win-
dows.
2.Increase the air volume of the automatic cli-
mate control to a high level, refer to
page103.
Page 119 of 262
Driving tips
117Reference
At a glance
Controls
Communications
Navigation
Entertainment
Mobility
Hot exhaust system
As in all vehicles, extremely high temper-
atures are generated in the exhaust sys-
tem. Do not remove the heat shields installed
adjacent to it, and never apply undercoating to
them. When driving, standing at idle and while
parking, take care to avoid possible contact
between the hot exhaust system and any highly
flammable materials such as hay, leaves, grass,
etc. Such contact could lead to a fire, and with it
the risk of serious property damage as well as
personal injury. Do not touch hot exhaust tail
pipes. Otherwise there is a risk of burns.<
Hydroplaning
When driving on wet or slushy roads,
reduce road speed. If you do not, a wedge
of water can form between tires and road sur-
face. This phenomenon is referred to as hydro-
planing, and is characterized by a partial or
complete loss of contact between the tires and
the road surface, ultimately undermining your
ability to steer and brake the vehicle.<
The risk of hydroplaning increases as the tread
depth of the tires decreases, also refer to Mini-
mum tire tread on page205.
Driving through water
Do not drive through water on the road if it
is deeper than 1 ft/30 cm, and then only at
walking speed at the most. Otherwise, the vehi-
cle's engine, the electrical systems and the
transmission may be damaged.<
Starting off
On slopes
The starting assistant enables you to start off
conveniently on slopes. The handbrake is not
required for this purpose.
1.Hold the vehicle with the footbrake.
2.Release the footbrake and drive off quickly.
The starting assistant holds the vehicle
for approx. 1 second after releasing the
footbrake. After releasing the footbrake, drive
off quickly, otherwise the starting assistant no longer holds the vehicle after approx. 1 second
and it begins to roll back.<
Start off quickly on slopes. Do not hold
the vehicle on a hill by pressing the accel-
erator, but apply the footbrake or handbrake
instead. Otherwise, overheating and heavy
wear can result in the area of the Sequential
Manual Transmission.<
To protect the clutch of the Sequential Manual
Transmission from overheating, the starting-off
behavior is changed under heavy loading, e.g. a
rapid succession of starts on slopes. This can
be noticed from shaking during starting off.
On a slippery surface
1.Select "P 400" program of M Engine
Dynamic Control, refer to page64.
2.Gently press accelerator pedal to prevent
wheels from spinning when starting off.
Clutch protection with manual
transmission
Be sure to avoid riding the clutch for longer peri-
ods.
Your BMW M6 is equipped with an overload
protection for the clutch. Riding the clutch for
longer periods is detected and the engine man-
agement system limits the engine speed to pro-
tect the clutch. This can result in the vehicle fail-
ing to accelerate when the clutch pedal is
partially depressed.
Braking safely
Your BMW is equipped with ABS as a standard
feature. In situations that require it, it is best to
brake with full force. Since the vehicle maintains
steering responsiveness, you can still avoid
possible obstacles with a minimum of steering
effort.
The pulsing of he brake pedal indicates that the
ABS is controlling braking.
In certain braking situations the perforated
brake rotors can cause operating noises which,
however, have not effect on the performance
and operating safety of the brake system.
Page 229 of 262
Mobility
227Reference
At a glance
Controls
Driving tips
Communications
Navigation
Entertainment
Only use the tow fitting that comes with
the vehicle and screw it in as far as possi-
ble. Use the tow fitting for towing only on roads.
Avoid lateral loading of the tow fitting, e.g. do
not lift the vehicle by the tow fitting. Otherwise,
the tow fitting and vehicle can be damaged.<
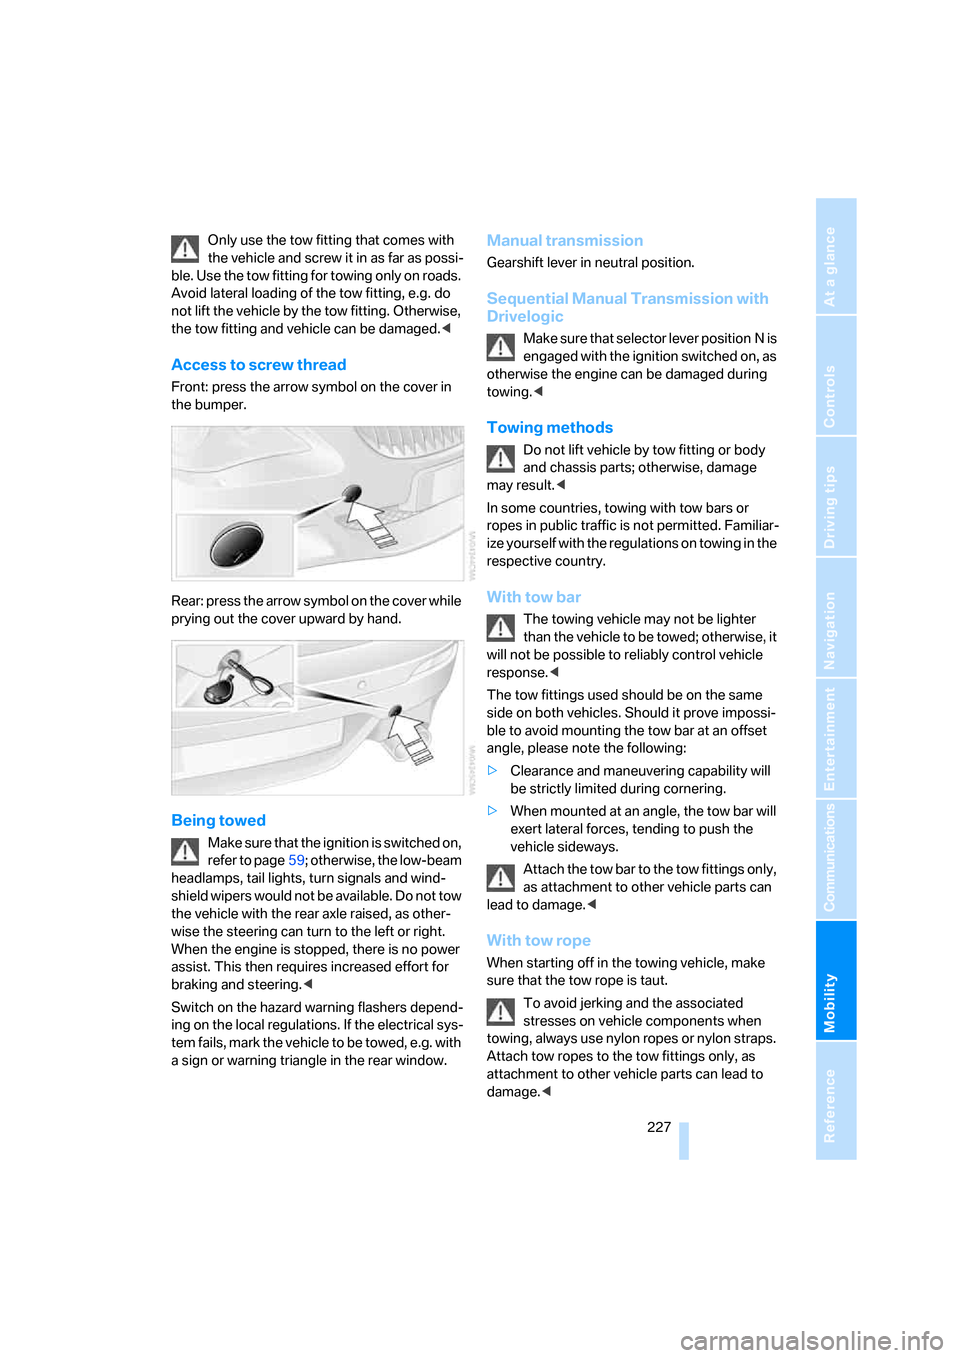
Access to screw thread
Front: press the arrow symbol on the cover in
the bumper.
Rear: press the arrow symbol on the cover while
prying out the cover upward by hand.
Being towed
Make sure that the ignition is switched on,
refer to page59; otherwise, the low-beam
headlamps, tail lights, turn signals and wind-
shield wipers would not be available. Do not tow
the vehicle with the rear axle raised, as other-
wise the steering can turn to the left or right.
When the engine is stopped, there is no power
assist. This then requires increased effort for
braking and steering.<
Switch on the hazard warning flashers depend-
ing on the local regulations. If the electrical sys-
tem fails, mark the vehicle to be towed, e.g. with
a sign or warning triangle in the rear window.
Manual transmission
Gearshift lever in neutral position.
Sequential Manual Transmission with
Drivelogic
Make sure that selector lever position N is
engaged with the ignition switched on, as
otherwise the engine can be damaged during
towing.<
Towing methods
Do not lift vehicle by tow fitting or body
and chassis parts; otherwise, damage
may result.<
In some countries, towing with tow bars or
ropes in public traffic is not permitted. Familiar-
ize yourself with the regulations on towing in the
respective country.
With tow bar
The towing vehicle may not be lighter
than the vehicle to be towed; otherwise, it
will not be possible to reliably control vehicle
response.<
The tow fittings used should be on the same
side on both vehicles. Should it prove impossi-
ble to avoid mounting the tow bar at an offset
angle, please note the following:
>Clearance and maneuvering capability will
be strictly limited during cornering.
>When mounted at an angle, the tow bar will
exert lateral forces, tending to push the
vehicle sideways.
Attach the tow bar to the tow fittings only,
as attachment to other vehicle parts can
lead to damage.<
With tow rope
When starting off in the towing vehicle, make
sure that the tow rope is taut.
To avoid jerking and the associated
stresses on vehicle components when
towing, always use nylon ropes or nylon straps.
Attach tow ropes to the tow fittings only, as
attachment to other vehicle parts can lead to
damage.<
Page 230 of 262
Giving and receiving assistance
228
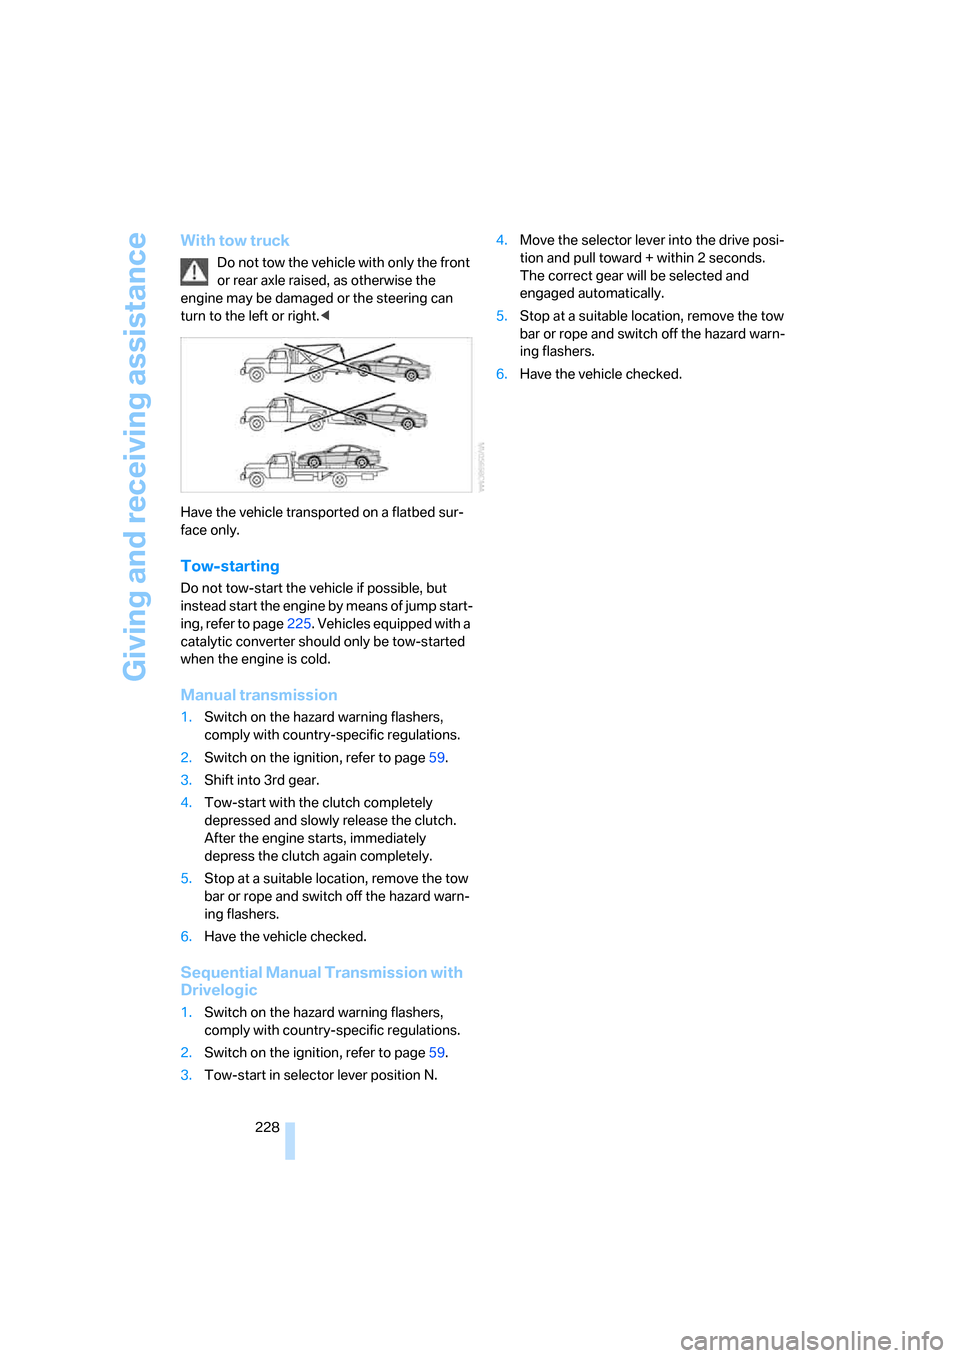
With tow truck
Do not tow the vehicle with only the front
or rear axle raised, as otherwise the
engine may be damaged or the steering can
turn to the left or right.<
Have the vehicle transported on a flatbed sur-
face only.
Tow-starting
Do not tow-start the vehicle if possible, but
instead start the engine by means of jump start-
ing, refer to page225. Vehicles equipped with a
catalytic converter should only be tow-started
when the engine is cold.
Manual transmission
1.Switch on the hazard warning flashers,
comply with country-specific regulations.
2.Switch on the ignition, refer to page59.
3.Shift into 3rd gear.
4.Tow-start with the clutch completely
depressed and slowly release the clutch.
After the engine starts, immediately
depress the clutch again completely.
5.Stop at a suitable location, remove the tow
bar or rope and switch off the hazard warn-
ing flashers.
6.Have the vehicle checked.
Sequential Manual Transmission with
Drivelogic
1.Switch on the hazard warning flashers,
comply with country-specific regulations.
2.Switch on the ignition, refer to page59.
3.Tow-start in selector lever position N.4.Move the selector lever into the drive posi-
tion and pull toward + within 2 seconds.
The correct gear will be selected and
engaged automatically.
5.Stop at a suitable location, remove the tow
bar or rope and switch off the hazard warn-
ing flashers.
6.Have the vehicle checked.