buttons BMW M6 CONVERTIBLE 2002 User Guide
[x] Cancel search | Manufacturer: BMW, Model Year: 2002, Model line: M6 CONVERTIBLE, Model: BMW M6 CONVERTIBLE 2002Pages: 186, PDF Size: 2.77 MB
Page 95 of 186
95n
OverviewControlsMaintenanceRepairsDataIndex
Computer in the MID
*
After three incorrect code entries, or
three attempts to start the engine
without a code entry, the alarm will
sound for 30 seconds on vehicles
equipped with an alarm.
Deactivating the alarm in an emer-
gency:
If you have forgotten the code, proceed
as follows:
1. Disconnect the battery, wait approx.
2 minutes, then reconnect it. Note
that on vehicles with an alarm, this
will sound
2. Set the ignition key to position 1:
The time display will count down for
the next ten minutes
3. After ten minutes, start the engine.
If the code becomes available
again in the meantime, it can be
entered during the waiting period after
pressing the CODE button.<
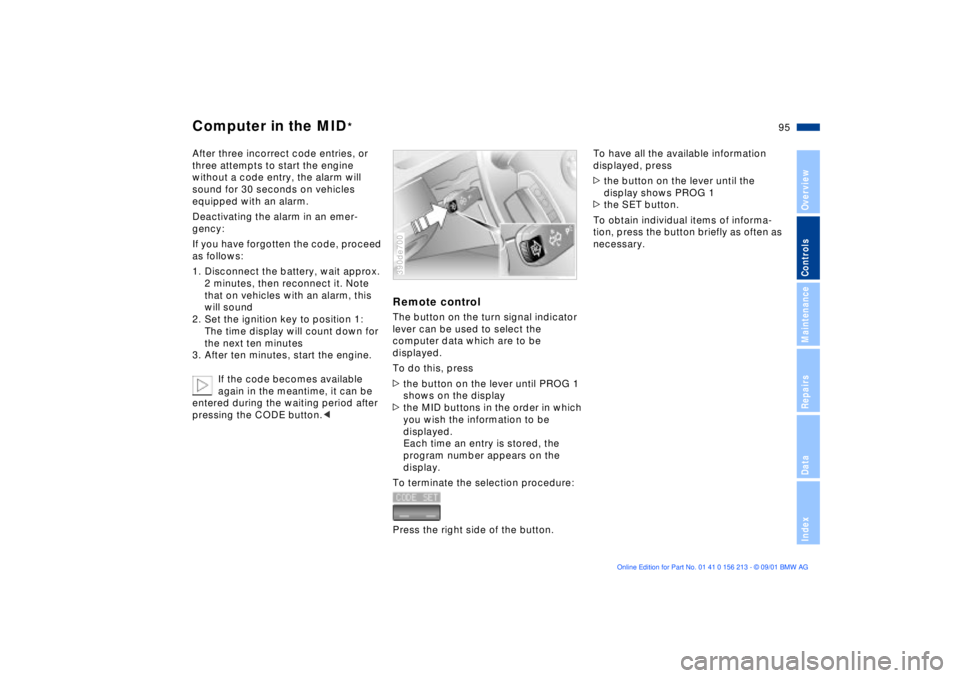
Remote controlThe button on the turn signal indicator
lever can be used to select the
computer data which are to be
displayed.
To do this, press
>the button on the lever until PROG 1
shows on the display
>the MID buttons in the order in which
you wish the information to be
displayed.
Each time an entry is stored, the
program number appears on the
display.
To terminate the selection procedure:
Press the right side of the button.390de700
To have all the available information
displayed, press
>the button on the lever until the
display shows PROG 1
>the SET button.
To obtain individual items of informa-
tion, press the button briefly as often as
necessary.
Page 113 of 186
113n
OverviewControlsMaintenanceRepairsDataIndex
The conceptThe BMW Universal Transmitter
replaces up to three hand-held transmit-
ters to control different devices such as
a garage door opener, alarm systems or
a door locking system. The BMW
Universal Transmitter recognizes and
"learns" the transmitted signal from each
of the original hand-held transmitters.
The signal of an original hand-held
transmitter can be programmed on one
of the three channel buttons. Following
that, each of the devices can be actu-ated with the appropriately-programmed
channel button. The indicator lamp
flashes to confirm transmission of the
signal.
Before you sell your vehicle, the
programmed channel buttons should
be cleared. Refer to page 115 for the
description of this process.
To prevent potential injuries or
damage during the programming
operation and before every remote trig-
gering of a programmed device using
the BMW Universal Transmitter, be sure
that there are no persons, animals or
objects within the range of movement
of the respective device. Also, comply
with the safety precautions of the orig-
inal hand-held transmitter.<
To Canadian residents:
During programming, your hand-
held transmitter may automatically stop
transmitting after two seconds. This
may not be long enough to program the
BMW Universal Transmitter. If you are
programming from one of these hand-
held transmitters, the Universal Trans-
mitter's lamp may begin to flash in a
series of double flashes. If this occurs,
continue to hold the button on the
Universal Transmitter while you reacti-
vate your hand-held transmitter. You
may have to repeat this function several
times while programming.<
Before programming, read the
"User's information" section on
page 115.<
The original hand-held transmitter
If this symbol is depicted on the
packaging or in the user's
instructions for the original
hand-held transmitter, it may be
assumed that this original hand-held
transmitter is compatible with the BMW
Universal Transmitter.
Checking for the change codeIn order to determine whether the orig-
inal hand-held transmitter is equipped
with a change code system, you may
either refer to the instructions for the
original hand-held transmitter or
program a channel button as described
in the left column on page 114 under
"Programming."
Following that, press and hold the
programmed channel button of the
BMW Universal Transmitter. If the indi-
cator lamp of the BMW Universal
Transmitter flashes rapidly for two
seconds and then stays on continu-
ously, the original hand-held transmitter
is equipped with a change code
system. If the change code system is
available, program the channel buttons
as described in the right-hand column
on page 114 under "Programming a
hand-held transmitter with change
code."
If you have additional questions,
please consult your BMW center
or call 1-800-355-3515.<
BMW Universal Transmitter
*
Page 114 of 186
114n
BMW Universal Transmitter
*
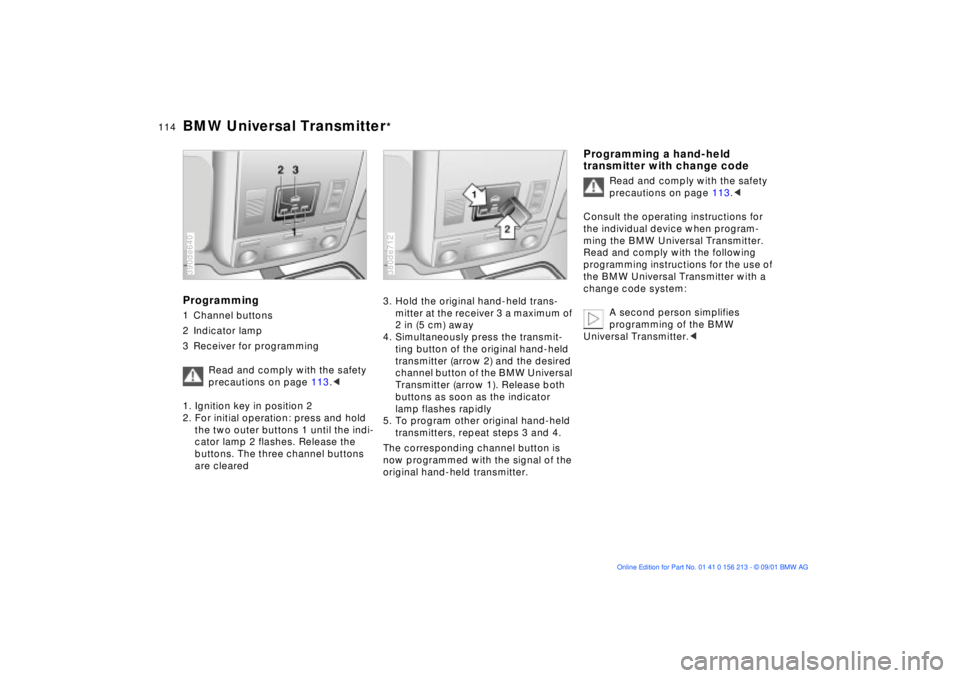
Programming1 Channel buttons
2 Indicator lamp
3 Receiver for programming
Read and comply with the safety
precautions on page 113.<
1. Ignition key in position 2
2. For initial operation: press and hold
the two outer buttons 1 until the indi-
cator lamp 2 flashes. Release the
buttons. The three channel buttons
are cleared390de640
3. Hold the original hand-held trans-
mitter at the receiver 3 a maximum of
2 in (5 cm) away
4. Simultaneously press the transmit-
ting button of the original hand-held
transmitter (arrow 2) and the desired
channel button of the BMW Universal
Transmitter (arrow 1). Release both
buttons as soon as the indicator
lamp flashes rapidly
5. To program other original hand-held
transmitters, repeat steps 3 and 4.
The corresponding channel button is
now programmed with the signal of the
original hand-held transmitter.380de712
Programming a hand-held
transmitter with change code
Read and comply with the safety
precautions on page 113.<
Consult the operating instructions for
the individual device when program-
ming the BMW Universal Transmitter.
Read and comply with the following
programming instructions for the use of
the BMW Universal Transmitter with a
change code system:
A second person simplifies
programming of the BMW
Universal Transmitter.<
Page 115 of 186
115n
OverviewControlsMaintenanceRepairsDataIndex
BMW Universal Transmitter
*
1. Program the BMW Universal Trans-
mitter as described above under
"Programming"
2. Press and hold the programming
button on the receiver of the device
for about two seconds or until the
programming lamp on the device
comes on
3. Press the desired channel button of
the BMW Universal Transmitter three
times.
If you have additional questions,
please consult your BMW center.<
Clearing the channel buttons
Read and comply with the safety
precautions on page 113.<
The memory of individual channel
buttons cannot be deleted. However,
the three channel buttons can be
cleared together in the following
manner:
>Press and hold the two outer channel
buttons of the BMW Universal Trans-
mitter until the indicator lamp flashes,
and then release the buttons.
All of the channel buttons are cleared.
User's informationDo not use this BMW Universal Trans-
mitter with any garage door opener that
lacks safety "stop" and "reverse"
features as required by federal safety
standards (this includes any garage
door opener model manufactured
before April 1, 1982).
This device complies with Part 15 of the
FCC Rules. Operation is subject to the
following two conditions:
(1) This device may not cause harmful
interference, and
(2) This device must accept any inter-
ference received, including interference
that may cause undesired operation.
Page 124 of 186
124n
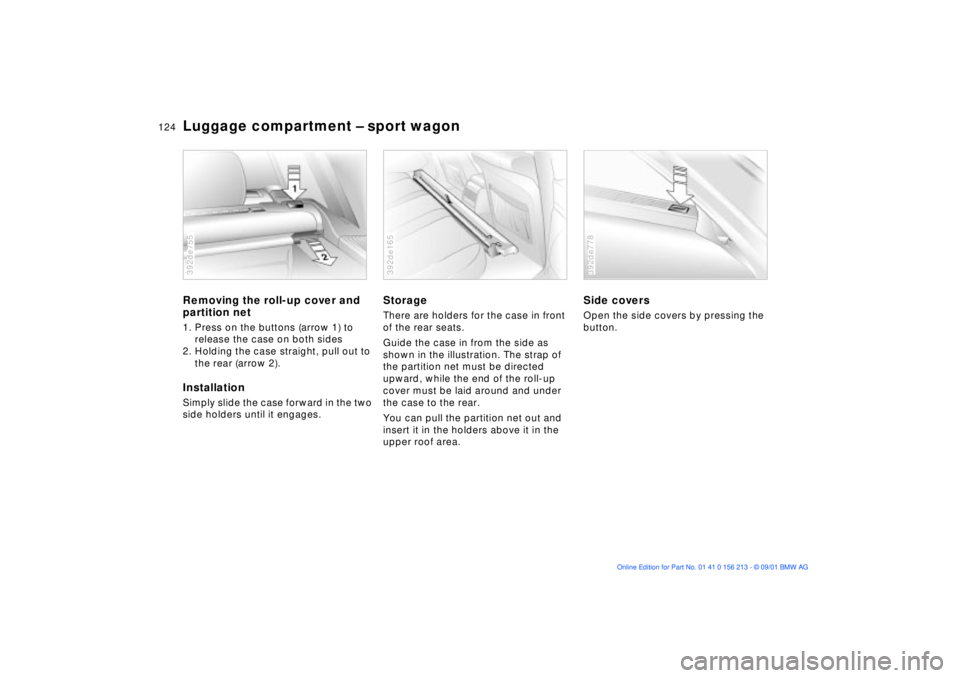
Luggage compartment Ð sport wagonRemoving the roll-up cover and
partition net1. Press on the buttons (arrow 1) to
release the case on both sides
2. Holding the case straight, pull out to
the rear (arrow 2).InstallationSimply slide the case forward in the two
side holders until it engages.392de755
StorageThere are holders for the case in front
of the rear seats.
Guide the case in from the side as
shown in the illustration. The strap of
the partition net must be directed
upward, while the end of the roll-up
cover must be laid around and under
the case to the rear.
You can pull the partition net out and
insert it in the holders above it in the
upper roof area.392de165
Side coversOpen the side covers by pressing the
button.392de778
Page 180 of 186
Everything from A to Zfor seat, mirror and
steering wheel54
related to individuals ("Key
Memory")64
related to the vehicle
("Vehicle Memory")64
Microfilter106, 112
MID (Multi-Information
Display)87
Mirrors57
adjusting57
defrosting57
memory setting54
Modifications,
technical10, 145
Monitoring inflation
pressure, tires99
Moonroof47
Multifunction buttons,
steering wheel22
Multi-Information Display
(MID)87 N
Non-smoker's
equipment118 O
OBD interface socket146
Odometer16, 80
Oil additives140 Oil change interval, refer to
the Service and Warranty
Information Booklet (US
models) or to the Warranty
and Service Guide Booklet
(Canadian models)
Oil consumption140
Oil dipstick140t
Oil level, indicator lamp20
Oil pressure, indicator
lamp19
Oil specifications141t
Oil viscosity141
Oils, disposal141t
OILSERVICE82
Old batteries160
Onboard computer, refer to
the "Owner's Manual for
Onboard Computer"
Onboard Diagnostic (OBD)
system146
Onboard tool kit150t
Opening and closing
from the inside37
from the outside33
using the key33
using the remote
control33
Opening the rear
window40 Operating range86
Outlets,
ventilation104, 107
Outside temperature
display80, 86
P
Park Distance Control
(PDC)96
Parked-car ventilation
system112
for additional information
refer to the "Owner's
Manual for Onboard
Computer"
Parking aid96
Parking brake20, 68
Parking lamps101
bulb replacement152t
Partition net123
Passenger-side mirror tilt
function55
PDC (Park Distance
Control)96
Pocket light116 Pollen filter106, 112
Power windows45
safety switch45
Power-slip control, refer to
ASC+T/DSC97
Q
Quality Grades, tires134 R
Rain sensor76
RDC (Tire Pressure
Monitor)99
Reading lamps103
Rear ashtray118
Rear window40
defroster105, 110
sun blinds112
wiper77
Rear window cleaning77
Rear-seat backrest
folding119
remove119
Rearview mirror57
Recirculated-air mode105
Reclining seat48
Refueling24
Releasing hood137
Page 181 of 186
Everything from A to Z
181n
OverviewControlsMaintenanceRepairsDataIndex
Reminder signal (Memo)89
Remote control34
computer95
Removable rear-seat
backrest119
Remove condensation from
windows106, 109
Replacing
fuses160t
lamps and bulbs151t
wiper blades150t
Reporting safety defects11
Reservoir, washer
system139t
Residual heat111
Rims135
Roller sun blind112
Roll-up cover123
Roof load capacity171
Roof-mounted luggage
rack127 S
Safety belts53
Safety defects, reporting11
Safety lock buttons37
Seat belts53
Seats electric power50
manually-adjusted50
memory setting54
Secure the load126
Securing cargo42, 126
Selector lever, automatic
transmission70, 73
Service and Warranty
Information Booklet (US
models)144
Service Interval
Display82, 144
Shiftlock70, 73
Shoulder support51
Side airbags58
Side Impact Head Protection
System58
Side lamps
bulb replacement152t
Side turn signal
bulb replacement153t
Ski bag120
Ski bag in the sport
wagon122
Sliding/tilt sunroof46
manual operation47
with glass moonroof47
Snow chains136 Socket for attaching
electrical appliances118
Spare tire157t
Speaker117
Special characteristics of
winter tires136
Special oil141t
Speed94
Speed limit91
Speed, average86, 94
Speedometer15, 16, 17
sport wagon
anchorages126
compartments in the
luggage
compartment124
cover in the luggage
compartment124
folding down the rear
backrest123
LATCH child-restraint
system64
load-securing
devices126
luggage
compartment123
opening the rear
window40
partition net123 rear window wiper, blade
replacement150t
releasing the tailgate after
an electrical
malfunction39
roll-up cover123
securing a load126
ski bag122
tail lamp assembly, bulb
replacement154t
transporting children
safely64
Standing lamps102
Starting assistance162t
Starting problems67t
Starting the engine67
Steering wheel
heating56
lock66
memory setting54
Steering wheel with
multifunction buttons22
Steptronic73
Stopwatch89
for additional information
refer to the "Owner's
Manual for Onboard
Computer"
Storage compartments116
in the cargo area124