navigation BMW M6 CONVERTIBLE 2007 E64 Owner's Guide
[x] Cancel search | Manufacturer: BMW, Model Year: 2007, Model line: M6 CONVERTIBLE, Model: BMW M6 CONVERTIBLE 2007 E64Pages: 256, PDF Size: 8.11 MB
Page 43 of 256
Controls
41Reference
At a glance
Driving tips
Communications
Navigation
Entertainment
Mobility
Do not place hands in the top mechanism dur-
ing the opening and closing action. Keep chil-
dren away from the travel path of the convert-
ible top.
For safety reasons, do not move the convertible
top unless the vehicle is stationary.<
If you have initiated top movement with
the vehicle at a stop and then start to
drive, e.g. at a traffic light, you can continue the
initiated operation up to a speed of 20 mph/
30 km/h:
To do so, press and hold the corresponding
button.<
Partial vacuums that occur at higher
speeds in the passenger compartment
can make the convertible top flap. Use the auto-
matic climate control to increase the air volume
so that a partial vacuum in the vehicle does not
occur.<
Prior to opening and closing
>Read the safety precautions above carefully
and comply with them fully.
>Ensure that the convertible top compart-
ment floor in the luggage compartment is
folded down, refer to page35, as otherwise
the convertible top cannot be opened.
>Make sure that the luggage compartment
lid is closed.
Opening and closing
For information on top operation with comfort
access, also refer to page37.
From radio readiness, refer to page58, with the
vehicle stationary:
To avoid putting excessive strain on the
battery, only move the convertible top
when the engine is running if possible.
Before closing the convertible top, remove for-
eign objects from the windshield frame, as
these might inhibit closing of the convertible
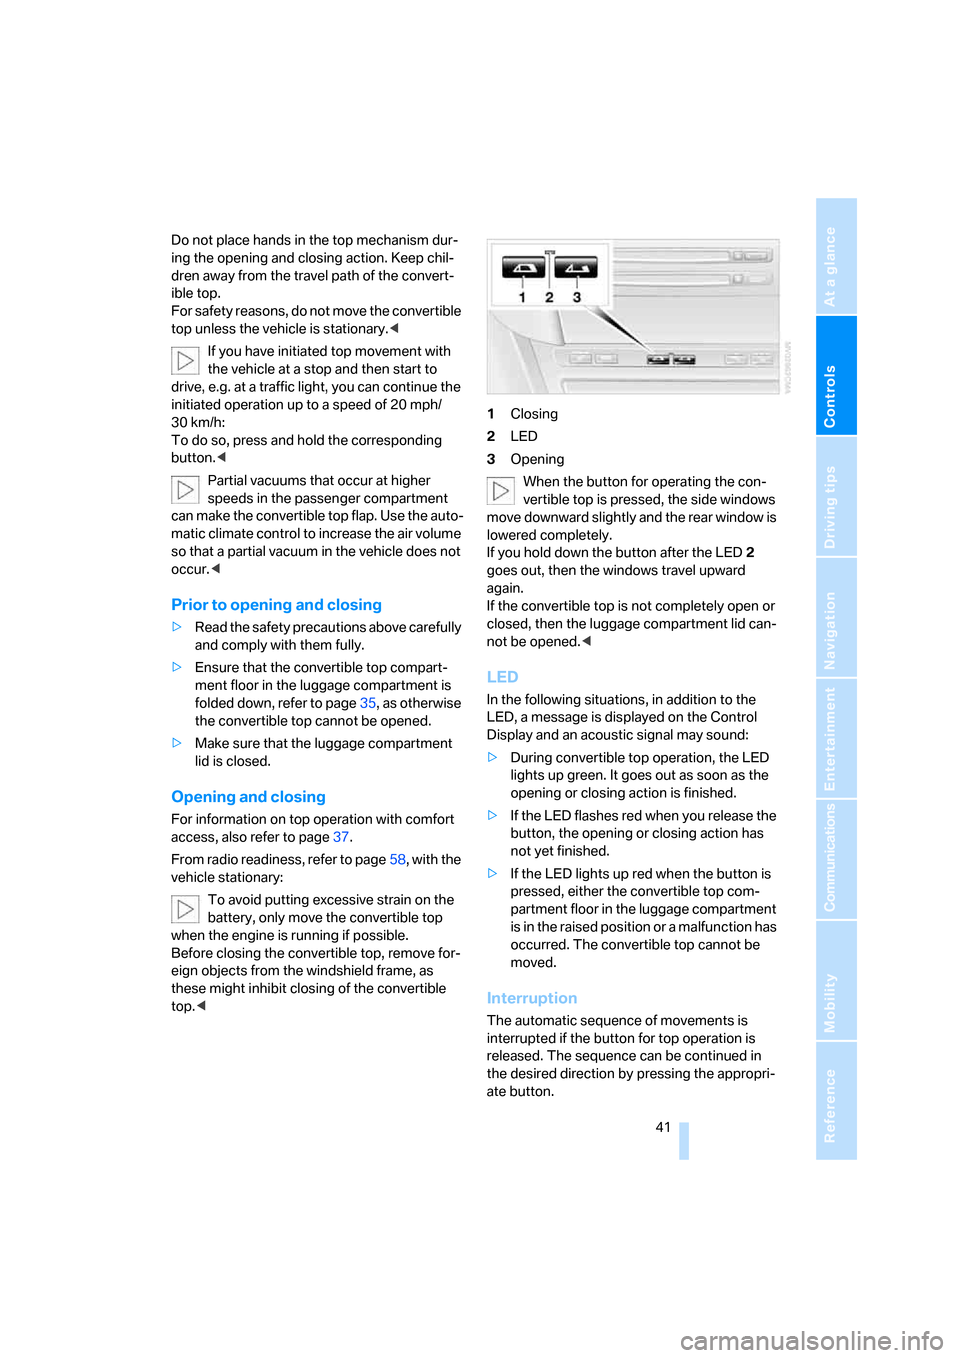
top.<1Closing
2LED
3Opening
When the button for operating the con-
vertible top is pressed, the side windows
move downward slightly and the rear window is
lowered completely.
If you hold down the button after the LED2
goes out, then the windows travel upward
again.
If the convertible top is not completely open or
closed, then the luggage compartment lid can-
not be opened.<
LED
In the following situations, in addition to the
LED, a message is displayed on the Control
Display and an acoustic signal may sound:
>During convertible top operation, the LED
lights up green. It goes out as soon as the
opening or closing action is finished.
>If the LED flashes red when you release the
button, the opening or closing action has
not yet finished.
>If the LED lights up red when the button is
pressed, either the convertible top com-
partment floor in the luggage compartment
is in the raised position or a malfunction has
occurred. The convertible top cannot be
moved.
Interruption
The automatic sequence of movements is
interrupted if the button for top operation is
released. The sequence can be continued in
the desired direction by pressing the appropri-
ate button.
Page 45 of 256
Controls
43Reference
At a glance
Driving tips
Communications
Navigation
Entertainment
Mobility
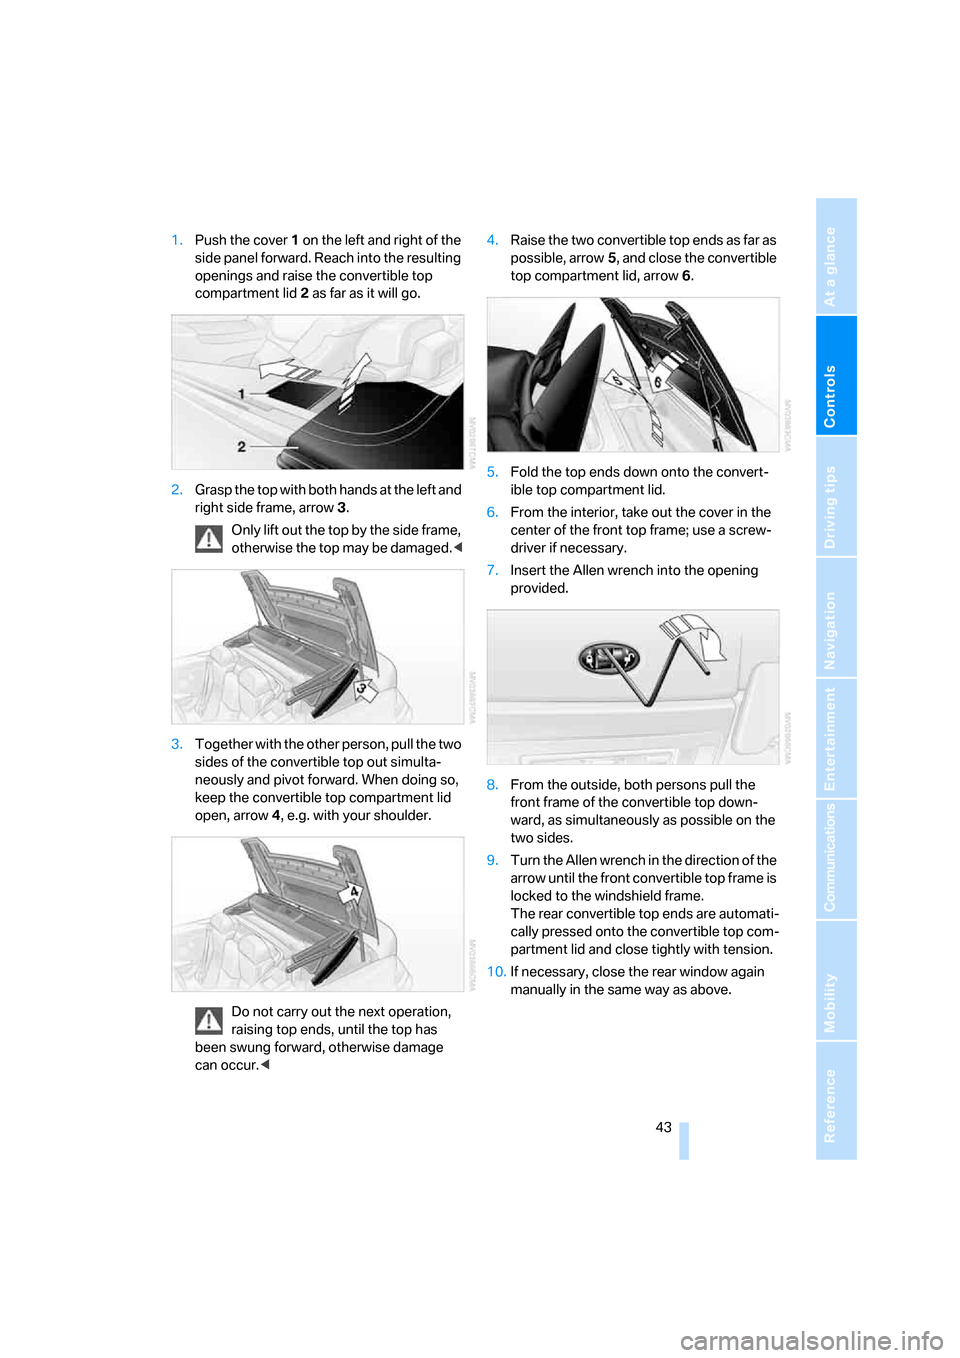
1.Push the cover 1 on the left and right of the
side panel forward. Reach into the resulting
openings and raise the convertible top
compartment lid2 as far as it will go.
2.Grasp the top with both hands at the left and
right side frame, arrow3.
Only lift out the top by the side frame,
otherwise the top may be damaged.<
3.Together with the other person, pull the two
sides of the convertible top out simulta-
neously and pivot forward. When doing so,
keep the convertible top compartment lid
open, arrow4, e.g. with your shoulder.
Do not carry out the next operation,
raising top ends, until the top has
been swung forward, otherwise damage
can occur.<4.Raise the two convertible top ends as far as
possible, arrow5, and close the convertible
top compartment lid, arrow6.
5.Fold the top ends down onto the convert-
ible top compartment lid.
6.From the interior, take out the cover in the
center of the front top frame; use a screw-
driver if necessary.
7.Insert the Allen wrench into the opening
provided.
8.From the outside, both persons pull the
front frame of the convertible top down-
ward, as simultaneously as possible on the
two sides.
9.Turn the Allen wrench in the direction of the
arrow until the front convertible top frame is
locked to the windshield frame.
The rear convertible top ends are automati-
cally pressed onto the convertible top com-
partment lid and close tightly with tension.
10.If necessary, close the rear window again
manually in the same way as above.
Page 47 of 256
Controls
45Reference
At a glance
Driving tips
Communications
Navigation
Entertainment
Mobility
Folding up
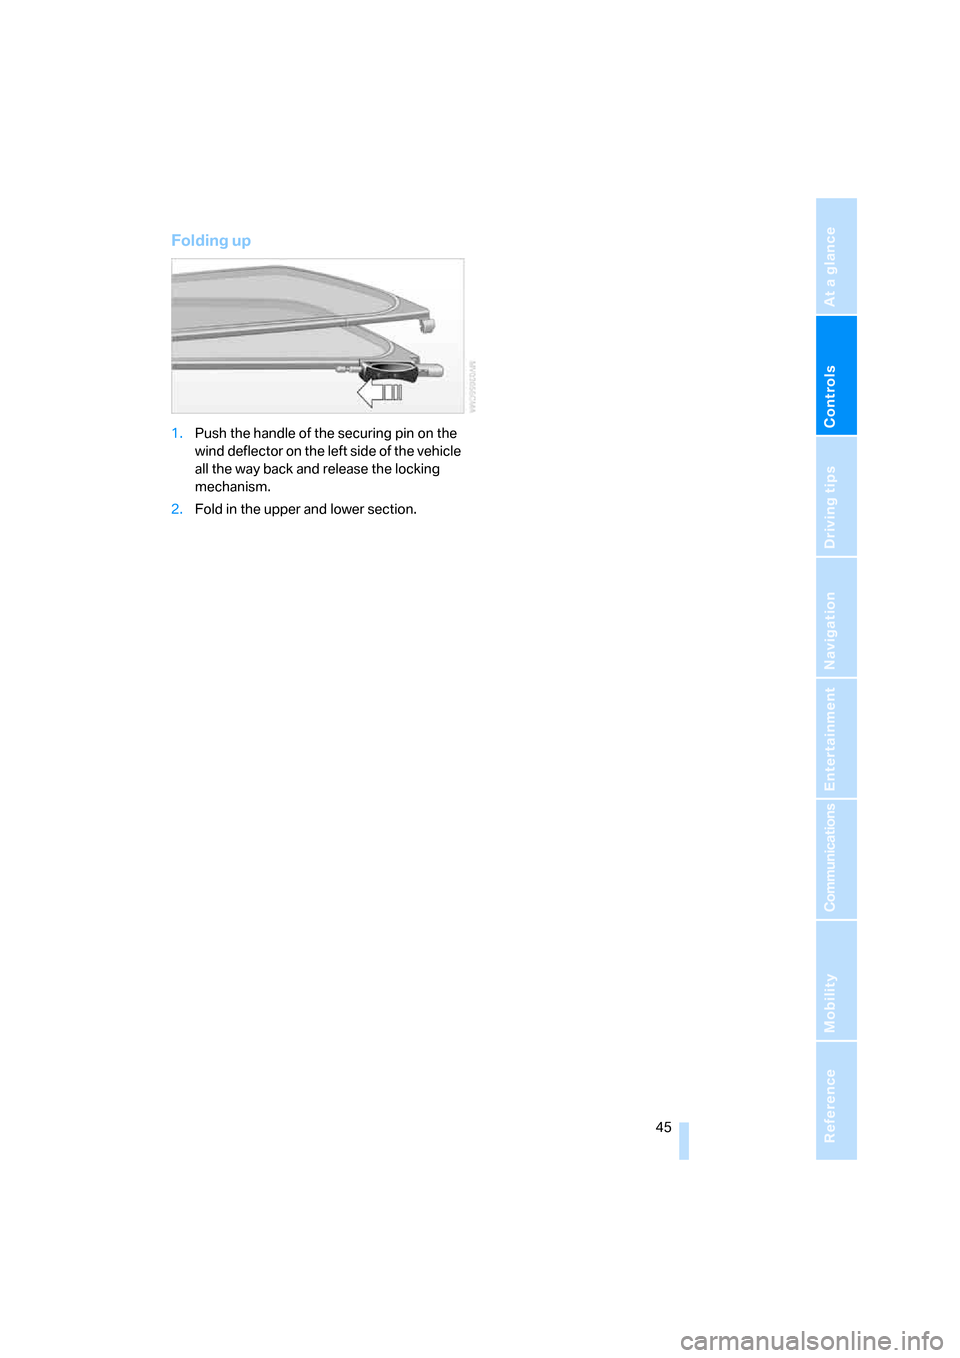
1.Push the handle of the securing pin on the
wind deflector on the left side of the vehicle
all the way back and release the locking
mechanism.
2.Fold in the upper and lower section.
Page 49 of 256
Controls
47Reference
At a glance
Driving tips
Communications
Navigation
Entertainment
Mobility
Seats
Note before adjusting
Never attempt to adjust your seat while
operating the vehicle. The seat could
respond with unexpected movement and the
ensuing loss of vehicle control could lead to an
accident.
On the front passenger side as well, do not tilt
the backrest too far toward the rear. Failure to
observe this precaution can prevent the belt
from providing effective protection against
injury, as the passenger could slide under the
belt in an accident.<
Also follow the instructions regarding damage
to the safety belt on page51.
Convertible: with the wind deflector fitted,
do not incline the front seat backrests too
far backward if the seat is to be moved back to
the end position. Otherwise, the wind deflector
will be damaged.<
Adjusting seat
To ensure that the safety systems con-
tinue to provide optimized protection,
please follow the adjustment instructions on
page46.<
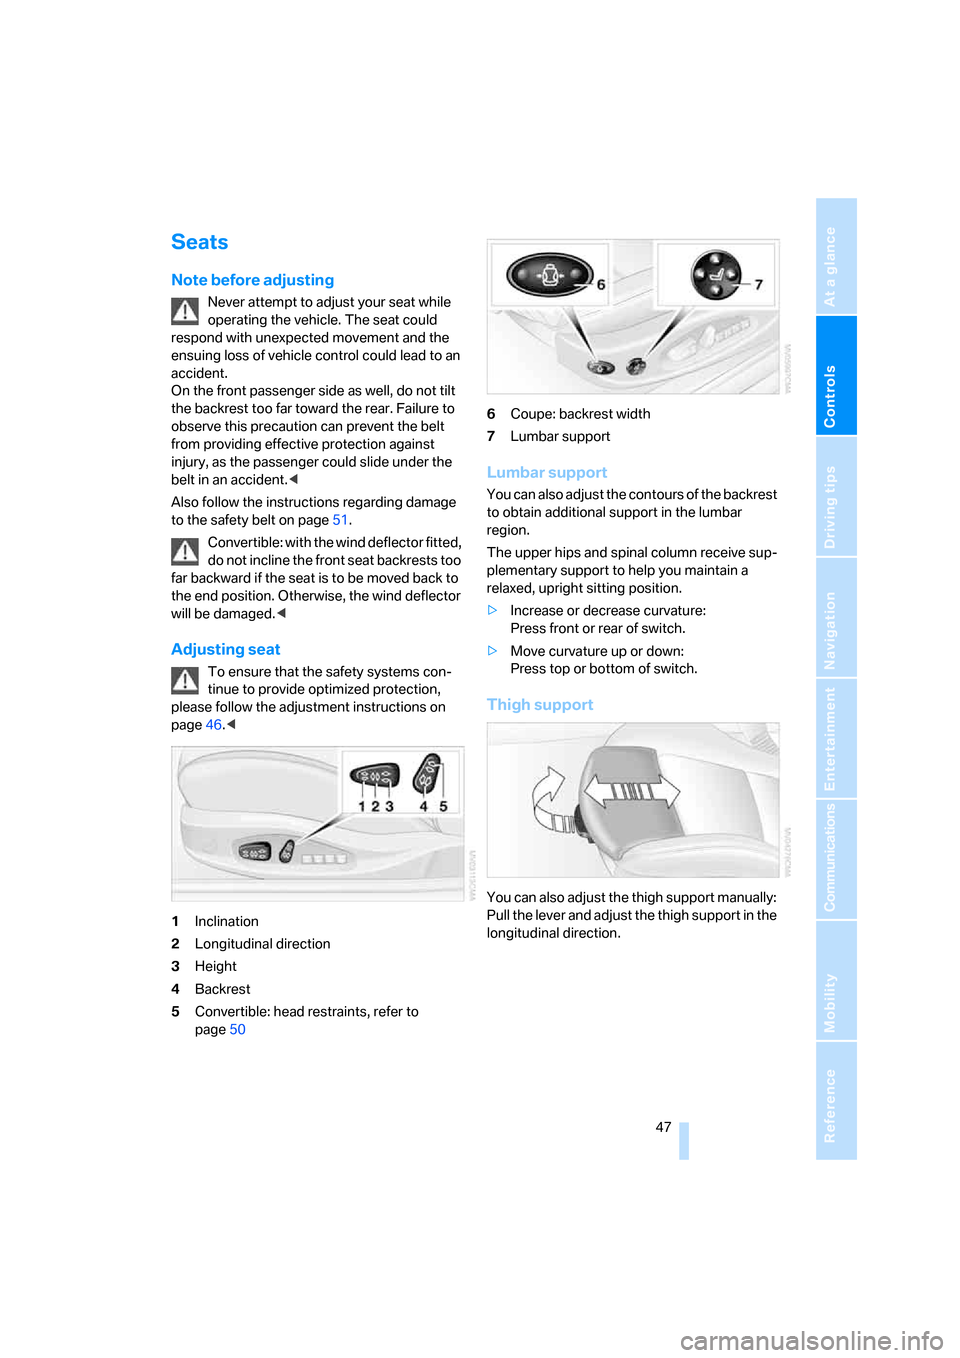
1Inclination
2Longitudinal direction
3Height
4Backrest
5Convertible: head restraints, refer to
page506Coupe: backrest width
7Lumbar support
Lumbar support
You can also adjust the contours of the backrest
to obtain additional support in the lumbar
region.
The upper hips and spinal column receive sup-
plementary support to help you maintain a
relaxed, upright sitting position.
>Increase or decrease curvature:
Press front or rear of switch.
>Move curvature up or down:
Press top or bottom of switch.
Thigh support
You can also adjust the thigh support manually:
Pull the lever and adjust the thigh support in the
longitudinal direction.
Page 51 of 256
Controls
49Reference
At a glance
Driving tips
Communications
Navigation
Entertainment
Mobility
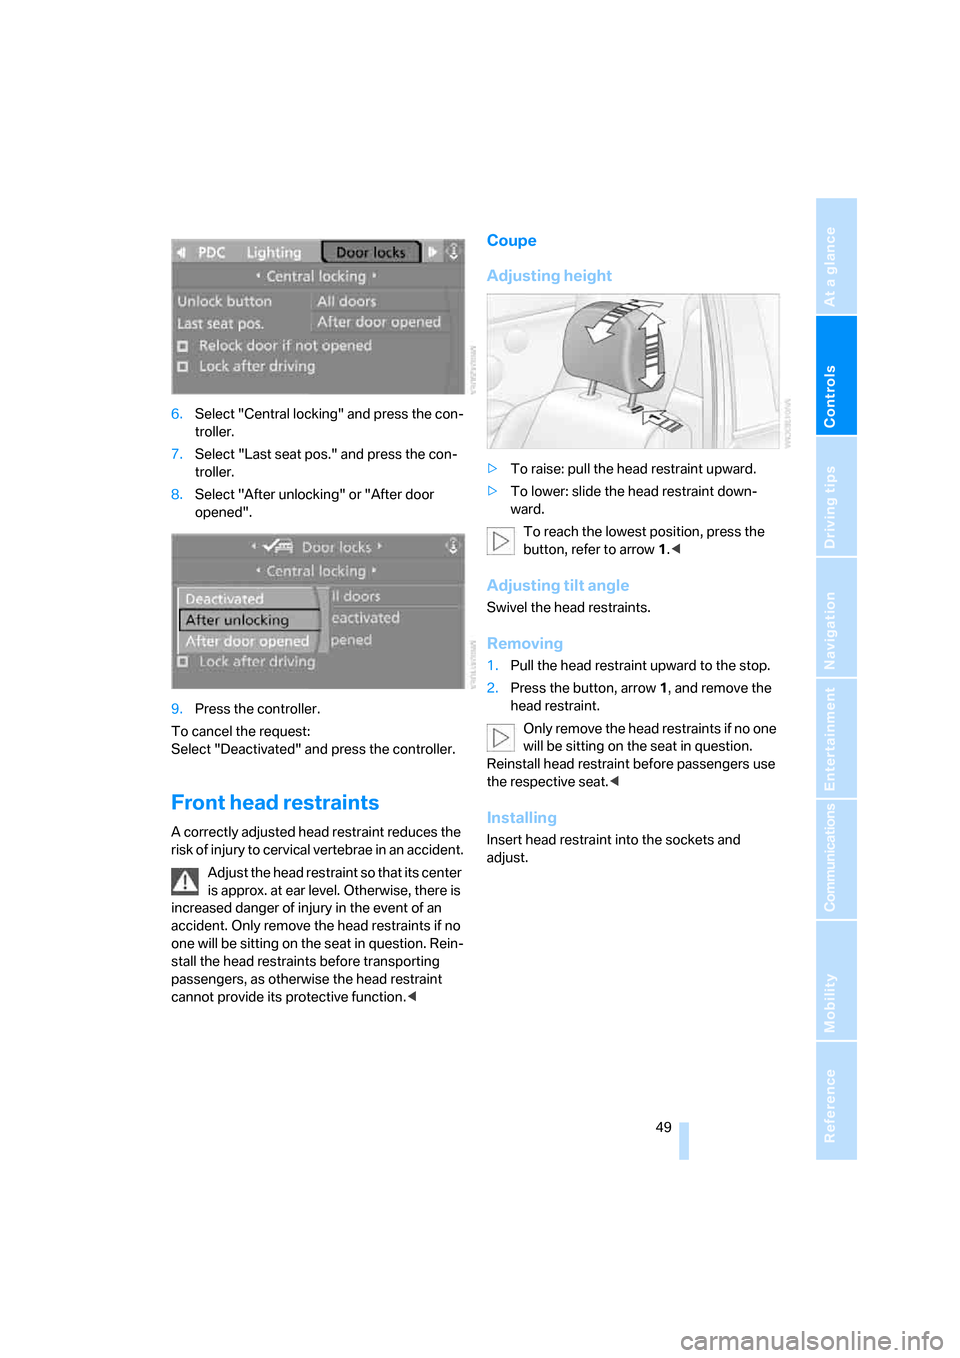
6.Select "Central locking" and press the con-
troller.
7.Select "Last seat pos." and press the con-
troller.
8.Select "After unlocking" or "After door
opened".
9.Press the controller.
To cancel the request:
Select "Deactivated" and press the controller.
Front head restraints
A correctly adjusted head restraint reduces the
risk of injury to cervical vertebrae in an accident.
Adjust the head restraint so that its center
is approx. at ear level. Otherwise, there is
increased danger of injury in the event of an
accident. Only remove the head restraints if no
one will be sitting on the seat in question. Rein-
stall the head restraints before transporting
passengers, as otherwise the head restraint
cannot provide its protective function.<
Coupe
Adjusting height
>To raise: pull the head restraint upward.
>To lower: slide the head restraint down-
ward.
To reach the lowest position, press the
button, refer to arrow 1.<
Adjusting tilt angle
Swivel the head restraints.
Removing
1.Pull the head restraint upward to the stop.
2.Press the button, arrow1, and remove the
head restraint.
Only remove the head restraints if no one
will be sitting on the seat in question.
Reinstall head restraint before passengers use
the respective seat.<
Installing
Insert head restraint into the sockets and
adjust.
Page 53 of 256
Controls
51Reference
At a glance
Driving tips
Communications
Navigation
Entertainment
Mobility
Lock backrest warning lamp:
Lights up when the backrest is not
locked. At the same time, a message is
shown on the Control Display.
Safety belts
To ensure that the safety systems con-
tinue to provide optimized protection,
please follow the adjustment instructions on
page46.<
Before every drive, make sure that safety belts
are being worn at all of the occupied seats. Air-
bags complement the safety belt as an addi-
tional safety device, but they do not represent a
substitute.
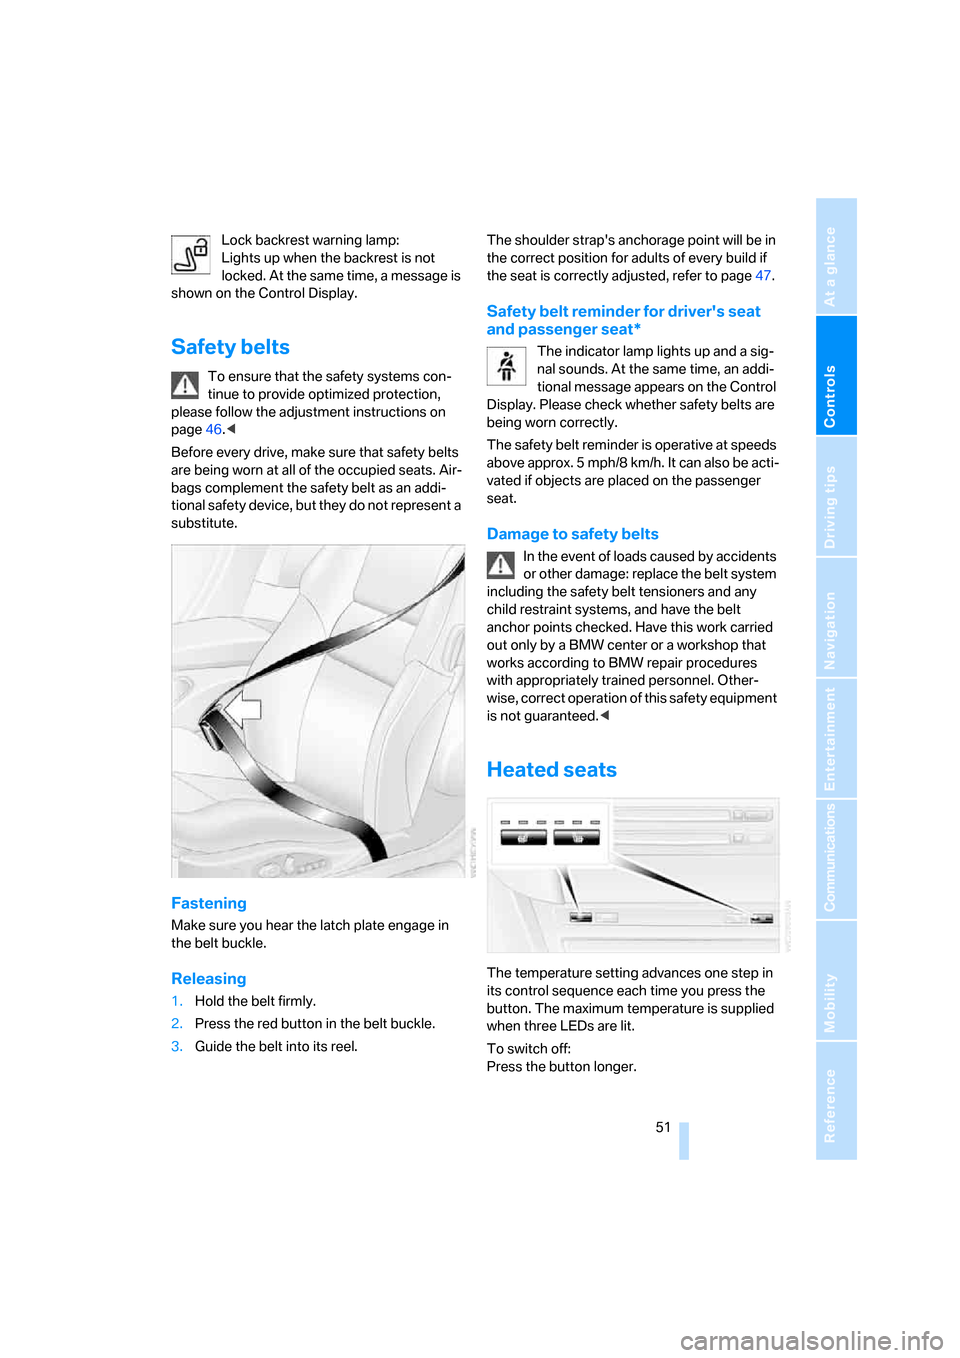
Fastening
Make sure you hear the latch plate engage in
the belt buckle.
Releasing
1.Hold the belt firmly.
2.Press the red button in the belt buckle.
3.Guide the belt into its reel.The shoulder strap's anchorage point will be in
the correct position for adults of every build if
the seat is correctly adjusted, refer to page47.
Safety belt reminder for driver's seat
and passenger seat*
The indicator lamp lights up and a sig-
nal sounds. At the same time, an addi-
tional message appears on the Control
Display. Please check whether safety belts are
being worn correctly.
The safety belt reminder is operative at speeds
above approx. 5 mph/8 km/h. It can also be acti-
vated if objects are placed on the passenger
seat.
Damage to safety belts
In the event of loads caused by accidents
or other damage: replace the belt system
including the safety belt tensioners and any
child restraint systems, and have the belt
anchor points checked. Have this work carried
out only by a BMW center or a workshop that
works according to BMW repair procedures
with appropriately trained personnel. Other-
wise, correct operation of this safety equipment
is not guaranteed.<
Heated seats
The temperature setting advances one step in
its control sequence each time you press the
button. The maximum temperature is supplied
when three LEDs are lit.
To switch off:
Press the button longer.
Page 55 of 256
Controls
53Reference
At a glance
Driving tips
Communications
Navigation
Entertainment
Mobility
Also do not attach stickers to the windshield in
front of the mirror.
Steering wheel
Adjusting
Do not adjust the steering wheel while the
vehicle is moving. There is a risk of acci-
dent as the result of unexpected movement.<
The steering wheel can be adjusted in four
directions.
Storing the steering-wheel position, refer to
Seat, mirror and steering wheel memory,
page48.
Easy entry/exit
To make it easier to enter and exit the vehicle,
the steering wheel temporarily moves into the
uppermost position.
Programmable button on steering
wheel
You can program the button individually.
The setting is stored for the remote control cur-
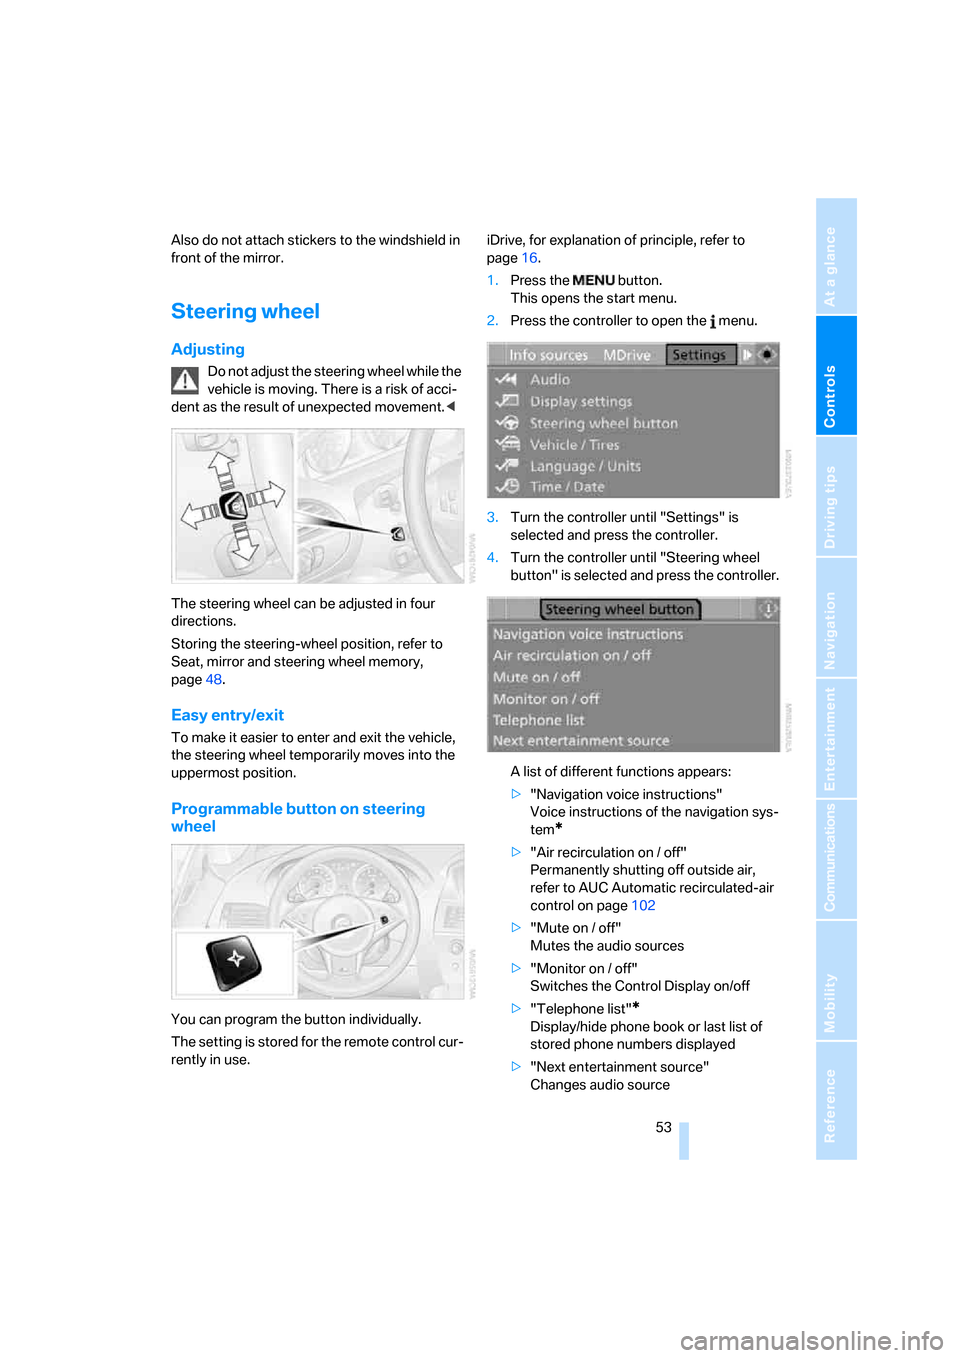
rently in use.iDrive, for explanation of principle, refer to
page16.
1.Press the button.
This opens the start menu.
2.Press the controller to open the menu.
3.Turn the controller until "Settings" is
selected and press the controller.
4.Turn the controller until "Steering wheel
button" is selected and press the controller.
A list of different functions appears:
>"Navigation voice instructions"
Voice instructions of the navigation sys-
tem
*
>"Air recirculation on / off"
Permanently shutting off outside air,
refer to AUC Automatic recirculated-air
control on page102
>"Mute on / off"
Mutes the audio sources
>"Monitor on / off"
Switches the Control Display on/off
>"Telephone list"
*
Display/hide phone book or last list of
stored phone numbers displayed
>"Next entertainment source"
Changes audio source
Page 56 of 256
Adjusting
54 5.Select the desired function unit and press
the controller.
Operating function
Press the button on the steering wheel.
If you have programmed "Navigation voice
instructions" for the button:
>To switch voice instructions on/off:
Press the button longer.
>To repeat the last voice instruction:
Press the button.
MDrive
With MDrive you can configure several individ-
ual settings for your vehicle on the Control Dis-
play and activate them simultaneously with the
button on the steering wheel.
Configuring settings
With the ignition switched on you can change
the settings of MDrive on the Control Display.
iDrive, for explanation of principle, refer to
page16.
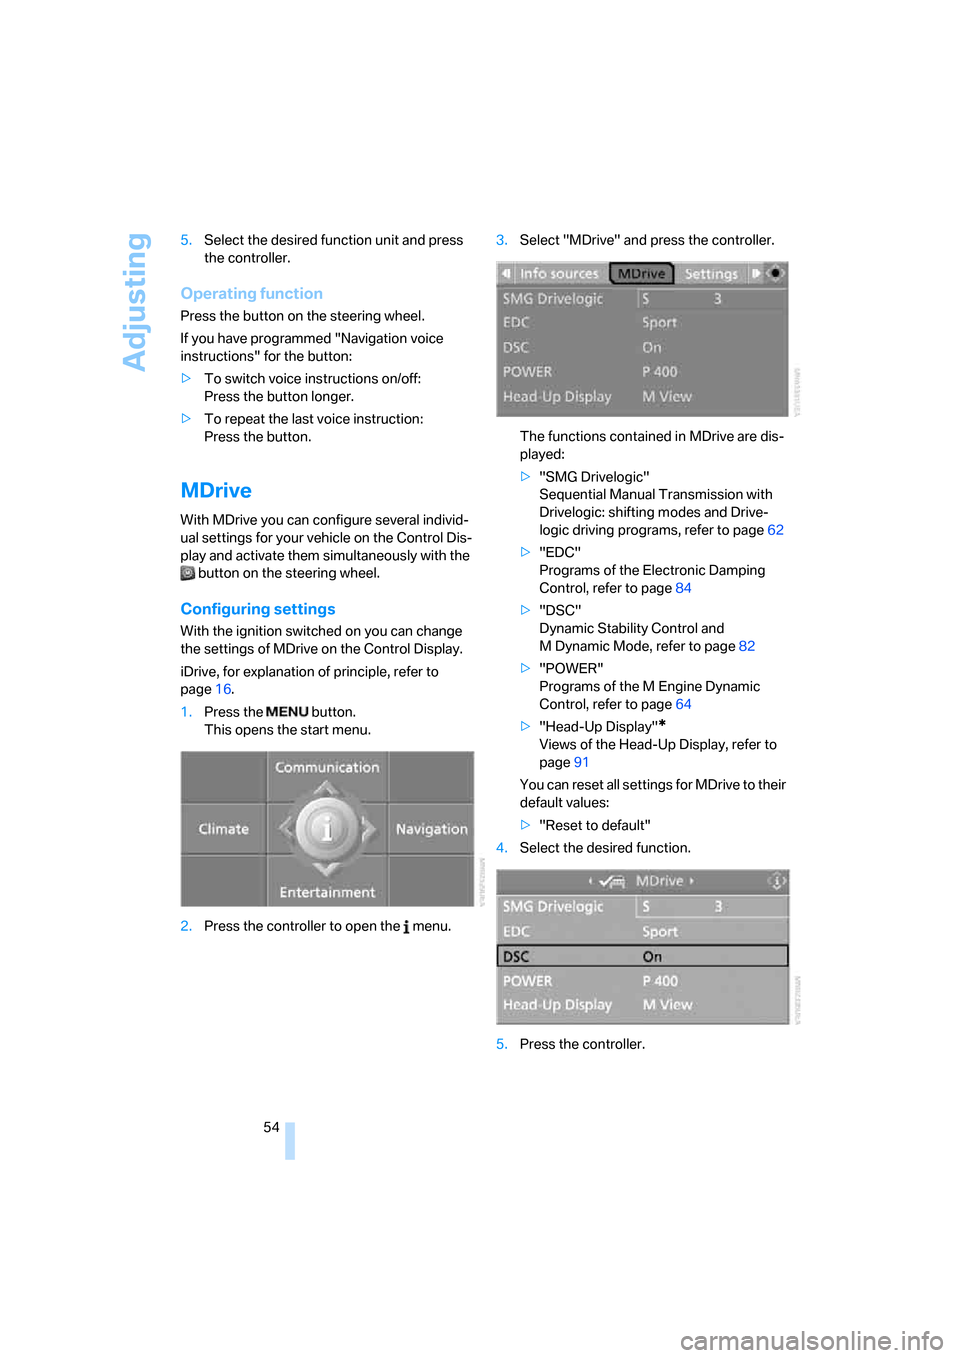
1.Press the button.
This opens the start menu.
2.Press the controller to open the menu.3.Select "MDrive" and press the controller.
The functions contained in MDrive are dis-
played:
>"SMG Drivelogic"
Sequential Manual Transmission with
Drivelogic: shifting modes and Drive-
logic driving programs, refer to page62
>"EDC"
Programs of the Electronic Damping
Control, refer to page84
>"DSC"
Dynamic Stability Control and
M Dynamic Mode, refer to page82
>"POWER"
Programs of the M Engine Dynamic
Control, refer to page64
>"Head-Up Display"
*
Views of the Head-Up Display, refer to
page91
You can reset all settings for MDrive to their
default values:
>"Reset to default"
4.Select the desired function.
5.Press the controller.
Page 57 of 256
Controls
55Reference
At a glance
Driving tips
Communications
Navigation
Entertainment
Mobility
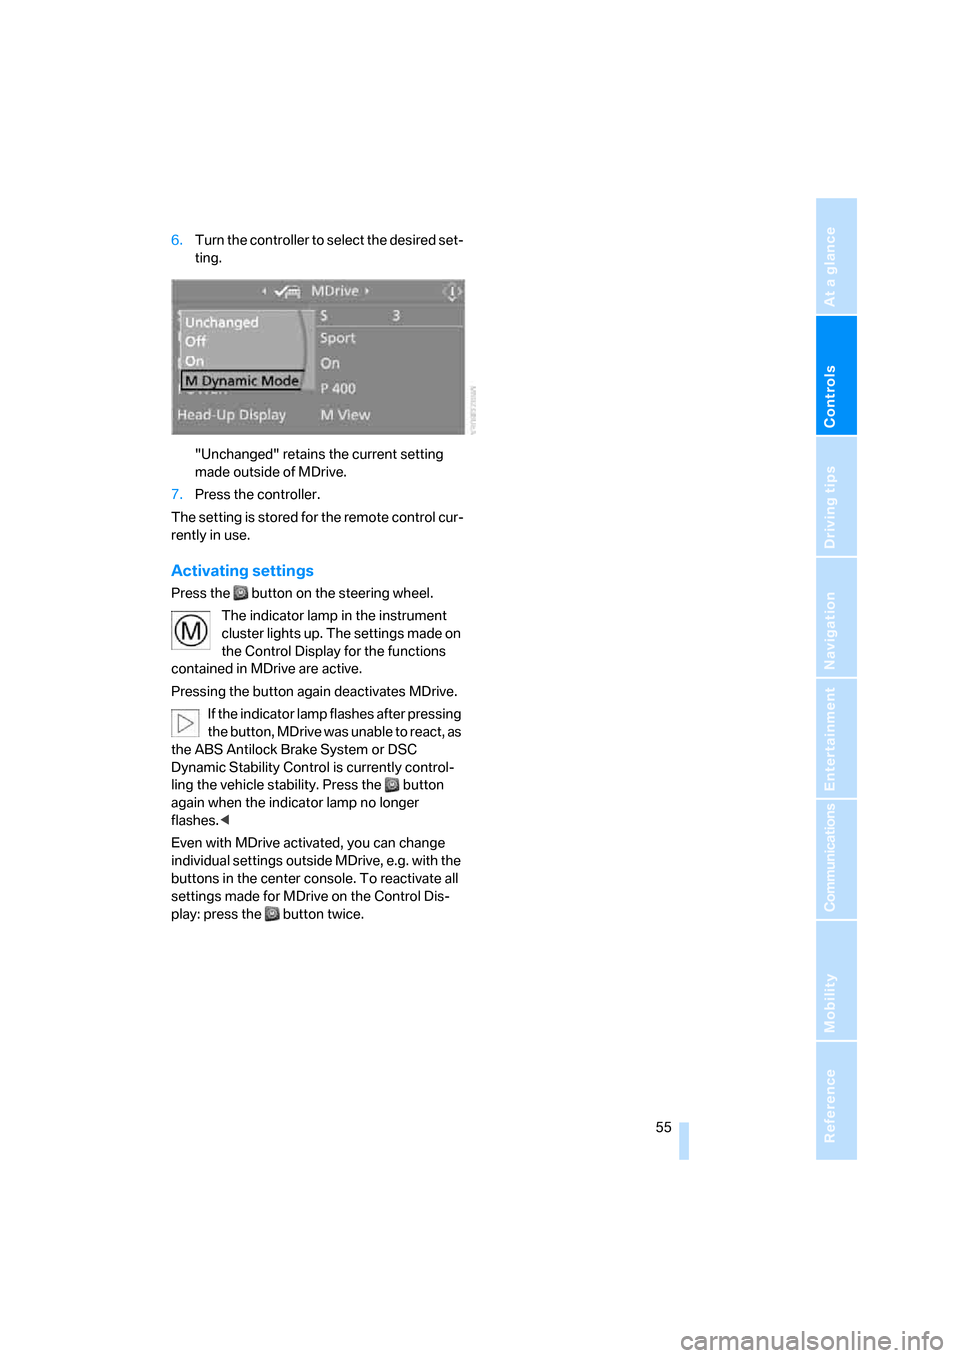
6.Turn the controller to select the desired set-
ting.
"Unchanged" retains the current setting
made outside of MDrive.
7.Press the controller.
The setting is stored for the remote control cur-
rently in use.
Activating settings
Press the button on the steering wheel.
The indicator lamp in the instrument
cluster lights up. The settings made on
the Control Display for the functions
contained in MDrive are active.
Pressing the button again deactivates MDrive.
If the indicator lamp flashes after pressing
the button, MDrive was unable to react, as
the ABS Antilock Brake System or DSC
Dynamic Stability Control is currently control-
ling the vehicle stability. Press the button
again when the indicator lamp no longer
flashes.<
Even with MDrive activated, you can change
individual settings outside MDrive, e.g. with the
buttons in the center console. To reactivate all
settings made for MDrive on the Control Dis-
play: press the button twice.
Page 59 of 256
Controls
57Reference
At a glance
Driving tips
Communications
Navigation
Entertainment
Mobility
Unlocking safety belt
1.Open the belt buckle.
2.Remove the child restraint system.
3.Allow the belt webbing to be pulled in com-
pletely.
Coupe: child restraint system with
tether strap
Only use the tether-strap mounting
points to secure child restraint systems,
otherwise the mounting points could be dam-
aged.<
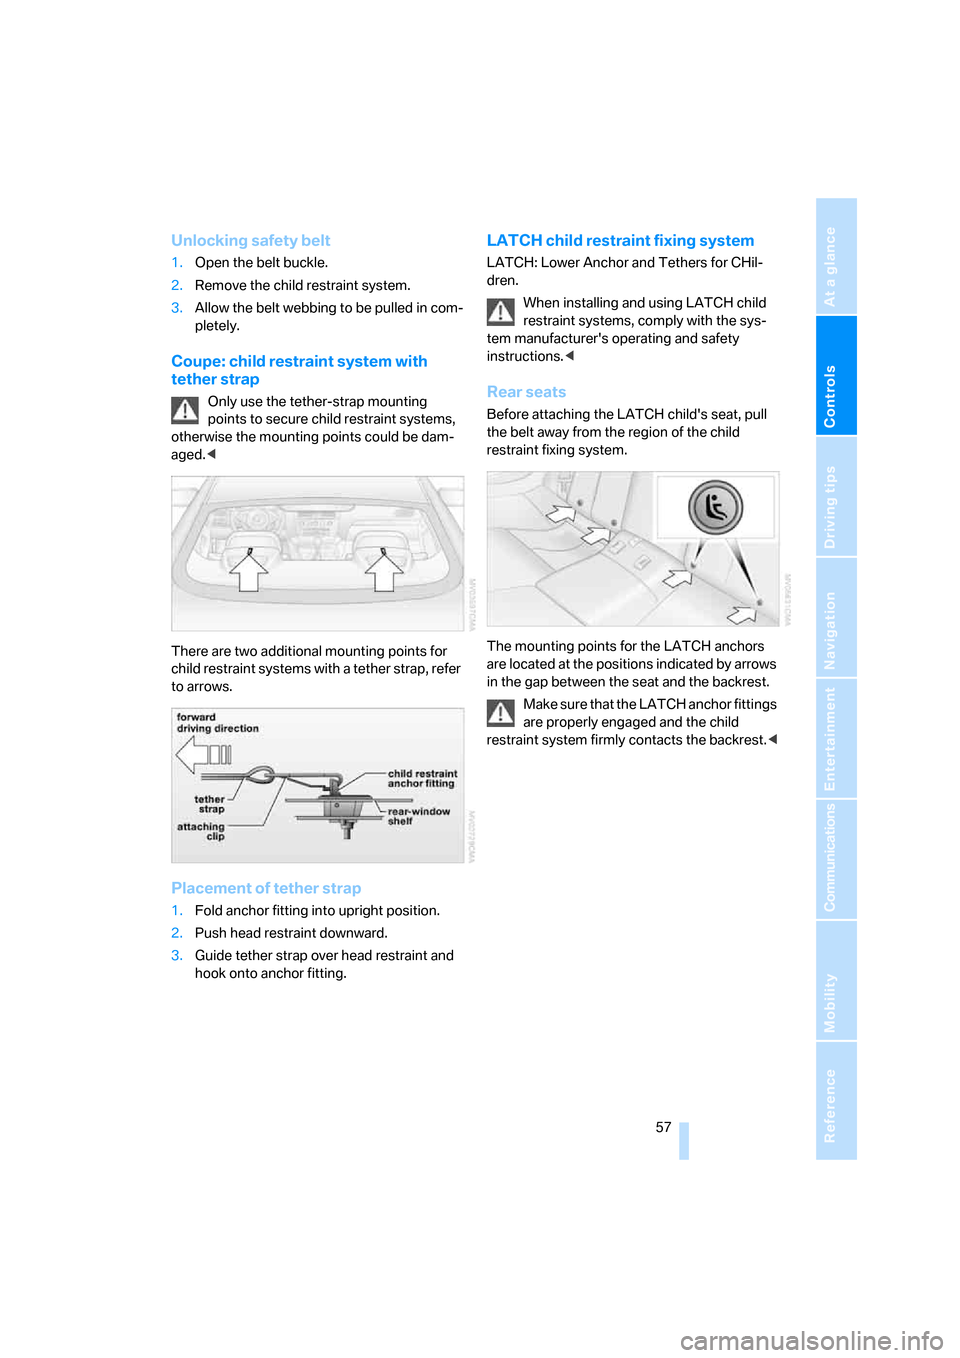
There are two additional mounting points for
child restraint systems with a tether strap, refer
to arrows.
Placement of tether strap
1.Fold anchor fitting into upright position.
2.Push head restraint downward.
3.Guide tether strap over head restraint and
hook onto anchor fitting.
LATCH child restraint fixing system
LATCH: Lower Anchor and Tethers for CHil-
dren.
When installing and using LATCH child
restraint systems, comply with the sys-
tem manufacturer's operating and safety
instructions.<
Rear seats
Before attaching the LATCH child's seat, pull
the belt away from the region of the child
restraint fixing system.
The mounting points for the LATCH anchors
are located at the positions indicated by arrows
in the gap between the seat and the backrest.
Make sure that the LATCH anchor fittings
are properly engaged and the child
restraint system firmly contacts the backrest.<