inflation pressure BMW M6 CONVERTIBLE 2007 E64 Owner's Manual
[x] Cancel search | Manufacturer: BMW, Model Year: 2007, Model line: M6 CONVERTIBLE, Model: BMW M6 CONVERTIBLE 2007 E64Pages: 256, PDF Size: 8.11 MB
Page 86 of 256
Technology for comfort, convenience and safety
84 The vehicle remains operational. Have the sys-
tem checked as soon as possible.
The brake system warning lamp lights
up yellow. A message appears on the
Control Display. The brake assistant is
defective. Have the system checked as soon as
possible.
Display of the previously described
malfunction on Canadian models.
EDC Electronic Damping
Control
The concept
If the influencing variables such as road surface
quality or operating conditions such as steer-
ing, braking etc. change, the damping automat-
ically adjusts to the new conditions within a
fraction of a second.
You can choose from three programs.
"Comfort" program
Select the "Comfort" program if you want com-
fort-oriented coordination of shock absorbers
and steering.
"Normal" program
The "Normal" program offers a balanced mix-
ture of the comfort and the sport program.
"Sport" program
Select the "Sport" program if you want a con-
sistently sporty coordination of shock absorb-
ers and steering.
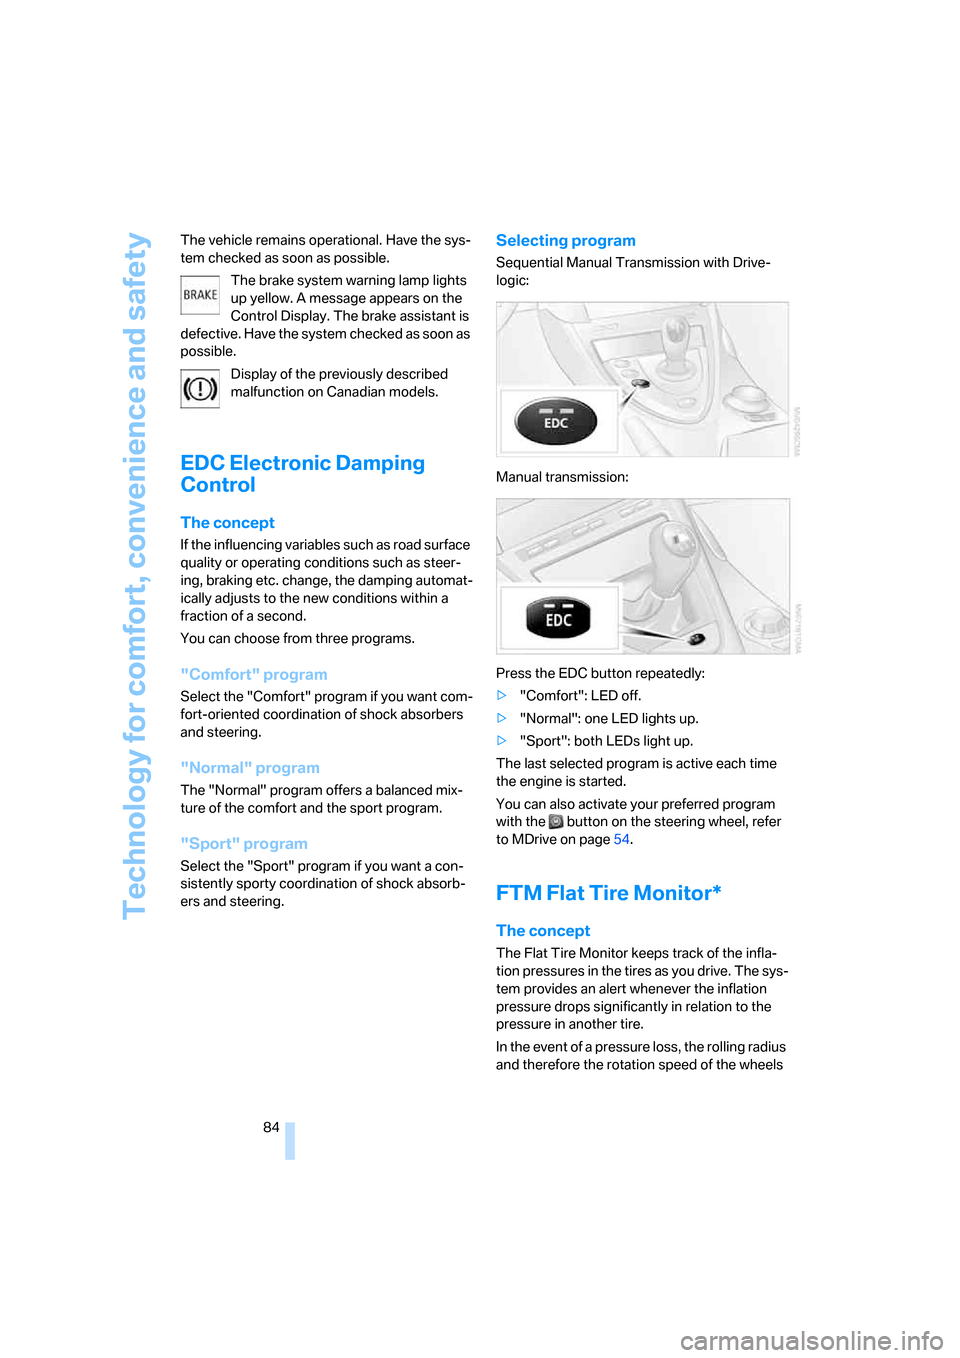
Selecting program
Sequential Manual Transmission with Drive-
logic:
Manual transmission:
Press the EDC button repeatedly:
>"Comfort": LED off.
>"Normal": one LED lights up.
>"Sport": both LEDs light up.
The last selected program is active each time
the engine is started.
You can also activate your preferred program
with the button on the steering wheel, refer
to MDrive on page54.
FTM Flat Tire Monitor*
The concept
The Flat Tire Monitor keeps track of the infla-
tion pressures in the tires as you drive. The sys-
tem provides an alert whenever the inflation
pressure drops significantly in relation to the
pressure in another tire.
In the event of a pressure loss, the rolling radius
and therefore the rotation speed of the wheels
Page 87 of 256
Controls
85Reference
At a glance
Driving tips
Communications
Navigation
Entertainment
Mobility
change. This change is detected and signaled
as a flat tire.
Functional requirement
To ensure the reliable signaling of a flat tire, the
system must be initialized at the correct tire
inflation pressure.
The initialization must be repeated after
every correction of the tire inflation pres-
sure and after every tire or wheel change.<
System limits
The Flat Tire Monitor cannot indicate
sudden severe tire damage caused by
outside factors and does not detect a natural,
even pressure drop in all four tires.<
In the following situations, the system could be
delayed or malfunction:
>System has not been initialized
>Driving on snow-covered or slippery roads
>Sporty driving style: slip in the drive wheels,
high lateral acceleration
>Driving with snow chains
*
Initializing system
The initialization finishes during driving,
which can be interrupted at any time.
When driving resumes, the initialization is auto-
matically continued.
Do not initialize the system when driving with
snow chains
*.<
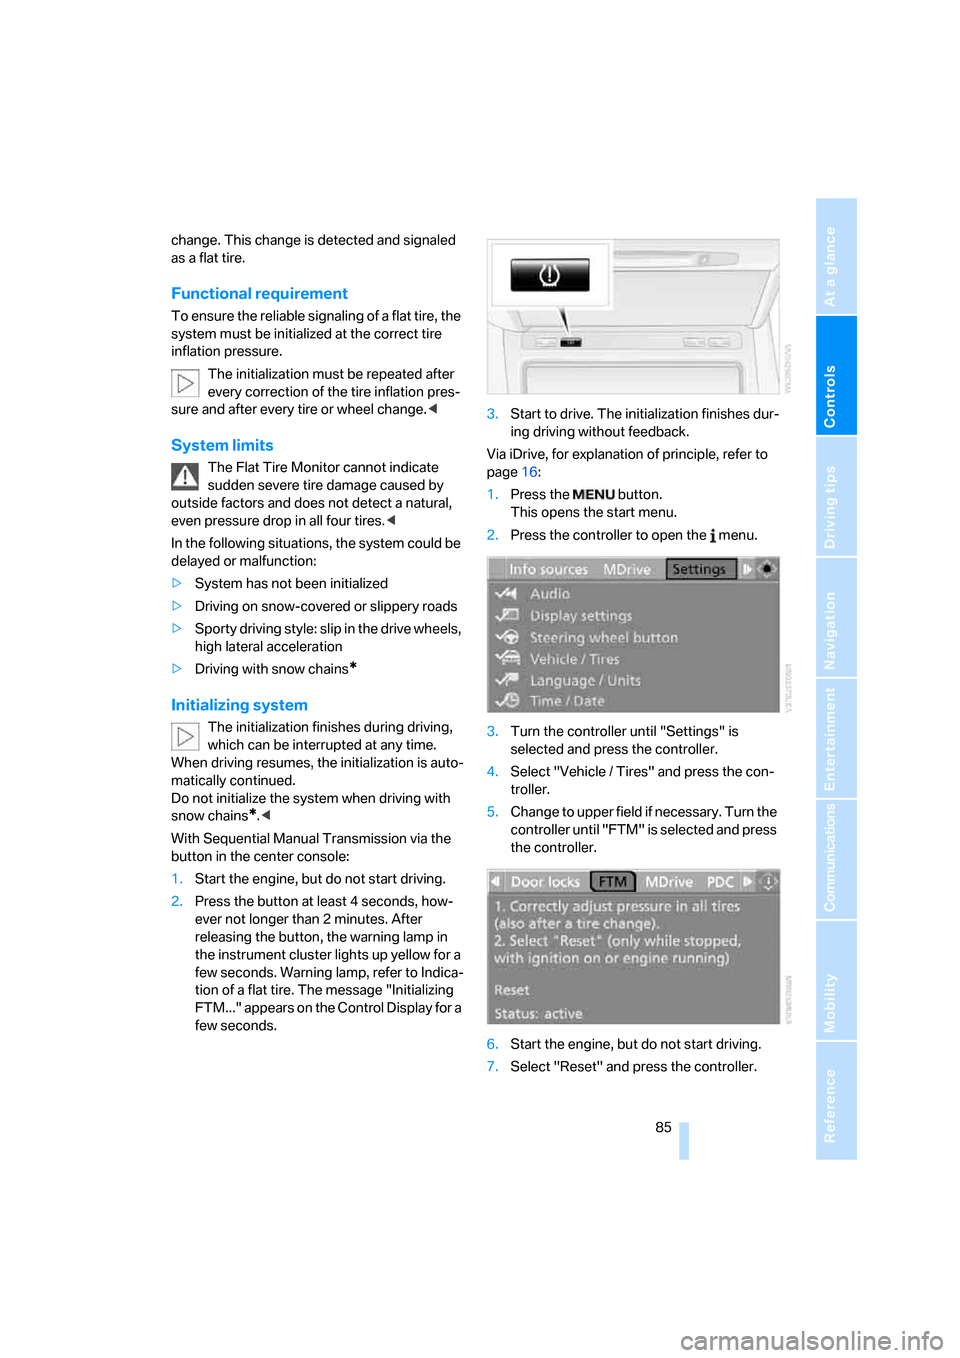
With Sequential Manual Transmission via the
button in the center console:
1.Start the engine, but do not start driving.
2.Press the button at least 4 seconds, how-
ever not longer than 2 minutes. After
releasing the button, the warning lamp in
the instrument cluster lights up yellow for a
few seconds. Warning lamp, refer to Indica-
tion of a flat tire. The message "Initializing
FTM..." appears on the Control Display for a
few seconds.3.Start to drive. The initialization finishes dur-
ing driving without feedback.
Via iDrive, for explanation of principle, refer to
page16:
1.Press the button.
This opens the start menu.
2.Press the controller to open the menu.
3.Turn the controller until "Settings" is
selected and press the controller.
4.Select "Vehicle / Tires" and press the con-
troller.
5.Change to upper field if necessary. Turn the
controller until "FTM" is selected and press
the controller.
6.Start the engine, but do not start driving.
7.Select "Reset" and press the controller.
Page 88 of 256
Technology for comfort, convenience and safety
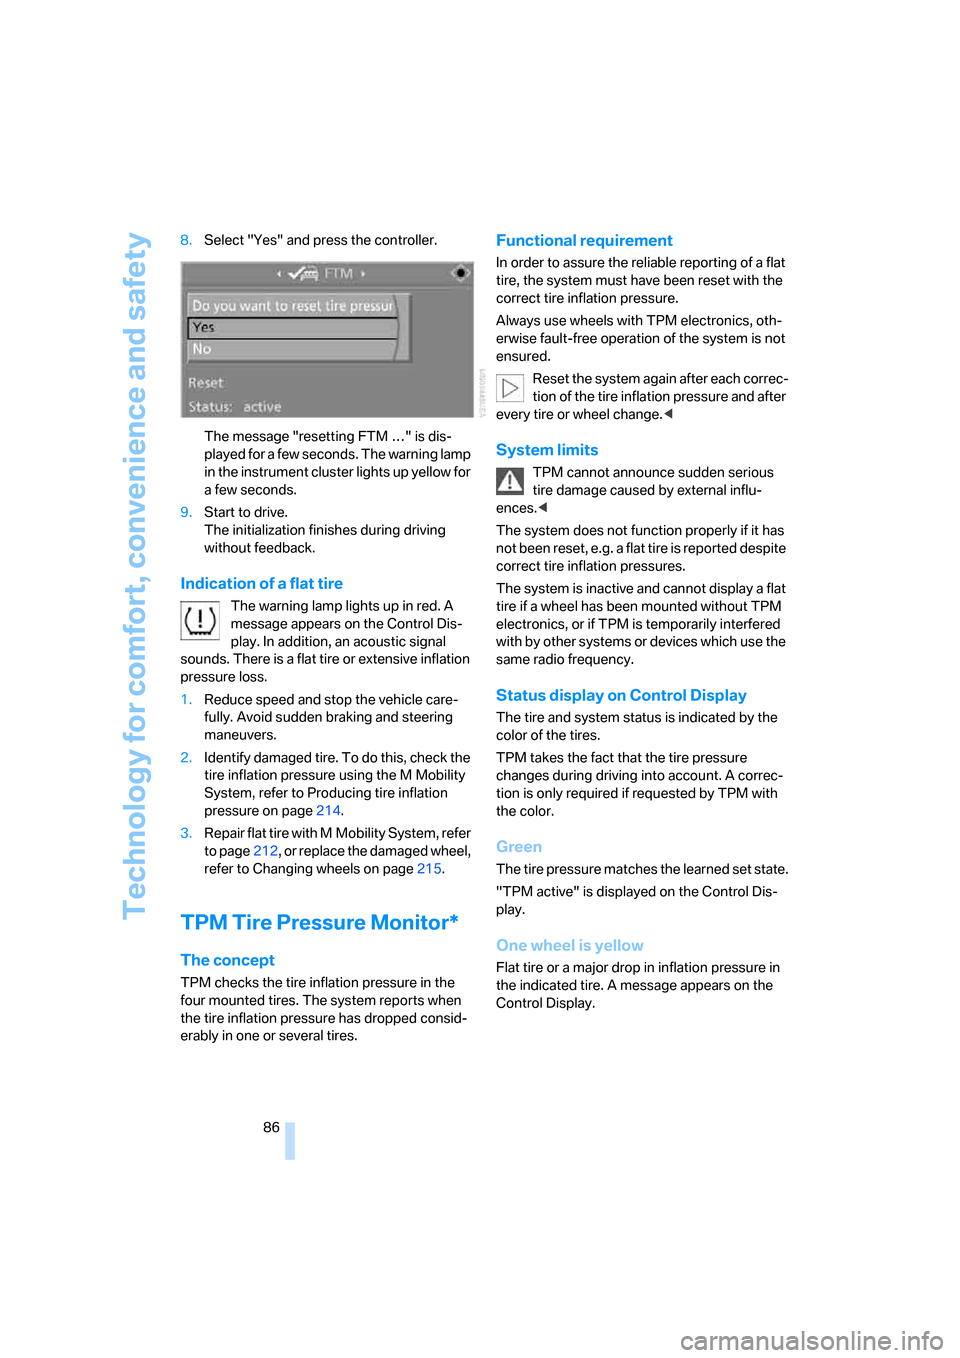
86 8.Select "Yes" and press the controller.
The message "resetting FTM …" is dis-
played for a few seconds. The warning lamp
in the instrument cluster lights up yellow for
a few seconds.
9.Start to drive.
The initialization finishes during driving
without feedback.
Indication of a flat tire
The warning lamp lights up in red. A
message appears on the Control Dis-
play. In addition, an acoustic signal
sounds. There is a flat tire or extensive inflation
pressure loss.
1.Reduce speed and stop the vehicle care-
fully. Avoid sudden braking and steering
maneuvers.
2.Identify damaged tire. To do this, check the
tire inflation pressure using the M Mobility
System, refer to Producing tire inflation
pressure on page214.
3.Repair flat tire with M Mobility System, refer
to page212, or replace the damaged wheel,
refer to Changing wheels on page215.
TPM Tire Pressure Monitor*
The concept
TPM checks the tire inflation pressure in the
four mounted tires. The system reports when
the tire inflation pressure has dropped consid-
erably in one or several tires.
Functional requirement
In order to assure the reliable reporting of a flat
tire, the system must have been reset with the
correct tire inflation pressure.
Always use wheels with TPM electronics, oth-
erwise fault-free operation of the system is not
ensured.
Reset the system again after each correc-
tion of the tire inflation pressure and after
every tire or wheel change.<
System limits
TPM cannot announce sudden serious
tire damage caused by external influ-
ences.<
The system does not function properly if it has
not been reset, e.g. a flat tire is reported despite
correct tire inflation pressures.
The system is inactive and cannot display a flat
tire if a wheel has been mounted without TPM
electronics, or if TPM is temporarily interfered
with by other systems or devices which use the
same radio frequency.
Status display on Control Display
The tire and system status is indicated by the
color of the tires.
TPM takes the fact that the tire pressure
changes during driving into account. A correc-
tion is only required if requested by TPM with
the color.
Green
The tire pressure matches the learned set state.
"TPM active" is displayed on the Control Dis-
play.
One wheel is yellow
Flat tire or a major drop in inflation pressure in
the indicated tire. A message appears on the
Control Display.
Page 89 of 256
Controls
87Reference
At a glance
Driving tips
Communications
Navigation
Entertainment
Mobility
All wheels are yellow
Flat tire or a major drop in inflation pressure in
several tires. A message appears on the Control
Display.
Gray
The system cannot detect a flat tire.
Reasons for this can be:
>TPM is being reset
>Temporary interference due to systems or
devices which use the same radio fre-
quency
>Malfunction
Resetting system
Reset the system again after each correc-
tion of the tire inflation pressure and after
every tire or wheel change.<
Resetting finishes during driving, which can be
interrupted at any time. When driving resumes,
resetting is continued automatically.
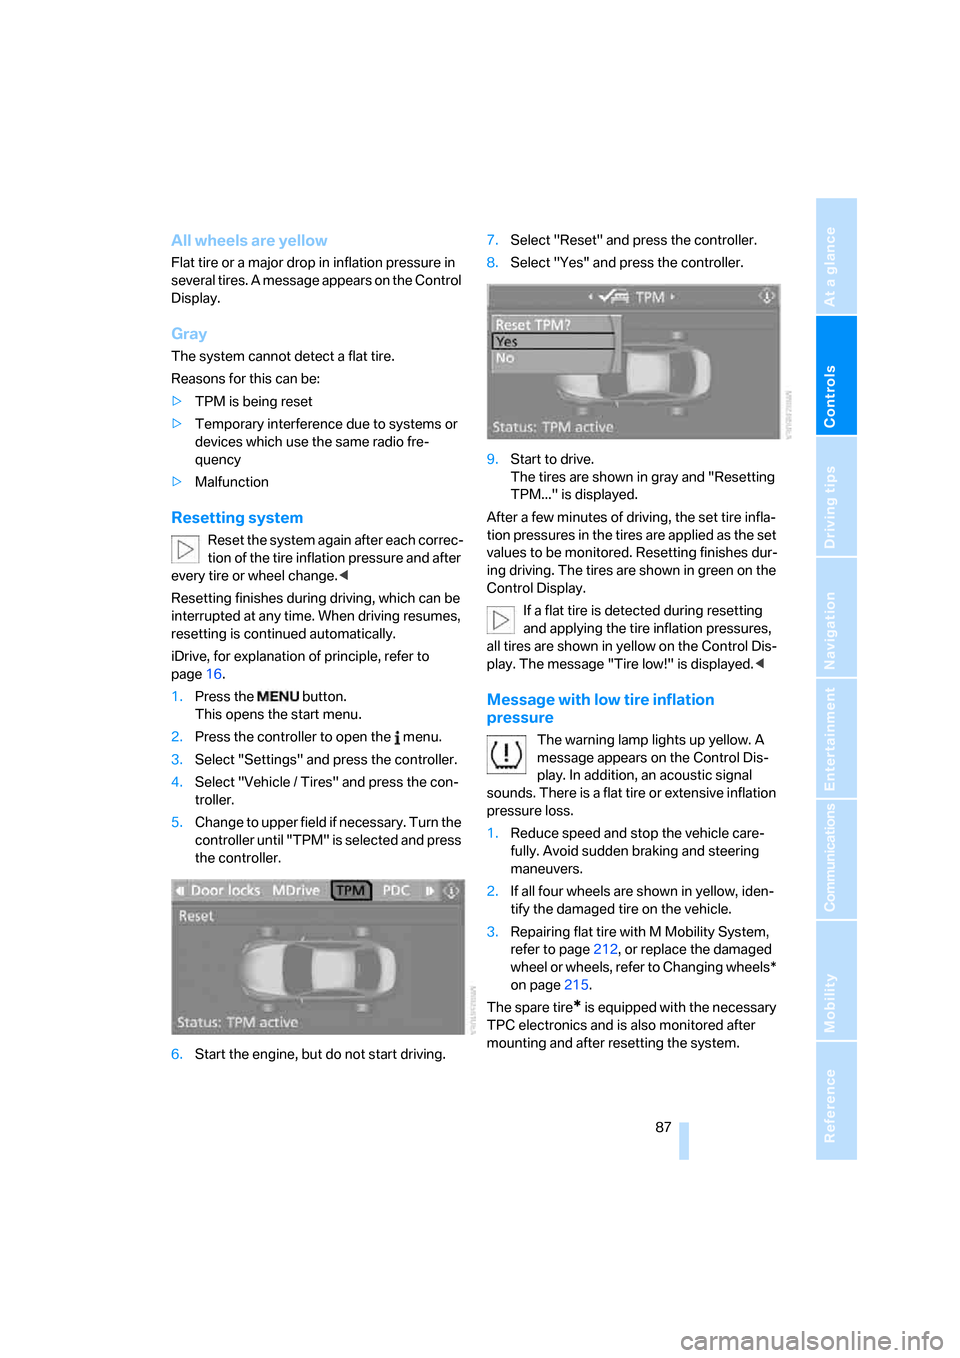
iDrive, for explanation of principle, refer to
page16.
1.Press the button.
This opens the start menu.
2.Press the controller to open the menu.
3.Select "Settings" and press the controller.
4.Select "Vehicle / Tires" and press the con-
troller.
5.Change to upper field if necessary. Turn the
controller until "TPM" is selected and press
the controller.
6.Start the engine, but do not start driving.7.Select "Reset" and press the controller.
8.Select "Yes" and press the controller.
9.Start to drive.
The tires are shown in gray and "Resetting
TPM..." is displayed.
After a few minutes of driving, the set tire infla-
tion pressures in the tires are applied as the set
values to be monitored. Resetting finishes dur-
ing driving. The tires are shown in green on the
Control Display.
If a flat tire is detected during resetting
and applying the tire inflation pressures,
all tires are shown in yellow on the Control Dis-
play. The message "Tire low!" is displayed.<
Message with low tire inflation
pressure
The warning lamp lights up yellow. A
message appears on the Control Dis-
play. In addition, an acoustic signal
sounds. There is a flat tire or extensive inflation
pressure loss.
1.Reduce speed and stop the vehicle care-
fully. Avoid sudden braking and steering
maneuvers.
2.If all four wheels are shown in yellow, iden-
tify the damaged tire on the vehicle.
3.Repairing flat tire with M Mobility System,
refer to page212, or replace the damaged
wheel or wheels, refer to Changing wheels*
on page215.
The spare tire
* is equipped with the necessary
TPC electronics and is also monitored after
mounting and after resetting the system.
Page 90 of 256
Technology for comfort, convenience and safety
88 Have the tire replaced by a BMW center or a
workshop informed on handling TPM which
works according to BMW repair procedures
with correspondingly trained personnel.
Malfunction
The yellow warning lamp flashes and
then lights up continuously. The tires
are shown in gray on the Control Dis-
play and a message is displayed. No flat tire can
be detected.
A message like this is displayed in the following
situations:
>In case of a malfunction;
have the system checked.
>If a wheels is mounted without TPM elec-
tronics.
>If TPM is temporarily interfered with by
other systems or devices which use the
same radio frequency.
Declaration according to NHTSA/
FMVSS 138 Tire Pressure Monitoring
Systems
Each tire, including the spare*, should be
checked monthly when cold and inflated to the
inflation pressure recommended by the vehicle
manufacturer on the vehicle placard or tire infla-
tion pressure label. If your vehicle has tires of a
different size than the size indicated on the
vehicle placard or tire inflation pressure label,
you should determine the proper tire inflation
pressure for those tires. As an added safety fea-
ture, your vehicle has been equipped with a tire
pressure monitoring system, TPMS, that illumi-
nates a low tire pressure indicator when one or
more of your tires are significantly under-
inflated. Accordingly, when the low tire pres-
sure indicator illuminates, you should stop and
check your tires as soon as possible, and inflate
them to the proper pressure. Driving on a signif-
icantly under-inflated tire causes the tire to
overheat and can lead to tire failure. Under-
inflation also reduces fuel efficiency and tire
tread life, and may affect the vehicle's handling
and stopping ability. Please note that the TPMS
is not a substitute for proper tire maintenance, and it is the driver's responsibility to maintain
correct tire pressure, even if under-inflation has
not reached the level to trigger illumination of
the TPMS low tire pressure indicator.
The TPMS malfunction indicator is combined
with the low tire pressure indicator. When the
system detects a malfunction, the indicator will
flash for approximately one minute and then
remain continuously illuminated. This
sequence will continue upon subsequent vehi-
cle startups as long as the malfunction exists.
When the malfunction indicator is illuminated,
the system may not be able to detect or signal
low tire pressure as intended. TPMS malfunc-
tions may occur for a variety of reasons, includ-
ing the installation of replacement or alternate
tires or wheels on the vehicle that prevent the
TPMS from functioning properly. Always check
the TPMS malfunction indicator after replacing
one or more tires or wheels on your vehicle to
ensure that the replacement or alternate tires
and wheels allow the TPMS to continue to func-
tion properly.Brake force display
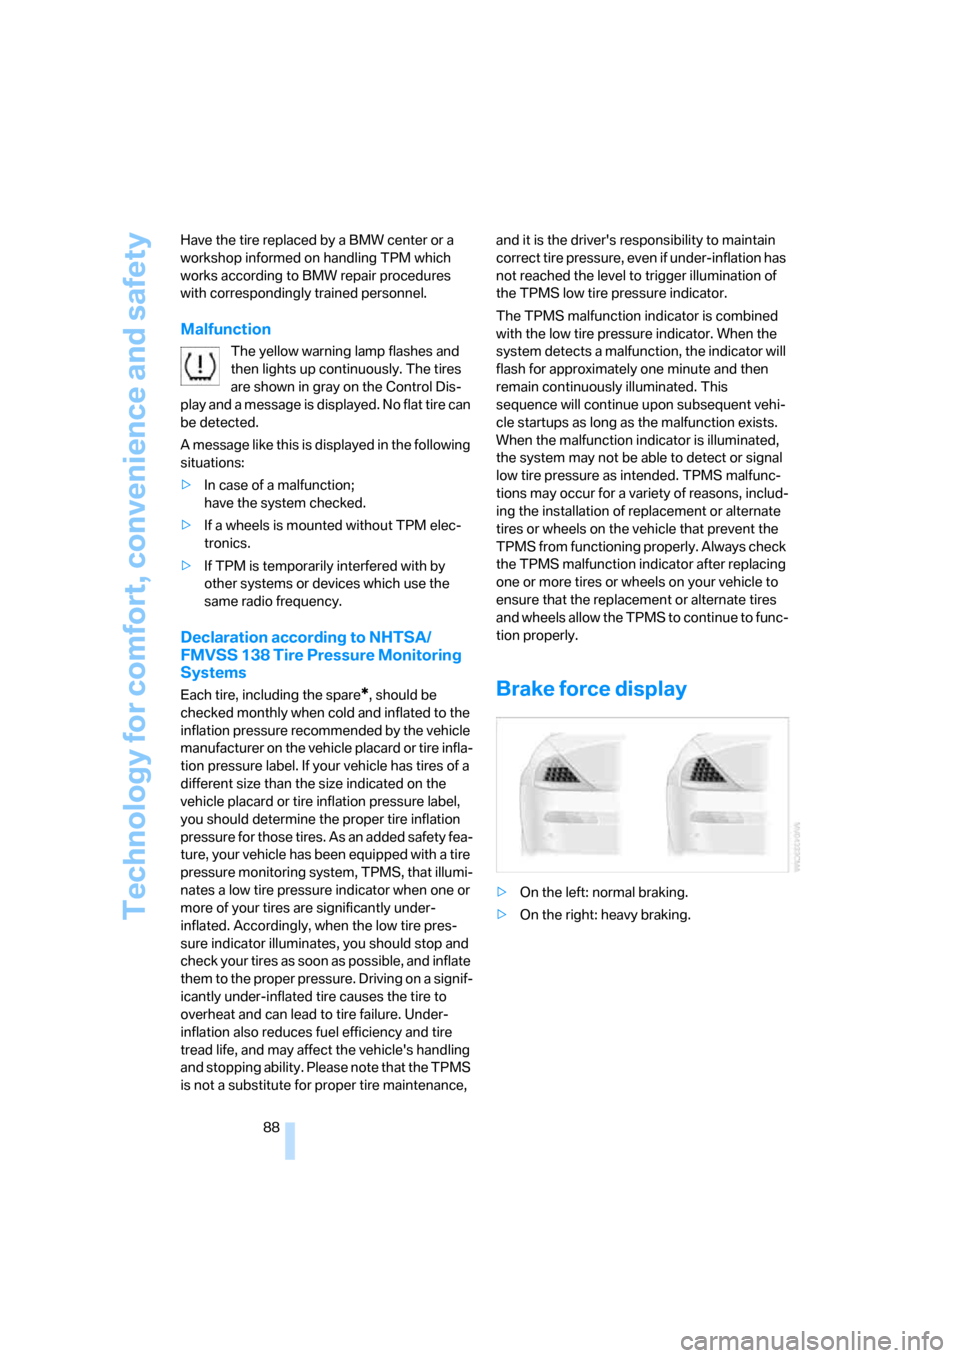
>On the left: normal braking.
>On the right: heavy braking.
Page 198 of 256
Wheels and tires
196
Wheels and tires
Tire inflation pressure
Information for your safety
The condition of the tires and the maintenance
of the specified tire pressure are crucial not only
to the tire's service life, but also to driving com-
fort and most importantly, driving safety.
Checking pressure
Only check tire inflation pressure when the tires
are cold. This means after a maximum of
1.25 miles/2 km driving or when the vehicle has
been parked for at least 2 hours. When tires are
warm, the tire inflation pressure increases.
Check the tire inflation pressure regularly
and correct if necessary, including on the
spare wheel
*: at least twice a month and before
starting long trips. Otherwise, driving instability
or tire damage, and therefore accidents, can
result from incorrect tire inflation pressures.<
After correcting the tire inflation pressure,
reinitialize the Flat Tire Monitor, refer to
page85, or reset the Tire Pressure Monitor,
refer to page87.<
Pressure specifications
The tables below provide all the correct inflation
pressures for the specified tire sizes at ambient
temperature.
The inflation pressures apply to the tire
sizes and tire brands respectively
approved and recommended by BMW; a list of
these is available from your BMW center.<
For correct identification of the right tire infla-
tion pressure for your tires, observe the follow-
ing:
>Tire sizes for your vehicle
>Load conditions
>Maximum allowable driving speed
Tire inflation pressures for driving
up to 100 mph/160 km/h
For normal driving up to 100 mph/160 km/h,
adjust pressures to the respective tire inflation
pressures listed on the following pages in the
column for traveling speeds up to a max. of
100 mph/160 km/h to achieve optimum driving
comfort.
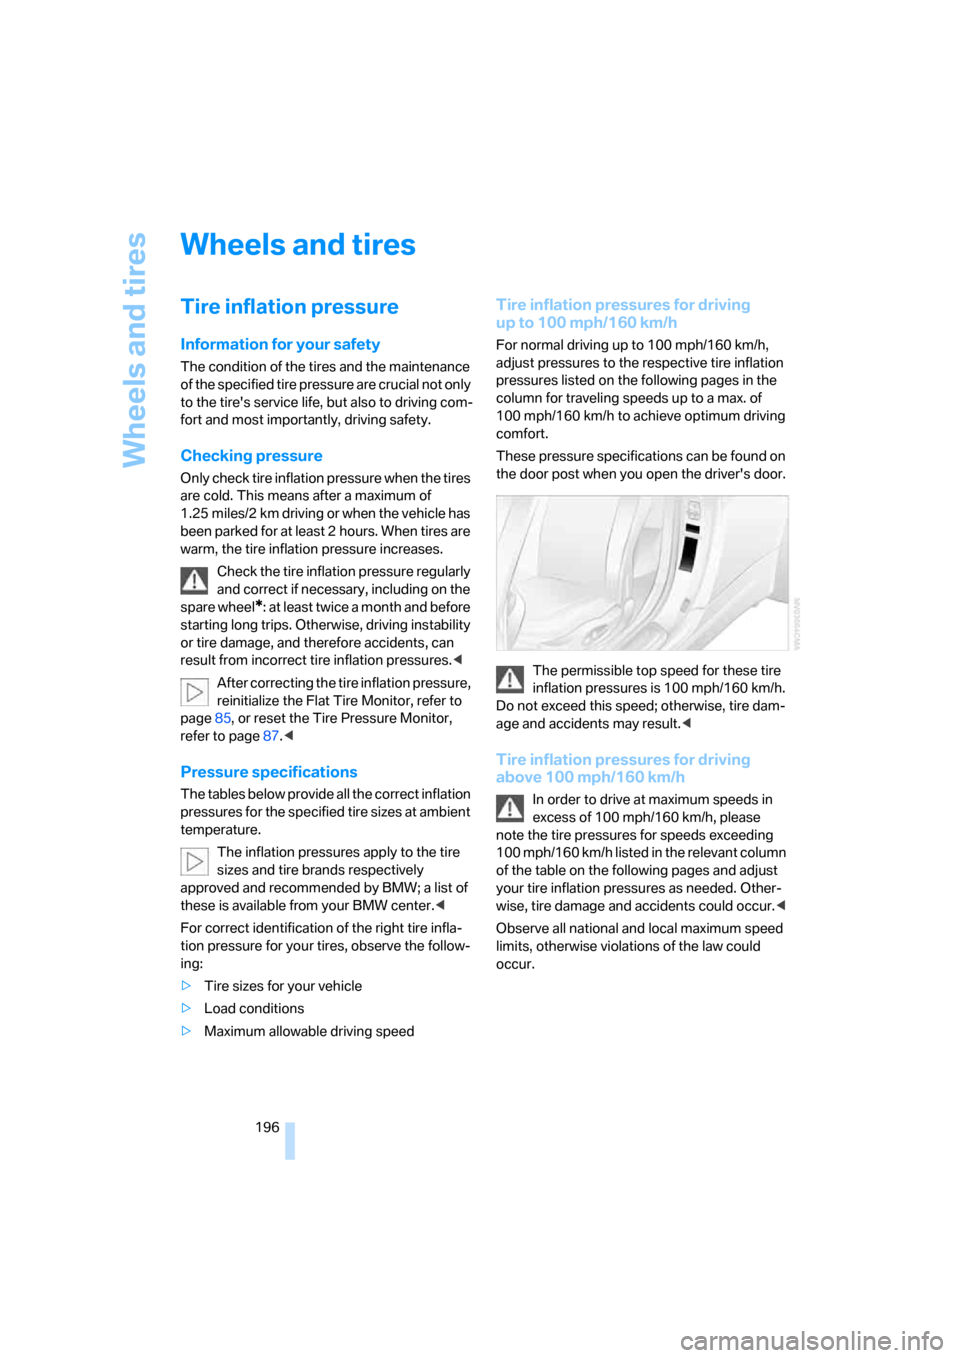
These pressure specifications can be found on
the door post when you open the driver's door.
The permissible top speed for these tire
inflation pressures is 100 mph/160 km/h.
Do not exceed this speed; otherwise, tire dam-
age and accidents may result.<
Tire inflation pressures for driving
above 100 mph/160 km/h
In order to drive at maximum speeds in
excess of 100 mph/160 km/h, please
note the tire pressures for speeds exceeding
100 mph/160 km/h listed in the relevant column
of the table on the following pages and adjust
your tire inflation pressures as needed. Other-
wise, tire damage and accidents could occur.<
Observe all national and local maximum speed
limits, otherwise violations of the law could
occur.
Page 199 of 256
Mobility
197Reference
At a glance
Controls
Driving tips
Communications
Navigation
Entertainment
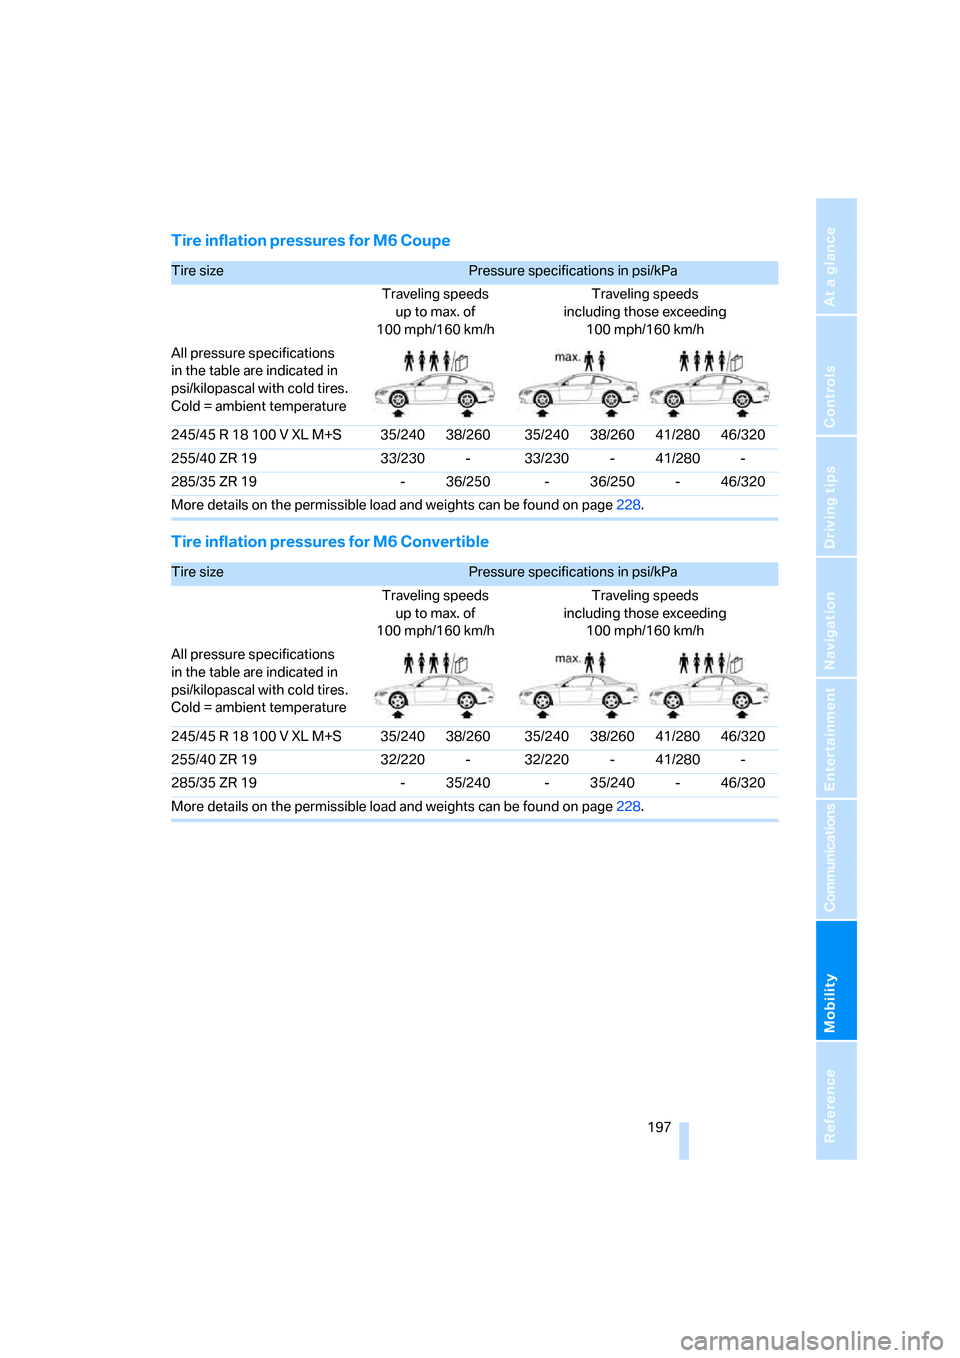
Tire inflation pressures for M6 Coupe
Tire inflation pressures for M6 Convertible
Tire sizePressure specifications in psi/kPa
Traveling speeds
up to max. of
100 mph/160 km/hTraveling speeds
including those exceeding
100 mph/160 km/h
All pressure specifications
in the table are indicated in
psi/kilopascal with cold tires.
Cold = ambient temperature
245/45 R 18 100 V XL M+S 35/240 38/260 35/240 38/260 41/280 46/320
255/40 ZR 19 33/230 - 33/230 - 41/280 -
285/35 ZR 19 - 36/250 - 36/250 - 46/320
More details on the permissible load and weights can be found on page228.
Tire sizePressure specifications in psi/kPa
Traveling speeds
up to max. of
100 mph/160 km/hTraveling speeds
including those exceeding
100 mph/160 km/h
All pressure specifications
in the table are indicated in
psi/kilopascal with cold tires.
Cold = ambient temperature
245/45 R 18 100 V XL M+S 35/240 38/260 35/240 38/260 41/280 46/320
255/40 ZR 19 32/220 - 32/220 - 41/280 -
285/35 ZR 19 - 35/240 - 35/240 - 46/320
More details on the permissible load and weights can be found on page228.
Page 203 of 256
Mobility
201Reference
At a glance
Controls
Driving tips
Communications
Navigation
Entertainment
After changing wheels/tires
After changing tires or wheels, the slip detec-
tion of the Sequential Manual Transmission
must become familiar with the changed state.
Reinitialize the system for this purpose:
1.Move the selector lever into the idling
position N on a straight stretch of road at a
speed between 20 mph/30 km/h and
90 mph/150 km/h.
2.Pull both shift paddles for approx. 2 sec-
onds.
If you do not carry out initialization, the system
will automatically learn the changed state grad-
ually during driving. This may be noticeable
from the clutch opening and closing briefly.
Storage
Store wheels and tires in a cool, dry place with
as little exposure to light as possible. Always
protect tires against all contact with oil, grease
and fuels. Do not exceed the maximum tire
inflation pressure indicated on the side wall of
the tire.
Rotating wheels between axles
BMW does not recommend moving the front
wheels to the rear or vice versa, as otherwise
the handling characteristics may be impaired.
Snow chains*
BMW only tests certain fine-link snow chains,
classifies them as road-safe and recommends
them. Consult your BMW center for more infor-
mation.
Use is only permitted in pairs, with winter tires
of the size 245/45 R 18 on the rear wheels.
Observe the manufacturer's instructions when
mounting snow chains. Do not exceed a speed
of 30 mph/50 km/h with the chains mounted.
Make sure that the snow chains are always suf-
ficiently tensioned. Retension in accordance
with the chain manufacturer's specifications if
necessary.Do not initialize the Flat Tire Monitor after
installing snow chains as this could cause
the Flat Tire Monitor to malfunction.
After mounting or removing snow chains, the
slip detection of the Sequential Manual Trans-
mission must become familiar with the altered
state. To do this, reinitialize the system, refer to
After changing wheels/tires.<
Page 214 of 256
Replacing components
212
Rear turn signals
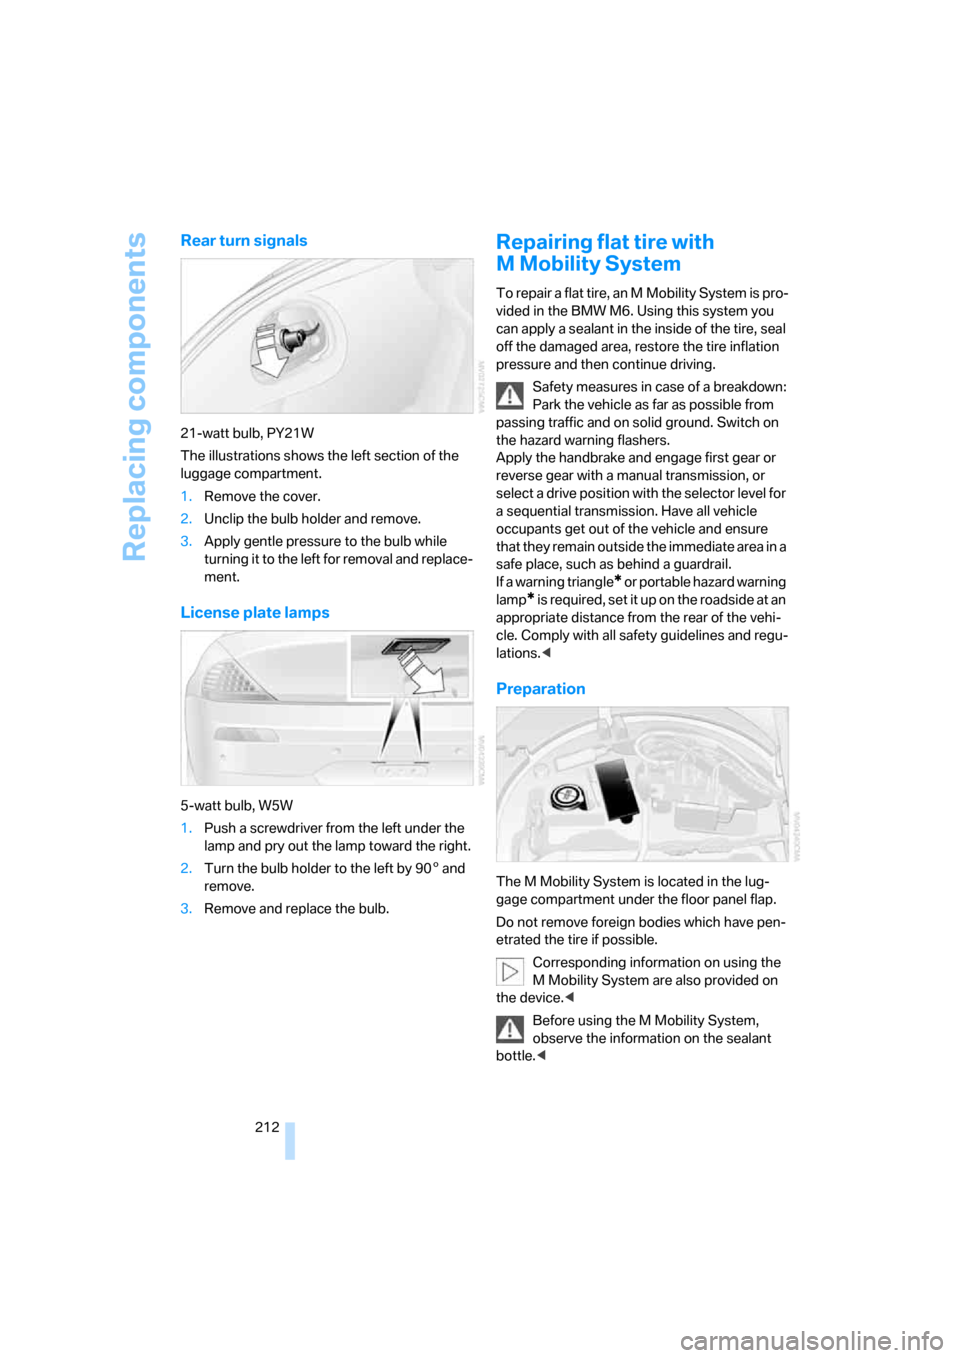
21-watt bulb, PY21W
The illustrations shows the left section of the
luggage compartment.
1.Remove the cover.
2.Unclip the bulb holder and remove.
3.Apply gentle pressure to the bulb while
turning it to the left for removal and replace-
ment.
License plate lamps
5-watt bulb, W5W
1.Push a screwdriver from the left under the
lamp and pry out the lamp toward the right.
2.Turn the bulb holder to the left by 905 and
remove.
3.Remove and replace the bulb.
Repairing flat tire with
M Mobility System
To repair a flat tire, an M Mobility System is pro-
vided in the BMW M6. Using this system you
can apply a sealant in the inside of the tire, seal
off the damaged area, restore the tire inflation
pressure and then continue driving.
Safety measures in case of a breakdown:
Park the vehicle as far as possible from
passing traffic and on solid ground. Switch on
the hazard warning flashers.
Apply the handbrake and engage first gear or
reverse gear with a manual transmission, or
select a drive position with the selector level for
a sequential transmission. Have all vehicle
occupants get out of the vehicle and ensure
that they remain outside the immediate area in a
safe place, such as behind a guardrail.
If a warning triangle
* or portable hazard warning
lamp
* is required, set it up on the roadside at an
appropriate distance from the rear of the vehi-
cle. Comply with all safety guidelines and regu-
lations.<
Preparation
The M Mobility System is located in the lug-
gage compartment under the floor panel flap.
Do not remove foreign bodies which have pen-
etrated the tire if possible.
Corresponding information on using the
M Mobility System are also provided on
the device.<
Before using the M Mobility System,
observe the information on the sealant
bottle.<
Page 215 of 256
Mobility
213Reference
At a glance
Controls
Driving tips
Communications
Navigation
Entertainment
Pull the sticker for the speed limit off the sealant
bottle and apply it to the steering wheel.
Please observe the best-by date on the
sealant bottle.<
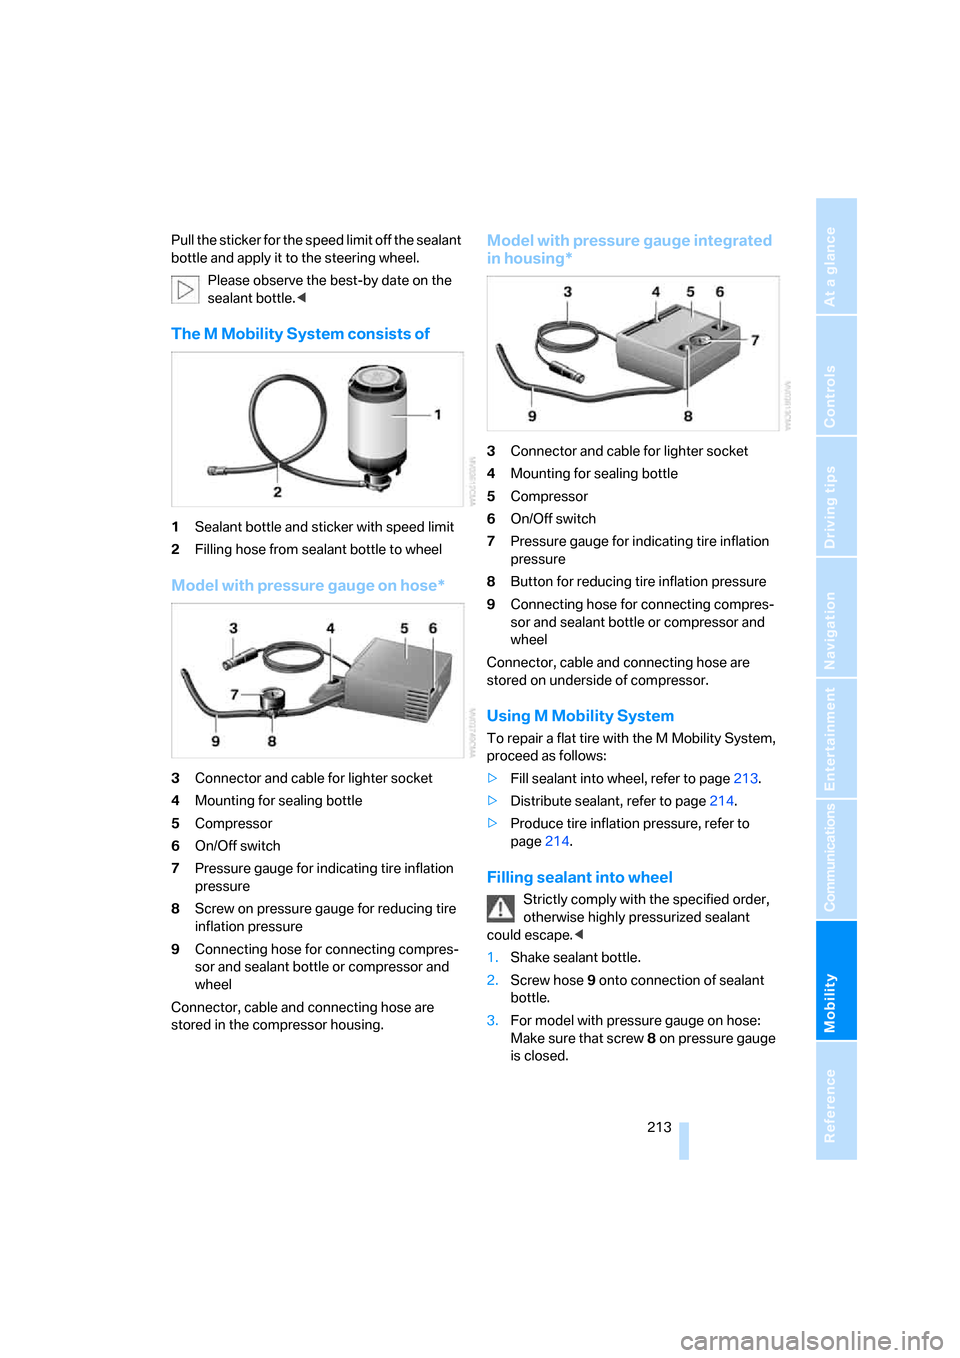
The M Mobility System consists of
1Sealant bottle and sticker with speed limit
2Filling hose from sealant bottle to wheel
Model with pressure gauge on hose*
3Connector and cable for lighter socket
4Mounting for sealing bottle
5Compressor
6On/Off switch
7Pressure gauge for indicating tire inflation
pressure
8Screw on pressure gauge for reducing tire
inflation pressure
9Connecting hose for connecting compres-
sor and sealant bottle or compressor and
wheel
Connector, cable and connecting hose are
stored in the compressor housing.
Model with pressure gauge integrated
in housing*
3Connector and cable for lighter socket
4Mounting for sealing bottle
5Compressor
6On/Off switch
7Pressure gauge for indicating tire inflation
pressure
8Button for reducing tire inflation pressure
9Connecting hose for connecting compres-
sor and sealant bottle or compressor and
wheel
Connector, cable and connecting hose are
stored on underside of compressor.
Using M Mobility System
To repair a flat tire with the M Mobility System,
proceed as follows:
>Fill sealant into wheel, refer to page213.
>Distribute sealant, refer to page214.
>Produce tire inflation pressure, refer to
page214.
Filling sealant into wheel
Strictly comply with the specified order,
otherwise highly pressurized sealant
could escape.<
1.Shake sealant bottle.
2.Screw hose9 onto connection of sealant
bottle.
3.For model with pressure gauge on hose:
Make sure that screw8 on pressure gauge
is closed.