check engine light BMW M6 CONVERTIBLE 2008 Owners Manual
[x] Cancel search | Manufacturer: BMW, Model Year: 2008, Model line: M6 CONVERTIBLE, Model: BMW M6 CONVERTIBLE 2008Pages: 262, PDF Size: 8.86 MB
Page 15 of 262
At a glance
13Reference
Controls
Driving tips
Communications
Navigation
Entertainment
Mobility
Indicator and warning lamps
The concept
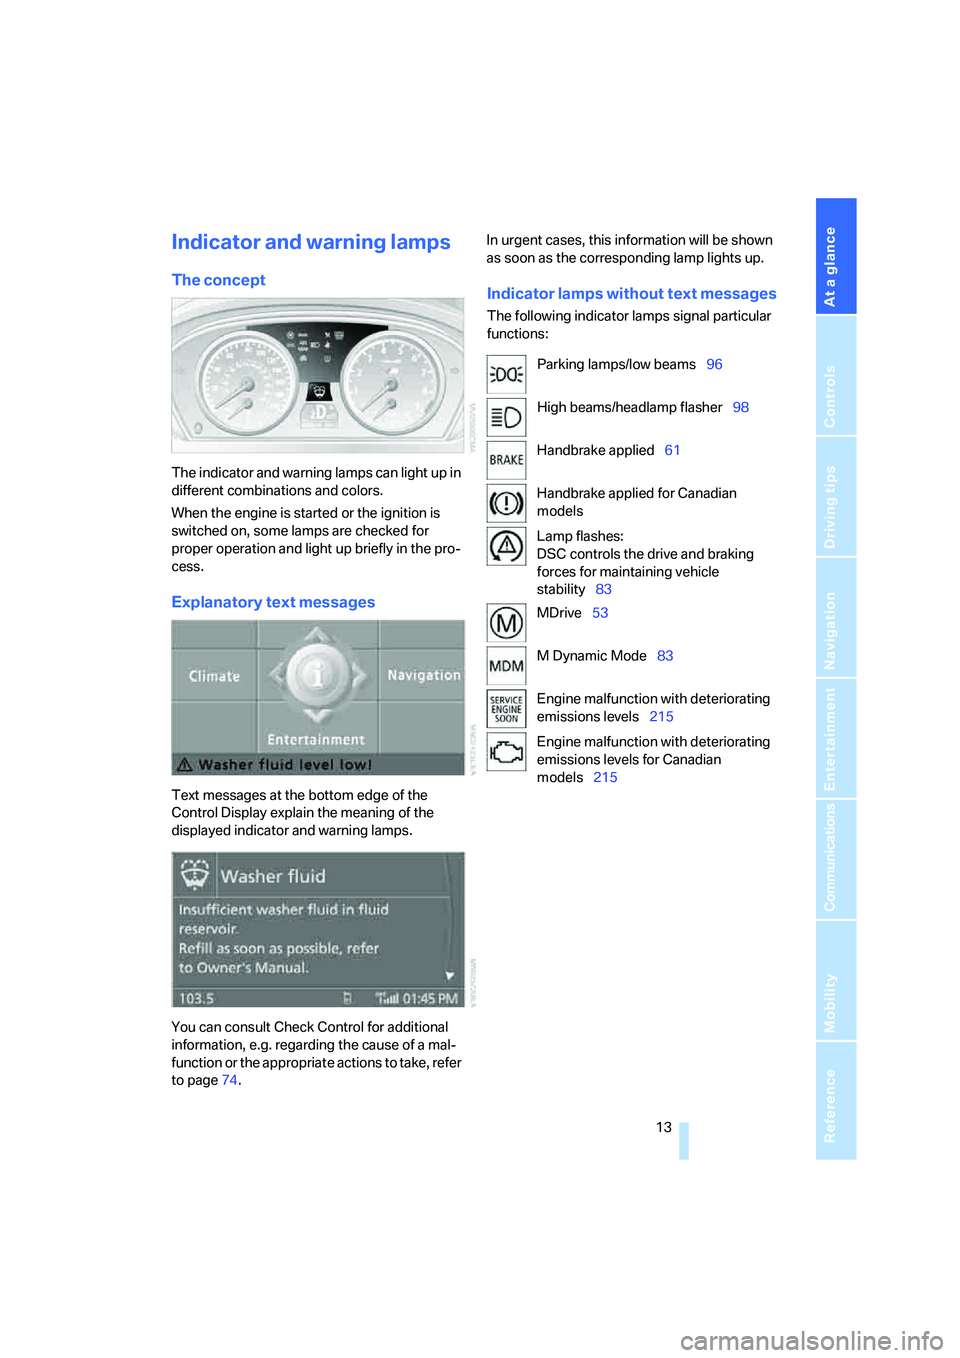
The indicator and warning lamps can light up in
different combinations and colors.
When the engine is started or the ignition is
switched on, some lamps are checked for
proper operation and light up briefly in the pro-
cess.
Explanatory text messages
Text messages at the bottom edge of the
Control Display explain the meaning of the
displayed indicator and warning lamps.
You can consult Check Control for additional
information, e.g. regarding the cause of a mal-
function or the appropriate actions to take, refer
to page74.In urgent cases, this information will be shown
as soon as the corresponding lamp lights up.
Indicator lamps without text messages
The following indicator lamps signal particular
functions:
Parking lamps/low beams96
High beams/headlamp flasher98
Handbrake applied61
Handbrake applied for Canadian
models
Lamp flashes:
DSC controls the drive and braking
forces for maintaining vehicle
stability83
MDrive53
M Dynamic Mode83
Engine malfunction with deteriorating
emissions levels215
Engine malfunction with deteriorating
emissions levels for Canadian
models215
Page 39 of 262
Controls
37Reference
At a glance
Driving tips
Communications
Navigation
Entertainment
Mobility
>The next unlocking and locking cycle is not
possible until after approx. 2 seconds.
>The engine can only be started if the vehicle
detects that the remote control is located in
the vehicle.
Comparison with ordinary remote
control
You can control the functions mentioned previ-
ously with the comfort access or by pressing
the buttons on the remote control. Before doing
so, please familiarize yourself with the informa-
tion on opening and closing, starting on
page28.
The special features when using comfort
access are described below.
Should a short delay occur when opening
or closing the windows or the convertible
top, the system is checking whether a remote
control is located in the vehicle. Please repeat
opening or closing if necessary.<
Unlocking
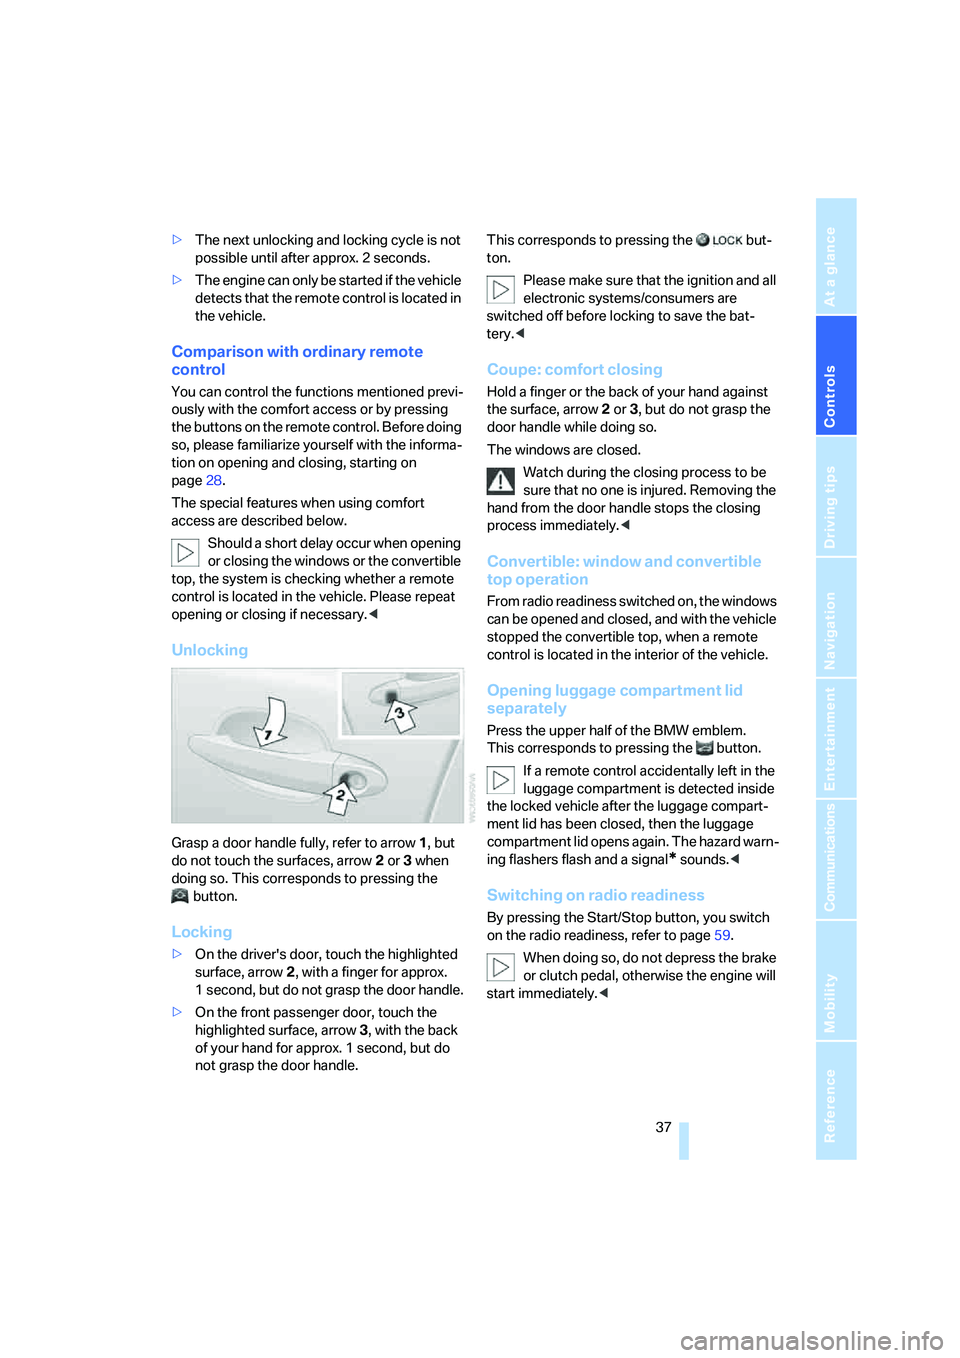
Grasp a door handle fully, refer to arrow1, but
do not touch the surfaces, arrow2 or 3 when
doing so. This corresponds to pressing the
button.
Locking
>On the driver's door, touch the highlighted
surface, arrow2, with a finger for approx.
1 second, but do not grasp the door handle.
>On the front passenger door, touch the
highlighted surface, arrow3, with the back
of your hand for approx. 1 second, but do
not grasp the door handle.This corresponds to pressing the but-
ton.
Please make sure that the ignition and all
electronic systems/consumers are
switched off before locking to save the bat-
tery.<
Coupe: comfort closing
Hold a finger or the back of your hand against
the surface, arrow2 or 3, but do not grasp the
door handle while doing so.
The windows are closed.
Watch during the closing process to be
sure that no one is injured. Removing the
hand from the door handle stops the closing
process immediately.<
Convertible: window and convertible
top operation
From radio readiness switched on, the windows
can be opened and closed, and with the vehicle
stopped the convertible top, when a remote
control is located in the interior of the vehicle.
Opening luggage compartment lid
separately
Press the upper half of the BMW emblem.
This corresponds to pressing the button.
If a remote control accidentally left in the
luggage compartment is detected inside
the locked vehicle after the luggage compart-
ment lid has been closed, then the luggage
compartment lid opens again. The hazard warn-
ing flashers flash and a signal
* sounds.<
Switching on radio readiness
By pressing the Start/Stop button, you switch
on the radio readiness, refer to page59.
When doing so, do not depress the brake
or clutch pedal, otherwise the engine will
start immediately.<
Page 71 of 262
Controls
69Reference
At a glance
Driving tips
Communications
Navigation
Entertainment
Mobility
Everything under control
Odometer, outside
temperature display, clock
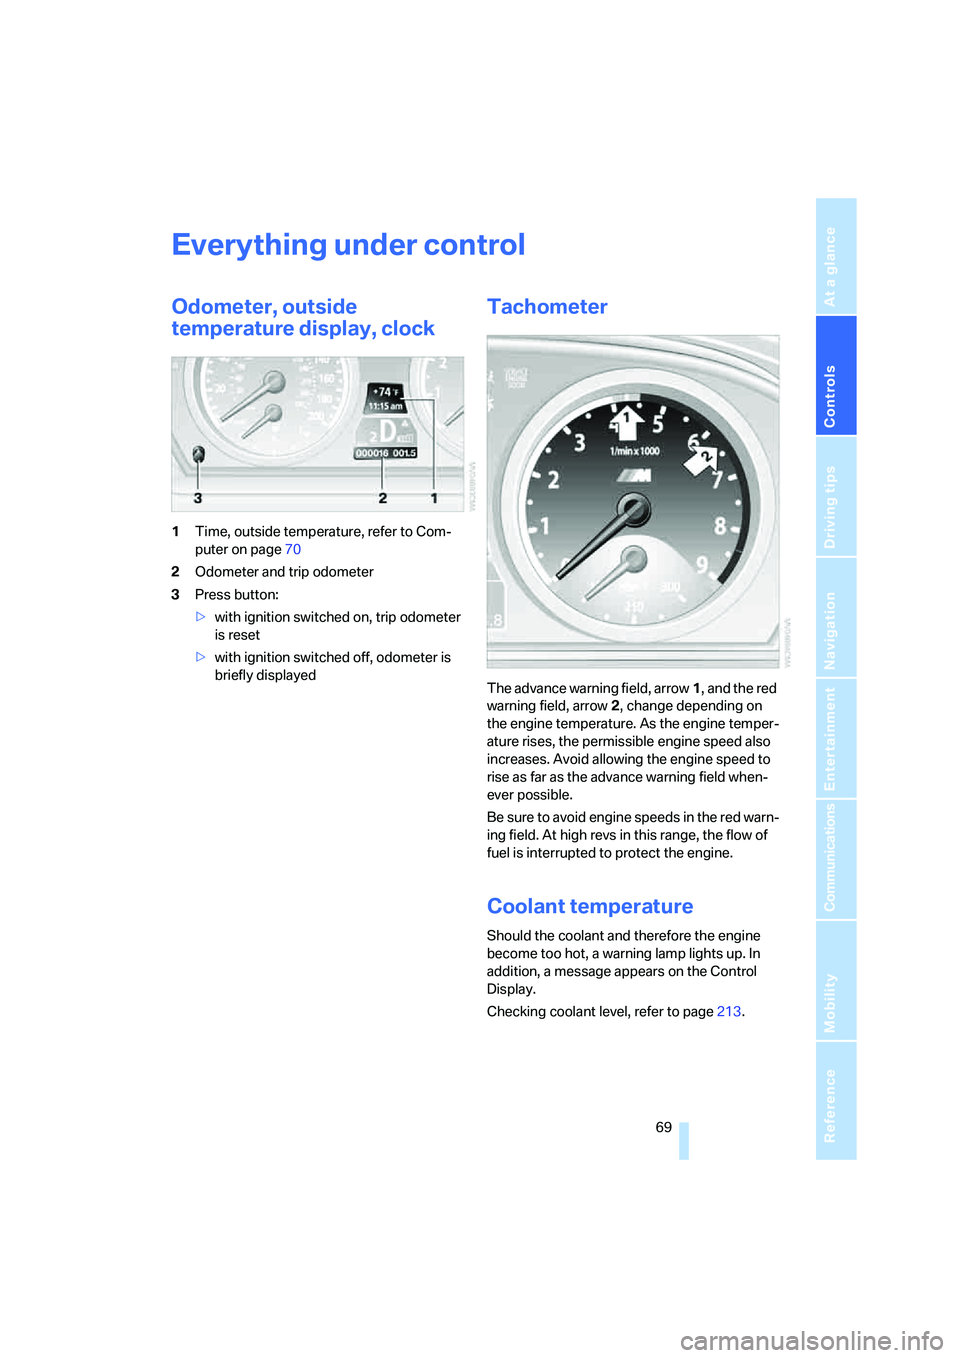
1Time, outside temperature, refer to Com-
puter on page70
2Odometer and trip odometer
3Press button:
>with ignition switched on, trip odometer
is reset
>with ignition switched off, odometer is
briefly displayed
Tachometer
The advance warning field, arrow1, and the red
warning field, arrow2, change depending on
the engine temperature. As the engine temper-
ature rises, the permissible engine speed also
increases. Avoid allowing the engine speed to
rise as far as the advance warning field when-
ever possible.
Be sure to avoid engine speeds in the red warn-
ing field. At high revs in this range, the flow of
fuel is interrupted to protect the engine.
Coolant temperature
Should the coolant and therefore the engine
become too hot, a warning lamp lights up. In
addition, a message appears on the Control
Display.
Checking coolant level, refer to page213.
Page 72 of 262
Everything under control
70
Engine oil temperature*
The general operating temperature lies
between 1757/806 and 2507/1206. Do
not exceed a value of approx. 2657/1306.
If the engine oil temperature is too high, the per-
missible engine speed, and with it the available
engine output is reduced.
Fuel gauge
Fuel tank capacity: approx. 18.5 US gal/
70 liters. You can find information on refueling
on page200.
If the tilt of the vehicle varies for a longer period,
when you are driving in mountainous areas, for
example, the indicator may fluctuate slightly.
Reserve
After the reserve quantity has been reached, a
message briefly appears on the Control Display;
the cruising range is shown in the computer.
Below a range of approx. 30 miles/50 km, the
message remains on the Control Display.
Refuel as soon as possible once your
cruising range falls below 30 miles/
50 km, otherwise engine functions are not
ensured and damage can occur.<
Computer
Displays in instrument cluster
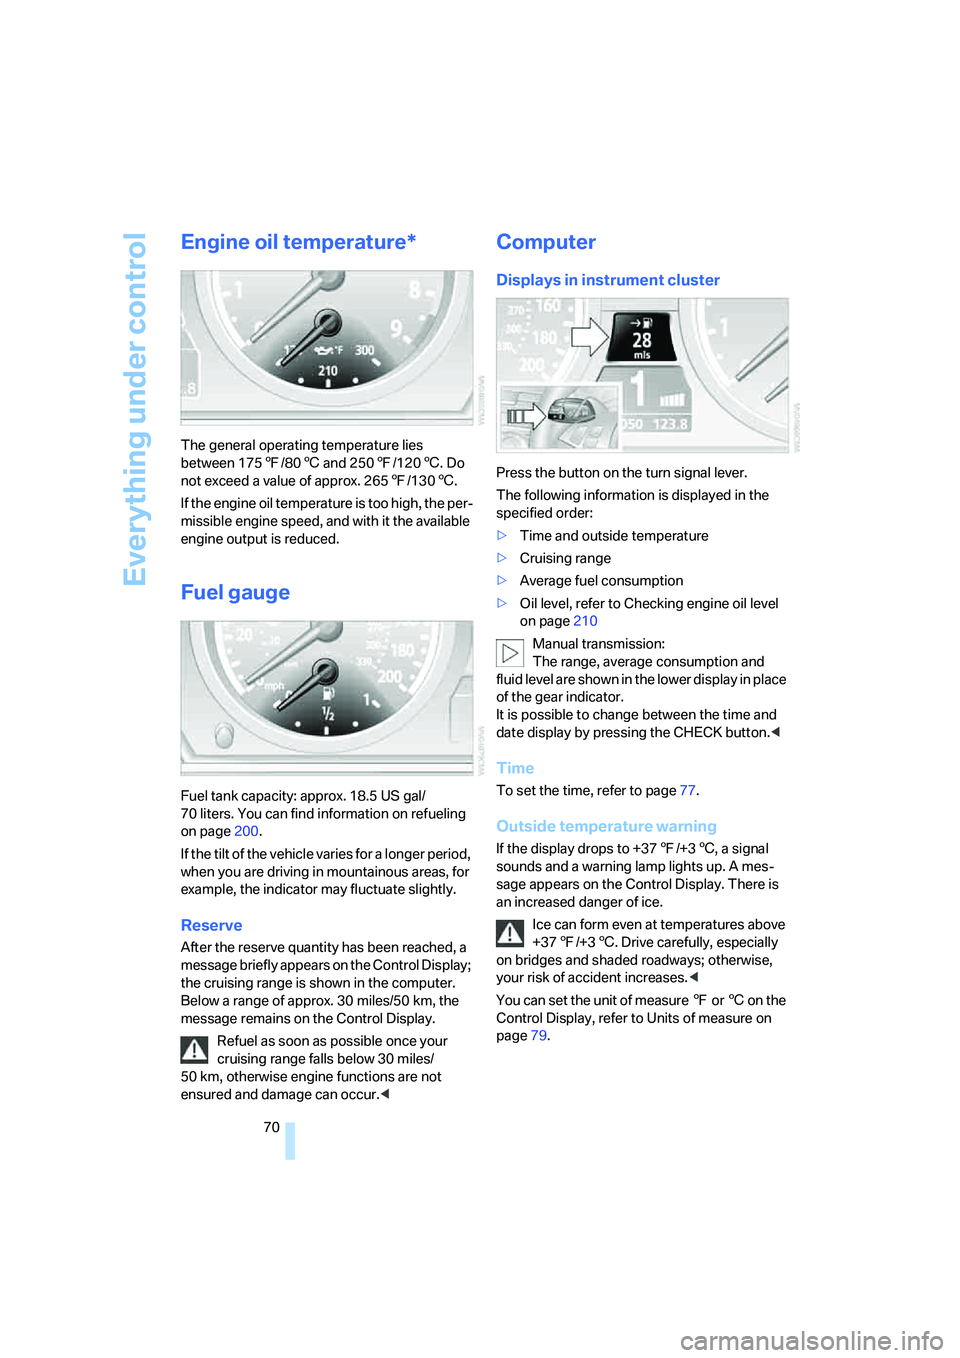
Press the button on the turn signal lever.
The following information is displayed in the
specified order:
>Time and outside temperature
>Cruising range
>Average fuel consumption
>Oil level, refer to Checking engine oil level
on page210
Manual transmission:
The range, average consumption and
fluid level are shown in the lower display in place
of the gear indicator.
It is possible to change between the time and
date display by pressing the CHECK button.<
Time
To set the time, refer to page77.
Outside temperature warning
If the display drops to +377/+36, a signal
sounds and a warning lamp lights up. A mes-
sage appears on the Control Display. There is
an increased danger of ice.
Ice can form even at temperatures above
+377/+36. Drive carefully, especially
on bridges and shaded roadways; otherwise,
your risk of accident increases.<
You can set the unit of measure 7 or 6 on the
Control Display, refer to Units of measure on
page79.
Page 83 of 262
Controls
81Reference
At a glance
Driving tips
Communications
Navigation
Entertainment
Mobility
Technology for comfort, convenience and
safety
PDC Park Distance Control*
The concept
The PDC assists you when you are parking.
Acoustic signals and an optical display
* alert
you to the approach of an object from behind
your vehicle. To measure the distance, there
are four ultrasonic sensors in each bumper.
The range of these sensors is approx. 7 ft/2 m.
However, an acoustic warning first sounds for
the sensors at the front and at the two rear cor-
ners at approx. 24 in/60 cm, and for the center
rear sensors at approx. 5 ft/1.50 m.
PDC is a parking aid that can indicate the
presence of objects when they are being
approached slowly, as is usually the case when
parking. Avoid approaching an object at high
speed; otherwise, the physical circumstances
could cause the system warning to be activated
too late.<
Switching on automatically
The system starts to operate approx. one sec-
ond after you shift into reverse or move the
selector lever into position R with the engine
running or the ignition switched on.
Wait this short time before driving off.
Switching on manually
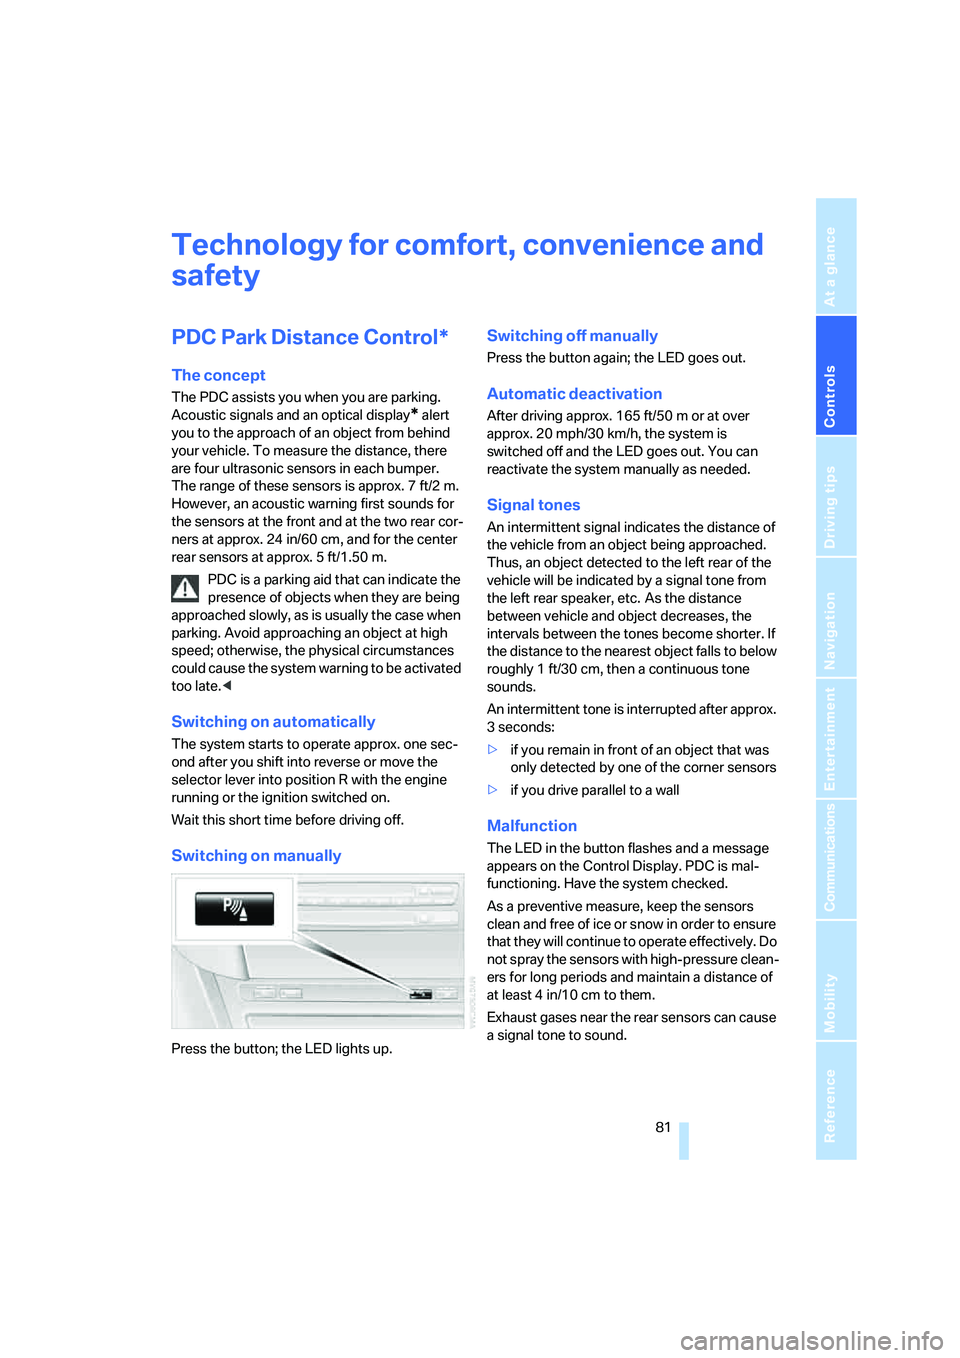
Press the button; the LED lights up.
Switching off manually
Press the button again; the LED goes out.
Automatic deactivation
After driving approx. 165 ft/50 m or at over
approx. 20 mph/30 km/h, the system is
switched off and the LED goes out. You can
reactivate the system manually as needed.
Signal tones
An intermittent signal indicates the distance of
the vehicle from an object being approached.
Thus, an object detected to the left rear of the
vehicle will be indicated by a signal tone from
the left rear speaker, etc. As the distance
between vehicle and object decreases, the
intervals between the tones become shorter. If
the distance to the nearest object falls to below
roughly 1 ft/30 cm, then a continuous tone
sounds.
An intermittent tone is interrupted after approx.
3seconds:
>if you remain in front of an object that was
only detected by one of the corner sensors
>if you drive parallel to a wall
Malfunction
The LED in the button flashes and a message
appears on the Control Display. PDC is mal-
functioning. Have the system checked.
As a preventive measure, keep the sensors
clean and free of ice or snow in order to ensure
that they will continue to operate effectively. Do
not spray the sensors with high-pressure clean-
ers for long periods and maintain a distance of
at least 4 in/10 cm to them.
Exhaust gases near the rear sensors can cause
a signal tone to sound.
Page 86 of 262
Technology for comfort, convenience and safety
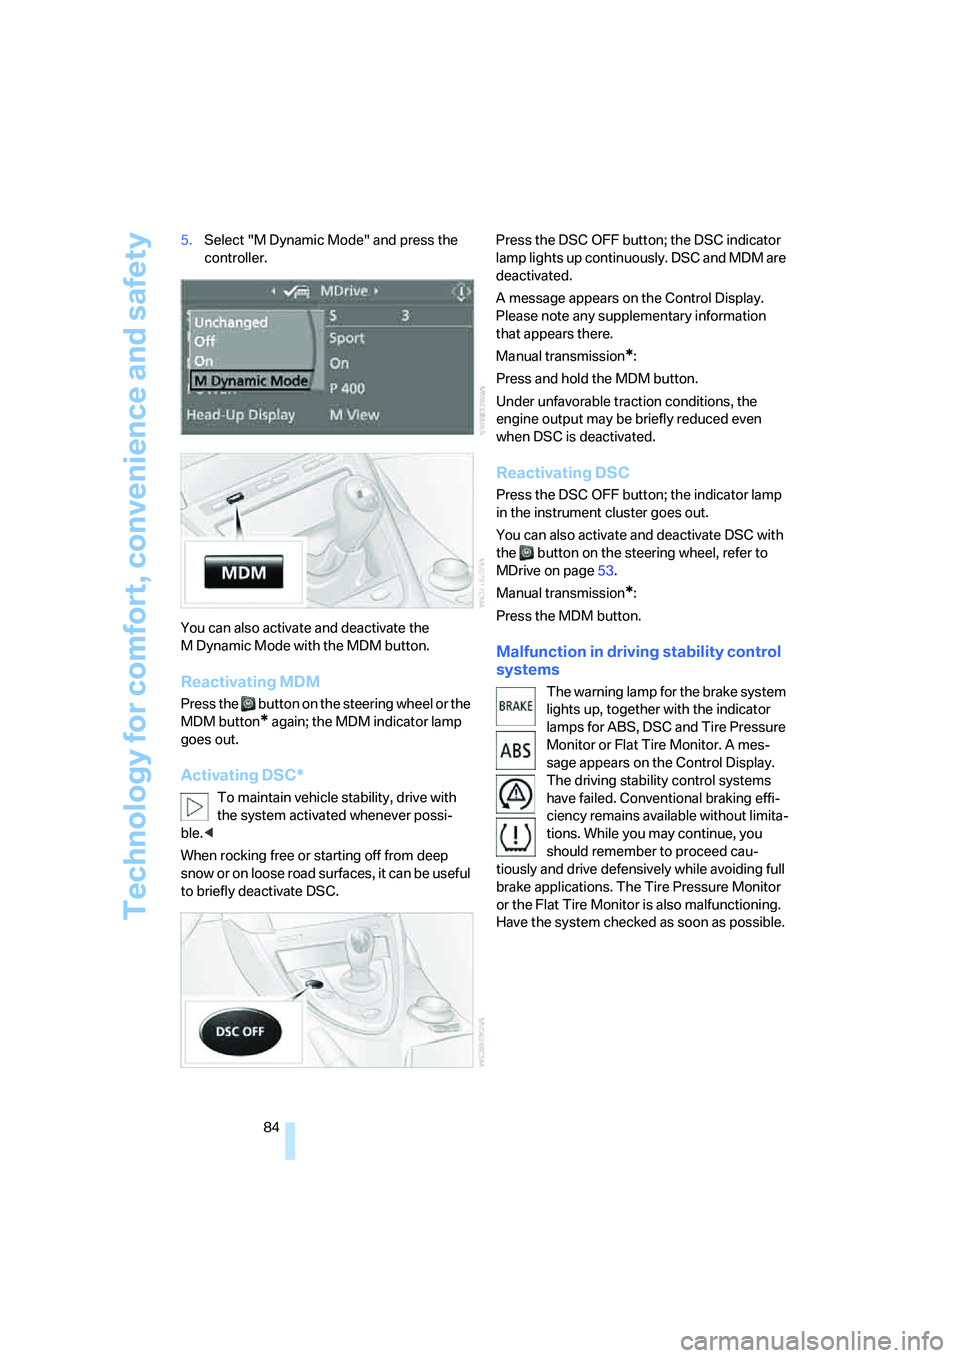
84 5.Select "M Dynamic Mode" and press the
controller.
You can also activate and deactivate the
M Dynamic Mode with the MDM button.
Reactivating MDM
Press the button on the steering wheel or the
MDM button
* again; the MDM indicator lamp
goes out.
Activating DSC*
To maintain vehicle stability, drive with
the system activated whenever possi-
ble.<
When rocking free or starting off from deep
snow or on loose road surfaces, it can be useful
to briefly deactivate DSC.Press the DSC OFF button; the DSC indicator
lamp lights up continuously. DSC and MDM are
deactivated.
A message appears on the Control Display.
Please note any supplementary information
that appears there.
Manual transmission
*:
Press and hold the MDM button.
Under unfavorable traction conditions, the
engine output may be briefly reduced even
when DSC is deactivated.
Reactivating DSC
Press the DSC OFF button; the indicator lamp
in the instrument cluster goes out.
You can also activate and deactivate DSC with
the button on the steering wheel, refer to
MDrive on page53.
Manual transmission
*:
Press the MDM button.
Malfunction in driving stability control
systems
The warning lamp for the brake system
lights up, together with the indicator
lamps for ABS, DSC and Tire Pressure
Monitor or Flat Tire Monitor. A mes-
sage appears on the Control Display.
The driving stability control systems
have failed. Conventional braking effi-
ciency remains available without limita-
tions. While you may continue, you
should remember to proceed cau-
tiously and drive defensively while avoiding full
brake applications. The Tire Pressure Monitor
or the Flat Tire Monitor is also malfunctioning.
Have the system checked as soon as possible.
Page 87 of 262
Controls
85Reference
At a glance
Driving tips
Communications
Navigation
Entertainment
Mobility
Display of the previously described
malfunction on Canadian models.
The DSC warning lamp lights up.
A malfunction has occurred in DSC
including MDM. The stability mainte-
nance functions are no longer available. The
vehicle remains operational. Have the system
checked as soon as possible.
The brake system warning lamp lights
up yellow. A message appears on the
Control Display. The brake assistant is
defective. Have the system checked as soon as
possible.
Display of the previously described
malfunction on Canadian models.
EDC Electronic Damping
Control
The concept
If the influencing variables such as road surface
quality or operating conditions such as steer-
ing, braking etc. change, the damping automat-
ically adjusts to the new conditions within a
fraction of a second.
You can choose from three programs.
"Comfort" program
Select the "Comfort" program if you want com-
fort-oriented coordination of shock absorbers
and steering.
"Normal" program
The "Normal" program offers a balanced mix-
ture of the comfort and the sport program.
"Sport" program
Select the "Sport" program if you want a con-
sistently sporty coordination of shock absorb-
ers and steering.
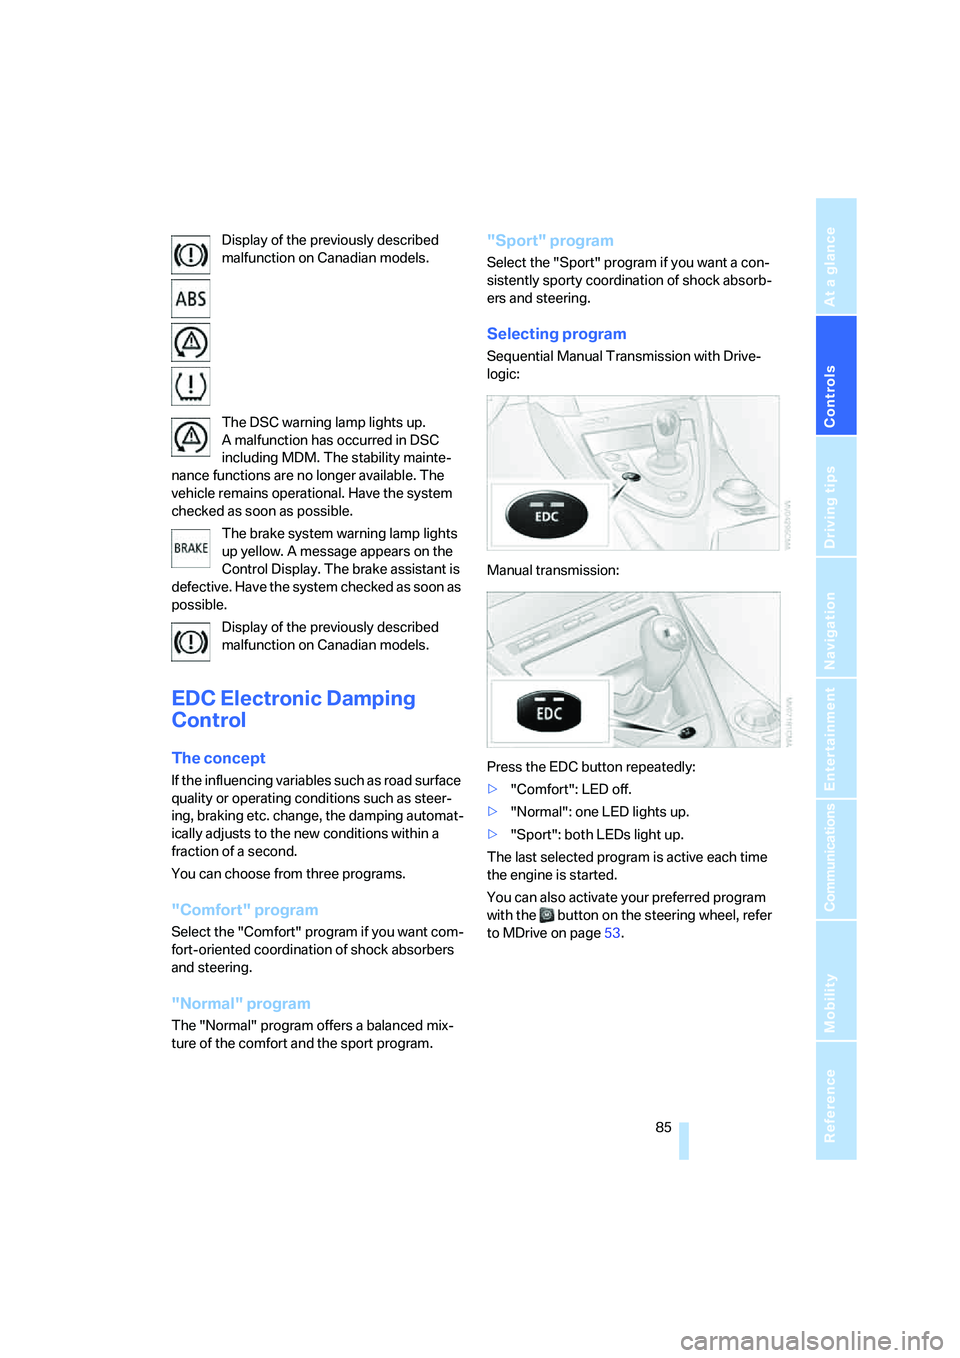
Selecting program
Sequential Manual Transmission with Drive-
logic:
Manual transmission:
Press the EDC button repeatedly:
>"Comfort": LED off.
>"Normal": one LED lights up.
>"Sport": both LEDs light up.
The last selected program is active each time
the engine is started.
You can also activate your preferred program
with the button on the steering wheel, refer
to MDrive on page53.
Page 89 of 262
Controls
87Reference
At a glance
Driving tips
Communications
Navigation
Entertainment
Mobility
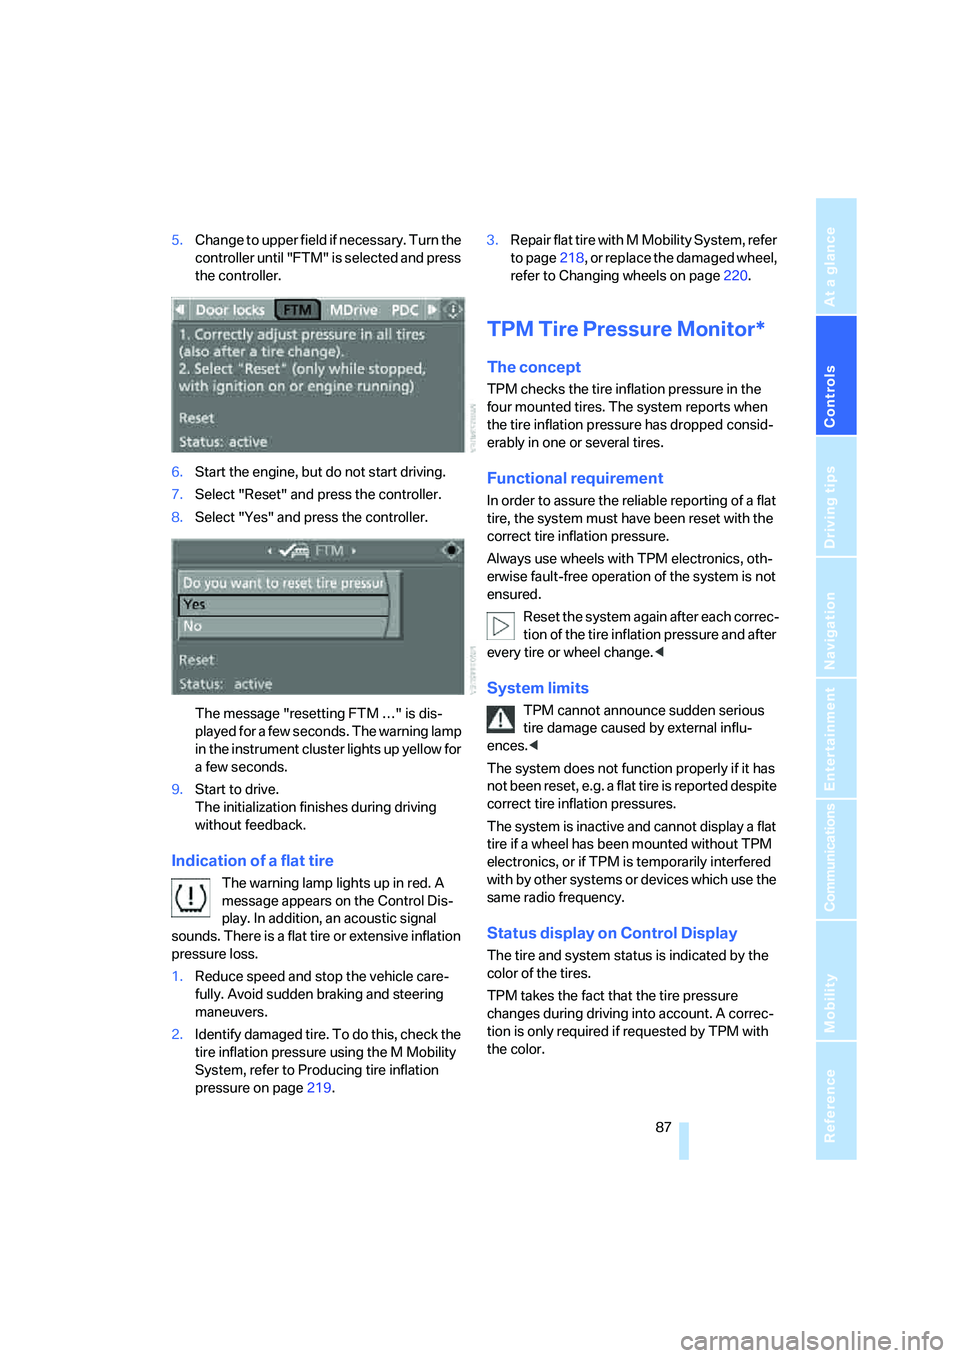
5.Change to upper field if necessary. Turn the
controller until "FTM" is selected and press
the controller.
6.Start the engine, but do not start driving.
7.Select "Reset" and press the controller.
8.Select "Yes" and press the controller.
The message "resetting FTM …" is dis-
played for a few seconds. The warning lamp
in the instrument cluster lights up yellow for
a few seconds.
9.Start to drive.
The initialization finishes during driving
without feedback.
Indication of a flat tire
The warning lamp lights up in red. A
message appears on the Control Dis-
play. In addition, an acoustic signal
sounds. There is a flat tire or extensive inflation
pressure loss.
1.Reduce speed and stop the vehicle care-
fully. Avoid sudden braking and steering
maneuvers.
2.Identify damaged tire. To do this, check the
tire inflation pressure using the M Mobility
System, refer to Producing tire inflation
pressure on page219.3.Repair flat tire with M Mobility System, refer
to page218, or replace the damaged wheel,
refer to Changing wheels on page220.
TPM Tire Pressure Monitor*
The concept
TPM checks the tire inflation pressure in the
four mounted tires. The system reports when
the tire inflation pressure has dropped consid-
erably in one or several tires.
Functional requirement
In order to assure the reliable reporting of a flat
tire, the system must have been reset with the
correct tire inflation pressure.
Always use wheels with TPM electronics, oth-
erwise fault-free operation of the system is not
ensured.
Reset the system again after each correc-
tion of the tire inflation pressure and after
every tire or wheel change.<
System limits
TPM cannot announce sudden serious
tire damage caused by external influ-
ences.<
The system does not function properly if it has
not been reset, e.g. a flat tire is reported despite
correct tire inflation pressures.
The system is inactive and cannot display a flat
tire if a wheel has been mounted without TPM
electronics, or if TPM is temporarily interfered
with by other systems or devices which use the
same radio frequency.
Status display on Control Display
The tire and system status is indicated by the
color of the tires.
TPM takes the fact that the tire pressure
changes during driving into account. A correc-
tion is only required if requested by TPM with
the color.
Page 96 of 262
Technology for comfort, convenience and safety
94
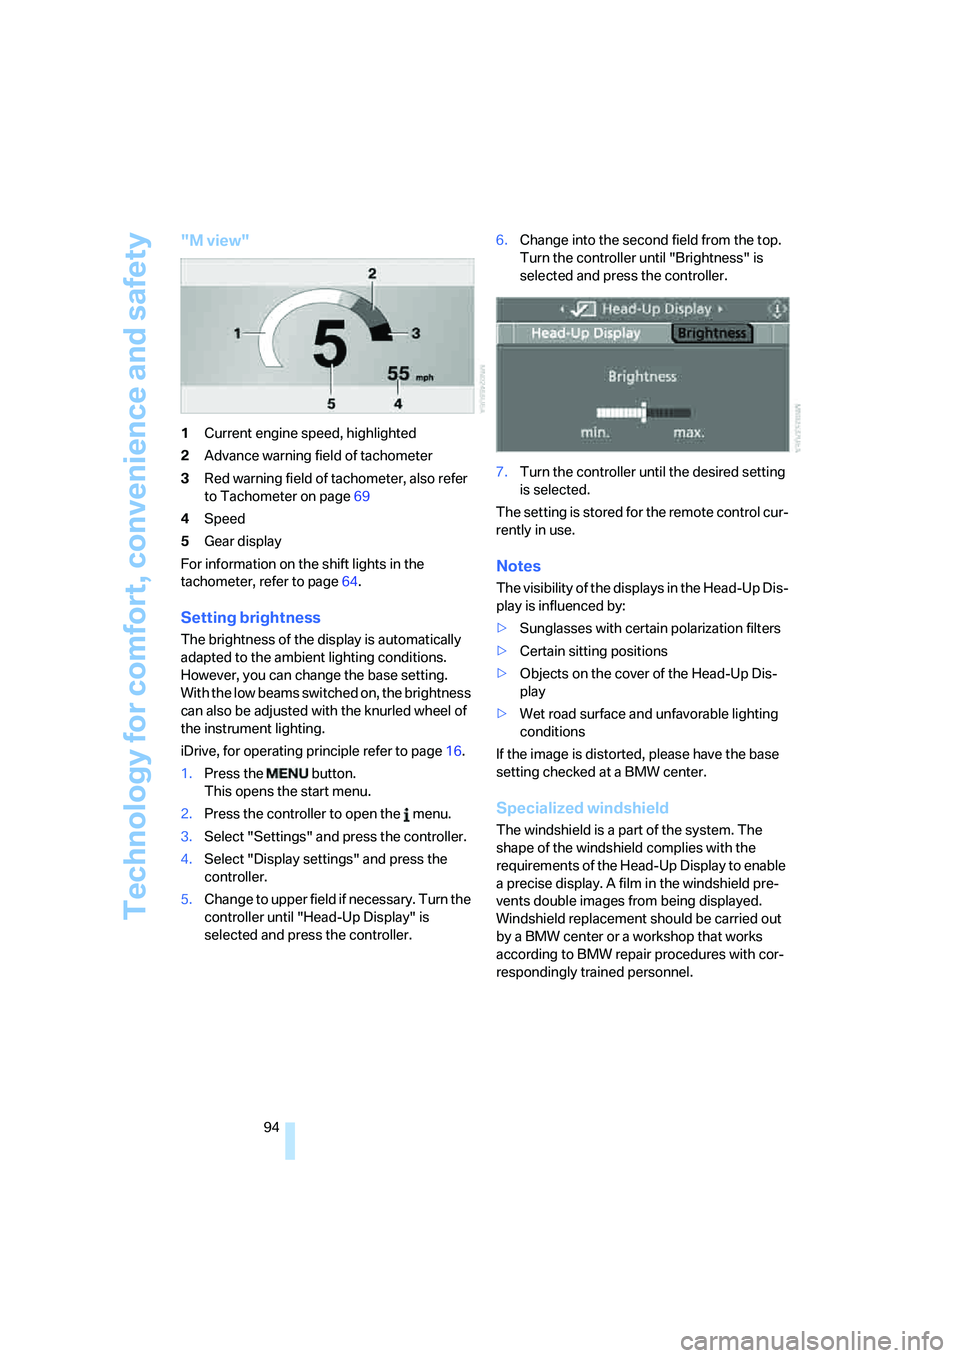
"M view"
1Current engine speed, highlighted
2Advance warning field of tachometer
3Red warning field of tachometer, also refer
to Tachometer on page69
4Speed
5Gear display
For information on the shift lights in the
tachometer, refer to page64.
Setting brightness
The brightness of the display is automatically
adapted to the ambient lighting conditions.
However, you can change the base setting.
With the low beams switched on, the brightness
can also be adjusted with the knurled wheel of
the instrument lighting.
iDrive, for operating principle refer to page16.
1.Press the button.
This opens the start menu.
2.Press the controller to open the menu.
3.Select "Settings" and press the controller.
4.Select "Display settings" and press the
controller.
5.Change to upper field if necessary. Turn the
controller until "Head-Up Display" is
selected and press the controller.6.Change into the second field from the top.
Turn the controller until "Brightness" is
selected and press the controller.
7.Turn the controller until the desired setting
is selected.
The setting is stored for the remote control cur-
rently in use.
Notes
The visibility of the displays in the Head-Up Dis-
play is influenced by:
>Sunglasses with certain polarization filters
>Certain sitting positions
>Objects on the cover of the Head-Up Dis-
play
>Wet road surface and unfavorable lighting
conditions
If the image is distorted, please have the base
setting checked at a BMW center.
Specialized windshield
The windshield is a part of the system. The
shape of the windshield complies with the
requirements of the Head-Up Display to enable
a precise display. A film in the windshield pre-
vents double images from being displayed.
Windshield replacement should be carried out
by a BMW center or a workshop that works
according to BMW repair procedures with cor-
respondingly trained personnel.
Page 110 of 262
Practical interior accessories
108
Practical interior accessories
Integrated universal remote
control*
The concept
The integrated universal remote control can
replace as many as three hand-held transmit-
ters for various remote-controlled accessories,
such as garage and gate or lighting systems.
The integrated universal remote control regis-
ters and stores signals from the original hand-
held transmitters.
The signal of an original hand-held transmitter
can be programmed on one of the three mem-
ory buttons1. After this, the programmed
memory button1 will operate the system in
question. The LED2 flashes to confirm trans-
mission of the signal.
If you sell your vehicle one day, delete the saved
programs beforehand for your own security,
refer to page109.
To prevent possible damage or injury,
before programming or using the inte-
grated universal remote control, always inspect
the immediate area to make certain that no peo-
ple, animals or objects are within the travel
range of the device. Also, comply with the
safety precautions of the original hand-held
transmitter.<
Checking compatibility
If you see this symbol on the packaging
or in the manual supplied with the orig-
inal hand-held transmitter, it is safe to
assume that it is compatible with the integrated
universal remote control.
If you have additional questions, please
contact your BMW center or call:
1-800-355-3515.
Information is also provided on the Internet at:
www.bmwusa.com or
www.homelink.com.
HomeLink is a registered trademark of
Johnson Controls, Inc.<
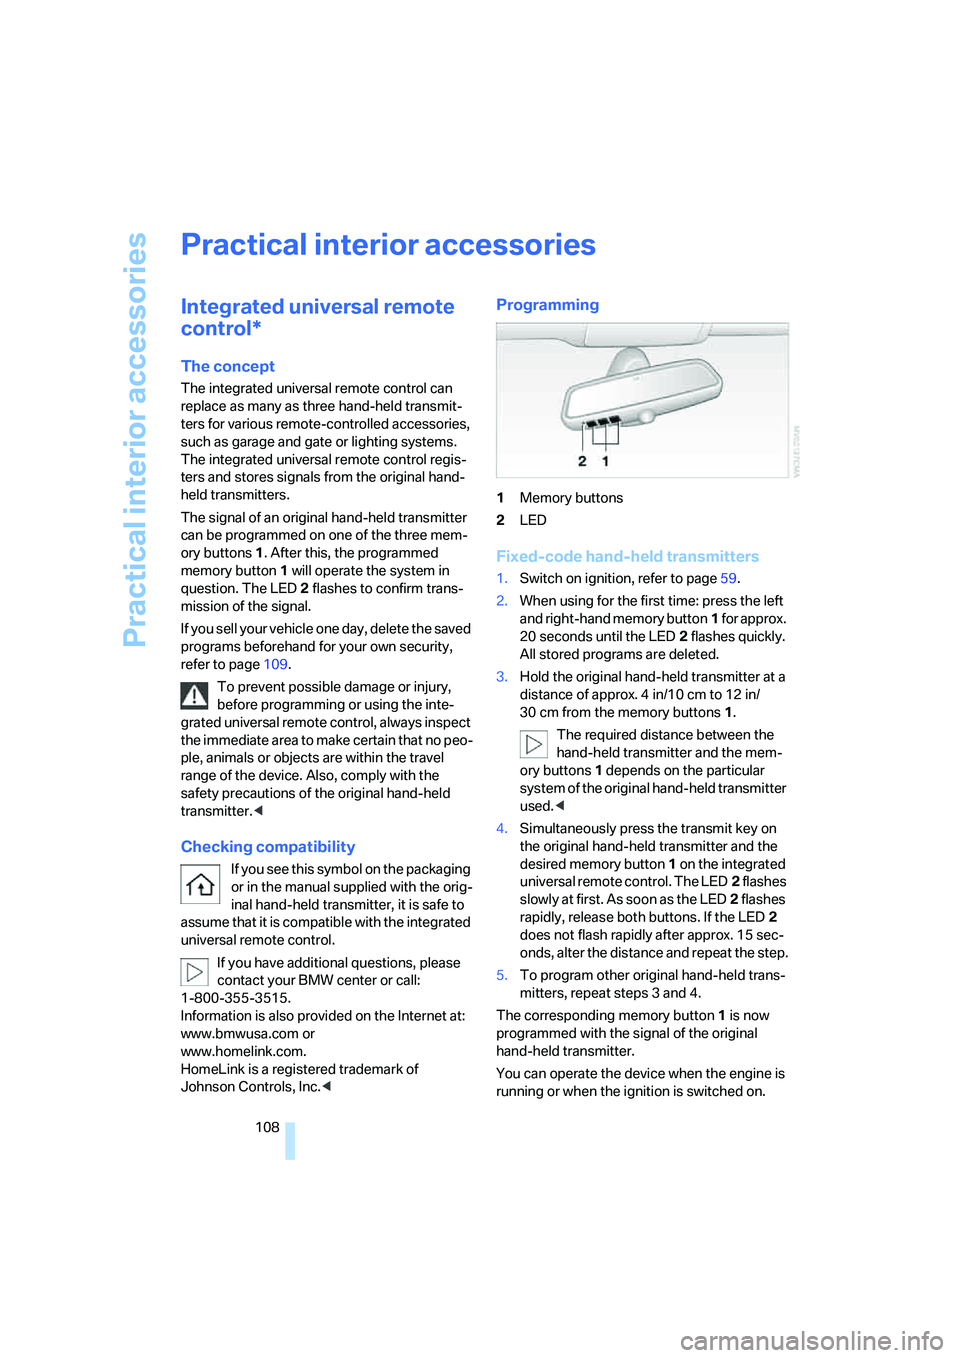
Programming
1Memory buttons
2LED
Fixed-code hand-held transmitters
1.Switch on ignition, refer to page59.
2.When using for the first time: press the left
and right-hand memory button1 for approx.
20 seconds until the LED2 flashes quickly.
All stored programs are deleted.
3.Hold the original hand-held transmitter at a
distance of approx. 4 in/10 cm to 12 in/
30 cm from the memory buttons1.
The required distance between the
hand-held transmitter and the mem-
ory buttons1 depends on the particular
system of the original hand-held transmitter
used.<
4.Simultaneously press the transmit key on
the original hand-held transmitter and the
desired memory button 1 on the integrated
universal remote control. The LED2 flashes
slowly at first. As soon as the LED2 flashes
rapidly, release both buttons. If the LED2
does not flash rapidly after approx. 15 sec-
onds, alter the distance and repeat the step.
5.To program other original hand-held trans-
mitters, repeat steps 3 and 4.
The corresponding memory button 1 is now
programmed with the signal of the original
hand-held transmitter.
You can operate the device when the engine is
running or when the ignition is switched on.