light BMW M6 CONVERTIBLE 2010 E64 Owner's Manual
[x] Cancel search | Manufacturer: BMW, Model Year: 2010, Model line: M6 CONVERTIBLE, Model: BMW M6 CONVERTIBLE 2010 E64Pages: 250, PDF Size: 8.4 MB
Page 13 of 250
At a glance
11Reference
Controls
Driving tips
Communications
Navigation
Entertainment
Mobility
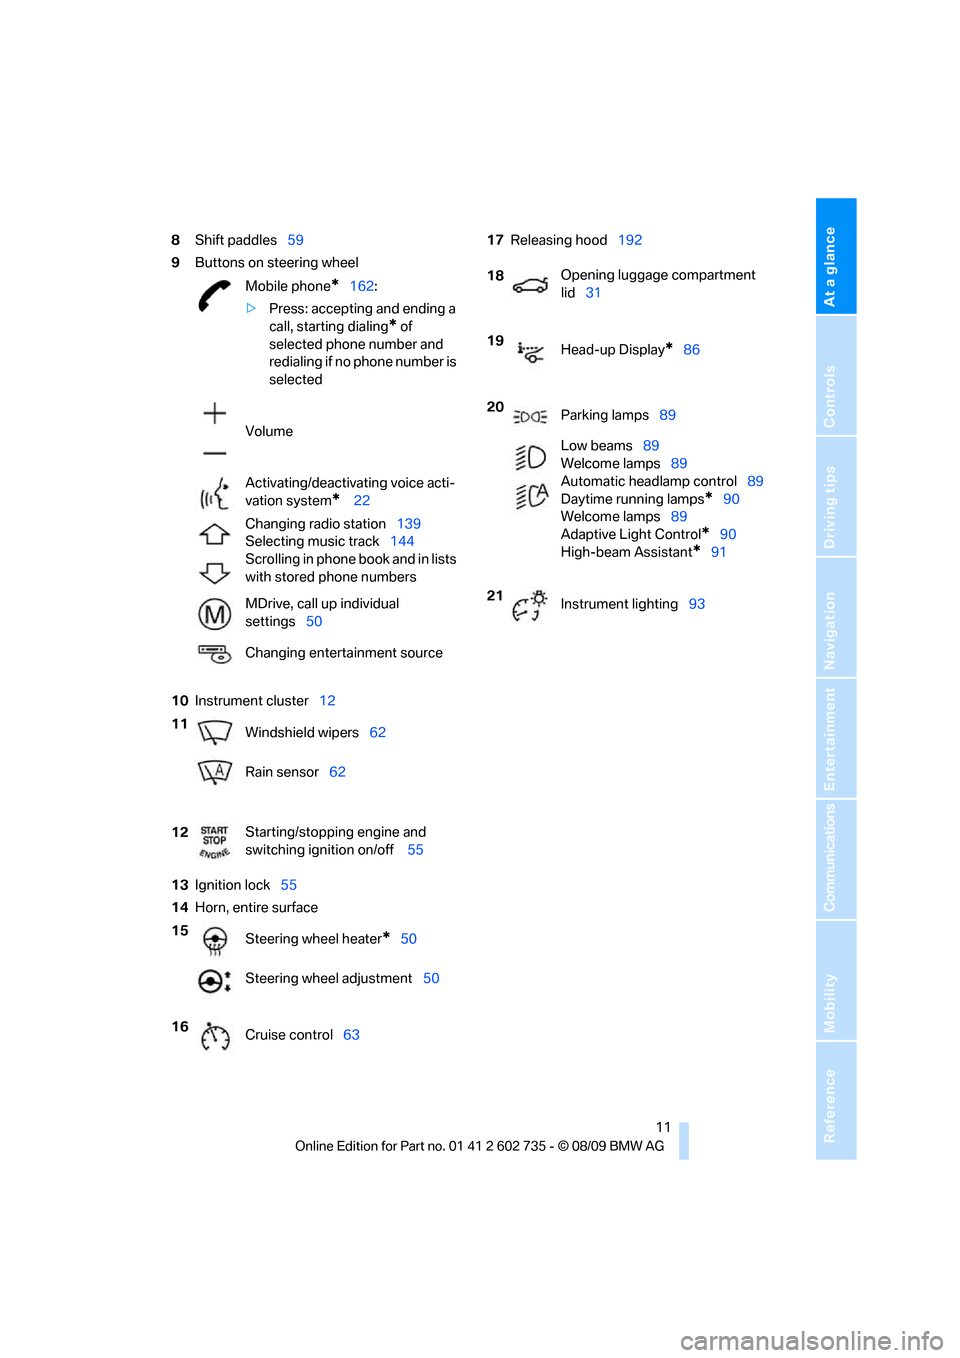
8Shift paddles59
9Buttons on steering wheel
10Instrument cluster12
13Ignition lock55
14Horn, entire surface17Releasing hood192
Mobile phone
*162:
>Press: accepting and ending a
call, starting dialing
* of
selected phone number and
redialing if no phone number is
selected
Volume
Activating/deactivating voice acti-
vation system
* 22
Changing radio station139
Selecting music track144
Scrolling in phone book and in lists
with stored phone numbers
MDrive, call up individual
settings50
Changing entertainment source
11
Windshield wipers62
Rain sensor62
12Starting/stopping engine and
switching ignition on/off 55
15
Steering wheel heater
*50
Steering wheel adjustment50
16
Cruise control63
18Opening luggage compartment
lid31
19
Head-up Display
*86
20
Parking lamps89
Low beams89
Welcome lamps89
Automatic headlamp control89
Daytime running lamps
*90
Welcome lamps89
Adaptive Light Control
*90
High-beam Assistant
*91
21
Instrument lighting93
Page 15 of 250
At a glance
13Reference
Controls
Driving tips
Communications
Navigation
Entertainment
Mobility
Indicator and warning lamps
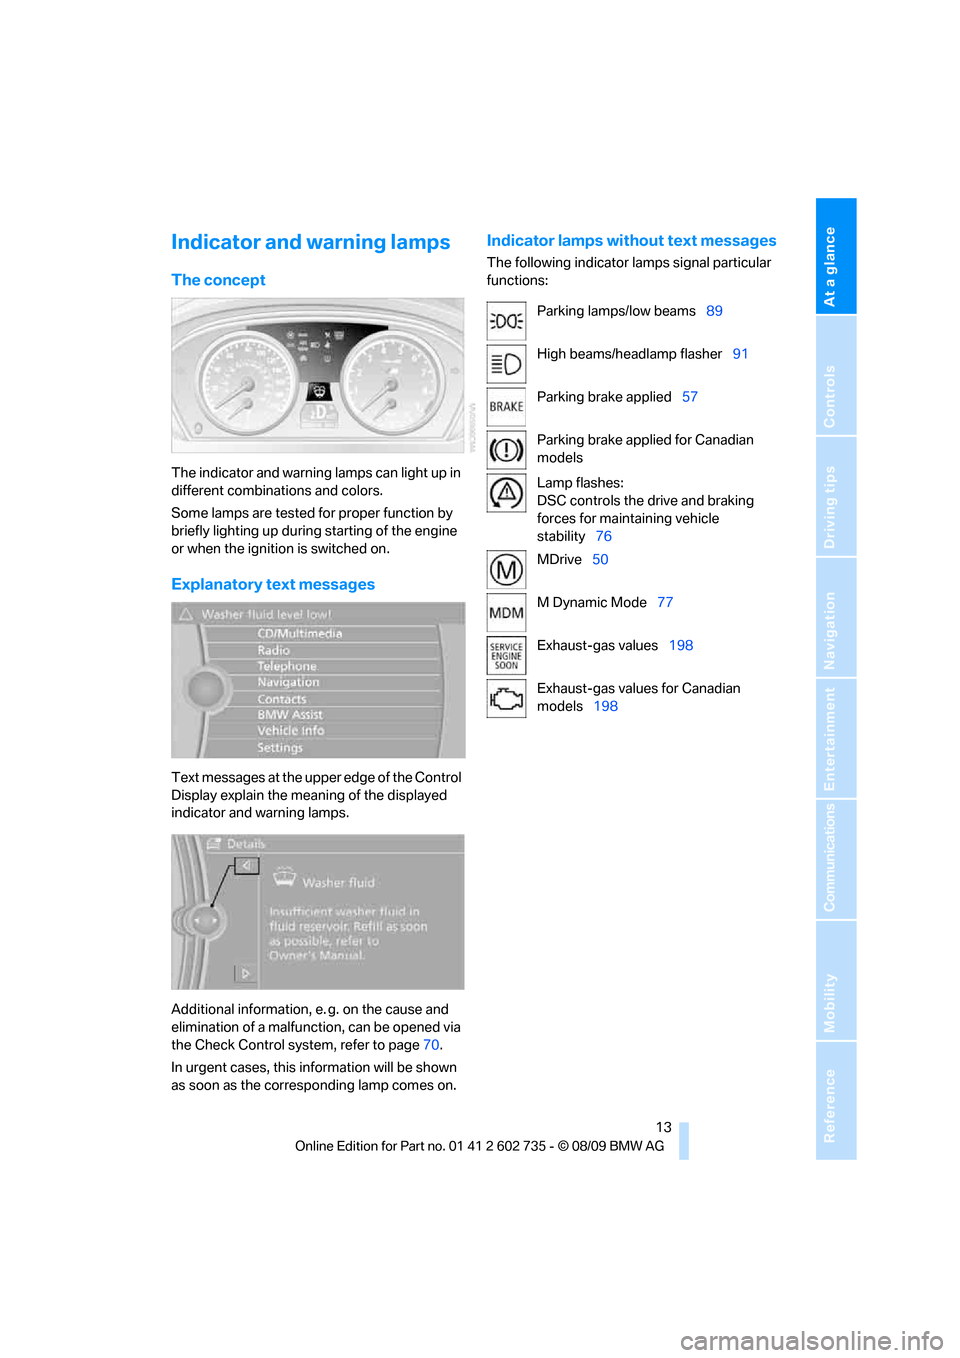
The concept
The indicator and warning lamps can light up in
different combinations and colors.
Some lamps are tested for proper function by
briefly lighting up during starting of the engine
or when the ignition is switched on.
Explanatory text messages
Text messages at the upper edge of the Control
Display explain the meaning of the displayed
indicator and warning lamps.
Additional information, e. g. on the cause and
elimination of a malfunction, can be opened via
the Check Control system, refer to page70.
In urgent cases, this information will be shown
as soon as the corresponding lamp comes on.
Indicator lamps without text messages
The following indicator lamps signal particular
functions:
Parking lamps/low beams89
High beams/headlamp flasher91
Parking brake applied57
Parking brake applied for Canadian
models
Lamp flashes:
DSC controls the drive and braking
forces for maintaining vehicle
stability76
MDrive50
M Dynamic Mode77
Exhaust-gas values198
Exhaust-gas values for Canadian
models198
Page 19 of 250
At a glance
17Reference
Controls
Driving tips
Communications
Navigation
Entertainment
Mobility
Basic operation
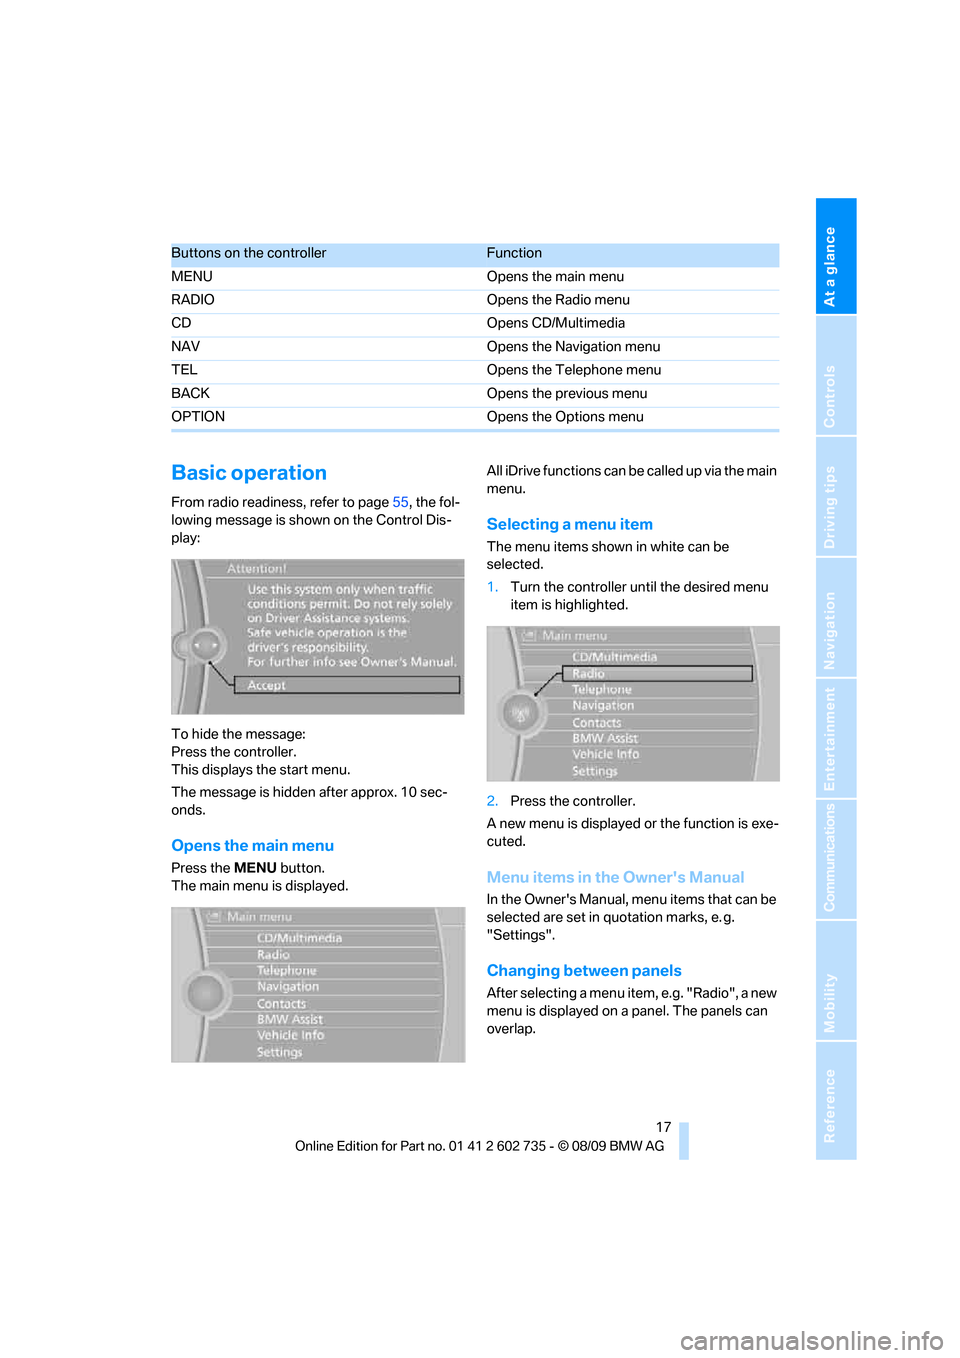
From radio readiness, refer to page55, the fol-
lowing message is shown on the Control Dis-
play:
To hide the message:
Press the controller.
This displays the start menu.
The message is hidden after approx. 10 sec-
onds.
Opens the main menu
Press the MENU button.
The main menu is displayed.All iDrive functions can be called up via the main
menu.
Selecting a menu item
The menu items shown in white can be
selected.
1.Turn the controller until the desired menu
item is highlighted.
2.Press the controller.
A new menu is displayed or the function is exe-
cuted.
Menu items in the Owner's Manual
In the Owner's Manual, menu items that can be
selected are set in quotation marks, e. g.
"Settings".
Changing between panels
After selecting a menu item, e.g. "Radio", a new
menu is displayed on a panel. The panels can
overlap.
Buttons on the controllerFunction
MENU Opens the main menu
RADIO Opens the Radio menu
CD Opens CD/Multimedia
NAV Opens the Navigation menu
TEL Opens the Telephone menu
BACK Opens the previous menu
OPTION Opens the Options menu
Page 20 of 250
iDrive
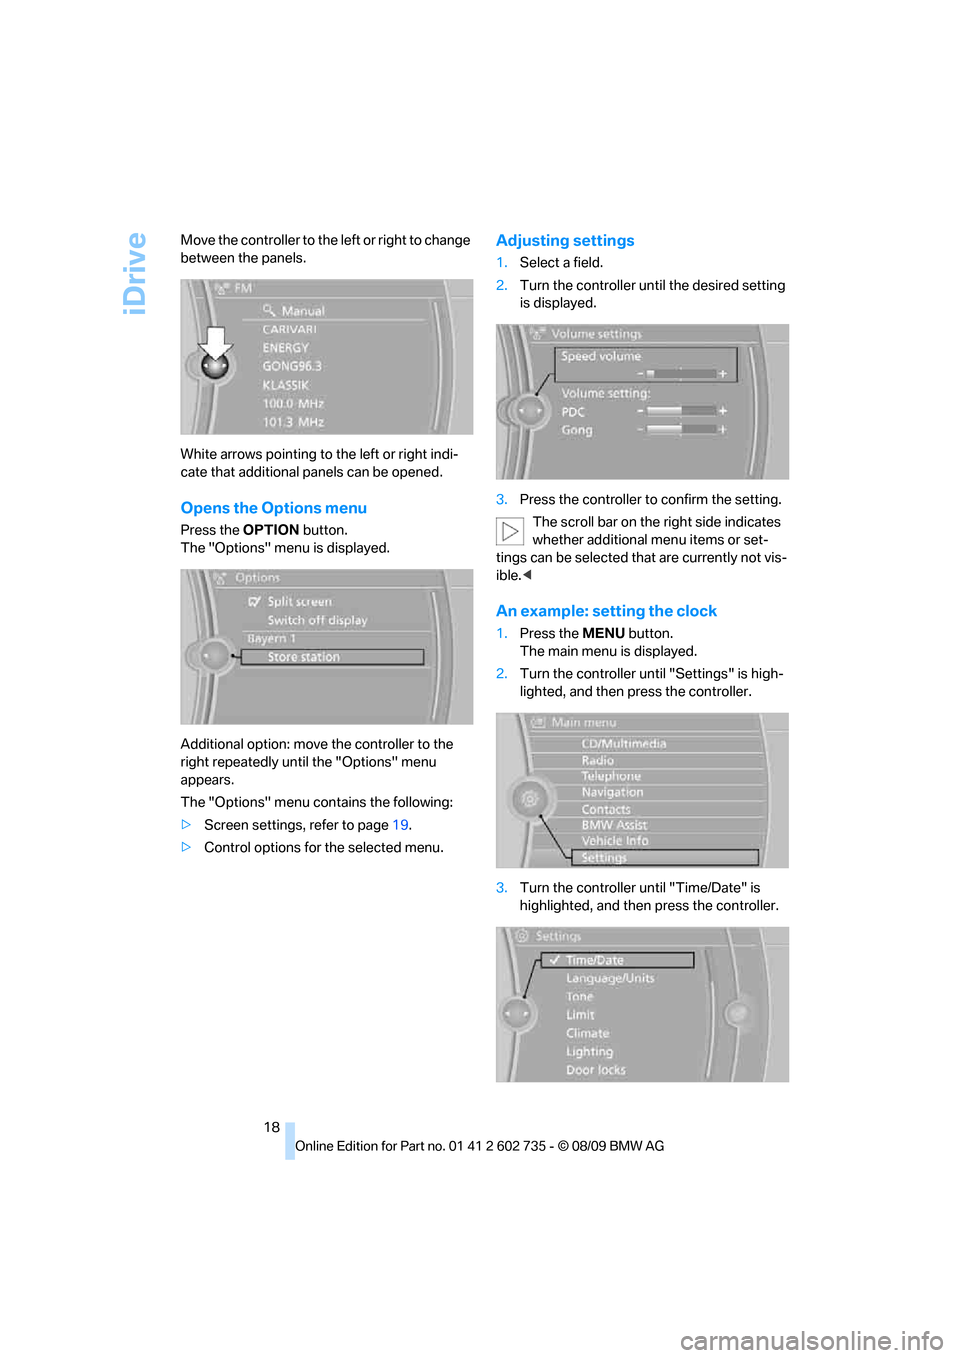
18 Move the controller to the left or right to change
between the panels.
White arrows pointing to the left or right indi-
cate that additional panels can be opened.
Opens the Options menu
Press the OPTION button.
The "Options" menu is displayed.
Additional option: move the controller to the
right repeatedly until the "Options" menu
appears.
The "Options" menu contains the following:
>Screen settings, refer to page19.
>Control options for the selected menu.
Adjusting settings
1.Select a field.
2.Turn the controller until the desired setting
is displayed.
3.Press the controller to confirm the setting.
The scroll bar on the right side indicates
whether additional menu items or set-
tings can be selected that are currently not vis-
ible.<
An example: setting the clock
1.Press the MENU button.
The main menu is displayed.
2.Turn the controller until "Settings" is high-
lighted, and then press the controller.
3.Turn the controller until "Time/Date" is
highlighted, and then press the controller.
Page 21 of 250
At a glance
19Reference
Controls
Driving tips
Communications
Navigation
Entertainment
Mobility
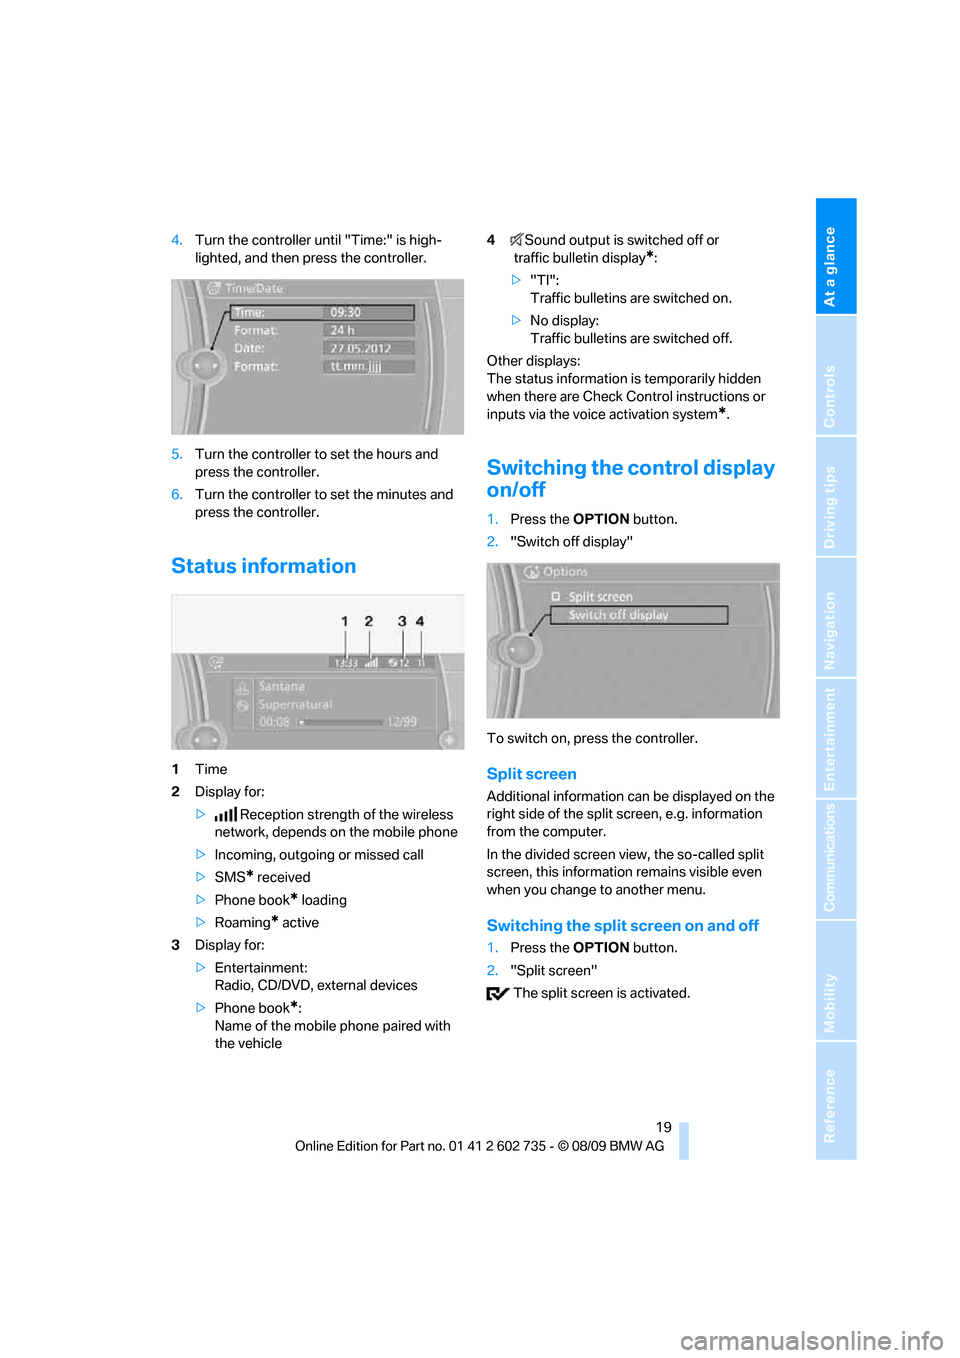
4.Turn the controller until "Time:" is high-
lighted, and then press the controller.
5.Turn the controller to set the hours and
press the controller.
6.Turn the controller to set the minutes and
press the controller.
Status information
1Time
2Display for:
>Reception strength of the wireless
network, depends on the mobile phone
>Incoming, outgoing or missed call
>SMS
* received
>Phone book
* loading
>Roaming
* active
3Display for:
>Entertainment:
Radio, CD/DVD, external devices
>Phone book
*:
Name of the mobile phone paired with
the vehicle4Sound output is switched off or
traffic bulletin display
*:
>"TI":
Traffic bulletins are switched on.
>No display:
Traffic bulletins are switched off.
Other displays:
The status information is temporarily hidden
when there are Check Control instructions or
inputs via the voice activation system
*.
Switching the control display
on/off
1.Press the OPTION button.
2."Switch off display"
To switch on, press the controller.
Split screen
Additional information can be displayed on the
right side of the split screen, e.g. information
from the computer.
In the divided screen view, the so-called split
screen, this information remains visible even
when you change to another menu.
Switching the split screen on and off
1.Press the OPTION button.
2."Split screen"
The split screen is activated.
Page 22 of 250
iDrive
20
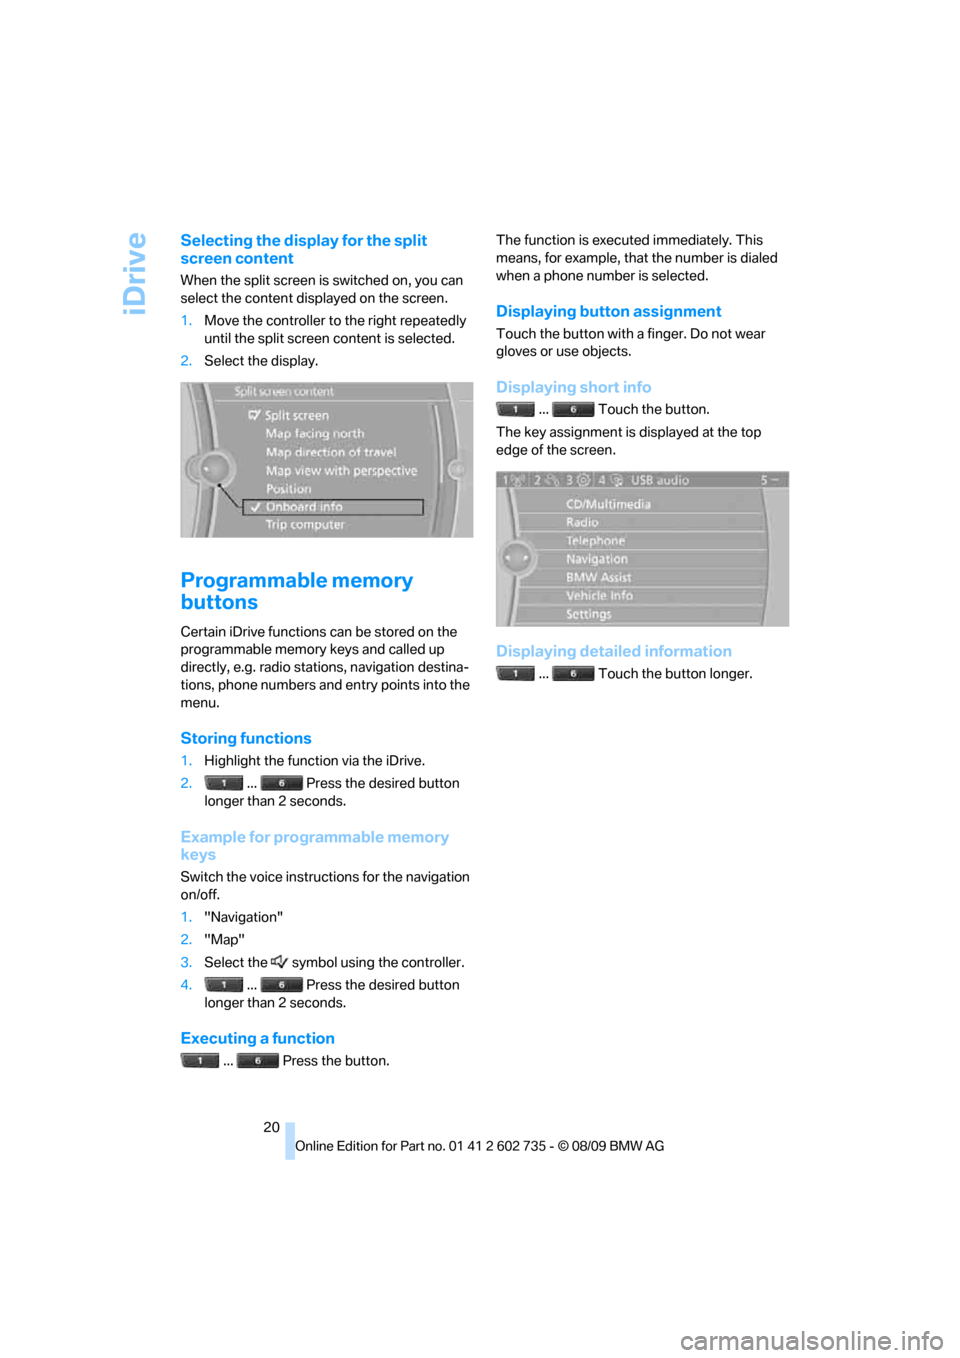
Selecting the display for the split
screen content
When the split screen is switched on, you can
select the content displayed on the screen.
1.Move the controller to the right repeatedly
until the split screen content is selected.
2.Select the display.
Programmable memory
buttons
Certain iDrive functions can be stored on the
programmable memory keys and called up
directly, e.g. radio stations, navigation destina-
tions, phone numbers and entry points into the
menu.
Storing functions
1.Highlight the function via the iDrive.
2.... Press the desired button
longer than 2 seconds.
Example for programmable memory
keys
Switch the voice instructions for the navigation
on/off.
1."Navigation"
2."Map"
3.Select the symbol using the controller.
4.... Press the desired button
longer than 2 seconds.
Executing a function
... Press the button.The function is executed immediately. This
means, for example, that the number is dialed
when a phone number is selected.
Displaying button assignment
Touch the button with a finger. Do not wear
gloves or use objects.
Displaying short info
... Touch the button.
The key assignment is displayed at the top
edge of the screen.
Displaying detailed information
... Touch the button longer.
Page 29 of 250
Controls
27Reference
At a glance
Driving tips
Communications
Navigation
Entertainment
Mobility
the vehicle is unlocked, the corresponding
remote control is detected and the settings
stored for it are called up and carried out.
This means that you will always find your BMW
set to your own personal settings even if
another person with his/her own remote control
and settings has used the vehicle since the last
time you drove it. The individual settings are
stored for a maximum of four remote controls,
for two with Comfort Access
*.
Personal Profile settings
Details on the settings are provided on the
specified pages.
>Behavior of the central locking system
when unlocking vehicle, refer to page28
>Automatic locking of the vehicle, refer to
page30
>Displays on Control Display:
>12h/24h clock mode, refer to page70
>Date format, refer to page70
>Brightness of the Control Display, refer
to page74
>Units of measure for consumption,
route/distances, temperature and pres-
sure, refer to page68
>Language on the Control Display, refer
to page73
>Lighting settings:
>Triple turn signal activation, refer to
page61
>Welcome lamps, refer to page89
>Pathway lighting, refer to page90
>Daytime running lamps
*, refer to
page90
>High-beam Assistant
*, refer to page91
>Drivelogic driving program in the Sequential
mode, refer to page59
>Individual settings for MDrive, refer to
page50
>PDC Park Distance Control
*: optical warn-
ing, refer to page75>Head-up Display
*: selection and brightness
of display, refer to page86
>Automatic climate control: for AUTO pro-
gram and intensity, cooling function, and
automatic recirculated air control/recircu-
lated air mode, temperature, air distribution,
temperature in the upper body region, refer
to page95
>Navigation system
*: voice instructions for
destination guidance, refer to page127
In addition, the following, most recently
selected settings are recalled during unlocking:
>Programmable memory buttons: selecting
stored functions, refer to page20
>Driver's seat, exterior-mirror and steering-
wheel position, refer to page45
>Audio sources: volume and tone settings,
refer to page136
>Radio: display of stored stations, refer to
page141
>Phone: adjusting volume, refer to page165
Central locking system
The concept
The central locking system functions when the
driver's door is closed.
The system simultaneously engages and
releases the locks on the following:
>Doors
>Compartment in the front center console
>Luggage compartment lid
>Fuel filler flap
Operating from outside
>Via the remote control
>Using door lock
>With Comfort Access
* via the door handles
These actions operate the anti-theft system
* at
the same time. It prevents the doors from being
unlocked using the lock buttons or door han-
dles. The interior lamps and the courtesy
lamps
* are also switched on and off with the
Page 36 of 250
Opening and closing
34
Tilt alarm sensor
The tilt of the vehicle is monitored. The alarm
system reacts, e.g. in case of an attempted
wheel theft or towing.
Interior motion sensor
Coupe:
The condition for proper operation of the inte-
rior motion sensor is closed windows.
Convertible:
Monitors the interior up to the height of the seat
cushions. This means that the alarm system,
including the interior motion sensor, is armed
even if the convertible top is open. Falling
objects, e.g. leaves, can trigger false alarms,
refer to Avoiding unintentional alarms.
Avoiding unintentional alarms
The tilt alarm sensor and interior motion sensor
may be switched off at the same time. This pre-
vents unintentional alarms, e.g. in the following
situations:
>In two-level garages
>When transporting on car-carrying trains,
by sea or on a trailer
>When animals are to remain in the vehicle
Switching off tilt alarm sensor and
interior motion sensor
Press the button on the remote control
again as soon as the vehicle is locked.
The indicator lamp lights up briefly and then
flashes continuously. The tilt alarm sensor and
the interior motion sensor are switched off until
the next time the vehicle is unlocked and subse-
quently locked again.
Comfort Access*
Comfort Access allows you to access your vehi-
cle without having to hold the remote control in
your hand. It is sufficient to carry the remote
control with you, e.g. in your jacket pocket. The
vehicle automatically detects the associated
remote control in the immediate vicinity or in
the interior.Comfort Access supports the following func-
tions:
>Unlocking/locking vehicle
>Convenient closing with Coupe
>Opening luggage compartment lid sepa-
rately
>Starting engine
Functional requirement
>The vehicle or the luggage compartment lid
can only be locked if the vehicle detects that
the remote control you are carrying is out-
side the vehicle.
>The next unlocking and locking cycle is not
possible until after approx. 2 seconds.
>The engine can only be started if the vehicle
detects that the remote control is located in
the vehicle.
Comparison with ordinary remote
control
You can control the functions mentioned previ-
ously with the Comfort Access or by pressing
the buttons on the remote control. Therefore,
please familiarize yourself with the information
on opening and closing beginning on page26
beforehand.
The special features when using Comfort
Access are described in the following.
Should a short delay occur when opening
or closing the windows or the convertible
top, the system is checking whether a remote
control is located in the vehicle. Please repeat
opening or closing if necessary.<
Page 37 of 250
Controls
35Reference
At a glance
Driving tips
Communications
Navigation
Entertainment
Mobility
Unlocking
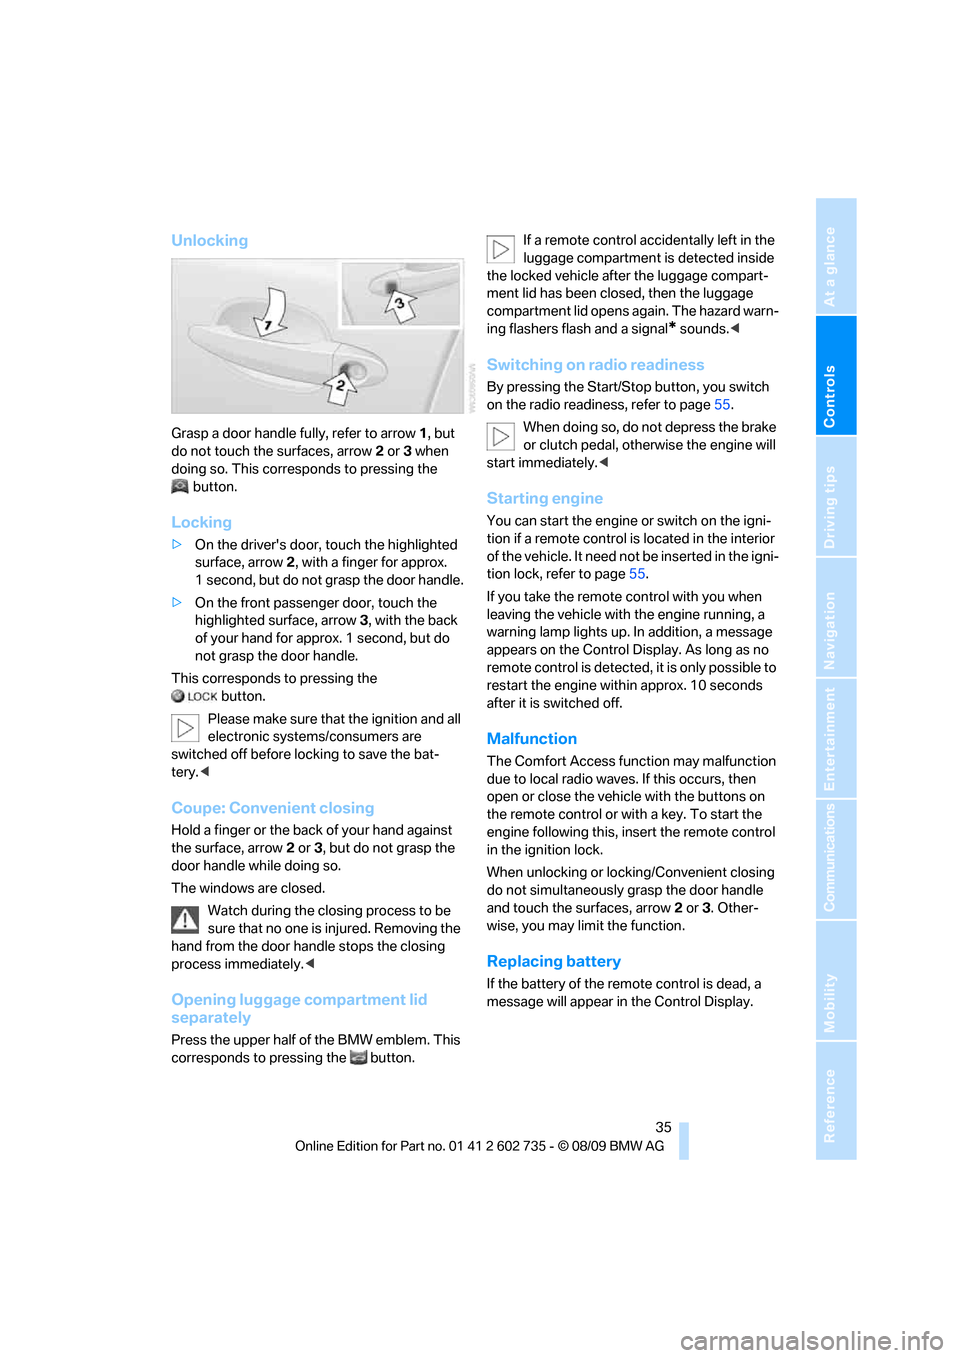
Grasp a door handle fully, refer to arrow1, but
do not touch the surfaces, arrow2 or 3 when
doing so. This corresponds to pressing the
button.
Locking
>On the driver's door, touch the highlighted
surface, arrow2, with a finger for approx.
1 second, but do not grasp the door handle.
>On the front passenger door, touch the
highlighted surface, arrow3, with the back
of your hand for approx. 1 second, but do
not grasp the door handle.
This corresponds to pressing the
button.
Please make sure that the ignition and all
electronic systems/consumers are
switched off before locking to save the bat-
tery.<
Coupe: Convenient closing
Hold a finger or the back of your hand against
the surface, arrow2 or 3, but do not grasp the
door handle while doing so.
The windows are closed.
Watch during the closing process to be
sure that no one is injured. Removing the
hand from the door handle stops the closing
process immediately.<
Opening luggage compartment lid
separately
Press the upper half of the BMW emblem. This
corresponds to pressing the button.If a remote control accidentally left in the
luggage compartment is detected inside
the locked vehicle after the luggage compart-
ment lid has been closed, then the luggage
compartment lid opens again. The hazard warn-
ing flashers flash and a signal
* sounds.<
Switching on radio readiness
By pressing the Start/Stop button, you switch
on the radio readiness, refer to page55.
When doing so, do not depress the brake
or clutch pedal, otherwise the engine will
start immediately.<
Starting engine
You can start the engine or switch on the igni-
tion if a remote control is located in the interior
of the vehicle. It need not be inserted in the igni-
tion lock, refer to page55.
If you take the remote control with you when
leaving the vehicle with the engine running, a
warning lamp lights up. In addition, a message
appears on the Control Display. As long as no
remote control is detected, it is only possible to
restart the engine within approx. 10 seconds
after it is switched off.
Malfunction
The Comfort Access function may malfunction
due to local radio waves. If this occurs, then
open or close the vehicle with the buttons on
the remote control or with a key. To start the
engine following this, insert the remote control
in the ignition lock.
When unlocking or locking/Convenient closing
do not simultaneously grasp the door handle
and touch the surfaces, arrow2 or 3. Other-
wise, you may limit the function.
Replacing battery
If the battery of the remote control is dead, a
message will appear in the Control Display.
Page 39 of 250
Controls
37Reference
At a glance
Driving tips
Communications
Navigation
Entertainment
Mobility
Together
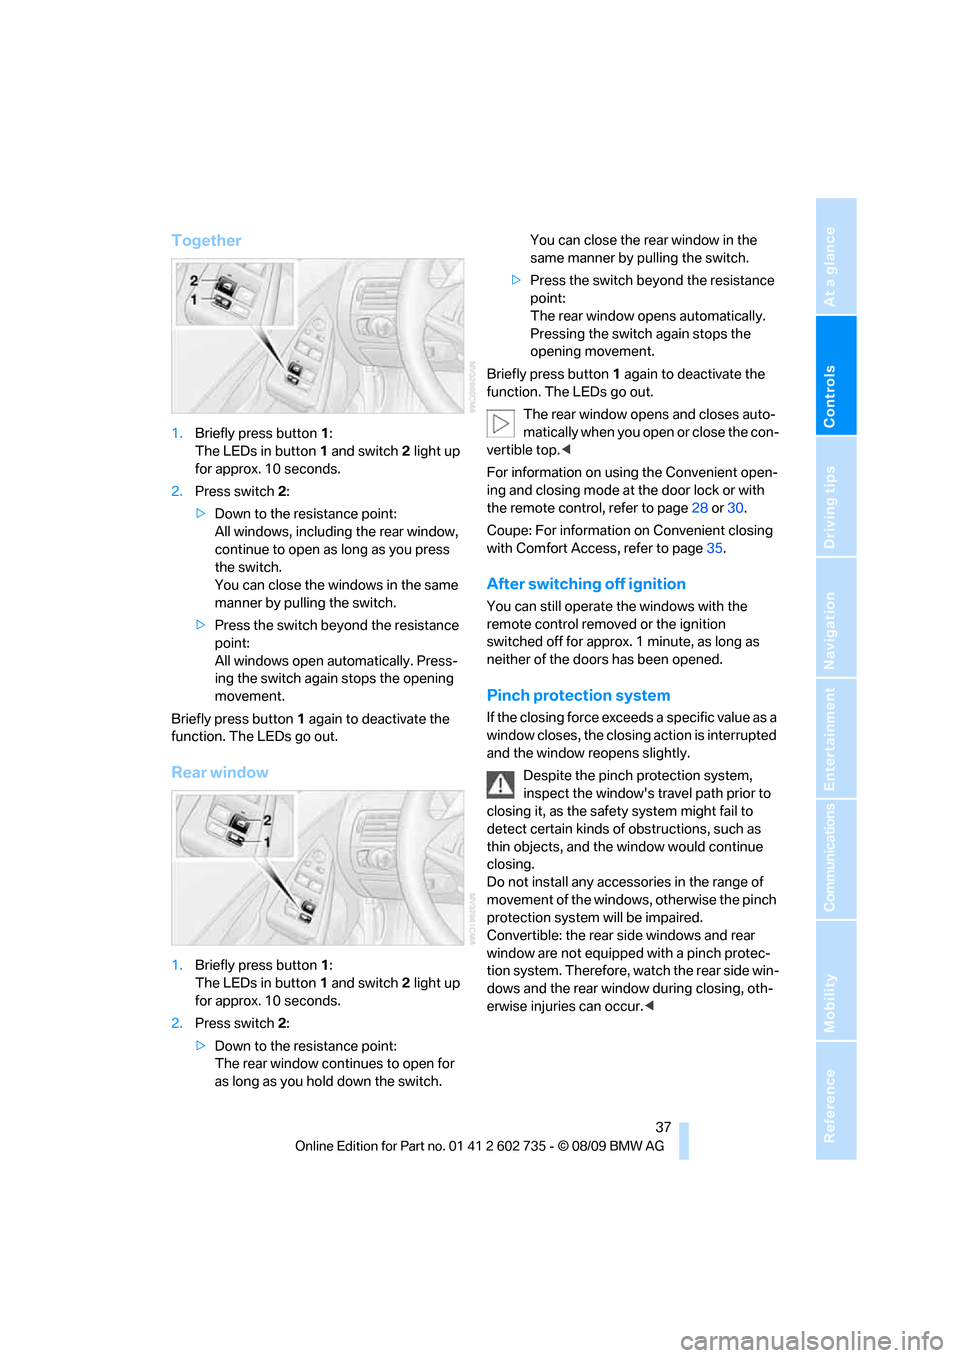
1.Briefly press button1:
The LEDs in button1 and switch2 light up
for approx. 10 seconds.
2.Press switch 2:
>Down to the resistance point:
All windows, including the rear window,
continue to open as long as you press
the switch.
You can close the windows in the same
manner by pulling the switch.
>Press the switch beyond the resistance
point:
All windows open automatically. Press-
ing the switch again stops the opening
movement.
Briefly press button 1 again to deactivate the
function. The LEDs go out.
Rear window
1.Briefly press button1:
The LEDs in button1 and switch2 light up
for approx. 10 seconds.
2.Press switch 2:
>Down to the resistance point:
The rear window continues to open for
as long as you hold down the switch.You can close the rear window in the
same manner by pulling the switch.
>Press the switch beyond the resistance
point:
The rear window opens automatically.
Pressing the switch again stops the
opening movement.
Briefly press button 1 again to deactivate the
function. The LEDs go out.
The rear window opens and closes auto-
matically when you open or close the con-
vertible top.<
For information on using the Convenient open-
ing and closing mode at the door lock or with
the remote control, refer to page28 or30.
Coupe: For information on Convenient closing
with Comfort Access, refer to page35.
After switching off ignition
You can still operate the windows with the
remote control removed or the ignition
switched off for approx. 1 minute, as long as
neither of the doors has been opened.
Pinch protection system
If the closing force exceeds a specific value as a
window closes, the closing action is interrupted
and the window reopens slightly.
Despite the pinch protection system,
inspect the window's travel path prior to
closing it, as the safety system might fail to
detect certain kinds of obstructions, such as
thin objects, and the window would continue
closing.
Do not install any accessories in the range of
movement of the windows, otherwise the pinch
protection system will be impaired.
Convertible: the rear side windows and rear
window are not equipped with a pinch protec-
tion system. Therefore, watch the rear side win-
dows and the rear window during closing, oth-
erwise injuries can occur.<