remote start BMW M6 CONVERTIBLE 2010 E64 Owner's Manual
[x] Cancel search | Manufacturer: BMW, Model Year: 2010, Model line: M6 CONVERTIBLE, Model: BMW M6 CONVERTIBLE 2010 E64Pages: 250, PDF Size: 8.4 MB
Page 28 of 250
Opening and closing
26
Opening and closing
Keys/remote control
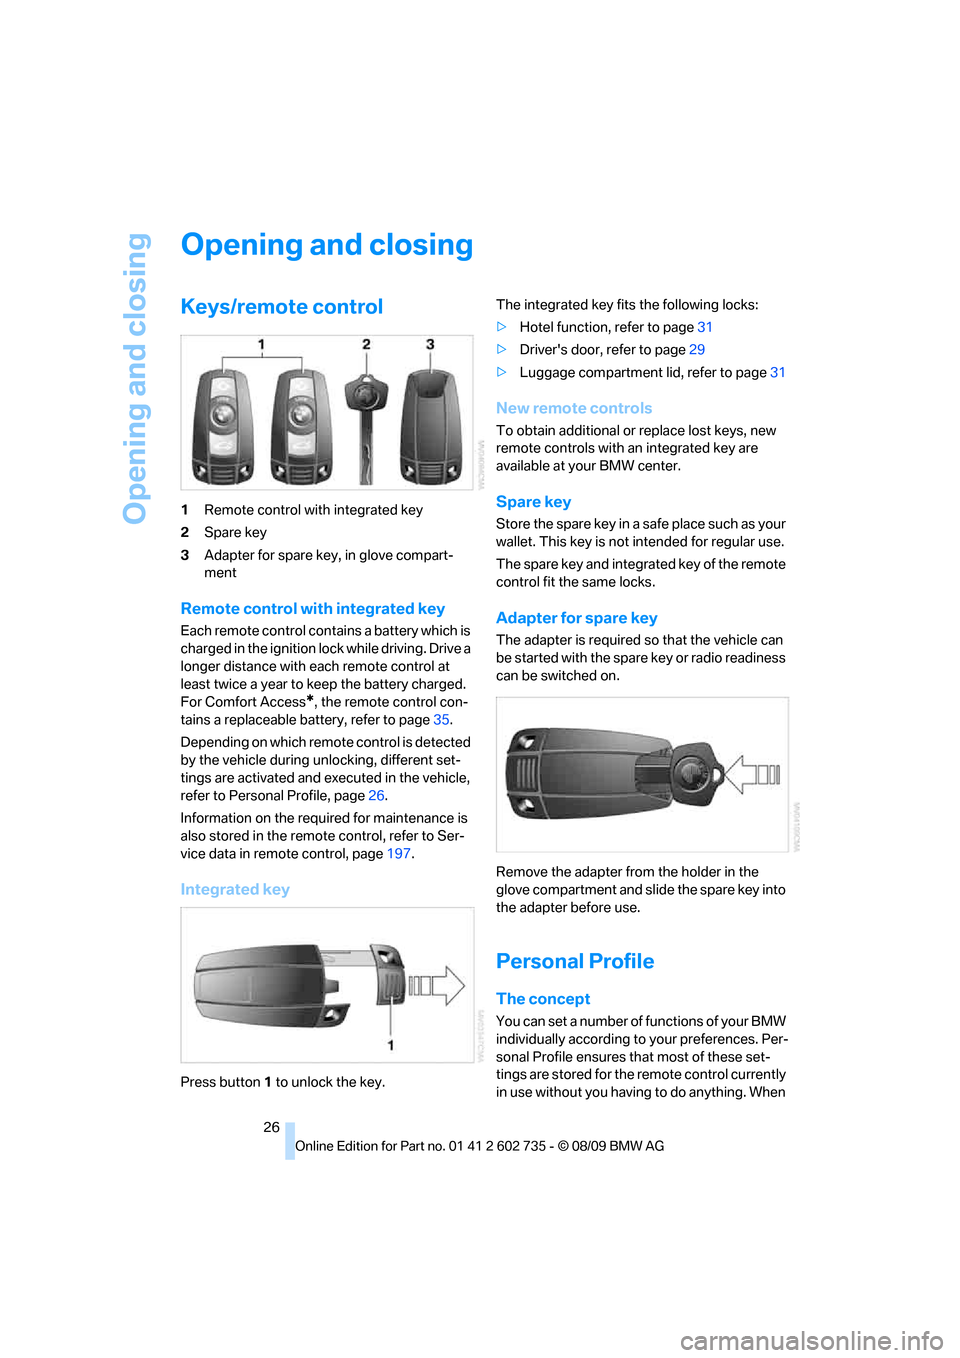
1Remote control with integrated key
2Spare key
3Adapter for spare key, in glove compart-
ment
Remote control with integrated key
Each remote control contains a battery which is
charged in the ignition lock while driving. Drive a
longer distance with each remote control at
least twice a year to keep the battery charged.
For Comfort Access
*, the remote control con-
tains a replaceable battery, refer to page35.
Depending on which remote control is detected
by the vehicle during unlocking, different set-
tings are activated and executed in the vehicle,
refer to Personal Profile, page26.
Information on the required for maintenance is
also stored in the remote control, refer to Ser-
vice data in remote control, page197.
Integrated key
Press button1 to unlock the key.The integrated key fits the following locks:
>Hotel function, refer to page31
>Driver's door, refer to page29
>Luggage compartment lid, refer to page31
New remote controls
To obtain additional or replace lost keys, new
remote controls with an integrated key are
available at your BMW center.
Spare key
Store the spare key in a safe place such as your
wallet. This key is not intended for regular use.
The spare key and integrated key of the remote
control fit the same locks.
Adapter for spare key
The adapter is required so that the vehicle can
be started with the spare key or radio readiness
can be switched on.
Remove the adapter from the holder in the
glove compartment and slide the spare key into
the adapter before use.
Personal Profile
The concept
You can set a number of functions of your BMW
individually according to your preferences. Per-
sonal Profile ensures that most of these set-
tings are stored for the remote control currently
in use without you having to do anything. When
Page 32 of 250
Opening and closing
30
When unlocking
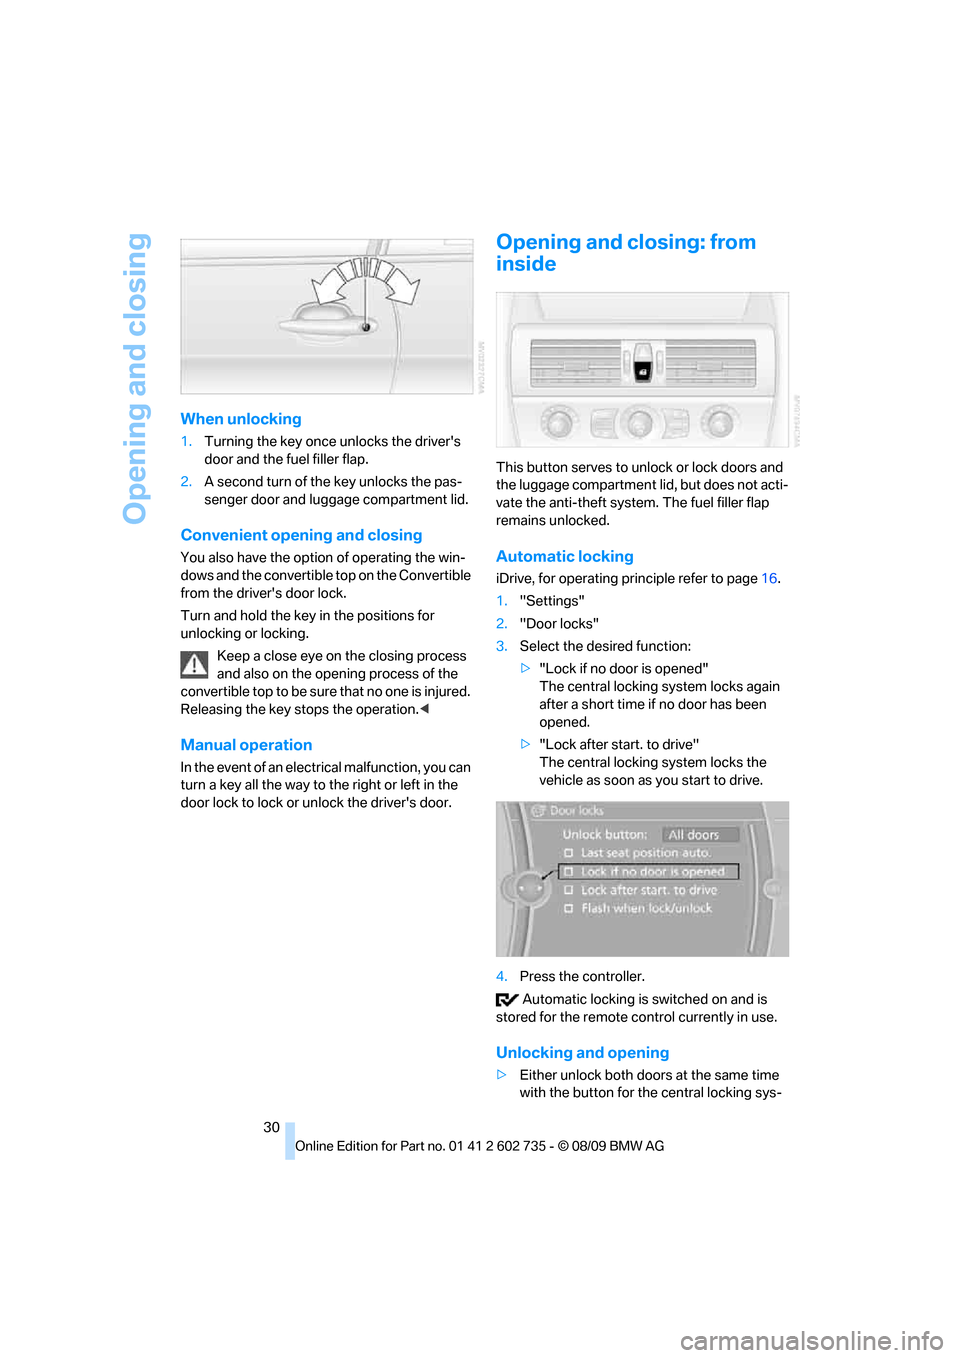
1.Turning the key once unlocks the driver's
door and the fuel filler flap.
2.A second turn of the key unlocks the pas-
senger door and luggage compartment lid.
Convenient opening and closing
You also have the option of operating the win-
dows and the convertible top on the Convertible
from the driver's door lock.
Turn and hold the key in the positions for
unlocking or locking.
Keep a close eye on the closing process
and also on the opening process of the
convertible top to be sure that no one is injured.
Releasing the key stops the operation.<
Manual operation
In the event of an electrical malfunction, you can
turn a key all the way to the right or left in the
door lock to lock or unlock the driver's door.
Opening and closing: from
inside
This button serves to unlock or lock doors and
the luggage compartment lid, but does not acti-
vate the anti-theft system. The fuel filler flap
remains unlocked.
Automatic locking
iDrive, for operating principle refer to page16.
1."Settings"
2."Door locks"
3.Select the desired function:
>"Lock if no door is opened"
The central locking system locks again
after a short time if no door has been
opened.
>"Lock after start. to drive"
The central locking system locks the
vehicle as soon as you start to drive.
4.Press the controller.
Automatic locking is switched on and is
stored for the remote control currently in use.
Unlocking and opening
>Either unlock both doors at the same time
with the button for the central locking sys-
Page 36 of 250
Opening and closing
34
Tilt alarm sensor
The tilt of the vehicle is monitored. The alarm
system reacts, e.g. in case of an attempted
wheel theft or towing.
Interior motion sensor
Coupe:
The condition for proper operation of the inte-
rior motion sensor is closed windows.
Convertible:
Monitors the interior up to the height of the seat
cushions. This means that the alarm system,
including the interior motion sensor, is armed
even if the convertible top is open. Falling
objects, e.g. leaves, can trigger false alarms,
refer to Avoiding unintentional alarms.
Avoiding unintentional alarms
The tilt alarm sensor and interior motion sensor
may be switched off at the same time. This pre-
vents unintentional alarms, e.g. in the following
situations:
>In two-level garages
>When transporting on car-carrying trains,
by sea or on a trailer
>When animals are to remain in the vehicle
Switching off tilt alarm sensor and
interior motion sensor
Press the button on the remote control
again as soon as the vehicle is locked.
The indicator lamp lights up briefly and then
flashes continuously. The tilt alarm sensor and
the interior motion sensor are switched off until
the next time the vehicle is unlocked and subse-
quently locked again.
Comfort Access*
Comfort Access allows you to access your vehi-
cle without having to hold the remote control in
your hand. It is sufficient to carry the remote
control with you, e.g. in your jacket pocket. The
vehicle automatically detects the associated
remote control in the immediate vicinity or in
the interior.Comfort Access supports the following func-
tions:
>Unlocking/locking vehicle
>Convenient closing with Coupe
>Opening luggage compartment lid sepa-
rately
>Starting engine
Functional requirement
>The vehicle or the luggage compartment lid
can only be locked if the vehicle detects that
the remote control you are carrying is out-
side the vehicle.
>The next unlocking and locking cycle is not
possible until after approx. 2 seconds.
>The engine can only be started if the vehicle
detects that the remote control is located in
the vehicle.
Comparison with ordinary remote
control
You can control the functions mentioned previ-
ously with the Comfort Access or by pressing
the buttons on the remote control. Therefore,
please familiarize yourself with the information
on opening and closing beginning on page26
beforehand.
The special features when using Comfort
Access are described in the following.
Should a short delay occur when opening
or closing the windows or the convertible
top, the system is checking whether a remote
control is located in the vehicle. Please repeat
opening or closing if necessary.<
Page 37 of 250
Controls
35Reference
At a glance
Driving tips
Communications
Navigation
Entertainment
Mobility
Unlocking
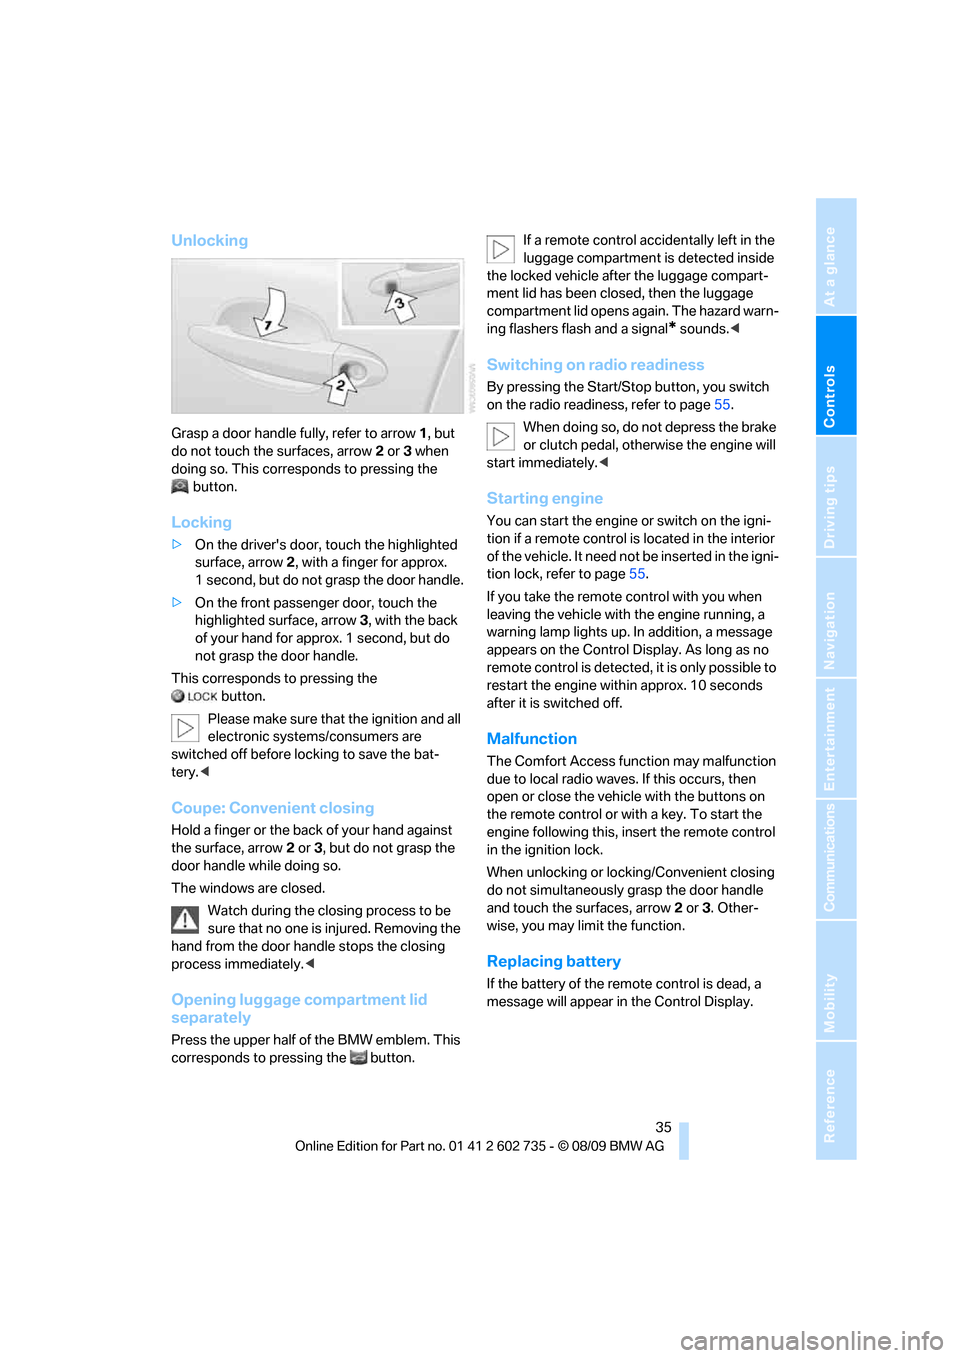
Grasp a door handle fully, refer to arrow1, but
do not touch the surfaces, arrow2 or 3 when
doing so. This corresponds to pressing the
button.
Locking
>On the driver's door, touch the highlighted
surface, arrow2, with a finger for approx.
1 second, but do not grasp the door handle.
>On the front passenger door, touch the
highlighted surface, arrow3, with the back
of your hand for approx. 1 second, but do
not grasp the door handle.
This corresponds to pressing the
button.
Please make sure that the ignition and all
electronic systems/consumers are
switched off before locking to save the bat-
tery.<
Coupe: Convenient closing
Hold a finger or the back of your hand against
the surface, arrow2 or 3, but do not grasp the
door handle while doing so.
The windows are closed.
Watch during the closing process to be
sure that no one is injured. Removing the
hand from the door handle stops the closing
process immediately.<
Opening luggage compartment lid
separately
Press the upper half of the BMW emblem. This
corresponds to pressing the button.If a remote control accidentally left in the
luggage compartment is detected inside
the locked vehicle after the luggage compart-
ment lid has been closed, then the luggage
compartment lid opens again. The hazard warn-
ing flashers flash and a signal
* sounds.<
Switching on radio readiness
By pressing the Start/Stop button, you switch
on the radio readiness, refer to page55.
When doing so, do not depress the brake
or clutch pedal, otherwise the engine will
start immediately.<
Starting engine
You can start the engine or switch on the igni-
tion if a remote control is located in the interior
of the vehicle. It need not be inserted in the igni-
tion lock, refer to page55.
If you take the remote control with you when
leaving the vehicle with the engine running, a
warning lamp lights up. In addition, a message
appears on the Control Display. As long as no
remote control is detected, it is only possible to
restart the engine within approx. 10 seconds
after it is switched off.
Malfunction
The Comfort Access function may malfunction
due to local radio waves. If this occurs, then
open or close the vehicle with the buttons on
the remote control or with a key. To start the
engine following this, insert the remote control
in the ignition lock.
When unlocking or locking/Convenient closing
do not simultaneously grasp the door handle
and touch the surfaces, arrow2 or 3. Other-
wise, you may limit the function.
Replacing battery
If the battery of the remote control is dead, a
message will appear in the Control Display.
Page 57 of 250
Controls
55Reference
At a glance
Driving tips
Communications
Navigation
Entertainment
Mobility
Driving
Ignition lock
Inserting remote control into ignition
lock
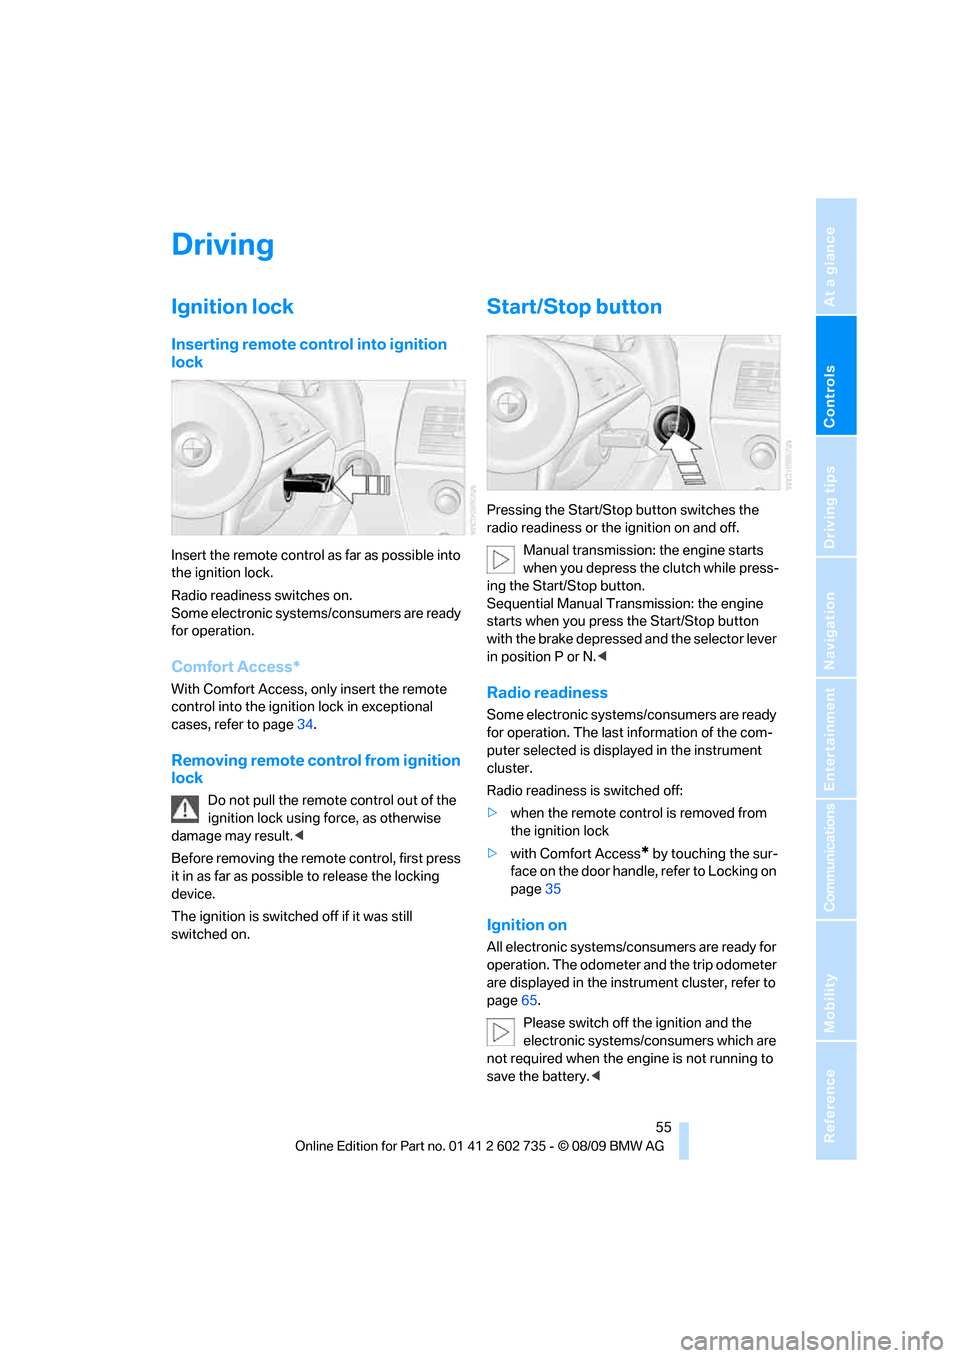
Insert the remote control as far as possible into
the ignition lock.
Radio readiness switches on.
Some electronic systems/consumers are ready
for operation.
Comfort Access*
With Comfort Access, only insert the remote
control into the ignition lock in exceptional
cases, refer to page34.
Removing remote control from ignition
lock
Do not pull the remote control out of the
ignition lock using force, as otherwise
damage may result.<
Before removing the remote control, first press
it in as far as possible to release the locking
device.
The ignition is switched off if it was still
switched on.
Start/Stop button
Pressing the Start/Stop button switches the
radio readiness or the ignition on and off.
Manual transmission: the engine starts
when you depress the clutch while press-
ing the Start/Stop button.
Sequential Manual Transmission: the engine
starts when you press the Start/Stop button
with the brake depressed and the selector lever
in position P or N.<
Radio readiness
Some electronic systems/consumers are ready
for operation. The last information of the com-
puter selected is displayed in the instrument
cluster.
Radio readiness is switched off:
>when the remote control is removed from
the ignition lock
>with Comfort Access
* by touching the sur-
face on the door handle, refer to Locking on
page35
Ignition on
All electronic systems/consumers are ready for
operation. The odometer and the trip odometer
are displayed in the instrument cluster, refer to
page65.
Please switch off the ignition and the
electronic systems/consumers which are
not required when the engine is not running to
save the battery.<
Page 58 of 250
Driving
56
Radio readiness and ignition switched
off
All indicator and warning lamps in the instru-
ment cluster go out.
Starting engine
Do not run the engine in enclosed areas,
otherwise the inhalation of toxic exhaust
gases can cause loss of consciousness and
death. The exhaust gases contain carbon mon-
oxide, an odorless and colorless, but highly
toxic gas.
Never leave an unattended vehicle with the
engine running, as such a vehicle represents a
potential safety hazard.
Before leaving the vehicle with the engine run-
ning, shift into neutral
* or move the selector
lever into position N and firmly apply the park-
ing brake, otherwise the vehicle can begin to
roll.<
Avoid frequent starting in quick succes-
sion or repeated starting attempts in
which the engine does not start. Otherwise, the
fuel is not burned or inadequately burned and
there is a danger of overheating and damaging
the catalytic converter.<
Do not allow the engine to warm up by leaving it
running while the vehicle remains stationary.
Instead, begin to drive at a moderate engine
speed.
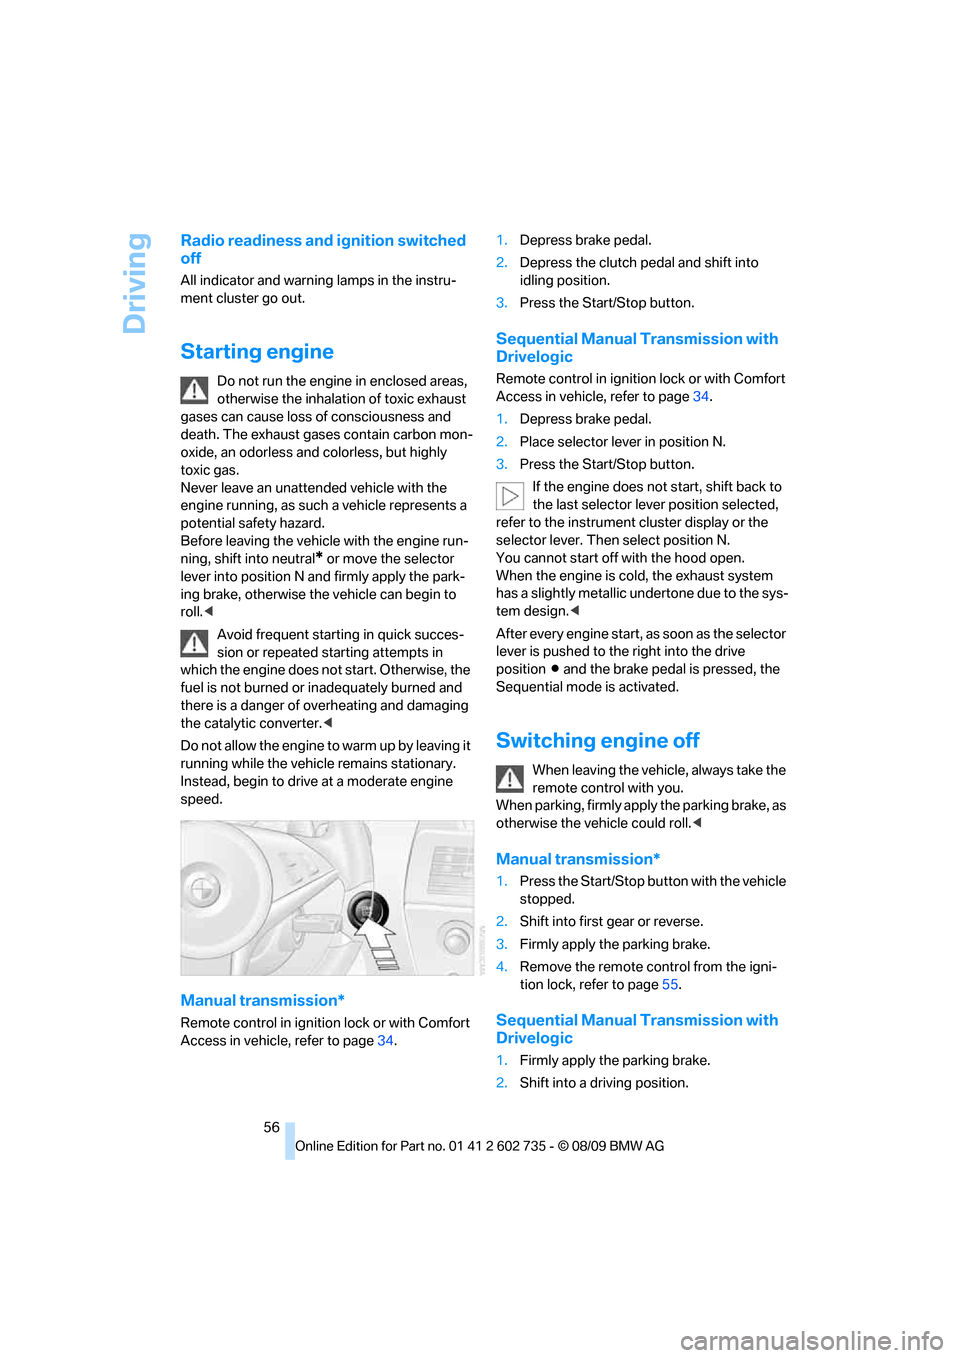
Manual transmission*
Remote control in ignition lock or with Comfort
Access in vehicle, refer to page34.1.Depress brake pedal.
2.Depress the clutch pedal and shift into
idling position.
3.Press the Start/Stop button.
Sequential Manual Transmission with
Drivelogic
Remote control in ignition lock or with Comfort
Access in vehicle, refer to page34.
1.Depress brake pedal.
2.Place selector lever in position N.
3.Press the Start/Stop button.
If the engine does not start, shift back to
the last selector lever position selected,
refer to the instrument cluster display or the
selector lever. Then select position N.
You cannot start off with the hood open.
When the engine is cold, the exhaust system
has a slightly metallic undertone due to the sys-
tem design.<
After every engine start, as soon as the selector
lever is pushed to the right into the drive
positionΒ and the brake pedal is pressed, the
Sequential mode is activated.
Switching engine off
When leaving the vehicle, always take the
remote control with you.
When parking, firmly apply the parking brake, as
otherwise the vehicle could roll.<
Manual transmission*
1.Press the Start/Stop button with the vehicle
stopped.
2.Shift into first gear or reverse.
3.Firmly apply the parking brake.
4.Remove the remote control from the igni-
tion lock, refer to page55.
Sequential Manual Transmission with
Drivelogic
1.Firmly apply the parking brake.
2.Shift into a driving position.
Page 59 of 250
Controls
57Reference
At a glance
Driving tips
Communications
Navigation
Entertainment
Mobility
3.Press the Start/Stop button.
If N is engaged when switching off the
engine, this will be pointed out to you visu-
ally and acoustically.
4.Remove the remote control from the igni-
tion lock, refer to page55.
Parking brake
The parking brake is primarily intended to pre-
vent the vehicle from rolling while parked; it
brakes the rear wheels.
Indicator lamp
The indicator lamp lights up, and a sig-
nal sounds when you drive away. The
parking brake is applied.
Indicator lamp for Canadian models.
Applying
The lever locks in position automatically.
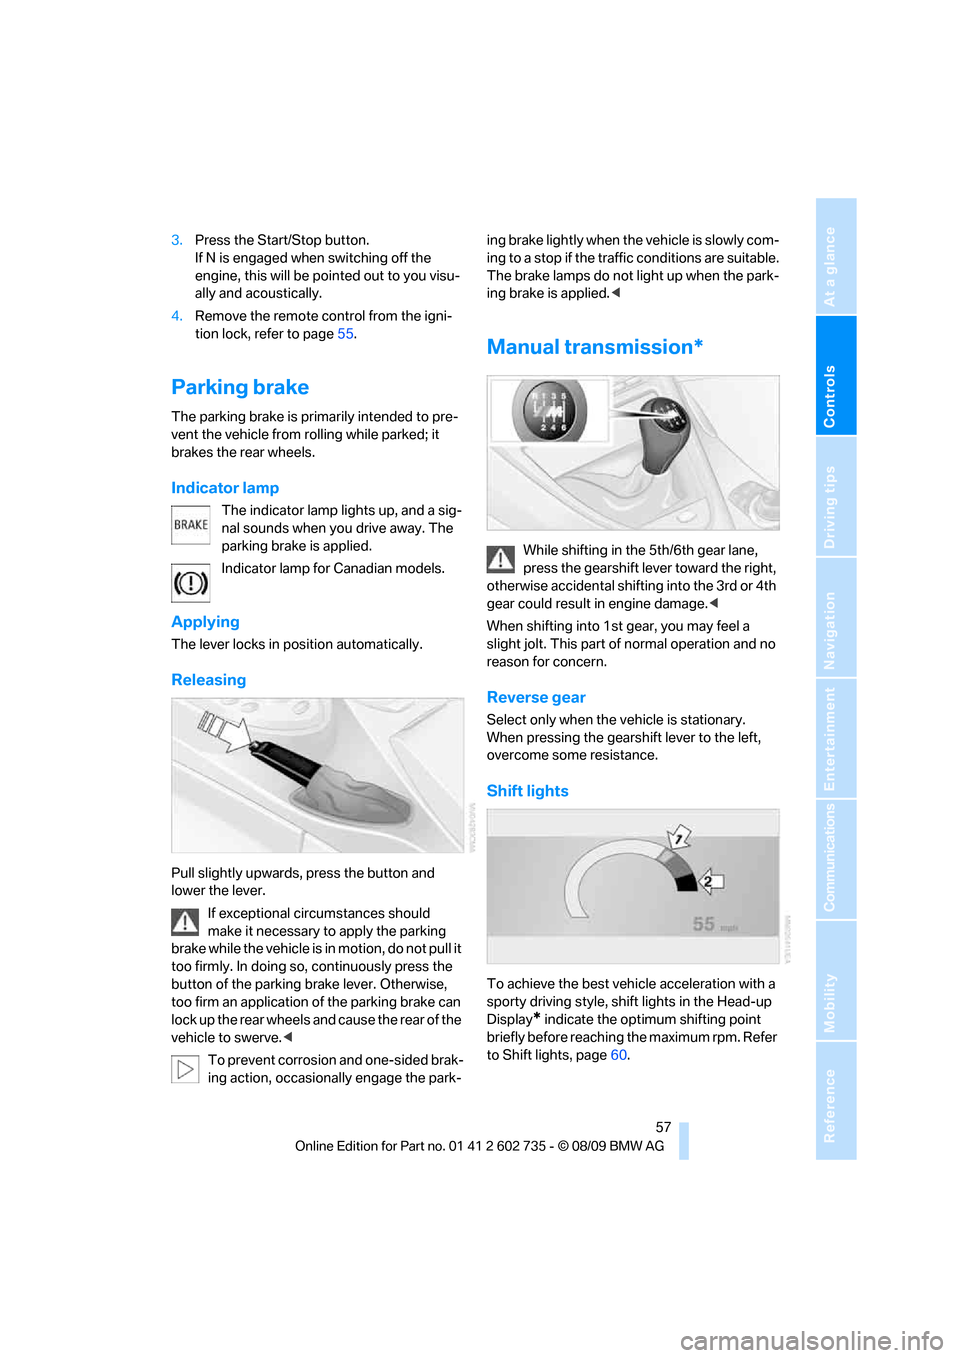
Releasing
Pull slightly upwards, press the button and
lower the lever.
If exceptional circumstances should
make it necessary to apply the parking
brake while the vehicle is in motion, do not pull it
too firmly. In doing so, continuously press the
button of the parking brake lever. Otherwise,
too firm an application of the parking brake can
lock up the rear wheels and cause the rear of the
vehicle to swerve.<
To prevent corrosion and one-sided brak-
ing action, occasionally engage the park-ing brake lightly when the vehicle is slowly com-
ing to a stop if the traffic conditions are suitable.
The brake lamps do not light up when the park-
ing brake is applied.<
Manual transmission*
While shifting in the 5th/6th gear lane,
press the gearshift lever toward the right,
otherwise accidental shifting into the 3rd or 4th
gear could result in engine damage.<
When shifting into 1st gear, you may feel a
slight jolt. This part of normal operation and no
reason for concern.
Reverse gear
Select only when the vehicle is stationary.
When pressing the gearshift lever to the left,
overcome some resistance.
Shift lights
To achieve the best vehicle acceleration with a
sporty driving style, shift lights in the Head-up
Display
* indicate the optimum shifting point
briefly before reaching the maximum rpm. Refer
to Shift lights, page60.
Page 89 of 250
Controls
87Reference
At a glance
Driving tips
Communications
Navigation
Entertainment
Mobility
view appears on the Control Display in gray and
cannot be selected.
"M View": the default view is displayed.
The M view for the Head-up Display can also be
selected with the button on the steering
wheel, refer to MDrive on page50.
The settings are stored for the remote control
currently in use.
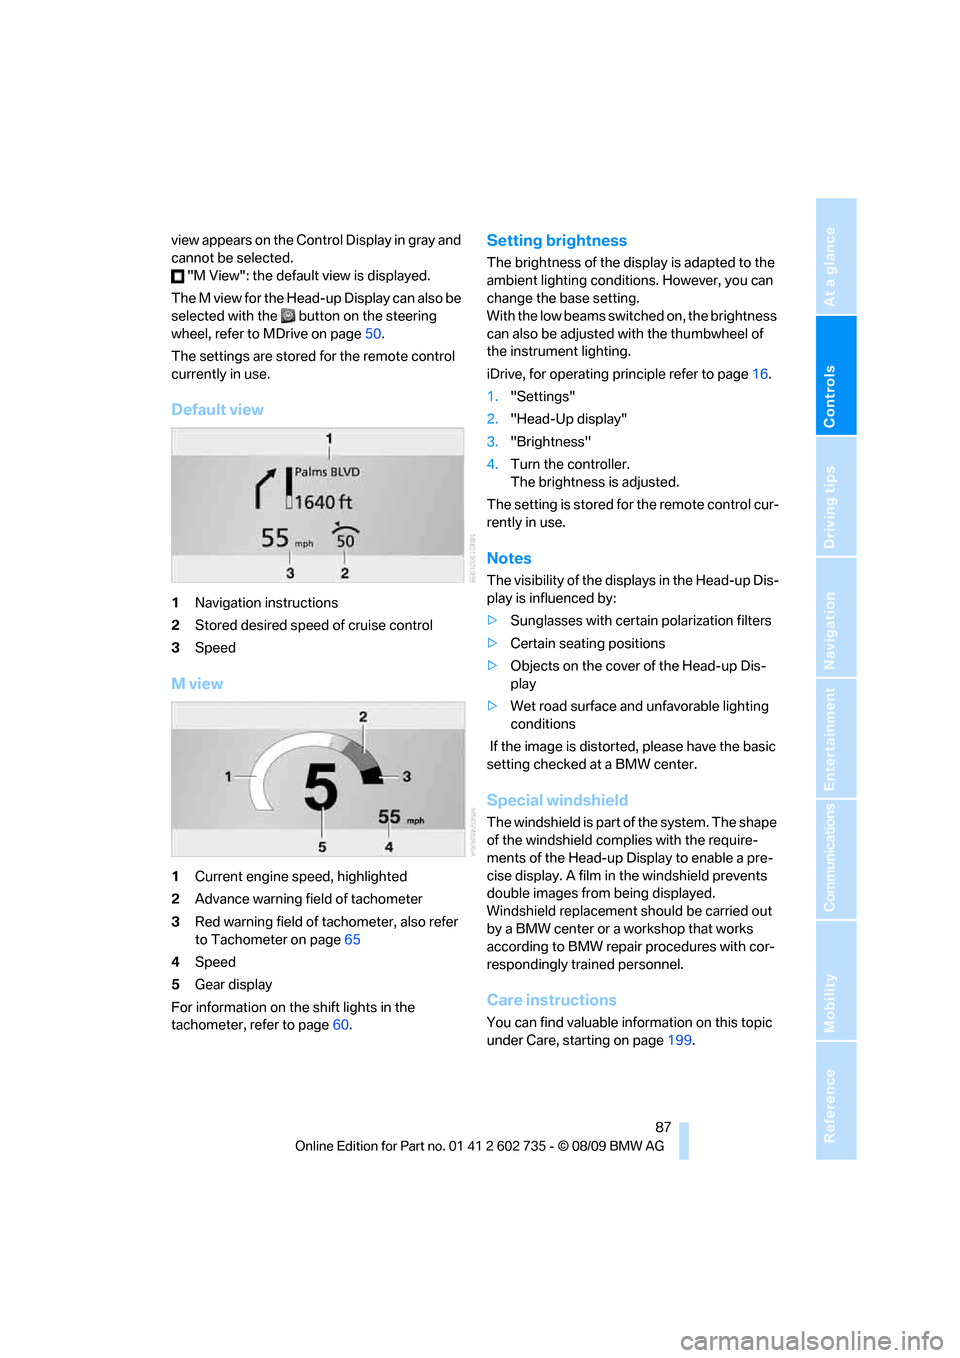
Default view
1Navigation instructions
2Stored desired speed of cruise control
3Speed
M view
1Current engine speed, highlighted
2Advance warning field of tachometer
3Red warning field of tachometer, also refer
to Tachometer on page65
4Speed
5Gear display
For information on the shift lights in the
tachometer, refer to page60.
Setting brightness
The brightness of the display is adapted to the
ambient lighting conditions. However, you can
change the base setting.
With the low beams switched on, the brightness
can also be adjusted with the thumbwheel of
the instrument lighting.
iDrive, for operating principle refer to page16.
1."Settings"
2."Head-Up display"
3."Brightness"
4.Turn the controller.
The brightness is adjusted.
The setting is stored for the remote control cur-
rently in use.
Notes
The visibility of the displays in the Head-up Dis-
play is influenced by:
>Sunglasses with certain polarization filters
>Certain seating positions
>Objects on the cover of the Head-up Dis-
play
>Wet road surface and unfavorable lighting
conditions
If the image is distorted, please have the basic
setting checked at a BMW center.
Special windshield
The windshield is part of the system. The shape
of the windshield complies with the require-
ments of the Head-up Display to enable a pre-
cise display. A film in the windshield prevents
double images from being displayed.
Windshield replacement should be carried out
by a BMW center or a workshop that works
according to BMW repair procedures with cor-
respondingly trained personnel.
Care instructions
You can find valuable information on this topic
under Care, starting on page199.
Page 102 of 250
Practical interior accessories
100
Practical interior accessories
Integrated universal remote
control*
The concept
The integrated universal remote control can
replace as many as three hand-held transmit-
ters for various remote-controlled accessories,
such as garage and gate or lighting systems.
The integrated universal remote control regis-
ters and stores signals from the original hand-
held transmitters.
The signal of an original hand-held transmitter
can be programmed on one of the three mem-
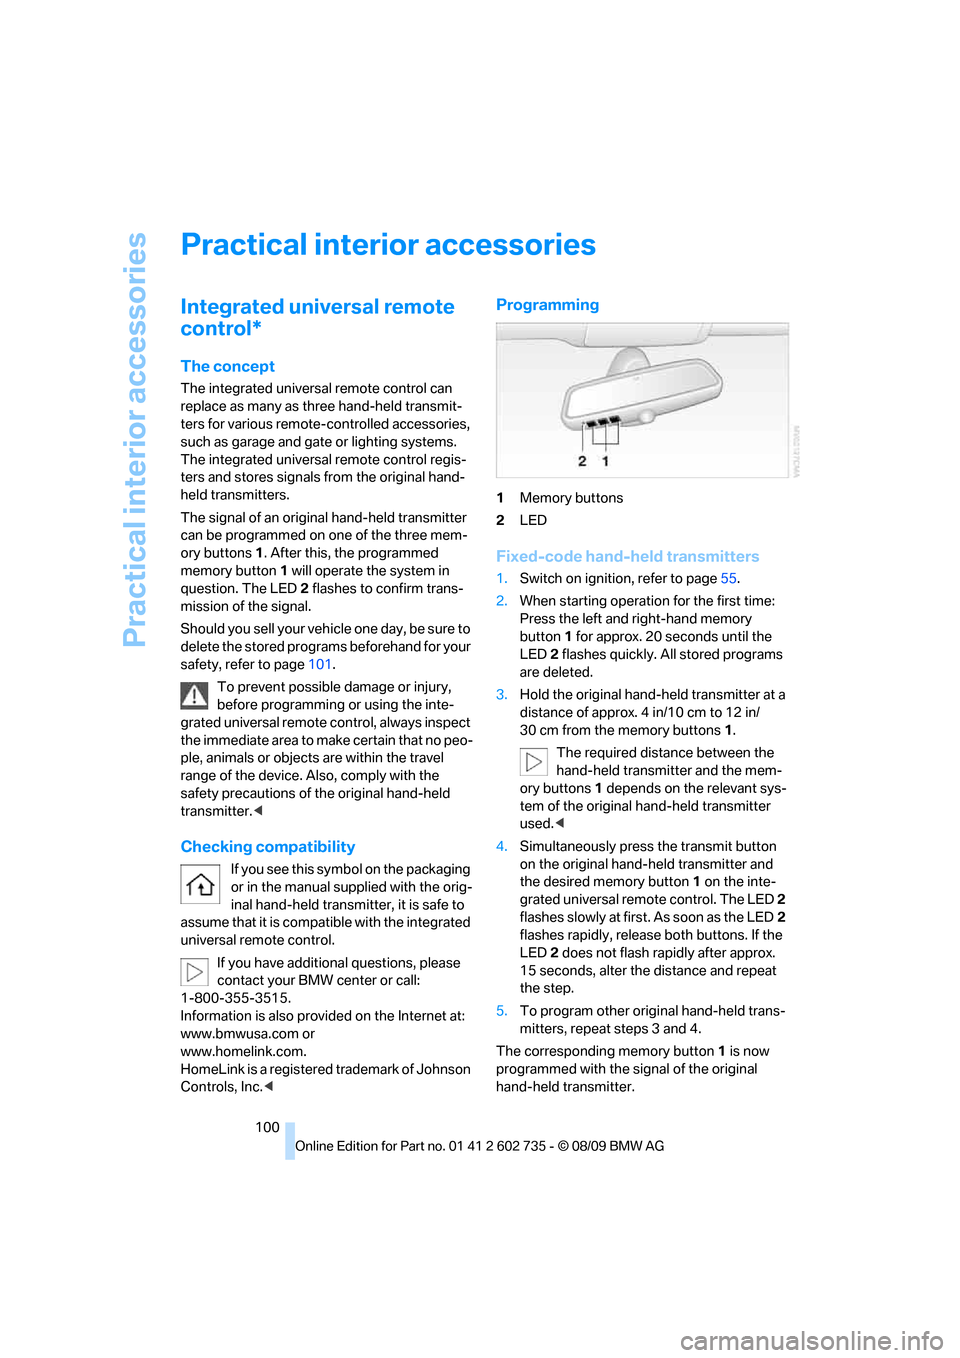
ory buttons1. After this, the programmed
memory button1 will operate the system in
question. The LED2 flashes to confirm trans-
mission of the signal.
Should you sell your vehicle one day, be sure to
delete the stored programs beforehand for your
safety, refer to page101.
To prevent possible damage or injury,
before programming or using the inte-
grated universal remote control, always inspect
the immediate area to make certain that no peo-
ple, animals or objects are within the travel
range of the device. Also, comply with the
safety precautions of the original hand-held
transmitter.<
Checking compatibility
If you see this symbol on the packaging
or in the manual supplied with the orig-
inal hand-held transmitter, it is safe to
assume that it is compatible with the integrated
universal remote control.
If you have additional questions, please
contact your BMW center or call:
1-800-355-3515.
Information is also provided on the Internet at:
www.bmwusa.com or
www.homelink.com.
HomeLink is a registered trademark of Johnson
Controls, Inc.<
Programming
1Memory buttons
2LED
Fixed-code hand-held transmitters
1.Switch on ignition, refer to page55.
2.When starting operation for the first time:
Press the left and right-hand memory
button1 for approx. 20 seconds until the
LED2 flashes quickly. All stored programs
are deleted.
3.Hold the original hand-held transmitter at a
distance of approx. 4 in/10 cm to 12 in/
30 cm from the memory buttons1.
The required distance between the
hand-held transmitter and the mem-
ory buttons1 depends on the relevant sys-
tem of the original hand-held transmitter
used.<
4.Simultaneously press the transmit button
on the original hand-held transmitter and
the desired memory button 1 on the inte-
grated universal remote control. The LED 2
flashes slowly at first. As soon as the LED2
flashes rapidly, release both buttons. If the
LED2 does not flash rapidly after approx.
15 seconds, alter the distance and repeat
the step.
5.To program other original hand-held trans-
mitters, repeat steps 3 and 4.
The corresponding memory button 1 is now
programmed with the signal of the original
hand-held transmitter.
Page 128 of 250
Destination guidance
126
Destination guidance
Starting destination
guidance
1."Navigation"
2."Enter address"
3.Select the destination.
4."Accept destination"
5."Start guidance"
The route is displayed on the Control Display
after it is calculated.
Terminating destination
guidance
1."Navigation"
2."Map"
3.Select the symbol.
4."Stop guidance"
Continuing destination
guidance
If the destination was not reached during the
last trip, destination guidance can be resumed.
"Resume guidance"
Route criteria
General information
You can influence the calculated route by
choosing certain route criteria. You can change
the route criteria as often as you like while
entering the destination and whenever the des-
tination guidance is active.
The route is planned according to fixed rules.
The type of road is taken into account, e.g.
whether it is a highway or a winding road. As a
result, the routes recommended by the naviga-
tion system may not always be the same ones that you would choose based on personal expe-
rience.
The settings are stored for the remote control
currently in use.
Changing route criteria
1."Navigation"
2."Map"
3."Route preference"
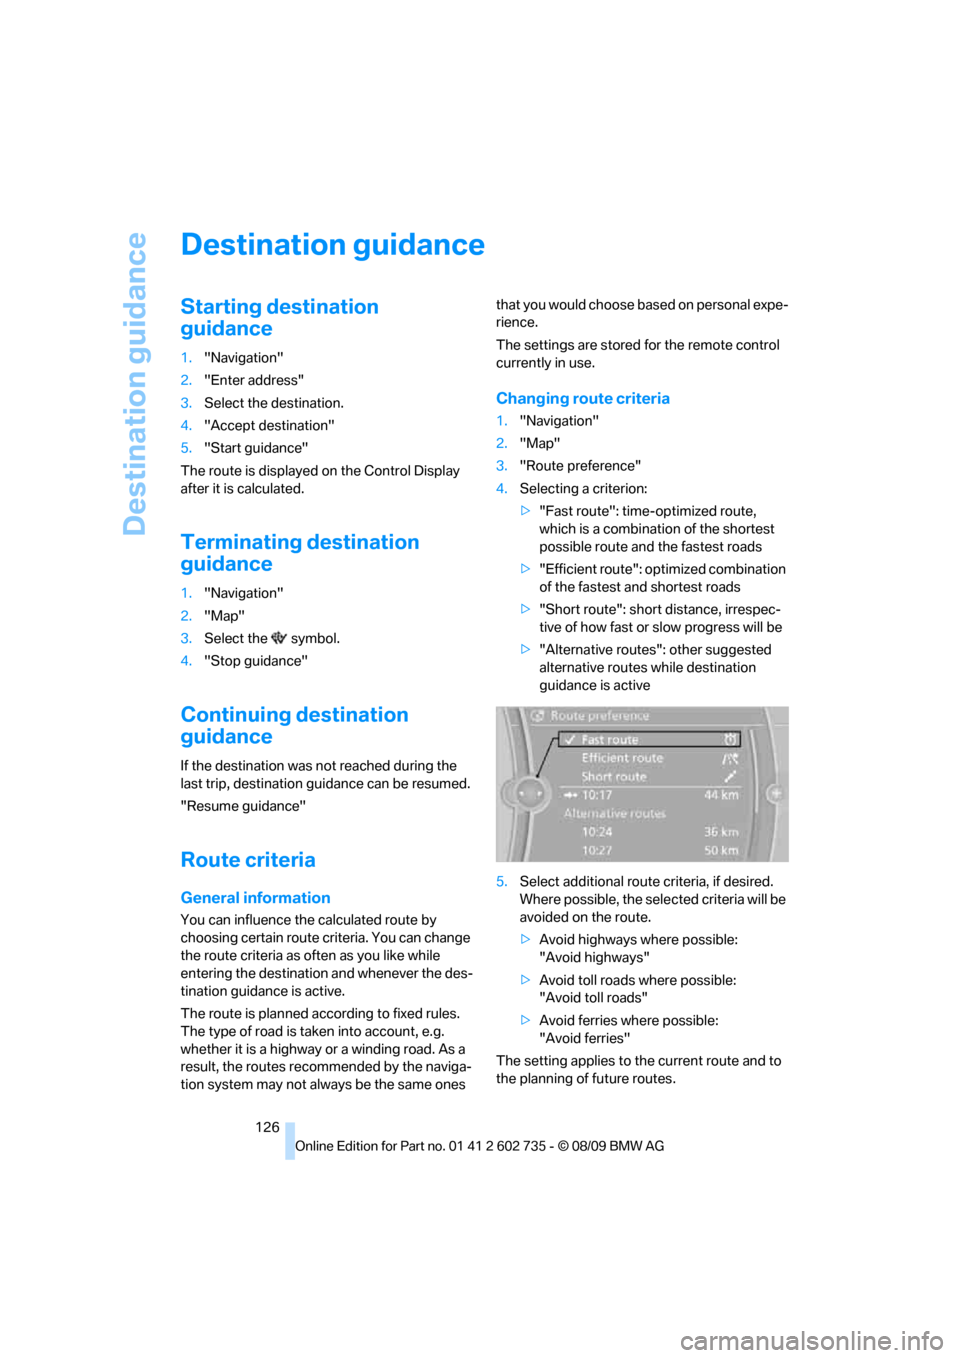
4.Selecting a criterion:
>"Fast route": time-optimized route,
which is a combination of the shortest
possible route and the fastest roads
>"Efficient route": optimized combination
of the fastest and shortest roads
>"Short route": short distance, irrespec-
tive of how fast or slow progress will be
>"Alternative routes": other suggested
alternative routes while destination
guidance is active
5.Select additional route criteria, if desired.
Where possible, the selected criteria will be
avoided on the route.
>Avoid highways where possible:
"Avoid highways"
>Avoid toll roads where possible:
"Avoid toll roads"
>Avoid ferries where possible:
"Avoid ferries"
The setting applies to the current route and to
the planning of future routes.