rear view mirror BMW M6 CONVERTIBLE 2013 F12 User Guide
[x] Cancel search | Manufacturer: BMW, Model Year: 2013, Model line: M6 CONVERTIBLE, Model: BMW M6 CONVERTIBLE 2013 F12Pages: 222, PDF Size: 7.3 MB
Page 134 of 222
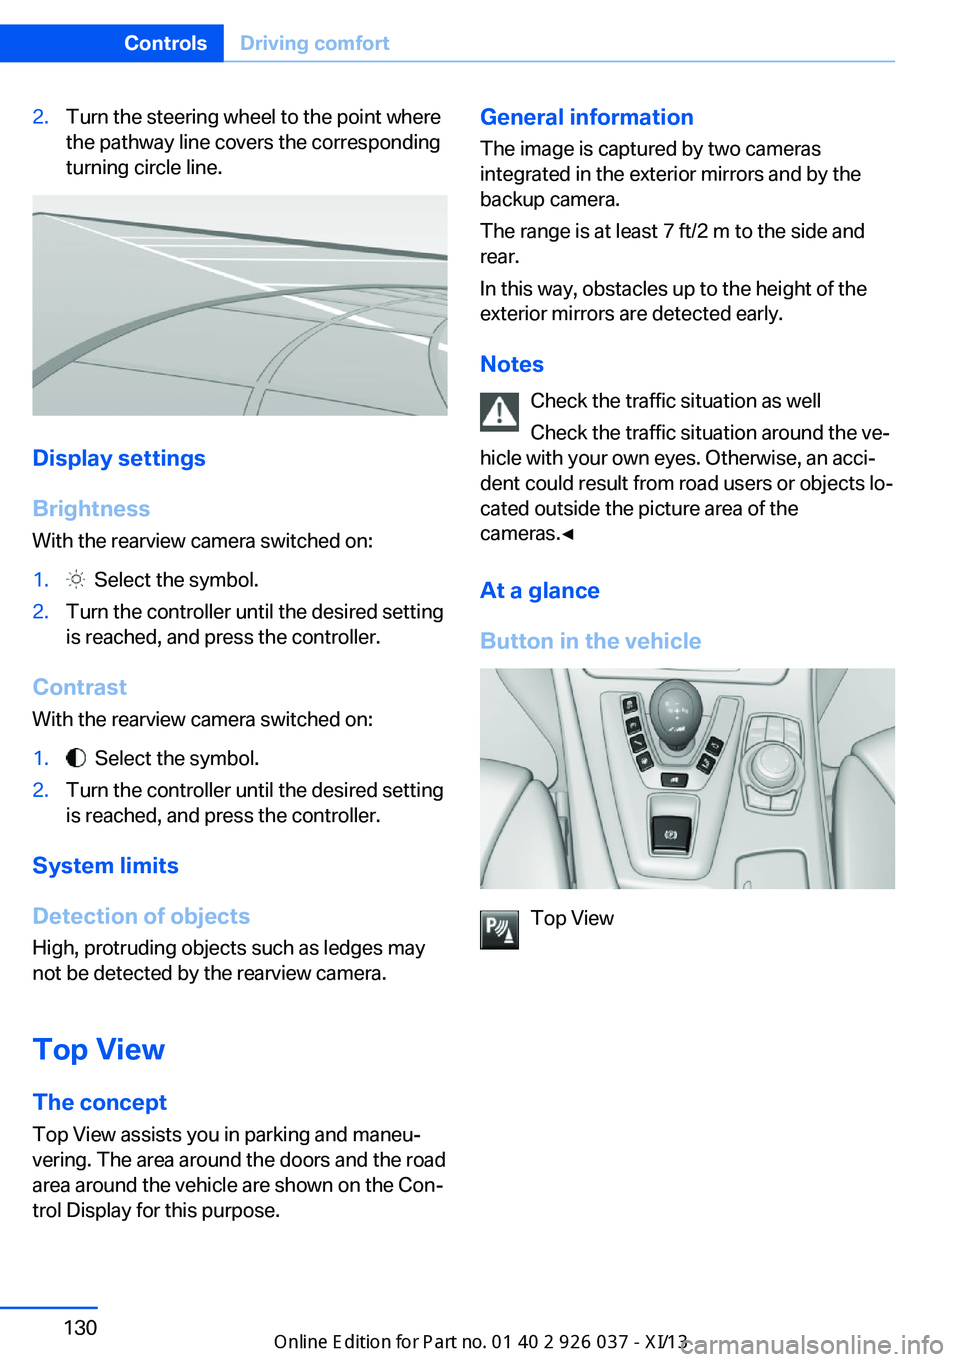
2.Turn the steering wheel to the point where
the pathway line covers the corresponding
turning circle line.
Display settings
Brightness
With the rearview camera switched on:
1. Select the symbol.2.Turn the controller until the desired setting
is reached, and press the controller.
Contrast
With the rearview camera switched on:
1. Select the symbol.2.Turn the controller until the desired setting
is reached, and press the controller.
System limits
Detection of objects
High, protruding objects such as ledges may
not be detected by the rearview camera.
Top View The concept
Top View assists you in parking and maneu‐
vering. The area around the doors and the road
area around the vehicle are shown on the Con‐
trol Display for this purpose.
General information
The image is captured by two cameras
integrated in the exterior mirrors and by the
backup camera.
The range is at least 7 ft/2 m to the side and
rear.
In this way, obstacles up to the height of the
exterior mirrors are detected early.
Notes Check the traffic situation as well
Check the traffic situation around the ve‐
hicle with your own eyes. Otherwise, an acci‐
dent could result from road users or objects lo‐
cated outside the picture area of the
cameras.◀
At a glance
Button in the vehicle
Top View
Seite 130ControlsDriving comfort130
Online Edition for Part no. 01 40 2 910 746 - VI/13
Page 135 of 222
Cameras
The lenses of the Top View cameras are lo‐
cated at the bottom of the exterior mirror hous‐
ings. The image quality may be impaired by
dirt.
Clean the lens, refer to page 200.
Switching on/off
Switching on automatically Select transmission position R with the engine
running.
The Top View and PDC images are displayed if
the system is switched on via iDrive.
Automatic deactivation during forward
travel
The system switches off when a certain driving
distance or speed is exceeded.
Switch the system back on if necessary.
Switching on/off manually Press the button.
▷On: the LED lights up.▷Off: the LED goes out.
Top View is displayed.
Switching on the backup camera via
the iDrive
With Top View switched on:
"Rear view camera"
The backup camera image is displayed. The
setting is stored for the remote control cur‐
rently in use.
Display
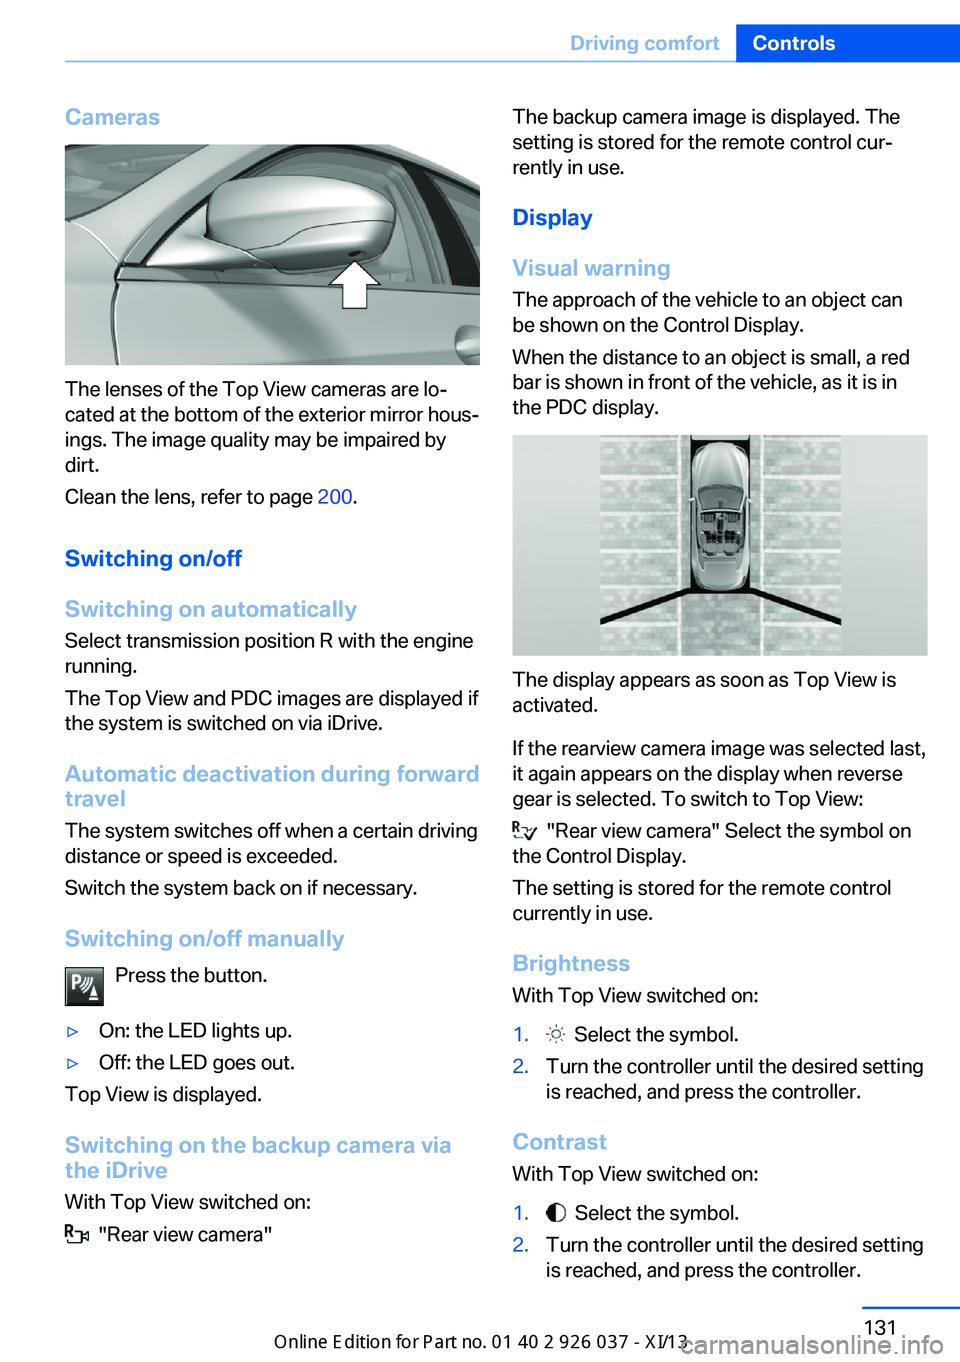
Visual warning The approach of the vehicle to an object can
be shown on the Control Display.
When the distance to an object is small, a red
bar is shown in front of the vehicle, as it is in
the PDC display.
The display appears as soon as Top View is
activated.
If the rearview camera image was selected last,
it again appears on the display when reverse
gear is selected. To switch to Top View:
"Rear view camera" Select the symbol on
the Control Display.
The setting is stored for the remote control
currently in use.
Brightness
With Top View switched on:
1. Select the symbol.2.Turn the controller until the desired setting
is reached, and press the controller.
Contrast
With Top View switched on:
1. Select the symbol.2.Turn the controller until the desired setting
is reached, and press the controller.Seite 131Driving comfortControls131
Online Edition for Part no. 01 40 2 910 746 - VI/13
Page 145 of 222
Interior equipmentVehicle equipmentAll standard, country-specific and optional
equipment that is offered in the model series is
described in this chapter. Therefore, equip‐
ment is also described that is not available in a
vehicle, e. g., because of the selected optional
equipment or country variant. This also applies
for safety-related functions and systems.
Integrated universal remote
control
The conceptThe integrated universal remote control can
operate up to 3 functions of remote-controlled
systems such as garage door drives or lighting
systems. The integrated universal remote con‐
trol replaces up to 3 different hand-held trans‐
mitters. To operate the remote control, the
buttons on the interior rearview mirror must be
programmed with the desired functions. The
hand-held transmitter for the particular system
is required in order to program the remote con‐
trol.
During programming
During programming and before activat‐
ing a device using the integrated universal re‐
mote control, ensure that there are no people,
animals, or objects in the range of movement
of the remote-controlled device; otherwise,
there is a risk of injury or damage.
Also follow the safety instructions of the hand-
held transmitter.◀
Before selling the vehicle, delete the stored
functions for the sake of security.Compatibility
If this symbol is printed on the packag‐
ing or in the instructions of the system
to be controlled, the system is gener‐
ally compatible with the integrated universal
remote control.
If you have any questions, please contact:▷Your service center.▷www.homelink.com on the Internet.
HomeLink is a registered trademark of John‐
son Controls, Inc.
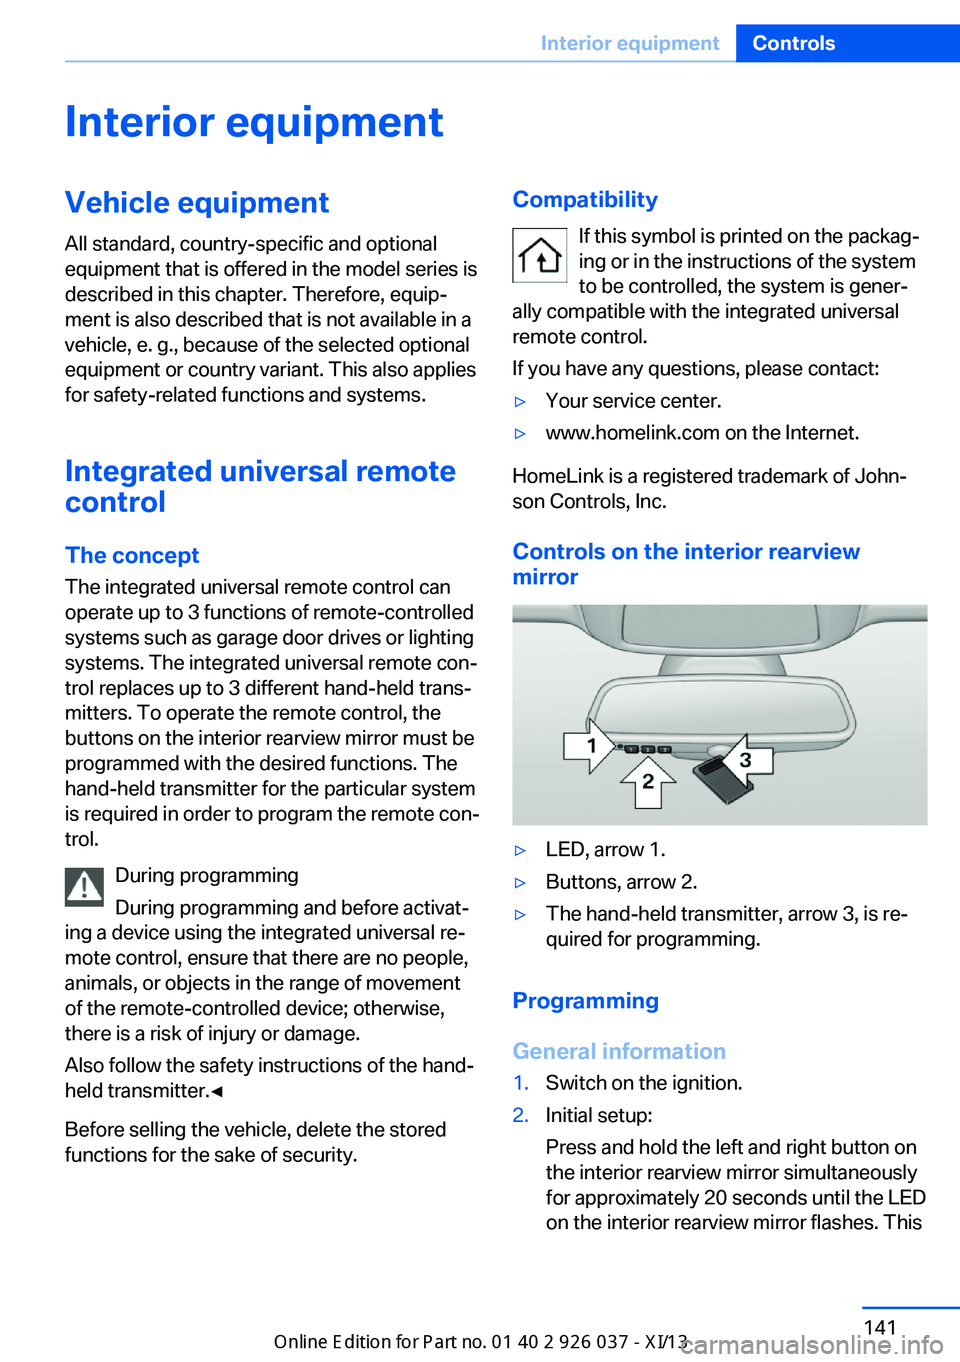
Controls on the interior rearview
mirror
▷LED, arrow 1.▷Buttons, arrow 2.▷The hand-held transmitter, arrow 3, is re‐
quired for programming.
Programming
General information
1.Switch on the ignition.2.Initial setup:
Press and hold the left and right button on
the interior rearview mirror simultaneously
for approximately 20 seconds until the LED
on the interior rearview mirror flashes. ThisSeite 141Interior equipmentControls141
Online Edition for Part no. 01 40 2 910 746 - VI/13
Page 146 of 222
erases all programming of the buttons on
the interior rearview mirror.3.Hold the hand-held transmitter for the sys‐
tem to be controlled approx. 1 to 3 in/2.5 to
8 cm away from the buttons on the interior
rearview mirror. The required distance de‐
pends on the manual transmitter.4.Simultaneously press and hold the button
of the desired function on the hand-held
transmitter and the button to be program‐
med on the interior rearview mirror. The
LED on the interior rearview mirror will be‐
gin flashing slowly.5.Release both buttons as soon as the LED
flashes more rapidly. When the LED is
flashing faster, this indicates that the but‐
ton on the interior rearview mirror has been
programmed.
If the LED does not flash faster after at
least 60 seconds, change the distance be‐
tween the interior rearview mirror and the
hand-held transmitter and repeat the step.
Several more attempts at different distan‐
ces may be necessary. Wait at least
15 seconds between attempts.
Canada: if programming with the hand-
held transmitter was interrupted, hold
down the interior rearview mirror button
and repeatedly press and release the
hand-held transmitter button for 2 sec‐
onds.6.To program other functions on other but‐
tons, repeat steps 3 to 5.
The systems can be controlled using the inte‐
rior rearview mirror buttons.
Special feature of the alternating-
code wireless system
If you are unable to operate the system after
repeated programming, please check if the
system to be controlled features an alternat‐
ing-code system.
Read the system's operating manual, or press
the programmed button on the interior rear‐
view mirror longer. If the LED on the interior
rearview mirror starts flashing rapidly and then
stays lit constantly for 2 seconds, the system
features an alternating-code system. Flashing
and continuous illumination of the LED will re‐
peat for approximately 20 seconds.
For systems with an alternating-code system,
the integrated universal remote control and the
system also have to be synchronized.
Please read the operating manual of the sys‐
tem being set up for information on how to
synchronize the system.
Synchronizing is easier with the aid of a sec‐
ond person.
To synchronize:1.Park the vehicle within range of the re‐
mote-controlled system.2.Program the relevant button on the interior
rearview mirror as described.3.Locate and press the synchronizing button
on the system being programmed. You
have approx. 30 seconds for the next step.4.Hold down the programmed button on the
interior rearview mirror for approximately
3 seconds and then release it. If necessary,
repeat this work step up to three times in
order to finish synchronization. Once syn‐
chronization is complete, the programmed
function will be carried out.
Reprogramming individual buttons
1.Switch on the ignition.2.Press and hold the interior rearview mirror
button to be programmed.3.As soon as the interior rearview mirror LED
starts flashing slowly, hold the hand-held
transmitter for the system to be controlled
approx. 1 to 3 in/2.5 to 8 cm away from the
buttons on the interior rearview mirror. The
required distance depends on the manual
transmitter.Seite 142ControlsInterior equipment142
Online Edition for Part no. 01 40 2 910 746 - VI/13
Page 147 of 222
4.Likewise, press and hold the button of the
desired function on the hand-held trans‐
mitter.5.Release both buttons as soon as the inte‐
rior rearview mirror LED flashes more rap‐
idly. When the LED is flashing faster, this
indicates that the button on the interior
rearview mirror has been programmed.
The system can then be controlled by the
button on the interior rearview mirror.
If the LED does not flash faster after at
least 60 seconds, change the distance and
repeat the step. Several more attempts at
different distances may be necessary. Wait
at least 15 seconds between attempts.
Canada: if programming with the hand-
held transmitter was interrupted, hold
down the interior rearview mirror button
and repeatedly press and release the
hand-held transmitter button for 2 sec‐
onds.
Controls
Before operation
Before operating a system using the
integrated universal remote control, ensure
that there are no people, animals, or objects
within the range of movement of the remote- controlled system; otherwise, there is a risk of
injury or damage.
Also follow the safety instructions of the hand-
held transmitter.◀
The system, such as the garage door, can be
operated using the button on the interior rear‐
view mirror while the engine is running or when
the ignition is started. To do this, hold down
the button within receiving range of the system
until the function is activated. The interior rear‐ view mirror LED stays lit while the wireless sig‐
nal is being transmitted.
Deleting stored functions Press and hold the left and right button on the
interior rearview mirror simultaneously for ap‐
proximately 20 seconds until the LED flashes
rapidly. All stored functions are deleted. The
functions cannot be deleted individually.
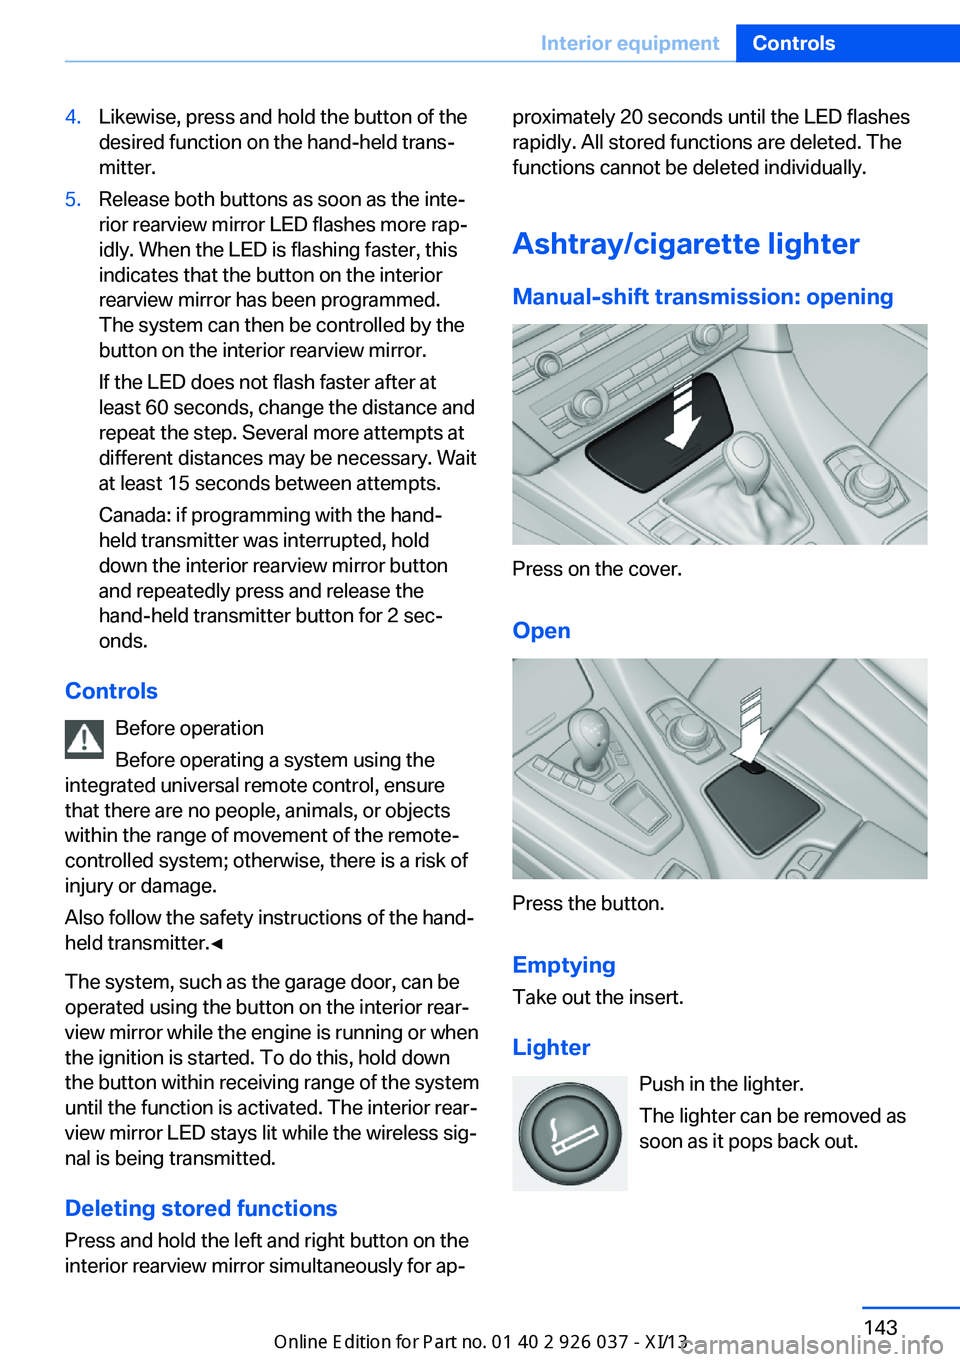
Ashtray/cigarette lighter Manual-shift transmission: opening
Press on the cover.
Open
Press the button. Emptying
Take out the insert.
Lighter Push in the lighter.
The lighter can be removed as
soon as it pops back out.
Seite 143Interior equipmentControls143
Online Edition for Part no. 01 40 2 910 746 - VI/13
Page 212 of 222
Everything from A to Z
IndexA ABS, Antilock Brake Sys‐ tem 119
Acceleration Assistant, refer to Launch Control 73
Activated-charcoal filter 139
Active Blind Spot Detec‐ tion 115
Active M differential 121
Active Protection 116
Active seat, front 53
Active seat ventilation, front 53
Adaptive brake lights, refer to Brake force display 116
Adaptive light control 94
Additives, oil 179
Adjusting, steering wheel 59
Adjustments, seats/head re‐ straints 51
After washing vehicle 197
Airbags 98
Airbags, indicator/warning light 99
Air circulation, refer to Recir‐ culated-air mode 138
Air distribution, manual 137
Air drying, refer to Cooling function 138
Air flow, automatic climate control 137
Air pressure, tires 167
Air vents, refer to Ventila‐ tion 139
Alarm system 40
Alarm, unintentional 41
All around the center con‐ sole 14
All around the interior rear‐ view mirror 15 All around the steering
wheel 12
All-season tires, refer to Win‐ ter tires 172
Alternating-code hand-held transmitter 142
Alternative oil types 179
Ambient light 96
Antifreeze, washer fluid 78
Antilock Brake System, ABS 119
Anti-slip control, refer to DSC 119
Approved engine oils 179
Armrest, refer to Front center armrest 147
Arrival time 90
Ashtray 143
Assistance, Roadside Assis‐ tance 191
Assistance when driving off 119
Attentiveness assistant 117
AUTO intensity 137
Automatic car wash 196
Automatic Curb Monitor 58
Automatic deactivation, front passenger airbags 100
Automatic headlamp con‐ trol 94
Automatic locking 39
Automatic recirculated-air control 138
Automatic Soft Closing, doors 37
AUTO program, automatic cli‐ mate control 137
AUTO program, intensity 137
Auto Start/Stop function 66
Average fuel consumption 89
Average speed 89 Axle loads, weights 205
B Backrest curvature, refer to Lumbar support 52
Backrest, seats 51
Backrest, width 52
Backup camera 127
Band-aids, refer to First aid kit 191
Bar for tow-starting/ towing 194
Battery replacement, vehicle battery 188
Battery replacement, vehicle remote control 30
Battery, vehicle 188
Belts, safety belts 54
Beverage holder, cu‐ pholder 148
BMW Assist, see user's manual for Navigation, En‐
tertainment and Communi‐
cation
BMW Homepage 6
BMW Internet page 6
BMW maintenance sys‐ tem 182
BMW M technology 152
Bottle holder, refer to Cu‐ pholder 148
Brake assistant 119
Brake discs, breaking in 154
Brake force display 116
Brake lamps, brake force dis‐ play 116
Brake lamps, bulb replace‐ ment 186
Brake lights, adaptive 116
Brake pads, breaking in 154 Seite 208ReferenceEverything from A to Z208
Online Edition for Part no. 01 40 2 910 746 - VI/13
Page 213 of 222
Braking, hints 156
Breakdown assis‐ tance 190, 191
Breaking in 154
Brightness of Control Dis‐ play 92
Bulb replacement, front 184
Bulb replacement, rear 186
Button, Start/Stop 64
Bypassing, refer to Jump- starting 192
C
California Proposition 65 Warning 7
Calling up mirror adjust‐ ment 40
Calling up seat adjust‐ ment 40
Calling up steering wheel ad‐ justment 40
Camera, backup camera 128
Camera, care 200
Camera, Side View 132
Camera, Top View 131
Can holder, refer to Cu‐ pholder 148
Car battery 188
Carbon ceramic brake M 152
Car care products 197
Care, displays 200
Care, vehicle 197
Cargo 158
Cargo area lid 37
Cargo area partition 45
Cargo area, storage compart‐ ments 148
Cargo, securing 159
Cargo straps, securing cargo 159
Car key, refer to Remote con‐ trol 30
Carpet, care 199
Car wash 196 Catalytic converter, refer to
Hot exhaust system 155
CBS Condition Based Serv‐ ice 182
CD/Multimedia, see user's manual for Navigation, En‐
tertainment and Communi‐
cation
Center console 14
Center-Lock, see button for central locking 33
Central locking system 33
Central screen, refer to Con‐ trol Display 16
Ceramic brake 152
Changes, technical, refer to Safety 7
Changing parts 184
Changing wheels 187
Changing wheels/tires 171
Check Control 80
Checking the oil level elec‐ tronically 178
Children, seating position 61
Children, transporting safely 61
Child restraint fixing sys‐ tem 61
Child restraint fixing system LATCH 62
Child restraint fixing systems, mounting 61
Child seat, mounting 61
Child seats 61
Chrome parts, care 199
Cigarette lighter 143
Cleaning, displays 200
Climate control 136
Climate control wind‐ shield 155
Clock 83
Closing/opening from in‐ side 36
Closing/opening via door lock 36 Closing/opening with remote
control 34
Collision warning with City Braking function 106
Combination switch, refer to Turn signals 75
Combination switch, refer to Wiper system 76
Comfort Access 38
Compound brake 152
Compressor 172
Computer 89
Condensation on win‐ dows 138
Condensation under the vehi‐ cle 157
Condition Based Service CBS 182
Confirmation signal 39
ConnectedDrive, see user's manual for Navigation, En‐
tertainment and Communi‐
cation
ConnectedDrive Services
Control Display 16
Control Display, settings 91
Controller 16
Control systems, driving sta‐ bility 119
Convenient closing 34
Convenient opening 34
Convertible, convertible top 43
Convertible mode, automatic climate control 137
Convertible program, auto‐ matic climate control 137
Convertible top 43
Convertible top, care 198
Convertible top, cargo area partition 45
Convertible top, emergency operation 46
Convertible top, rollover pro‐ tection system 101
Convertible top tool 46 Seite 209Everything from A to ZReference209
Online Edition for Part no. 01 40 2 910 746 - VI/13
Page 214 of 222
Coolant 181
Coolant temperature 83
Cooling function 138
Cooling, maximum 138
Cooling system 181
Corrosion on brake discs 156
Cruise control 123
Cruising range 84
Cupholder 148
Current fuel consumption 84
D
Damage, tires 170
Damper control 121
Damper Control, Elec‐ tronic 121
Data, technical 204
Date 83
Daytime running lights 94
Defrosting, refer to Windows, defrosting 138
Departure time, parked-car ventilation 140
Destination distance 89
Differential lock 121
Digital clock 83
Digital speed 83
Digital tachometer 83
Dimensions 204
Dimmable exterior mirrors 58
Dimmable interior rearview mirror 58
Direction indicator, refer to Turn signals 75
Display in windshield 133
Display lighting, refer to In‐ strument lighting 96
Displays 79
Displays, cleaning 200
Disposal, coolant 181
Disposal, vehicle battery 188
Distance control, refer to PDC 125
Distance to destination 89 Divided screen view, split
screen 20
Door lock, refer to Remote control 30
Doors, Automatic Soft Clos‐ ing 37
Double-clutch transmis‐ sion 70
Drivelogic 72
Drive mode 71
Drive-off assistant 119
Drive-off assistant, refer to DSC 119
Driver assistance, see Intelli‐ gent Safety 105
Driving Assistant, see Intelli‐ gent Safety 105
Driving Dynamics Control 74
Driving Dynamics System 85
Driving dynamics, system states 85
Driving instructions, breaking in 154
Driving notes, general 155
Driving on racetracks 153
Driving program, refer to Drivelogic 72
Driving stability control sys‐ tems 119
Driving tips 155
DSC Dynamic Stability Con‐ trol 119
Dynamic Stability Control DSC 119
E EDC, Electronic Damper Con‐ trol 121
EfficientDynamics 85
EfficientDynamics display 85
EfficientDynamics menu 85
Electronic Damper Control EDC 121
Electronic displays, instru‐ ment cluster 80 Electronic Stability Program
ESP, refer to DSC 119
Emergency detection, remote control 31
Emergency operation, convertible top 46
Emergency release, door lock 36
Emergency release, fuel filler flap 164
Emergency Request 190
Emergency service, refer to Roadside Assistance 191
Emergency start function, en‐ gine start 31
Emergency unlocking, trunk lid 38
Energy Control 84
Energy recovery 84
Engine, automatic Start/Stop function 66
Engine, automatic switch- off 66
Engine compartment 176
Engine compartment, work‐ ing in 176
Engine coolant 181
Engine oil 178
Engine oil, adding 179
Engine oil additives 179
Engine oil change 180
Engine oil filler neck 179
Engine oil temperature 82
Engine oil types, alterna‐ tive 179
Engine oil types, ap‐ proved 179
Engine start during malfunc‐ tion 31
Engine start, jump-start‐ ing 192
Engine start, refer to Starting the engine 65
Engine stop 66
Engine temperature 82 Seite 210ReferenceEverything from A to Z210
Online Edition for Part no. 01 40 2 910 746 - VI/13
Page 216 of 222
IIce warning, refer to External temperature warning 83
Icy roads, refer to External temperature warning 83
Identification marks, tires 169
Identification number, refer to Important features in the en‐
gine compartment 176
iDrive 16
Ignition key, refer to Remote control 30
Ignition off 64
Ignition on 64
Indication of a flat tire 103 , 105
Indicator and warning lamps 80
Individual air distribution 137
Individual settings, refer to M Drive 59
Individual settings, refer to Personal Profile 31
Inflation pressure, tires 167
Inflation pressure warning FTM, tires 104
Info display, refer to Com‐ puter 89
Initialize, Tire Pressure Moni‐ tor TPM 103
Initializing, Flat Tire Monitor FTM 104
Instrument cluster 79
Instrument cluster, electronic displays 80
Instrument lighting 96
Integrated key 30
Integrated universal remote control 141
Intelligent Emergency Re‐ quest 190
Intelligent Safety 105
Intensity, AUTO pro‐ gram 137
Interior equipment 141 Interior lamps 96
Interior lamps via remote con‐ trol 35
Interior motion sensor 41
Interior rearview mirror, auto‐ matic dimming feature 58
Internet page 6
Interval display, service re‐ quirements 85
J Jacking points for the vehicle jack 187
Jump-starting 192
K
Key/remote control 30
Keyless Go, refer to Comfort Access 38
Key Memory, refer to Per‐ sonal Profile 31
Knee airbag 98
L
Lamp replacement, front 184
Lamp replacement, rear 186
Lamps 93
Lamps and bulbs 184
Lane departure warning 113
Lane margin, warning 113
Language on Control Dis‐ play 91
Lashing eyes, securing cargo 159
LATCH child restraint fixing system 62
Launch Control 73
Leather, care 198
LED headlamps, Bulb re‐ placement 186
LED light 186
LEDs, light-emitting di‐ odes 185 Length, vehicle 205
Letters and numbers, enter‐ ing 21
License plate lamp, bulb re‐ placement 186
Light alloy wheels, care 199
Light control 94
Light-emitting diodes, LEDs 185
Lighting 93
Lighting, speaker 97
Lighting via remote con‐ trol 35
Light switch 93
Load 158
Loading 158
Lock, door 36
Locking/unlocking from in‐ side 36
Locking/unlocking via door lock 36
Locking/unlocking with re‐ mote control 34
Locking, automatic 39
Locking, central 33
Locking, settings 39
Locking via trunk lid 37
Low beams 93
Low beams, automatic, refer to High-beam Assistant 95
Lower back support 52
Low Speed Assistant 74
Lumbar support 52
M
Maintenance 182
Maintenance require‐ ments 182
Maintenance, service require‐ ments 85
Maintenance system, BMW 182
Malfunction displays, refer to Check Control 80
Manual air distribution 137 Seite 212ReferenceEverything from A to Z212
Online Edition for Part no. 01 40 2 910 746 - VI/13
Page 217 of 222
Manual air flow 137
Manual brake, refer to Parking brake 68
Manual operation, backup camera 128
Manual operation, door lock 36
Manual operation, exterior mirrors 58
Manual operation, fuel filler flap 164
Manual operation, Park Dis‐ tance Control PDC 126
Manual operation, Side View 133
Manual operation, Top View 131
Marking on approved tires 171
Massage seat, front 53
Master key, refer to Remote control 30
Maximum cooling 138
Maximum speed, display 87
Maximum speed, winter tires 172
M carbon ceramic brake 152
M Compound brake 152
M differential, active 121
MDM, M Dynamic Mode 120
M double-clutch transmis‐ sion 70
M Drive 59
M Driver's Package, driving instructions 157
M Driving Dynamics Con‐ trol 74
M Dynamic Mode MDM 120
Measure, units of 91
Medical kit 191
Memory for seat, mirrors, steering wheel 56
Menu in instrument clus‐ ter 88
Menus, operating, iDrive 16 Menus, refer to iDrive operat‐
ing concept 17
Messages, refer to Check Control 80
Microfilter 139
Minimum tread, tires 170
Mirror 57
Mirror memory 56
Mobile communication devi‐ ces in the vehicle 155
Mobility System 172
Modifications, technical, refer to Safety 7
Moisture in headlamp 185
Monitor, refer to Control Dis‐ play 16
Mounting of child restraint fix‐ ing systems 61
M technology 152
Multifunction steering wheel, buttons 12
M view, head-up display 134
N
Navigation, see user's manual for Navigation, Entertain‐
ment and Communication
Neck restraints, front, refer to Head restraints 55
Neutral cleaner, see wheel cleaner 199
New wheels and tires 171
Night Vision with pedestrian detection 110
No Passing Information 87
Nylon rope for tow-starting/ towing 194
O OBD Onboard Diagnosis 183
OBD, see OBD Onboard Di‐ agnosis 183
Obstacle marking, rearview camera 129 Octane rating, refer to Gaso‐
line quality 166
Odometer 83
Office, see user's manual for Navigation, Entertainment
and Communication
Oil 178
Oil, adding 179
Oil additives 179
Oil change 180
Oil change interval, service requirements 85
Oil filler neck 179
Oil types, alternative 179
Oil types, approved 179
Old batteries, disposal 188
Onboard monitor, refer to Control Display 16
Onboard vehicle tool kit 184
Opening and closing 30
Opening and closing, from in‐ side 36
Opening and closing via door lock 36
Opening and closing, with re‐ mote control 34
Operating concept, iDrive 16
Optional equipment, standard equipment 6
Outside air, refer to Auto‐ matic recirculated-air con‐
trol 138
Overheating of engine, refer to Coolant temperature 83
Overtaking prohibitions 87
P Paint, vehicle 197
Park Distance Control PDC 125
Parked-car ventilation 140
Parked vehicle, condensa‐ tion 157
Parking aid, refer to PDC 125
Parking brake 68 Seite 213Everything from A to ZReference213
Online Edition for Part no. 01 40 2 910 746 - VI/13