ignition BMW M6 CONVERTIBLE 2013 F12 Owner's Manual
[x] Cancel search | Manufacturer: BMW, Model Year: 2013, Model line: M6 CONVERTIBLE, Model: BMW M6 CONVERTIBLE 2013 F12Pages: 222, PDF Size: 7.3 MB
Page 17 of 222
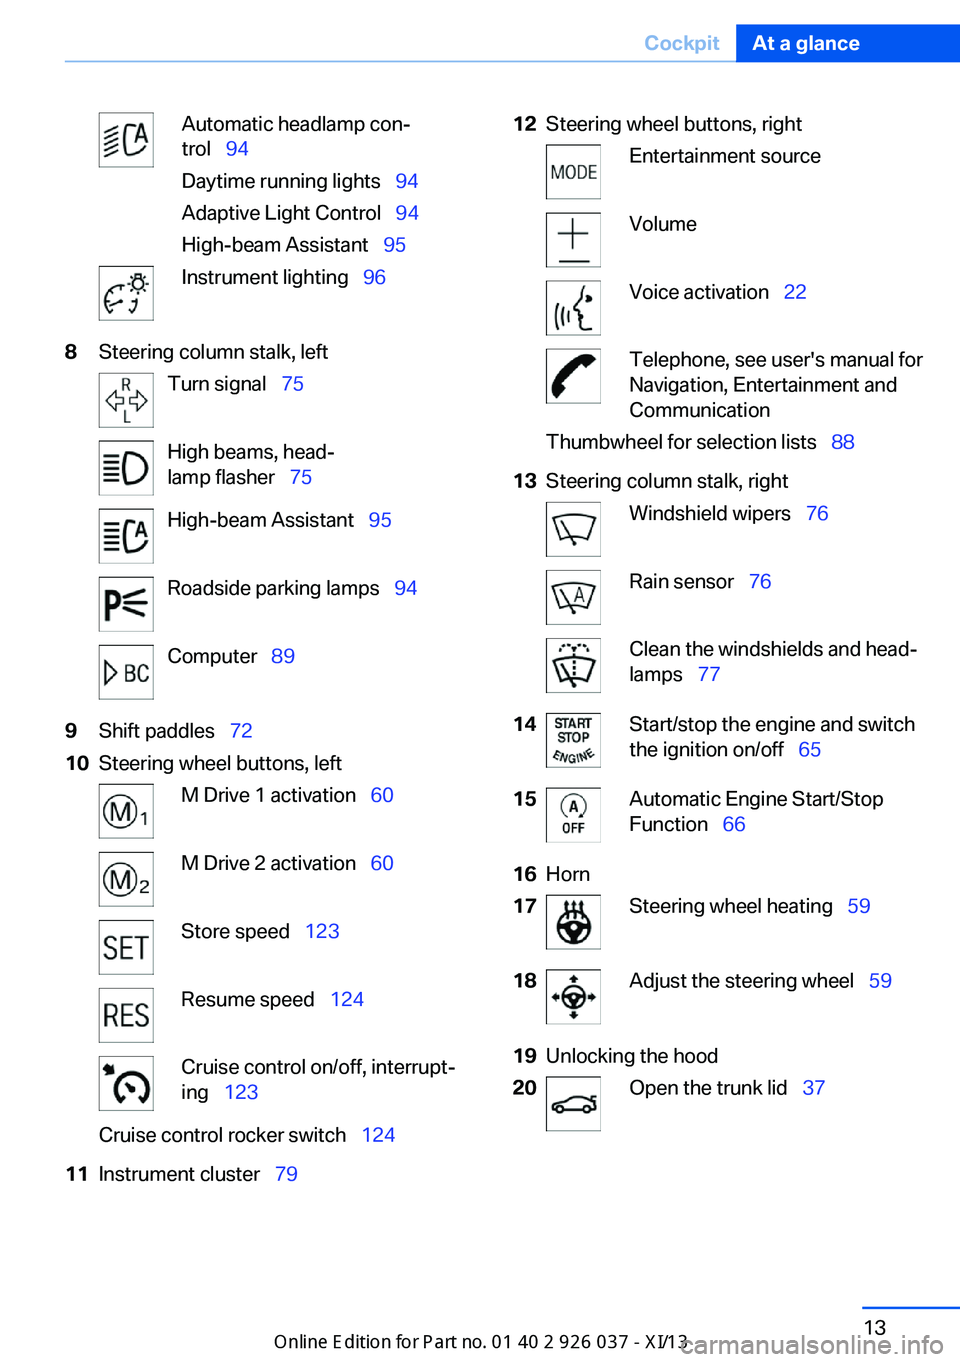
Automatic headlamp con‐
trol 94
Daytime running lights 94
Adaptive Light Control 94
High-beam Assistant 95Instrument lighting 968Steering column stalk, leftTurn signal 75High beams, head‐
lamp flasher 75High-beam Assistant 95Roadside parking lamps 94Computer 899Shift paddles 7210Steering wheel buttons, leftM Drive 1 activation 60M Drive 2 activation 60Store speed 123Resume speed 124Cruise control on/off, interrupt‐
ing 123Cruise control rocker switch 12411Instrument cluster 7912Steering wheel buttons, rightEntertainment sourceVolumeVoice activation 22Telephone, see user's manual for
Navigation, Entertainment and
CommunicationThumbwheel for selection lists 8813Steering column stalk, rightWindshield wipers 76Rain sensor 76Clean the windshields and head‐
lamps 7714Start/stop the engine and switch
the ignition on/off 6515Automatic Engine Start/Stop
Function 6616Horn17Steering wheel heating 5918Adjust the steering wheel 5919Unlocking the hood20Open the trunk lid 37Seite 13CockpitAt a glance13
Online Edition for Part no. 01 40 2 910 746 - VI/13
Page 35 of 222
Take the used battery to a recycling
center or to your service center.
New remote controls You can obtain new remote controls from your
service center.
Loss of the remote controls Lost remote controls can be blocked by your
service center.
Emergency detection of remote
control
It is possible to switch on the ignition or start
the engine in situations such as the following:▷Interference of radio transmission to re‐
mote control by external sources.▷Discharged battery in the remote control.▷Interference of radio transmission by mo‐
bile devices in close proximity to the re‐
mote control.▷Interference of radio transmission by
charger while charging items such as mo‐
bile devices in the vehicle.
A Check Control message is displayed if an at‐
tempt is made to switch on the ignition or start
the engine.
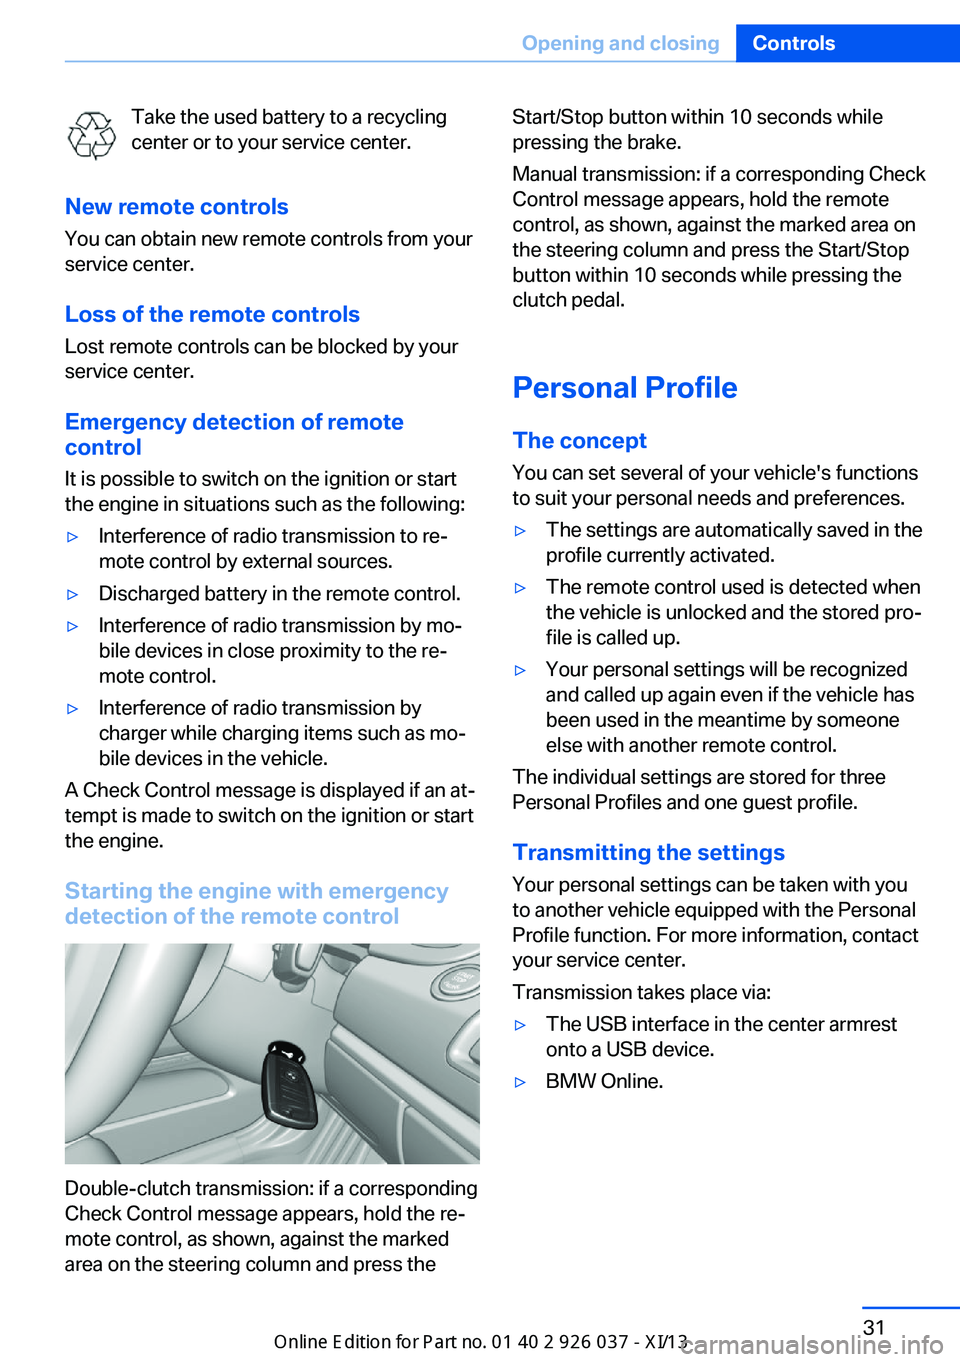
Starting the engine with emergency
detection of the remote control
Double-clutch transmission: if a corresponding
Check Control message appears, hold the re‐
mote control, as shown, against the marked
area on the steering column and press the
Start/Stop button within 10 seconds while
pressing the brake.
Manual transmission: if a corresponding Check
Control message appears, hold the remote
control, as shown, against the marked area on
the steering column and press the Start/Stop
button within 10 seconds while pressing the
clutch pedal.
Personal Profile
The concept You can set several of your vehicle's functions
to suit your personal needs and preferences.▷The settings are automatically saved in the
profile currently activated.▷The remote control used is detected when
the vehicle is unlocked and the stored pro‐
file is called up.▷Your personal settings will be recognized
and called up again even if the vehicle has
been used in the meantime by someone
else with another remote control.
The individual settings are stored for three
Personal Profiles and one guest profile.
Transmitting the settings
Your personal settings can be taken with you
to another vehicle equipped with the Personal
Profile function. For more information, contact
your service center.
Transmission takes place via:
▷The USB interface in the center armrest
onto a USB device.▷BMW Online.Seite 31Opening and closingControls31
Online Edition for Part no. 01 40 2 910 746 - VI/13
Page 43 of 222
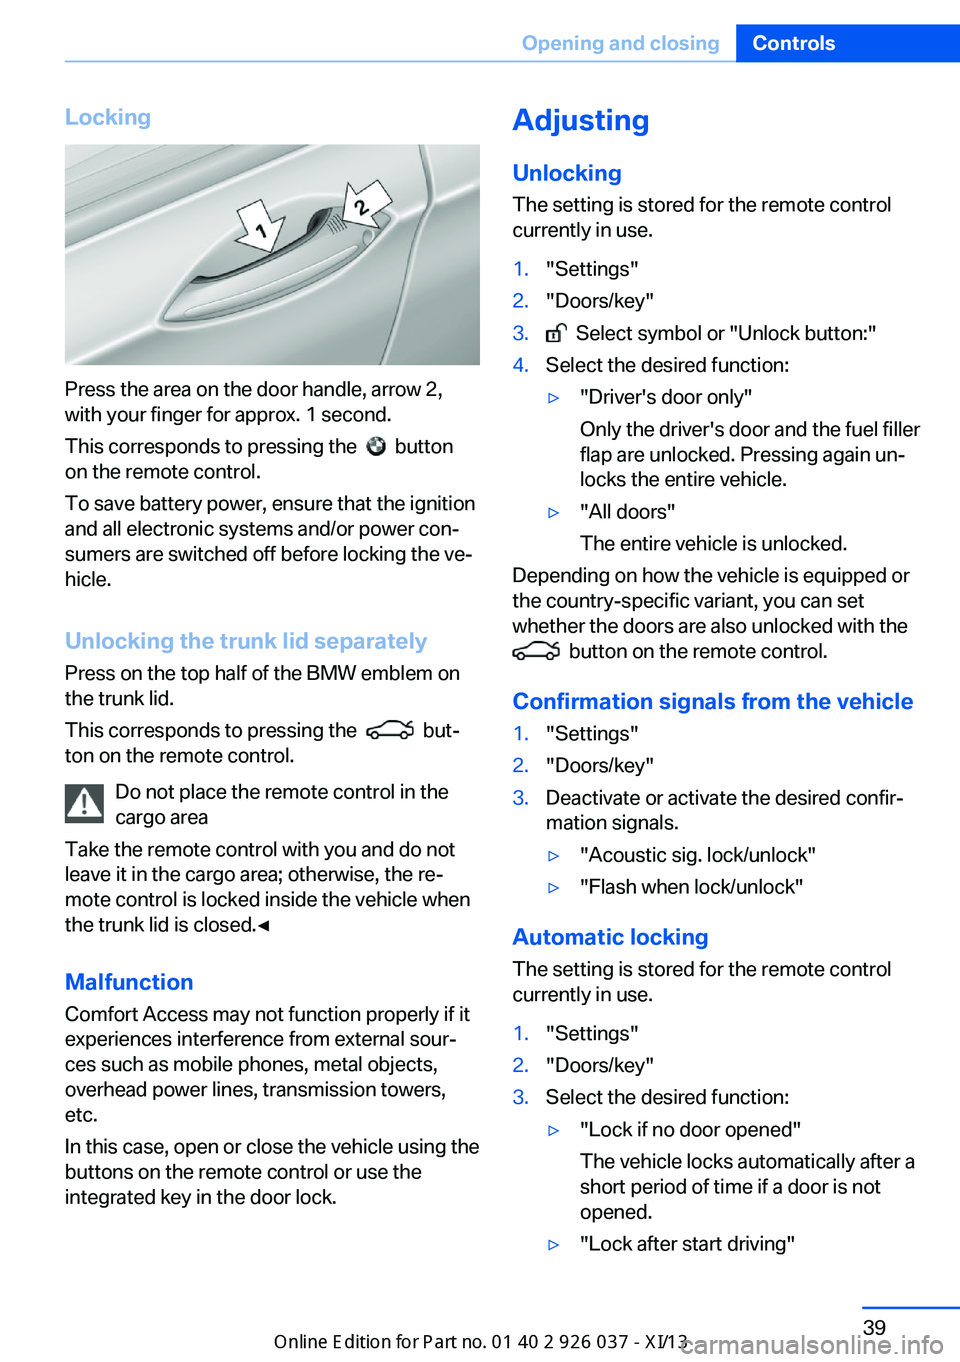
Locking
Press the area on the door handle, arrow 2,
with your finger for approx. 1 second.
This corresponds to pressing the
button
on the remote control.
To save battery power, ensure that the ignition
and all electronic systems and/or power con‐
sumers are switched off before locking the ve‐
hicle.
Unlocking the trunk lid separately
Press on the top half of the BMW emblem on
the trunk lid.
This corresponds to pressing the
but‐
ton on the remote control.
Do not place the remote control in the
cargo area
Take the remote control with you and do not
leave it in the cargo area; otherwise, the re‐
mote control is locked inside the vehicle when
the trunk lid is closed.◀
Malfunction
Comfort Access may not function properly if it
experiences interference from external sour‐
ces such as mobile phones, metal objects,
overhead power lines, transmission towers,
etc.
In this case, open or close the vehicle using the
buttons on the remote control or use the
integrated key in the door lock.
Adjusting
Unlocking The setting is stored for the remote control
currently in use.1."Settings"2."Doors/key"3. Select symbol or "Unlock button:"4.Select the desired function:▷"Driver's door only"
Only the driver's door and the fuel filler
flap are unlocked. Pressing again un‐
locks the entire vehicle.▷"All doors"
The entire vehicle is unlocked.
Depending on how the vehicle is equipped or
the country-specific variant, you can set
whether the doors are also unlocked with the
button on the remote control.
Confirmation signals from the vehicle
1."Settings"2."Doors/key"3.Deactivate or activate the desired confir‐
mation signals.▷"Acoustic sig. lock/unlock"▷"Flash when lock/unlock"
Automatic locking
The setting is stored for the remote control
currently in use.
1."Settings"2."Doors/key"3.Select the desired function:▷"Lock if no door opened"
The vehicle locks automatically after a
short period of time if a door is not
opened.▷"Lock after start driving"Seite 39Opening and closingControls39
Online Edition for Part no. 01 40 2 910 746 - VI/13
Page 45 of 222
Switching off the alarm▷Unlock the vehicle using the remote con‐
trol.▷With Comfort Access: If you are carrying
the remote control with you, pull on the
driver side or front passenger side door
handle.
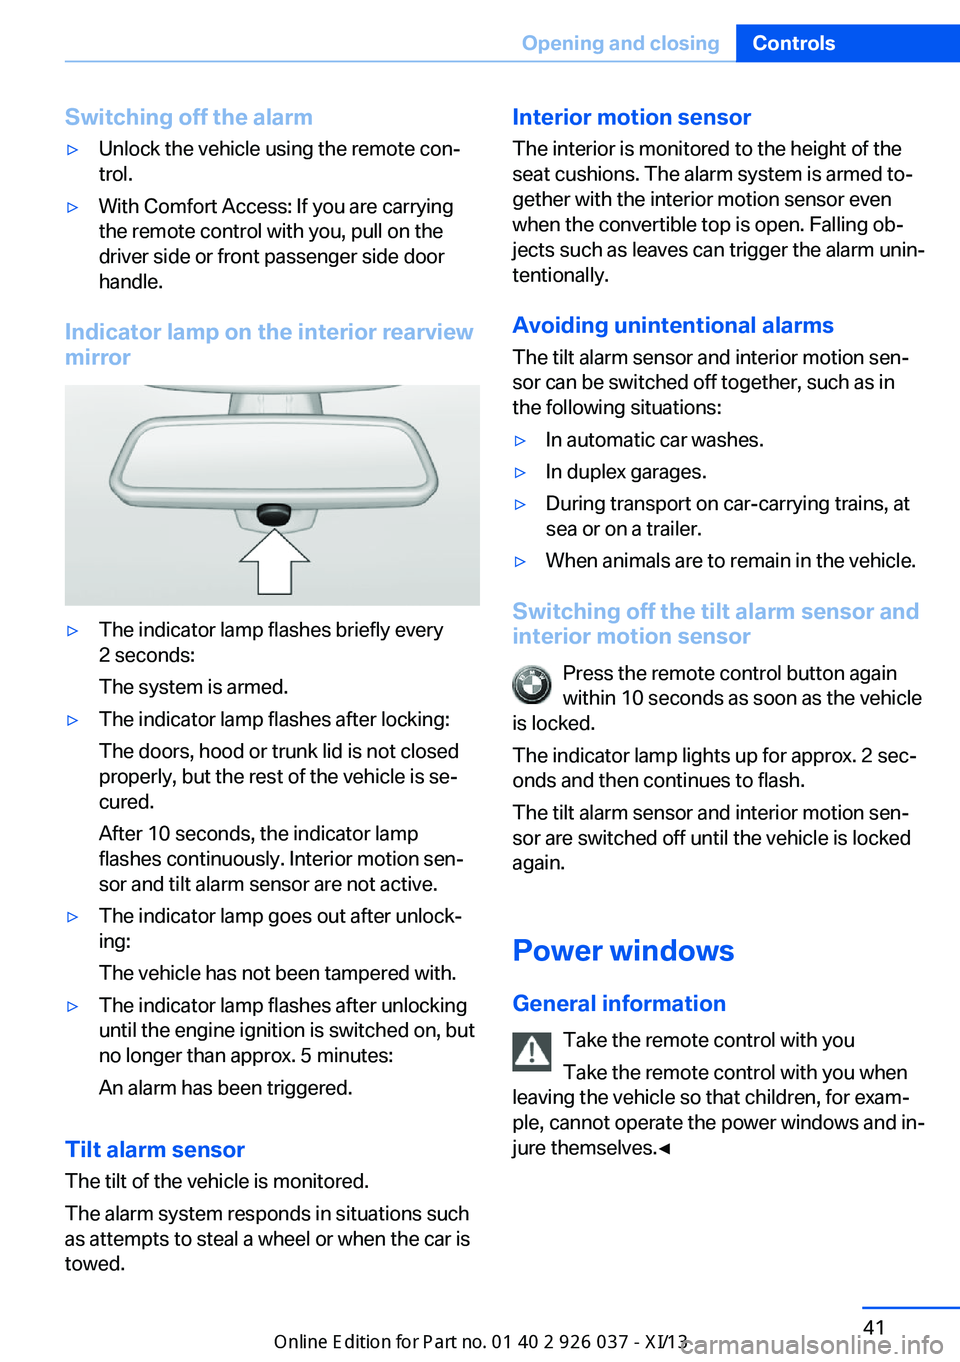
Indicator lamp on the interior rearview
mirror
▷The indicator lamp flashes briefly every
2 seconds:
The system is armed.▷The indicator lamp flashes after locking:
The doors, hood or trunk lid is not closed
properly, but the rest of the vehicle is se‐
cured.
After 10 seconds, the indicator lamp
flashes continuously. Interior motion sen‐
sor and tilt alarm sensor are not active.▷The indicator lamp goes out after unlock‐
ing:
The vehicle has not been tampered with.▷The indicator lamp flashes after unlocking
until the engine ignition is switched on, but
no longer than approx. 5 minutes:
An alarm has been triggered.
Tilt alarm sensor The tilt of the vehicle is monitored.
The alarm system responds in situations such
as attempts to steal a wheel or when the car is
towed.
Interior motion sensor
The interior is monitored to the height of the
seat cushions. The alarm system is armed to‐
gether with the interior motion sensor even
when the convertible top is open. Falling ob‐
jects such as leaves can trigger the alarm unin‐
tentionally.
Avoiding unintentional alarms The tilt alarm sensor and interior motion sen‐
sor can be switched off together, such as in
the following situations:▷In automatic car washes.▷In duplex garages.▷During transport on car-carrying trains, at
sea or on a trailer.▷When animals are to remain in the vehicle.
Switching off the tilt alarm sensor and
interior motion sensor
Press the remote control button again
within 10 seconds as soon as the vehicle
is locked.
The indicator lamp lights up for approx. 2 sec‐
onds and then continues to flash.
The tilt alarm sensor and interior motion sen‐
sor are switched off until the vehicle is locked
again.
Power windows
General information Take the remote control with you
Take the remote control with you when
leaving the vehicle so that children, for exam‐
ple, cannot operate the power windows and in‐
jure themselves.◀
Seite 41Opening and closingControls41
Online Edition for Part no. 01 40 2 910 746 - VI/13
Page 48 of 222
▷Do not leave the open convertible top in
the convertible top well longer than one
day while the top is still wet; otherwise,
damage could result due to moisture.▷When opening the convertible top, make
sure there are no foreign bodies on top of
it.▷The convertible top pivots up during open‐
ing and closing. When the top is moved,
e.g., in garages, make sure that there is a
minimum height of 79 inches/2 meters;
otherwise, it damages may result.▷Do not place any objects on the convertible
top, otherwise, they could fall and cause
damage or injuries.▷When the rollover protection system is ex‐
tended, do not under any circumstances
move the convertible top.▷Always open or close the convertible top
completely. Convertible top and
convertible top well storage cover are
locked in the final positions. Driving with
the convertible tope or convertible top well
storage cover unlocked can result in dam‐
age.▷Do not reach into the convertible top
mechanism during the opening and closing
operation. Keep children away from the
opening path of the convertible top, other‐
wise, there is a risk of injury.▷When the convertible top is opened during
driving, be alert to traffic; otherwise, it may
result in an accident. If possible, do not
move the convertible top while driving in
reverse because rearward vision is se‐
verely impaired while the convertible top is
in motion. During windy conditions, do not
operate the convertible top while driving.
Do not drive faster than 30 mph/50 km/h;
otherwise, vehicle damage may occur.▷Do not attach any roof carrier systems;
otherwise, an accident may occur.◀Functional requirements
The ignition or radio ready state must be
switched on.
It is not possible to start the engine and oper‐
ate the convertible top simultaneously. When
the engine is started, the convertible top
movement is briefly interrupted.
Under the following conditions, the convertible
top movement cannot be moved and a Check
Control message is displayed.▷Cargo area partition is flipped up.▷Trunk lid is open.▷External temperature is too low.▷Vehicle system too low.▷Convertible top drive is overheating.▷Movement of the convertible top not al‐
lowed because of national regulations.▷Vehicle speed is too high.
Before opening and closing
▷Follow the safety instructions for the
convertible top.▷Make sure that the cargo area partition in
the cargo area is folded down.▷Make sure that the cargo does not push
against the cargo area partition from be‐
low.▷Make sure that the trunk lid is closed.
Convertible top switch
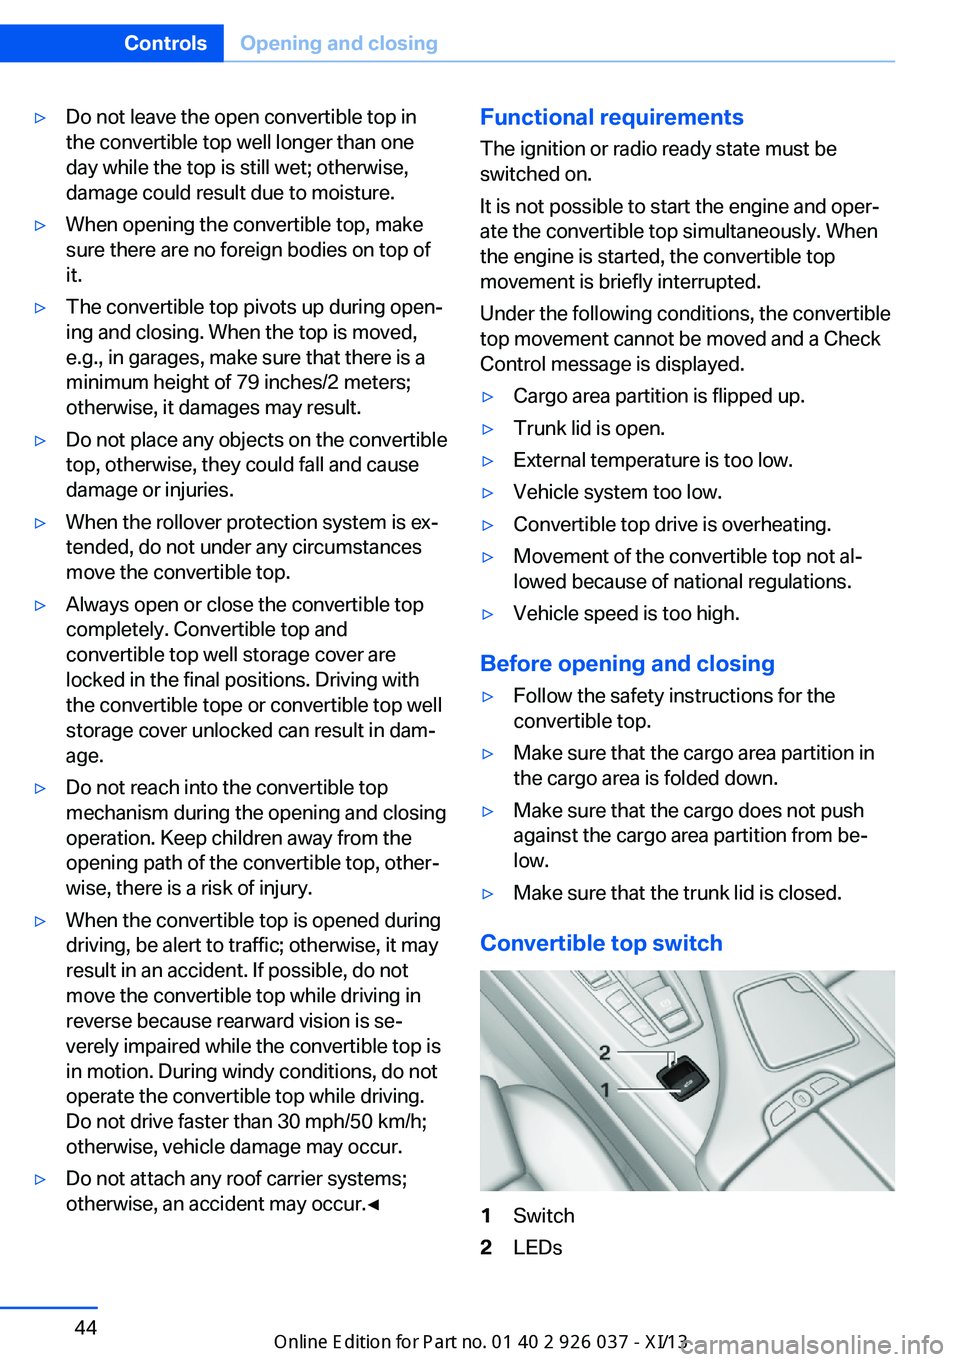
1Switch2LEDsSeite 44ControlsOpening and closing44
Online Edition for Part no. 01 40 2 910 746 - VI/13
Page 50 of 222
Manually close convertible top
If there is a defect, the convertible top can be
manually closed. Two persons are necessary
to do this.
Do not manually open convertible top
and close it manually only in emergency
situations.
Do not manually open the convertible top. The
convertible top well storage cover cannot latch
if there is an electrical defect and would open
during driving.
Manually close the convertible top only in
emergency situations.
Damage can result from improper handling.◀
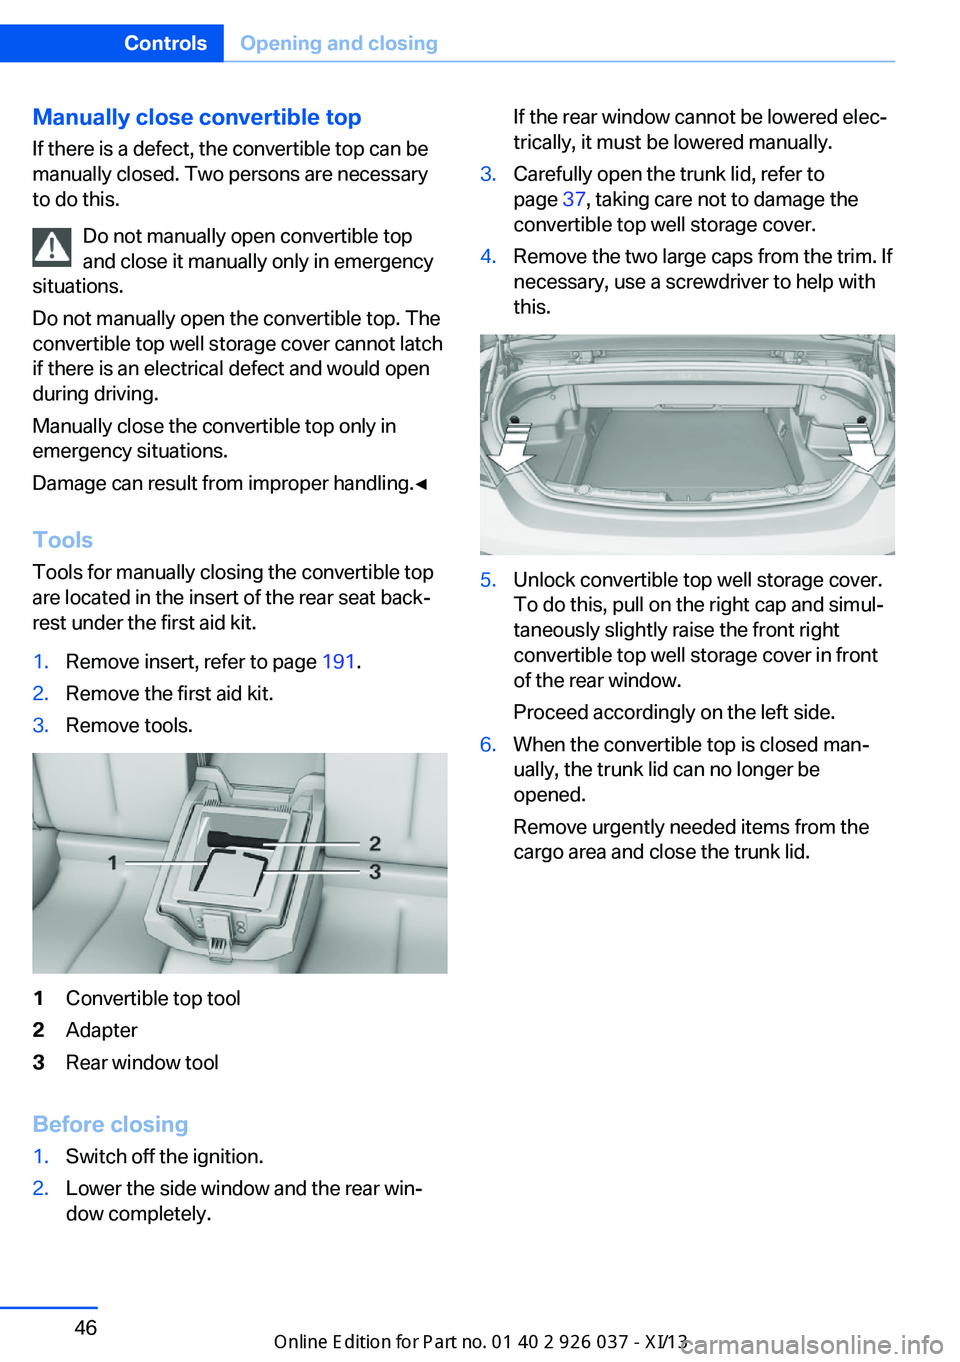
ToolsTools for manually closing the convertible top
are located in the insert of the rear seat back‐
rest under the first aid kit.1.Remove insert, refer to page 191.2.Remove the first aid kit.3.Remove tools.1Convertible top tool2Adapter3Rear window tool
Before closing
1.Switch off the ignition.2.Lower the side window and the rear win‐
dow completely.If the rear window cannot be lowered elec‐
trically, it must be lowered manually.3.Carefully open the trunk lid, refer to
page 37, taking care not to damage the
convertible top well storage cover.4.Remove the two large caps from the trim. If
necessary, use a screwdriver to help with
this.5.Unlock convertible top well storage cover.
To do this, pull on the right cap and simul‐
taneously slightly raise the front right
convertible top well storage cover in front
of the rear window.
Proceed accordingly on the left side.6.When the convertible top is closed man‐
ually, the trunk lid can no longer be
opened.
Remove urgently needed items from the
cargo area and close the trunk lid.Seite 46ControlsOpening and closing46
Online Edition for Part no. 01 40 2 910 746 - VI/13
Page 51 of 222
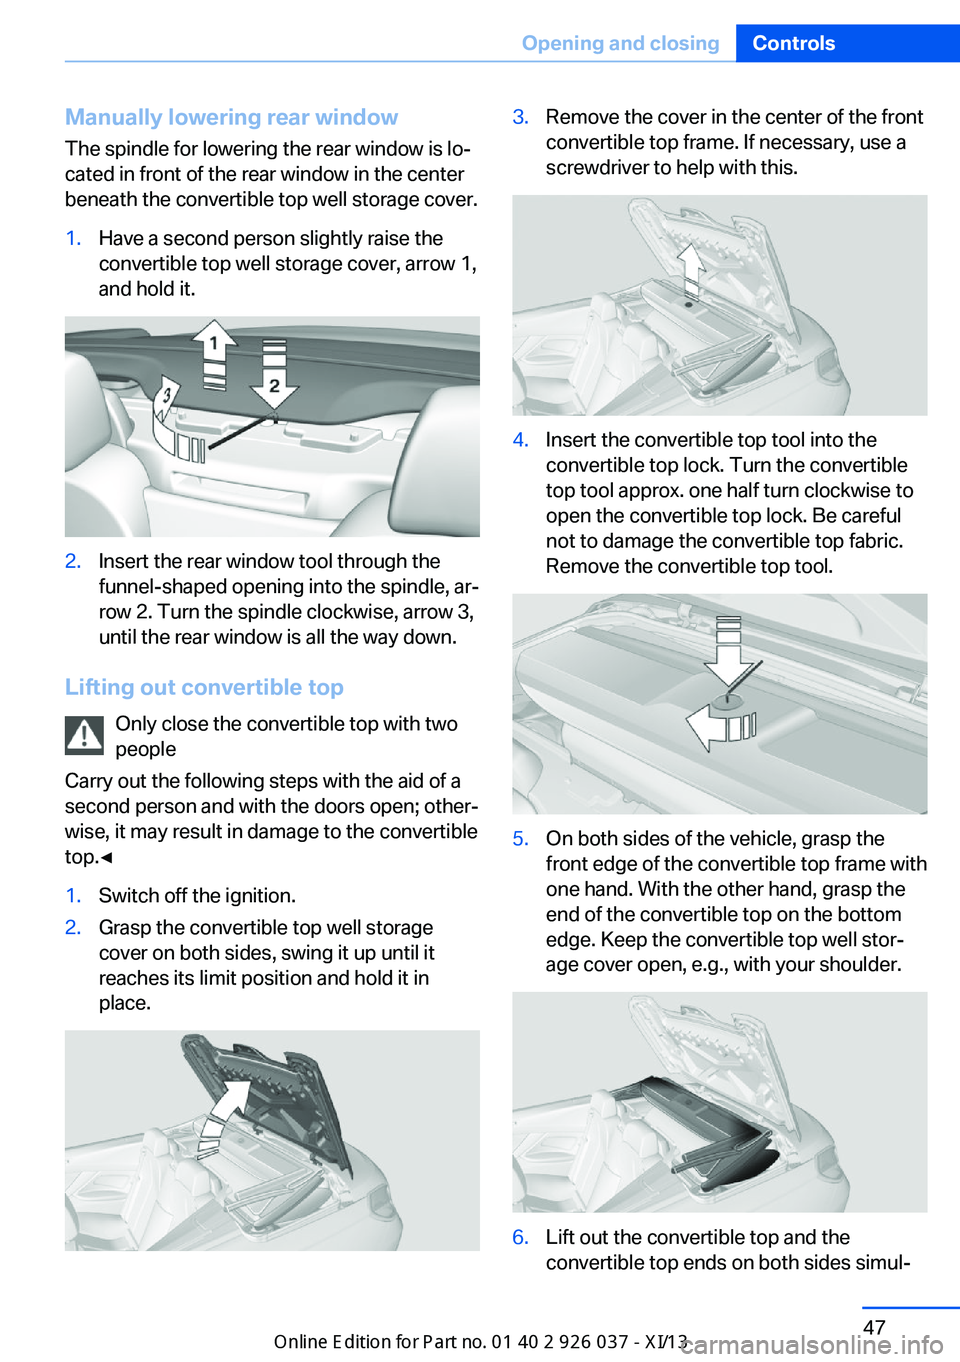
Manually lowering rear windowThe spindle for lowering the rear window is lo‐
cated in front of the rear window in the center
beneath the convertible top well storage cover.1.Have a second person slightly raise the
convertible top well storage cover, arrow 1,
and hold it.2.Insert the rear window tool through the
funnel-shaped opening into the spindle, ar‐
row 2. Turn the spindle clockwise, arrow 3,
until the rear window is all the way down.
Lifting out convertible top
Only close the convertible top with two
people
Carry out the following steps with the aid of a second person and with the doors open; other‐
wise, it may result in damage to the convertible
top.◀
1.Switch off the ignition.2.Grasp the convertible top well storage
cover on both sides, swing it up until it
reaches its limit position and hold it in
place.3.Remove the cover in the center of the front
convertible top frame. If necessary, use a
screwdriver to help with this.4.Insert the convertible top tool into the
convertible top lock. Turn the convertible
top tool approx. one half turn clockwise to
open the convertible top lock. Be careful
not to damage the convertible top fabric.
Remove the convertible top tool.5.On both sides of the vehicle, grasp the
front edge of the convertible top frame with
one hand. With the other hand, grasp the
end of the convertible top on the bottom
edge. Keep the convertible top well stor‐
age cover open, e.g., with your shoulder.6.Lift out the convertible top and the
convertible top ends on both sides simul‐Seite 47Opening and closingControls47
Online Edition for Part no. 01 40 2 910 746 - VI/13
Page 53 of 222
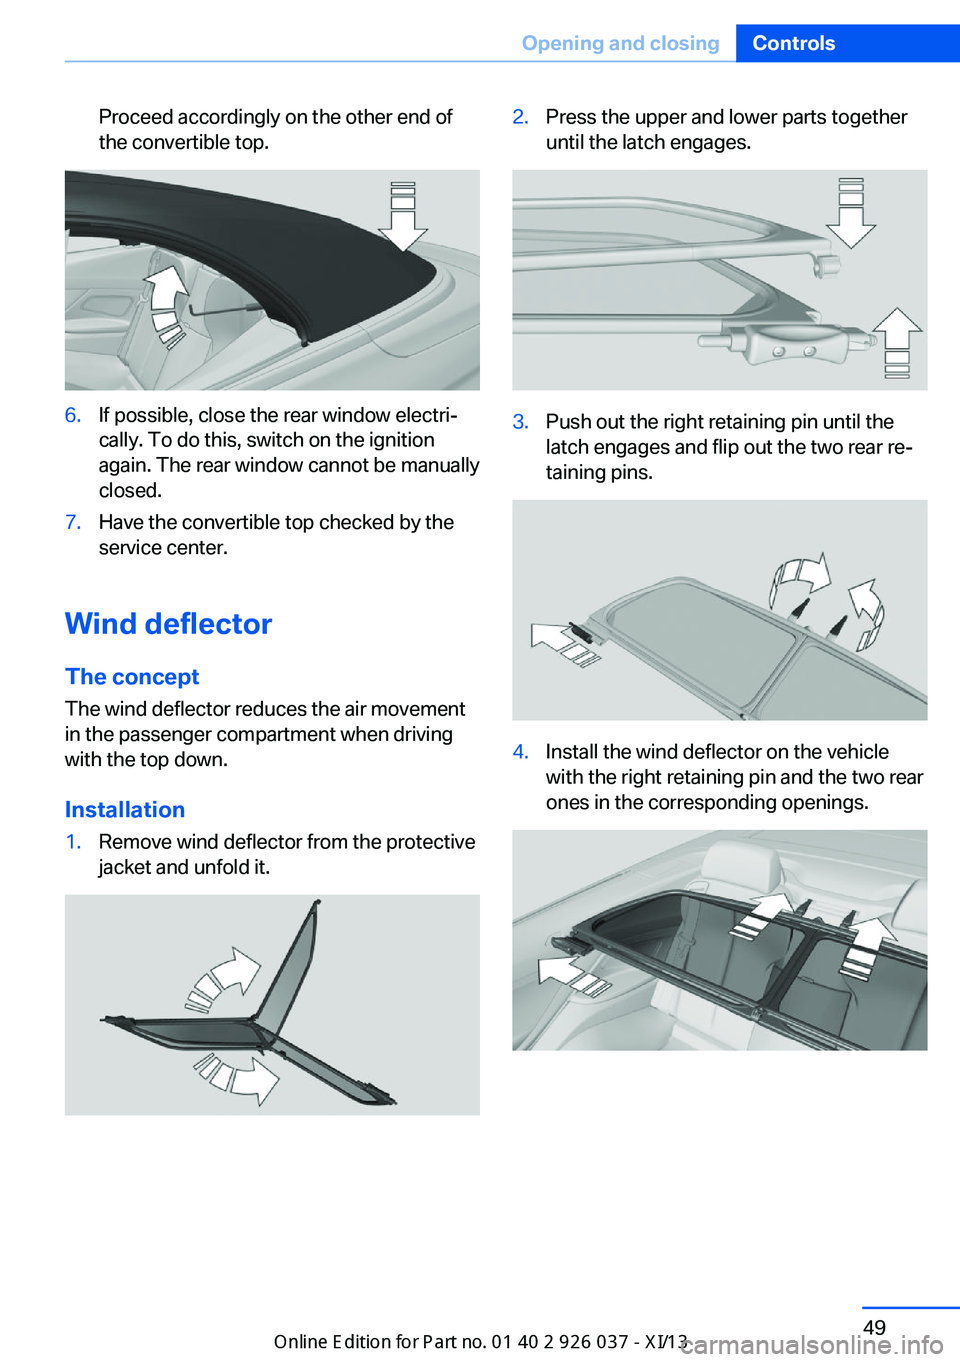
Proceed accordingly on the other end of
the convertible top.6.If possible, close the rear window electri‐
cally. To do this, switch on the ignition
again. The rear window cannot be manually
closed.7.Have the convertible top checked by the
service center.
Wind deflector
The concept The wind deflector reduces the air movement
in the passenger compartment when driving
with the top down.
Installation
1.Remove wind deflector from the protective
jacket and unfold it.2.Press the upper and lower parts together
until the latch engages.3.Push out the right retaining pin until the
latch engages and flip out the two rear re‐
taining pins.4.Install the wind deflector on the vehicle
with the right retaining pin and the two rear
ones in the corresponding openings.Seite 49Opening and closingControls49
Online Edition for Part no. 01 40 2 910 746 - VI/13
Page 61 of 222
Storing1.Switch on the ignition.2.Set the desired position.3. Press the button. The LED in the
button lights up.4.Press the desired button 1 or 2. The LED
goes out.
If the M button is pressed accidentally:
Press the button again.
The LED goes out.
Calling up settings Do not retrieve the memory while driving
Do not retrieve the memory setting while
driving, as an unexpected movement of the
seat or steering wheel could result in an acci‐
dent.◀
Comfort function
1.Open the driver's door.2.Switch off the ignition.3.Briefly press the desired button 1 or 2.
The corresponding seat position is performed
automatically.
The procedure stops when a switch for adjust‐
ing the seat or one of the buttons is pressed.
Safety mode
1.Close the driver's door or switch on the ig‐
nition.2.Press and hold the desired button 1 or 2
until the adjustment procedure is com‐
pleted.
Calling up of a seat position
deactivated
After a brief period, the calling up of stored
seat positions is deactivated to save battery
power.
To reactivate calling up of a seat position:
▷Open or close the door or trunk lid.▷Press a button on the remote control.▷Press the Start/Stop button.
Mirrors
Exterior mirrors
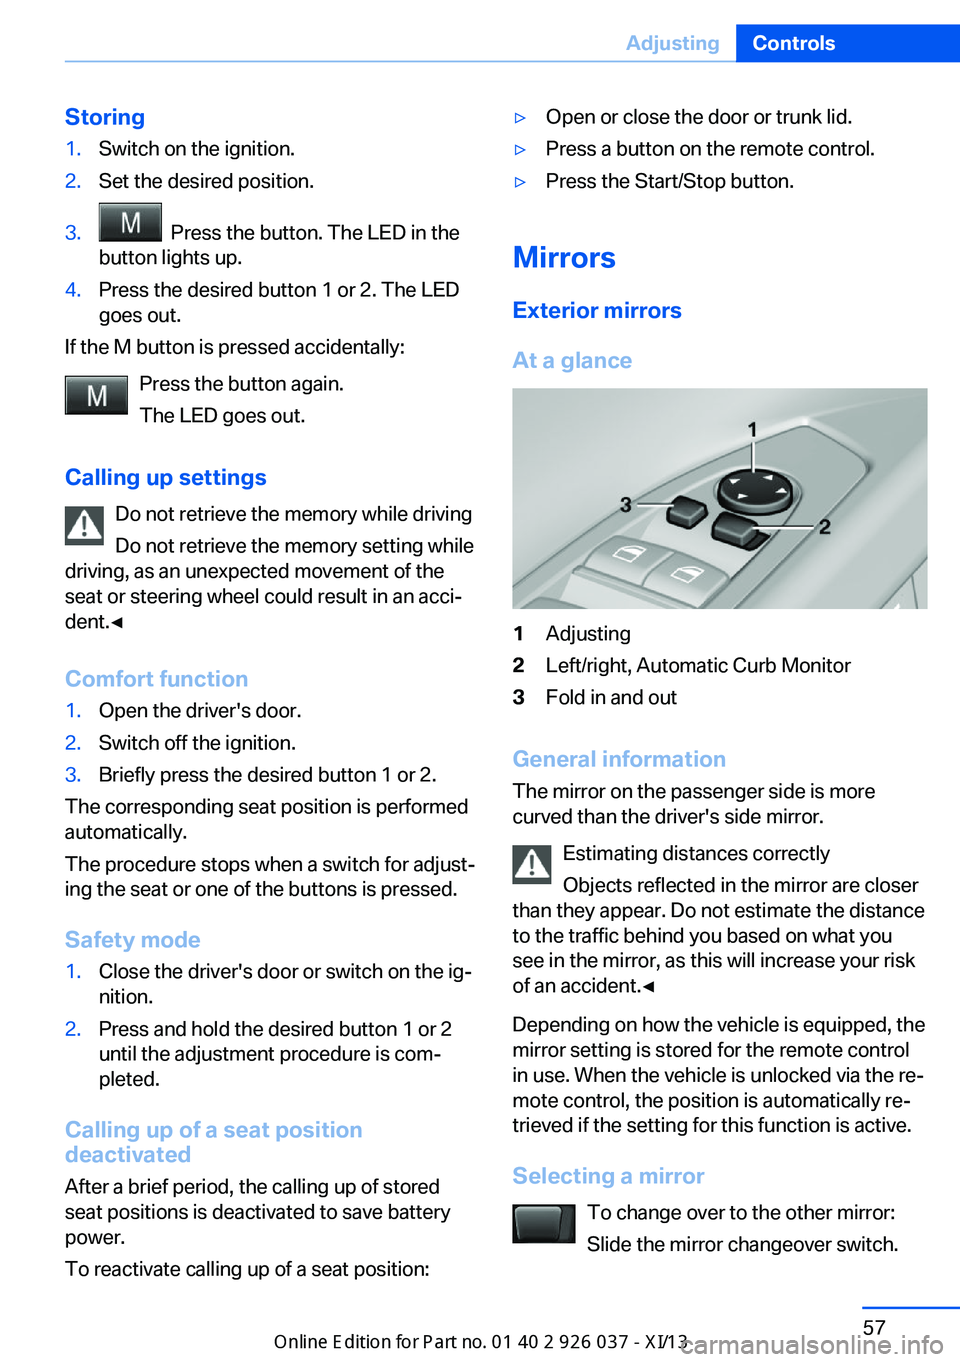
At a glance
1Adjusting2Left/right, Automatic Curb Monitor3Fold in and out
General information
The mirror on the passenger side is more
curved than the driver's side mirror.
Estimating distances correctly
Objects reflected in the mirror are closer
than they appear. Do not estimate the distance
to the traffic behind you based on what you
see in the mirror, as this will increase your risk
of an accident.◀
Depending on how the vehicle is equipped, the
mirror setting is stored for the remote control
in use. When the vehicle is unlocked via the re‐
mote control, the position is automatically re‐
trieved if the setting for this function is active.
Selecting a mirror To change over to the other mirror:Slide the mirror changeover switch.
Seite 57AdjustingControls57
Online Edition for Part no. 01 40 2 910 746 - VI/13
Page 68 of 222
DrivingVehicle equipment
All standard, country-specific and optional
equipment that is offered in the model series is
described in this chapter. Therefore, equip‐
ment is also described that is not available in a
vehicle, e. g., because of the selected optional
equipment or country variant. This also applies
for safety-related functions and systems.
Start/Stop button The concept Pressing the Start/Stop button
switches the ignition on or off
and starts the engine.
Double-clutch transmission:
The engine starts if the brake is
depressed while pressing the Start/Stop but‐
ton.
Manual transmission: the engine starts if the
clutch pedal is depressed when the Start/Stop
button is pressed.
Ignition onDouble-clutch transmission: Press the Start/
Stop button but do not depress the brake.
Manual-shift transmission: press the Start/
Stop button, and do not press on the clutch
pedal at the same time.
All vehicle systems are ready for operation.
Most of the indicator and warning lamps in the
instrument cluster light up for varying lengths
of time.
To save battery power when the engine is off,
switch off the ignition and any unnecessary
electronic systems/power consumers.
The ignition switches off automatically:▷When locking the vehicle, even if the low
beams are switched on.▷Shortly before the battery is discharged
completely, so that the engine can still be
started.
Note
If the engine is switched off and the ignition is
switched on, the system automatically
switches to the radio ready state when the
door is opened if the lights are switched off or
the daytime running lights are switched on.
Ignition off
Double-clutch transmission: Press the Start/
Stop button again, but do not depress the
brake.
Manual-shift transmission: press the Start/
Stop button again, and do not press on the
clutch pedal at the same time.
All indicator lamps in the instrument cluster go
out.
To save battery power when the engine is off,
switch off the ignition and any unnecessary
electronic systems/power consumers.
Transmission position P with the ignition
off
When the ignition is switched off, position P is
engaged automatically. When in an automatic
car wash, for example, ensure that the ignition
is not switched off accidentally.◀
The ignition automatically cuts off while the
vehicle is stationary and the engine is stopped:
▷When locking the vehicle, and when the
low beams are activated.▷Shortly before the battery is discharged
completely, so that the engine can still be
started. This function is only available
when the low beams are switched off.Seite 64ControlsDriving64
Online Edition for Part no. 01 40 2 910 746 - VI/13