transmission BMW M6 CONVERTIBLE 2015 F12M Owner's Guide
[x] Cancel search | Manufacturer: BMW, Model Year: 2015, Model line: M6 CONVERTIBLE, Model: BMW M6 CONVERTIBLE 2015 F12MPages: 230, PDF Size: 4.9 MB
Page 167 of 230
Drivetrain
With this vehicle, particular value was placed
on the direct connection from engine to the
drivetrain. Due to the torsionally rigid design of
the drivetrain, as is typical in a sports car, the
transmission of the torque also gives acoustic
feedback.
When there are load changes, this may result
in clicking noises. The do not cause any im‐
pairment of the operation or the service life of
the components.
Driving on racetracks
Requirements
Before driving on a racetrack:▷Participation in BMW Driver Experience
Training.▷Check engine oil fill level and replenish as
necessary.▷Have vehicle checked at a service center.
Hints
Racetrack operation leads to increased wear.
The vehicle is not designed for motorsports
competitive use. This wear is not covered by
the warranty.
The standard brake linings and the wear indi‐
cators are not designed for racetrack opera‐
tion. For more information and advice, contact
your service center.
Seite 163BMW M6 technologyDriving tips163
Online Edition for Part no. 01 40 2 959 664 - II/15
Page 168 of 230
Things to remember when drivingVehicle features and options
This chapter describes all standard, country-
specific and optional features offered with the
series. It also describes features that are not
necessarily available in your car, e. g., due to
the selected options or country versions. This
also applies to safety-related functions and
systems. The respectively applicable country
provisions must be observed when using the
respective features and systems.
Breaking-in period General information
Moving parts need time to adjust to one an‐
other (break-in time).
The following instructions will help accomplish
a long vehicle life and good efficiency.
During break-in, do not use the Launch Con‐
trol, refer to page 81.
Engine, transmission, and axle drive
Up to 1,200 miles/2,000 km
Drive at varying engine and road speeds, but
do not exceed 5,500 rpm and
106 mph/170 km/h.
Avoid full load or kickdown under all circum‐
stances.
At 1,200 miles/2,000 km Have drive-in checkup maintenance per‐
formed.
From 1,200 miles/2,000 km to
3,100 miles/5,000 km
The engine and road speed can gradually be
increased to a constant speed of
137 mph/220 km/h.Use the maximum speed of 155 mph/250 km/h
only briefly, e.g., when passing.
Tires
Tire traction is not optimal due to manufactur‐
ing circumstances when tires are brand-new;
they achieve their full traction potential after a
break-in time.
Drive conservatively for the first
200 miles/300 km.
Brake system
M Compound brakes require an initial break-in
period of approx. 300 miles/500 km to achieve
optimal performance between brake discs and
brake pads. Drive moderately during this
break-in period.
M carbon ceramic brakes require an initial
break-in period of approx. 600 miles/1,000 km
to achieve optimal performance between brake
discs and brake pads. Drive moderately during
this break-in period.
Clutch
The function of the clutch reaches its optimal
level only after a distance driven of approx.
300 miles/500 km. During this break-in period,
engage the clutch gently.
Following part replacement
The same break-in procedures should be ob‐
served if any of the components above-men‐
tioned have to be renewed in the course of the
vehicle's operating life.Seite 164Driving tipsThings to remember when driving164
Online Edition for Part no. 01 40 2 959 664 - II/15
Page 170 of 230
Driving through waterObserve water level and speed
Do not exceed the maximum water level
and maximum speed; otherwise, the vehicle's
engine, the electrical systems and the trans‐
mission may be damaged.◀
Drive though calm water only and only if it is
not deeper than 9.8 inches/25 cm and at this
height, no faster than walking speed, up to
3 mph/5 km/h.
Braking safely
Your vehicle is equipped with ABS as a stand‐
ard feature.
Applying the brakes fully is the most effective
way of braking in situations needed.
Steering is still responsive. You can still avoid
any obstacles with a minimum of steering ef‐
fort.
The pulsing of the brake pedal indicates that
ABS is in its active mode.
In certain braking situations, the perforated
brake discs can cause functional problems.
However, this has no effect on the perform‐
ance and operational reliability of the brake.
Objects within the range of movement
of the pedals
No objects in the area around the pedals
Keep floor mats, carpets, and any other
objects out of the pedal area; otherwise, the
function of the pedals could be impeded while
driving and create the risk of an accident.
Do not place additional floor mats over existing
mats or other objects.
Only use floor mats that have been approved
for the vehicle and can be properly attached to
floor.
Ensure that the floor mats are securely fas‐
tened again after they were removed for clean‐
ing, e.g.◀Driving in wet conditions
When roads are wet, salted, or in heavy rain,
press brake pedal ever so gently every few
miles.
Ensure that this action does not endanger
other traffic.
The heat generated in this process helps dry
the brake discs and pads.
In this way braking efficiency will be available
when you need it.
Hills Avoid stressing the brakes
Avoid placing excessive stress on the
brake system. Light but consistent brake pres‐
sure can lead to high temperatures, brakes
wearing out and possibly even brake failure.◀
Do not drive in neutral
Do not drive in neutral or with the engine
stopped, as doing so disables engine braking.
In addition, steering and brake assist are un‐
available with the engine stopped.◀
Drive long or steep downhill gradients in the
gear that requires least braking efforts. Other‐
wise the brakes may overheat and reduce
brake efficiency.
Manual transmission:
You can increase the engine's braking effect
by shifting down, going all the way to first gear,
if needed.
M double-clutch transmission:
You can increase the engine's braking effect
by shifting down in sequential mode, refer to
page 79.
Brake disc corrosion
Brake disc corrosion and contamination of the
brake pads are favored by:▷Low mileage.▷Extended periods when the vehicle is not
used at all.Seite 166Driving tipsThings to remember when driving166
Online Edition for Part no. 01 40 2 959 664 - II/15
Page 194 of 230
Too much engine oil
Have the vehicle checked immediately;
otherwise, surplus engine oil can lead to en‐
gine damage.◀
Detailed measurement
The concept In the detailed measurement the engine oil
level is checked and displayed via a scale.
Gasoline engine:
If the engine oil level reaches the minimum
level, a check control message is displayed.
Diesel engine:
During the measurement, the idle speed is in‐
creased somewhat.
Requirements▷Vehicle is on level road.▷Manual transmission: shift lever in neutral
position, clutch and accelerator pedals not
depressed.▷M Double clutch transmission: selector
lever in selector lever position N and accel‐
erator pedal not depressed.▷Engine is running and is at operating tem‐
perature.
Performing a detailed measurement
In order to perform a detailed measurement of
the engine oil level:
1."Vehicle info"2."Vehicle status"3. "Measure engine oil level"4."Start measurement"
The engine oil level is checked and displayed
via a scale.
Time: approx. 1 minute.
Adding engine oil
General information
Switch off the ignition and safely park the vehi‐
cle before engine oil is added.
Oil filler neck
Only add engine oil when the message is dis‐
played in the instrument cluster. The quantity
to be added is indicated in the message dis‐
played in the instrument cluster.
Adding engine oil
Add oil within the next 125 miles/200 km;
otherwise, this may cause engine damage.◀
Do not add too much engine oil
When too much engine oil is added, im‐
mediately have the vehicle checked, otherwise,
this may cause engine damage.◀
Protect children
Keep oil, grease, etc., out of reach of chil‐
dren and observe the warnings on the contain‐
ers to prevent health risks.◀
Engine oil types to add Hints No oil additives
Oil additives may lead to engine dam‐
age.◀
Seite 190MobilityEngine oil190
Online Edition for Part no. 01 40 2 959 664 - II/15
Page 207 of 230
corresponding engine or body ground of
the vehicle to be started.
Starting the engine
Never use spray fluids to start the engine.
1.Start the engine of the assisting vehicle
and let it run for several minutes at an in‐
creased idle speed.2.Start the engine of the vehicle that is to be
started in the usual way.
If the first starting attempt is not success‐
ful, wait a few minutes before making an‐
other attempt in order to allow the dis‐
charged battery to recharge.3.Let both engines run for several minutes.4.Disconnect the jumper cables in the re‐
verse order.
Check the battery and recharge if needed.
Tow-starting and towing Note Tow-starting and towing
For tow-starting or towing, switch off the
Intelligent Safety systems; otherwise malfunc‐
tions of the individual braking systems might
lead to accidents.◀
Manual transmission
Observe before towing your vehicle Gearshift lever in neutral position.
Towing When the parking brake is blocked
The parking brake cannot be released
manually.
Do not tow the vehicle with the parking brake
blocked, or the vehicle can be damaged.
Contact your service center.◀
Follow the towing instructions
Follow all towing instructions; otherwise,
vehicle damage or accidents may occur.◀▷Make sure that the ignition is switched on;
otherwise, the low beams, tail lights, turn
signals, and wipers may be unavailable.▷Do not tow the vehicle with the rear axle
tilted, as the front wheels could turn.▷When the engine is stopped, there is no
power assist. Consequently, more force
needs to be applied when braking and
steering.▷Larger steering wheel movements are re‐
quired.▷The towing vehicle must not be lighter
than the vehicle being towed; otherwise,
it will not be possible to control the vehi‐
cle's response.
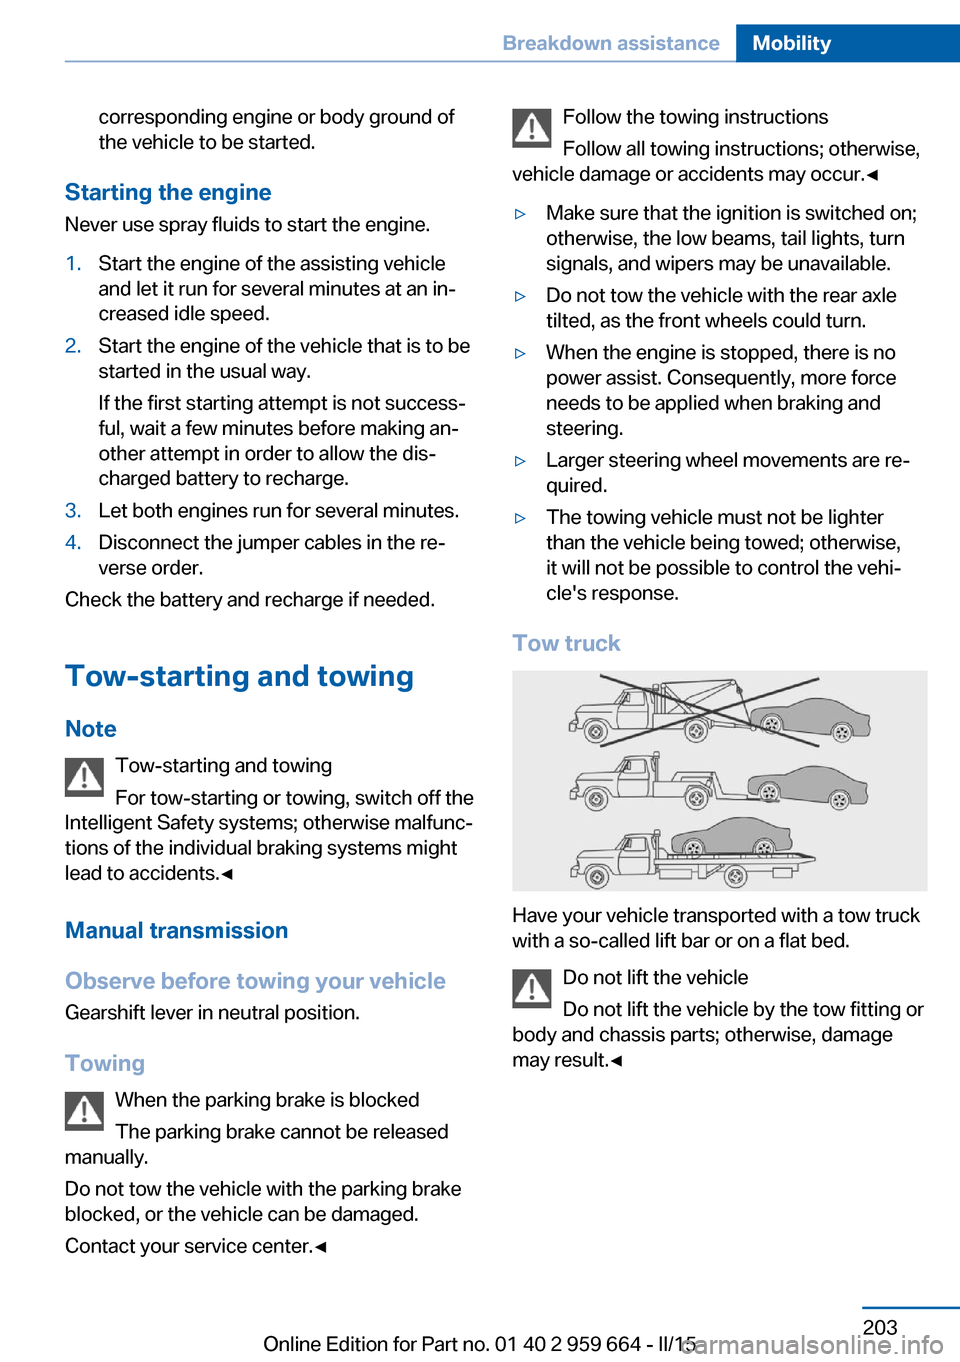
Tow truck
Have your vehicle transported with a tow truck
with a so-called lift bar or on a flat bed.
Do not lift the vehicle
Do not lift the vehicle by the tow fitting or
body and chassis parts; otherwise, damage
may result.◀
Seite 203Breakdown assistanceMobility203
Online Edition for Part no. 01 40 2 959 664 - II/15
Page 208 of 230
M double-clutch transmission:
transporting your vehicle
Note Your vehicle is not permitted to be towed.
Therefore, contact a service center in the
event of a breakdown.
Do not have the vehicle towed
Have your vehicle transported on a load‐
ing platform only; otherwise, damage may oc‐
cur.◀
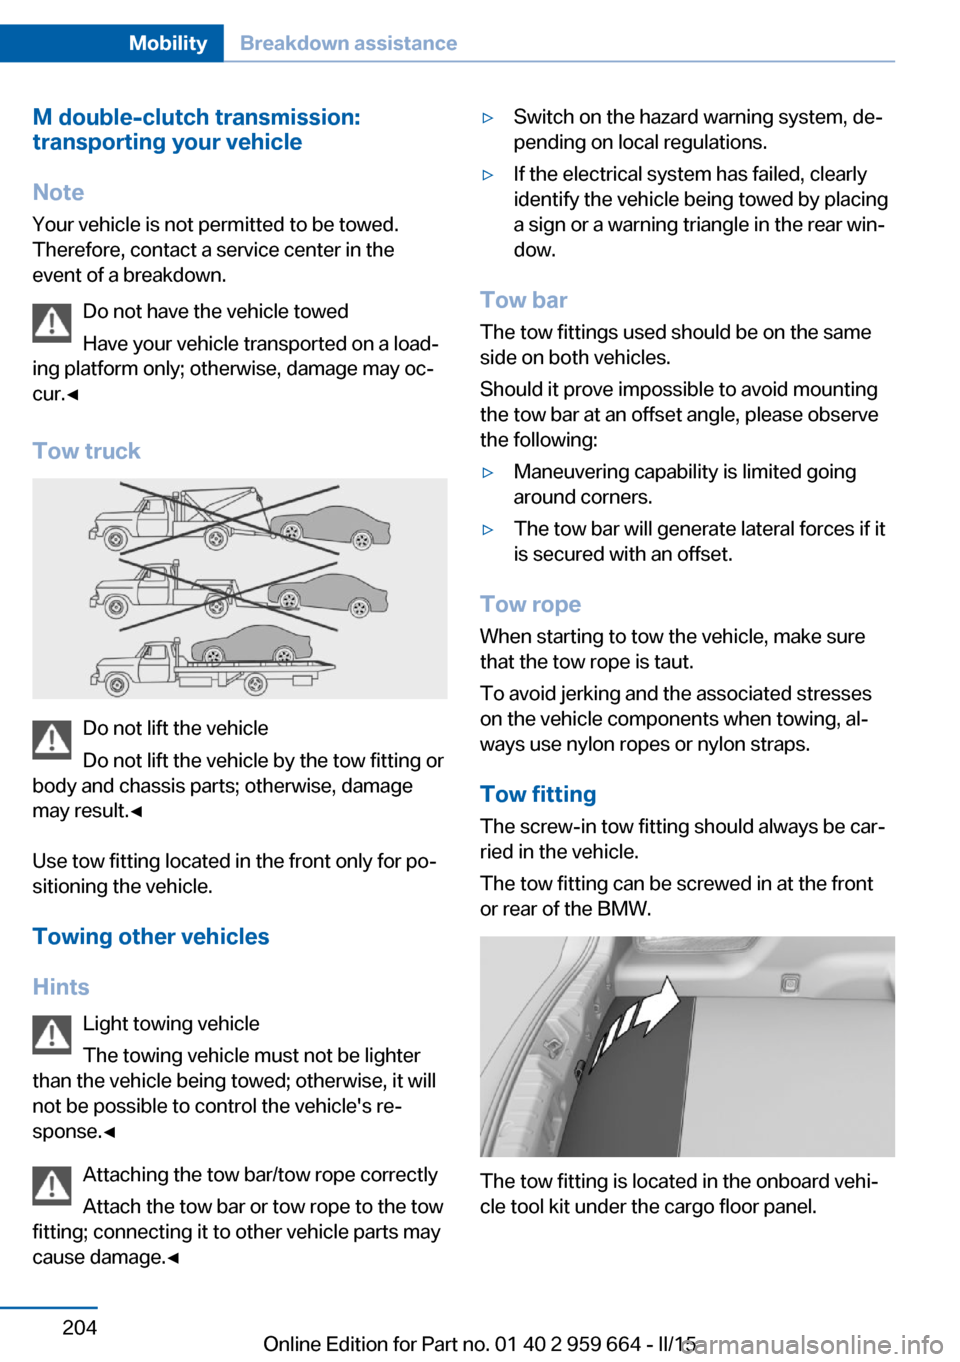
Tow truck
Do not lift the vehicle
Do not lift the vehicle by the tow fitting or
body and chassis parts; otherwise, damage
may result.◀
Use tow fitting located in the front only for po‐
sitioning the vehicle.
Towing other vehicles
Hints Light towing vehicle
The towing vehicle must not be lighter
than the vehicle being towed; otherwise, it will
not be possible to control the vehicle's re‐
sponse.◀
Attaching the tow bar/tow rope correctly
Attach the tow bar or tow rope to the tow
fitting; connecting it to other vehicle parts may
cause damage.◀
▷Switch on the hazard warning system, de‐
pending on local regulations.▷If the electrical system has failed, clearly
identify the vehicle being towed by placing
a sign or a warning triangle in the rear win‐
dow.
Tow bar
The tow fittings used should be on the same
side on both vehicles.
Should it prove impossible to avoid mounting
the tow bar at an offset angle, please observe
the following:
▷Maneuvering capability is limited going
around corners.▷The tow bar will generate lateral forces if it
is secured with an offset.
Tow rope
When starting to tow the vehicle, make sure
that the tow rope is taut.
To avoid jerking and the associated stresses
on the vehicle components when towing, al‐
ways use nylon ropes or nylon straps.
Tow fitting
The screw-in tow fitting should always be car‐
ried in the vehicle.
The tow fitting can be screwed in at the front
or rear of the BMW.
The tow fitting is located in the onboard vehi‐
cle tool kit under the cargo floor panel.
Seite 204MobilityBreakdown assistance204
Online Edition for Part no. 01 40 2 959 664 - II/15
Page 209 of 230
Tow fitting, information on use▷Use only the tow fitting provided with
the vehicle and screw it all the way in.▷Use the tow fitting for towing on paved
roads only.▷Avoid lateral loading of the tow fitting, e.g.,
do not lift the vehicle by the tow fitting.
Otherwise, damage to the tow fitting and the
vehicle can occur.◀
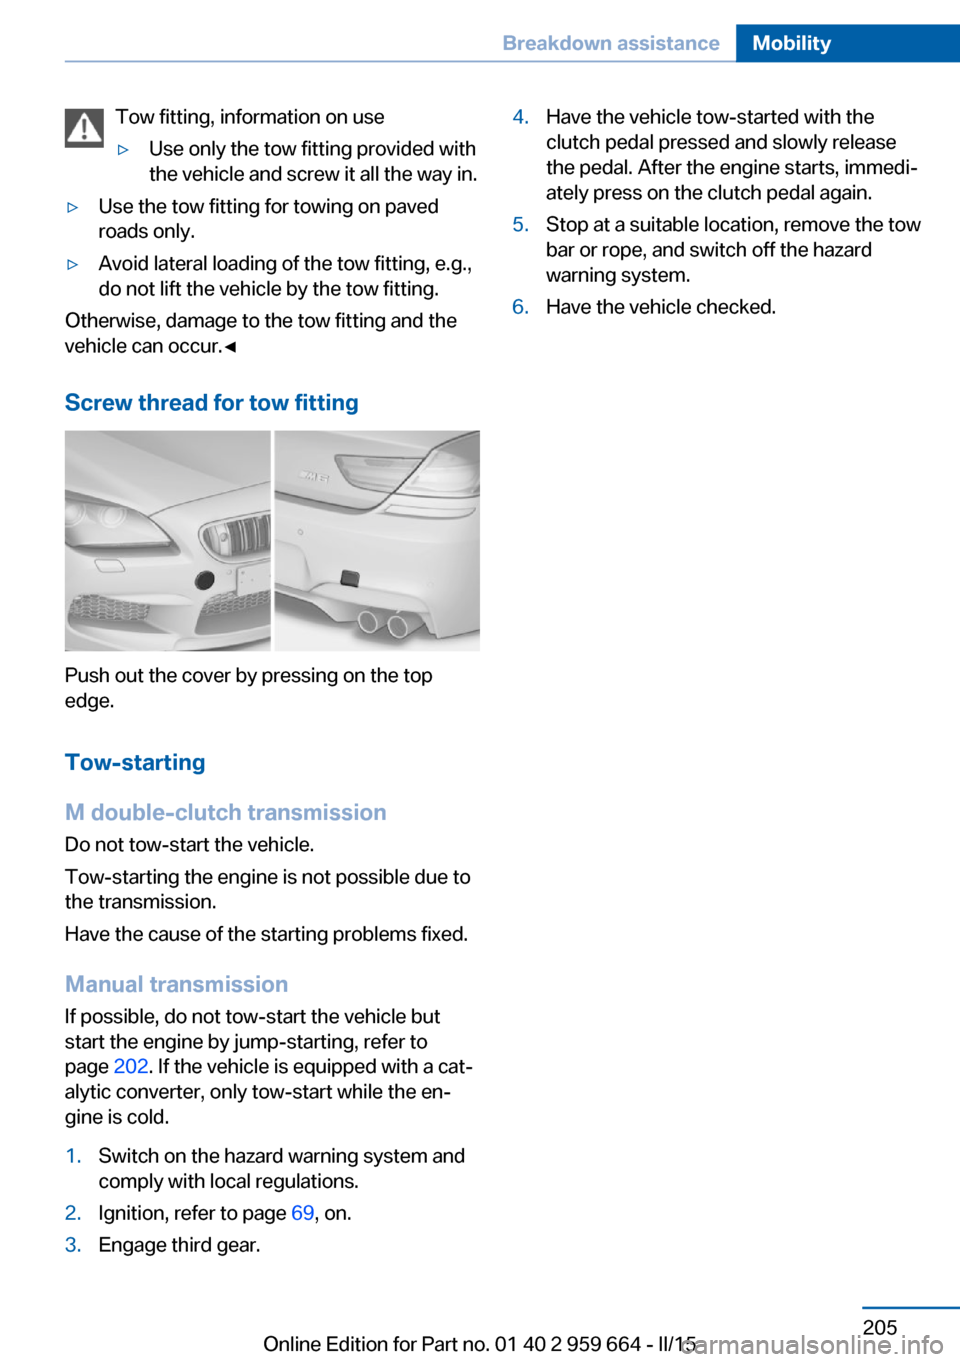
Screw thread for tow fitting
Push out the cover by pressing on the top
edge.
Tow-starting
M double-clutch transmission
Do not tow-start the vehicle.
Tow-starting the engine is not possible due to
the transmission.
Have the cause of the starting problems fixed.
Manual transmission
If possible, do not tow-start the vehicle but
start the engine by jump-starting, refer to
page 202. If the vehicle is equipped with a cat‐
alytic converter, only tow-start while the en‐
gine is cold.
1.Switch on the hazard warning system and
comply with local regulations.2.Ignition, refer to page 69, on.3.Engage third gear.4.Have the vehicle tow-started with the
clutch pedal pressed and slowly release
the pedal. After the engine starts, immedi‐
ately press on the clutch pedal again.5.Stop at a suitable location, remove the tow
bar or rope, and switch off the hazard
warning system.6.Have the vehicle checked.Seite 205Breakdown assistanceMobility205
Online Edition for Part no. 01 40 2 959 664 - II/15
Page 211 of 230
Manual transmission:1.Drive into the car wash.2.Shift to neutral.3.Switch the engine off.4.Switch on the ignition.
M double-clutch transmission:
1.Drive into the car wash.2.Engage selector lever position N.3.Switch the engine off.
In this way, the ignition remains switched
on, and a Check-Control message is dis‐
played.
Do not turn off the ignition in the car
wash
Do not turn off the ignition in the car wash;
otherwise, the transmission position P is
engaged and damages can result.◀
The vehicle cannot be locked from the outside
when in selector lever position N. A signal
sounds when an attempt is made to lock the
vehicle.
To start the engine with manual transmission:
1.Press on the clutch pedal.2.Press the Start/Stop button.
To start the engine with a M double clutch
transmission:
1.Depress the brake pedal.2.Press the Start/Stop button.
Pressing the Start/Stop button without step‐
ping on the brake turns the ignition off.
Transmission position
Transmission position P is engaged automati‐
cally:
▷When the ignition is switched off.▷After approx. 15 minutes.Headlights▷Do not rub dry and do not use abrasive or
acidic cleansers.▷Soak areas that have been dirtied e. g.,
from insects, with shampoo and wash off
with water.▷Thaw ice with de-icing spray; do not use an
ice scraper.
After washing the vehicle
After washing the vehicle, apply the brakes
briefly to dry them; otherwise, braking action
can be reduced and corrosion of the brake
discs can occur.
Completely remove all residues on the win‐
dows, to minimize loss of visibility due to
smearing and to reduce wiper noises and
wiper blade wear.
Vehicle care
Car care products BMW recommends using care and cleaning
products from BMW, since these have been
tested and approved.
Car care and cleaning products
Follow the instructions on the container.
When cleaning the interior, open the doors or
windows.
Only use products intended for cleaning vehi‐
cles.
Cleansers can contain substances that are
dangerous and harmful to your health.◀
Vehicle paint
Regular care contributes to driving safety and
value retention. Environmental influences in
areas with elevated air pollution or natural con‐
taminants, such as tree resin or pollen can af‐
fect the vehicle's paintwork. Tailor the fre‐
quency and extent of your car care to these
influences.
Seite 207CareMobility207
Online Edition for Part no. 01 40 2 959 664 - II/15
Page 218 of 230
Technical dataVehicle features and options
This chapter describes all standard, country-
specific and optional features offered with the
series. It also describes features that are not
necessarily available in your car, e. g., due tothe selected options or country versions. This
also applies to safety-related functions and
systems. The respectively applicable country
provisions must be observed when using the
respective features and systems.
Note
The technical data and specifications in this
Owner's Manual are used as guidance values.
The vehicle-specific data can deviate from this,
for example, due to the selected special equip‐
ment, country version or country-specific
measurement method. Detailed values can befound in the approval documents, on informa‐
tion signs on the vehicle or can be obtained
from the service center.
The information in the vehicle documents al‐
ways has priority.
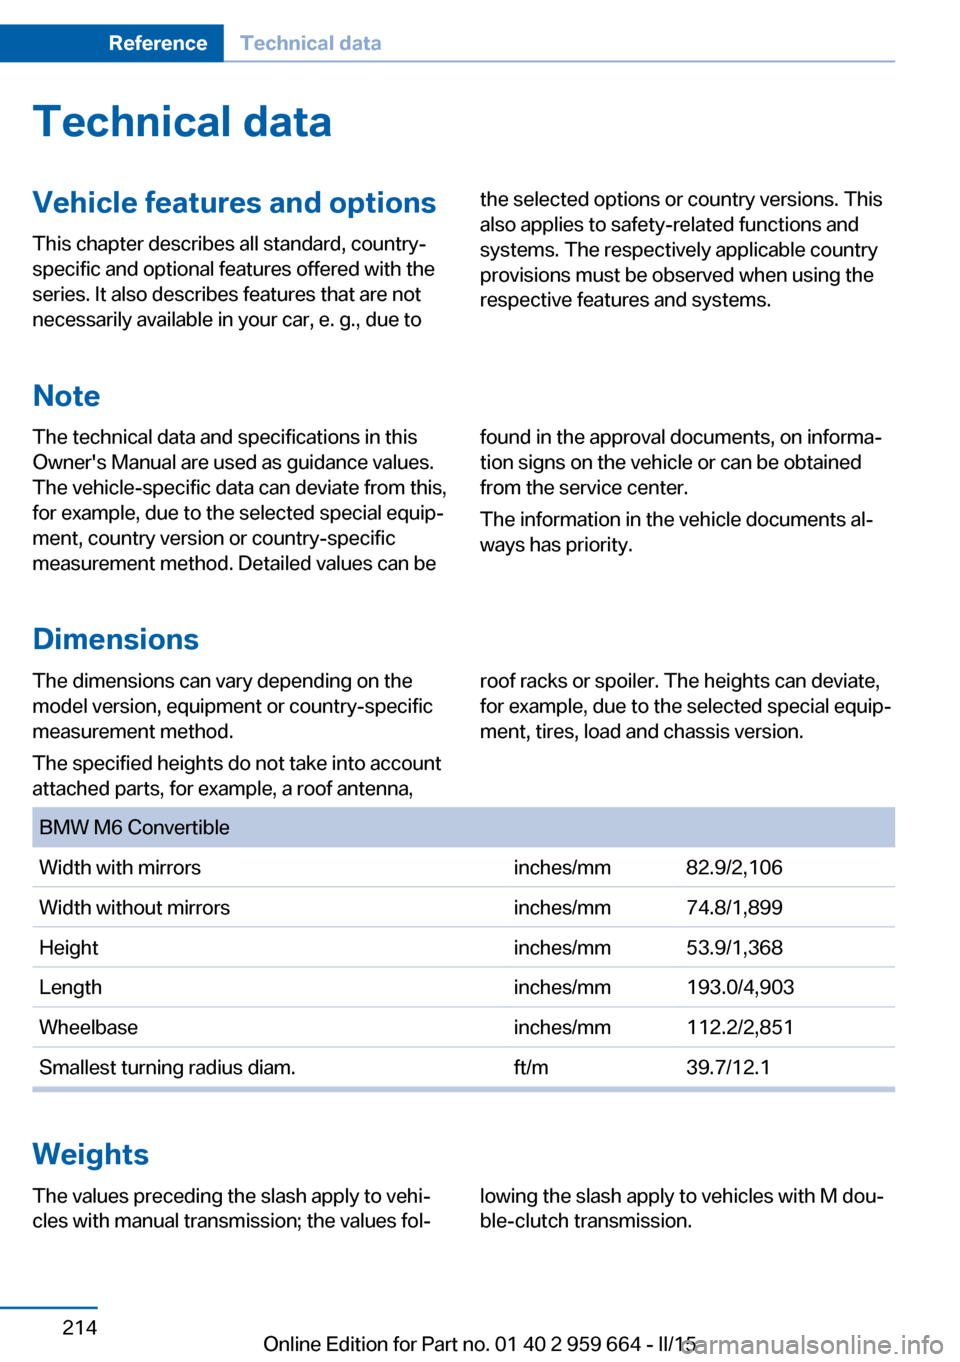
Dimensions
The dimensions can vary depending on the
model version, equipment or country-specific
measurement method.
The specified heights do not take into account
attached parts, for example, a roof antenna,roof racks or spoiler. The heights can deviate,
for example, due to the selected special equip‐
ment, tires, load and chassis version. BMW M6 ConvertibleWidth with mirrorsinches/mm82.9/2,106Width without mirrorsinches/mm74.8/1,899Heightinches/mm53.9/1,368Lengthinches/mm193.0/4,903Wheelbaseinches/mm112.2/2,851Smallest turning radius diam.ft/m39.7/12.1
Weights
The values preceding the slash apply to vehi‐
cles with manual transmission; the values fol‐lowing the slash apply to vehicles with M dou‐
ble-clutch transmission.Seite 214ReferenceTechnical data214
Online Edition for Part no. 01 40 2 959 664 - II/15
Page 225 of 230
Malfunction displays, seeCheck Control 85
Manual air distribution 146
Manual air flow 146
Manual brake, refer to Parking brake 73
Manual operation, door lock 40
Manual operation, exterior mirrors 63
Manual operation, fuel filler flap 174
Manual operation, Park Dis‐ tance Control PDC 137
Manual operation, rearview camera 139
Manual operation, Side View 142
Manual operation, Top View 143
Manual transmission 83
Marking on approved tires 182
Massage seat, front 58
Master key, refer to Remote control 34
Maximum cooling 147
Maximum speed, display 93
Maximum speed, winter tires 183
M carbon ceramic brake 162
M Compound brake 162
M differential, active 132
MDM, M Dynamic Mode 130
M double-clutch transmis‐ sion 78
M Drive 128
M Driver's Package, driving instructions 167
M Driving Dynamics Con‐ trol 82
M Dynamic Mode MDM 130
Measure, units of 98
Medical kit 201
Memory for seat, mirrors, steering wheel 62 Menu EfficientDynamics 91
Menu in instrument clus‐ ter 94
Menus, operating, iDrive 18
Menus, refer to iDrive operat‐ ing concept 19
Messages, see Check Con‐ trol 85
Microfilter 148
Minimum tread, tires 181
Mirror 63
Mirror memory 62
Mobile communication devi‐ ces in the vehicle 165
Mobility System 183
Modifications, technical, refer to Safety 7
Moisture in headlight 196
Monitor, refer to Control Dis‐ play 18
Mounting of child restraint systems 66
M technology 162
Multifunction steering wheel, buttons 14
M view, Head-up display 99
N
Navigation, see user's manual for Navigation, Entertain‐
ment and Communication
Neck restraints, front, refer to Head restraints 60
Neutral cleaner, see wheel cleaner 209
New wheels and tires 182
Night Vision 120
Night Vision device, see Night Vision 120
Nylon rope for tow-starting/ towing 204
O OBD Onboard Diagnosis 194 OBD, see OBD Onboard Di‐
agnosis 194
Object detection, see Night Vision 120
Obstacle marking, rearview camera 140
Octane rating, refer to Rec‐ ommended fuel grade 176
Odometer 89
Office, see user's manual for Navigation, Entertainment
and Communication
Oil 189
Oil, adding 190
Oil additives 190
Oil change 191
Oil change interval, service requirements 91
Oil filler neck 190
Oil types, alternative 191
Oil types, approved 191
Old batteries, disposal 198
On-board computer 94
Onboard monitor, refer to Control Display 18
Onboard vehicle tool kit 195
Opening/closing via door lock 40
Opening and closing 34
Opening and closing, without remote control 40
Opening and closing, with re‐ mote control 37
Operating concept, iDrive 18
Optional equipment, standard equipment 6
Outside air, refer to Auto‐ matic recirculated-air con‐
trol 147
Overheating of engine, refer to Coolant temperature 89
P Paint, vehicle 207 Seite 221Everything from A to ZReference221
Online Edition for Part no. 01 40 2 959 664 - II/15