turn signal BMW M6 COUPE 2006 E63 User Guide
[x] Cancel search | Manufacturer: BMW, Model Year: 2006, Model line: M6 COUPE, Model: BMW M6 COUPE 2006 E63Pages: 227, PDF Size: 8.32 MB
Page 84 of 227
Lamps
82 vene at any time and switch the high beams on
and off in the accustomed manner.
Activating high-beam assistant
1.Turn the light switch to switch position3,
refer to page80.
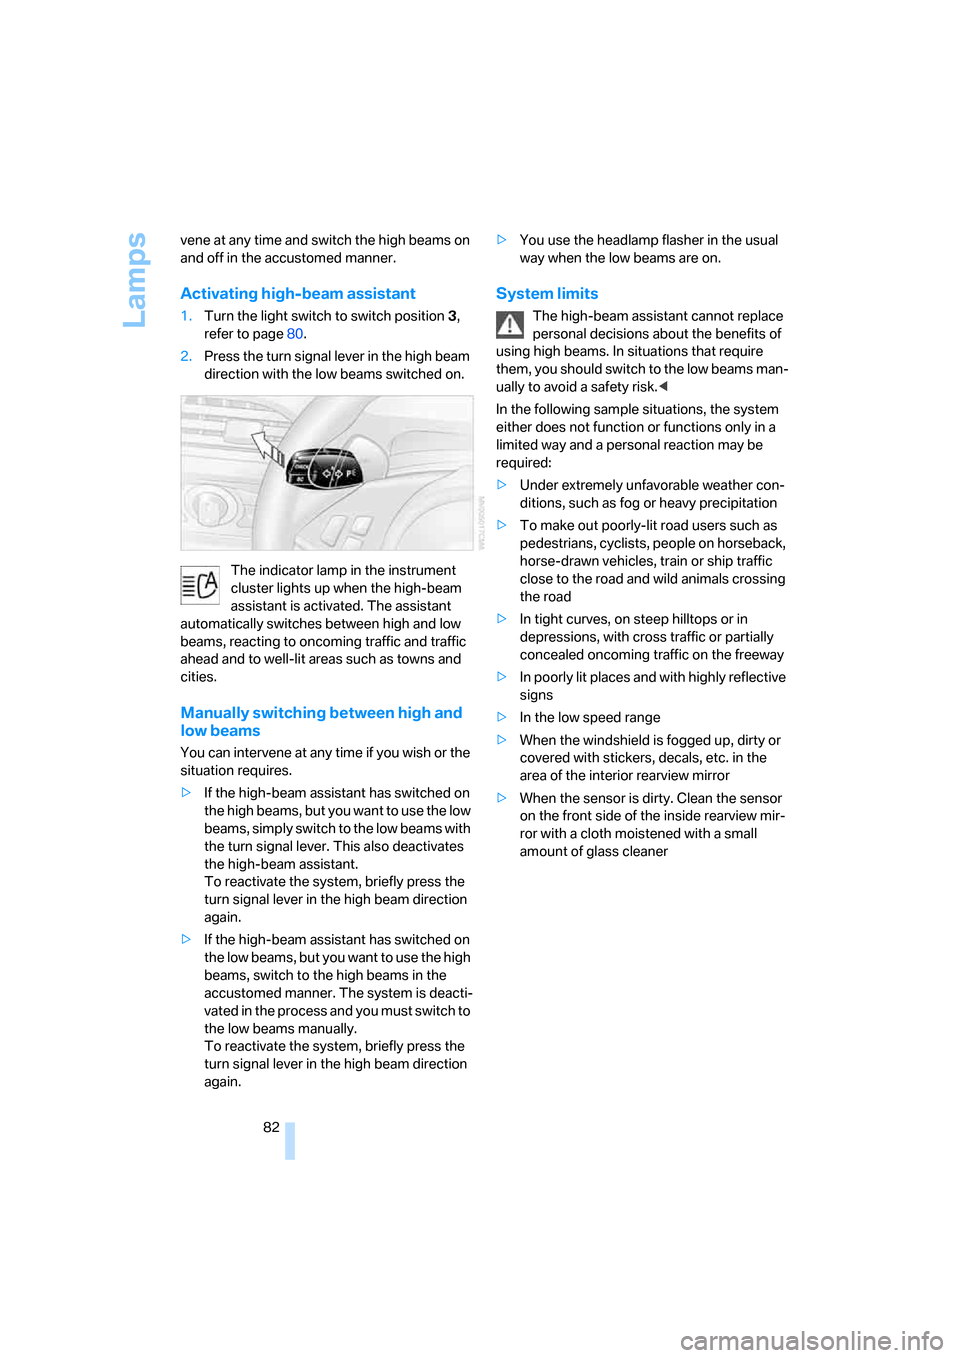
2.Press the turn signal lever in the high beam
direction with the low beams switched on.
The indicator lamp in the instrument
cluster lights up when the high-beam
assistant is activated. The assistant
automatically switches between high and low
beams, reacting to oncoming traffic and traffic
ahead and to well-lit areas such as towns and
cities.
Manually switching between high and
low beams
You can intervene at any time if you wish or the
situation requires.
>If the high-beam assistant has switched on
the high beams, but you want to use the low
beams, simply switch to the low beams with
the turn signal lever. This also deactivates
the high-beam assistant.
To reactivate the system, briefly press the
turn signal lever in the high beam direction
again.
>If the high-beam assistant has switched on
the low beams, but you want to use the high
beams, switch to the high beams in the
accustomed manner. The system is deacti-
vated in the process and you must switch to
the low beams manually.
To reactivate the system, briefly press the
turn signal lever in the high beam direction
again.>You use the headlamp flasher in the usual
way when the low beams are on.
System limits
The high-beam assistant cannot replace
personal decisions about the benefits of
using high beams. In situations that require
them, you should switch to the low beams man-
ually to avoid a safety risk.<
In the following sample situations, the system
either does not function or functions only in a
limited way and a personal reaction may be
required:
>Under extremely unfavorable weather con-
ditions, such as fog or heavy precipitation
>To make out poorly-lit road users such as
pedestrians, cyclists, people on horseback,
horse-drawn vehicles, train or ship traffic
close to the road and wild animals crossing
the road
>In tight curves, on steep hilltops or in
depressions, with cross traffic or partially
concealed oncoming traffic on the freeway
>In poorly lit places and with highly reflective
signs
>In the low speed range
>When the windshield is fogged up, dirty or
covered with stickers, decals, etc. in the
area of the interior rearview mirror
>When the sensor is dirty. Clean the sensor
on the front side of the inside rearview mir-
ror with a cloth moistened with a small
amount of glass cleaner
Page 125 of 227
Navigation
Driving tips
123Reference
At a glance
Controls
Communications
Entertainment
Mobility
What to do if …
What to do if …
>a navigation DVD is inserted, but the
request to insert the DVD is displayed on
the Control Display?
The navigation DVD may not be the right
DVD for the navigation system. The DVD is
labeled accordingly.
>you request the current position of your
vehicle, but do not receive a precise dis-
play?
The system is unable to receive enough
GPS signals at your current position due to
obstructions, your position is not yet avail-
able on your navigation DVD, or the system
is in the process of calculating your posi-
tion. As a rule, reception is guaranteed in
the open air.
>the destination guidance does not accept a
destination?
The data of the destination is not stored on
the navigation DVD that is loaded. Select a
destination that is as close as possible to
the original.
>the destination guidance does not accept a
destination without the street name?
On the navigation DVD, no downtown area
can be determined for the city or town
entered. Enter any street, or a destination
such as the railway station etc., then start
the destination guidance.
>you want to enter a destination for the des-
tination guidance, but it is not possible to
select the letters for your desired entry?
The data of the destination is not stored on
the navigation DVD that is loaded. In this
case, the system will not offer you any let-
ters to choose from. Select a destination
that is as close as possible to the original.>the system stops furnishing directions on
which way to turn as you approach intersec-
tions?
You are driving in an area that has not yet
been completely recorded on the naviga-
tion DVD. Instead of an arrow indicating a
turn, you will see an arrow which indicates
the general direction of your planned route.
Or you have left the recommended route
and the system requires a few seconds to
calculate a new recommended route.
>the navigation system does not react to
entries?
If the battery has just been reconnected
after having been disconnected, it then
takes up to 10 minutes before the system is
once again operational.
Page 132 of 227
Radio
130
Radio
Your radio provides reception of the FM and AM
wavebands.
Listening to radio
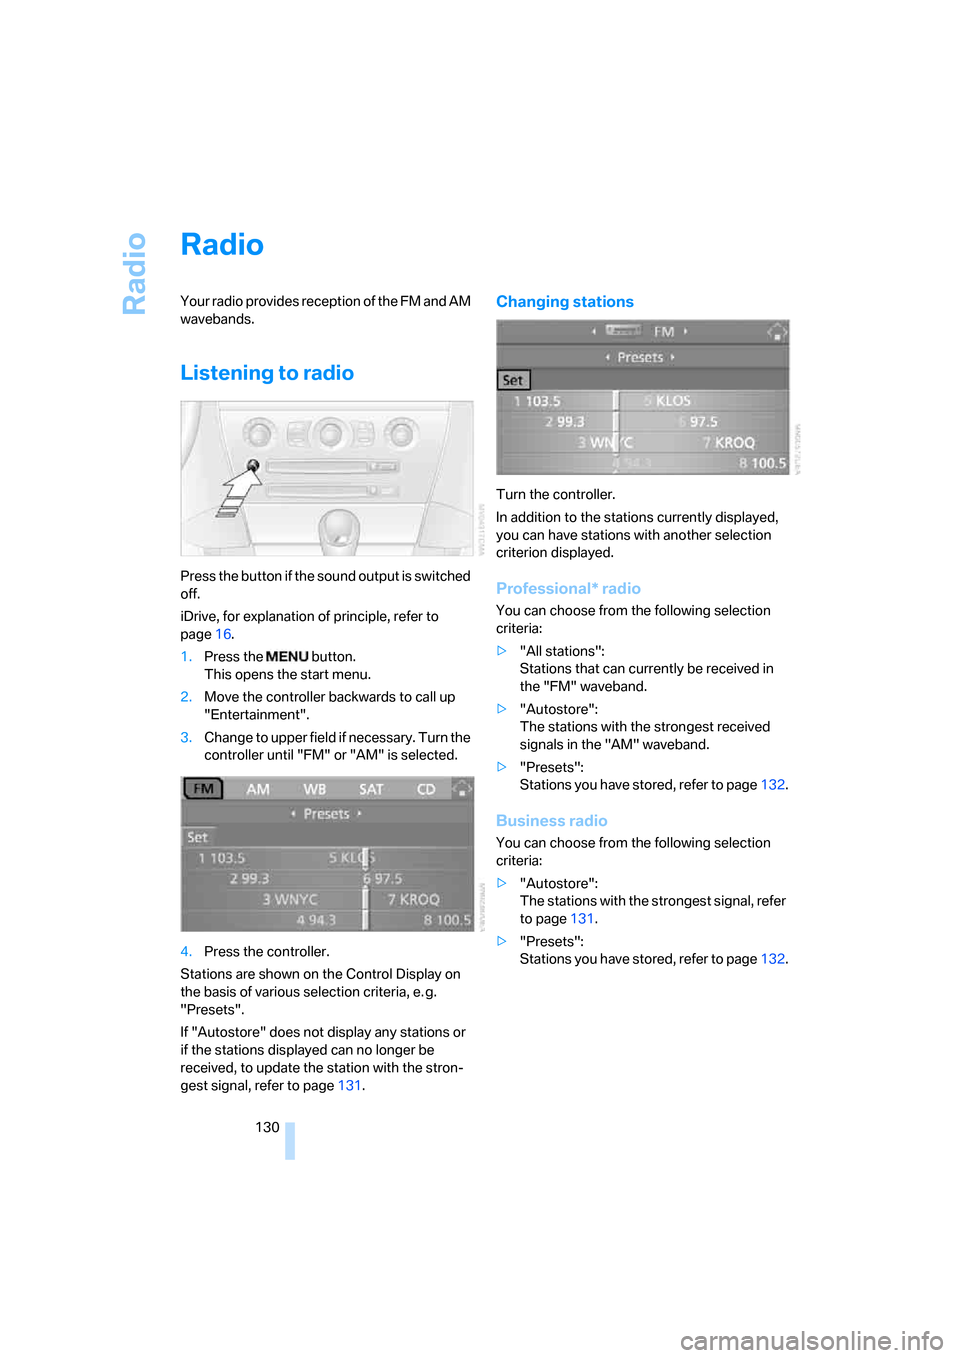
Press the button if the sound output is switched
off.
iDrive, for explanation of principle, refer to
page16.
1.Press the button.
This opens the start menu.
2.Move the controller backwards to call up
"Entertainment".
3.Change to upper field if necessary. Turn the
controller until "FM" or "AM" is selected.
4.Press the controller.
Stations are shown on the Control Display on
the basis of various selection criteria, e. g.
"Presets".
If "Autostore" does not display any stations or
if the stations displayed can no longer be
received, to update the station with the stron-
gest signal, refer to page131.
Changing stations
Turn the controller.
In addition to the stations currently displayed,
you can have stations with another selection
criterion displayed.
Professional* radio
You can choose from the following selection
criteria:
>"All stations":
Stations that can currently be received in
the "FM" waveband.
>"Autostore":
The stations with the strongest received
signals in the "AM" waveband.
>"Presets":
Stations you have stored, refer to page132.
Business radio
You can choose from the following selection
criteria:
>"Autostore":
The stations with the strongest signal, refer
to page131.
>"Presets":
Stations you have stored, refer to page132.
Page 140 of 227
Radio
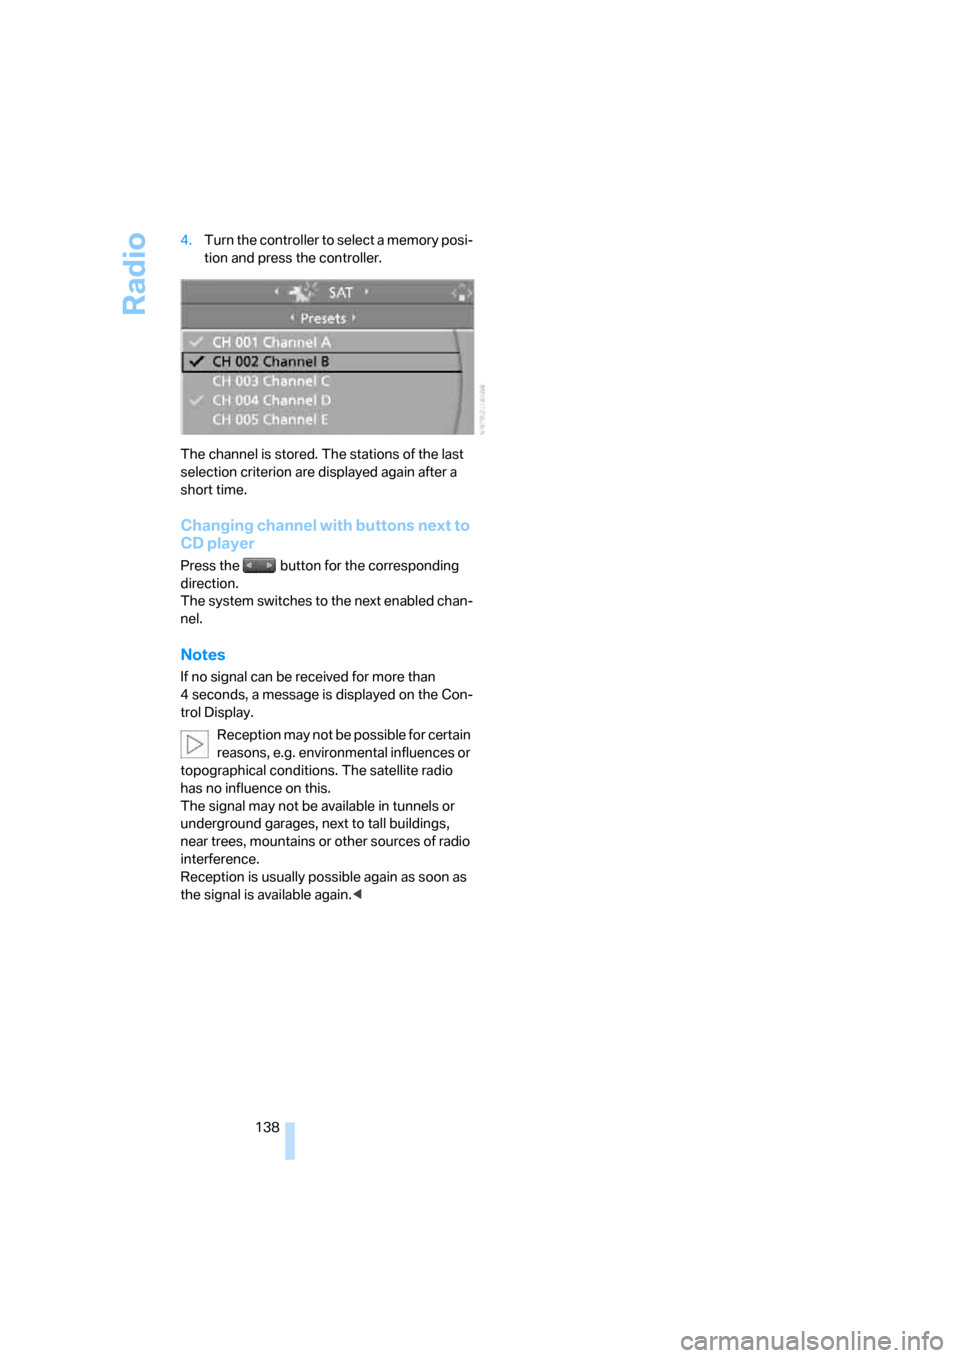
138 4.Turn the controller to select a memory posi-
tion and press the controller.
The channel is stored. The stations of the last
selection criterion are displayed again after a
short time.
Changing channel with buttons next to
CD player
Press the button for the corresponding
direction.
The system switches to the next enabled chan-
nel.
Notes
If no signal can be received for more than
4 seconds, a message is displayed on the Con-
trol Display.
Reception may not be possible for certain
reasons, e.g. environmental influences or
topographical conditions. The satellite radio
has no influence on this.
The signal may not be available in tunnels or
underground garages, next to tall buildings,
near trees, mountains or other sources of radio
interference.
Reception is usually possible again as soon as
the signal is available again.<
Page 159 of 227
157
Entertainment
Reference
At a glance
Controls
Driving tips Communications
Navigation
Mobility
Voice commands
Activating system
1.Press the button on the steering wheel.
An acoustic signal indicates that you can
say commands.
2.Say the command.
The text or numbers that the voice com-
mand system has registered will appear on
the Control Display.
Ending/canceling operation by voice
Press the button on the steering wheel
or
In dialogs where text is spoken, not a command,
e.g. a name, canceling is only possible using the
button on the steering wheel.
Having possible commands read aloud
The system understands default commands
that must be spoken word for word.
You can have the system read aloud the possi-
ble commands at any point:
Using alternative commands
There are often a number of commands to run a
function, e.g.:
The system recognizes digits from zero to nine.
You can say each digit individually or group
them into a sequence to accelerate the input.
Example: dialing phone numbers
Start the dialog:
Press the button on the steering wheel.
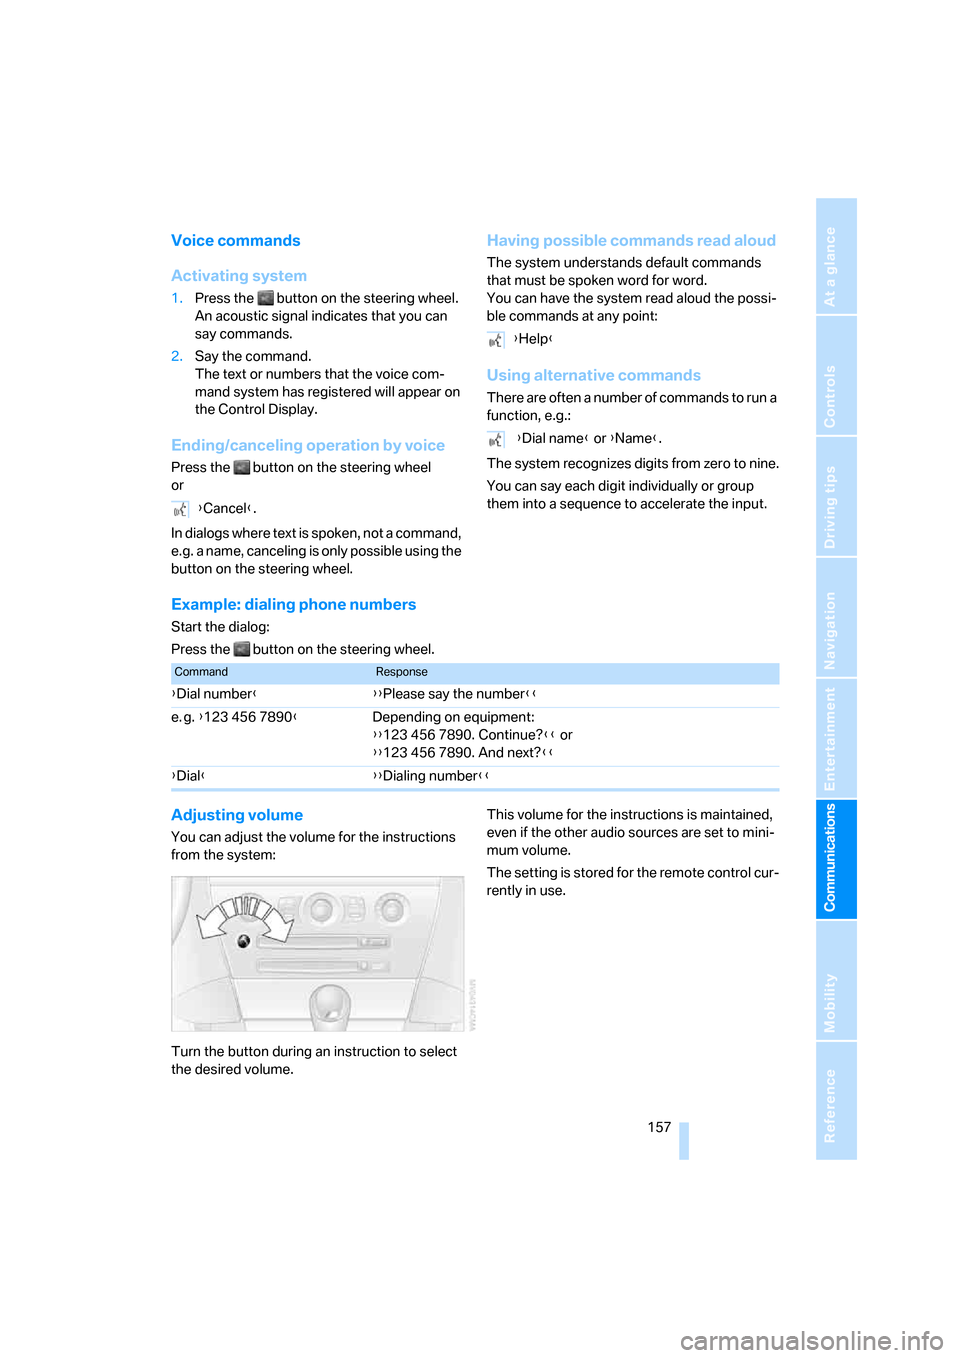
Adjusting volume
You can adjust the volume for the instructions
from the system:
Turn the button during an instruction to select
the desired volume.This volume for the instructions is maintained,
even if the other audio sources are set to mini-
mum volume.
The setting is stored for the remote control cur-
rently in use. {Cancel}.
{Help}
{Dial name} or {Name}.
CommandResponse
{Dial number}{{Please say the number}}
e. g. {123 456 7890}Depending on equipment:
{{123 456 7890. Continue?}} or
{{123 456 7890. And next?}}
{Dial}{{Dialing number}}
Page 178 of 227
Under the hood
176
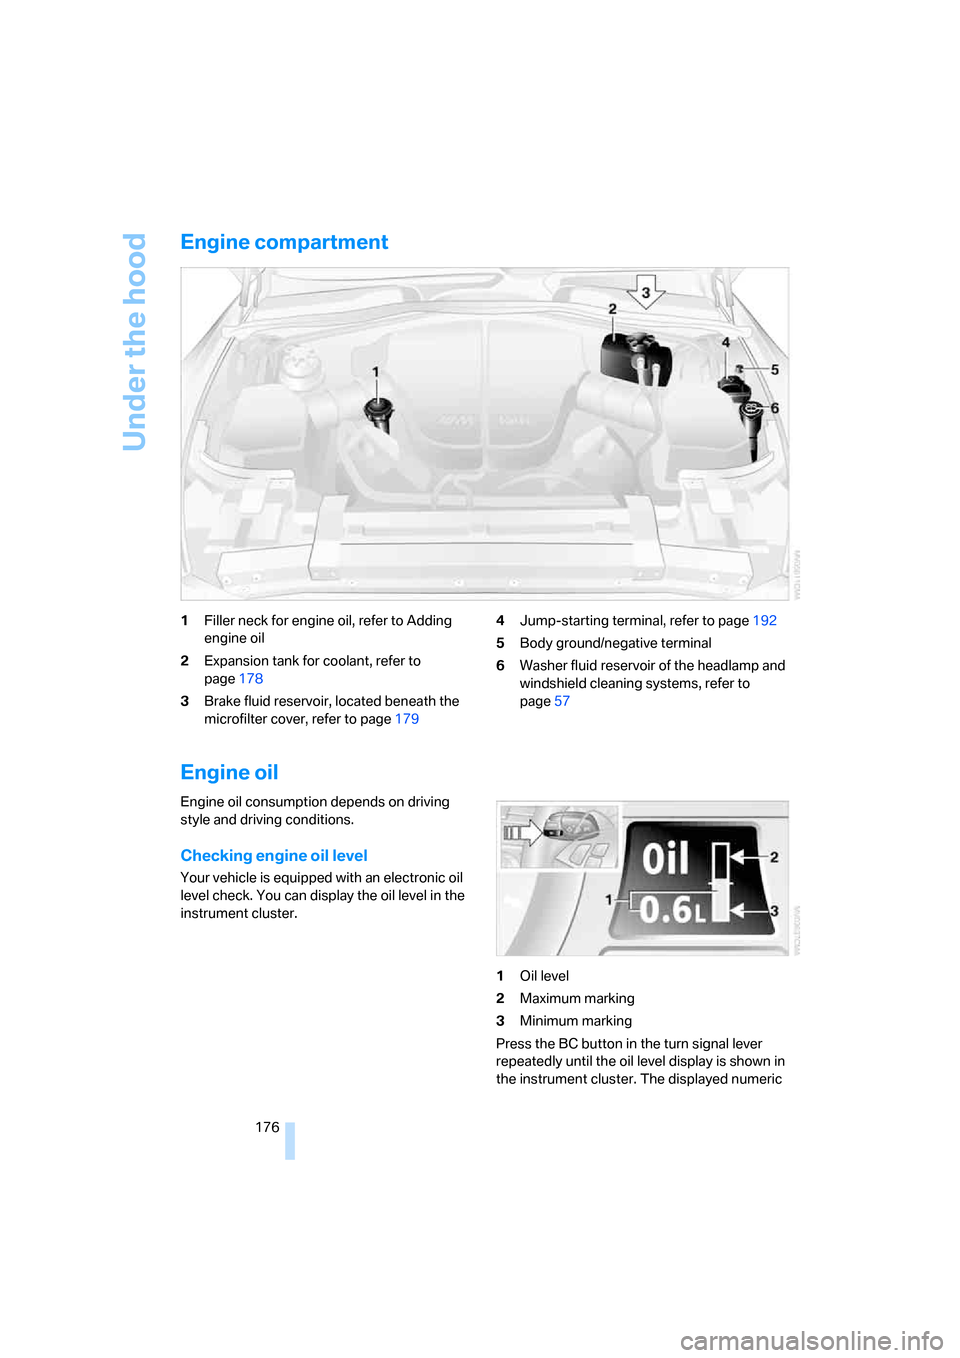
Engine compartment
1Filler neck for engine oil, refer to Adding
engine oil
2Expansion tank for coolant, refer to
page178
3Brake fluid reservoir, located beneath the
microfilter cover, refer to page1794Jump-starting terminal, refer to page192
5Body ground/negative terminal
6Washer fluid reservoir of the headlamp and
windshield cleaning systems, refer to
page57
Engine oil
Engine oil consumption depends on driving
style and driving conditions.
Checking engine oil level
Your vehicle is equipped with an electronic oil
level check. You can display the oil level in the
instrument cluster.
1Oil level
2Maximum marking
3Minimum marking
Press the BC button in the turn signal lever
repeatedly until the oil level display is shown in
the instrument cluster. The displayed numeric
Page 179 of 227
Mobility
177Reference
At a glance
Controls
Driving tips
Communications
Navigation
Entertainment
value indicates the current oil level in liters
above Minimum.
After starting the engine, the last determined
value is displayed.
The oil level must be between the two marks.
Exact measurement
The oil level is measured continuously while
driving or when stopped with the engine run-
ning.
The determination of a new value can take
30 minutes or longer.
If only dashes are shown in the display,
it was not possible to determine a new
value. This can, for example, be the case when
driving short distances or with a sporty driving
style.<
Fast measurement
In addition to the continuous measurement, you
can also quickly determine the current oil level,
e.g. after adding engine oil, however with a low
measuring accuracy.
1.With the engine at operating temperature,
i.e. after at least 6 miles/10 km of uninter-
rupted driving, park the vehicle in a horizon-
tal position.
2.Allow the engine to run at idle.
3.Press the BC button in the turn signal lever
repeatedly until the oil level display is
shown in the instrument cluster.
4.Press the BC button in the turn signal lever
for at least 2 seconds.
The oil level is determined. A clock symbol
is displayed during the measurement.
5.After approx. 1 minute the current oil level is
displayed.
If not all measuring conditions are met,
e.g. with the engine cold, "-.-" is dis-
played. The requested measurement is carried
out as soon as possible.<
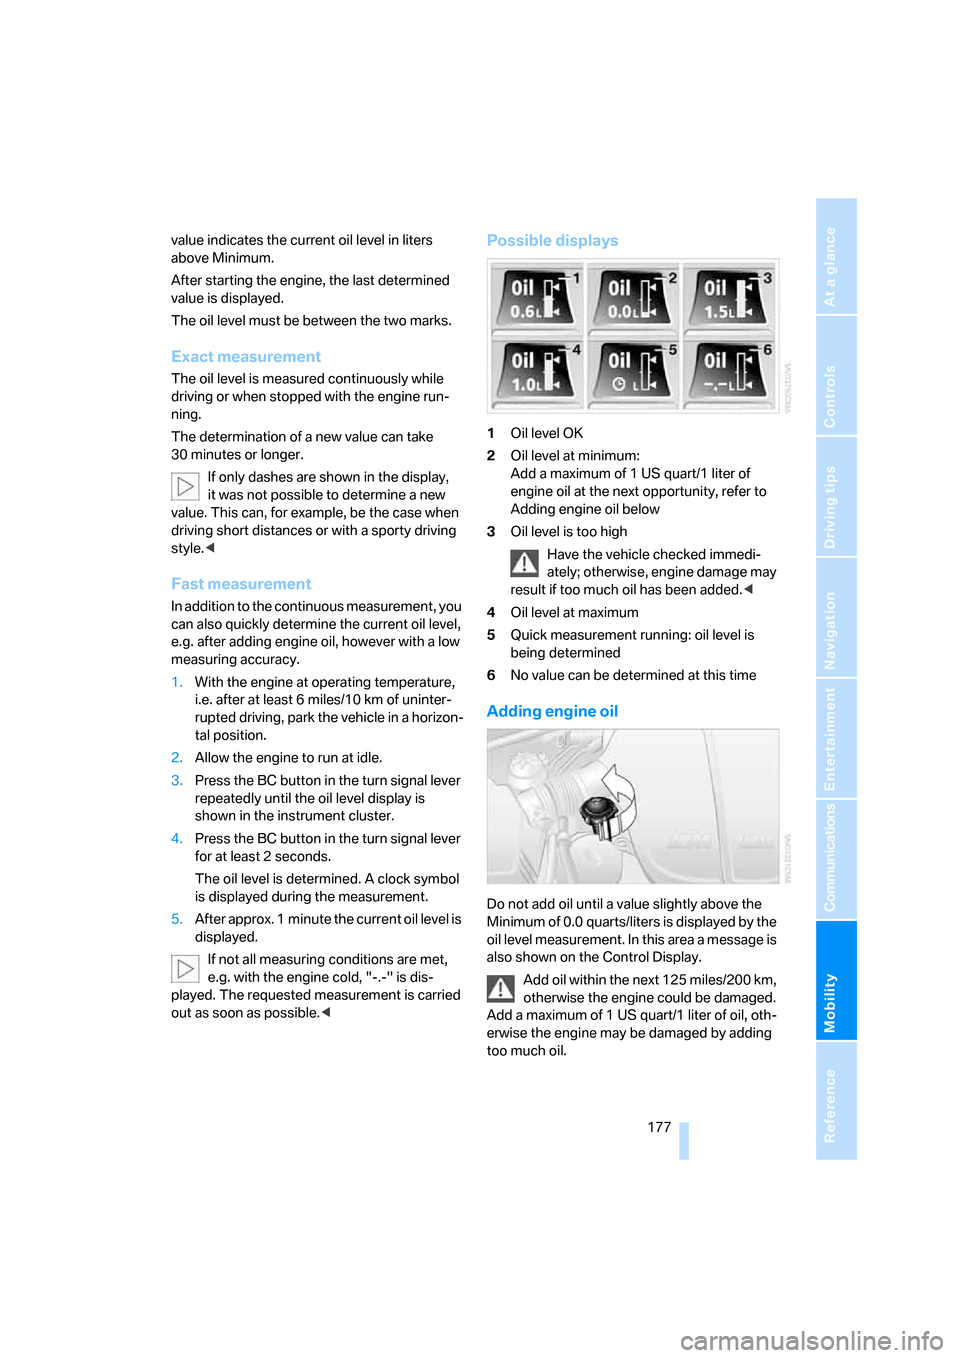
Possible displays
1Oil level OK
2Oil level at minimum:
Add a maximum of 1 US quart/1 liter of
engine oil at the next opportunity, refer to
Adding engine oil below
3Oil level is too high
Have the vehicle checked immedi-
ately; otherwise, engine damage may
result if too much oil has been added.<
4Oil level at maximum
5Quick measurement running: oil level is
being determined
6No value can be determined at this time
Adding engine oil
Do not add oil until a value slightly above the
Minimum of 0.0 quarts/liters is displayed by the
oil level measurement. In this area a message is
also shown on the Control Display.
Add oil within the next 125 miles/200 km,
otherwise the engine could be damaged.
Add a maximum of 1 US quart/1 liter of oil, oth-
erwise the engine may be damaged by adding
too much oil.
Page 185 of 227
Mobility
183Reference
At a glance
Controls
Driving tips
Communications
Navigation
Entertainment
procedures with correspondingly trained per-
sonnel. Due to the high voltage involved, there
is a danger to life and limb when work is carried
out improperly.<
High beams, parking lamps
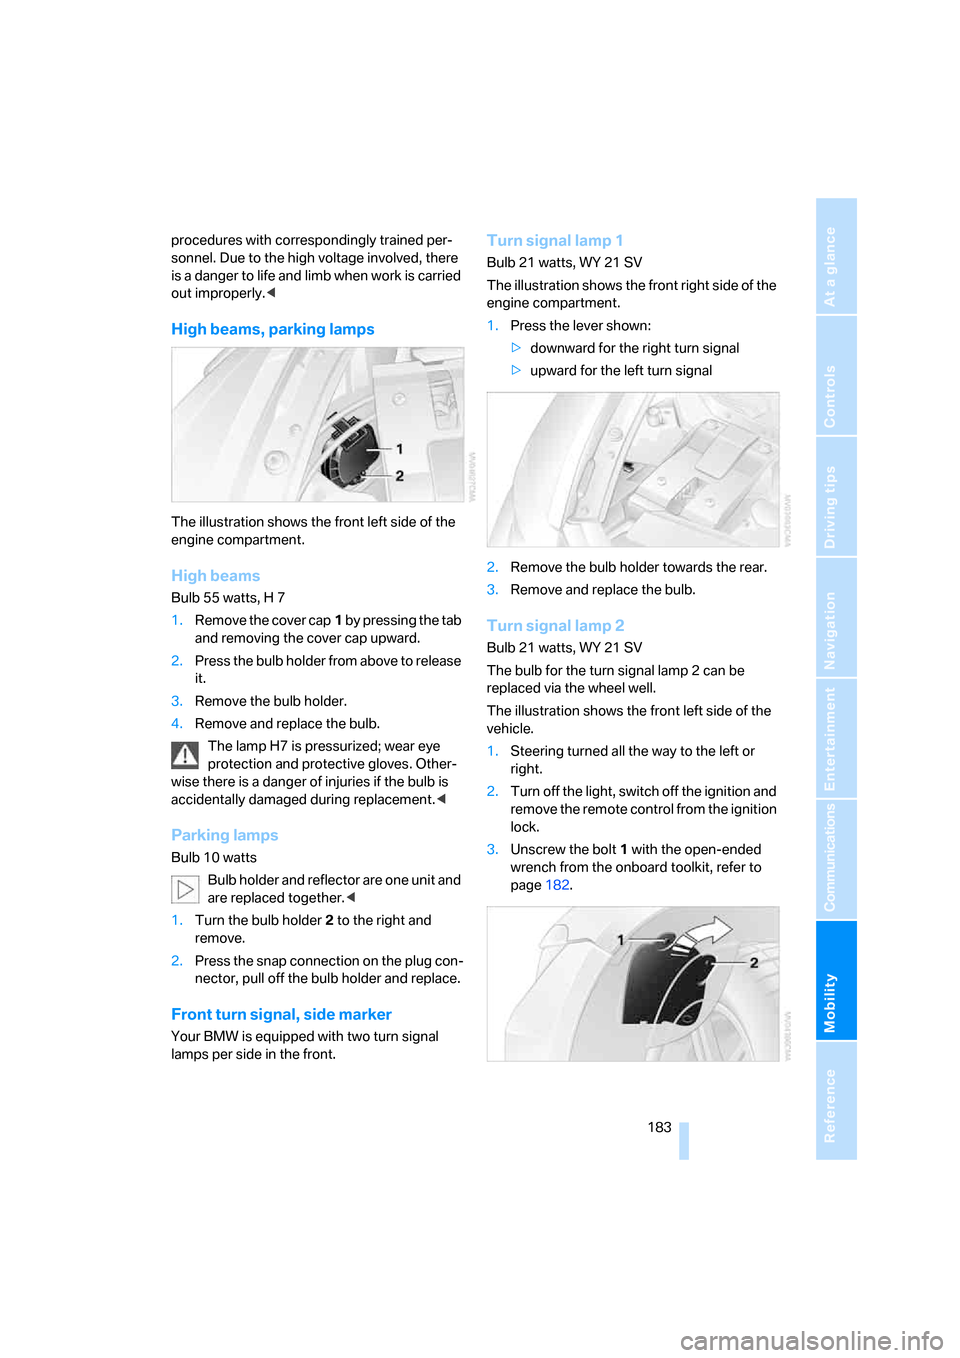
The illustration shows the front left side of the
engine compartment.
High beams
Bulb 55 watts, H 7
1.Remove the cover cap1 by pressing the tab
and removing the cover cap upward.
2.Press the bulb holder from above to release
it.
3.Remove the bulb holder.
4.Remove and replace the bulb.
The lamp H7 is pressurized; wear eye
protection and protective gloves. Other-
wise there is a danger of injuries if the bulb is
accidentally damaged during replacement.<
Parking lamps
Bulb 10 watts
Bulb holder and reflector are one unit and
are replaced together.<
1.Turn the bulb holder2 to the right and
remove.
2.Press the snap connection on the plug con-
nector, pull off the bulb holder and replace.
Front turn signal, side marker
Your BMW is equipped with two turn signal
lamps per side in the front.
Turn signal lamp 1
Bulb 21 watts, WY 21 SV
The illustration shows the front right side of the
engine compartment.
1.Press the lever shown:
>downward for the right turn signal
>upward for the left turn signal
2.Remove the bulb holder towards the rear.
3.Remove and replace the bulb.
Turn signal lamp 2
Bulb 21 watts, WY 21 SV
The bulb for the turn signal lamp 2 can be
replaced via the wheel well.
The illustration shows the front left side of the
vehicle.
1.Steering turned all the way to the left or
right.
2.Turn off the light, switch off the ignition and
remove the remote control from the ignition
lock.
3.Unscrew the bolt 1 with the open-ended
wrench from the onboard toolkit, refer to
page182.
Page 186 of 227
Replacing components
184 4.Turn the cover around the rear securing
point2 upward while simultaneously pulling
it out of the trim panel at the bottom.
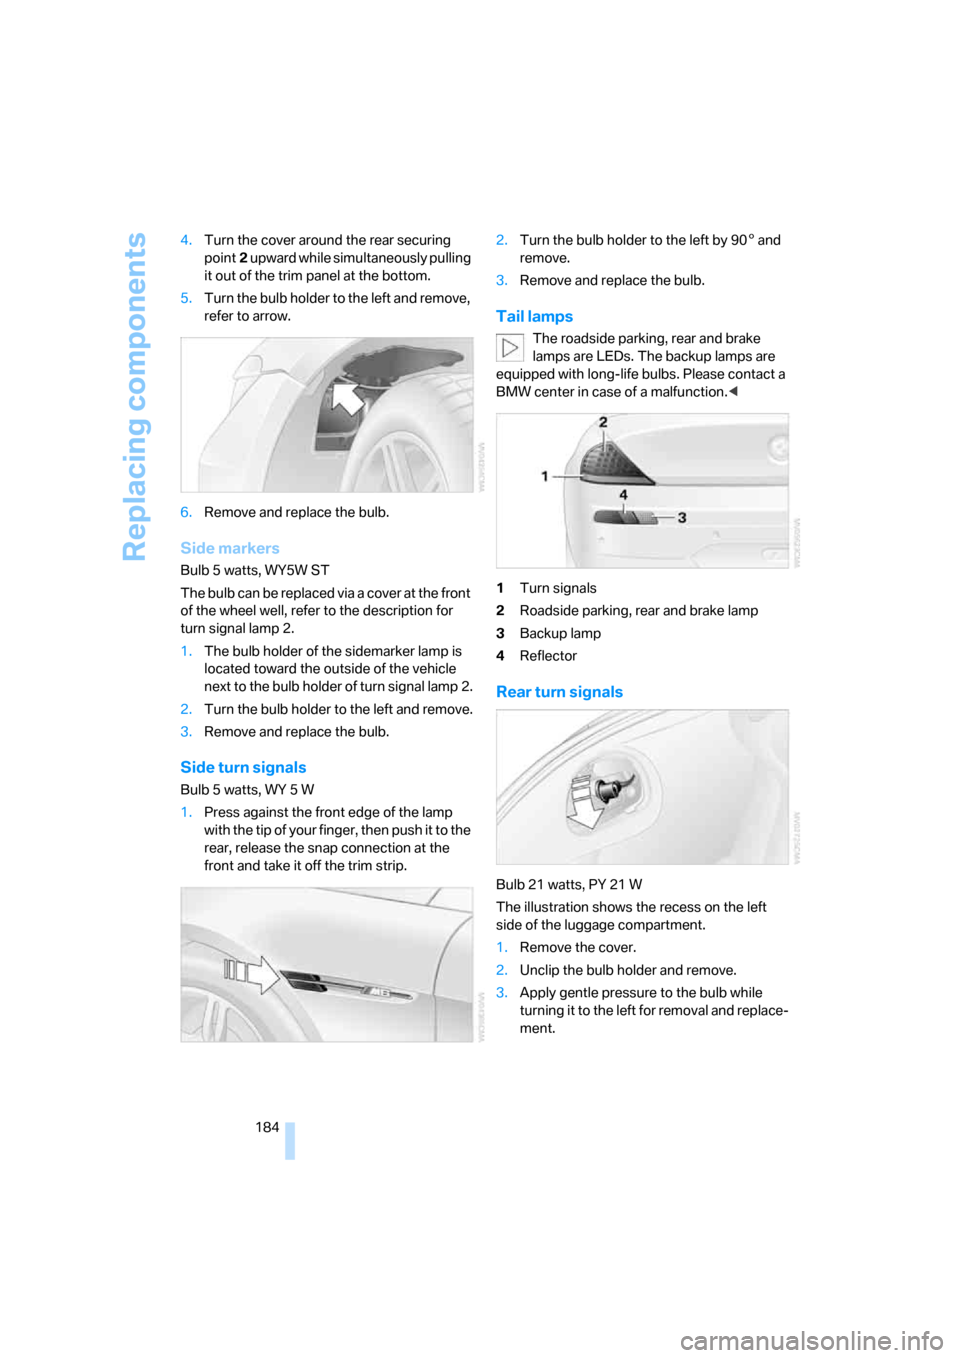
5.Turn the bulb holder to the left and remove,
refer to arrow.
6.Remove and replace the bulb.
Side markers
Bulb 5 watts, WY5W ST
The bulb can be replaced via a cover at the front
of the wheel well, refer to the description for
turn signal lamp 2.
1.The bulb holder of the sidemarker lamp is
located toward the outside of the vehicle
next to the bulb holder of turn signal lamp 2.
2.Turn the bulb holder to the left and remove.
3.Remove and replace the bulb.
Side turn signals
Bulb 5 watts, WY 5 W
1.Press against the front edge of the lamp
with the tip of your finger, then push it to the
rear, release the snap connection at the
front and take it off the trim strip.2.Turn the bulb holder to the left by 905 and
remove.
3.Remove and replace the bulb.
Tail lamps
The roadside parking, rear and brake
lamps are LEDs. The backup lamps are
equipped with long-life bulbs. Please contact a
BMW center in case of a malfunction.<
1Turn signals
2Roadside parking, rear and brake lamp
3Backup lamp
4Reflector
Rear turn signals
Bulb 21 watts, PY 21 W
The illustration shows the recess on the left
side of the luggage compartment.
1.Remove the cover.
2.Unclip the bulb holder and remove.
3.Apply gentle pressure to the bulb while
turning it to the left for removal and replace-
ment.
Page 196 of 227
Giving and receiving assistance
194 Rear
Being towed
Make sure that the ignition is switched on,
refer to page50; otherwise, the low-beam
headlights, tail lights, turn signals and wind-
shield wipers would not be available. If the vehi-
cle electrical system fails, do not tow-start or
tow the vehicle. The electric steering-wheel
lock cannot be unlocked and the vehicle cannot
be steered. For information on jump starting,
refer to page192. There is no power assistance
with the engine stopped. This then requires
increased effort for braking and steering.<
Switch on the hazard warning flashers depend-
ing on the local regulations. If the electrical sys-
tem fails, mark the vehicle to be towed, e.g. with
a sign or warning triangle in the rear window.
Engage selector lever position N with the igni-
tion switched on.
Towing methods
Do not lift vehicle by tow fitting or body
and chassis parts; otherwise, damage
may result.<
In some countries, towing with tow bars or
ropes in public traffic is not permitted. Familiar-
ize yourself with the regulations on towing in the
respective country.
With tow bar
The towing vehicle may not be lighter
than the vehicle to be towed; otherwise, it
will not be possible to reliably control vehicle
response.
ble to avoid mounting the tow bar at an offset
angle, please note the following:
>Clearance and maneuvering capability will
be strictly limited during cornering.
>When mounted at an angle, the tow bar will
exert lateral forces, tending to push the
vehicle sideways.
Attach the tow bar to the tow fittings only,
as attachment to other vehicle parts can
lead to damage.<
With tow rope
When starting off in the towing vehicle, make
sure that the tow rope is taut.
To avoid jerking and the associated
stresses on vehicle components when
towing, always use nylon ropes or nylon straps.
Attach tow ropes to the tow fittings only, as
attachment to other vehicle parts can lead to
damage.<
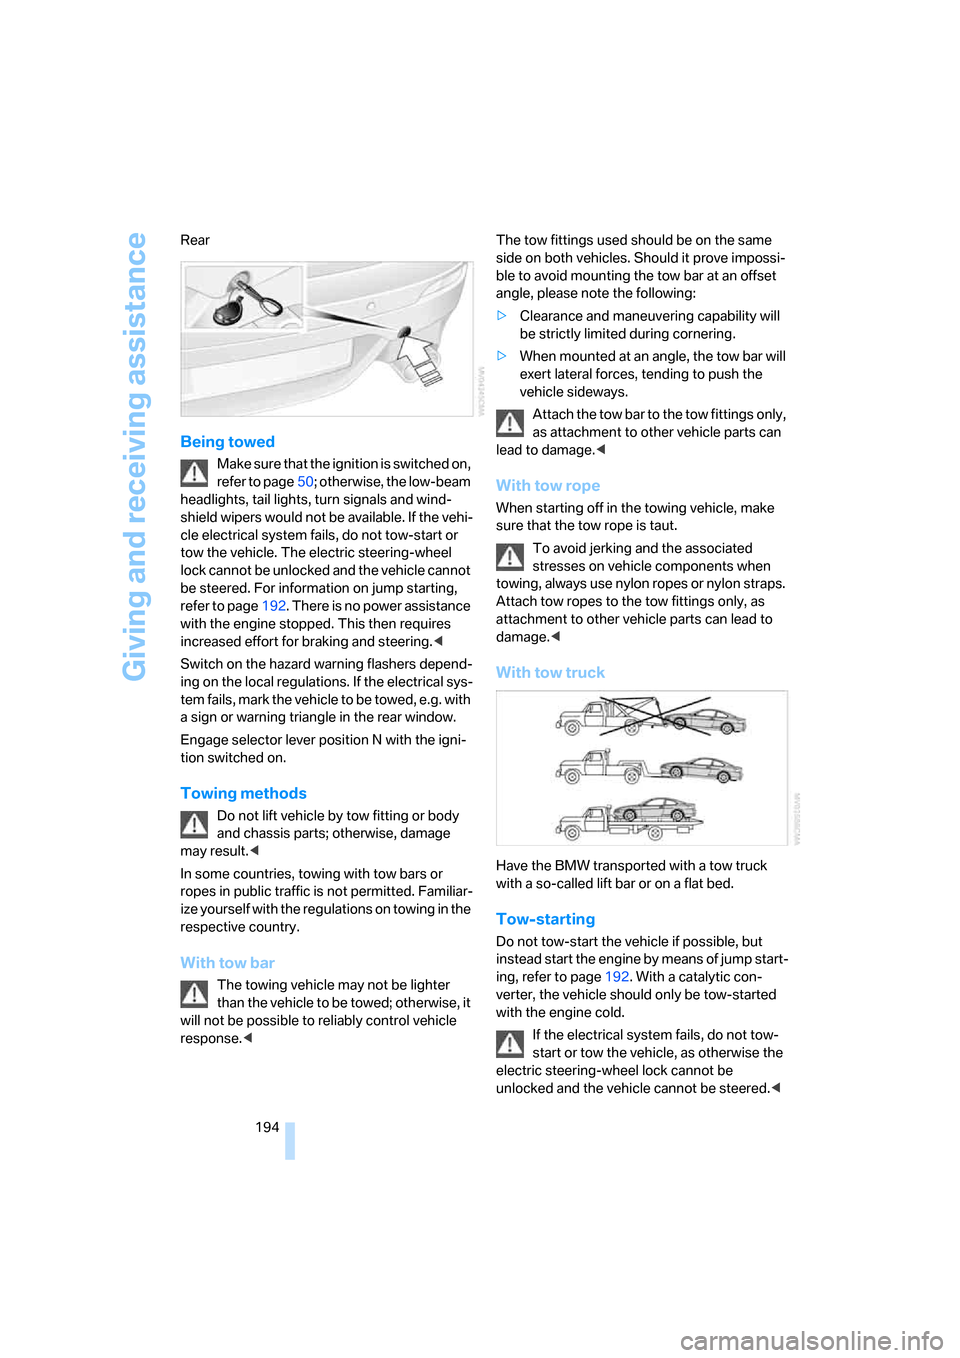
With tow truck
Have the BMW transported with a tow truck
with a so-called lift bar or on a flat bed.
Tow-starting
Do not tow-start the vehicle if possible, but
instead start the engine by means of jump start-
ing, refer to page192. With a catalytic con-
verter, the vehicle should only be tow-started
with the engine cold.
If the electrical system fails, do not tow-
start or tow the vehicle, as otherwise the
electric steering-wheel lock cannot be
unlocked and the vehicle cannot be steered.<