navigation system BMW M6 COUPE 2006 E63 Workshop Manual
[x] Cancel search | Manufacturer: BMW, Model Year: 2006, Model line: M6 COUPE, Model: BMW M6 COUPE 2006 E63Pages: 227, PDF Size: 8.32 MB
Page 163 of 227
161
Entertainment
Reference
At a glance
Controls
Driving tips Communications
Navigation
Mobility
TeleService , BMW Assist
TeleService
TeleService assists you when communicating
with a BMW center. The built-in car phone can
be used to transmit data regarding the service
status of your vehicle or regarding legally man-
dated inspections directly to your BMW center.
This is the same data that is also stored in the
remote control for CBS Condition Based Ser-
vice. Your BMW center can then contact you,
and you can make an appointment that suits
you while you are still on the road. Your advan-
tage here is that your BMW center can prepare
in advance for the required maintenance work.
The TeleService functions are country-specific:
the data regarding the service status of your
vehicle or regarding legally mandated inspec-
tions is transmitted on a country-specific basis
either automatically before they fall due or dur-
ing your calls to the BMW center. Your BMW
center will be glad to provide more detailed
information.
BMW Assist
BMW Assist provides you with other services in
addition to TeleService. For example, the posi-
tion data of your vehicle can be transferred to
the BMW Assist response center if an emer-
gency call
* has been initiated.
Many functions of BMW Assist depend on the
individually agreed contract. Data transmission,
e. g. of the CBS Condition Based Service, dif-
fers from country to country.
The contract of participation with BMW Assist
and the activation must be completed before
you can use BMW Assist.
When the contract expires, the car phone can
be deactivated by a BMW center without your
having to visit a BMW center. Following deacti-
vation of the car phone, no emergency calls can
be made. The car phone can be reactivated
after signing a new contract with a BMW center.You can also use the services of BMW Assist via
the Internet. The range of services is continually
being expanded.
Requirements
You can use TeleService or BMW Assist when
the following requirements are met:
>The installed car phone is logged on to a
cellular telephone network. This network
must be capable of transmitting the ser-
vices.
>To transmit position data, the vehicle must
be able to determine the current position.
This can be displayed on the Control Dis-
play.
>For TeleService or BMW Assist to be acti-
vated and updated, the GPS signal must be
available.
>For BMW Assist: you have applied to your
BMW center or BMW Customer Support for
BMW Assist.
Enabling TeleService or BMW Assist
For you to be able to use the services of
TeleService or BMW Assist, these must be
enabled.
Requirements
>Make sure that the vehicle can determine its
current location. Reception is best when
you have an unobstructed view to the sky.
>Leave radio readiness switched on while
connecting to the system.
Enabling
iDrive, for explanation of principle, refer to
page16.
1.Press the button.
This opens the start menu.
2.Press the controller to open the menu.
**
Page 175 of 227
Mobility
173Reference
At a glance
Controls
Driving tips
Communications
Navigation
Entertainment
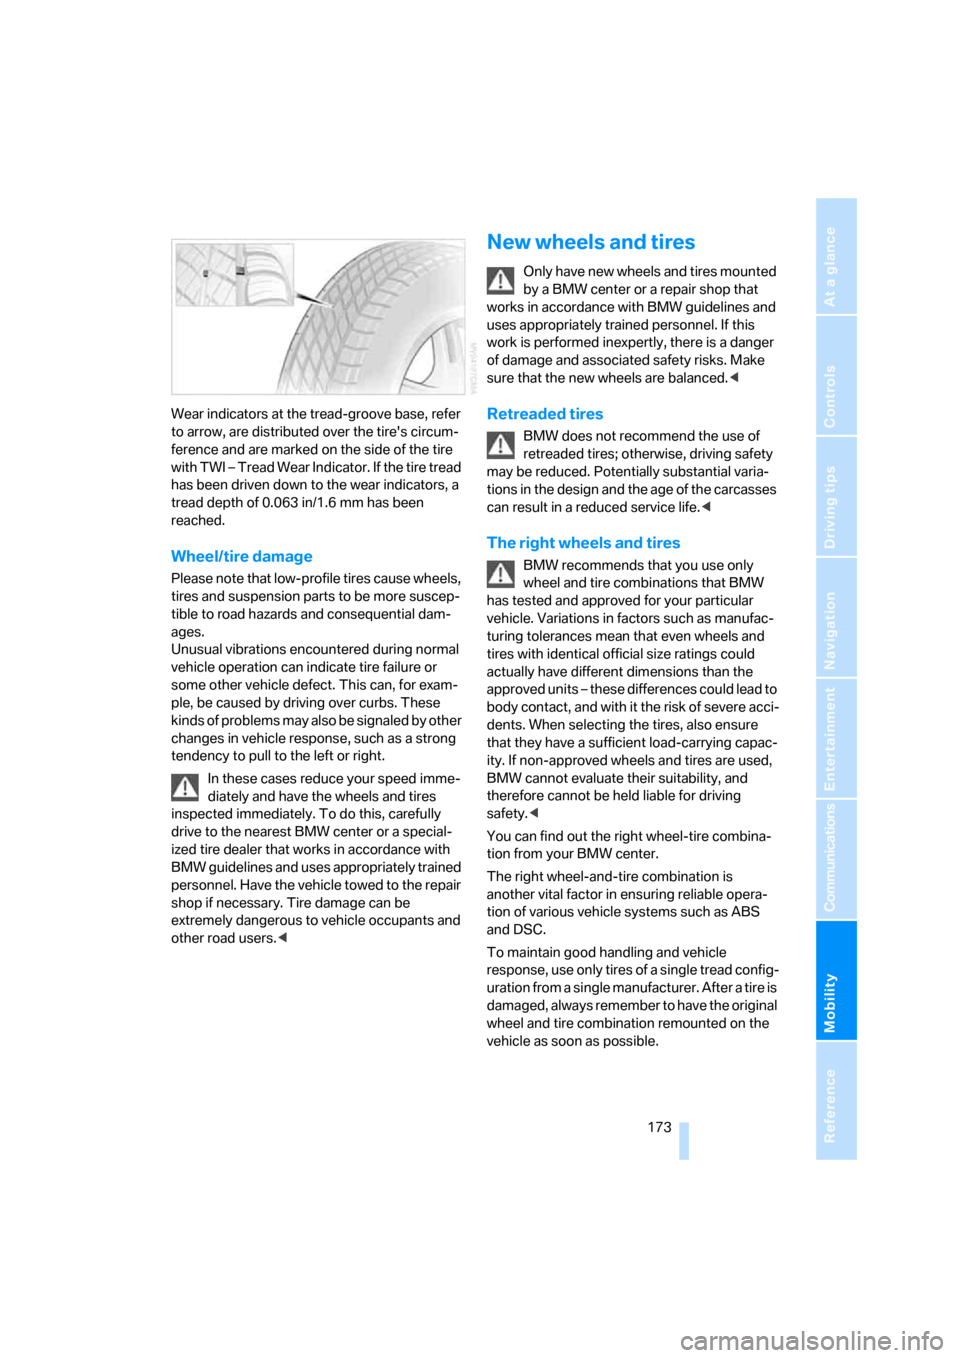
Wear indicators at the tread-groove base, refer
to arrow, are distributed over the tire's circum-
ference and are marked on the side of the tire
with TWI – Tread Wear Indicator. If the tire tread
has been driven down to the wear indicators, a
tread depth of 0.063 in/1.6 mm has been
reached.
Wheel/tire damage
Please note that low-profile tires cause wheels,
tires and suspension parts to be more suscep-
tible to road hazards and consequential dam-
ages.
Unusual vibrations encountered during normal
vehicle operation can indicate tire failure or
some other vehicle defect. This can, for exam-
ple, be caused by driving over curbs. These
kinds of problems may also be signaled by other
changes in vehicle response, such as a strong
tendency to pull to the left or right.
In these cases reduce your speed imme-
diately and have the wheels and tires
inspected immediately. To do this, carefully
drive to the nearest BMW center or a special-
ized tire dealer that works in accordance with
BMW guidelines and uses appropriately trained
personnel. Have the vehicle towed to the repair
shop if necessary. Tire damage can be
extremely dangerous to vehicle occupants and
other road users.<
New wheels and tires
Only have new wheels and tires mounted
by a BMW center or a repair shop that
works in accordance with BMW guidelines and
uses appropriately trained personnel. If this
work is performed inexpertly, there is a danger
of damage and associated safety risks. Make
sure that the new wheels are balanced.<
Retreaded tires
BMW does not recommend the use of
retreaded tires; otherwise, driving safety
may be reduced. Potentially substantial varia-
tions in the design and the age of the carcasses
can result in a reduced service life.<
The right wheels and tires
BMW recommends that you use only
wheel and tire combinations that BMW
has tested and approved for your particular
vehicle. Variations in factors such as manufac-
turing tolerances mean that even wheels and
tires with identical official size ratings could
actually have different dimensions than the
approved units – these differences could lead to
body contact, and with it the risk of severe acci-
dents. When selecting the tires, also ensure
that they have a sufficient load-carrying capac-
ity. If non-approved wheels and tires are used,
BMW cannot evaluate their suitability, and
therefore cannot be held liable for driving
safety.<
You can find out the right wheel-tire combina-
tion from your BMW center.
The right wheel-and-tire combination is
another vital factor in ensuring reliable opera-
tion of various vehicle systems such as ABS
and DSC.
To maintain good handling and vehicle
response, use only tires of a single tread config-
uration from a single manufacturer. After a tire is
damaged, always remember to have the original
wheel and tire combination remounted on the
vehicle as soon as possible.
Page 181 of 227
Mobility
179Reference
At a glance
Controls
Driving tips
Communications
Navigation
Entertainment
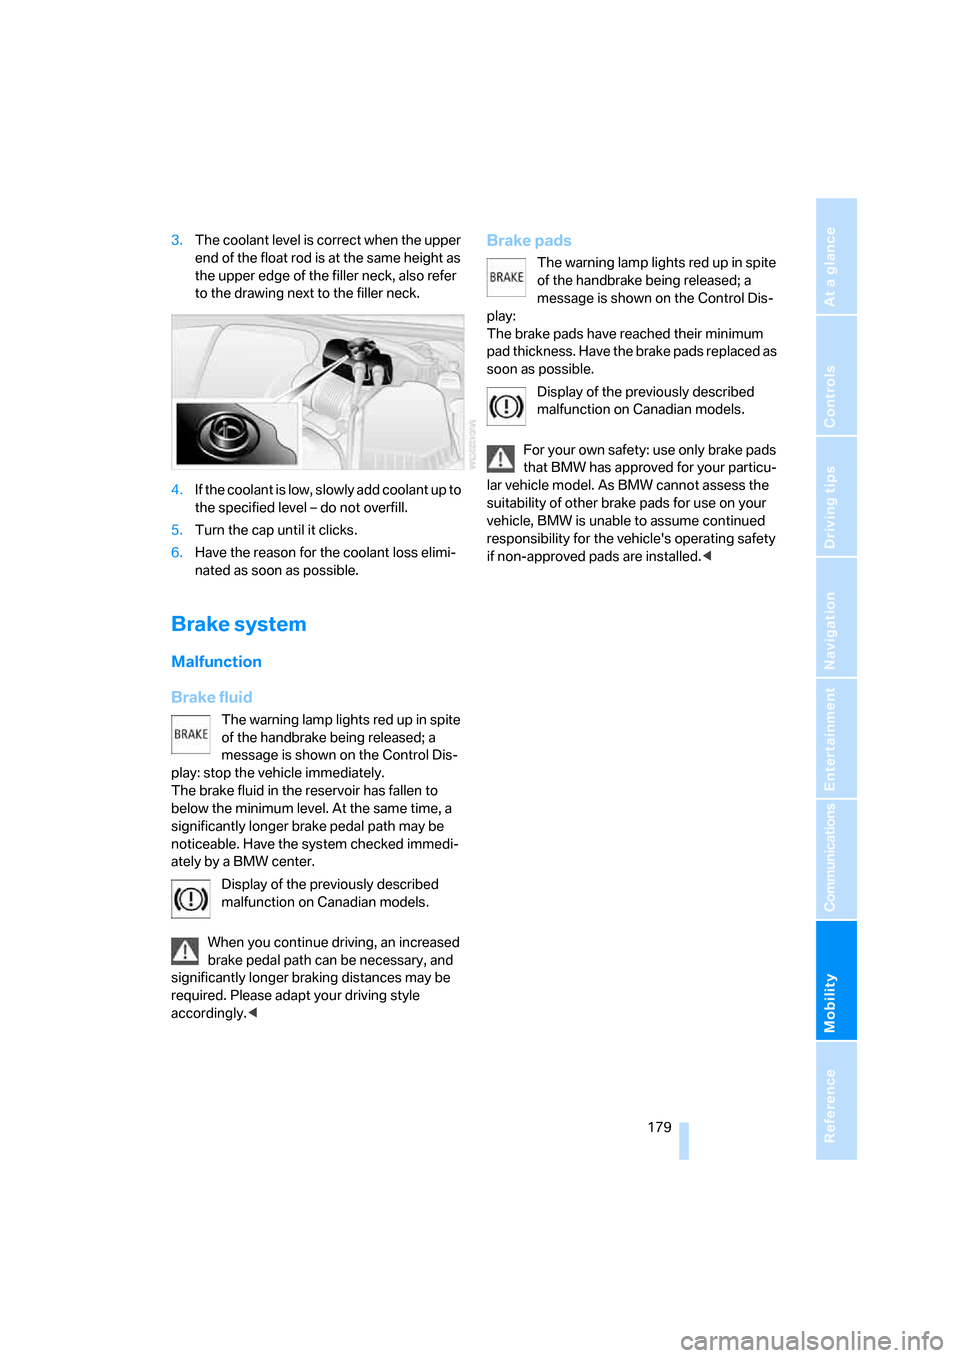
3.The coolant level is correct when the upper
end of the float rod is at the same height as
the upper edge of the filler neck, also refer
to the drawing next to the filler neck.
4.If the coolant is low, slowly add coolant up to
the specified level – do not overfill.
5.Turn the cap until it clicks.
6.Have the reason for the coolant loss elimi-
nated as soon as possible.
Brake system
Malfunction
Brake fluid
The warning lamp lights red up in spite
of the handbrake being released; a
message is shown on the Control Dis-
play: stop the vehicle immediately.
The brake fluid in the reservoir has fallen to
below the minimum level. At the same time, a
significantly longer brake pedal path may be
noticeable. Have the system checked immedi-
ately by a BMW center.
Display of the previously described
malfunction on Canadian models.
When you continue driving, an increased
brake pedal path can be necessary, and
significantly longer braking distances may be
required. Please adapt your driving style
accordingly.<
Brake pads
The warning lamp lights red up in spite
of the handbrake being released; a
message is shown on the Control Dis-
play:
The brake pads have reached their minimum
pad thickness. Have the brake pads replaced as
soon as possible.
Display of the previously described
malfunction on Canadian models.
For your own safety: use only brake pads
that BMW has approved for your particu-
lar vehicle model. As BMW cannot assess the
suitability of other brake pads for use on your
vehicle, BMW is unable to assume continued
responsibility for the vehicle's operating safety
if non-approved pads are installed.<
Page 183 of 227
Mobility
181Reference
At a glance
Controls
Driving tips
Communications
Navigation
Entertainment
Socket for OBD Onboard
Diagnostics interface
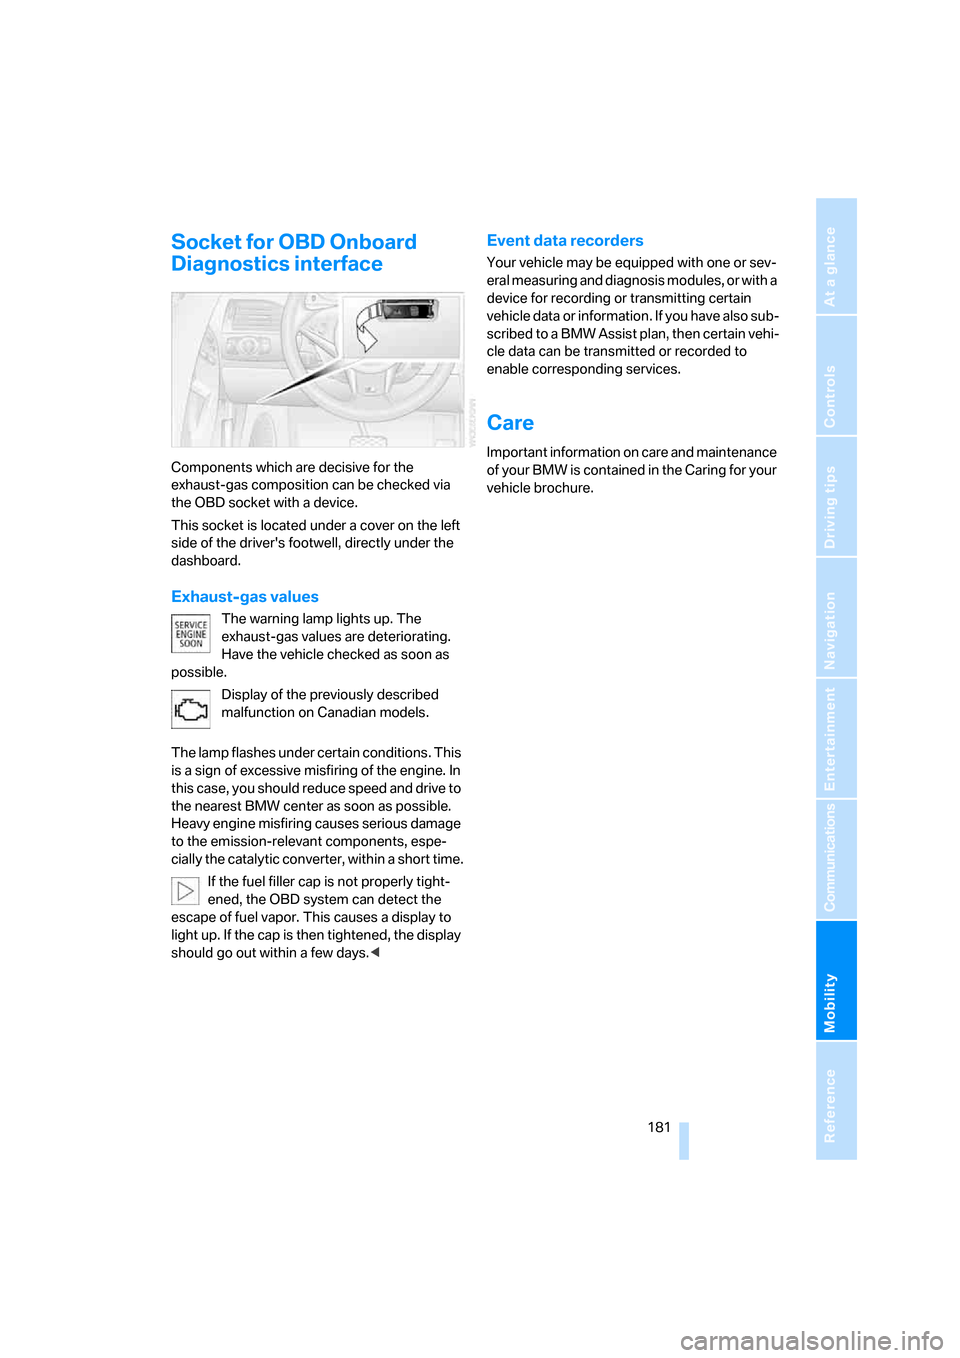
Components which are decisive for the
exhaust-gas composition can be checked via
the OBD socket with a device.
This socket is located under a cover on the left
side of the driver's footwell, directly under the
dashboard.
Exhaust-gas values
The warning lamp lights up. The
exhaust-gas values are deteriorating.
Have the vehicle checked as soon as
possible.
Display of the previously described
malfunction on Canadian models.
The lamp flashes under certain conditions. This
is a sign of excessive misfiring of the engine. In
this case, you should reduce speed and drive to
the nearest BMW center as soon as possible.
Heavy engine misfiring causes serious damage
to the emission-relevant components, espe-
cially the catalytic converter, within a short time.
If the fuel filler cap is not properly tight-
ened, the OBD system can detect the
escape of fuel vapor. This causes a display to
light up. If the cap is then tightened, the display
should go out within a few days.<
Event data recorders
Your vehicle may be equipped with one or sev-
eral measuring and diagnosis modules, or with a
device for recording or transmitting certain
vehicle data or information. If you have also sub-
scribed to a BMW Assist plan, then certain vehi-
cle data can be transmitted or recorded to
enable corresponding services.
Care
Important information on care and maintenance
of your BMW is contained in the Caring for your
vehicle brochure.
Page 187 of 227
Mobility
185Reference
At a glance
Controls
Driving tips
Communications
Navigation
Entertainment
License plate lamps
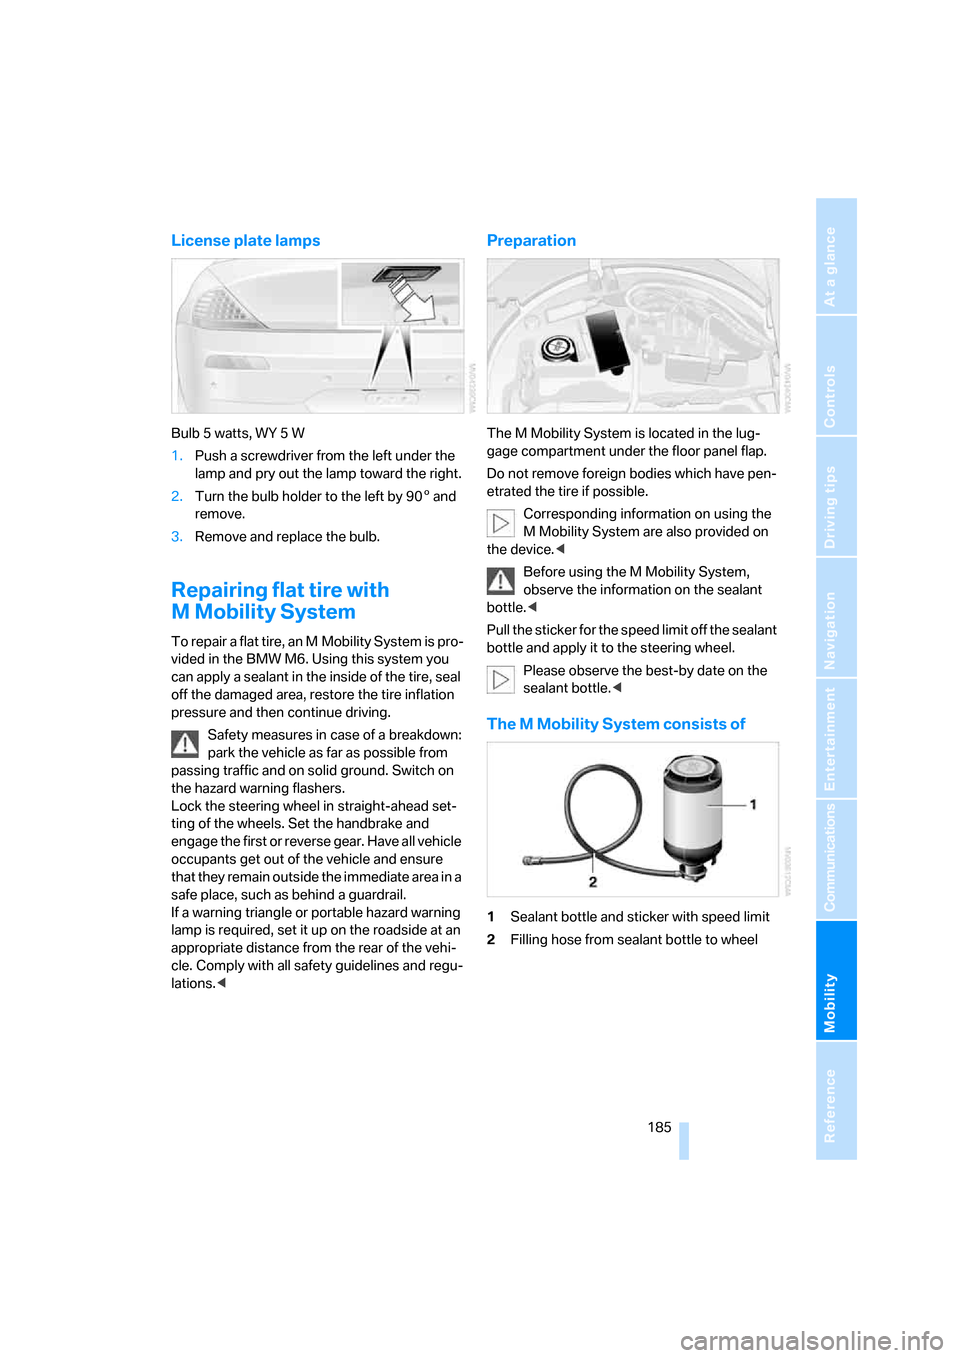
Bulb 5 watts, WY 5 W
1.Push a screwdriver from the left under the
lamp and pry out the lamp toward the right.
2.Turn the bulb holder to the left by 905 and
remove.
3.Remove and replace the bulb.
Repairing flat tire with
M Mobility System
To repair a flat tire, an M Mobility System is pro-
vided in the BMW M6. Using this system you
can apply a sealant in the inside of the tire, seal
off the damaged area, restore the tire inflation
pressure and then continue driving.
Safety measures in case of a breakdown:
park the vehicle as far as possible from
passing traffic and on solid ground. Switch on
the hazard warning flashers.
Lock the steering wheel in straight-ahead set-
ting of the wheels. Set the handbrake and
engage the first or reverse gear. Have all vehicle
occupants get out of the vehicle and ensure
that they remain outside the immediate area in a
safe place, such as behind a guardrail.
If a warning triangle or portable hazard warning
lamp is required, set it up on the roadside at an
appropriate distance from the rear of the vehi-
cle. Comply with all safety guidelines and regu-
lations.<
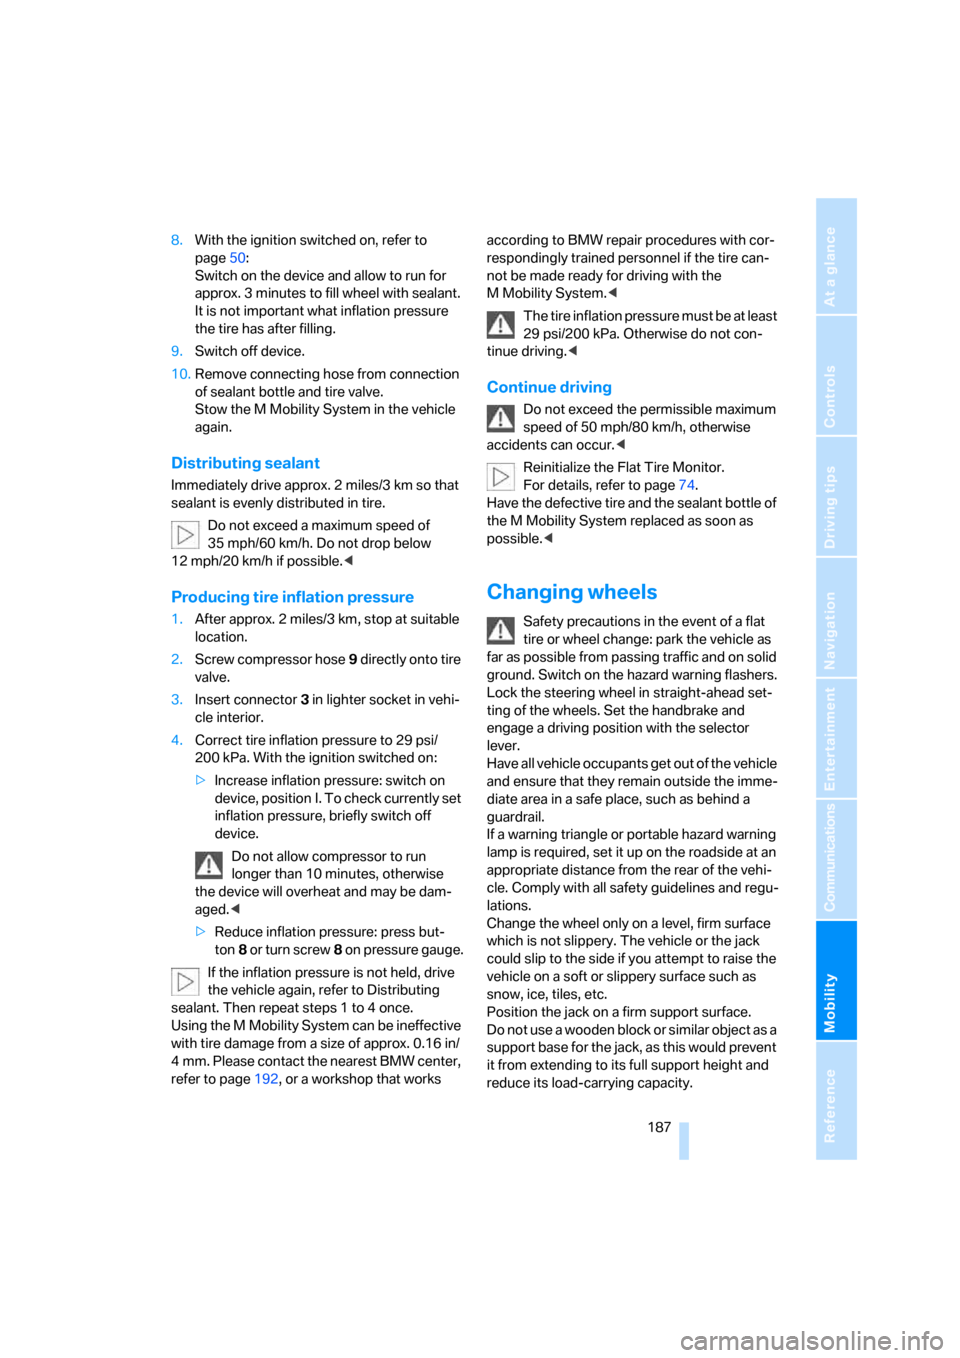
Preparation
The M Mobility System is located in the lug-
gage compartment under the floor panel flap.
Do not remove foreign bodies which have pen-
etrated the tire if possible.
Corresponding information on using the
M Mobility System are also provided on
the device.<
Before using the M Mobility System,
observe the information on the sealant
bottle.<
Pull the sticker for the speed limit off the sealant
bottle and apply it to the steering wheel.
Please observe the best-by date on the
sealant bottle.<
The M Mobility System consists of
1Sealant bottle and sticker with speed limit
2Filling hose from sealant bottle to wheel
Page 189 of 227
Mobility
187Reference
At a glance
Controls
Driving tips
Communications
Navigation
Entertainment
8.With the ignition switched on, refer to
page50:
Switch on the device and allow to run for
approx. 3 minutes to fill wheel with sealant.
It is not important what inflation pressure
the tire has after filling.
9.Switch off device.
10.Remove connecting hose from connection
of sealant bottle and tire valve.
Stow the M Mobility System in the vehicle
again.
Distributing sealant
Immediately drive approx. 2 miles/3 km so that
sealant is evenly distributed in tire.
Do not exceed a maximum speed of
35 mph/60 km/h. Do not drop below
12 mph/20 km/h if possible.<
Producing tire inflation pressure
1.After approx. 2 miles/3 km, stop at suitable
location.
2.Screw compressor hose9 directly onto tire
valve.
3.Insert connector 3 in lighter socket in vehi-
cle interior.
4.Correct tire inflation pressure to 29 psi/
200 kPa. With the ignition switched on:
>Increase inflation pressure: switch on
device, position I. To check currently set
inflation pressure, briefly switch off
device.
Do not allow compressor to run
longer than 10 minutes, otherwise
the device will overheat and may be dam-
aged.<
>Reduce inflation pressure: press but-
ton8 or turn screw8 on pressure gauge.
If the inflation pressure is not held, drive
the vehicle again, refer to Distributing
sealant. Then repeat steps 1 to 4 once.
Using the M Mobility System can be ineffective
with tire damage from a size of approx. 0.16 in/
4 mm. Please contact the nearest BMW center,
refer to page192, or a workshop that works according to BMW repair procedures with cor-
respondingly trained personnel if the tire can-
not be made ready for driving with the
M Mobility System.<
The tire inflation pressure must be at least
29 psi/200 kPa. Otherwise do not con-
tinue driving.<
Continue driving
Do not exceed the permissible maximum
speed of 50 mph/80 km/h, otherwise
accidents can occur.<
Reinitialize the Flat Tire Monitor.
For details, refer to page74.
Have the defective tire and the sealant bottle of
the M Mobility System replaced as soon as
possible.<
Changing wheels
Safety precautions in the event of a flat
tire or wheel change: park the vehicle as
far as possible from passing traffic and on solid
ground. Switch on the hazard warning flashers.
Lock the steering wheel in straight-ahead set-
ting of the wheels. Set the handbrake and
engage a driving position with the selector
lever.
Have all vehicle occupants get out of the vehicle
and ensure that they remain outside the imme-
diate area in a safe place, such as behind a
guardrail.
If a warning triangle or portable hazard warning
lamp is required, set it up on the roadside at an
appropriate distance from the rear of the vehi-
cle. Comply with all safety guidelines and regu-
lations.
Change the wheel only on a level, firm surface
which is not slippery. The vehicle or the jack
could slip to the side if you attempt to raise the
vehicle on a soft or slippery surface such as
snow, ice, tiles, etc.
Position the jack on a firm support surface.
Do not use a wooden block or similar object as a
support base for the jack, as this would prevent
it from extending to its full support height and
reduce its load-carrying capacity.
Page 192 of 227
Replacing components
190
Disposal
After replacement, have old batteries dis-
posed of by your BMW center or deposit
them at a recycling center. Maintain the battery
in an upright position for transport and storage.
Always secure the battery to prevent it from tip-
ping over during transport.<
Power failure
Following a temporary interruption of the power
supply, the operation of some equipment is lim-
ited and must be reinitialized. Individual settings
are also lost and must be updated:
>Seat, mirror and steering wheel memory
The position must be stored again, refer to
page40.
>Time and Date
The values must be updated, refer to
page67.
>Radio
Stations must be stored again if necessary,
refer to page132.
>Navigation system
Wait until the system starts, refer to
page123.
Fuses
Never attempt to repair a blown fuse, and
do not replace a defective fuse with a sub-
stitute of another color or amperage rating, as
this could lead to overloading of the wiring, ulti-
mately resulting in a fire in the vehicle.<
Spare fuses and a pair of plastic tweezers are
located in the compartment for the onboard tool
kit, refer to page182.
Information on fuse allocation is located below
the bracket for the onboard tool kit, see below.
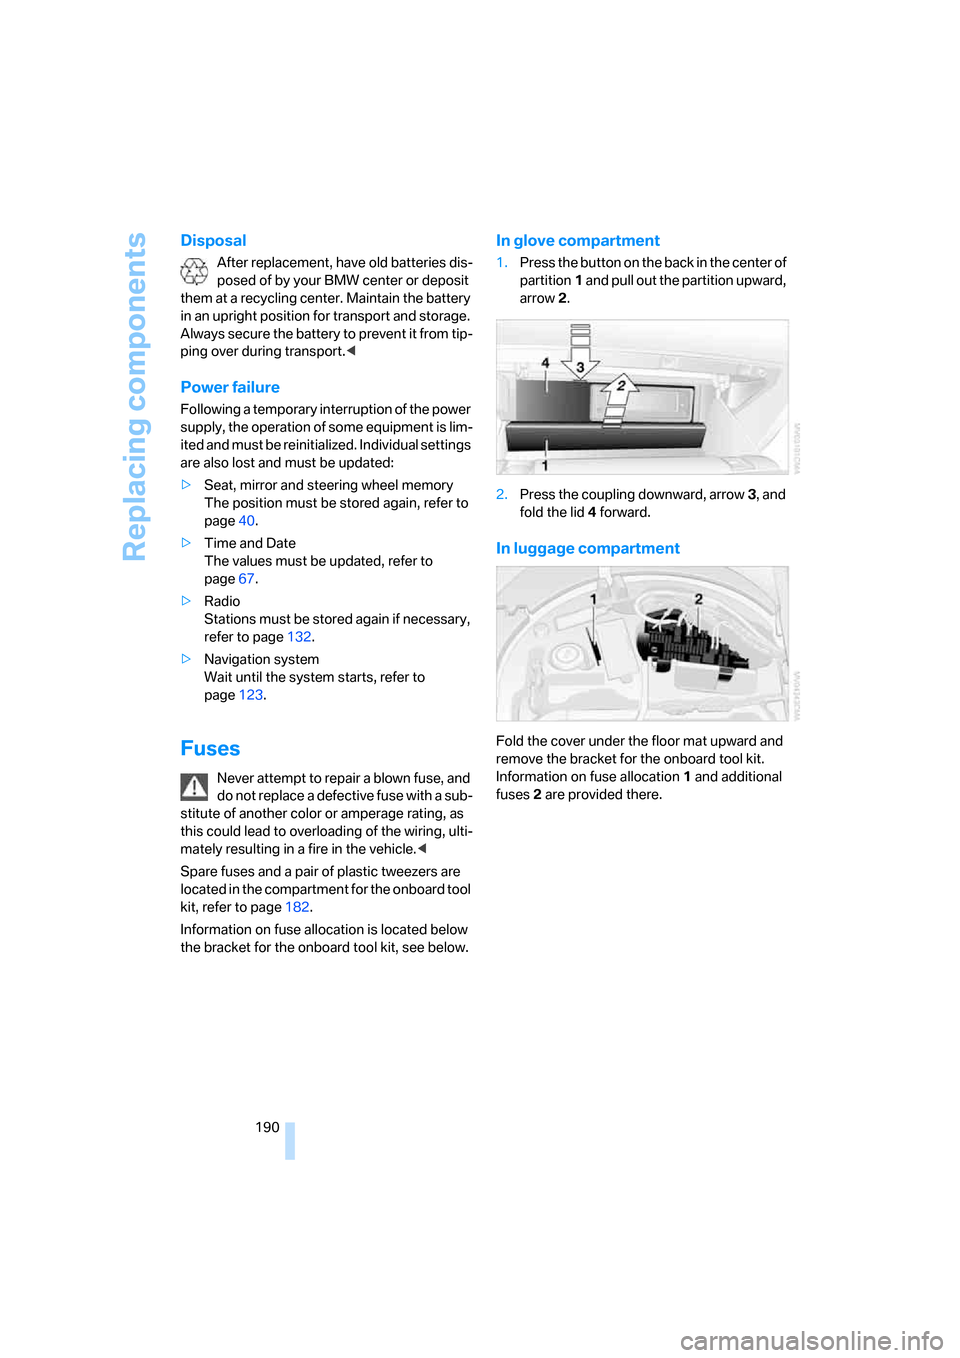
In glove compartment
1.Press the button on the back in the center of
partition1 and pull out the partition upward,
arrow2.
2.Press the coupling downward, arrow3, and
fold the lid 4 forward.
In luggage compartment
Fold the cover under the floor mat upward and
remove the bracket for the onboard tool kit.
Information on fuse allocation1 and additional
fuses2 are provided there.
Page 193 of 227
Mobility
191Reference
At a glance
Controls
Driving tips
Communications
Navigation
Entertainment
Giving and receiving assistance
Emergency call
Conditions for an emergency call:
>Complete preparation for mobile phone.
With this equipment, an emergency call is
still possible when no mobile phone is
logged on in the vehicle.
>BMW Assist is activated.
Activating BMW Assist, refer to page161.
>Radio readiness is activated.
>The car phone is logged on to a mobile
communications network.
>The emergency call system is operable.
When the contact of participation with
BMW Assist expires, the car phone can be
deactivated by a BMW center without having to
visit a workshop. Following deactivation of the
car phone, no emergency calls can be made.
The car phone can be reactivated after signing
a new contract with a BMW center.
Initiating an emergency call
1.Briefly press protective cover to open.
2.Press the button for at least 2 seconds.
The LED in the button lights up. As soon as the
voice connection to the BMW Assist response
center has been established, the LED flashes.
If conditions allow, remain in the vehicle until
the connection has been established. You will
then be able to provide a detailed description of
the situation.If the current location of your vehicle can be
determined, it will be forwarded to the
BMW Assist response center.
If the LED flashes, but you are unable to hear
the BMW Assist response center through the
handsfree system, this could indicate, for
instance, that the handsfree system is no longer
operational. But the response center is still able
to hear you.
Under certain conditions, an emergency call is
automatically initiated immediately after a
severe accident. The automatic emergency call
is not affected by the button being pressed.
For technical reasons, the emergency call
cannot be guaranteed under the most
unfavorable conditions.<
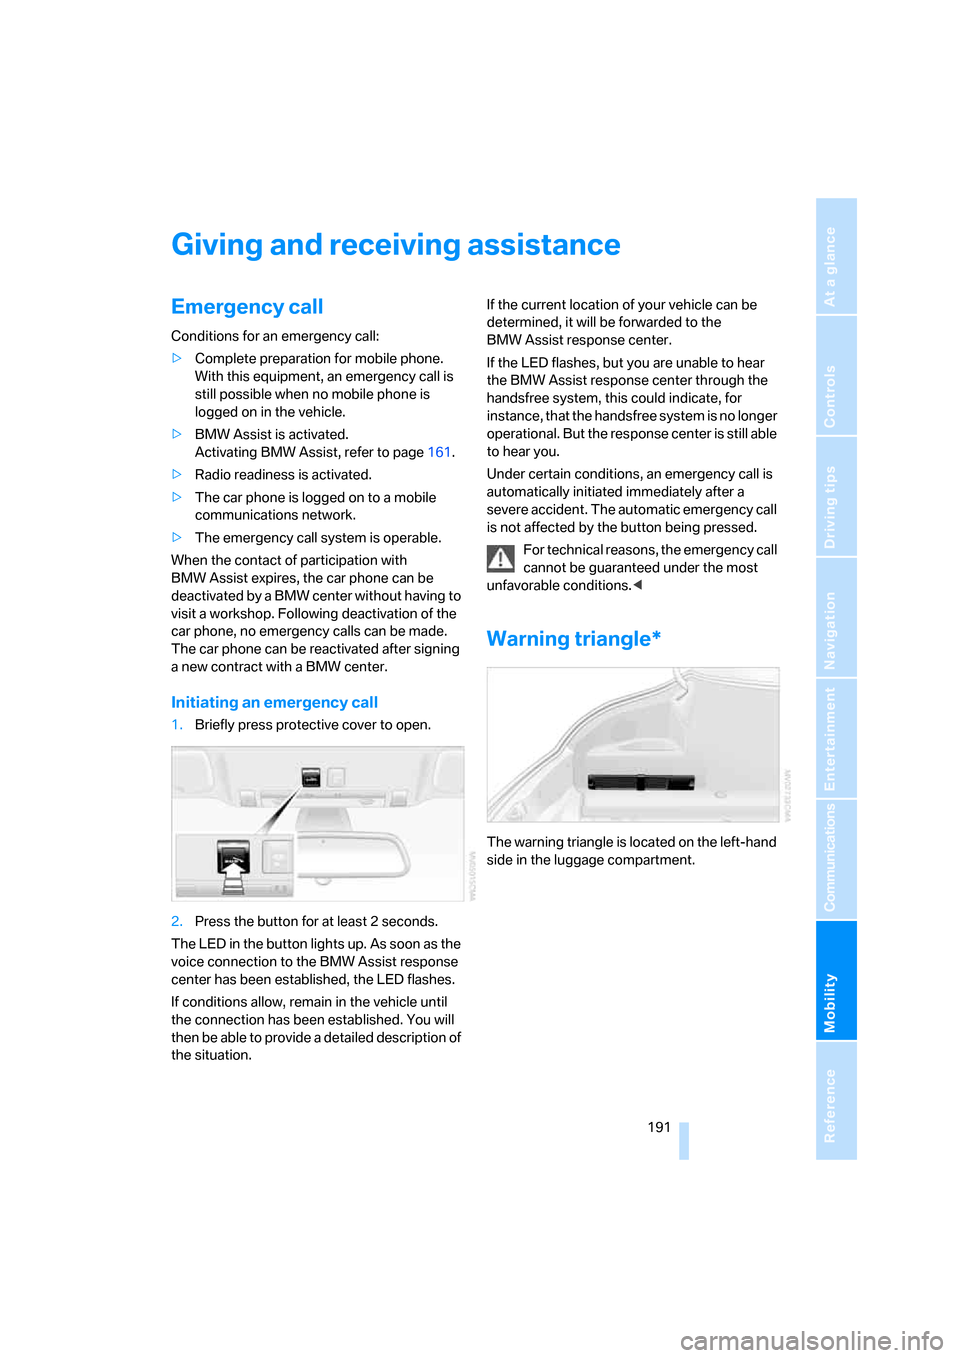
Warning triangle*
The warning triangle is located on the left-hand
side in the luggage compartment.
Page 203 of 227
Reference 201
At a glance
Controls
Driving tips
Communications
Navigation
Entertainment
Mobility
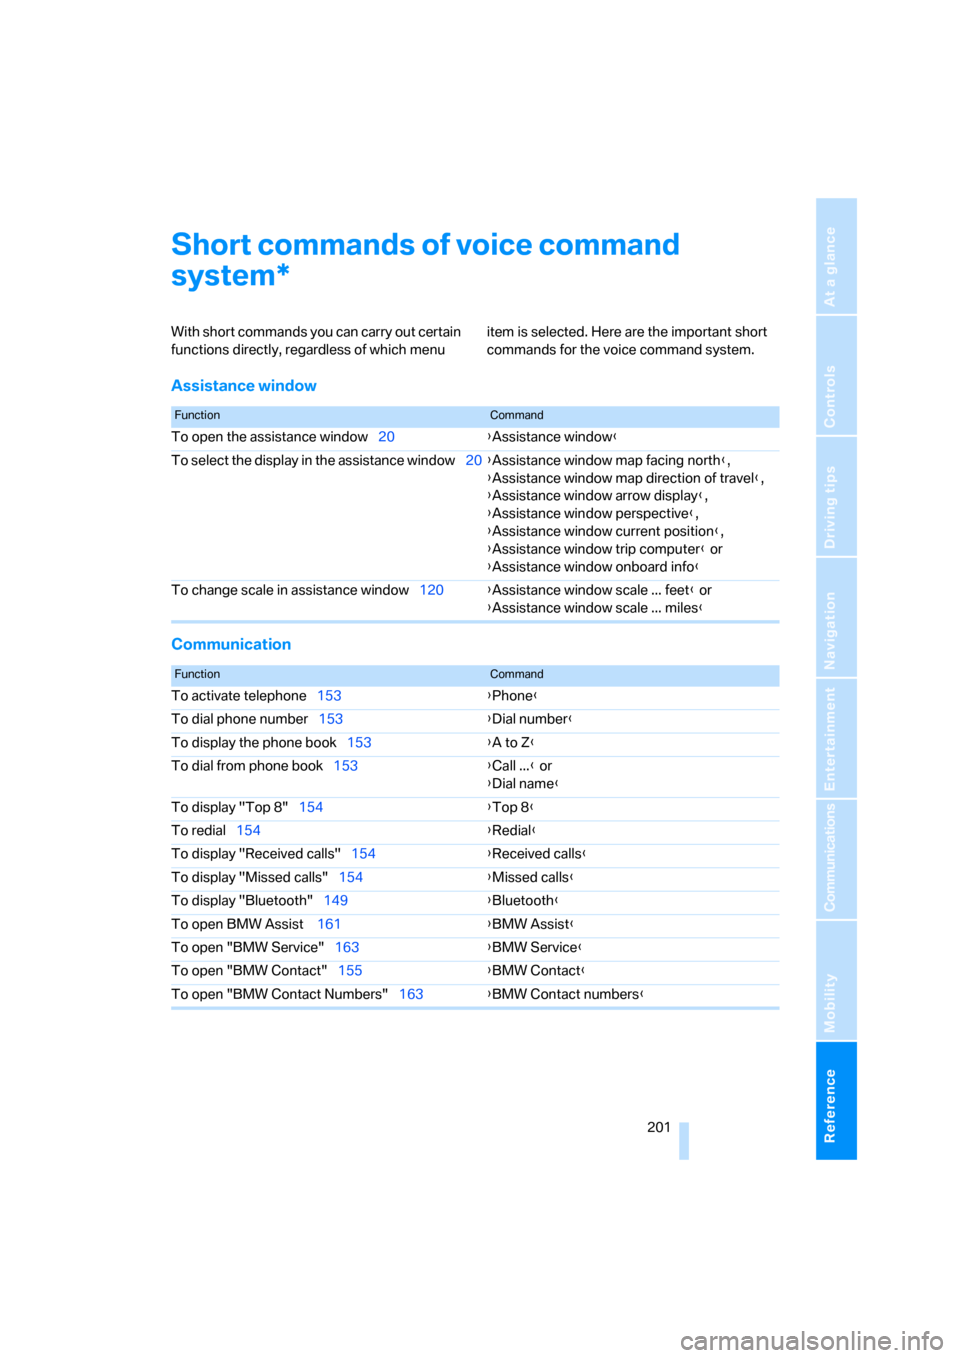
Short commands of voice command
system
With short commands you can carry out certain
functions directly, regardless of which menu item is selected. Here are the important short
commands for the voice command system.
Assistance window
Communication
*
FunctionCommand
To open the assistance window20{Assistance window}
To select the display in the assistance window20{Assistance window map facing north},
{Assistance window map direction of travel},
{Assistance window arrow display},
{Assistance window perspective},
{Assistance window current position},
{Assistance window trip computer} or
{Assistance window onboard info}
To change scale in assistance window120{Assistance window scale ... feet} or
{Assistance window scale ... miles}
FunctionCommand
To activate telephone153{Phone}
To dial phone number153{Dial number}
To display the phone book153{A to Z}
To dial from phone book153{Call ...} or
{Dial name}
To display "Top 8"154{Top 8}
To redial154{Redial}
To display "Received calls"154{Received calls}
To display "Missed calls"154{Missed calls}
To display "Bluetooth"149{Bluetooth}
To open BMW Assist 161{BMW Assist}
To open "BMW Service"163{BMW Service}
To open "BMW Contact"155{BMW Contact}
To open "BMW Contact Numbers"163{BMW Contact numbers}
Page 204 of 227
Short commands of voice command system
202
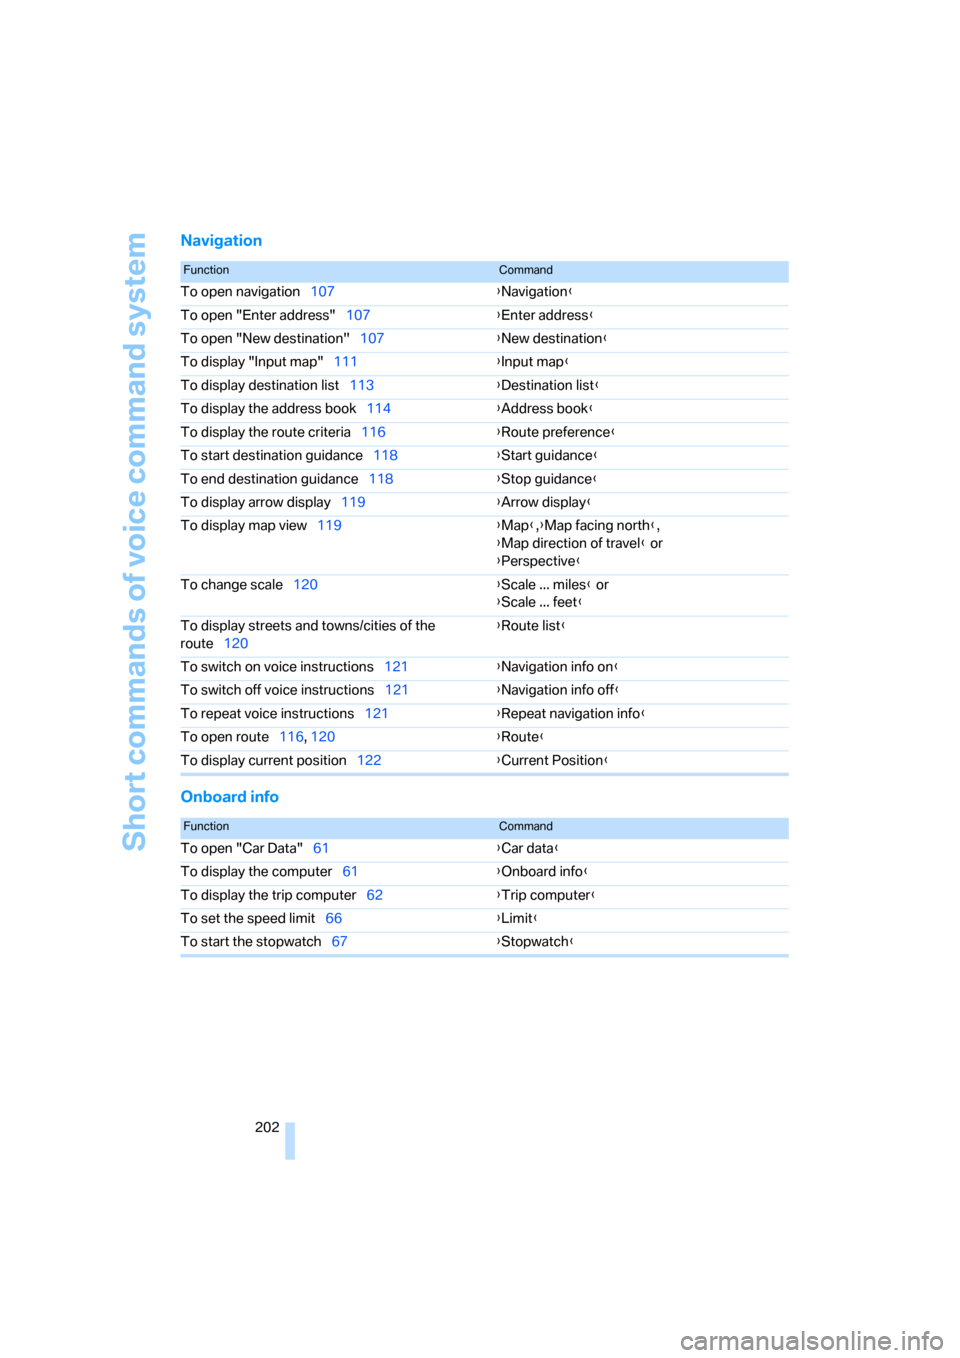
Navigation
Onboard info
FunctionCommand
To open navigation107{Navigation}
To open "Enter address"107{Enter address}
To open "New destination"107{New destination}
To display "Input map"111{Input map}
To display destination list113{Destination list}
To display the address book114{Address book}
To display the route criteria116{Route preference}
To start destination guidance118{Start guidance}
To end destination guidance118{Stop guidance}
To display arrow display119{Arrow display}
To display map view119{Map},{Map facing north},
{Map direction of travel} or
{Perspective}
To change scale120{Scale ... miles} or
{Scale ... feet}
To display streets and towns/cities of the
route120{Route list}
To switch on voice instructions121{Navigation info on}
To switch off voice instructions121{Navigation info off}
To repeat voice instructions121{Repeat navigation info}
To open route116, 120
{Route}
To display current position122{Current Position}
FunctionCommand
To open "Car Data"61{Car data}
To display the computer61{Onboard info}
To display the trip computer62{Trip computer}
To set the speed limit66{Limit}
To start the stopwatch67{Stopwatch}