rear entertainment BMW M6 COUPE 2007 E63 User Guide
[x] Cancel search | Manufacturer: BMW, Model Year: 2007, Model line: M6 COUPE, Model: BMW M6 COUPE 2007 E63Pages: 256, PDF Size: 8.11 MB
Page 97 of 256
Controls
95Reference
At a glance
Driving tips
Communications
Navigation
Entertainment
Mobility
Lamps
Parking lamps/low beams
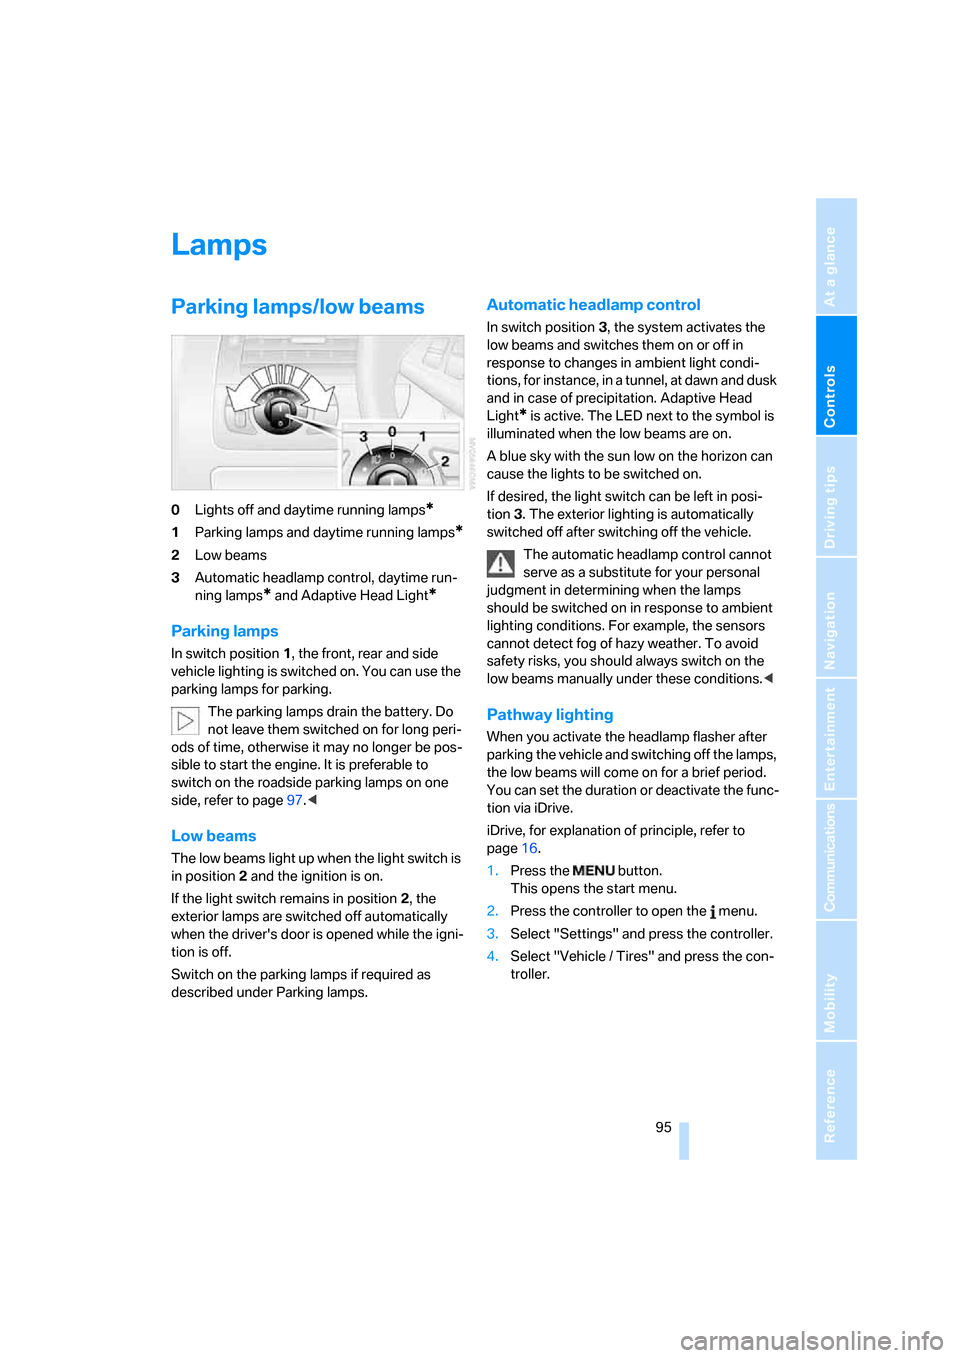
0Lights off and daytime running lamps*
1Parking lamps and daytime running lamps*
2Low beams
3Automatic headlamp control,
daytime run-
ning lamps
* and Adaptive Head Light*
Parking lamps
In switch position1, the front, rear and side
vehicle lighting is switched on. You can use the
parking lamps for parking.
The parking lamps drain the battery. Do
not leave them switched on for long peri-
ods of time, otherwise it may no longer be pos-
sible to start the engine. It is preferable to
switch on the roadside parking lamps on one
side, refer to page97.<
Low beams
The low beams light up when the light switch is
in position 2 and the ignition is on.
If the light switch remains in position 2, the
exterior lamps are switched off automatically
when the driver's door is opened while the igni-
tion is off.
Switch on the parking lamps if required as
described under Parking lamps.
Automatic headlamp control
In switch position3, the system activates the
low beams and switches them on or off in
response to changes in ambient light condi-
tions, for instance, in a tunnel, at dawn and dusk
and in case of precipitation. Adaptive Head
Light
* is active. The LED next to the symbol is
illuminated when the low beams are on.
A blue sky with the sun low on the horizon can
cause the lights to be switched on.
If desired, the light switch can be left in posi-
tion3. The exterior lighting is automatically
switched off after switching off the vehicle.
The automatic headlamp control cannot
serve as a substitute for your personal
judgment in determining when the lamps
should be switched on in response to ambient
lighting conditions. For example, the sensors
cannot detect fog of hazy weather. To avoid
safety risks, you should always switch on the
low beams manually under these conditions.<
Pathway lighting
When you activate the headlamp flasher after
parking the vehicle and switching off the lamps,
the low beams will come on for a brief period.
You can set the duration or deactivate the func-
tion via iDrive.
iDrive, for explanation of principle, refer to
page16.
1.Press the button.
This opens the start menu.
2.Press the controller to open the menu.
3.Select "Settings" and press the controller.
4.Select "Vehicle / Tires" and press the con-
troller.
Page 101 of 256
Controls
99Reference
At a glance
Driving tips
Communications
Navigation
Entertainment
Mobility
Climate
Automatic climate control
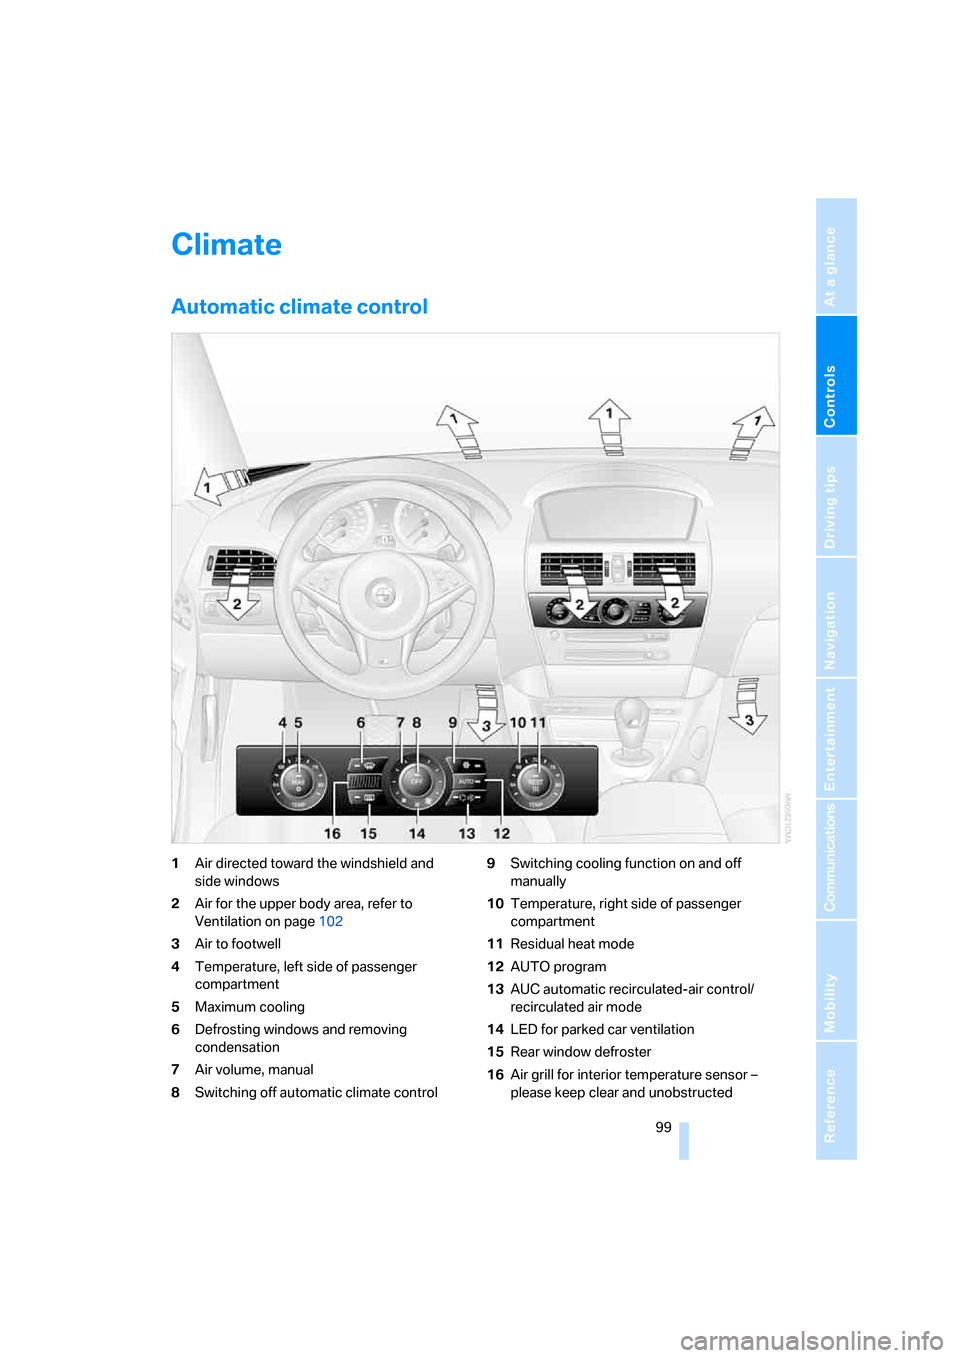
1Air directed toward the windshield and
side windows
2Air for the upper body area, refer to
Ventilation on page102
3Air to footwell
4Temperature, left side of passenger
compartment
5Maximum cooling
6Defrosting windows and removing
condensation
7Air volume, manual
8Switching off automatic climate control9Switching cooling function on and off
manually
10Temperature, right side of passenger
compartment
11Residual heat mode
12AUTO program
13AUC automatic recirculated-air control/
recirculated air mode
14LED for parked car ventilation
15Rear window defroster
16Air grill for interior temperature sensor –
please keep clear and unobstructed
Page 103 of 256
Controls
101Reference
At a glance
Driving tips
Communications
Navigation
Entertainment
Mobility
Adapting temperature in upper body
region
1.Open the start menu.
2.Open "Climate".
3.Select "Vent settings" and press the con-
troller.
4.Select the field by moving the controller and
adjust the temperature by turning the con-
troller.
Defrosting windows and removing
condensation
Quickly remove ice and condensa-
tion from the windshield and front
side windows.
To do this, also switch on the cooling function.
Rear window defroster
The rear window defroster
switches off automatically after a
certain amount of time.
Convertible: the rear window defroster is only
activated when the rear window is closed.
Depending on the vehicle equipment, upper
wires are used as an antenna and are not part of
the rear window defroster.
Air volume, manual
You can adjust the air volume by
turning. You can reactivate the
automatic mode for the air volume
with the AUTO button.
Manual air distribution
1.Open the start menu.
2.Open "Climate".3.Select "Vent settings" and press the con-
troller.
The driver's and front passenger side can
be adjusted separately with the fields on the
right or left side.
4.Select the driver's or front passenger side if
necessary.
Move the controller to the right or left
repeatedly until the driver's side or front
passenger side is selected.
5.Select the desired field by moving the con-
troller.
6.Turn the controller to adjust the air distribu-
tion.
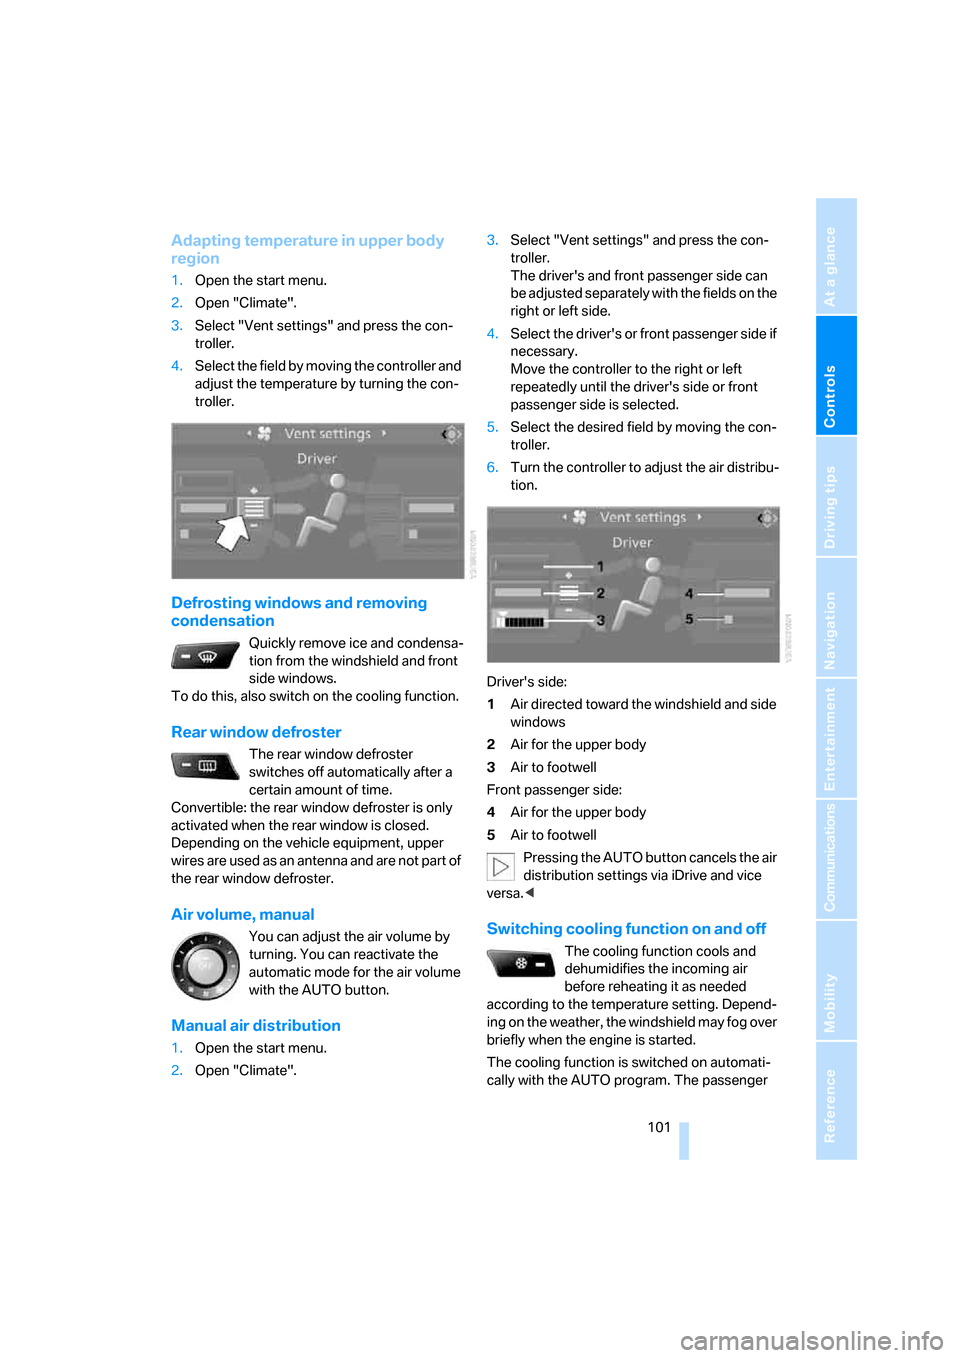
Driver's side:
1Air directed toward the windshield and side
windows
2Air for the upper body
3Air to footwell
Front passenger side:
4Air for the upper body
5Air to footwell
Pressing the AUTO button cancels the air
distribution settings via iDrive and vice
versa.<
Switching cooling function on and off
The cooling function cools and
dehumidifies the incoming air
before reheating it as needed
according to the temperature setting. Depend-
ing on the weather, the windshield may fog over
briefly when the engine is started.
The cooling function is switched on automati-
cally with the AUTO program. The passenger
Page 111 of 256
Controls
109Reference
At a glance
Driving tips
Communications
Navigation
Entertainment
Mobility
The lighter can be removed as soon as it pops
back out.
Hold or touch the hot cigarette lighter by
the knob only. Holding or touching it in
other areas could result in burns.
Always take along the remote control when you
leave the vehicle; otherwise, children could, for
example, use the lighter and burn themselves.<
Connecting electrical devices
Socket
With the engine running or the ignition switched
on, the cigarette lighter socket can be used as a
power outlet for hand flashlights, car vacuum
cleaners, etc., with power ratings of up to
approx. 200 W at 12 V. Avoid damaging the
socket by inserting plugs of different shapes or
sizes.
In front passenger footwell
Access to the socket:
Fold open the cover.
Ski bag*
It permits safe and clean transport of up to two
pairs of standard skis or one snowboard.
You can use the ski bag to stow skis up to 6.9 ft/
2.10 m long.
Loading
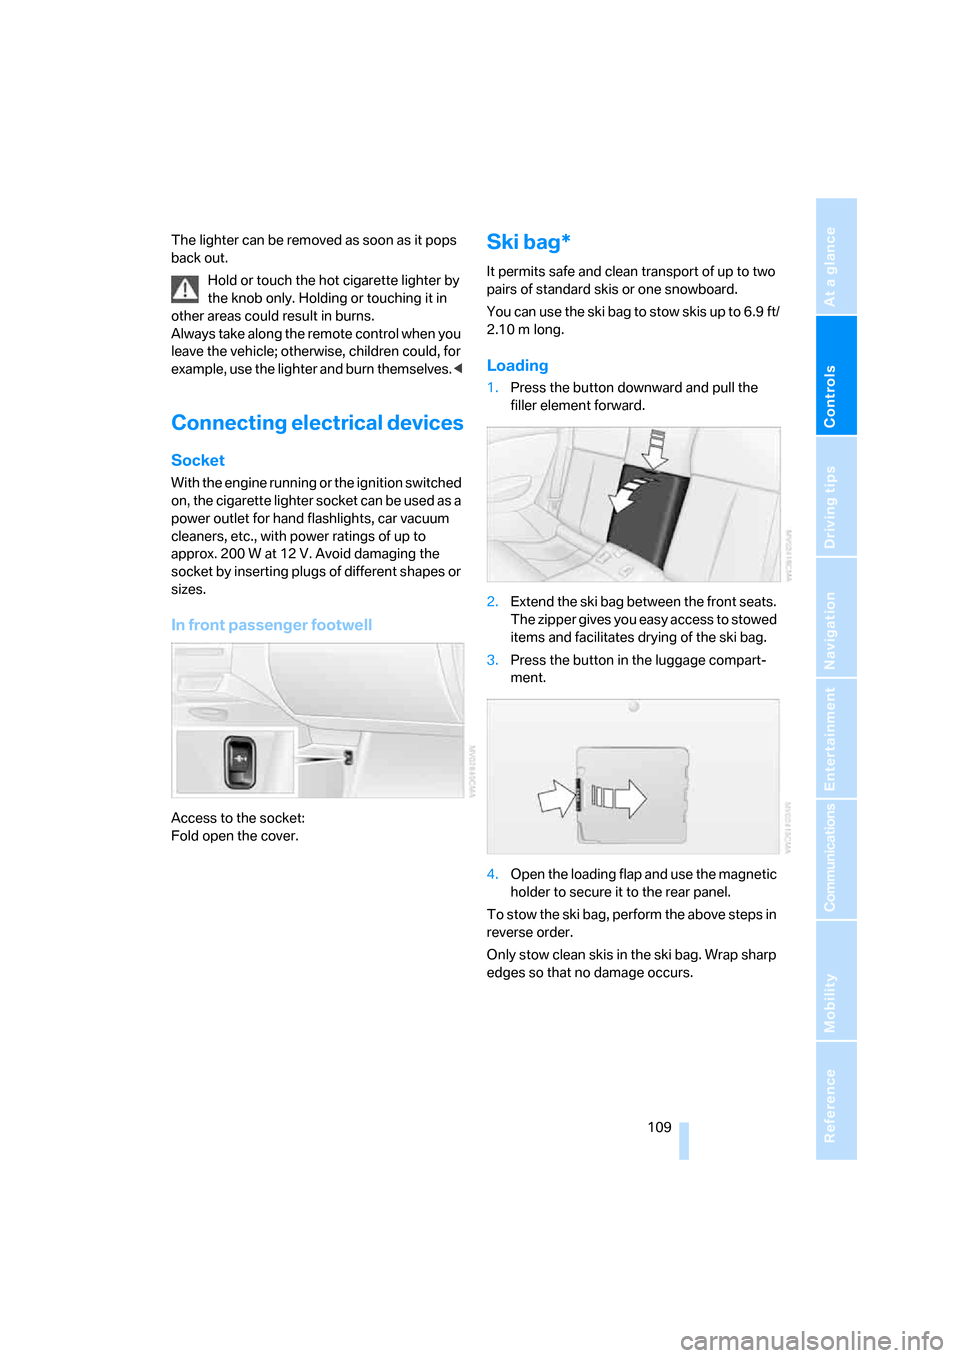
1.Press the button downward and pull the
filler element forward.
2.Extend the ski bag between the front seats.
The zipper gives you easy access to stowed
items and facilitates drying of the ski bag.
3.Press the button in the luggage compart-
ment.
4.Open the loading flap and use the magnetic
holder to secure it to the rear panel.
To stow the ski bag, perform the above steps in
reverse order.
Only stow clean skis in the ski bag. Wrap sharp
edges so that no damage occurs.
Page 119 of 256
Driving tips
117Reference
At a glance
Controls
Communications
Navigation
Entertainment
Mobility
Cargo loading
To avoid loading the tires beyond their
approved carrying capacity, never over-
load the vehicle. Overloading can lead to over-
heating and increases the rate at which damage
develops inside the tires. The ultimate result
can assume the form of a sudden blow-out.<
Determining loading limit
1.Locate the following statement on your
vehicle's placard
*:
The combined weight of occupants
and cargo should never exceed
YYY lbs. or XXX kg, as otherwise the vehicle
may be damaged and unstable driving con-
ditions may result.<
2.Determine the combined weight of the
driver and passengers that will be riding in
your vehicle.
3.Subtract the combined weight of the driver
and passengers from XXX lbs. or YYY kg.
4.The resulting figure equals the available
amount of cargo and luggage load capacity.
For example, if the XXX amount equals
800 lbs. and there will be four 150-lb. pas-
sengers in your vehicle, the amount of avail-
able cargo and luggage load capacity is
200 lbs.:
800lbs. minus 600lbs. = 200lbs.
5.Determine the combined weight of luggage
and cargo being loaded on the vehicle. That
weight may not safely exceed the available
cargo and luggage load capacity calculated
in step 4.6.If your vehicle will be towing a trailer, part of
the load from your trailer will be transferred
to your vehicle. Consult the manual for
transporting a trailer to determine how this
may reduce the available cargo and luggage
load capacity of your vehicle.
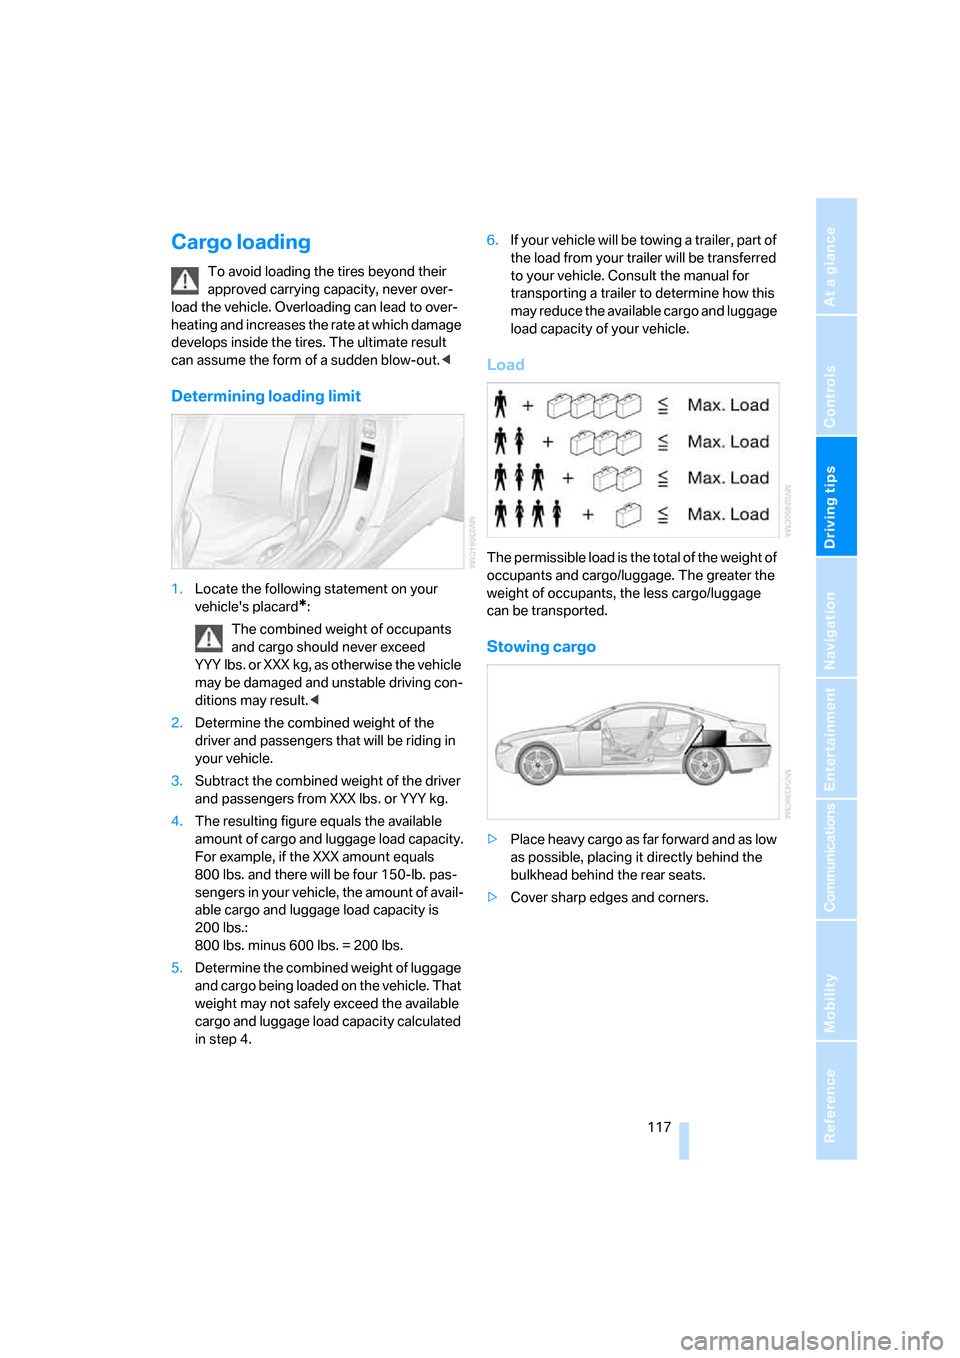
Load
The permissible load is the total of the weight of
occupants and cargo/luggage. The greater the
weight of occupants, the less cargo/luggage
can be transported.
Stowing cargo
>Place heavy cargo as far forward and as low
as possible, placing it directly behind the
bulkhead behind the rear seats.
>Cover sharp edges and corners.
Page 203 of 256
Mobility
201Reference
At a glance
Controls
Driving tips
Communications
Navigation
Entertainment
After changing wheels/tires
After changing tires or wheels, the slip detec-
tion of the Sequential Manual Transmission
must become familiar with the changed state.
Reinitialize the system for this purpose:
1.Move the selector lever into the idling
position N on a straight stretch of road at a
speed between 20 mph/30 km/h and
90 mph/150 km/h.
2.Pull both shift paddles for approx. 2 sec-
onds.
If you do not carry out initialization, the system
will automatically learn the changed state grad-
ually during driving. This may be noticeable
from the clutch opening and closing briefly.
Storage
Store wheels and tires in a cool, dry place with
as little exposure to light as possible. Always
protect tires against all contact with oil, grease
and fuels. Do not exceed the maximum tire
inflation pressure indicated on the side wall of
the tire.
Rotating wheels between axles
BMW does not recommend moving the front
wheels to the rear or vice versa, as otherwise
the handling characteristics may be impaired.
Snow chains*
BMW only tests certain fine-link snow chains,
classifies them as road-safe and recommends
them. Consult your BMW center for more infor-
mation.
Use is only permitted in pairs, with winter tires
of the size 245/45 R 18 on the rear wheels.
Observe the manufacturer's instructions when
mounting snow chains. Do not exceed a speed
of 30 mph/50 km/h with the chains mounted.
Make sure that the snow chains are always suf-
ficiently tensioned. Retension in accordance
with the chain manufacturer's specifications if
necessary.Do not initialize the Flat Tire Monitor after
installing snow chains as this could cause
the Flat Tire Monitor to malfunction.
After mounting or removing snow chains, the
slip detection of the Sequential Manual Trans-
mission must become familiar with the altered
state. To do this, reinitialize the system, refer to
After changing wheels/tires.<
Page 209 of 256
Mobility
207Reference
At a glance
Controls
Driving tips
Communications
Navigation
Entertainment
Maintenance
BMW Maintenance System
The BMW Maintenance System supports the
preservation of the traffic and operating safety
of your BMW. The service schedule also
includes operations related to the vehicle's
comfort and convenience features, such as
replacement of the filters for the inside air.
The ultimate objective is to ensure economical
maintenance by providing the ideal service for
your vehicle.
Should the day come when you decide to sell
your BMW, you will find that a complete dealer
service history is an asset of inestimable value.
CBS Condition Based Service
Sensors and special algorithms take the differ-
ent driving conditions of your BMW into
account. Condition Based Service uses this to
determine the current and future service
requirements. By letting you define a service
and maintenance regimen that reflects your
own individual requirements, the system builds
the basis for trouble-free driving.
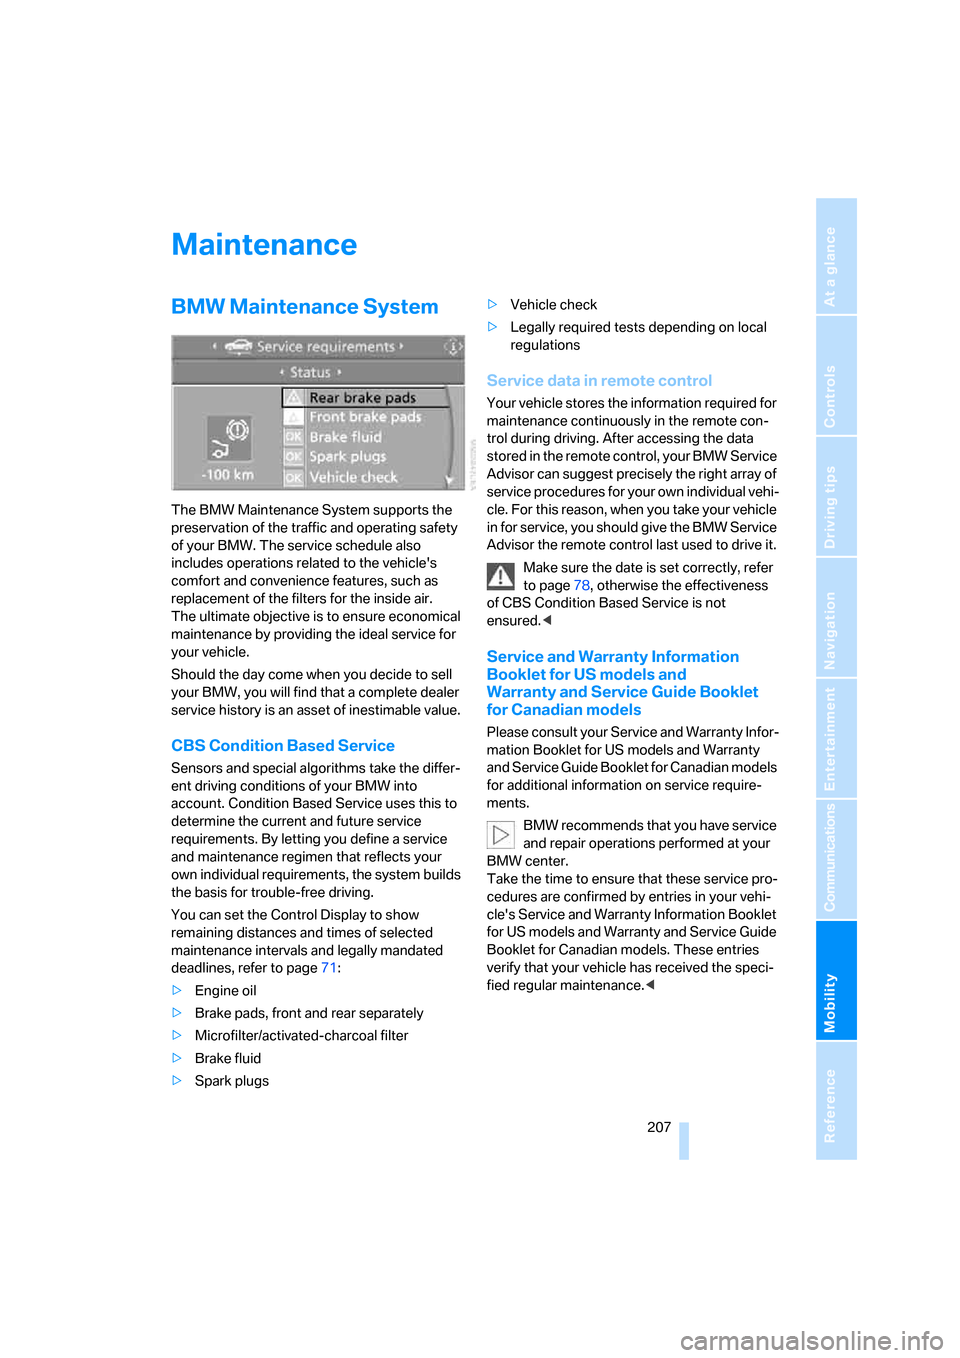
You can set the Control Display to show
remaining distances and times of selected
maintenance intervals and legally mandated
deadlines, refer to page71:
>Engine oil
>Brake pads, front and rear separately
>Microfilter/activated-charcoal filter
>Brake fluid
>Spark plugs>Vehicle check
>Legally required tests depending on local
regulations
Service data in remote control
Your vehicle stores the information required for
maintenance continuously in the remote con-
trol during driving. After accessing the data
stored in the remote control, your BMW Service
Advisor can suggest precisely the right array of
service procedures for your own individual vehi-
cle. For this reason, when you take your vehicle
in for service, you should give the BMW Service
Advisor the remote control last used to drive it.
Make sure the date is set correctly, refer
to page78, otherwise the effectiveness
of CBS Condition Based Service is not
ensured.<
Service and Warranty Information
Booklet for US models and
Warranty and Service Guide Booklet
for Canadian models
Please consult your Service and Warranty Infor-
mation Booklet for US models and Warranty
and Service Guide Booklet for Canadian models
for additional information on service require-
ments.
BMW recommends that you have service
and repair operations performed at your
BMW center.
Take the time to ensure that these service pro-
cedures are confirmed by entries in your vehi-
cle's Service and Warranty Information Booklet
for US models and Warranty and Service Guide
Booklet for Canadian models. These entries
verify that your vehicle has received the speci-
fied regular maintenance.<
Page 213 of 256
Mobility
211Reference
At a glance
Controls
Driving tips
Communications
Navigation
Entertainment
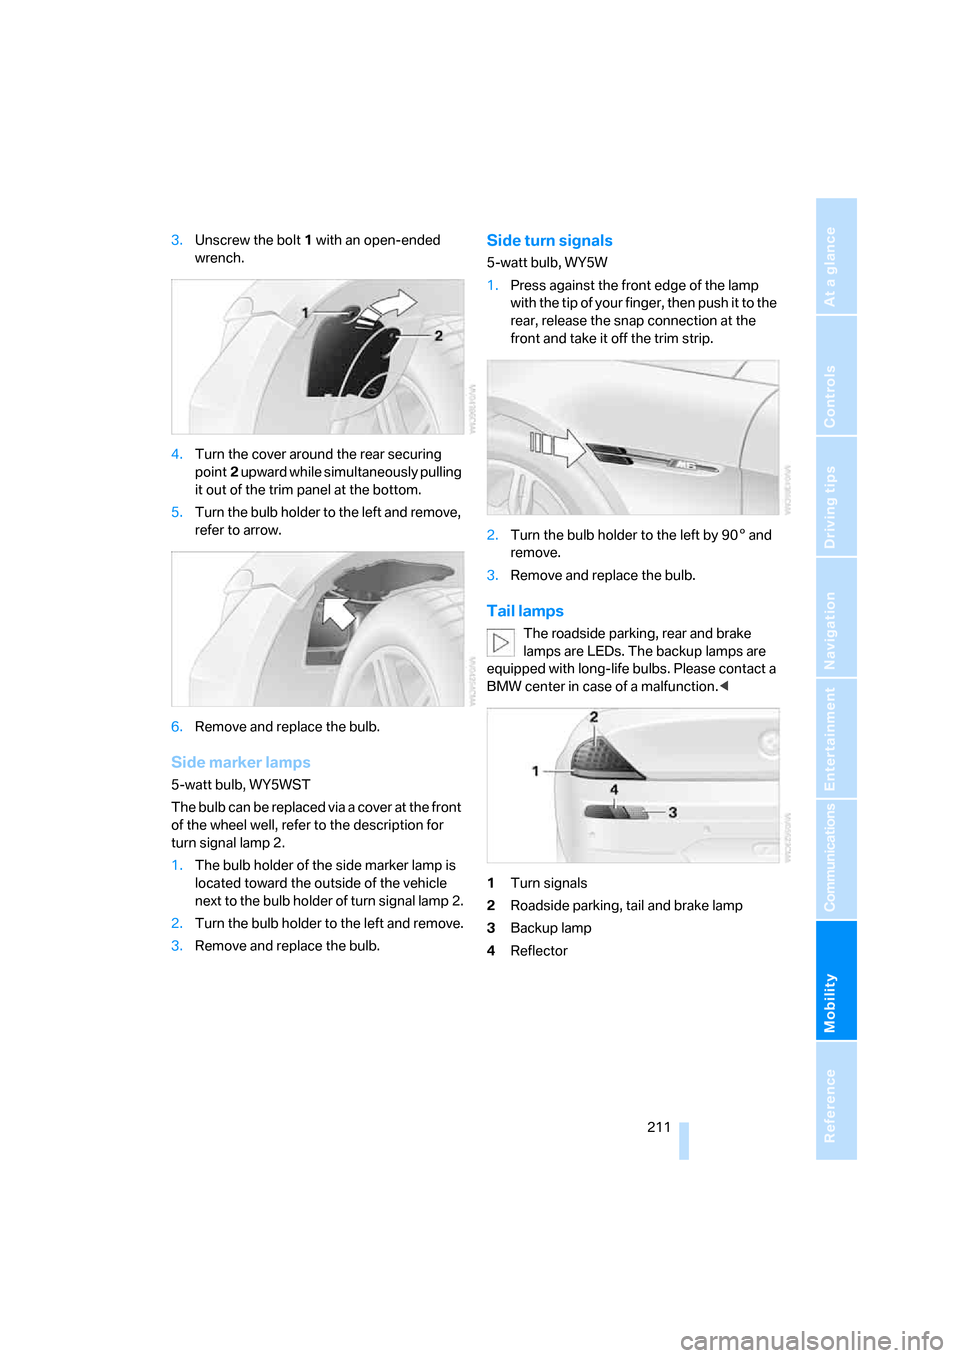
3.Unscrew the bolt 1 with an open-ended
wrench.
4.Turn the cover around the rear securing
point2 upward while simultaneously pulling
it out of the trim panel at the bottom.
5.Turn the bulb holder to the left and remove,
refer to arrow.
6.Remove and replace the bulb.
Side marker lamps
5-watt bulb, WY5WST
The bulb can be replaced via a cover at the front
of the wheel well, refer to the description for
turn signal lamp 2.
1.The bulb holder of the side marker lamp is
located toward the outside of the vehicle
next to the bulb holder of turn signal lamp 2.
2.Turn the bulb holder to the left and remove.
3.Remove and replace the bulb.
Side turn signals
5-watt bulb, WY5W
1.Press against the front edge of the lamp
with the tip of your finger, then push it to the
rear, release the snap connection at the
front and take it off the trim strip.
2.Turn the bulb holder to the left by 905 and
remove.
3.Remove and replace the bulb.
Tail lamps
The roadside parking, rear and brake
lamps are LEDs. The backup lamps are
equipped with long-life bulbs. Please contact a
BMW center in case of a malfunction.<
1Turn signals
2Roadside parking, tail and brake lamp
3Backup lamp
4Reflector
Page 217 of 256
Mobility
215Reference
At a glance
Controls
Driving tips
Communications
Navigation
Entertainment
Changing wheels*
Safety precautions in the event of a flat
tire or wheel change: Park the vehicle as
far as possible from passing traffic and on solid
ground. Switch on the hazard warning flashers.
Apply the handbrake and engage first gear or
reverse gear with a manual transmission, or
select a drive position with the selector level for
a sequential transmission.
Have all vehicle occupants get out of the vehicle
and ensure that they remain outside the imme-
diate area in a safe place, such as behind a
guardrail.
If a warning triangle
* or portable hazard warning
lamp
* is r e q u ir e d , s e t i t up o n t h e ro a d s id e a t a n
appropriate distance from the rear of the vehi-
cle. Comply with all safety guidelines and regu-
lations.
Change the wheel only on a level, firm surface
which is not slippery. The vehicle or the jack
could slip to the side if you attempt to raise the
vehicle on a soft or slippery surface such as
snow, ice, tiles, etc.
Position the jack on a firm support surface.
Do not use a wooden block or similar object as a
support base for the jack, as this would prevent
it from extending to its full support height and
reduce its load-carrying capacity.
To avoid serious or fatal injury: never lie under
the vehicle, and never start the engine while it is
supported by the jack.<
What you will need
To avoid rattling noises later on, note the posi-
tions of the tools before removing them, then
return them to their initial positions after com-
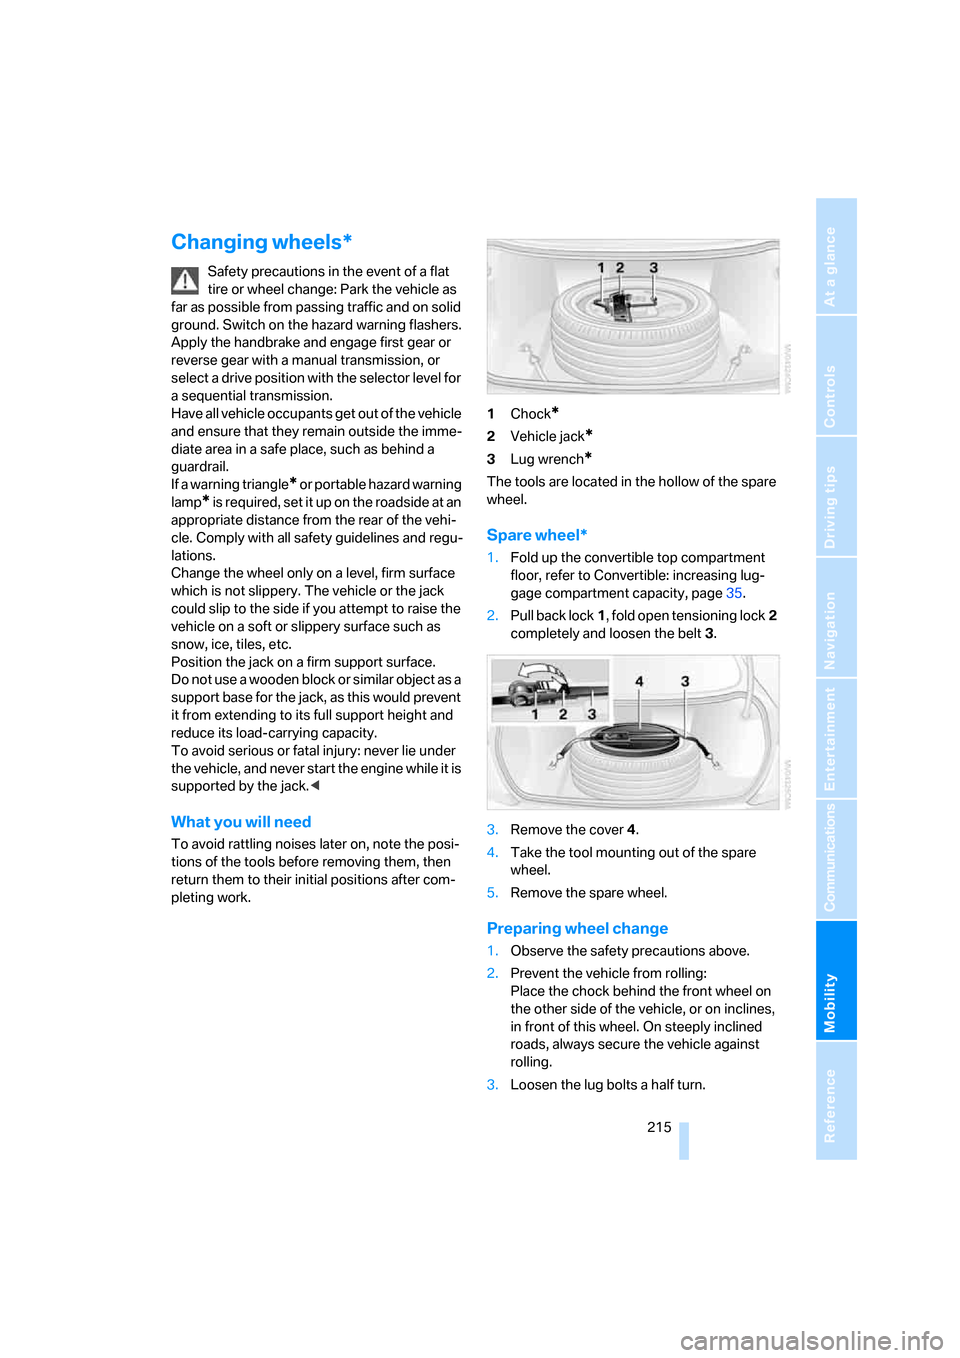
pleting work.1Chock
*
2Vehicle jack*
3Lug wrench*
The tools are located in the hollow of the spare
wheel.
Spare wheel*
1.Fold up the convertible top compartment
floor, refer to Convertible: increasing lug-
gage compartment capacity, page35.
2.Pull back lock1, fold open tensioning lock2
completely and loosen the belt3.
3.Remove the cover4.
4.Take the tool mounting out of the spare
wheel.
5.Remove the spare wheel.
Preparing wheel change
1.Observe the safety precautions above.
2.Prevent the vehicle from rolling:
Place the chock behind the front wheel on
the other side of the vehicle, or on inclines,
in front of this wheel. On steeply inclined
roads, always secure the vehicle against
rolling.
3.Loosen the lug bolts a half turn.
Page 223 of 256
Mobility
221Reference
At a glance
Controls
Driving tips
Communications
Navigation
Entertainment
1.Fold open the cover of the BMW jump-
starting terminal. To do so, pull the tab.
2.Attach one end of the jumper cable plus/+
to the positive terminal of the battery or a
jump-starting terminal of the vehicle provid-
ing assistance.
3.Attach the second end of the cable to the
positive terminal of the battery or to a jump-
starting terminal of the vehicle to be started.
4.Attach one end of the jumper cable minus/–
to the negative terminal of the battery or to
an engine or body ground of the vehicle
providing assistance.
Your BMW M6 has a special nut as body
ground or negative terminal.
5.Attach the second end of the cable to the
negative terminal of the battery or to the
engine or body ground of the vehicle to be
started.
Starting engine
1.Start the engine on the assisting vehicle
and allow it to run at idle for several minutes
at slightly increased speed.
2.Start the engine on the other vehicle in the
usual way.
If the first starting attempt is not successful, wait a few minutes before another attempt
in order to allow the discharged battery to
recharge.
3.Let the engines run for a few minutes.
4.Disconnect the jumper cables by reversing
the connection sequence.
Check the battery and recharge if necessary.
Never use spray fluids to start the
engine.<
Tow-starting and towing
Observe applicable laws and regulations
for tow-starting and towing.<
Do not transport any passengers other
than the driver in a vehicle that is being
towed.<
Using tow fitting
The threaded tow fitting is stored in the tool kit
mounted on the inside of the luggage compart-
ment under the floor mat, refer to page209, and
should always remain in the vehicle. It can be
screwed in at the front or rear of the BMW M6.
Only use the tow fitting that comes with
the vehicle and screw it in as far as possi-
ble. Use the tow fitting for towing only on roads.
Avoid lateral loading of the tow fitting, e.g. do
not lift the vehicle by the tow fitting. Otherwise,
the tow fitting and vehicle can be damaged.<
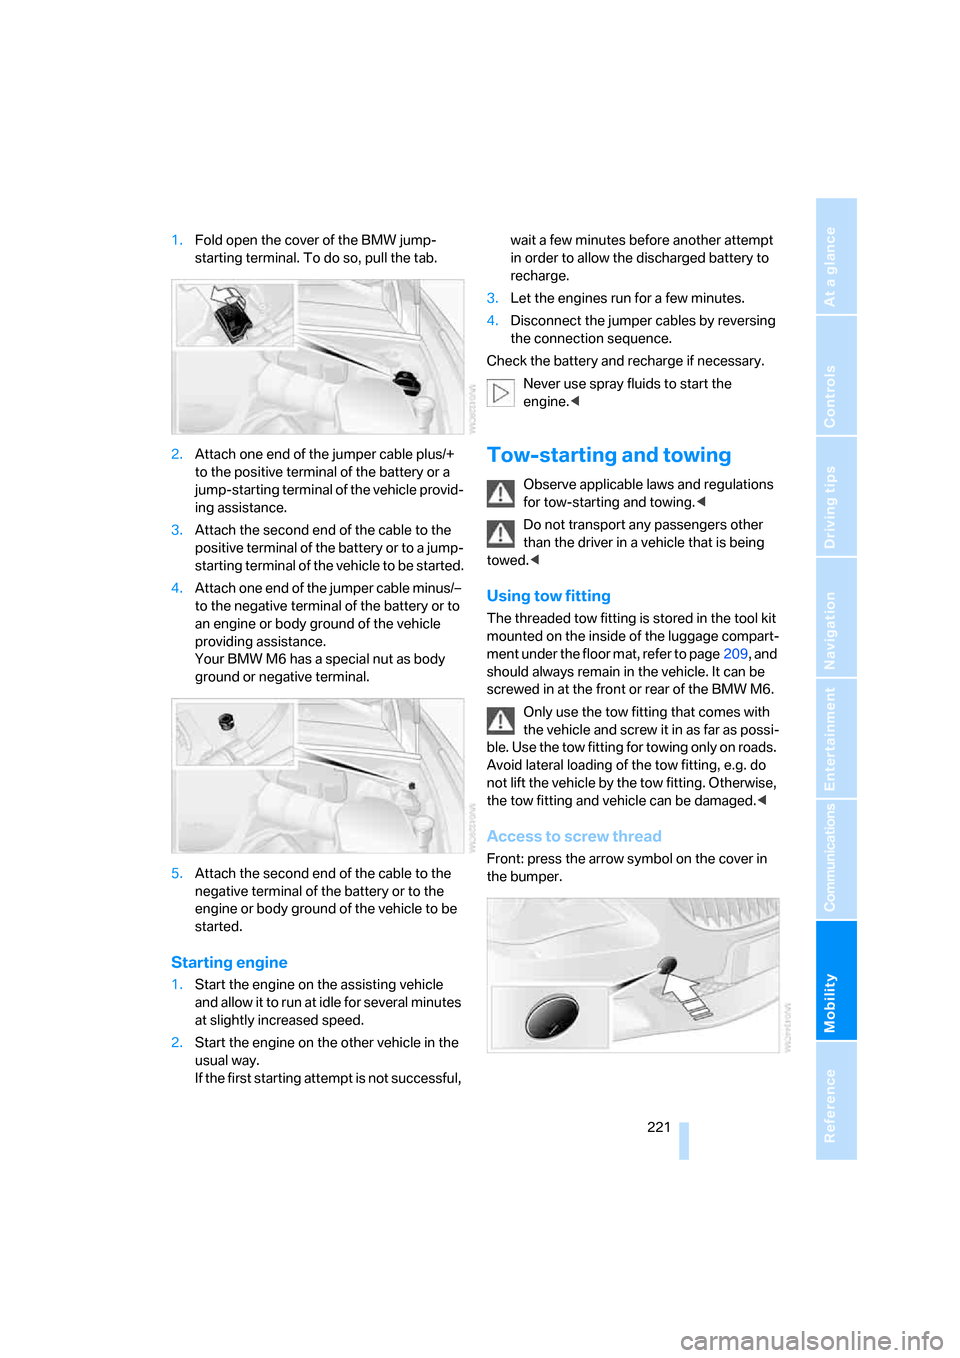
Access to screw thread
Front: press the arrow symbol on the cover in
the bumper.