manual transmission BMW M6 COUPE 2007 E63 Owner's Manual
[x] Cancel search | Manufacturer: BMW, Model Year: 2007, Model line: M6 COUPE, Model: BMW M6 COUPE 2007 E63Pages: 256, PDF Size: 8.11 MB
Page 14 of 256
Cockpit
12
Instrument cluster
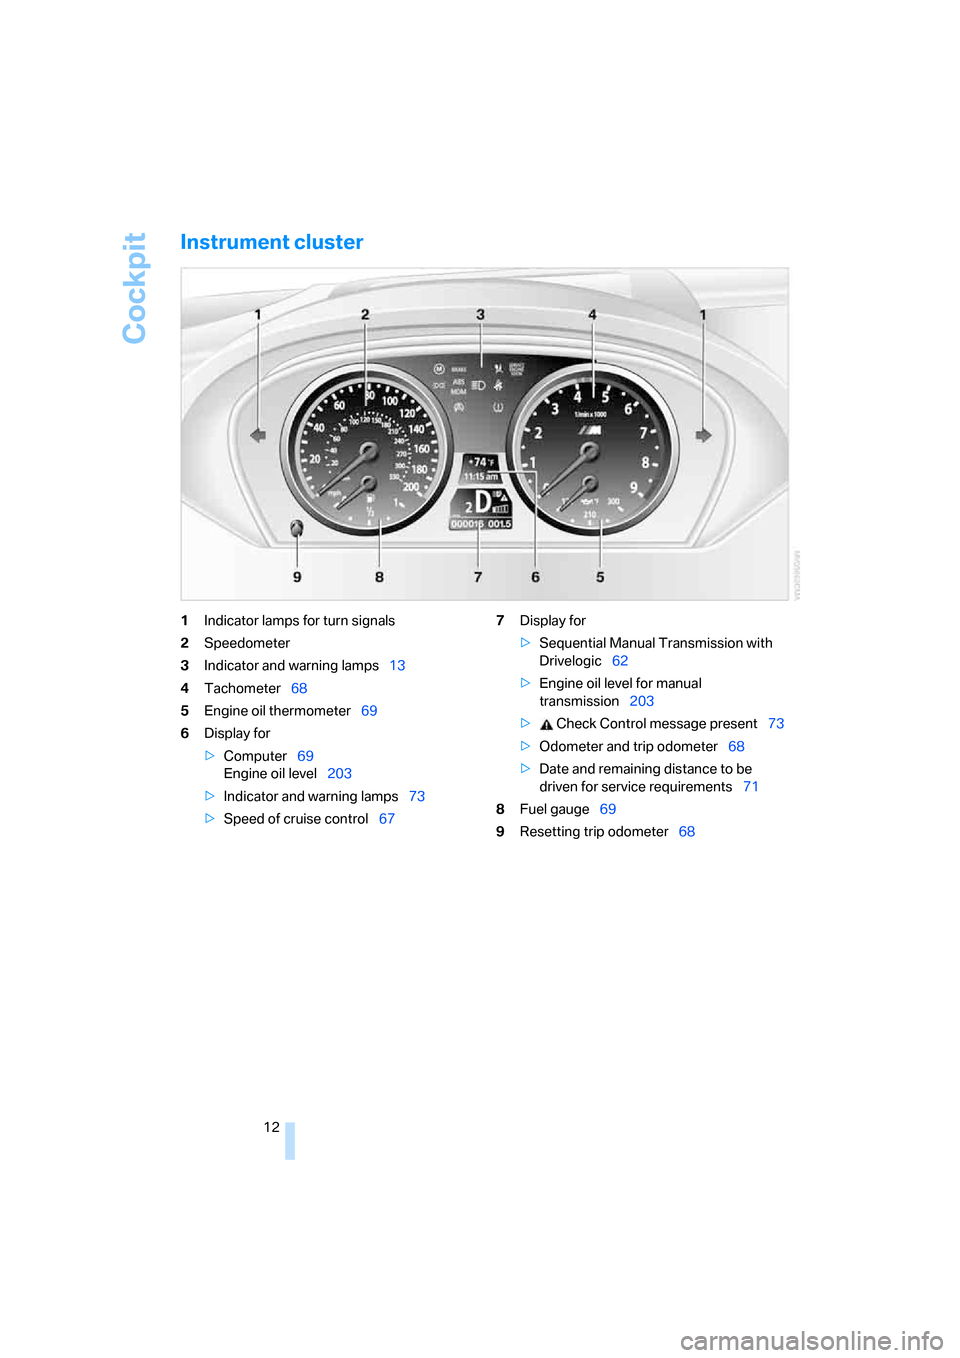
1Indicator lamps for turn signals
2Speedometer
3Indicator and warning lamps13
4Tachometer68
5Engine oil thermometer69
6Display for
>Computer69
Engine oil level203
>Indicator and warning lamps73
>Speed of cruise control677Display for
>Sequential Manual Transmission with
Drivelogic62
>Engine oil level for manual
transmission203
> Check Control message present73
>Odometer and trip odometer68
>Date and remaining distance to be
driven for service requirements71
8Fuel gauge69
9Resetting trip odometer68
Page 17 of 256
At a glance
15Reference
Controls
Driving tips
Communications
Navigation
Entertainment
Mobility
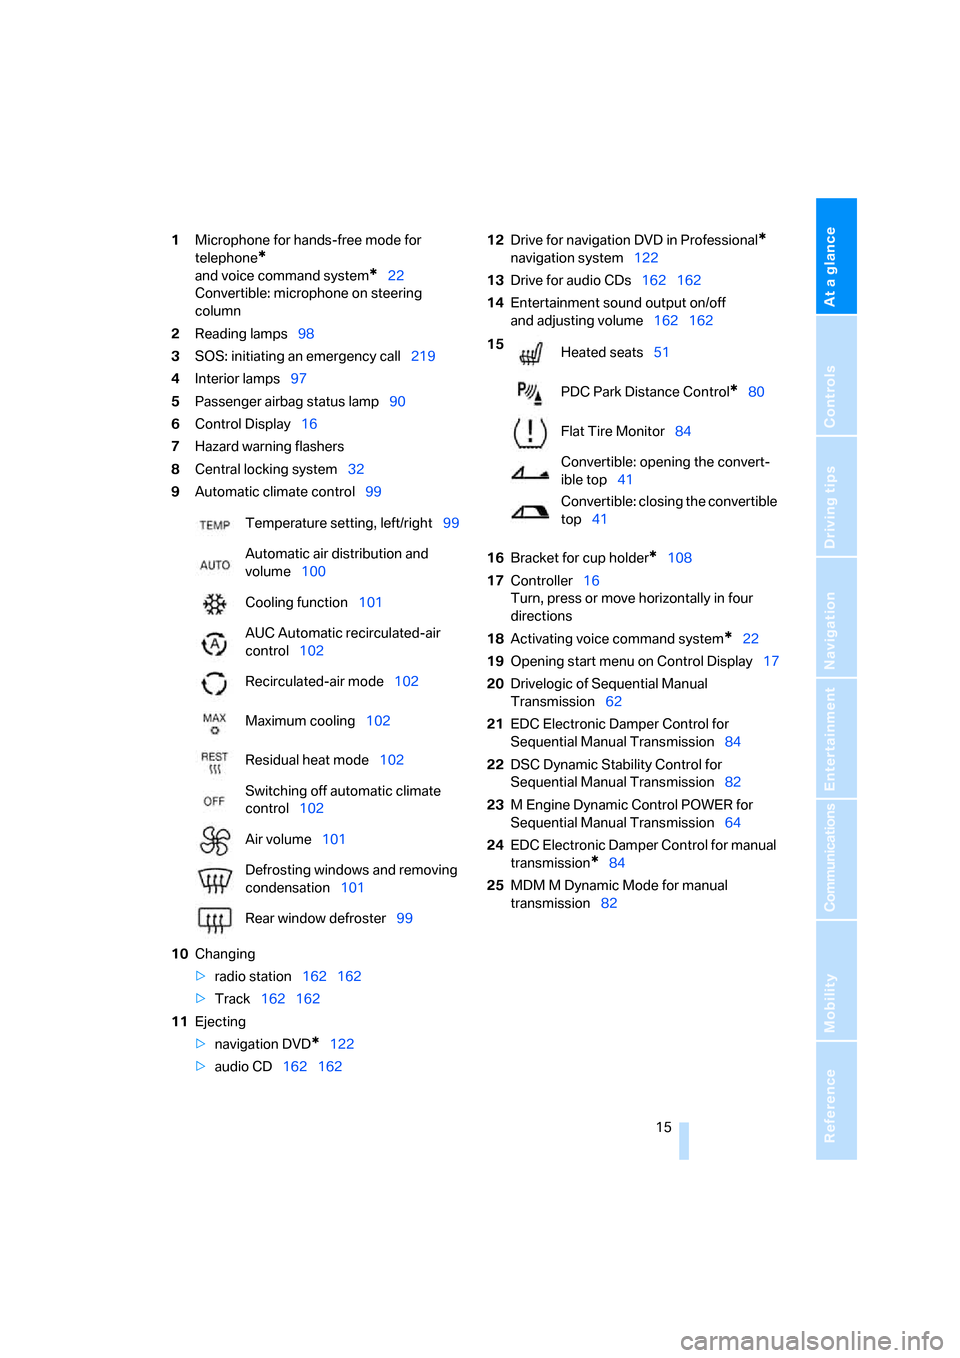
1Microphone for hands-free mode for
telephone
*
and voice command system*22
Convertible: microphone on steering
column
2Reading lamps98
3SOS: initiating an emergency call219
4Interior lamps97
5Passenger airbag status lamp90
6Control Display16
7Hazard warning flashers
8Central locking system32
9Automatic climate control99
10Changing
>radio station162 162
>Track162 162
11Ejecting
>navigation DVD
*122
>audio CD162 16212Drive for navigation DVD in Professional
*
navigation system122
13Drive for audio CDs162 162
14Entertainment sound output on/off
and adjusting volume162 162
16Bracket for cup holder
*108
17Controller16
Turn, press or move horizontally in four
directions
18Activating voice command system
*22
19Opening start menu on Control Display17
20Drivelogic of Sequential Manual
Transmission62
21EDC Electronic Damper Control for
Sequential Manual Transmission84
22DSC Dynamic Stability Control for
Sequential Manual Transmission82
23M Engine Dynamic Control POWER for
Sequential Manual Transmission64
24EDC Electronic Damper Control for manual
transmission
*84
25MDM M Dynamic Mode for manual
transmission82 Temperature setting, left/right99
Automatic air distribution and
volume100
Cooling function101
AUC Automatic recirculated-air
control102
Recirculated-air mode102
Maximum cooling102
Residual heat mode102
Switching off automatic climate
control102
Air volume101
Defrosting windows and removing
condensation101
Rear window defroster99
15
Heated seats51
PDC Park Distance Control
*80
Flat Tire Monitor84
Convertible: opening the convert-
ible top41
Convertible: closing the convertible
top41
Page 56 of 256
Adjusting
54 5.Select the desired function unit and press
the controller.
Operating function
Press the button on the steering wheel.
If you have programmed "Navigation voice
instructions" for the button:
>To switch voice instructions on/off:
Press the button longer.
>To repeat the last voice instruction:
Press the button.
MDrive
With MDrive you can configure several individ-
ual settings for your vehicle on the Control Dis-
play and activate them simultaneously with the
button on the steering wheel.
Configuring settings
With the ignition switched on you can change
the settings of MDrive on the Control Display.
iDrive, for explanation of principle, refer to
page16.
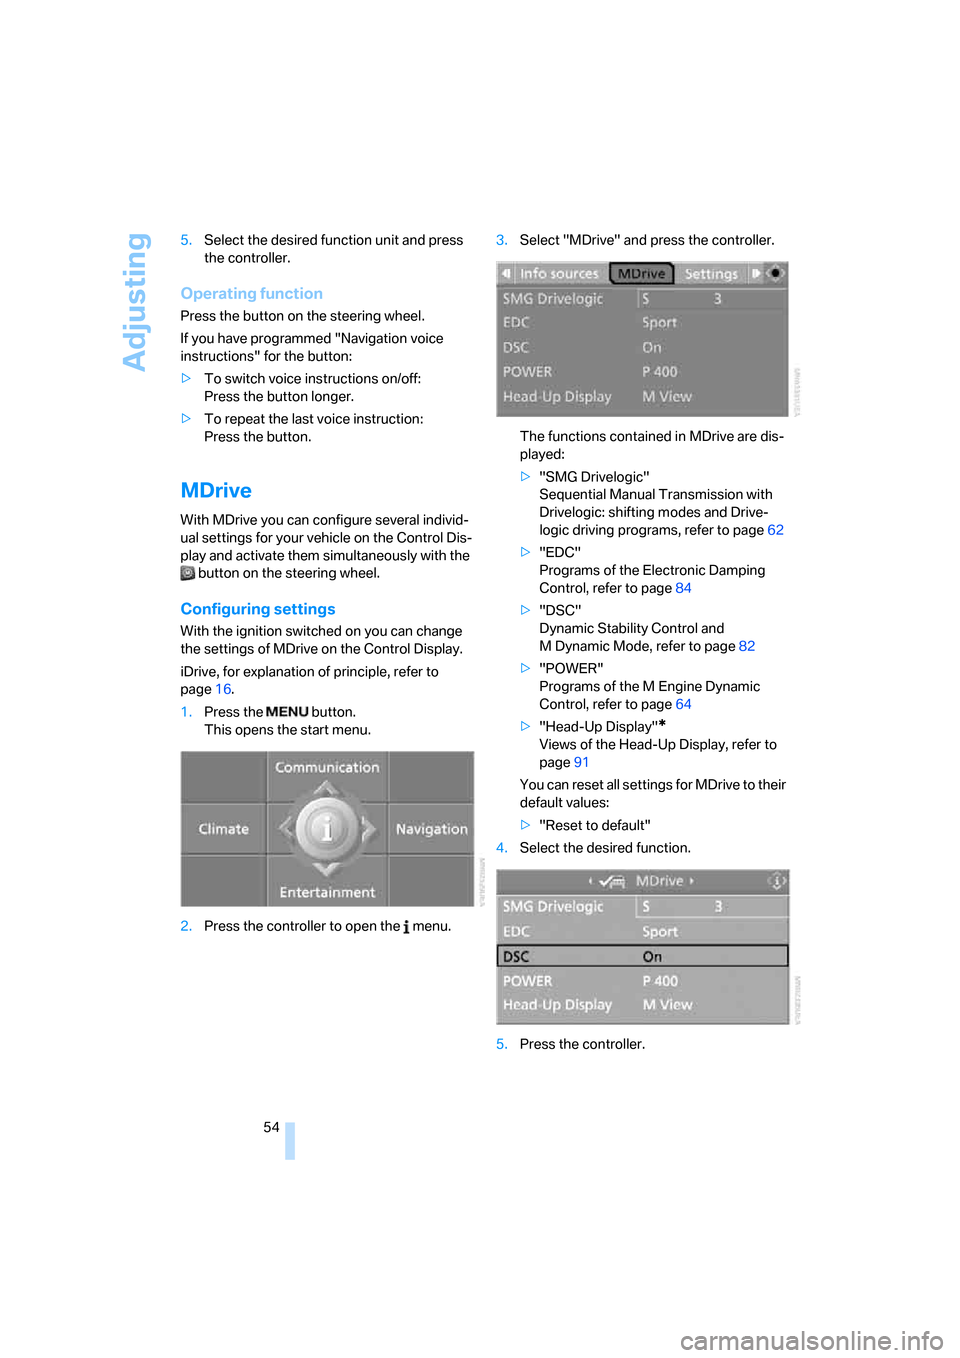
1.Press the button.
This opens the start menu.
2.Press the controller to open the menu.3.Select "MDrive" and press the controller.
The functions contained in MDrive are dis-
played:
>"SMG Drivelogic"
Sequential Manual Transmission with
Drivelogic: shifting modes and Drive-
logic driving programs, refer to page62
>"EDC"
Programs of the Electronic Damping
Control, refer to page84
>"DSC"
Dynamic Stability Control and
M Dynamic Mode, refer to page82
>"POWER"
Programs of the M Engine Dynamic
Control, refer to page64
>"Head-Up Display"
*
Views of the Head-Up Display, refer to
page91
You can reset all settings for MDrive to their
default values:
>"Reset to default"
4.Select the desired function.
5.Press the controller.
Page 60 of 256
Driving
58
Driving
Ignition lock
Inserting remote control into ignition
lock
Insert the remote control as far as possible into
the ignition lock.
Radio readiness switches on.
Some electronic systems/consumers are ready
for operation.
Comfort access*
With comfort access, only insert the remote
control into the ignition lock in exceptional
cases, refer to page37.
Removing remote control from ignition
lock
Do not pull the remote control out of the
ignition lock using force, as otherwise
damage may result.<
Before removing the remote control, first press
it in as far as possible to release the locking
device.
The ignition is switched off if it was still
switched on.
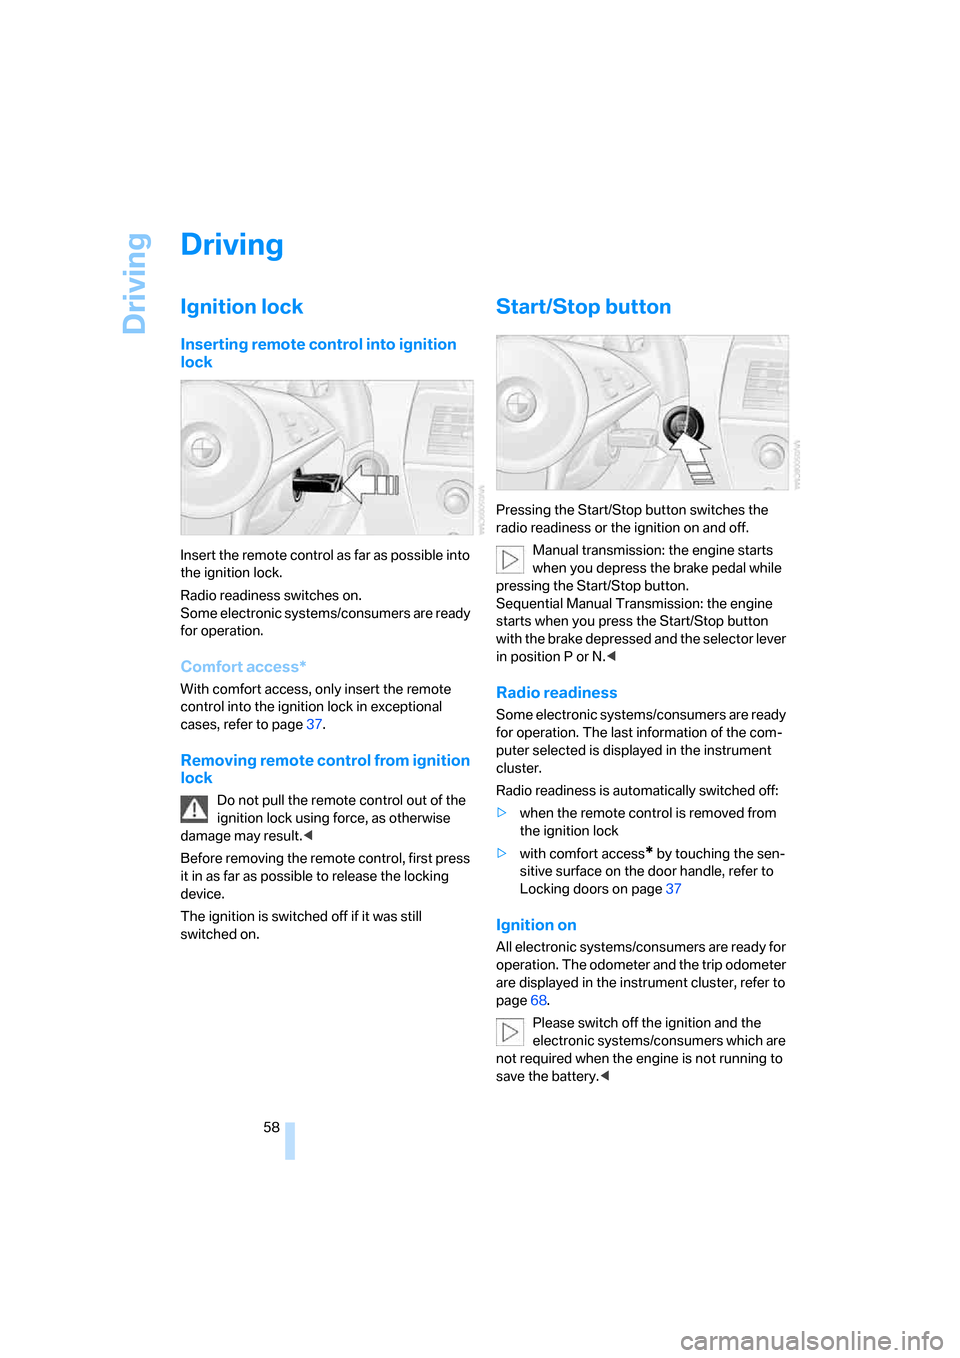
Start/Stop button
Pressing the Start/Stop button switches the
radio readiness or the ignition on and off.
Manual transmission: the engine starts
when you depress the brake pedal while
pressing the Start/Stop button.
Sequential Manual Transmission: the engine
starts when you press the Start/Stop button
with the brake depressed and the selector lever
in position P or N.<
Radio readiness
Some electronic systems/consumers are ready
for operation. The last information of the com-
puter selected is displayed in the instrument
cluster.
Radio readiness is automatically switched off:
>when the remote control is removed from
the ignition lock
>with comfort access
* by touching the sen-
sitive surface on the door handle, refer to
Locking doors on page37
Ignition on
All electronic systems/consumers are ready for
operation. The odometer and the trip odometer
are displayed in the instrument cluster, refer to
page68.
Please switch off the ignition and the
electronic systems/consumers which are
not required when the engine is not running to
save the battery.<
Page 61 of 256
Controls
59Reference
At a glance
Driving tips
Communications
Navigation
Entertainment
Mobility
Radio readiness and ignition off
All indicator and warning lamps in the instru-
ment cluster go out.
Starting engine
Do not run the engine in closed rooms,
otherwise the inhalation of toxic exhaust
gases can cause unconsciousness and death.
The exhaust gases contain carbon monoxide,
an odorless and colorless, but highly toxic gas.
Never leave an unattended vehicle with the
engine running, as such a vehicle represents a
potential safety hazard.
Before leaving the vehicle with the engine run-
ning, shift into neutral
* or move the selector
lever into position N and firmly apply the hand-
brake, otherwise the vehicle can begin to roll.<
Do not allow the engine to warm up by leaving it
running while the vehicle remains stationary.
Instead, drive off at a moderate engine speed.
Avoid frequent starting in quick succes-
sion or repeated starting attempts in
which the engine does not start. Otherwise, the
fuel is not burned at all or is burned inade-
quately and there is a danger of overheating and
damage to the catalytic converter.<
Manual transmission*
Remote control in ignition lock or with comfort
access in vehicle, refer to page37.
1.Depress brake pedal.
2.Depress the clutch pedal and select the
idling position.
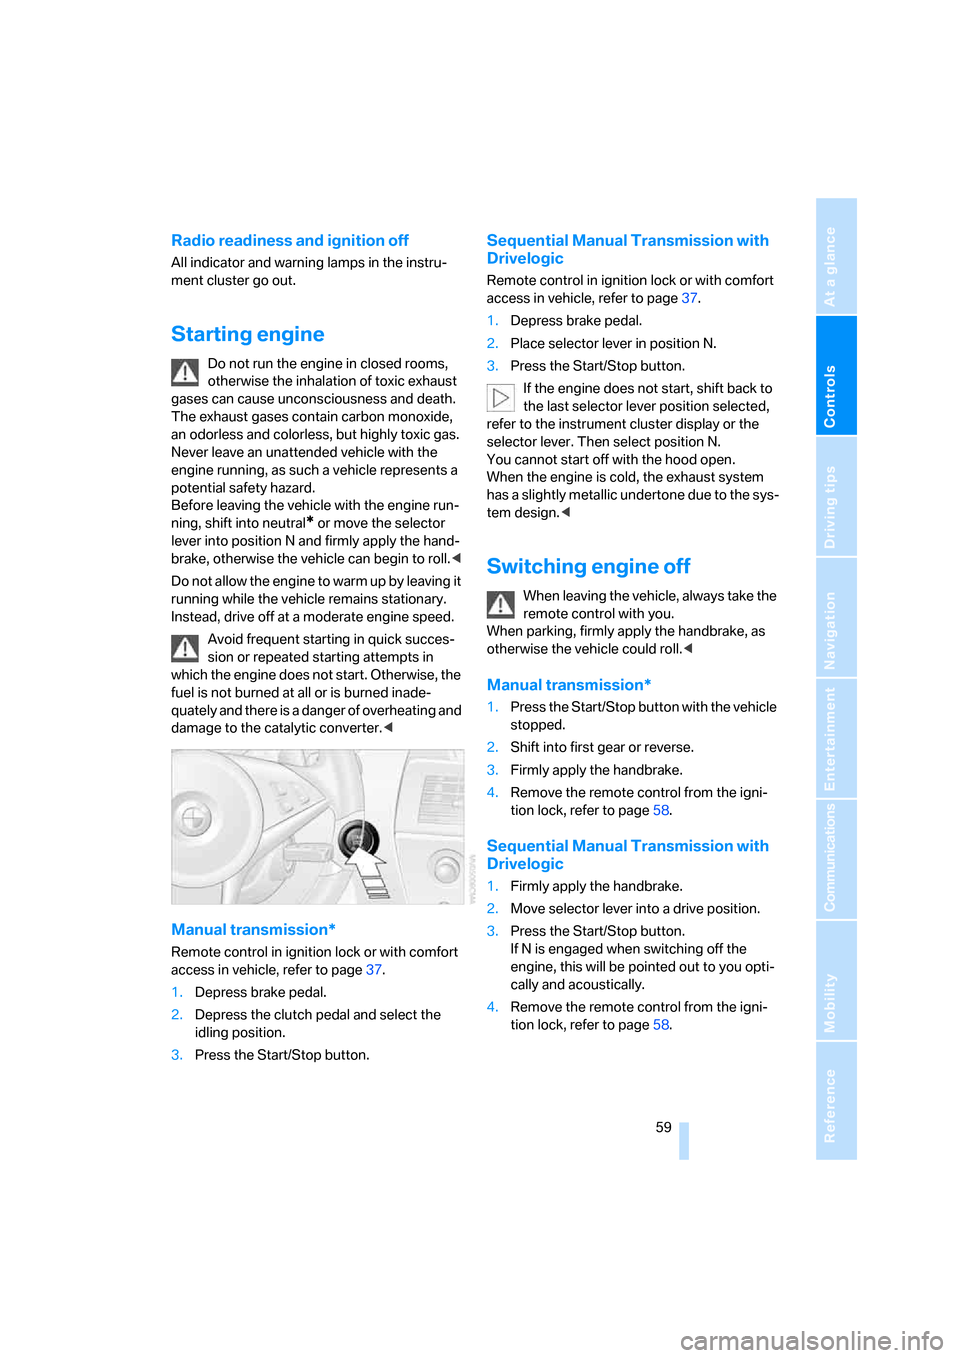
3.Press the Start/Stop button.
Sequential Manual Transmission with
Drivelogic
Remote control in ignition lock or with comfort
access in vehicle, refer to page37.
1.Depress brake pedal.
2.Place selector lever in position N.
3.Press the Start/Stop button.
If the engine does not start, shift back to
the last selector lever position selected,
refer to the instrument cluster display or the
selector lever. Then select position N.
You cannot start off with the hood open.
When the engine is cold, the exhaust system
has a slightly metallic undertone due to the sys-
tem design.<
Switching engine off
When leaving the vehicle, always take the
remote control with you.
When parking, firmly apply the handbrake, as
otherwise the vehicle could roll.<
Manual transmission*
1.Press the Start/Stop button with the vehicle
stopped.
2.Shift into first gear or reverse.
3.Firmly apply the handbrake.
4.Remove the remote control from the igni-
tion lock, refer to page58.
Sequential Manual Transmission with
Drivelogic
1.Firmly apply the handbrake.
2.Move selector lever into a drive position.
3.Press the Start/Stop button.
If N is engaged when switching off the
engine, this will be pointed out to you opti-
cally and acoustically.
4.Remove the remote control from the igni-
tion lock, refer to page58.
Page 62 of 256
Driving
60
Handbrake
The handbrake is primarily intended to prevent
the vehicle from rolling while parked; it brakes
the rear wheels.
Indicator lamp
The indicator lamp lights up, and a sig-
nal also sounds when starting off. The
handbrake is applied.
Indicator lamp for Canadian models.
Applying
The lever locks in position automatically.
Releasing
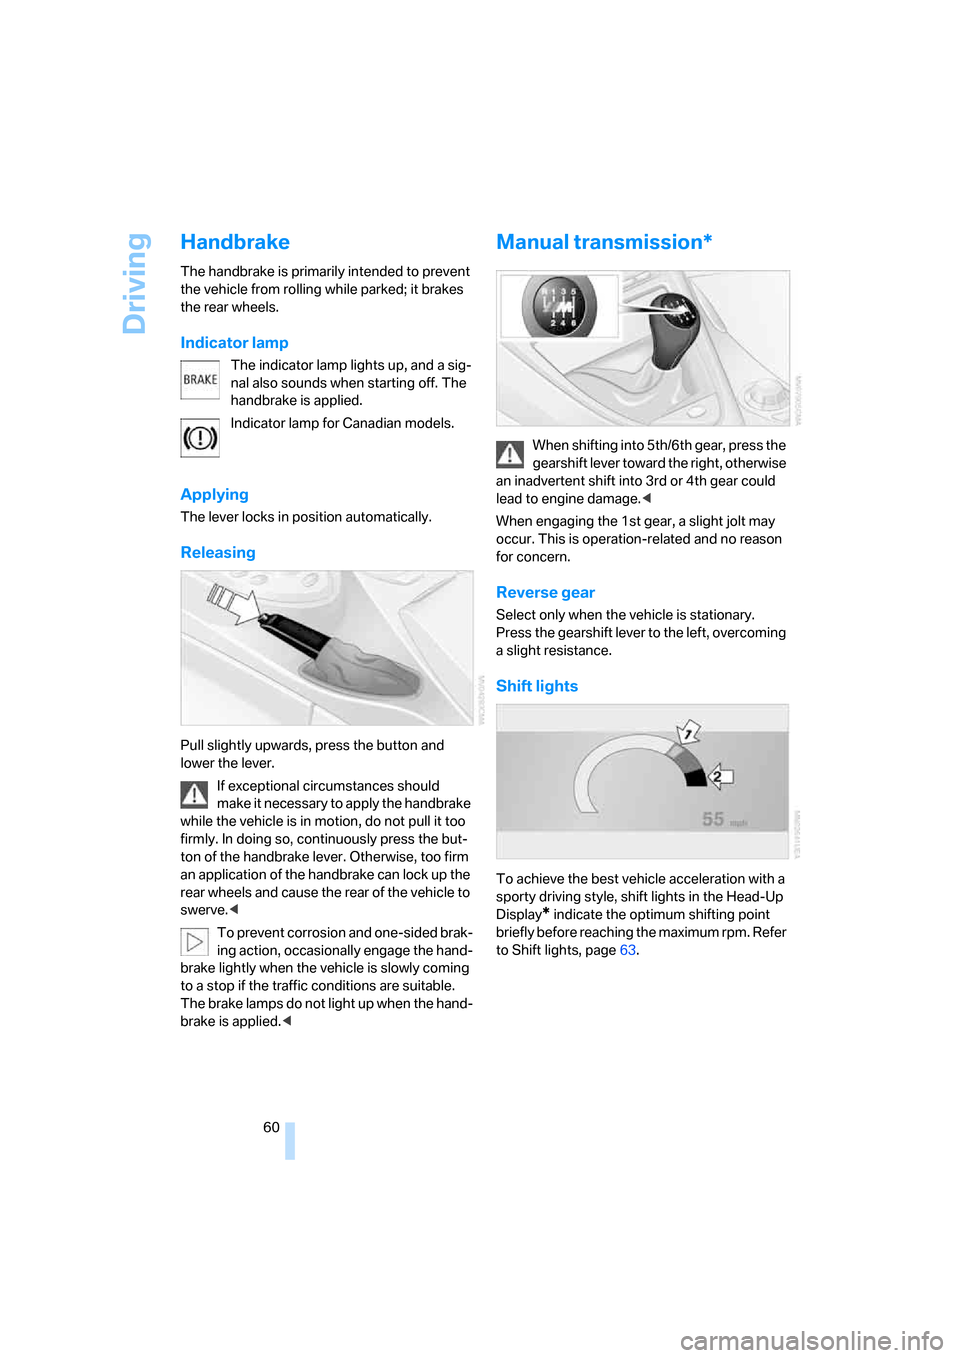
Pull slightly upwards, press the button and
lower the lever.
If exceptional circumstances should
make it necessary to apply the handbrake
while the vehicle is in motion, do not pull it too
firmly. In doing so, continuously press the but-
ton of the handbrake lever. Otherwise, too firm
an application of the handbrake can lock up the
rear wheels and cause the rear of the vehicle to
swerve.<
To prevent corrosion and one-sided brak-
ing action, occasionally engage the hand-
brake lightly when the vehicle is slowly coming
to a stop if the traffic conditions are suitable.
The brake lamps do not light up when the hand-
brake is applied.<
Manual transmission*
When shifting into 5th/6th gear, press the
gearshift lever toward the right, otherwise
an inadvertent shift into 3rd or 4th gear could
lead to engine damage.<
When engaging the 1st gear, a slight jolt may
occur. This is operation-related and no reason
for concern.
Reverse gear
Select only when the vehicle is stationary.
Press the gearshift lever to the left, overcoming
a slight resistance.
Shift lights
To achieve the best vehicle acceleration with a
sporty driving style, shift lights in the Head-Up
Display
* indicate the optimum shifting point
briefly before reaching the maximum rpm. Refer
to Shift lights, page63.
Page 63 of 256
Controls
61Reference
At a glance
Driving tips
Communications
Navigation
Entertainment
Mobility
Sequential Manual
Transmission with Drivelogic
The concept
The SMG Sequential Manual Transmission
with Drivelogic is an automated manual trans-
mission in which an electrohydraulic system
handles the clutching and gear changes.
The Sequential Manual Transmission is oper-
ated with the selector lever and two shift pad-
dles on the steering wheel.
It offers the following functions:
>Choice of manual or automatic mode:
Sequential mode or Drive mode
>Selection option between different driving
programs, Drivelogic, refer to page62
>Upshift display, shift lights, refer to page63
>Automatic downshifting and prevention of
incorrect shifting even in sequential opera-
tion
>Automatic double clutching
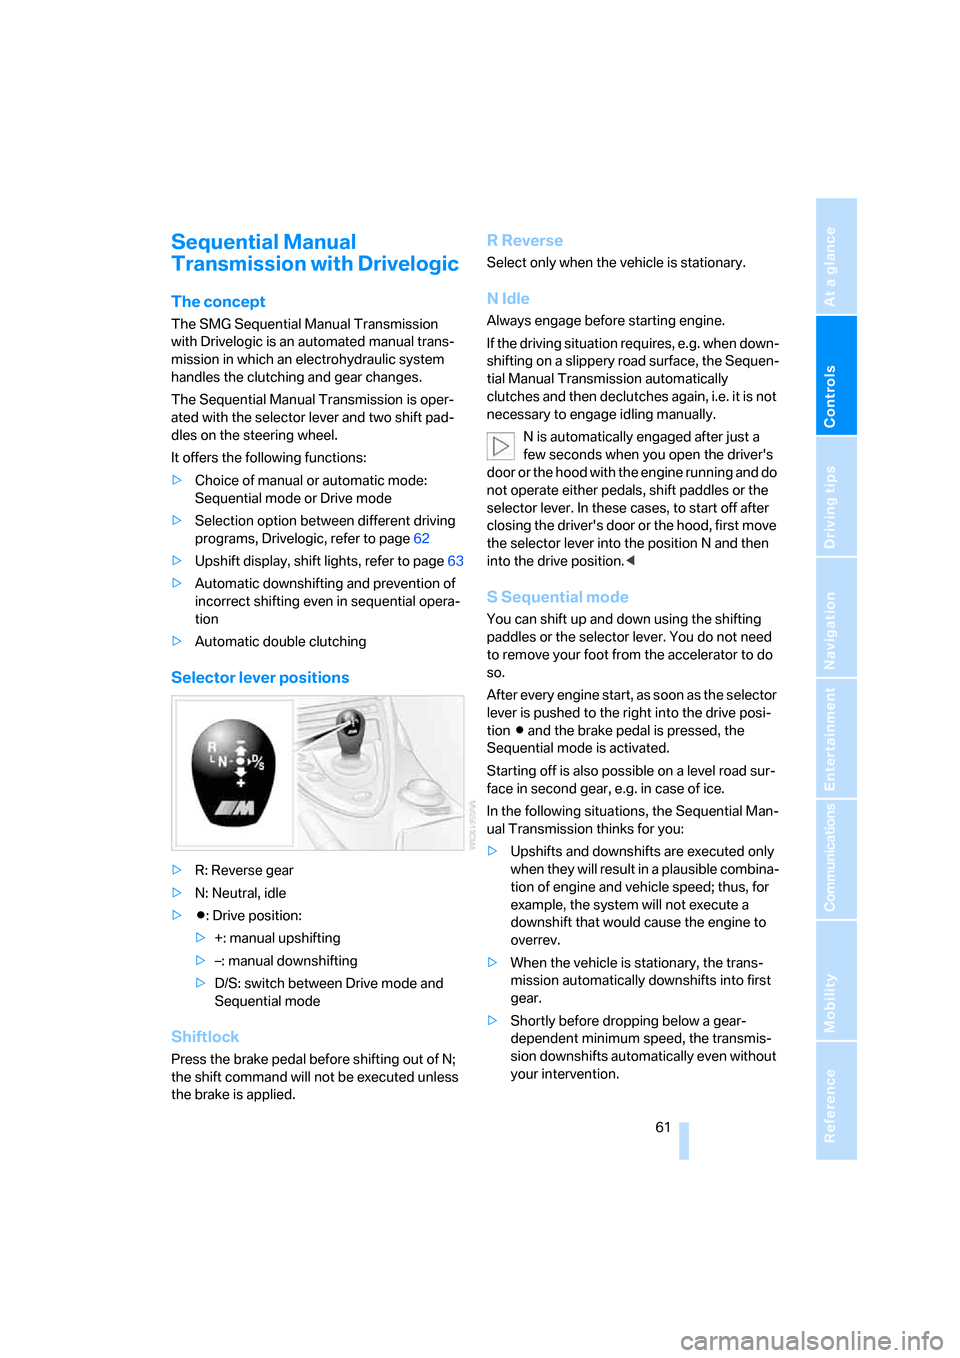
Selector lever positions
>R: Reverse gear
>N: Neutral, idle
>Β: Drive position:
>+: manual upshifting
>–: manual downshifting
>D/S: switch between Drive mode and
Sequential mode
Shiftlock
Press the brake pedal before shifting out of N;
the shift command will not be executed unless
the brake is applied.
R Reverse
Select only when the vehicle is stationary.
N Idle
Always engage before starting engine.
If the driving situation requires, e.g. when down-
shifting on a slippery road surface, the Sequen-
tial Manual Transmission automatically
clutches and then declutches again, i.e. it is not
necessary to engage idling manually.
N is automatically engaged after just a
few seconds when you open the driver's
door or the hood with the engine running and do
not operate either pedals, shift paddles or the
selector lever. In these cases, to start off after
closing the driver's door or the hood, first move
the selector lever into the position N and then
into the drive position.<
S Sequential mode
You can shift up and down using the shifting
paddles or the selector lever. You do not need
to remove your foot from the accelerator to do
so.
After every engine start, as soon as the selector
lever is pushed to the right into the drive posi-
tion Β and the brake pedal is pressed, the
Sequential mode is activated.
Starting off is also possible on a level road sur-
face in second gear, e.g. in case of ice.
In the following situations, the Sequential Man-
ual Transmission thinks for you:
>Upshifts and downshifts are executed only
when they will res ult in a plausible combina-
tion of engine and vehicle speed; thus, for
example, the system will not execute a
downshift that would cause the engine to
overrev.
>When the vehicle is stationary, the trans-
mission automatically downshifts into first
gear.
>Shortly before dropping below a gear-
dependent minimum speed, the transmis-
sion downshifts automatically even without
your intervention.
Page 71 of 256
Controls
69Reference
At a glance
Driving tips
Communications
Navigation
Entertainment
Mobility
Engine oil temperature gauge
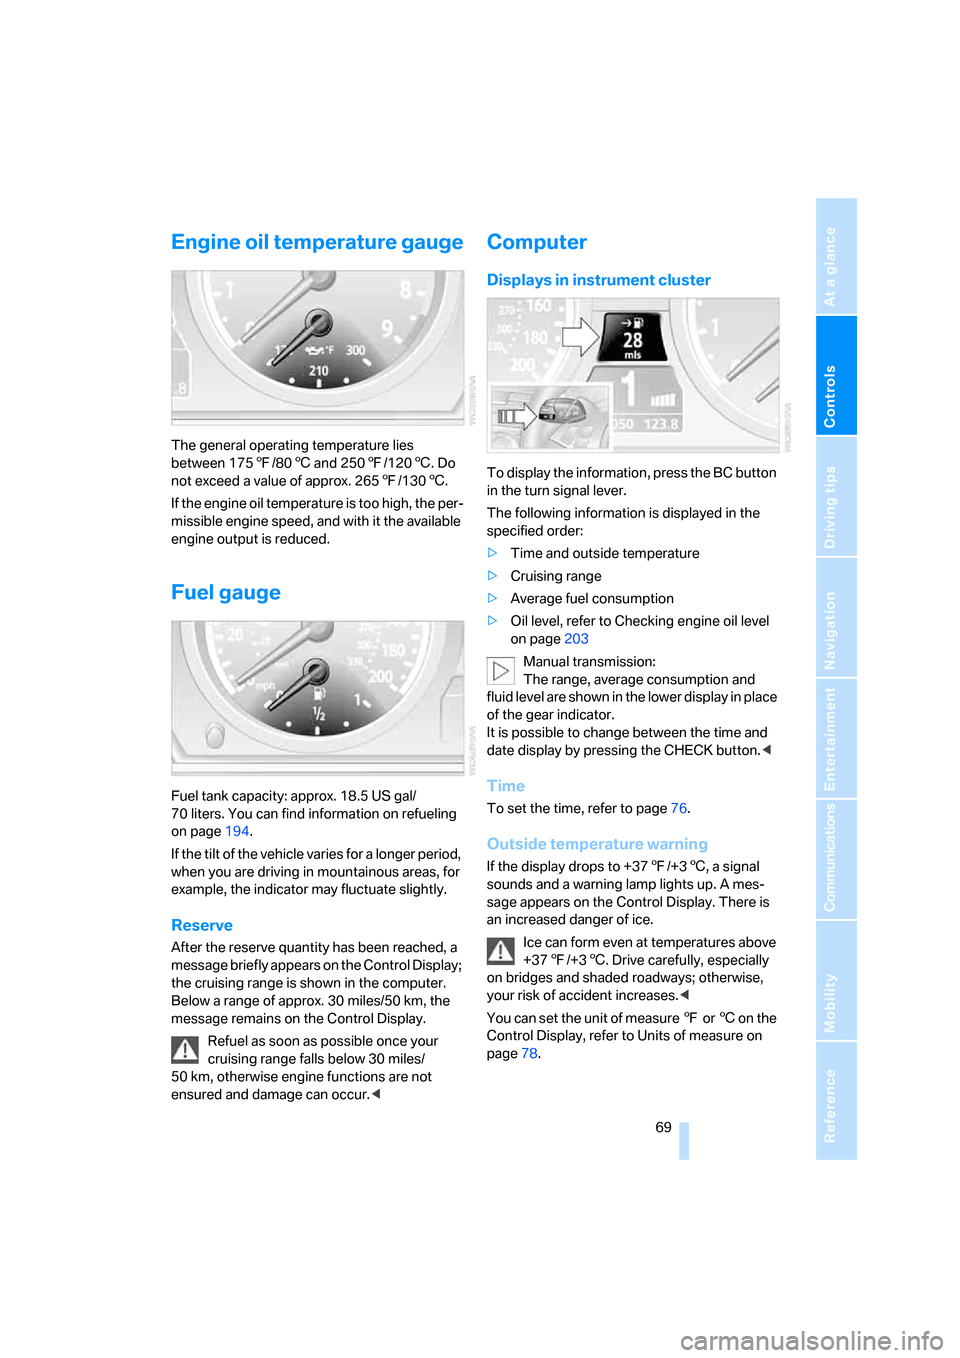
The general operating temperature lies
between 1757/806 and 2507/1206. Do
not exceed a value of approx. 2657/1306.
If the engine oil temperature is too high, the per-
missible engine speed, and with it the available
engine output is reduced.
Fuel gauge
Fuel tank capacity: approx. 18.5 US gal/
70 liters. You can find information on refueling
on page194.
If the tilt of the vehicle varies for a longer period,
when you are driving in mountainous areas, for
example, the indicator may fluctuate slightly.
Reserve
After the reserve quantity has been reached, a
message briefly appears on the Control Display;
the cruising range is shown in the computer.
Below a range of approx. 30 miles/50 km, the
message remains on the Control Display.
Refuel as soon as possible once your
cruising range falls below 30 miles/
50 km, otherwise engine functions are not
ensured and damage can occur.<
Computer
Displays in instrument cluster
To display the information, press the BC button
in the turn signal lever.
The following information is displayed in the
specified order:
>Time and outside temperature
>Cruising range
>Average fuel consumption
>Oil level, refer to Checking engine oil level
on page203
Manual transmission:
The range, average consumption and
fluid level are shown in the lower display in place
of the gear indicator.
It is possible to change between the time and
date display by pressing the CHECK button.<
Time
To set the time, refer to page76.
Outside temperature warning
If the display drops to +377/+36, a signal
sounds and a warning lamp lights up. A mes-
sage appears on the Control Display. There is
an increased danger of ice.
Ice can form even at temperatures above
+377/+36. Drive carefully, especially
on bridges and shaded roadways; otherwise,
your risk of accident increases.<
You can set the unit of measure 7 or 6 on the
Control Display, refer to Units of measure on
page78.
Page 84 of 256
Technology for comfort, convenience and safety
82
Brake assistant
When you apply the brakes rapidly, this system
automatically produces the maximum braking
force boost and thus helps to achieve the short-
est possible braking distance during full brak-
ing. This system exploits all of the benefits pro-
vided by ABS.
Do not reduce the pressure on the brake pedal
for the duration of the full braking.
DSC Dynamic Stability Control
DSC optimizes the vehicle stability and traction.
It also detects unstable driving states such as
understeering and oversteering, and helps
keep the vehicle on course within the physical
limits by reducing the engine output and by
braking at the wheels.
The DSC is operational every time you start the
engine.
The laws of physics cannot be repealed,
even with DSC. An appropriate driving
style always remains the responsibility of the
driver. Do not reduce the additional safety mar-
gin of the system by taking risks.<
Indicator lamp
The indicator lamp goes out shortly
after the engine is started.
The indicator lamp flashes: DSC is con-
trolling the drive forces and brake forces.
The indicator lamp lights up continuously: DSC
is deactivated.
M Dynamic Mode MDM
The M Dynamic Mode is a mode of the DSC
Dynamic Stability Control. It enables driving
with greater longitudinal and lateral accelera-
tion on dry road surfaces, however with limited
vehicle stability. The system does not provide
stabilizing intervention by reducing the engine
output and braking at the wheels until the abso-
lute driving limit is reached. Steering correc-
tions by the driver may also be required in this
driving state.
The M Dynamic Mode is deactivated each time
the engine is started.With the M Dynamic Mode activated, sta-
bilizing interventions are only carried out
to a reduced degree.<
To maintain vehicle stability, drive with
DSC activated and the M Dynamic Mode
deactivated whenever possible.<
Indicator lamp
The indicator lamp goes out shortly
after the engine is started. The indica-
tor lamp lights up continuously:
M Dynamic Mode is activated.
The indicator lamp lights up continuously and
the DSC indicator lamp flashes: the M Dynamic
Mode is active and controls the drive and brak-
ing forces.
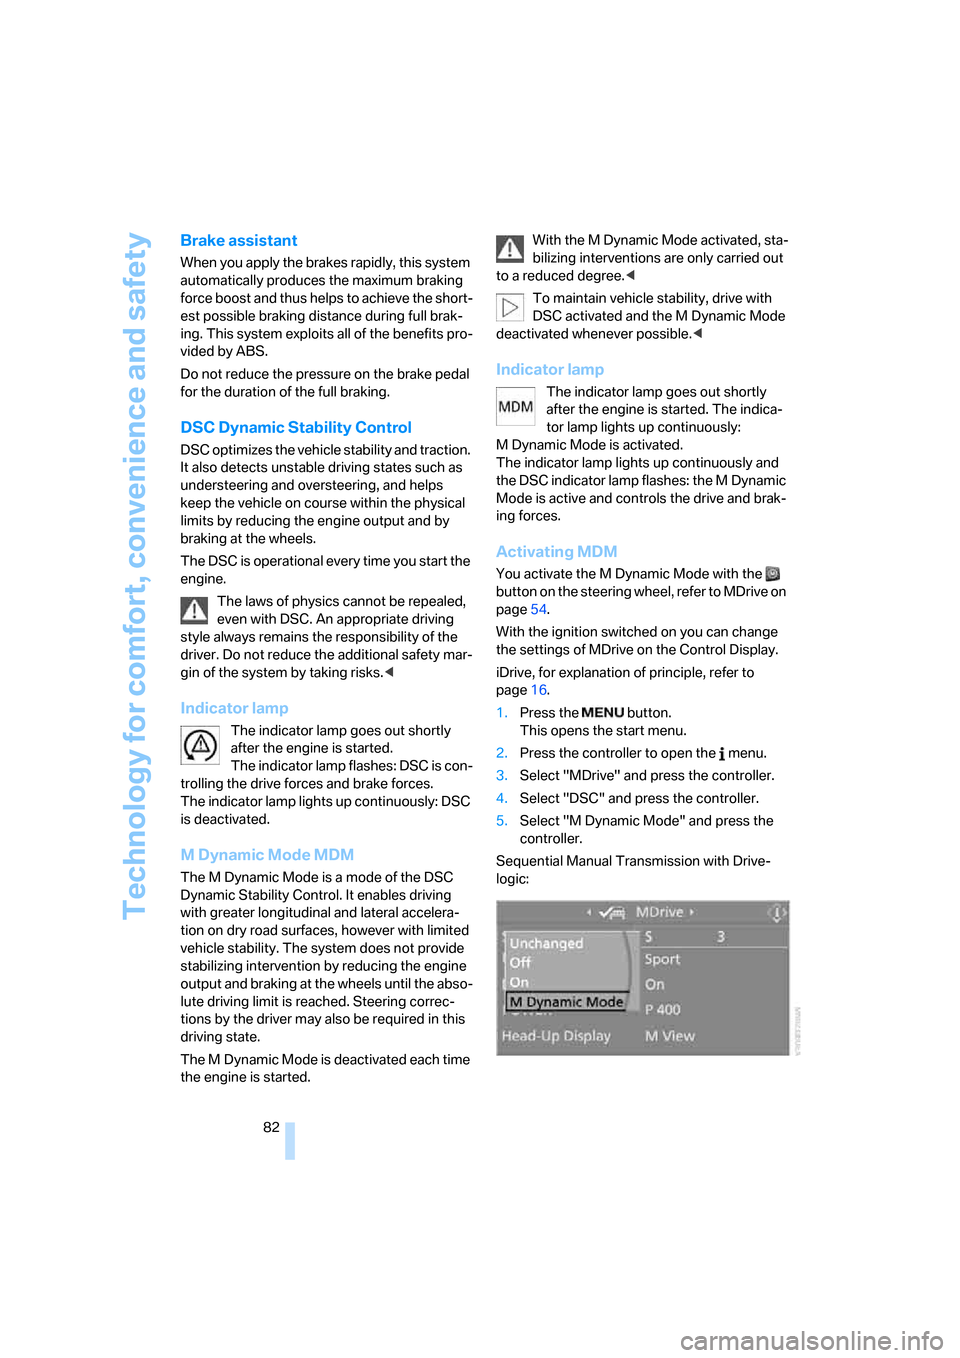
Activating MDM
You activate the M Dynamic Mode with the
button on the steering wheel, refer to MDrive on
page54.
With the ignition switched on you can change
the settings of MDrive on the Control Display.
iDrive, for explanation of principle, refer to
page16.
1.Press the button.
This opens the start menu.
2.Press the controller to open the menu.
3.Select "MDrive" and press the controller.
4.Select "DSC" and press the controller.
5.Select "M Dynamic Mode" and press the
controller.
Sequential Manual Transmission with Drive-
logic:
Page 85 of 256
Controls
83Reference
At a glance
Driving tips
Communications
Navigation
Entertainment
Mobility
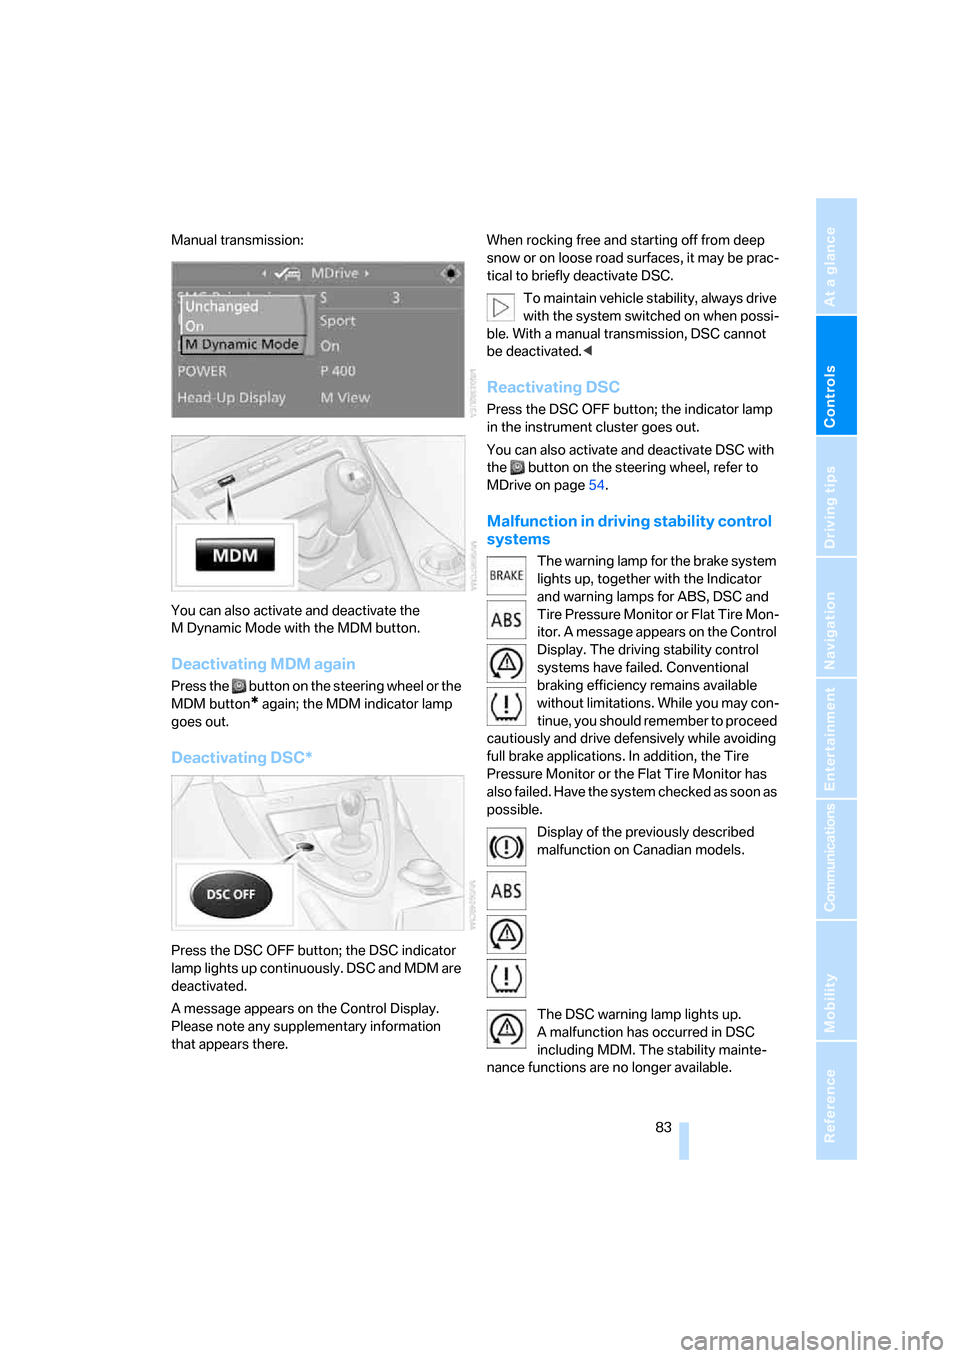
Manual transmission:
You can also activate and deactivate the
M Dynamic Mode with the MDM button.
Deactivating MDM again
Press the button on the steering wheel or the
MDM button
* again; the MDM indicator lamp
goes out.
Deactivating DSC*
Press the DSC OFF button; the DSC indicator
lamp lights up continuously. DSC and MDM are
deactivated.
A message appears on the Control Display.
Please note any supplementary information
that appears there.When rocking free and starting off from deep
snow or on loose road surfaces, it may be prac-
tical to briefly deactivate DSC.
To maintain vehicle stability, always drive
with the system switched on when possi-
ble. With a manual transmission, DSC cannot
be deactivated.<
Reactivating DSC
Press the DSC OFF button; the indicator lamp
in the instrument cluster goes out.
You can also activate and deactivate DSC with
the button on the steering wheel, refer to
MDrive on page54.
Malfunction in driving stability control
systems
The warning lamp for the brake system
lights up, together with the Indicator
and warning lamps for ABS, DSC and
Tire Pressure Monitor or Flat Tire Mon-
itor. A message appears on the Control
Display. The driving stability control
systems have failed. Conventional
braking efficiency remains available
without limitations. While you may con-
tinue, you should remember to proceed
cautiously and drive defensively while avoiding
full brake applications. In addition, the Tire
Pressure Monitor or the Flat Tire Monitor has
also failed. Have the system checked as soon as
possible.
Display of the previously described
malfunction on Canadian models.
The DSC warning lamp lights up.
A malfunction has occurred in DSC
including MDM. The stability mainte-
nance functions are no longer available.