navigation system BMW M6 COUPE 2010 E63 Owner's Manual
[x] Cancel search | Manufacturer: BMW, Model Year: 2010, Model line: M6 COUPE, Model: BMW M6 COUPE 2010 E63Pages: 250, PDF Size: 8.4 MB
Page 5 of 250
Reference
At a glance
Controls
Driving tips
Communications
Navigation
Entertainment
Mobility
Contents
The fastest way to find specific topics is to use
the index, refer to page230.
Using this Owner's Manual
4Notes
7Reporting safety defects
At a glance
10Cockpit
16iDrive
21Letters and numbers
22Voice activation system
Controls
26Opening and closing
43Adjusting
52Transporting children safely
55Driving
65Controls Overview
75Technology for comfort, convenience
and safety
89Lamps
94Climate
100Practical interior accessories
Driving tips
108Things to remember when driving
112 BMW M6 Engineering
Navigation
116Navigation system
117Destination entry
126Destination guidance
132What to do if…
Entertainment
136On/off and tone
139Radio
142Satellite radio
144CD/DVD player and CD changer
151Music collection
156External devices
Communications
162Telephone
174Contacts
176BMW Assist
Mobility
184Refueling
186Wheels and tires
192Under the hood
197Maintenance
199Care
203Replacing components
212Giving and receiving assistance
Reference
220Technical data
224Short commands of voice activation
system
230Everything from A to Z
Page 9 of 250
7Reference
At a glance
Controls
Driving tips
Communications
Navigation
Entertainment
Mobility
Service and warranty
We recommend that you read this publication
thoroughly.
Your BMW is covered by the following warran-
ties:
>New Vehicle Limited Warranty
>Rust Perforation Limited Warranty
>Federal Emissions System Defect Warranty
>Federal Emissions Performance Warranty
>California Emission Control System Limited
Warranty
Detailed information about these warranties is
listed in the Service and Warranty Information
Booklet for US models or in the Warranty and
Service Guide Booklet for Canadian models.
Your vehicle has been specifically adapted and
designed to meet the particular operating con-
ditions and homologation requirements in your
country and continental region in order to
deliver the full driving pleasure while the vehicle
is operated under those conditions. If you wish
to operate your vehicle in another country or
region, you may be required to adapt your vehi-
cle to meet different prevailing operating condi-
tions and homologation requirements. You
should also be aware of any applicable warranty
limitations or exclusions for such country or
region. In such case, please contact Customer
Relations for further information.
Reporting safety defects
For US customers
The following applies only to vehicles owned
and operated in the US.
If you believe that your vehicle has a defect
which could cause a crash or could cause injury
or death, you should immediately inform the
National Highway Traffic Safety Administration
(NHTSA) in addition to notifying BMW of North
America, LLC, P.O. Box 1227, Westwood, New
Jersey 07675-1227, Telephone (800) 831-
1117.
If NHTSA receives similar complaints, it may
open an investigation, and if it finds that a safety
defect exists in a group of vehicles, it may order
a recall and remedy campaign. However,
NHTSA cannot become involved in individual
problems between you, your center, or BMW of
North America, LLC.
To contact NHTSA, you may call the Vehicle
Safety Hotline toll-free at 1-888-327-4236
(TTY: 1-800-424-9153); go to
http://www.safercar.gov; or write to: Adminis-
trator, NHTSA, 400 Seventh Street, SW.,
Washington, DC 20590. You can also obtain
other information about motor vehicle safety
from http://www.safercar.gov
For Canadian customers
Canadian customers who wish to report a
safety-related defect to Transport Canada,
Defect Investigations and Recalls, may call
1-800-333-0510 toll-free from anywhere in
Canada or 1-613-993-9851 from the Ottawa
region and from other countries, or contact
Transport Canada by mail at: Transport Can-
ada, ASFAD, Place de Ville, Tower C,
330 Sparks Street, Ottawa, ON, K1A 0N5.
You can also obtain other information about
motor vehicle safety from http://www.tc.gc.ca
Page 13 of 250
At a glance
11Reference
Controls
Driving tips
Communications
Navigation
Entertainment
Mobility
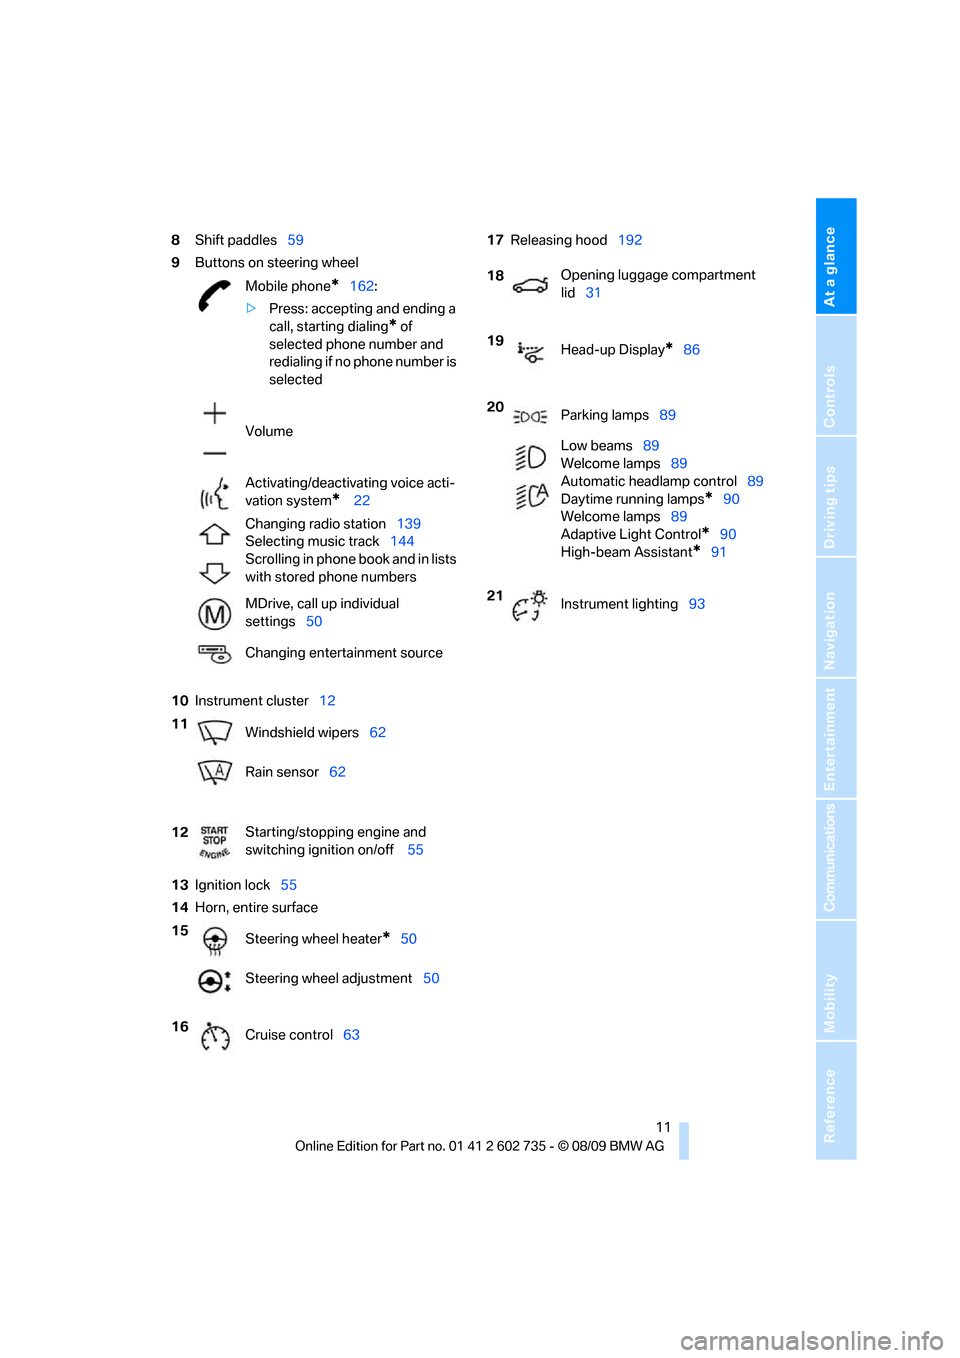
8Shift paddles59
9Buttons on steering wheel
10Instrument cluster12
13Ignition lock55
14Horn, entire surface17Releasing hood192
Mobile phone
*162:
>Press: accepting and ending a
call, starting dialing
* of
selected phone number and
redialing if no phone number is
selected
Volume
Activating/deactivating voice acti-
vation system
* 22
Changing radio station139
Selecting music track144
Scrolling in phone book and in lists
with stored phone numbers
MDrive, call up individual
settings50
Changing entertainment source
11
Windshield wipers62
Rain sensor62
12Starting/stopping engine and
switching ignition on/off 55
15
Steering wheel heater
*50
Steering wheel adjustment50
16
Cruise control63
18Opening luggage compartment
lid31
19
Head-up Display
*86
20
Parking lamps89
Low beams89
Welcome lamps89
Automatic headlamp control89
Daytime running lamps
*90
Welcome lamps89
Adaptive Light Control
*90
High-beam Assistant
*91
21
Instrument lighting93
Page 15 of 250
At a glance
13Reference
Controls
Driving tips
Communications
Navigation
Entertainment
Mobility
Indicator and warning lamps
The concept
The indicator and warning lamps can light up in
different combinations and colors.
Some lamps are tested for proper function by
briefly lighting up during starting of the engine
or when the ignition is switched on.
Explanatory text messages
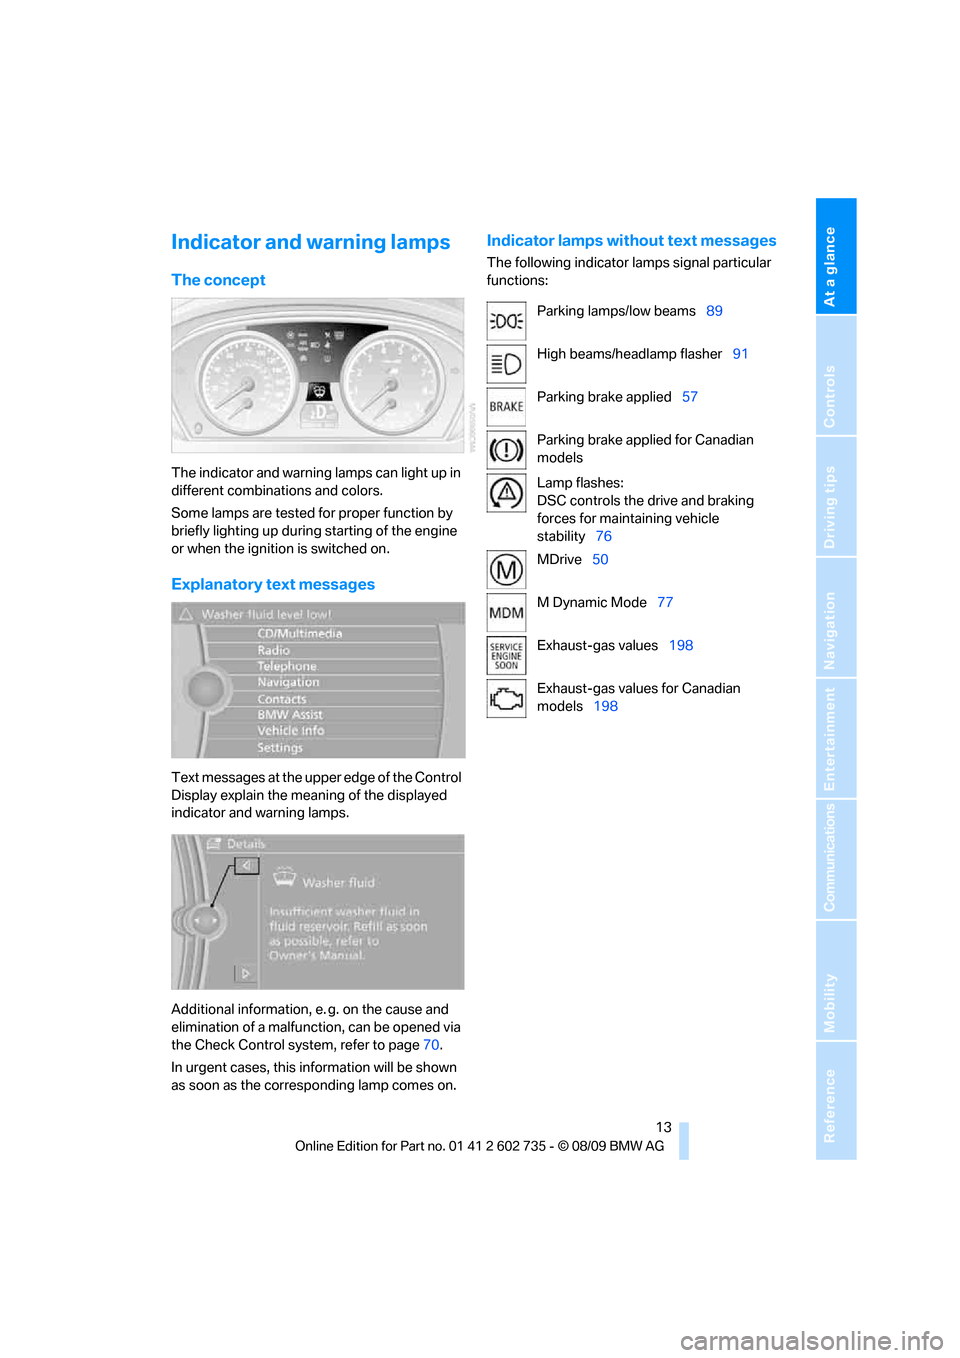
Text messages at the upper edge of the Control
Display explain the meaning of the displayed
indicator and warning lamps.
Additional information, e. g. on the cause and
elimination of a malfunction, can be opened via
the Check Control system, refer to page70.
In urgent cases, this information will be shown
as soon as the corresponding lamp comes on.
Indicator lamps without text messages
The following indicator lamps signal particular
functions:
Parking lamps/low beams89
High beams/headlamp flasher91
Parking brake applied57
Parking brake applied for Canadian
models
Lamp flashes:
DSC controls the drive and braking
forces for maintaining vehicle
stability76
MDrive50
M Dynamic Mode77
Exhaust-gas values198
Exhaust-gas values for Canadian
models198
Page 17 of 250
At a glance
15Reference
Controls
Driving tips
Communications
Navigation
Entertainment
Mobility
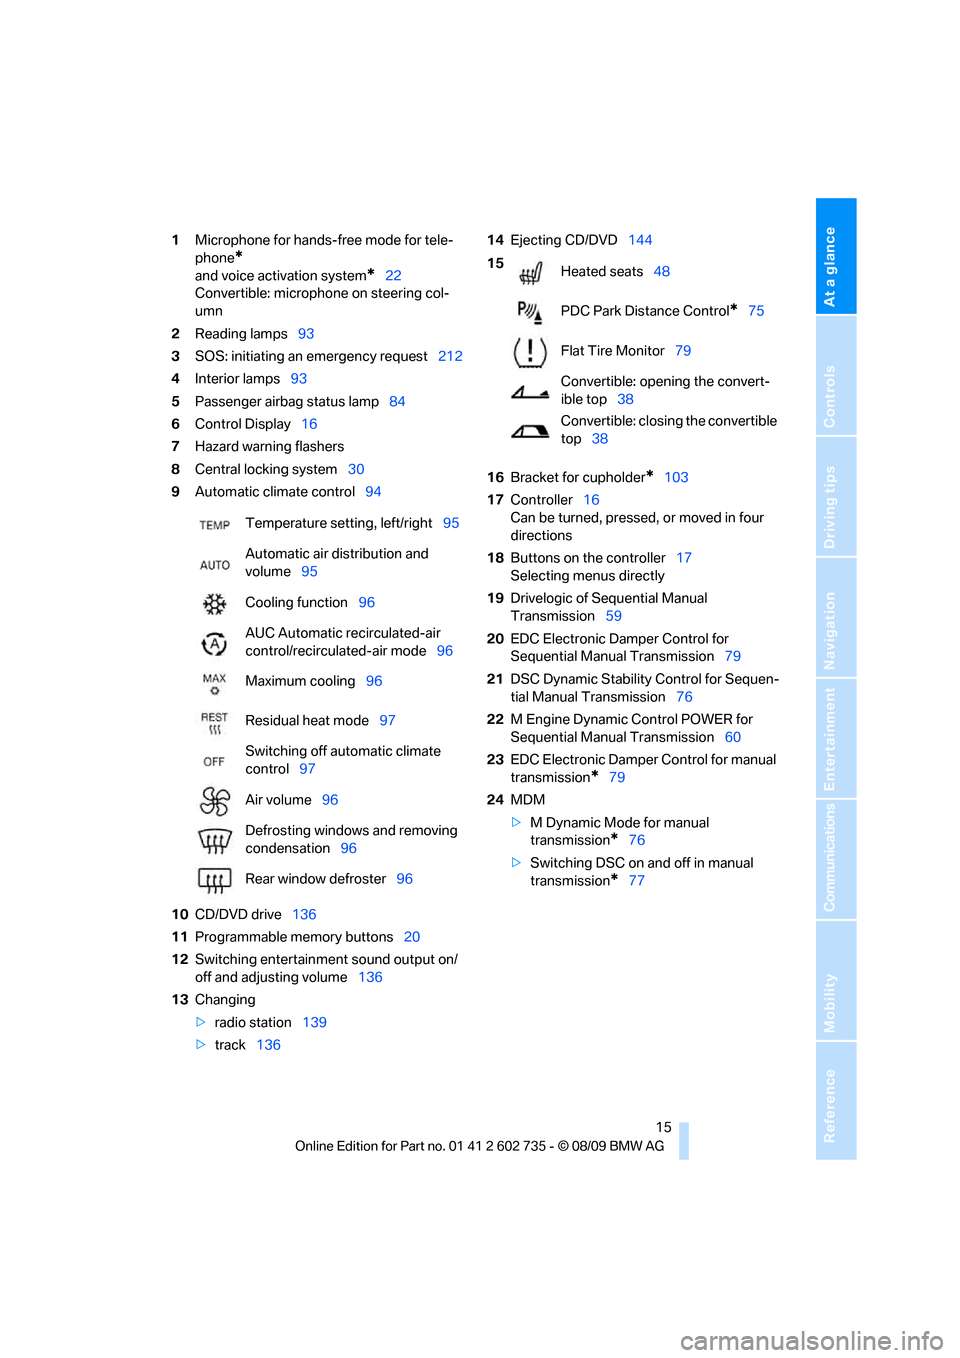
1Microphone for hands-free mode for tele-
phone
*
and voice activation system*22
Convertible: microphone on steering col-
umn
2Reading lamps93
3SOS: initiating
an emergency request212
4Interior lamps93
5Passenger airbag status lamp84
6Control Display16
7Hazard warning flashers
8Central locking system30
9Automatic climate control94
10CD/DVD drive136
11Programmable memory buttons20
12Switching entertainment sound output on/
off and adjusting volume136
13Changing
>radio station139
>track13614Ejecting CD/DVD144
16Bracket for cupholder
*103
17Controller16
Can be turned, pressed, or moved in four
directions
18Buttons on the controller17
Selecting menus directly
19Drivelogic of Sequential Manual
Transmission59
20EDC Electronic Damper Control for
Sequential Manual Transmission79
21DSC Dynamic Stability Control for Sequen-
tial Manual Transmission76
22M Engine Dynamic Control POWER for
Sequential Manual Transmission60
23EDC Electronic Damper Control for manual
transmission
*79
24MDM
>M Dynamic Mode for manual
transmission
*76
>Switching DSC on and off in manual
transmission
*77 Temperature setting, left/right95
Automatic air distribution and
volume95
Cooling function96
AUC Automatic recirculated-air
control/recirculated-air mode96
Maximum cooling96
Residual heat mode97
Switching off automatic climate
control97
Air volume96
Defrosting windows and removing
condensation96
Rear window defroster96
15
Heated seats48
PDC Park Distance Control
*75
Flat Tire Monitor79
Convertible: opening the convert-
ible top38
Convertible: closing the convertible
top38
Page 21 of 250
At a glance
19Reference
Controls
Driving tips
Communications
Navigation
Entertainment
Mobility
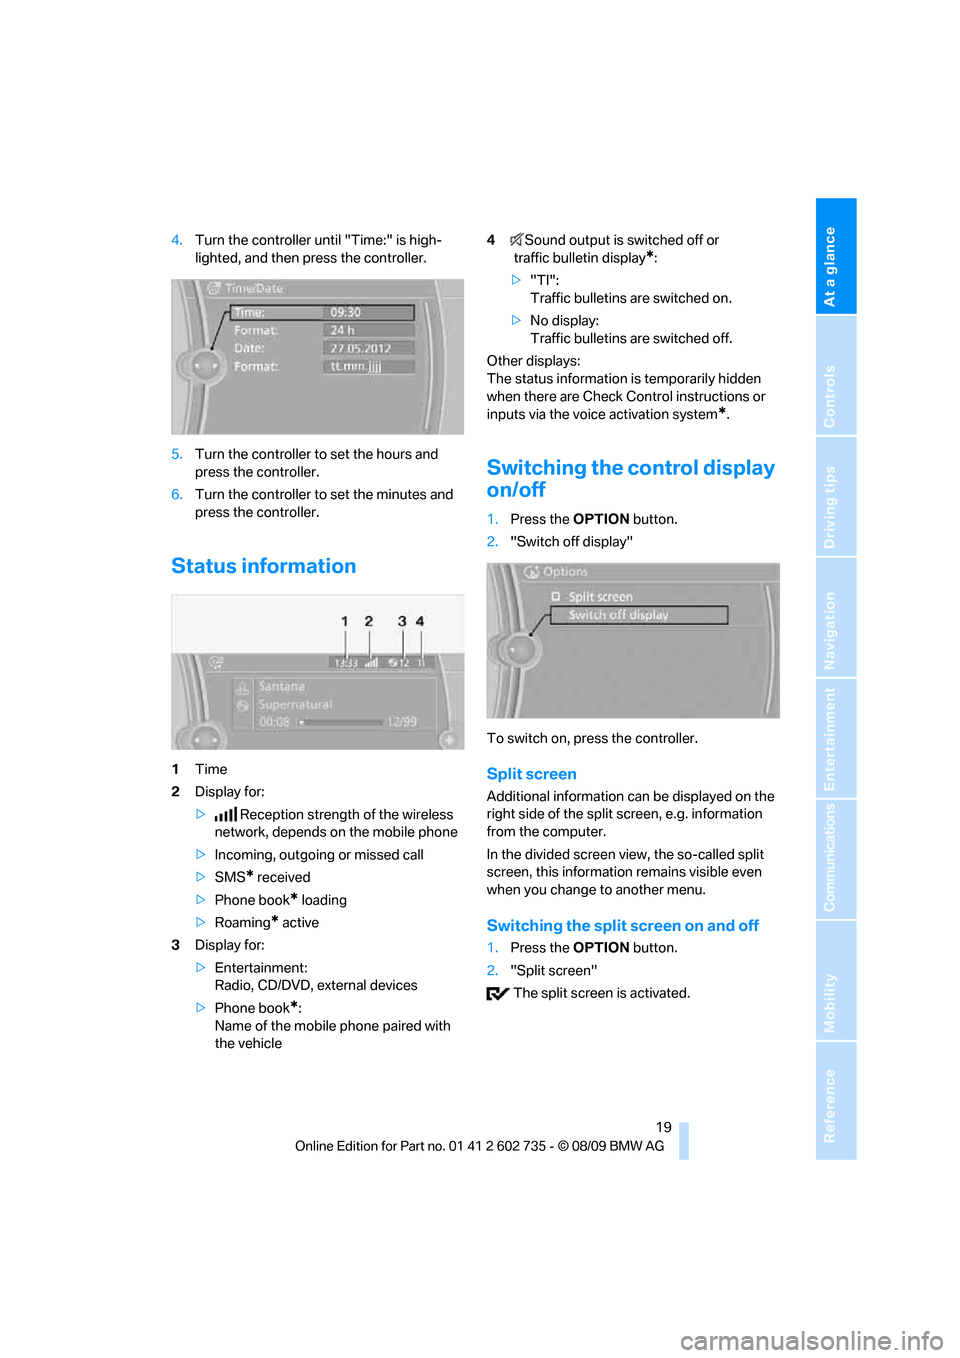
4.Turn the controller until "Time:" is high-
lighted, and then press the controller.
5.Turn the controller to set the hours and
press the controller.
6.Turn the controller to set the minutes and
press the controller.
Status information
1Time
2Display for:
>Reception strength of the wireless
network, depends on the mobile phone
>Incoming, outgoing or missed call
>SMS
* received
>Phone book
* loading
>Roaming
* active
3Display for:
>Entertainment:
Radio, CD/DVD, external devices
>Phone book
*:
Name of the mobile phone paired with
the vehicle4Sound output is switched off or
traffic bulletin display
*:
>"TI":
Traffic bulletins are switched on.
>No display:
Traffic bulletins are switched off.
Other displays:
The status information is temporarily hidden
when there are Check Control instructions or
inputs via the voice activation system
*.
Switching the control display
on/off
1.Press the OPTION button.
2."Switch off display"
To switch on, press the controller.
Split screen
Additional information can be displayed on the
right side of the split screen, e.g. information
from the computer.
In the divided screen view, the so-called split
screen, this information remains visible even
when you change to another menu.
Switching the split screen on and off
1.Press the OPTION button.
2."Split screen"
The split screen is activated.
Page 25 of 250
At a glance
23Reference
Controls
Driving tips
Communications
Navigation
Entertainment
Mobility
In dialogs that call for a text of your choice, the
procedure can only be canceled using the but-
ton on the steering wheel.
Possible commands
The commands available in each case depend
on the menu item selected on the Control Dis-
play.
To have the possible commands read aloud:
For example, if "CD/DVD" is selected, the com-
mands for operating CD/Multimedia are read
aloud.
Calling up functions immediately via
short commands
Short commands enable you to perform certain
functions immediately, irrespective of which
menu item is selected, refer to page224.
An example: selecting the track of a CD
1.Switch on Entertainment sound output if
necessary.
2.Press the button on the steering wheel.
Setting the voice dialog
You can set whether the system should use the
standard dialog or a shorter variant. In the
shorter variant of the voice dialog, the prompts
and responses from the system are abbrevi-
ated.
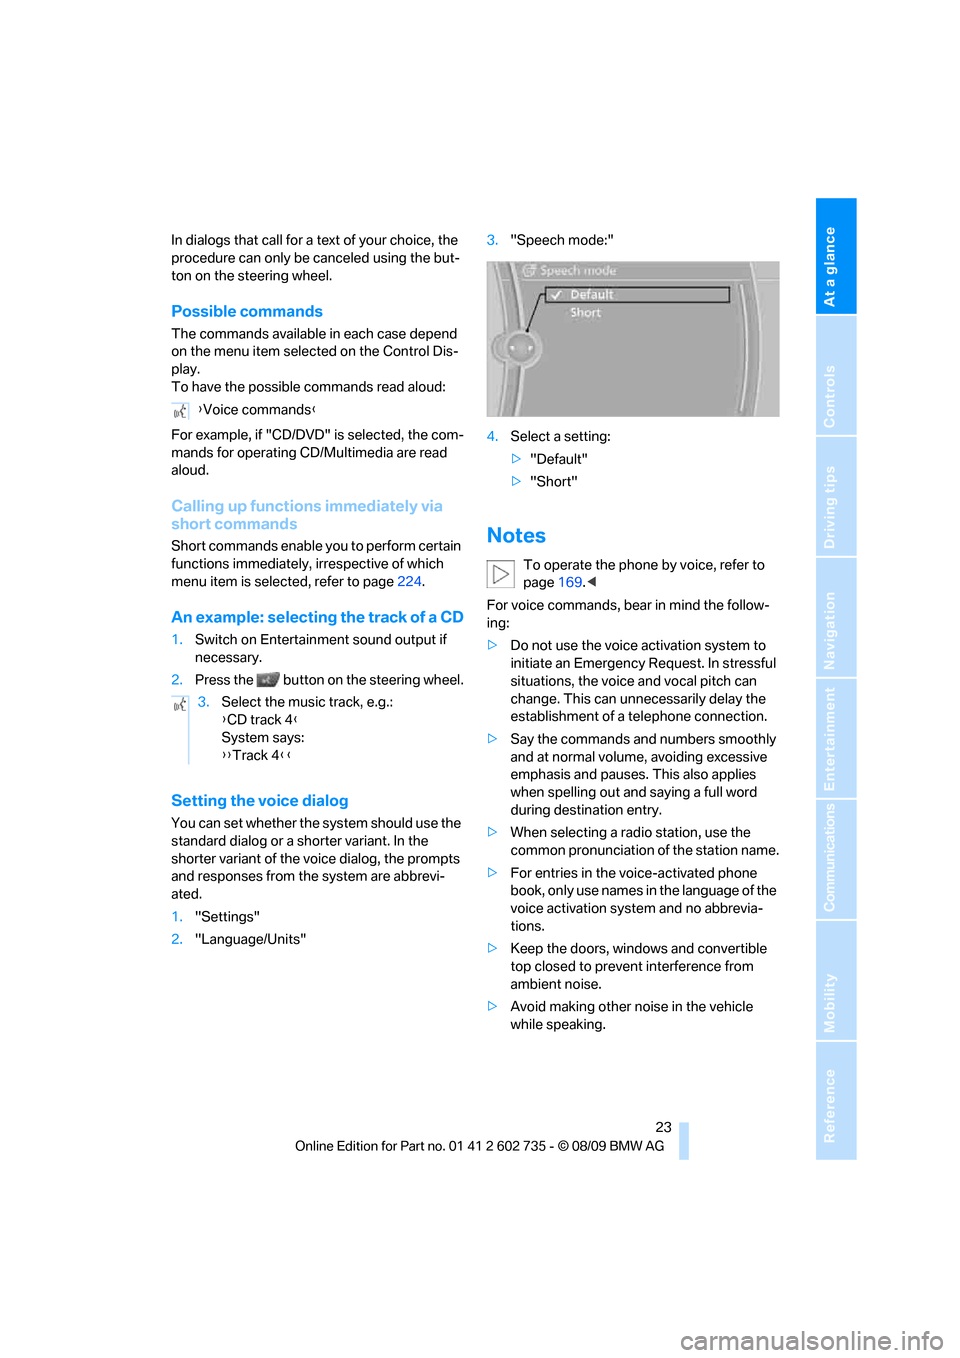
1."Settings"
2."Language/Units"3."Speech mode:"
4.Select a setting:
>"Default"
>"Short"
Notes
To operate the phone by voice, refer to
page169.<
For voice commands, bear in mind the follow-
ing:
>Do not use the voice activation system to
initiate an Emergency Request. In stressful
situations, the voice and vocal pitch can
change. This can unnecessarily delay the
establishment of a telephone connection.
>Say the commands and numbers smoothly
and at normal volume, avoiding excessive
emphasis and pauses. This also applies
when spelling out and saying a full word
during destination entry.
>When selecting a radio station, use the
common pronunciation of the station name.
>For entries in the voice-activated phone
book, only use names in the language of the
voice activation system and no abbrevia-
tions.
>Keep the doors, windows and convertible
top closed to prevent interference from
ambient noise.
>Avoid making other noise in the vehicle
while speaking. {Voice commands}
3.Select the music track, e.g.:
{CD track 4}
System says:
{{Track 4}}
Page 29 of 250
Controls
27Reference
At a glance
Driving tips
Communications
Navigation
Entertainment
Mobility
the vehicle is unlocked, the corresponding
remote control is detected and the settings
stored for it are called up and carried out.
This means that you will always find your BMW
set to your own personal settings even if
another person with his/her own remote control
and settings has used the vehicle since the last
time you drove it. The individual settings are
stored for a maximum of four remote controls,
for two with Comfort Access
*.
Personal Profile settings
Details on the settings are provided on the
specified pages.
>Behavior of the central locking system
when unlocking vehicle, refer to page28
>Automatic locking of the vehicle, refer to
page30
>Displays on Control Display:
>12h/24h clock mode, refer to page70
>Date format, refer to page70
>Brightness of the Control Display, refer
to page74
>Units of measure for consumption,
route/distances, temperature and pres-
sure, refer to page68
>Language on the Control Display, refer
to page73
>Lighting settings:
>Triple turn signal activation, refer to
page61
>Welcome lamps, refer to page89
>Pathway lighting, refer to page90
>Daytime running lamps
*, refer to
page90
>High-beam Assistant
*, refer to page91
>Drivelogic driving program in the Sequential
mode, refer to page59
>Individual settings for MDrive, refer to
page50
>PDC Park Distance Control
*: optical warn-
ing, refer to page75>Head-up Display
*: selection and brightness
of display, refer to page86
>Automatic climate control: for AUTO pro-
gram and intensity, cooling function, and
automatic recirculated air control/recircu-
lated air mode, temperature, air distribution,
temperature in the upper body region, refer
to page95
>Navigation system
*: voice instructions for
destination guidance, refer to page127
In addition, the following, most recently
selected settings are recalled during unlocking:
>Programmable memory buttons: selecting
stored functions, refer to page20
>Driver's seat, exterior-mirror and steering-
wheel position, refer to page45
>Audio sources: volume and tone settings,
refer to page136
>Radio: display of stored stations, refer to
page141
>Phone: adjusting volume, refer to page165
Central locking system
The concept
The central locking system functions when the
driver's door is closed.
The system simultaneously engages and
releases the locks on the following:
>Doors
>Compartment in the front center console
>Luggage compartment lid
>Fuel filler flap
Operating from outside
>Via the remote control
>Using door lock
>With Comfort Access
* via the door handles
These actions operate the anti-theft system
* at
the same time. It prevents the doors from being
unlocked using the lock buttons or door han-
dles. The interior lamps and the courtesy
lamps
* are also switched on and off with the
Page 31 of 250
Controls
29Reference
At a glance
Driving tips
Communications
Navigation
Entertainment
Mobility
Panic mode*
You can trigger the alarm system in case of dan-
ger:
Press the button for at least 3 seconds.
Switching off alarm: press any button.
Opening luggage compartment lid
Press the button for approx. 1 second.
The luggage compartment lid opens, regard-
less of whether it was previously locked or
unlocked.
A previously locked luggage compart-
ment lid is also locked again after closing.
Coupe: during opening, the luggage compart-
ment lid pivots back and up. Make sure that
adequate clearance is available before open-
ing.<
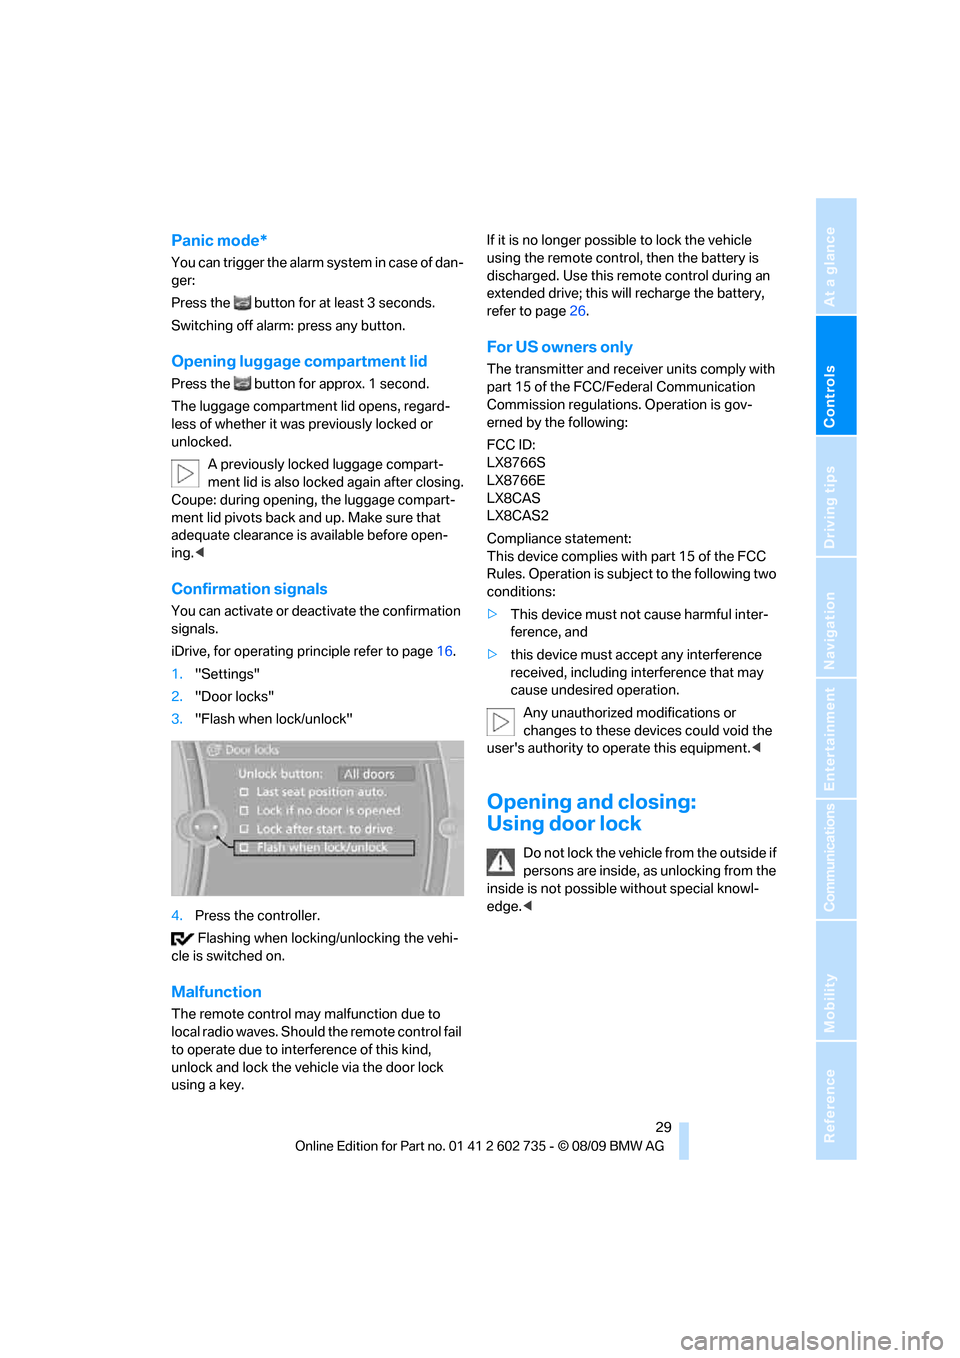
Confirmation signals
You can activate or deactivate the confirmation
signals.
iDrive, for operating principle refer to page16.
1."Settings"
2."Door locks"
3."Flash when lock/unlock"
4.Press the controller.
Flashing when locking/unlocking the vehi-
cle is switched on.
Malfunction
The remote control may malfunction due to
local radio waves. Should the remote control fail
to operate due to interference of this kind,
unlock and lock the vehicle via the door lock
using a key.If it is no longer possible to lock the vehicle
using the remote control, then the battery is
discharged. Use this remote control during an
extended drive; this will recharge the battery,
refer to page26.
For US owners only
The transmitter and receiver units comply with
part 15 of the FCC/Federal Communication
Commission regulations. Operation is gov-
erned by the following:
FCC ID:
LX8766S
LX8766E
LX8CAS
LX8CAS2
Compliance statement:
This device complies with part 15 of the FCC
Rules. Operation is subject to the following two
conditions:
>This device must not cause harmful inter-
ference, and
>this device must accept any interference
received, including interference that may
cause undesired operation.
Any unauthorized modifications or
changes to these devices could void the
user's authority to operate this equipment.<
Opening and closing:
Using door lock
Do not lock the vehicle from the outside if
persons are inside, as unlocking from the
inside is not possible without special knowl-
edge.<
Page 33 of 250
Controls
31Reference
At a glance
Driving tips
Communications
Navigation
Entertainment
Mobility
tem and then pull the door handle above the
armrest or
>pull on the door handle of each door twice:
the first time unlocks the door, the second
time opens it.
Locking
>Use the central locking button to lock both
of the doors simultaneously, or
>press down the lock button of a door.
To prevent you from being locked out, the
open driver's door cannot be locked using
the lock button.
Persons or animals left unattended in a
parked vehicle can lock the doors from
the inside. Always take along the remote control
when leaving the vehicle so that the vehicle can
then be opened from the outside.<
Hotel function
The hotel function locks the compartment in
the front center console and the luggage com-
partment lid separately and disconnects them
from the central locking system. If you hand
over the remote control without the integrated
key, refer to page26, e.g. at a hotel, then this
prevents access to the luggage compartment
and to the compartment in the front center con-
sole.
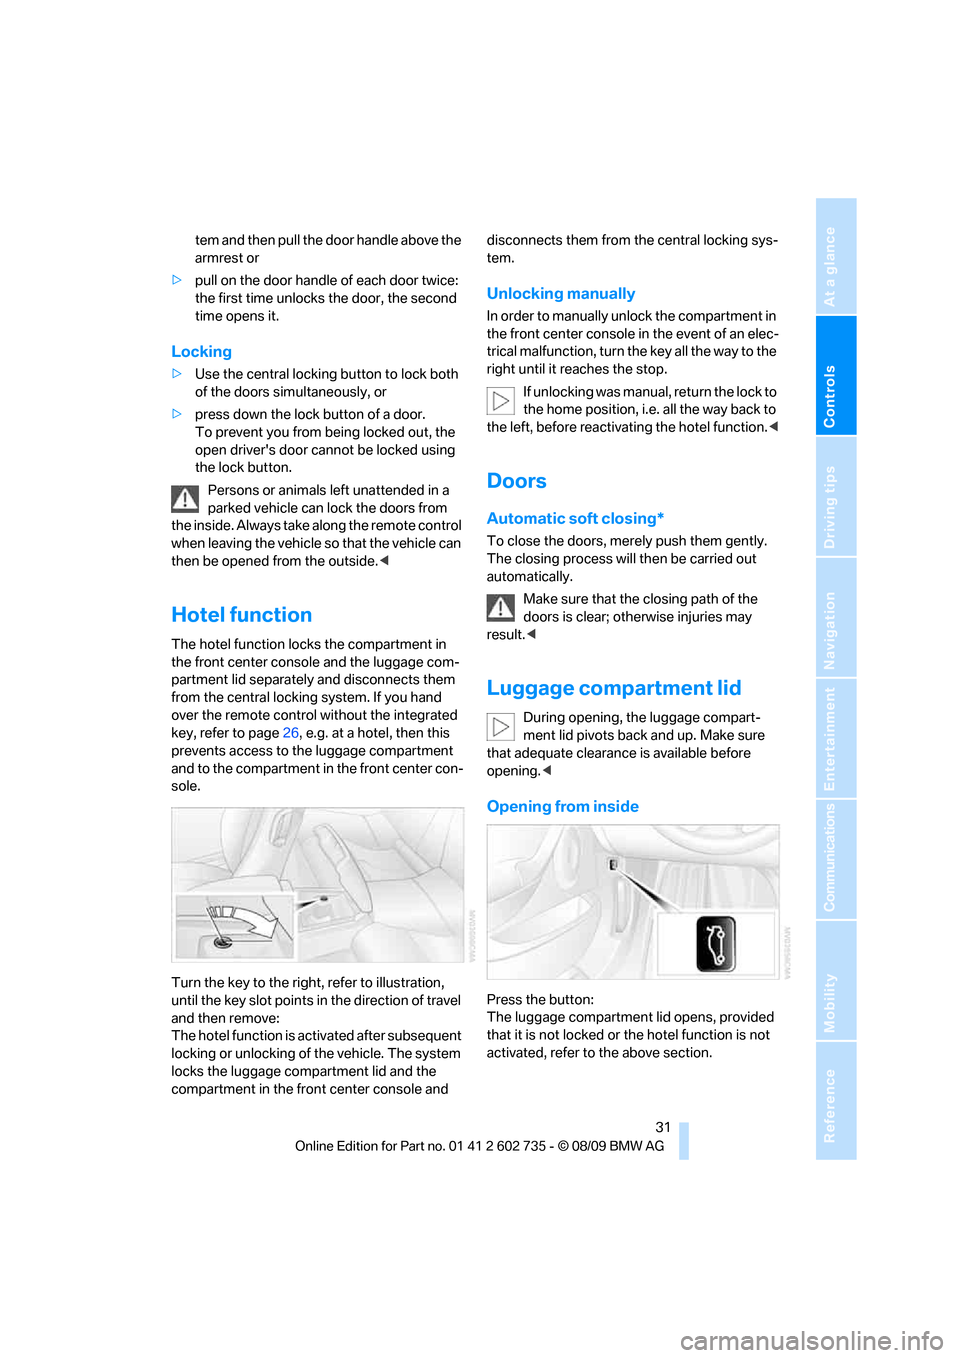
Turn the key to the right, refer to illustration,
until the key slot points in the direction of travel
and then remove:
The hotel function is activated after subsequent
locking or unlocking of the vehicle. The system
locks the luggage compartment lid and the
compartment in the front center console and disconnects them from the central locking sys-
tem.
Unlocking manually
In order to manually unlock the compartment in
the front center console in the event of an elec-
trical malfunction, turn the key all the way to the
right until it reaches the stop.
If unlocking was manual, return the lock to
the home position, i.e. all the way back to
the left, before reactivating the hotel function.<
Doors
Automatic soft closing*
To close the doors, merely push them gently.
The closing process will then be carried out
automatically.
Make sure that the closing path of the
doors is clear; otherwise injuries may
result.<
Luggage compartment lid
During opening, the luggage compart-
ment lid pivots back and up. Make sure
that adequate clearance is available before
opening.<
Opening from inside
Press the button:
The luggage compartment lid opens, provided
that it is not locked or the hotel function is not
activated, refer to the above section.