buttons BMW M6 GRAN COUPE 2014 F06M User Guide
[x] Cancel search | Manufacturer: BMW, Model Year: 2014, Model line: M6 GRAN COUPE, Model: BMW M6 GRAN COUPE 2014 F06MPages: 226, PDF Size: 5.12 MB
Page 46 of 226
Locking
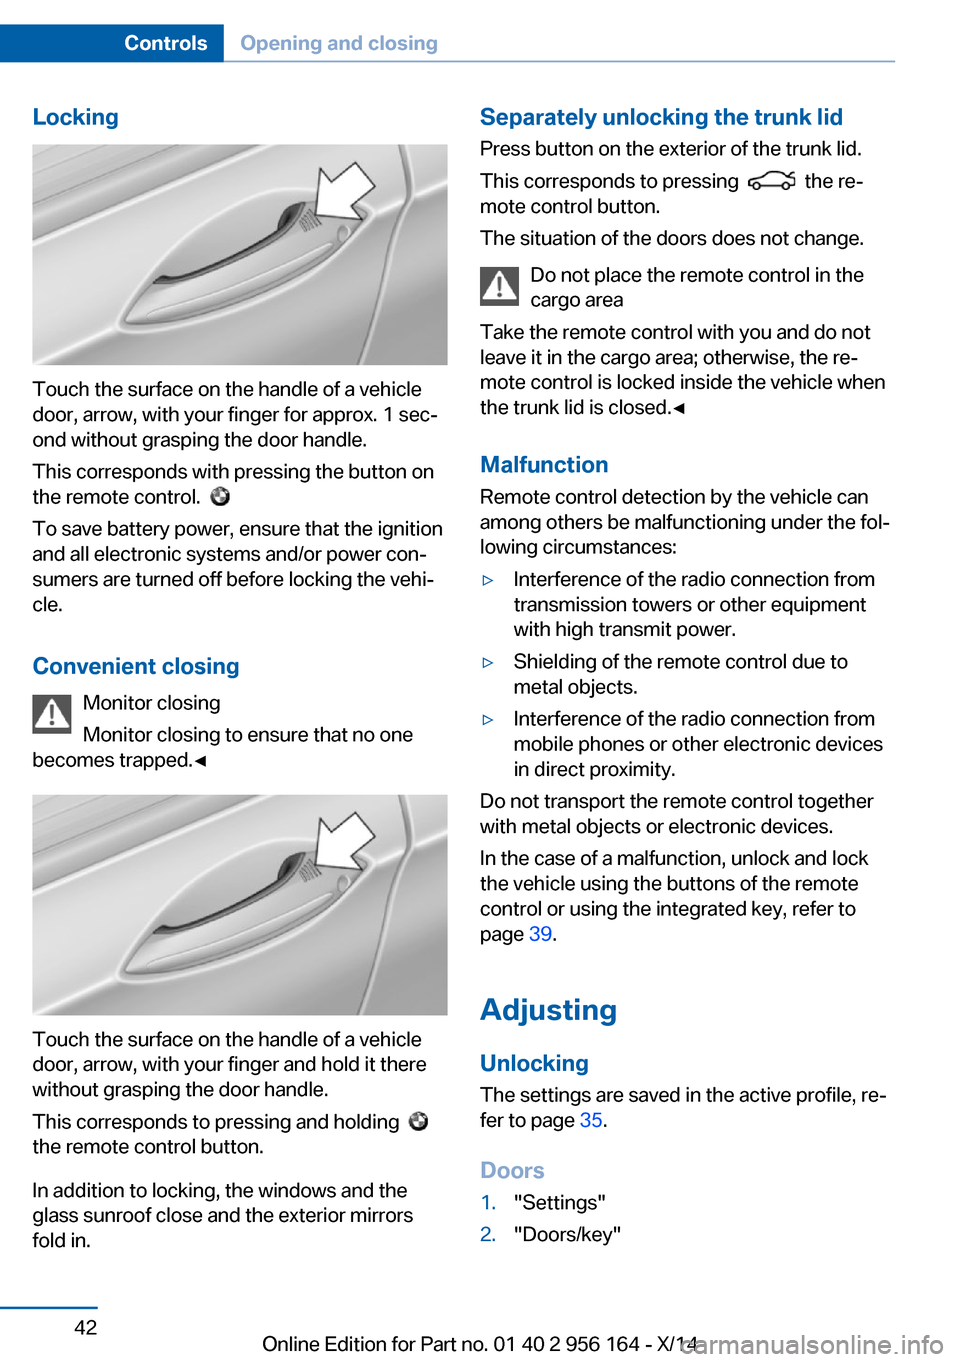
Touch the surface on the handle of a vehicle
door, arrow, with your finger for approx. 1 sec‐
ond without grasping the door handle.
This corresponds with pressing the button on
the remote control.
To save battery power, ensure that the ignition
and all electronic systems and/or power con‐
sumers are turned off before locking the vehi‐
cle.
Convenient closing Monitor closing
Monitor closing to ensure that no one
becomes trapped.◀
Touch the surface on the handle of a vehicle
door, arrow, with your finger and hold it there
without grasping the door handle.
This corresponds to pressing and holding
the remote control button.
In addition to locking, the windows and the
glass sunroof close and the exterior mirrors
fold in.
Separately unlocking the trunk lid
Press button on the exterior of the trunk lid.
This corresponds to pressing
the re‐
mote control button.
The situation of the doors does not change.
Do not place the remote control in the
cargo area
Take the remote control with you and do not
leave it in the cargo area; otherwise, the re‐
mote control is locked inside the vehicle when
the trunk lid is closed.◀
Malfunction
Remote control detection by the vehicle can
among others be malfunctioning under the fol‐
lowing circumstances:
▷Interference of the radio connection from
transmission towers or other equipment
with high transmit power.▷Shielding of the remote control due to
metal objects.▷Interference of the radio connection from
mobile phones or other electronic devices
in direct proximity.
Do not transport the remote control together
with metal objects or electronic devices.
In the case of a malfunction, unlock and lock
the vehicle using the buttons of the remote
control or using the integrated key, refer to
page 39.
Adjusting
Unlocking The settings are saved in the active profile, re‐
fer to page 35.
Doors
1."Settings"2."Doors/key"Seite 42ControlsOpening and closing42
Online Edition for Part no. 01 40 2 956 164 - X/14
Page 59 of 226
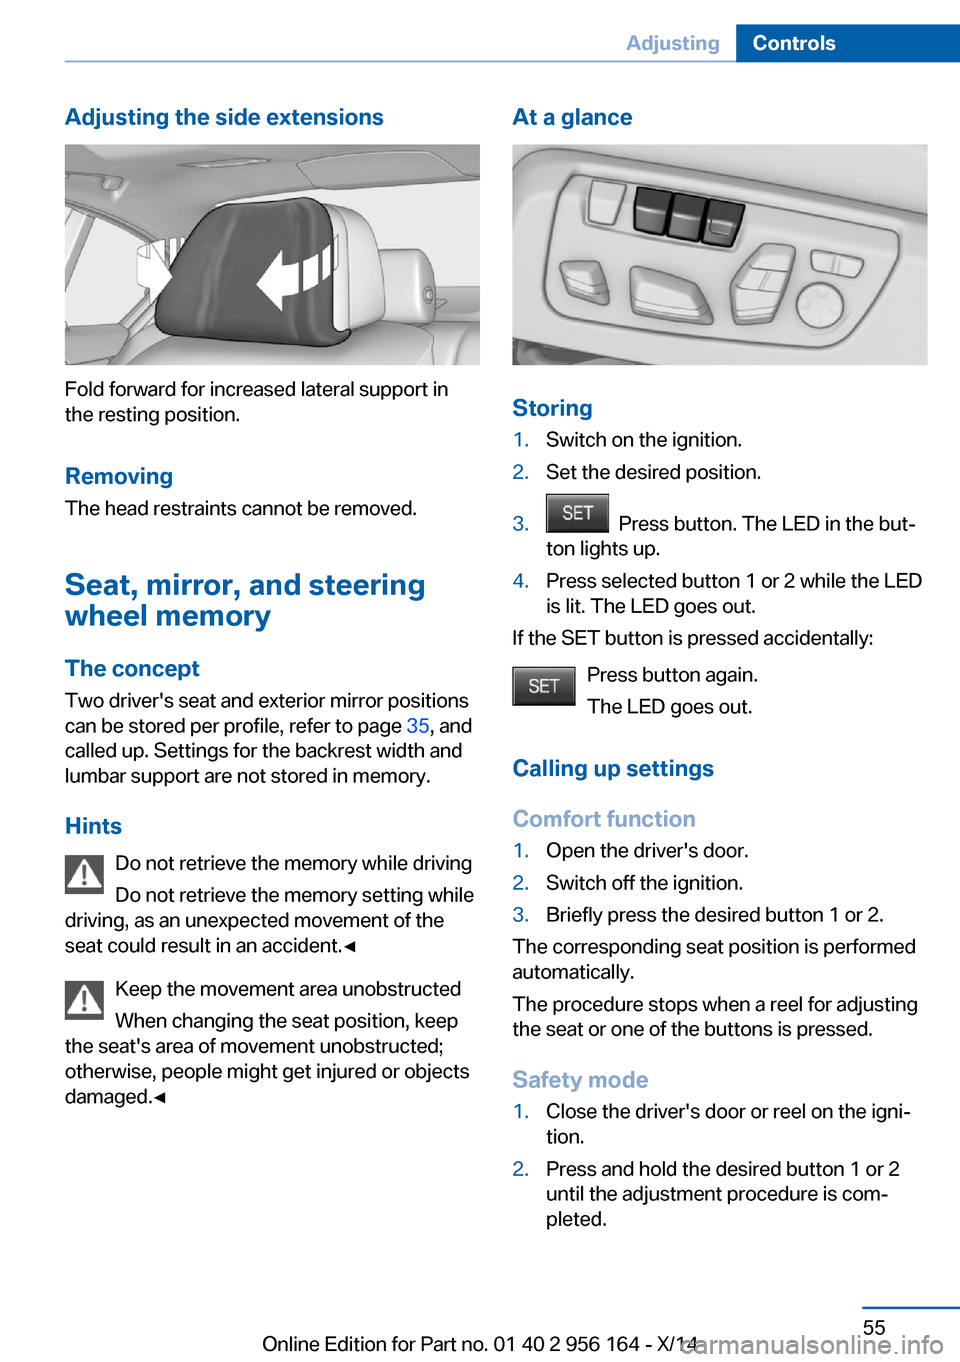
Adjusting the side extensions
Fold forward for increased lateral support in
the resting position.
Removing The head restraints cannot be removed.
Seat, mirror, and steering
wheel memory
The concept
Two driver's seat and exterior mirror positions
can be stored per profile, refer to page 35, and
called up. Settings for the backrest width and
lumbar support are not stored in memory.
Hints Do not retrieve the memory while driving
Do not retrieve the memory setting while
driving, as an unexpected movement of the
seat could result in an accident.◀
Keep the movement area unobstructed
When changing the seat position, keep
the seat's area of movement unobstructed;
otherwise, people might get injured or objects
damaged.◀
At a glance
Storing
1.Switch on the ignition.2.Set the desired position.3. Press button. The LED in the but‐
ton lights up.4.Press selected button 1 or 2 while the LED
is lit. The LED goes out.
If the SET button is pressed accidentally:
Press button again.
The LED goes out.
Calling up settings
Comfort function
1.Open the driver's door.2.Switch off the ignition.3.Briefly press the desired button 1 or 2.
The corresponding seat position is performed
automatically.
The procedure stops when a reel for adjusting
the seat or one of the buttons is pressed.
Safety mode
1.Close the driver's door or reel on the igni‐
tion.2.Press and hold the desired button 1 or 2
until the adjustment procedure is com‐
pleted.Seite 55AdjustingControls55
Online Edition for Part no. 01 40 2 956 164 - X/14
Page 63 of 226
On the Control Display:1."Settings"2."M Drive 1" or "M Drive 2"3.Select the desired setting option.4.Select the desired channel.
Individual settings are stored for the profile
currently in use.
If M Drive is activated, a change in the setting
on the Control Display is immediately adopted.
Activating/deactivating M Drive
Activating Press the corresponding button on the steer‐
ing wheel:
▷Activate M Drive 1.▷Activate M Drive 2.
If DSC OFF or MDM is set in M Drive, a mes‐
sage appears in the instrument cluster. This
message is confirmed by pressing the button
again.
Deactivating Press the corresponding button on the steer‐
ing wheel.
Indicator lights
▷Indicator lamp comes on: corre‐
sponding M Drive is activated.▷Indicator lamp flashes: M Drive
could not be activated. Antilock
braking system ABS or Dynamic
Stability Control DSC directly regu‐
late the driving stability.
Reactivate M Drive if indicator lamp
is no longer flashing.
Hints
If M Drive is activated, individual settings can
also be modified outside of M Drive, e. g. using
the buttons in the center console. This deacti‐
vates M Drive.
To reactivate all settings made for M Drive on
the Control Display, briefly press one of the fol‐
lowing buttons:▷▷
To adopt the changed settings in M Drive,
press and hold the corresponding button.
Resetting M Drive
Individual settings can be reset to default val‐
ues.
1."Settings"2."M Drive 1" or "M Drive 2"3."Reset M Drive 1" or "Reset M Drive 2"4."Yes"
To cancel resetting: "No"
Seite 59AdjustingControls59
Online Edition for Part no. 01 40 2 956 164 - X/14
Page 93 of 226
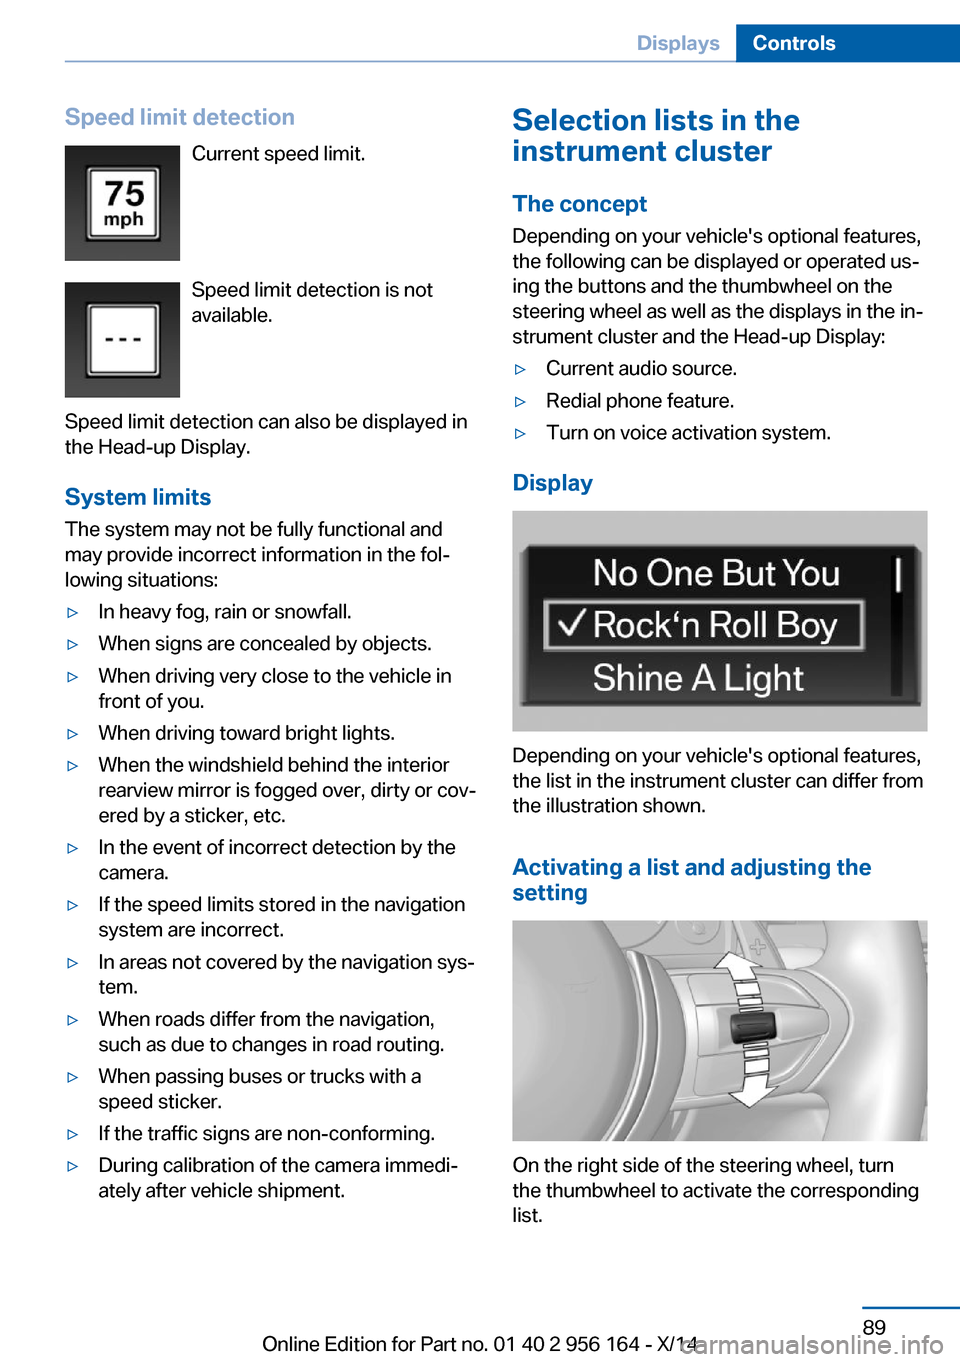
Speed limit detectionCurrent speed limit.
Speed limit detection is not
available.
Speed limit detection can also be displayed in
the Head-up Display.
System limits
The system may not be fully functional and
may provide incorrect information in the fol‐
lowing situations:▷In heavy fog, rain or snowfall.▷When signs are concealed by objects.▷When driving very close to the vehicle in
front of you.▷When driving toward bright lights.▷When the windshield behind the interior
rearview mirror is fogged over, dirty or cov‐
ered by a sticker, etc.▷In the event of incorrect detection by the
camera.▷If the speed limits stored in the navigation
system are incorrect.▷In areas not covered by the navigation sys‐
tem.▷When roads differ from the navigation,
such as due to changes in road routing.▷When passing buses or trucks with a
speed sticker.▷If the traffic signs are non-conforming.▷During calibration of the camera immedi‐
ately after vehicle shipment.Selection lists in the
instrument cluster
The concept Depending on your vehicle's optional features,
the following can be displayed or operated us‐
ing the buttons and the thumbwheel on the
steering wheel as well as the displays in the in‐
strument cluster and the Head-up Display:▷Current audio source.▷Redial phone feature.▷Turn on voice activation system.
Display
Depending on your vehicle's optional features,
the list in the instrument cluster can differ from
the illustration shown.
Activating a list and adjusting the
setting
On the right side of the steering wheel, turn
the thumbwheel to activate the corresponding
list.
Seite 89DisplaysControls89
Online Edition for Part no. 01 40 2 956 164 - X/14
Page 119 of 226
If the vehicle systems detect that the vehicle is
located in a residential area, the animal detec‐
tion is temporarily switched off.
Hints Personal responsibility
Night Vision cannot replace the driver's
personal judgment of the visibility conditions
and the traffic situation. The view ahead and
the actual visibility conditions must always be
the basis on which the vehicle speed is ad‐
justed; otherwise, there is a risk to road
safety.◀
At a glance
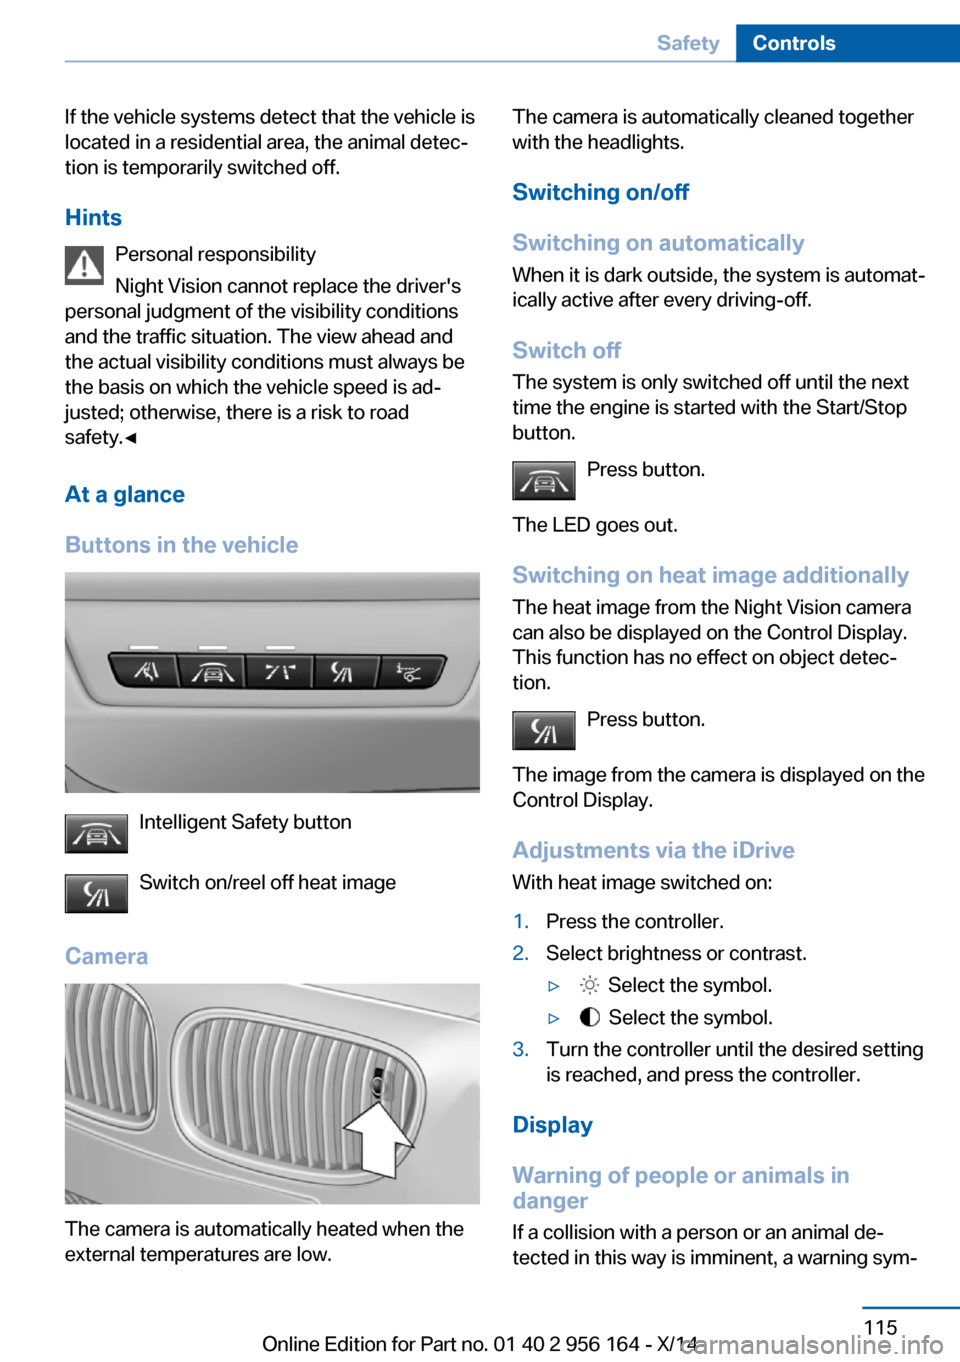
Buttons in the vehicle
Intelligent Safety button
Switch on/reel off heat image
Camera
The camera is automatically heated when the
external temperatures are low.
The camera is automatically cleaned together
with the headlights.
Switching on/off
Switching on automatically When it is dark outside, the system is automat‐
ically active after every driving-off.
Switch off The system is only switched off until the next
time the engine is started with the Start/Stop
button.
Press button.
The LED goes out.
Switching on heat image additionally The heat image from the Night Vision camera
can also be displayed on the Control Display.
This function has no effect on object detec‐
tion.
Press button.
The image from the camera is displayed on the
Control Display.
Adjustments via the iDrive With heat image switched on:1.Press the controller.2.Select brightness or contrast.▷ Select the symbol.▷ Select the symbol.3.Turn the controller until the desired setting
is reached, and press the controller.
Display
Warning of people or animals in
danger
If a collision with a person or an animal de‐
tected in this way is imminent, a warning sym‐
Seite 115SafetyControls115
Online Edition for Part no. 01 40 2 956 164 - X/14
Page 132 of 226
Driving comfortVehicle features and options
This chapter describes all standard, country-
specific and optional features offered with the
series. It also describes features that are not
necessarily available in your car, e. g., due to
the selected options or country versions. This
also applies to safety-related functions and
systems.
Cruise controlThe concept
The system maintains a preset speed via the
buttons on the steering wheel. The system
brakes on downhill gradients if engine braking
is insufficient.
General information Depending on the driving settings, the features
of the cruise control can change in certain
areas.
Hints Unfavorable conditions
Do not use the system if unfavorable
conditions make it impossible to drive at a con‐
stant speed, e.g.:▷On winding roads.▷In heavy traffic.▷On slippery roads, in fog, snow or rain, or
on a loose road surface.
Otherwise, you could lose control of the vehi‐
cle and cause an accident.◀
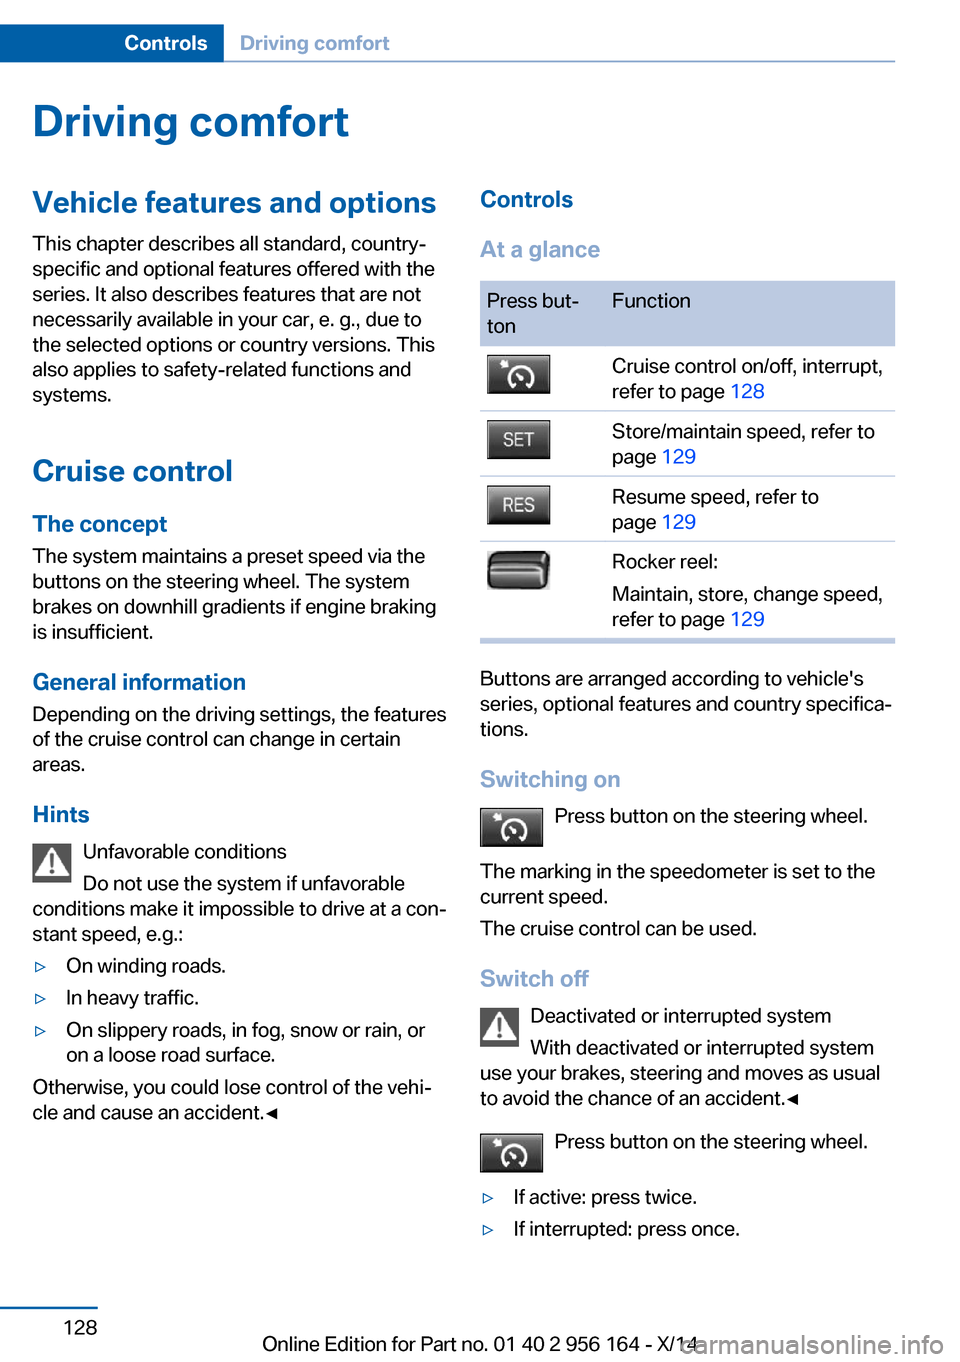
Controls
At a glancePress but‐
tonFunctionCruise control on/off, interrupt,
refer to page 128Store/maintain speed, refer to
page 129Resume speed, refer to
page 129Rocker reel:
Maintain, store, change speed,
refer to page 129
Buttons are arranged according to vehicle's
series, optional features and country specifica‐
tions.
Switching on Press button on the steering wheel.
The marking in the speedometer is set to the
current speed.
The cruise control can be used.
Switch off Deactivated or interrupted system
With deactivated or interrupted system
use your brakes, steering and moves as usual
to avoid the chance of an accident.◀
Press button on the steering wheel.
▷If active: press twice.▷If interrupted: press once.Seite 128ControlsDriving comfort128
Online Edition for Part no. 01 40 2 956 164 - X/14
Page 149 of 226
Interior equipmentVehicle features and optionsThis chapter describes all standard, country-
specific and optional features offered with the
series. It also describes features that are not
necessarily available in your car, e. g., due to
the selected options or country versions. This
also applies to safety-related functions and
systems.
Universal Integrated RemoteControl
The concept
The universal garage door opener can operate
up to 3 functions of remote-controlled sys‐
tems such as garage door drives or lighting
systems. The universal garage door opener re‐
places up to 3 different hand-held transmitters.
To operate the remote control, the buttons on
the interior rearview mirror must be program‐
med with the desired functions. The hand-held
transmitter for the particular system is required
in order to program the remote control.
During programming
During programming and before activat‐
ing a device using the universal garage door
opener, ensure that there are no people, ani‐
mals or objects in the area of the remote-con‐
trolled device; otherwise, there is a risk of in‐
jury or damage.
Also follow the safety instructions of the hand-
held transmitter.◀
Before selling the vehicle, delete the stored
functions for the sake of security.
Compatibility If this symbol is printed on the packag‐
ing or in the instructions of the system
to be controlled, the system is gener‐ally compatible with the universal garage door
opener.
If you have any questions, please contact:▷Your service center.▷www.homelink.com on the Internet.
HomeLink is a registered trademark of Gentex
Corporation.
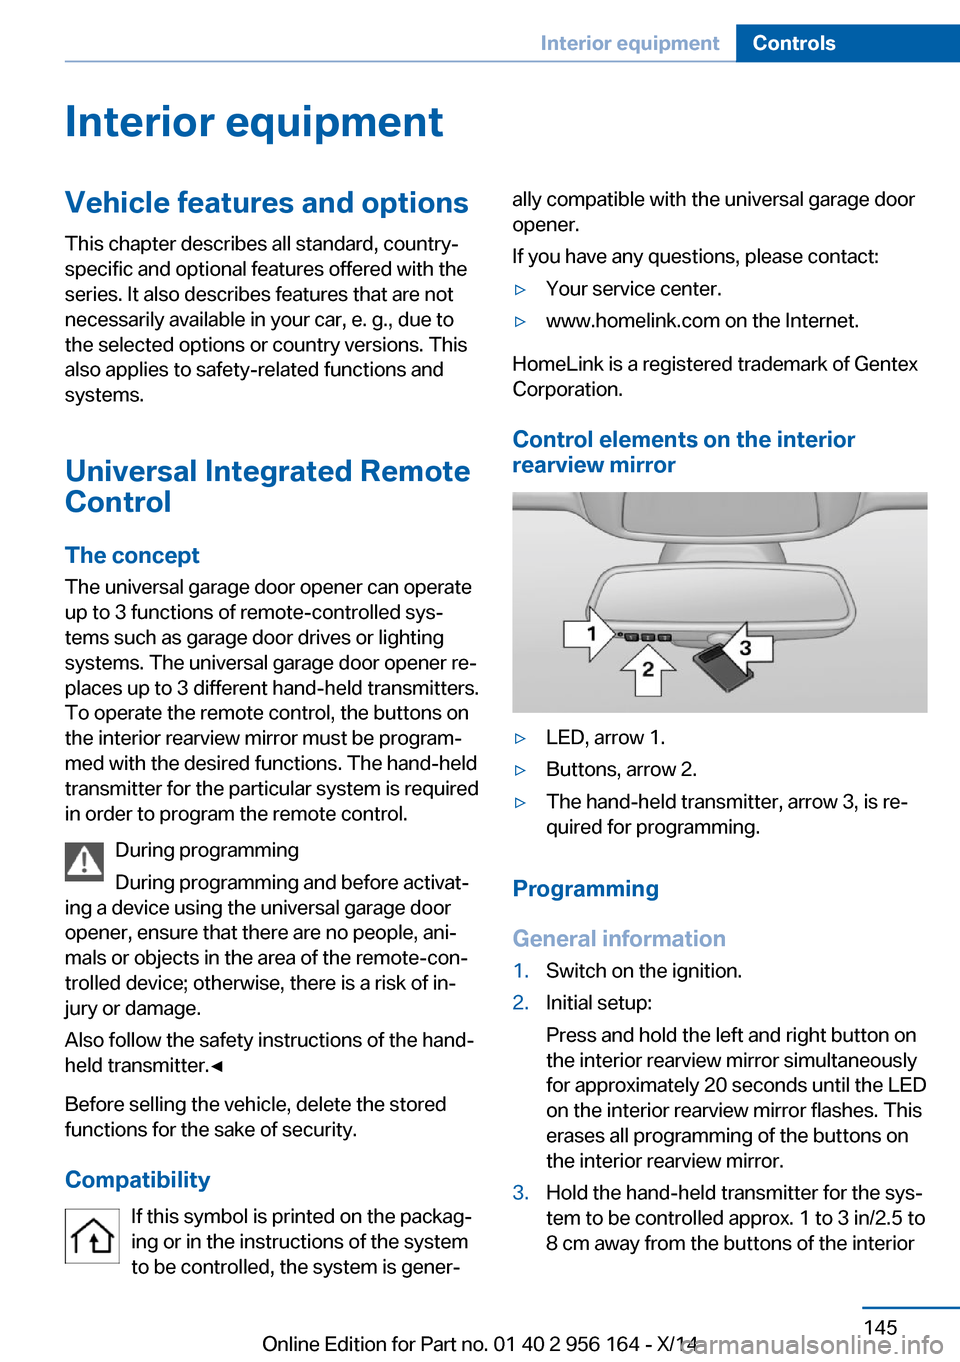
Control elements on the interior
rearview mirror
▷LED, arrow 1.▷Buttons, arrow 2.▷The hand-held transmitter, arrow 3, is re‐
quired for programming.
Programming
General information
1.Switch on the ignition.2.Initial setup:
Press and hold the left and right button on
the interior rearview mirror simultaneously
for approximately 20 seconds until the LED
on the interior rearview mirror flashes. This
erases all programming of the buttons on
the interior rearview mirror.3.Hold the hand-held transmitter for the sys‐
tem to be controlled approx. 1 to 3 in/2.5 to
8 cm away from the buttons of the interiorSeite 145Interior equipmentControls145
Online Edition for Part no. 01 40 2 956 164 - X/14
Page 150 of 226
rearview mirror. The required distance de‐
pends on the manual transmitter.4.Simultaneously press and hold the button
of the desired function on the hand-held
transmitter and the button to be program‐
med on the interior rearview mirror. The
LED on the interior rearview mirror will be‐
gin flashing slowly.5.Release both buttons as soon as the LED
flashes more rapidly. The LED flashing
faster indicates that the button on the inte‐
rior rearview mirror has been programmed.
If the LED does not flash faster after at
least 60 seconds, change the distance be‐
tween the interior rearview mirror and the
hand-held transmitter and repeat the step.
Several more attempts at different distan‐
ces may be necessary. Wait at least
15 seconds between attempts.
Canada: if programming with the hand-
held transmitter was interrupted, hold
down the interior rearview mirror button
and repeatedly press and release the
hand-held transmitter button for 2 sec‐
onds.6.To program other functions on other but‐
tons, repeat steps 3 to 5.
The systems can be controlled using the inte‐
rior rearview mirror buttons.
Special feature of the alternating-
code wireless system
If you are unable to operate the system after
repeated programming, please check if the
system to be controlled features an alternat‐
ing-code system.
Read the system's operating manual, or press
the programmed button on the interior rear‐
view mirror longer. If the LED on the interior
rearview mirror starts flashing rapidly and then
stays lit constantly for 2 seconds, the system
features an alternating-code system. Flashing
and continuous illumination of the LED will re‐
peat for approximately 20 seconds.
For systems with an alternating-code system,
the universal garage door opener and the sys‐
tem also have to be synchronized.
Please read the operating manual to find out how to synchronize the system.
Synchronizing is easier with the aid of a sec‐
ond person.
To synchronize:1.Park the vehicle within range of the re‐
mote-controlled system.2.Program the relevant button on the interior
rearview mirror as described.3.Locate and press the synchronizing button
on the system being programmed. You
have approx. 30 seconds for the next step.4.Hold down the programmed button on the
interior rearview mirror for approximately
3 seconds and then release it. If necessary,
repeat this step up to three times in order
to finish synchronization. Once synchroni‐
zation is complete, the programmed func‐
tion will be carried out.
Reprogramming individual buttons
1.Switch on the ignition.2.Press and hold the interior rearview mirror
button to be programmed.3.As soon as the interior rearview mirror LED
starts flashing slowly, hold the hand-held
transmitter for the system to be controlled
approx. 1 to 3 in/2.5 to 8 cm away from the
buttons of the interior rearview mirror. The
required distance depends on the manual
transmitter.4.Likewise, press and hold the button of the
desired function on the hand-held trans‐
mitter.5.Release both buttons as soon as the inte‐
rior rearview mirror LED flashes more rap‐
idly. The LED flashing faster indicates that
the button on the interior rearview mirror
has been programmed. The system canSeite 146ControlsInterior equipment146
Online Edition for Part no. 01 40 2 956 164 - X/14
Page 157 of 226
▷Do not use force when plugging the con‐
nector into the USB interface.▷Do not connect devices such as fans or
lights to the USB interface.▷Do not connect USB hard drives.▷Do not use the USB interface for recharg‐
ing external devices.
With navigation system Professional
or TV: at a glance
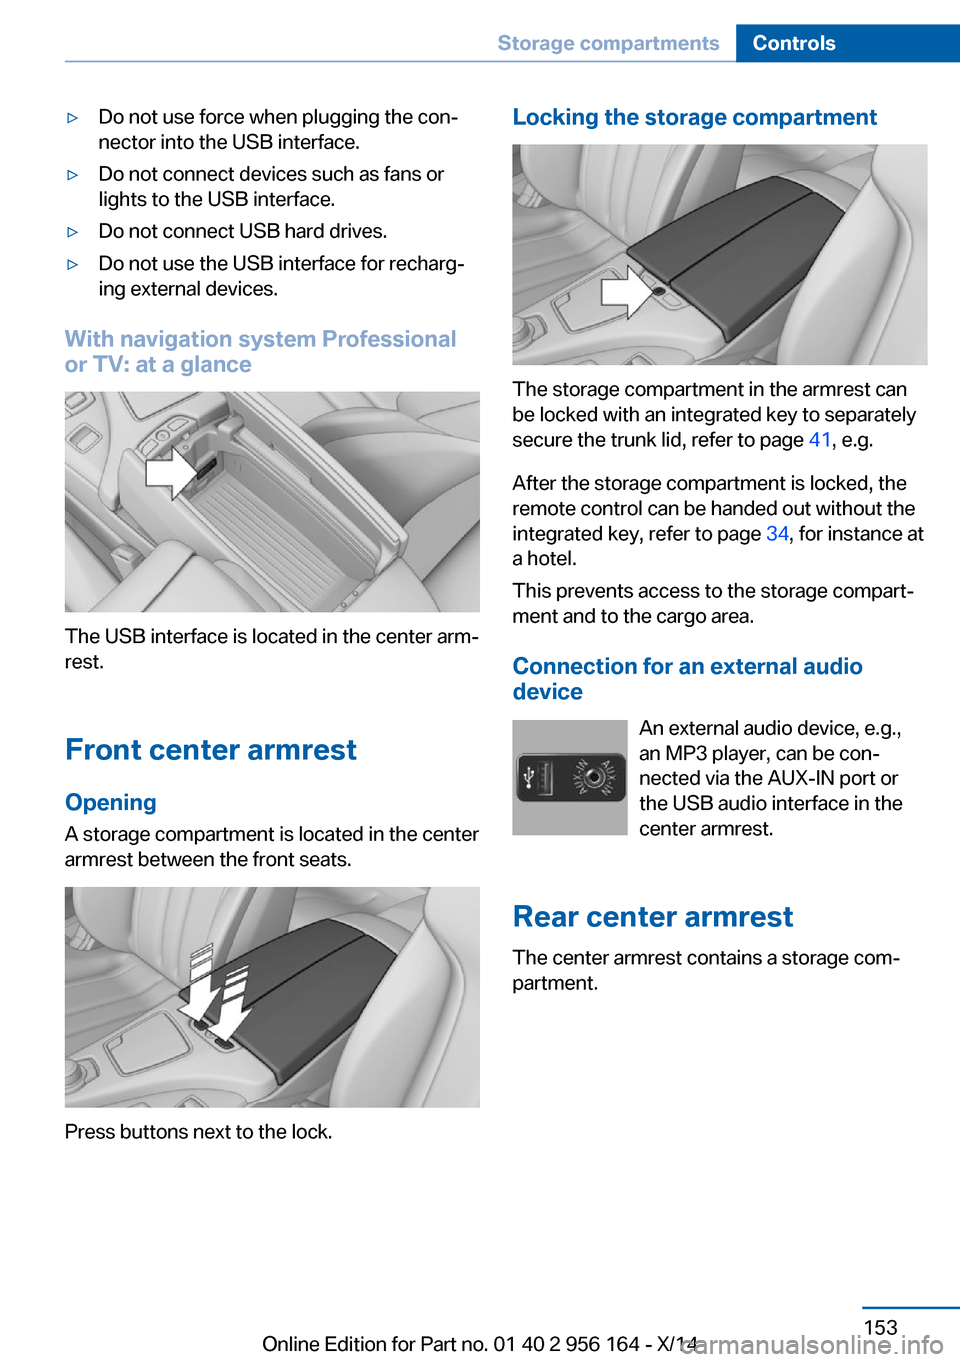
The USB interface is located in the center arm‐
rest.
Front center armrest Opening
A storage compartment is located in the center
armrest between the front seats.
Press buttons next to the lock.
Locking the storage compartment
The storage compartment in the armrest can
be locked with an integrated key to separately
secure the trunk lid, refer to page 41, e.g.
After the storage compartment is locked, the
remote control can be handed out without the
integrated key, refer to page 34, for instance at
a hotel.
This prevents access to the storage compart‐
ment and to the cargo area.
Connection for an external audio
device
An external audio device, e.g.,
an MP3 player, can be con‐
nected via the AUX-IN port or
the USB audio interface in the center armrest.
Rear center armrest The center armrest contains a storage com‐
partment.
Seite 153Storage compartmentsControls153
Online Edition for Part no. 01 40 2 956 164 - X/14
Page 158 of 226
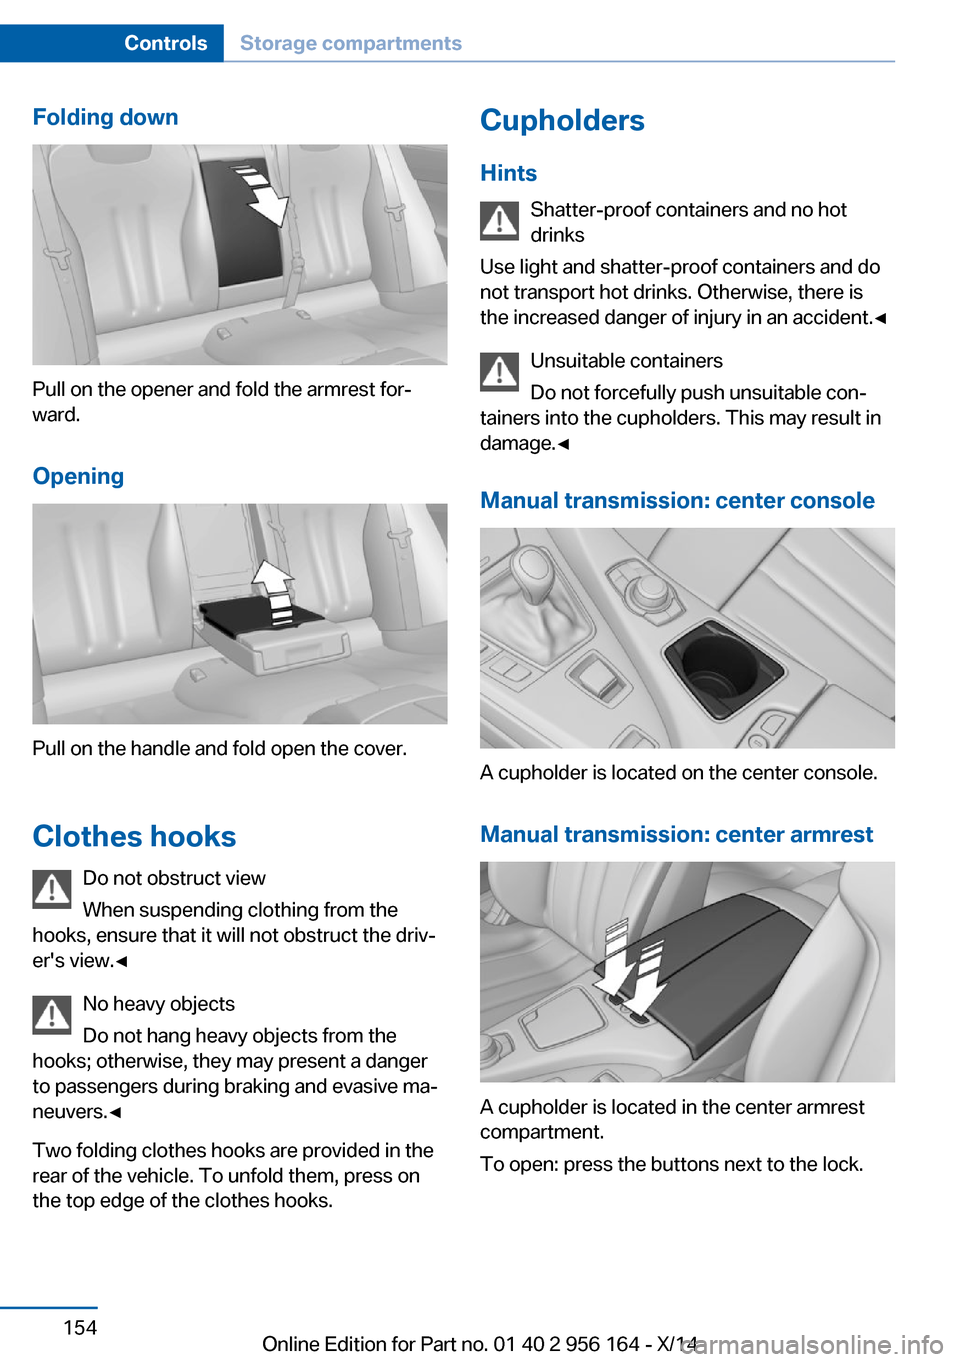
Folding down
Pull on the opener and fold the armrest for‐
ward.
Opening
Pull on the handle and fold open the cover.
Clothes hooks Do not obstruct view
When suspending clothing from the
hooks, ensure that it will not obstruct the driv‐
er's view.◀
No heavy objects
Do not hang heavy objects from the
hooks; otherwise, they may present a danger
to passengers during braking and evasive ma‐
neuvers.◀
Two folding clothes hooks are provided in the
rear of the vehicle. To unfold them, press on
the top edge of the clothes hooks.
Cupholders
Hints Shatter-proof containers and no hot
drinks
Use light and shatter-proof containers and do
not transport hot drinks. Otherwise, there is the increased danger of injury in an accident.◀
Unsuitable containers
Do not forcefully push unsuitable con‐
tainers into the cupholders. This may result in
damage.◀
Manual transmission: center console
A cupholder is located on the center console.
Manual transmission: center armrest
A cupholder is located in the center armrest
compartment.
To open: press the buttons next to the lock.
Seite 154ControlsStorage compartments154
Online Edition for Part no. 01 40 2 956 164 - X/14