remote start BMW M6 GRAN COUPE 2014 F06M Owner's Manual
[x] Cancel search | Manufacturer: BMW, Model Year: 2014, Model line: M6 GRAN COUPE, Model: BMW M6 GRAN COUPE 2014 F06MPages: 226, PDF Size: 5.12 MB
Page 39 of 226
3.Remove the cover of the battery compart‐
ment, arrow 2.4.Insert a battery of the same type with the
positive side facing up.5.Press the cover closed.
Take the used battery to a recycling
center or to your service center.
New remote controls New remote controls are available from the
service center.
Loss of the remote controls Lost remote controls can be disabled by your
service center.
Emergency detection of remote
control
It is possible to reel on the ignition or start the
engine in situations such as the following:
▷Interference of radio transmission to re‐
mote control by external sources e.g., by
radio masts.▷Empty battery in remote control.▷Interference from radio transmissions
through mobile devices in close proximity
to remote control.▷Interference of radio transmission by
charger while charging items such as mo‐
bile devices in the vehicle.
A Check Control message is displayed if an at‐
tempt is made to reel on the ignition or start
the engine.
Starting the engine with emergency
detection of the remote control
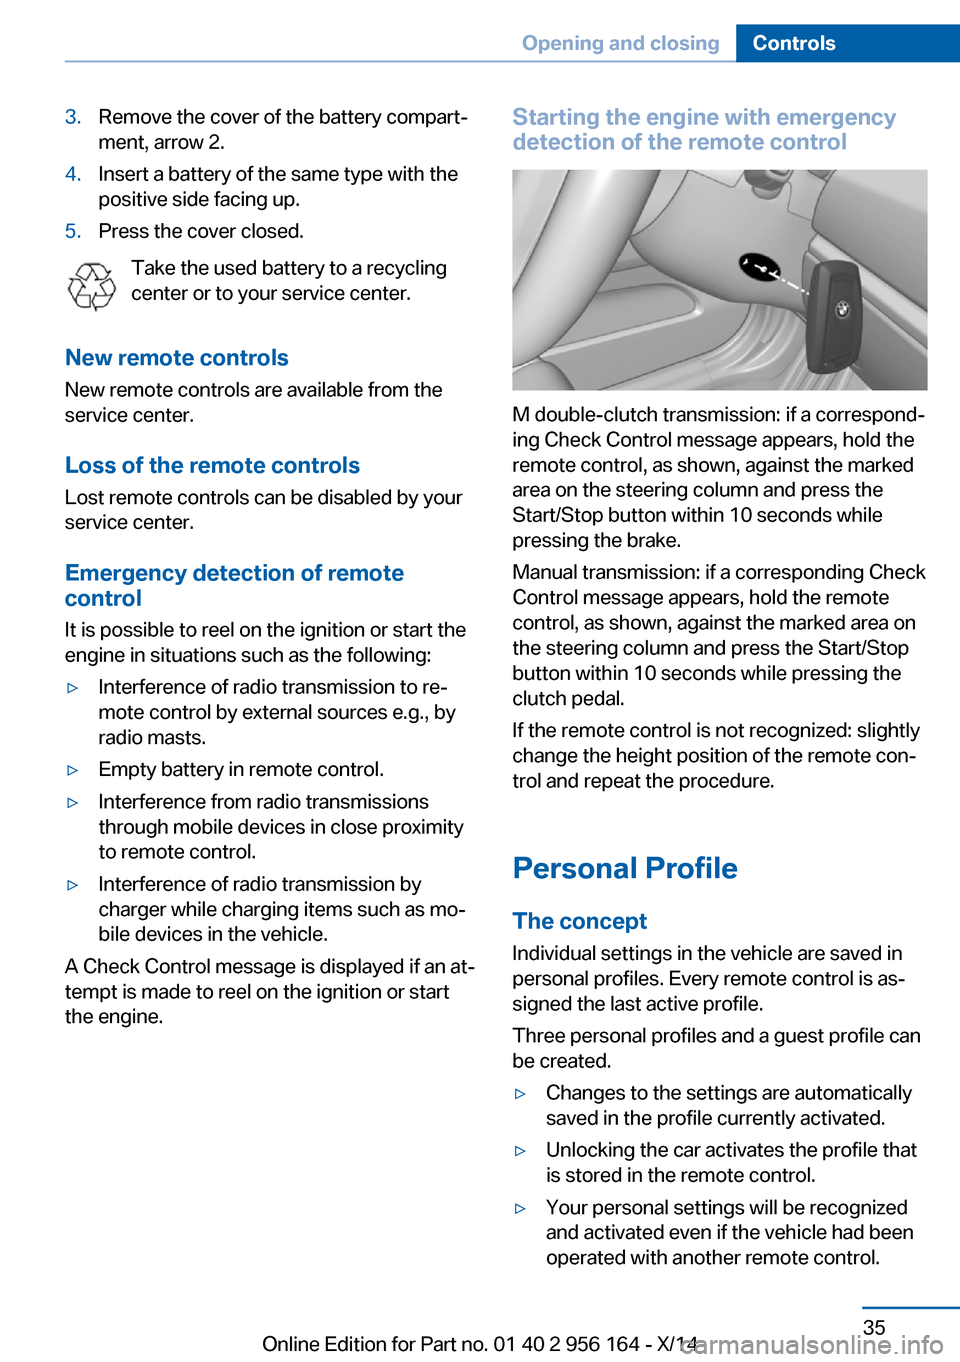
M double-clutch transmission: if a correspond‐
ing Check Control message appears, hold the
remote control, as shown, against the marked
area on the steering column and press the
Start/Stop button within 10 seconds while
pressing the brake.
Manual transmission: if a corresponding Check
Control message appears, hold the remote
control, as shown, against the marked area on
the steering column and press the Start/Stop
button within 10 seconds while pressing the
clutch pedal.
If the remote control is not recognized: slightly
change the height position of the remote con‐
trol and repeat the procedure.
Personal Profile
The concept Individual settings in the vehicle are saved in
personal profiles. Every remote control is as‐
signed the last active profile.
Three personal profiles and a guest profile can
be created.
▷Changes to the settings are automatically
saved in the profile currently activated.▷Unlocking the car activates the profile that
is stored in the remote control.▷Your personal settings will be recognized
and activated even if the vehicle had been
operated with another remote control.Seite 35Opening and closingControls35
Online Edition for Part no. 01 40 2 956 164 - X/14
Page 41 of 226
Existing settings and contacts are overwritten
with the imported profile.1."Settings"2."Profiles"3."Import profile"4.BMW Online: "BMW Online"
USB interface: "USB device"
Using the guest profile
The guest profile is for individual settings that
are saved in none of the three personal pro‐
files.
This can be useful for drivers who are using
the vehicle temporarily and do not have their
own profile.
1."Settings"2."Profiles"3."Guest"
The guest profile cannot be renamed. It is not
assigned to the current remote control.
Display profile list during start
The profile list can be displayed during each
start to select the desired profile.
1."Settings"2."Profiles"3."Options"4."Display user list at startup"
Using the remote control
Note Take the remote control with youPeople or animals left unattended in a
parked vehicle can lock the doors from the in‐
side. Always take the remote control with you
when leaving the vehicle so that the vehicle
can then be opened from the outside.◀
Unlocking
Press button on the remote control.▷All doors and the trunk lid are unlocked.▷Interior lamps and courtesy lamps are acti‐
vated. This function is not available, if the
interior lamps were switched off manually.▷The welcome lamps are switched on, if this
function was activated.▷Exterior mirrors folded through convenient
closing are folded open.
You can set how the vehicle is to be unlocked.
For Settings, refer to page 42.
Anti-theft protection is switched off.
The alarm system, refer to page 43, is dis‐
armed.
Convenient opening Press and hold this button on the re‐mote control after unlocking.
The windows are opened, the glass sunroof is
tilted and the sliding visor moves back, as long
as the button on the remote control is pressed.
Locking Locking from the outside
Do not lock the vehicle from the outside
with people inside the car, as the vehicle can‐
not be unlocked from inside without special knowledge.◀
Press button on the remote control.
All doors and the trunk lid are locked.
Anti-theft protection is switched on. It pre‐
vents the doors from being unlocked using the
lock buttons or the door openers.
The alarm system, refer to page 43, is armed.
Seite 37Opening and closingControls37
Online Edition for Part no. 01 40 2 956 164 - X/14
Page 45 of 226
Closing
Recessed grips in the interior trim of the trunk
lid make it easier to pull down the lid.
Locking separately The trunk lid can be locked separately using
the reel in the center armrest. If the center arm
rest is locked, the trunk lid cannot be opened.
▷Trunk lid secured, arrow 1.▷Trunk lid not secured, ar‐
row 2.
Slide the reel into the arrow 1 position. This
secures the trunk lid and disconnects it from
the central locking system.
This is beneficial when the vehicle is parked
using valet service. The infrared remote con‐
trol can be handed out without the key.
Emergency unlocking
Pull the handle inside the cargo area.
The trunk lid unlocks.
Comfort Access
The concept
The vehicle can be accessed without activat‐
ing the remote control.
All you need to do is to have the remote con‐
trol with you, such as in your pants pocket.
The vehicle automatically detects the remote
control when it is in close proximity or in the
car's interior.
Comfort Access supports the following func‐
tions:▷Unlocking/locking of the vehicle.▷Convenient closing.▷Open the trunk lid individually.▷Start the engine.
Functional requirements
▷There are no external sources of interfer‐
ence nearby.▷To lock the vehicle, the remote control
must be located outside of the vehicle.▷The next unlocking and locking cycle is not
possible until after approx. 2 seconds.▷The engine can only be started if the re‐
mote control is in the vehicle.
Unlocking
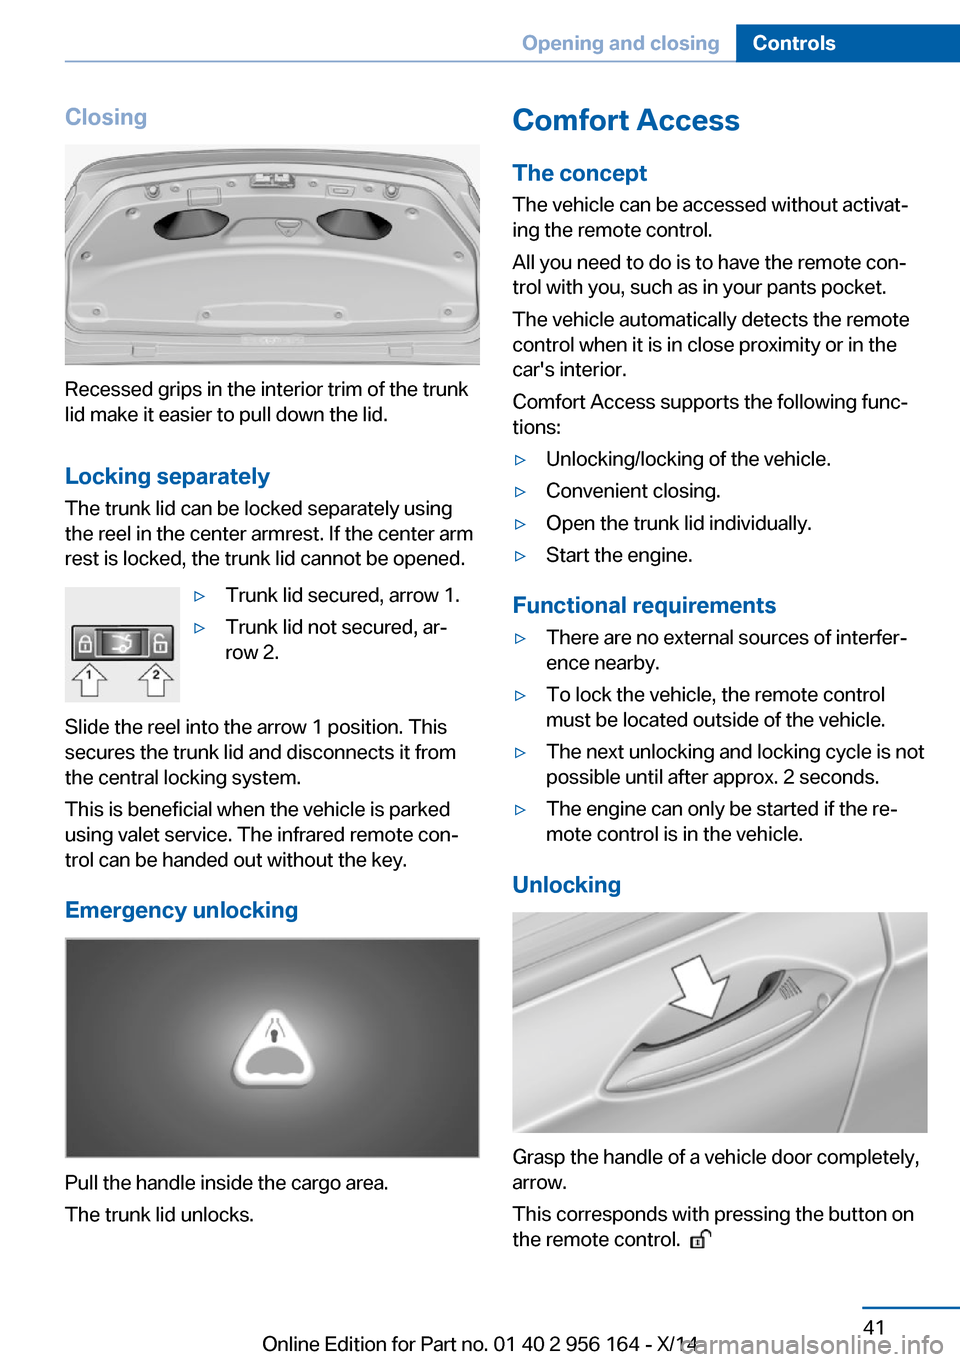
Grasp the handle of a vehicle door completely,
arrow.
This corresponds with pressing the button on
the remote control.
Seite 41Opening and closingControls41
Online Edition for Part no. 01 40 2 956 164 - X/14
Page 60 of 226
Calling up of a seat position
deactivated
After a brief period, calling up stored seat posi‐
tions is deactivated to save battery power.
To reactivate calling up of a seat position:▷Open or close the door or trunk lid.▷Press a button on the remote control.▷Press the Start/Stop button.
Mirrors
Exterior mirrors
General information The mirror on the passenger side is more
curved than the driver's side mirror.
Depending on the vehicle equipment, the mir‐
ror setting is stored for the profile currently in
use. When the vehicle is unlocked via the re‐
mote control, the position is automatically re‐
trieved if this function is active.
Note Estimating distances correctly
Objects reflected in the mirror are closer
than they appear. Do not estimate the distance
to the traffic behind you based on what you
see in the mirror, as this will increase your risk
of an accident.◀
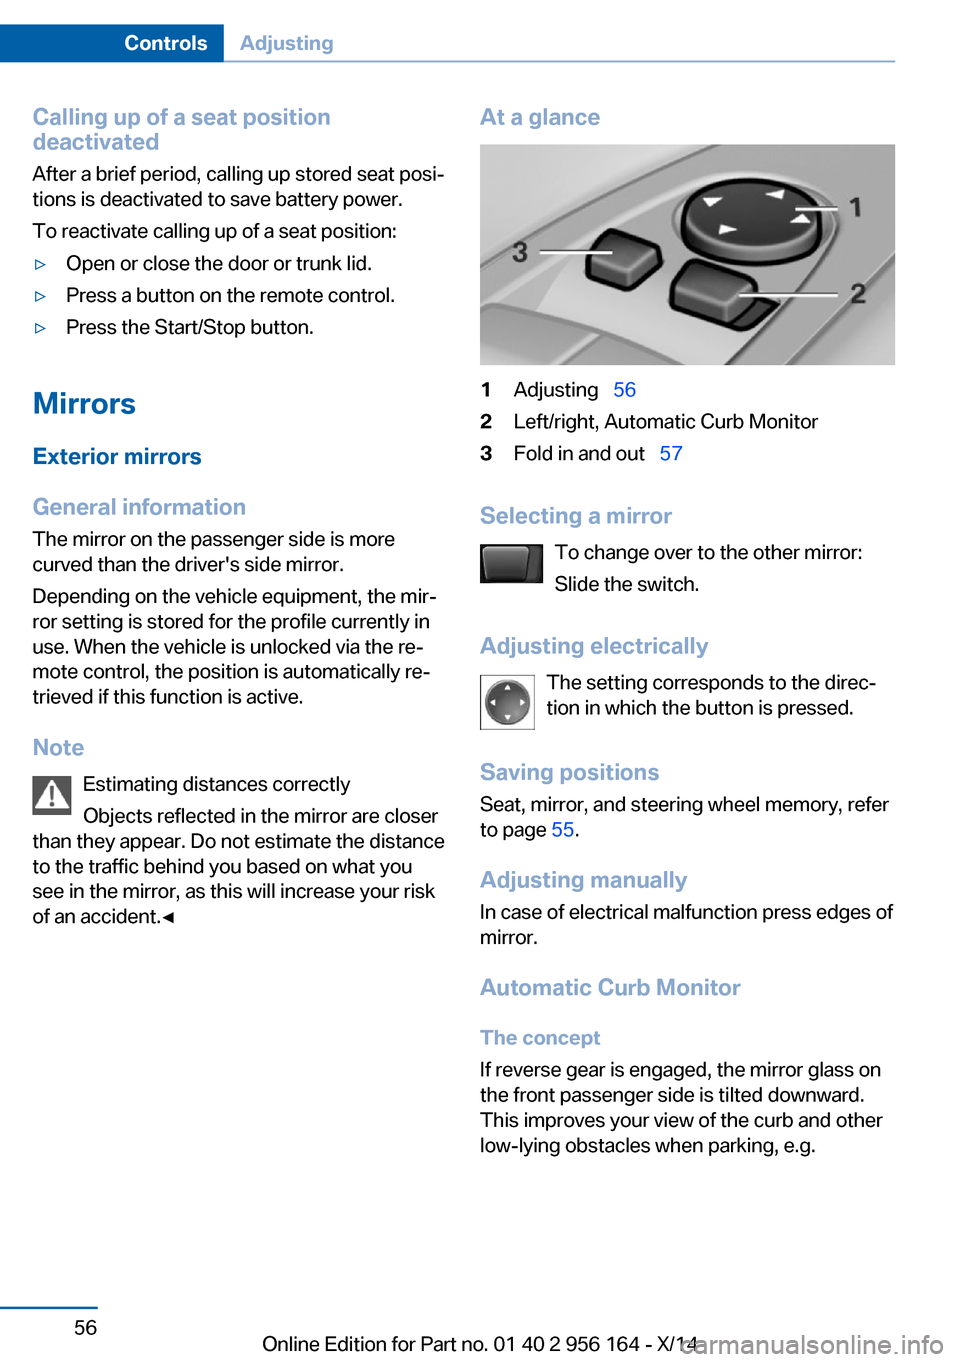
At a glance1Adjusting 562Left/right, Automatic Curb Monitor3Fold in and out 57
Selecting a mirror
To change over to the other mirror:
Slide the switch.
Adjusting electrically The setting corresponds to the direc‐
tion in which the button is pressed.
Saving positions
Seat, mirror, and steering wheel memory, refer
to page 55.
Adjusting manually In case of electrical malfunction press edges of
mirror.
Automatic Curb Monitor The concept
If reverse gear is engaged, the mirror glass on
the front passenger side is tilted downward.
This improves your view of the curb and other
low-lying obstacles when parking, e.g.
Seite 56ControlsAdjusting56
Online Edition for Part no. 01 40 2 956 164 - X/14
Page 69 of 226
Radio ready stateActivate radio-ready state:▷When the engine is running: press the
Start/Stop button.
Some electronic systems/power consumers
remain ready for operation.
The radio-ready state switches off automati‐
cally:
▷After approx. 8 minutes.▷When the vehicle is locked using the cen‐
tral locking system.▷Shortly before the battery is discharged
completely, so that the engine can still be
started.
The radio-ready state remains active if, e.g.,
the ignition is automatically switched off for the
following reasons:
▷Opening or closing the driver's door.▷Unfastening of the driver's safety belt.▷When automatically switching from low
beams to parking lights.
Starting the engine
Hints Enclosed areas
Do not let the engine run in enclosed
areas, since breathing in exhaust fumes may
lead to loss of consciousness and death. The
exhaust gases contain carbon monoxide, an
odorless and colorless but highly toxic gas.◀
Unattended vehicle
Do not leave the vehicle unattended with
the engine running; doing so poses a risk of
danger.
Before leaving the vehicle with the engine run‐
ning, set the parking brake and engage trans‐
mission position P; otherwise, the vehicle may begin to move.◀
Repeated starting in quick succession
Avoid trying to start the vehicle repeat‐
edly and in quick succession. Otherwise, the
fuel is not burned or is inadequately burned,
posing a risk of overheating and damage to the
catalytic converter.◀
Do not wait for the engine to warm-up while
the vehicle remains stationary. Start driving at
moderate engine speeds.
M double-clutch transmission
Starting the engine1.Depress the brake pedal.2.Press the Start/Stop button.
The ignition is activated automatically for a
certain time and is stopped as soon as the en‐
gine starts.
Manual transmission
Starting the engine
1.Depress the brake pedal.2.Press on the clutch pedal and shift to neu‐
tral.3.Press the Start/Stop button.
The ignition is activated automatically for a
certain time and is stopped as soon as the en‐
gine starts.
Engine stop
Hints Take the remote control with you
Take the remote control with you when
leaving the vehicle so that children, e.g., can‐
not start the engine.◀
Apply parking brake and further secure
the vehicle if needed.
Set the parking brake firmly when parking; oth‐
erwise, the vehicle could roll. On steep upward
Seite 65DrivingControls65
Online Edition for Part no. 01 40 2 956 164 - X/14
Page 72 of 226
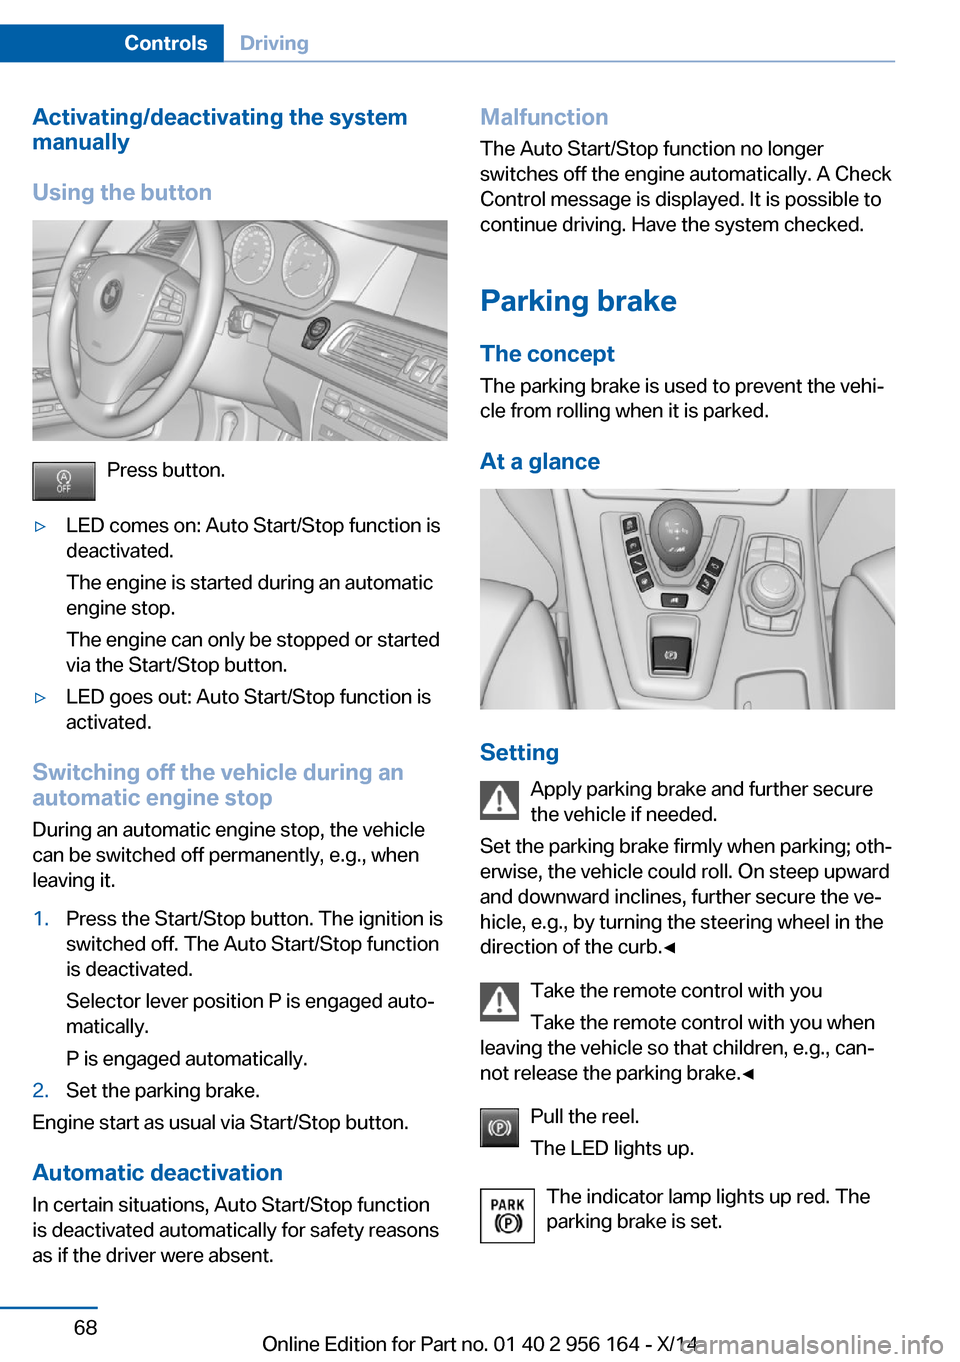
Activating/deactivating the system
manually
Using the button
Press button.
▷LED comes on: Auto Start/Stop function is
deactivated.
The engine is started during an automatic
engine stop.
The engine can only be stopped or started
via the Start/Stop button.▷LED goes out: Auto Start/Stop function is
activated.
Switching off the vehicle during an
automatic engine stop
During an automatic engine stop, the vehicle
can be switched off permanently, e.g., when
leaving it.
1.Press the Start/Stop button. The ignition is
switched off. The Auto Start/Stop function
is deactivated.
Selector lever position P is engaged auto‐
matically.
P is engaged automatically.2.Set the parking brake.
Engine start as usual via Start/Stop button.
Automatic deactivation
In certain situations, Auto Start/Stop function
is deactivated automatically for safety reasons
as if the driver were absent.
Malfunction
The Auto Start/Stop function no longer
switches off the engine automatically. A Check Control message is displayed. It is possible to
continue driving. Have the system checked.
Parking brake The conceptThe parking brake is used to prevent the vehi‐
cle from rolling when it is parked.
At a glance
Setting Apply parking brake and further secure
the vehicle if needed.
Set the parking brake firmly when parking; oth‐
erwise, the vehicle could roll. On steep upward
and downward inclines, further secure the ve‐
hicle, e.g., by turning the steering wheel in the
direction of the curb.◀
Take the remote control with you
Take the remote control with you when
leaving the vehicle so that children, e.g., can‐
not release the parking brake.◀
Pull the reel.
The LED lights up.
The indicator lamp lights up red. The
parking brake is set.
Seite 68ControlsDriving68
Online Edition for Part no. 01 40 2 956 164 - X/14
Page 151 of 226
then be controlled by the button on the in‐
terior rearview mirror.
If the LED does not flash faster after at
least 60 seconds, change the distance and
repeat the step. Several more attempts at
different distances may be necessary. Wait
at least 15 seconds between attempts.
Canada: if programming with the hand-
held transmitter was interrupted, hold
down the interior rearview mirror button
and repeatedly press and release the
hand-held transmitter button for 2 sec‐
onds.
Controls
Before operation
Before operating a system using the uni‐
versal garage door opener, ensure that there are no people, animals, or objects within the
range of movement of the remote-controlled
system; otherwise, there is a risk of injury or
damage.
Also follow the safety instructions of the hand-
held transmitter.◀
The system, such as the garage door, can be
operated using the button on the interior rear‐
view mirror while the engine is running or when
the ignition is started. To do this, hold down
the button within receiving range of the system
until the function is activated. The interior rear‐ view mirror LED stays lit while the wireless sig‐
nal is being transmitted.
Deleting stored functions Press and hold the left and right button on the
interior rearview mirror simultaneously for ap‐
proximately 20 seconds until the LED flashes
rapidly. All stored functions are deleted. The
functions cannot be deleted individually.
Sun visor
Glare shieldFold the sun visor down or up.
Vanity mirror A vanity mirror is located in the sun visor be‐
hind a cover. When the cover is opened, the
mirror lighting switches on.
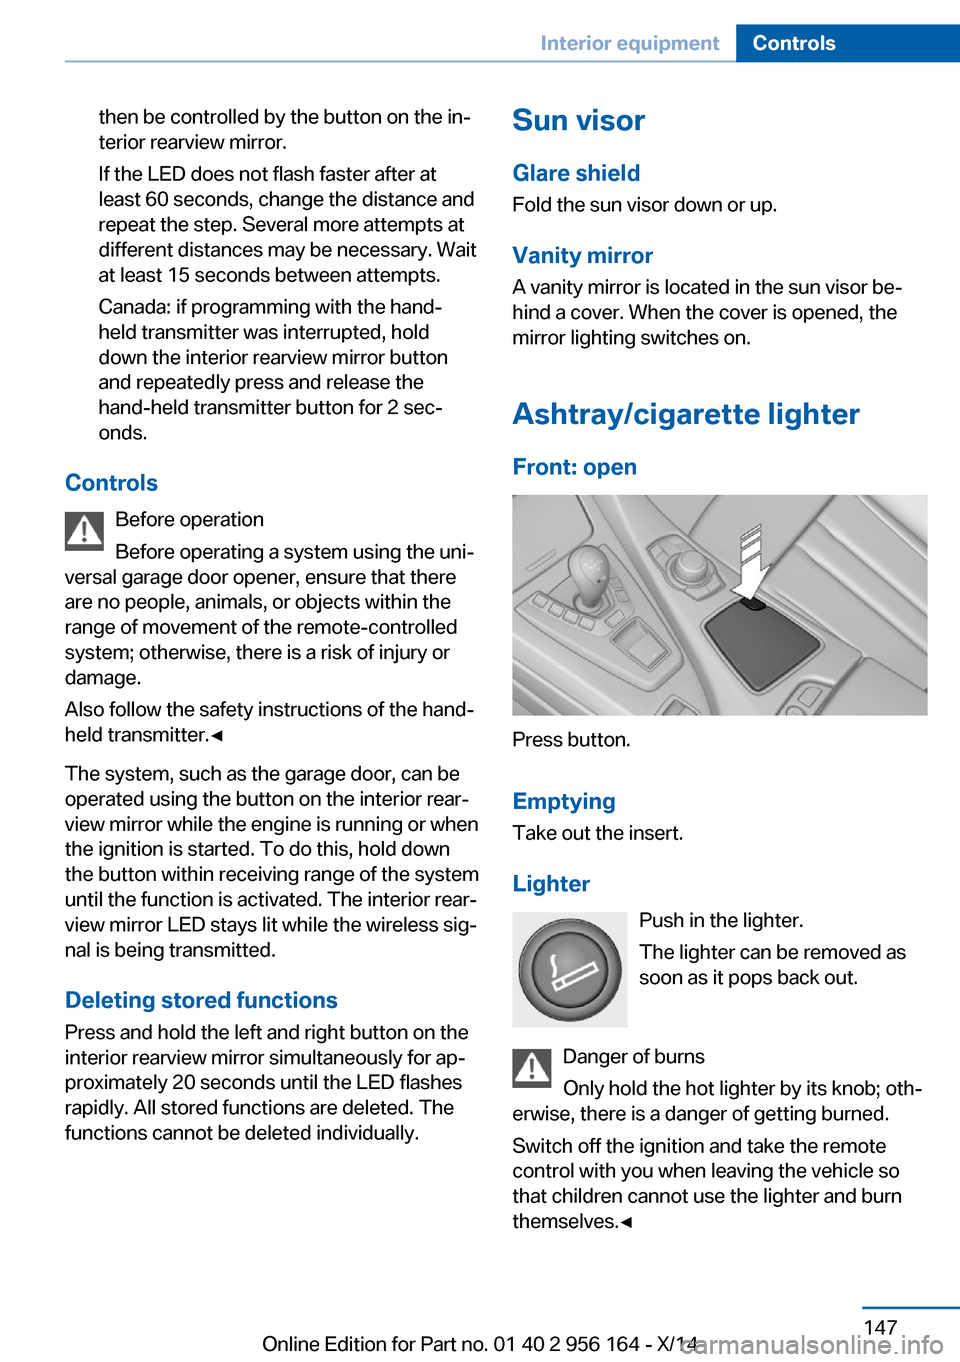
Ashtray/cigarette lighter
Front: open
Press button.
Emptying Take out the insert.
Lighter Push in the lighter.
The lighter can be removed as
soon as it pops back out.
Danger of burns
Only hold the hot lighter by its knob; oth‐
erwise, there is a danger of getting burned.
Switch off the ignition and take the remote
control with you when leaving the vehicle so
that children cannot use the lighter and burn
themselves.◀
Seite 147Interior equipmentControls147
Online Edition for Part no. 01 40 2 956 164 - X/14
Page 216 of 226
Everything from A to Z
IndexA ABS, Antilock Brake Sys‐ tem 123
Acceleration Assistant, refer to Launch Control 76
Activated-charcoal filter 141
Active Blind Spot Detec‐ tion 118
Active M differential 125
Active Protection 120
Active seat, front 51
Active seat ventilation, front 52
Adaptive brake lights, refer to Brake force display 120
Adaptive Light Control 97
Additives, oil 186
Adjusting, steering wheel 58
Adjustments, seats/head re‐ straints 49
After washing vehicle 204
Airbags 101
Airbags, indicator/warning light 102
Air circulation, refer to Recir‐ culated-air mode 140
Air, dehumidifying, refer to Cooling function 140
Air distribution, manual 139
Air flow, automatic climate control 140
Air outlets, see ventila‐ tion 143
Air pressure, tires 174
Alarm system 43
Alarm, unintentional 45
All around the center con‐ sole 16
All around the interior rear‐ view mirror 17 All around the steering
wheel 14
All-season tires, refer to Win‐ ter tires 179
Alternating-code hand-held transmitter 146
Alternative oil types 187
Ambient light 99
Animal detection, see Night Vision 114
Antifreeze, washer fluid 72
Antilock Brake System, ABS 123
Anti-slip control, refer to DSC 123
Approved axle load 210
Approved engine oils 187
Armrest, refer to Front center armrest 153
Armrest, refer to Rear center armrest 153
Arrival time 91
Ashtray 147
Ashtray, rear 148
Assistance, Roadside Assis‐ tance 198
Assistance when driving off 123
Attentiveness assistant 120
AUTO intensity 139
Automatic car wash 203
Automatic Curb Monitor 56
Automatic deactivation, front- seat passenger airbags 103
Automatic headlight con‐ trol 97
Automatic locking 43
Automatic recirculated-air control 140
Automatic Soft Closing, doors 40 AUTO program, automatic cli‐
mate control 139
AUTO program, intensity 139
Auto Start/Stop function 66
Average fuel consumption 90
Average speed 90
Axle loads, weights 210
B Backrest curvature, refer to Lumbar support 50
Backrest, seats 49
Backrest, width 51
Band-aids, refer to First aid kit 198
Bar for tow-starting/ towing 201
Battery replacement, vehicle battery 195
Battery replacement, vehicle remote control 34
Battery, vehicle 195
Belts, safety belts 52
Beverage holder, cu‐ pholder 154
Blinds, sun protection 46
BMW Assist, see user's manual for Navigation, En‐
tertainment and Communi‐
cation
BMW maintenance sys‐ tem 189
BMW M technology 158
Bottle holder, refer to Cu‐ pholder 154
Brake assistant 123
Brake discs, break-in 160
Brake force display 120
Brake lights, adaptive 120 Seite 212ReferenceEverything from A to Z212
Online Edition for Part no. 01 40 2 956 164 - X/14
Page 217 of 226
Brake lights, brake force dis‐play 120
Brake lights, bulb replace‐ ment 193
Brake pads, break-in 160
Braking, hints 162
Breakdown assis‐ tance 197, 198
Break-in 160
Brightness of Control Dis‐ play 93
Bulb replacement, front 191
Bulb replacement, rear 193
Button, Start/Stop 64
Bypassing, refer to Jump- starting 198
C
California Proposition 65 Warning 7
Calling up mirror adjust‐ ment 43
Calling up seat adjust‐ ment 43
Calling up steering wheel ad‐ justment 43
Camera, care 206
Camera, rearview cam‐ era 133
Camera, Side View 135
Camera, Top View 137
Can holder, refer to Cu‐ pholder 154
Car battery 195
Carbon ceramic brake M 158
Car care products 204
Care, displays 206
Care, vehicle 204
Cargo 164
Cargo area, enlarging 149
Cargo area, storage compart‐ ments 155
Cargo, securing 165
Cargo straps, securing cargo 165 Car key, refer to Remote con‐
trol 34
Carpet, care 206
Car wash 203
Catalytic converter, refer to Hot exhaust system 161
CBS Condition Based Serv‐ ice 189
CD/Multimedia, see user's manual for Navigation, En‐
tertainment and Communi‐
cation
Center console 16
Central locking system 39
Central screen, refer to Con‐ trol Display 18
Ceramic brake 158
Changes, technical, refer to Safety 7
Changing parts 191
Changing wheels 194
Changing wheels/tires 178
Chassis number, see vehicle identification number 9
Check Control 80
Checking the engine oil level electronically 185
Checking the oil level elec‐ tronically 185
Children, seating position 60
Children, transporting safely 60
Child restraint fixing sys‐ tem 60
Child restraint fixing system LATCH 61
Child restraint fixing systems, mounting 60
Child safety locks 63
Child seat, mounting 60
Child seats 60
Chrome parts, care 205
Cigarette lighter 147
Cleaning displays 206
Climate control 139 Climate control laminated
tinted safety glass 161
Climate control wind‐ shield 161
Clock 84
Closing/opening via door lock 39
Closing/opening with remote control 37
Clothes hooks 154
Combination reel, refer to Turn signals 70
Combination reel, refer to Wiper system 70
Comfort Access 41
Compound brake 158
Compressor 179
Computer 90
Condensation on win‐ dows 140
Condensation under the vehi‐ cle 163
Condition Based Service CBS 189
Confirmation signal 43
ConnectedDrive, see user's manual for Navigation, En‐
tertainment and Communi‐
cation
ConnectedDrive Services
Control Display 18
Control Display, settings 92
Controller 18
Control systems, driving sta‐ bility 123
Convenient opening with the remote control 37
Coolant 188
Coolant level 188
Coolant temperature 84
Cooling function 140
Cooling, maximum 140
Cooling system 188
Corrosion on brake discs 163
Cosmetic mirror 147
Cruise control 128 Seite 213Everything from A to ZReference213
Online Edition for Part no. 01 40 2 956 164 - X/14
Page 218 of 226
Cruising range 85
Cupholder 154
Current fuel consumption 85
D
Damage, tires 177
Damping control 125
Damping control, dy‐ namic 125
Data, technical 210
Date 84
Daytime running lights 97
Defrosting, refer to Windows, defrosting 140
Dehumidifying, air 140
Deleting personal data 24
Deletion of personal data 24
Destination distance 91
Differential lock 125
Digital clock 84
Digital speed 84
Digital tachometer 84
Dimensions 210
Dimmable exterior mirrors 57
Dimmable interior rearview mirror 57
Direction indicator, refer to Turn signals 70
Display, electronic, instru‐ ment cluster 79
Display in windshield 93
Display lighting, refer to In‐ strument lighting 99
Displays, cleaning 206
Disposal, coolant 188
Disposal, vehicle battery 195
Distance control, refer to PDC 130
Distance to destination 91
Divided screen view, split screen 23
Door lock 39
Door lock, refer to Remote control 34 Doors, Automatic Soft Clos‐
ing 40
Double-clutch transmis‐ sion 73
Drivelogic 75
Drive mode 74
Drive-off assistant 123
Drive-off assistant, refer to DSC 123
Driver assistance, refer to In‐ telligent Safety 108
Driving Assistant, refer to In‐ telligent Safety 108
Driving Dynamics Control 77
Driving instructions, break- in 160
Driving notes, general 161
Driving on racetracks 159
Driving program, refer to Drivelogic 75
Driving stability control sys‐ tems 123
Driving tips 161
DSC Dynamic Stability Con‐ trol 123
Dynamic Damping Con‐ trol 125
Dynamic driving systems 86
Dynamic driving, system states 86
Dynamic Stability Control DSC 123
E EfficientDynamics 86
EfficientDynamics display 86
EfficientDynamics menu 86
Electronic displays, instru‐ ment cluster 79
Electronic oil measure‐ ment 185
Electronic Stability Program ESP, refer to DSC 123
Emergency detection, remote control 35 Emergency release, fuel filler
flap 170
Emergency Request 197
Emergency service, refer to Roadside Assistance 198
Emergency start function, en‐ gine start 35
Emergency unlocking, trunk lid 41
Energy Control 85
Energy recovery 86
Engine, automatic reel-off 66
Engine, automatic Start/Stop function 66
Engine compartment 183
Engine compartment, work‐ ing in 183
Engine coolant 188
Engine oil 185
Engine oil, adding 186
Engine oil additives 186
Engine oil change 187
Engine oil filler neck 186
Engine oil temperature 84
Engine oil types, alterna‐ tive 187
Engine oil types, ap‐ proved 187
Engine start during malfunc‐ tion 35
Engine start, jump-start‐ ing 198
Engine start, refer to Starting the engine 65
Engine stop 65
Engine temperature 84
Entering/exiting vehicle, as‐ sistance, steering wheel 58
Entering a car wash 203
Equipment, interior 145
Error displays, see Check Control 80
ESP Electronic Stability Pro‐ gram, refer to DSC 123
Exchanging wheels/tires 178
Exhaust system 161 Seite 214ReferenceEverything from A to Z214
Online Edition for Part no. 01 40 2 956 164 - X/14