folding BMW X1 2014 E84 Owner's Manual
[x] Cancel search | Manufacturer: BMW, Model Year: 2014, Model line: X1, Model: BMW X1 2014 E84Pages: 297, PDF Size: 7 MB
Page 54 of 297
2.Shift into reverse or engage transmission
position R.
Deactivating
Slide the mirror changeover switch to the pas‐
senger's side mirror position.
Fold in and out Press button 2.
Possible up to approx. 15 mph/20 km/h.
For example, this is advantageous
▷In car washes.▷In narrow streets.▷For folding back mirrors that were folded
away manually.
Mirrors that were folded in are folded out auto‐
matically at a speed of approx.
25 mph/40 km/h.
Fold in the mirror in a car wash
Before entering an automatic car wash,
fold in the exterior mirrors by hand or with the
button; otherwise, they could be damaged, de‐
pending on the width of the vehicle.◀
Automatic heating
Depending on the external temperature, both
exterior mirrors are automatically heated when
the engine is running or the ignition is
switched on.
Interior rearview mirror
Reducing the blinding effect
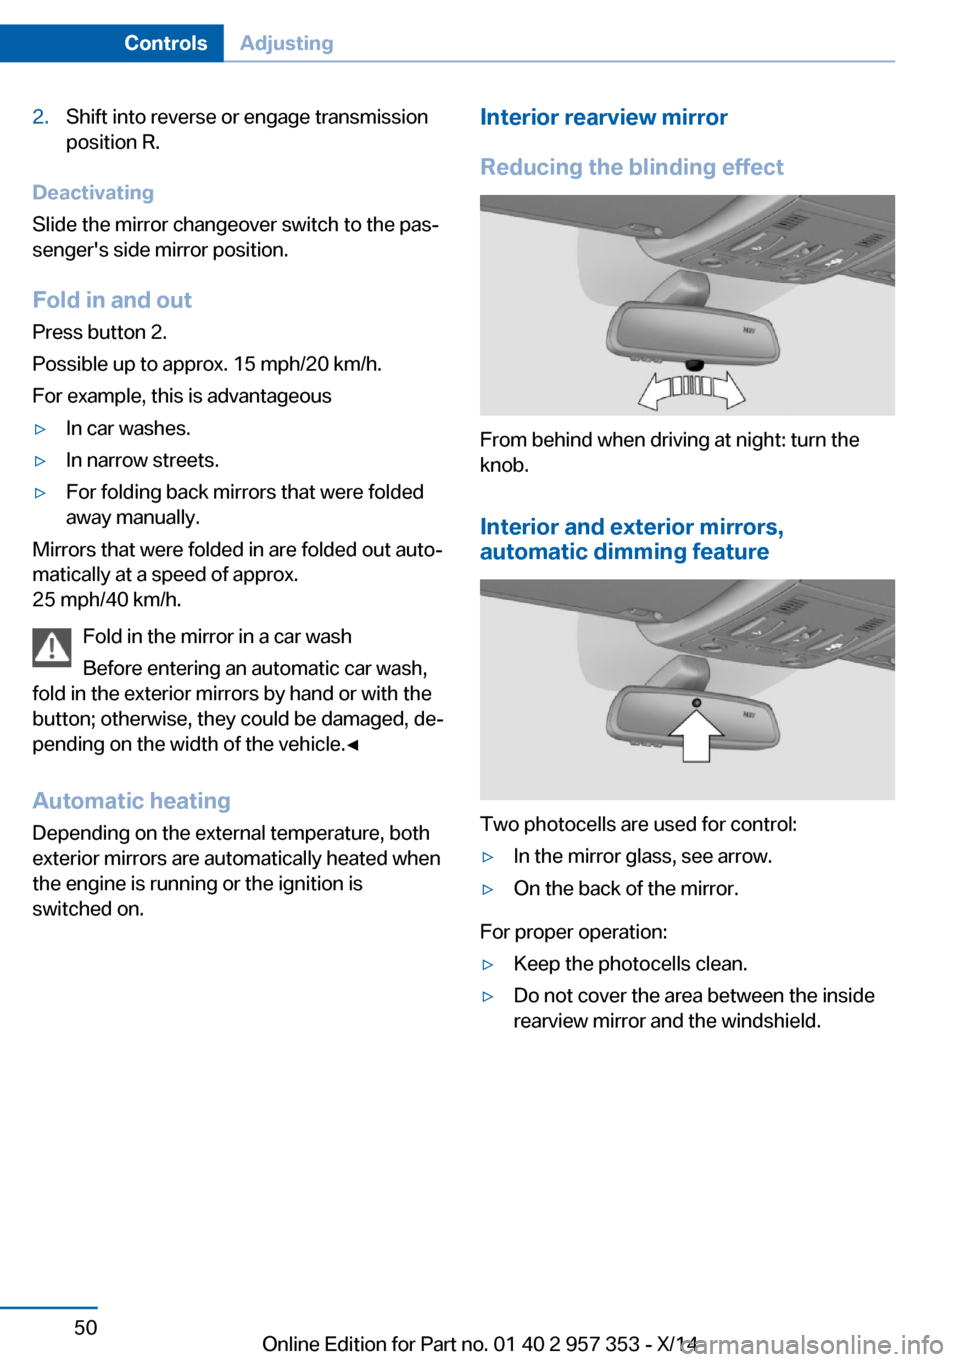
From behind when driving at night: turn the
knob.
Interior and exterior mirrors,
automatic dimming feature
Two photocells are used for control:
▷In the mirror glass, see arrow.▷On the back of the mirror.
For proper operation:
▷Keep the photocells clean.▷Do not cover the area between the inside
rearview mirror and the windshield.Seite 50ControlsAdjusting50
Online Edition for Part no. 01 40 2 957 353 - X/14
Page 121 of 297
Sun visorGlare protection
Folding down
Fold the sun visor down.
Folding up Fold the sun visor up.
Glare protection from the side Folding down1.Fold the sun visor down.2.Detach from the holder and pivot sideways
to the side window.
Folding up
To close the sun visor, proceed in reverse or‐
der.
Vanity mirror A vanity mirror is located behind a cover on
each sun visor. The mirror lighting comes on
when the cover is opened.
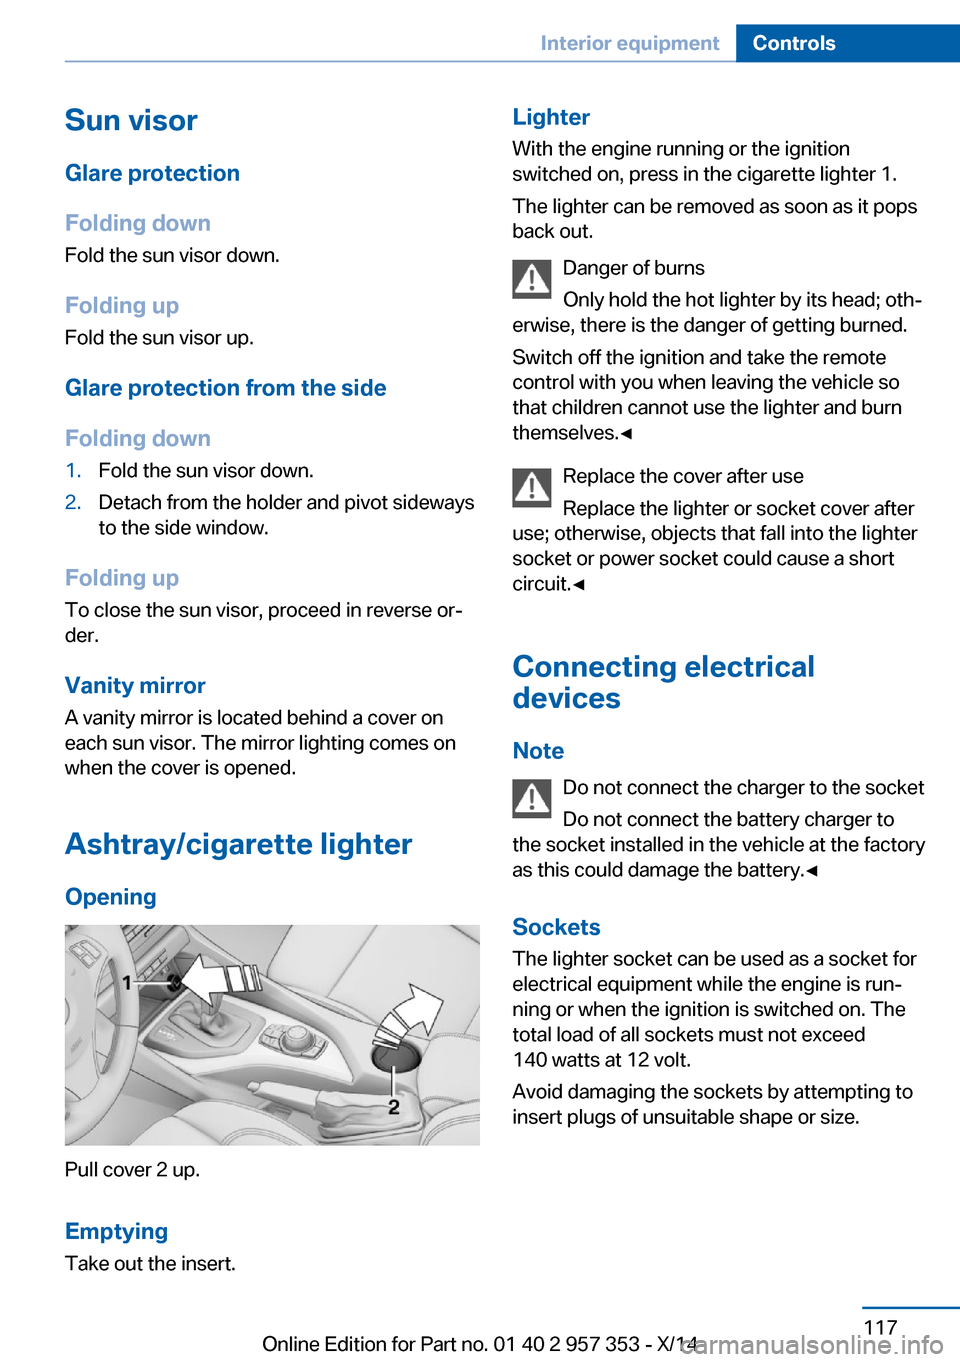
Ashtray/cigarette lighter Opening
Pull cover 2 up.
Emptying
Take out the insert.
Lighter With the engine running or the ignition
switched on, press in the cigarette lighter 1.
The lighter can be removed as soon as it pops
back out.
Danger of burns
Only hold the hot lighter by its head; oth‐
erwise, there is the danger of getting burned.
Switch off the ignition and take the remote
control with you when leaving the vehicle so
that children cannot use the lighter and burn
themselves.◀
Replace the cover after use
Replace the lighter or socket cover after
use; otherwise, objects that fall into the lighter
socket or power socket could cause a short
circuit.◀
Connecting electrical devices
Note Do not connect the charger to the socket
Do not connect the battery charger to
the socket installed in the vehicle at the factory
as this could damage the battery.◀
Sockets
The lighter socket can be used as a socket for
electrical equipment while the engine is run‐
ning or when the ignition is switched on. The
total load of all sockets must not exceed
140 watts at 12 volt.
Avoid damaging the sockets by attempting to
insert plugs of unsuitable shape or size.Seite 117Interior equipmentControls117
Online Edition for Part no. 01 40 2 957 353 - X/14
Page 123 of 297
Enlarging the cargo area
General information
The cargo area can be enlarged by folding
down the rear seat backrests.
The rear seat backrest is divided at a ratio of
40-20-40.
The backrests can be adjusted to 10 different
positions between the comfort and transport
positions and they can be folded down.
In the comfort position, the backrests are tilted
back to the greatest possible angle and in the
transport position they are nearly vertical.
Before mounting a child restraint fixing system,
note the instructions, refer to page 52.
Danger of pinching
Before folding down the rear seat back‐
rests, ensure that path of movement of the
backrests is clear. Especially when the middle
section is folded down, ensure that no one is
located in or reaches into the path of move‐
ment of the rear seat backrests. Otherwise, in‐
juries or damage may result.◀
Observe the instructions concerning the
safety belt
Observe the instructions concerning the safety
belt, refer to page 46. Otherwise, personal pro‐
tection may be compromised.◀
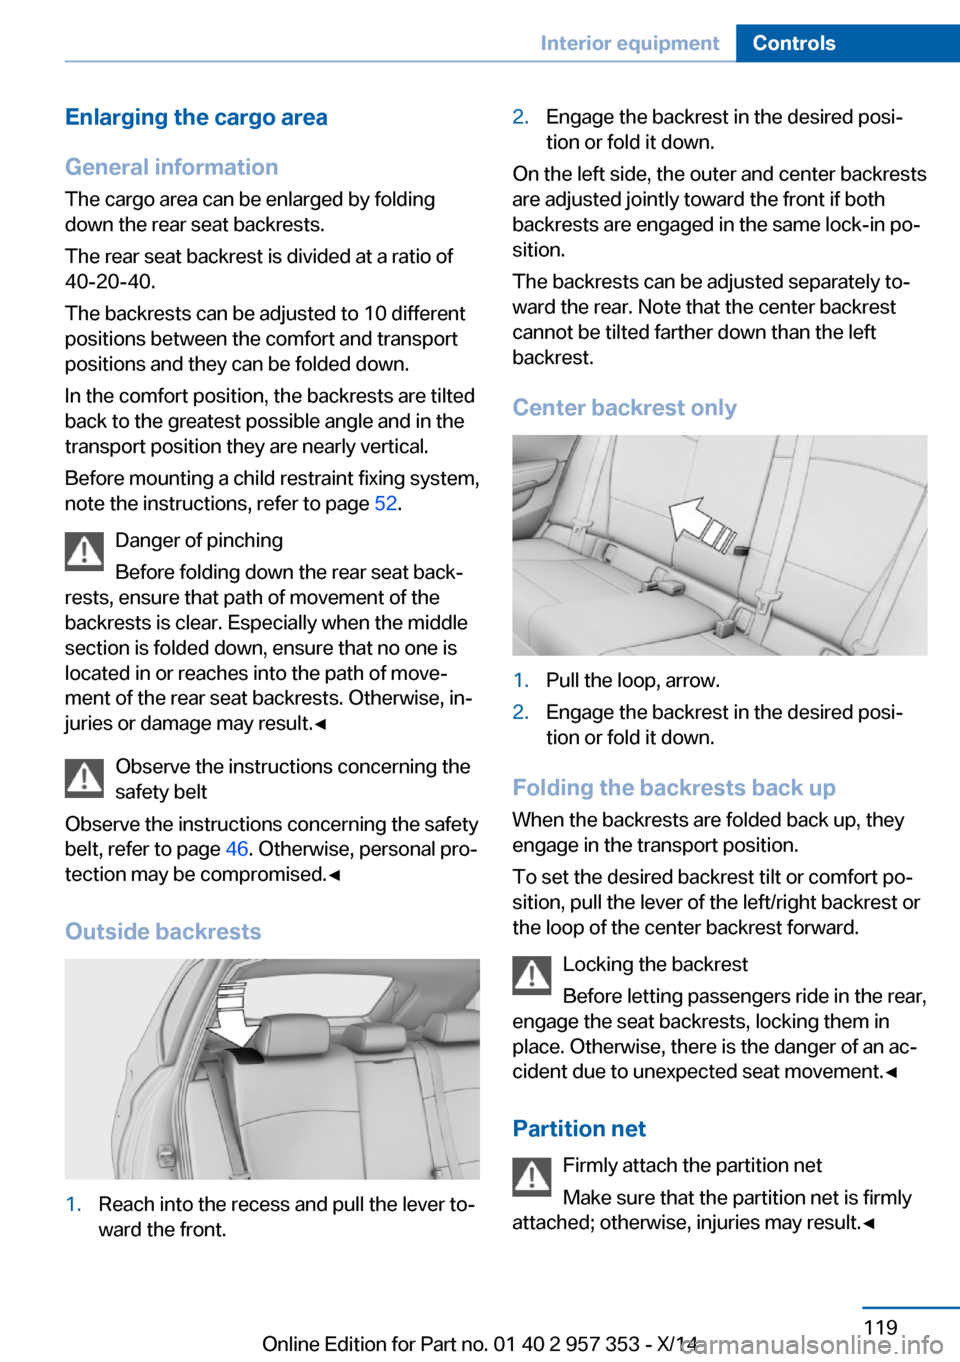
Outside backrests1.Reach into the recess and pull the lever to‐
ward the front.2.Engage the backrest in the desired posi‐
tion or fold it down.
On the left side, the outer and center backrests
are adjusted jointly toward the front if both
backrests are engaged in the same lock-in po‐
sition.
The backrests can be adjusted separately to‐
ward the rear. Note that the center backrest
cannot be tilted farther down than the left
backrest.
Center backrest only
1.Pull the loop, arrow.2.Engage the backrest in the desired posi‐
tion or fold it down.
Folding the backrests back up
When the backrests are folded back up, they
engage in the transport position.
To set the desired backrest tilt or comfort po‐
sition, pull the lever of the left/right backrest or
the loop of the center backrest forward.
Locking the backrest
Before letting passengers ride in the rear,
engage the seat backrests, locking them in
place. Otherwise, there is the danger of an ac‐
cident due to unexpected seat movement.◀
Partition net Firmly attach the partition net
Make sure that the partition net is firmly
attached; otherwise, injuries may result.◀
Seite 119Interior equipmentControls119
Online Edition for Part no. 01 40 2 957 353 - X/14
Page 128 of 297
▷Do not use force when plugging the con‐
nector into the USB interface.▷Do not connect devices such as fans or
lamps to the USB interface.▷Do not connect a USB hard drive.▷Do not use the USB interface to recharge
external devices.
Center armrest front
Storage compartment The center armrest between the front seats
contains a compartment with cupholders or
the cover for the snap-in adapter, depending
on the version.
Details on this mobile phone cradle, refer to
page 205.
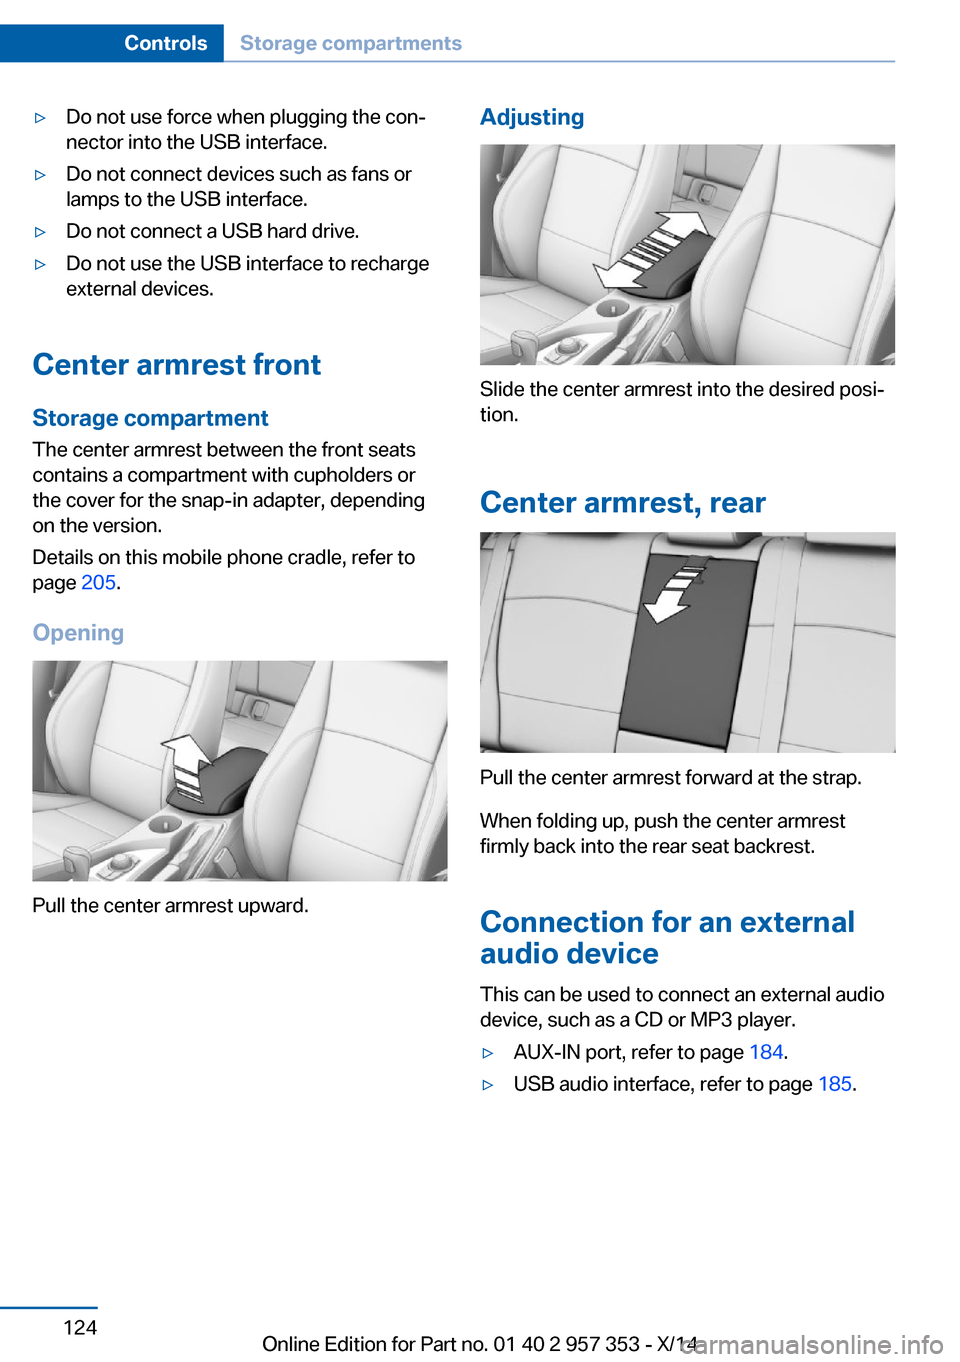
Opening
Pull the center armrest upward.
Adjusting
Slide the center armrest into the desired posi‐
tion.
Center armrest, rear
Pull the center armrest forward at the strap.
When folding up, push the center armrest
firmly back into the rear seat backrest.
Connection for an external
audio device
This can be used to connect an external audio
device, such as a CD or MP3 player.
▷AUX-IN port, refer to page 184.▷USB audio interface, refer to page 185.Seite 124ControlsStorage compartments124
Online Edition for Part no. 01 40 2 957 353 - X/14
Page 253 of 297
Headlight setting
Changing the bulbs and lights may influence
the headlight settings. Have the headlight set‐
ting checked by a service center and corrected
if necessary after changing bulbs or lights.
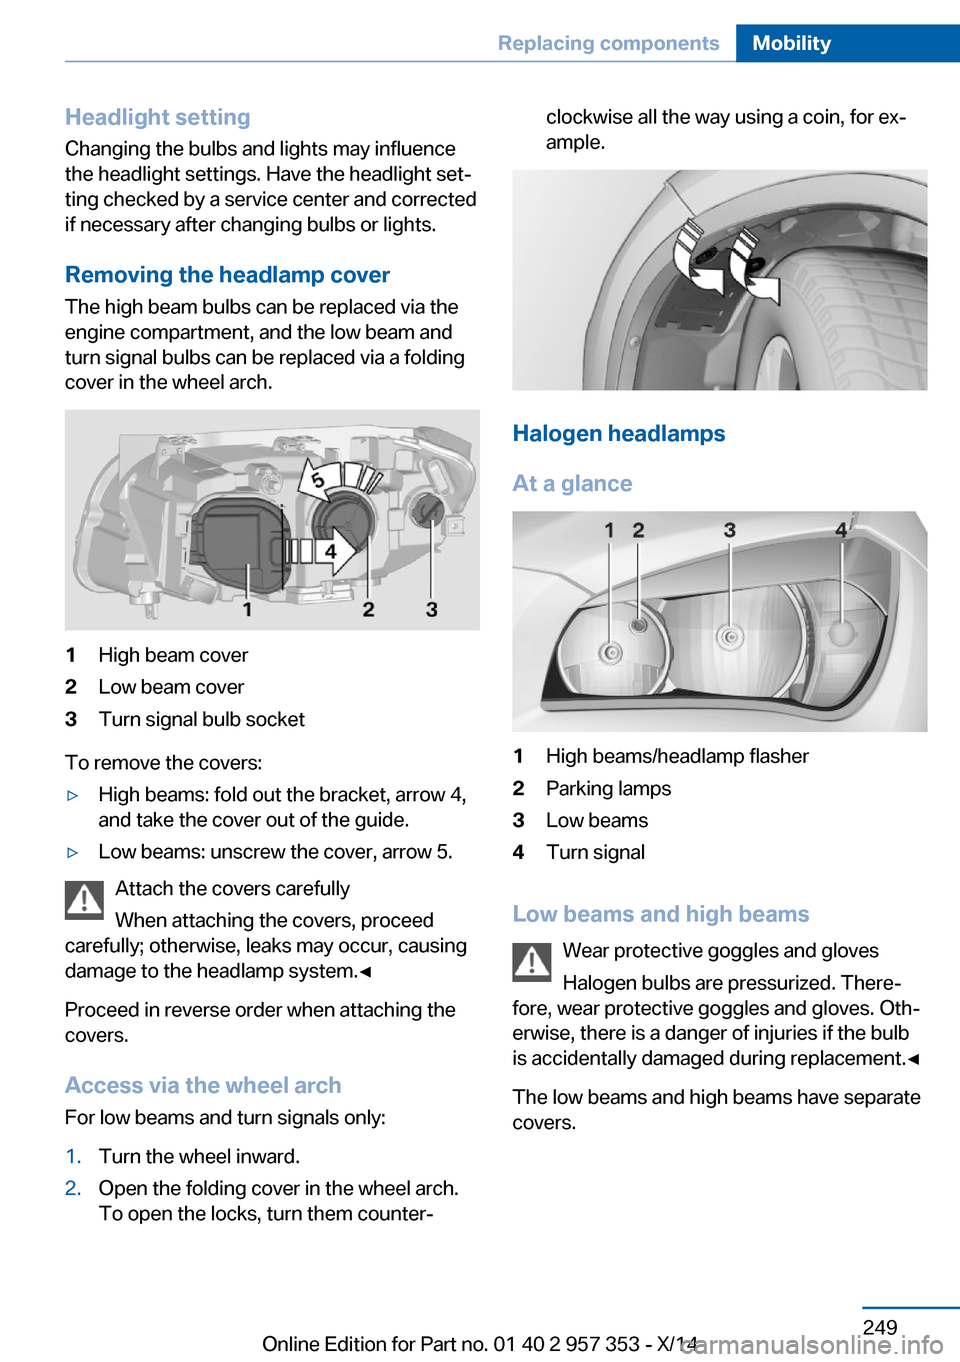
Removing the headlamp cover
The high beam bulbs can be replaced via the
engine compartment, and the low beam and
turn signal bulbs can be replaced via a folding
cover in the wheel arch.1High beam cover2Low beam cover3Turn signal bulb socket
To remove the covers:
▷High beams: fold out the bracket, arrow 4,
and take the cover out of the guide.▷Low beams: unscrew the cover, arrow 5.
Attach the covers carefully
When attaching the covers, proceed
carefully; otherwise, leaks may occur, causing
damage to the headlamp system.◀
Proceed in reverse order when attaching the
covers.
Access via the wheel arch For low beams and turn signals only:
1.Turn the wheel inward.2.Open the folding cover in the wheel arch.
To open the locks, turn them counter‐clockwise all the way using a coin, for ex‐
ample.
Halogen headlamps
At a glance
1High beams/headlamp flasher2Parking lamps3Low beams4Turn signal
Low beams and high beams Wear protective goggles and gloves
Halogen bulbs are pressurized. There‐
fore, wear protective goggles and gloves. Oth‐
erwise, there is a danger of injuries if the bulb
is accidentally damaged during replacement.◀
The low beams and high beams have separate
covers.
Seite 249Replacing componentsMobility249
Online Edition for Part no. 01 40 2 957 353 - X/14
Page 254 of 297
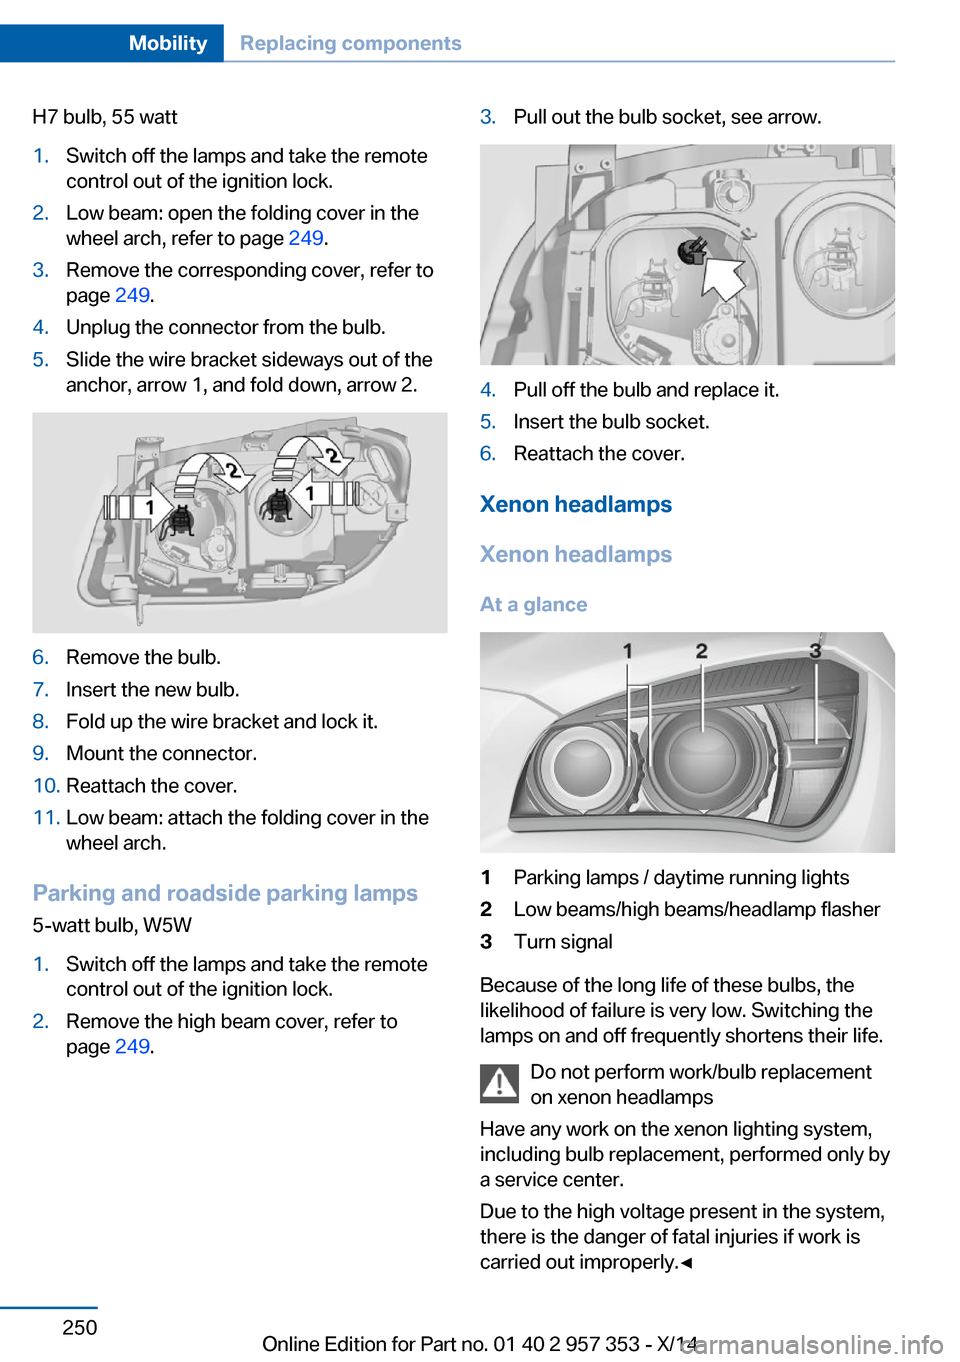
H7 bulb, 55 watt1.Switch off the lamps and take the remote
control out of the ignition lock.2.Low beam: open the folding cover in the
wheel arch, refer to page 249.3.Remove the corresponding cover, refer to
page 249.4.Unplug the connector from the bulb.5.Slide the wire bracket sideways out of the
anchor, arrow 1, and fold down, arrow 2.6.Remove the bulb.7.Insert the new bulb.8.Fold up the wire bracket and lock it.9.Mount the connector.10.Reattach the cover.11.Low beam: attach the folding cover in the
wheel arch.
Parking and roadside parking lamps
5-watt bulb, W5W
1.Switch off the lamps and take the remote
control out of the ignition lock.2.Remove the high beam cover, refer to
page 249.3.Pull out the bulb socket, see arrow.4.Pull off the bulb and replace it.5.Insert the bulb socket.6.Reattach the cover.
Xenon headlamps
Xenon headlamps At a glance
1Parking lamps / daytime running lights2Low beams/high beams/headlamp flasher3Turn signal
Because of the long life of these bulbs, the
likelihood of failure is very low. Switching the
lamps on and off frequently shortens their life.
Do not perform work/bulb replacement
on xenon headlamps
Have any work on the xenon lighting system,
including bulb replacement, performed only by
a service center.
Due to the high voltage present in the system,
there is the danger of fatal injuries if work is
carried out improperly.◀
Seite 250MobilityReplacing components250
Online Edition for Part no. 01 40 2 957 353 - X/14
Page 255 of 297
Adhere to the general instructions, refer to
page 248.
With Xenon headlamps, the following lamps
are designed with LED technology:▷Parking and roadside parking lamps.▷Daytime running lights.
Contact your service center in the event of a
malfunction.
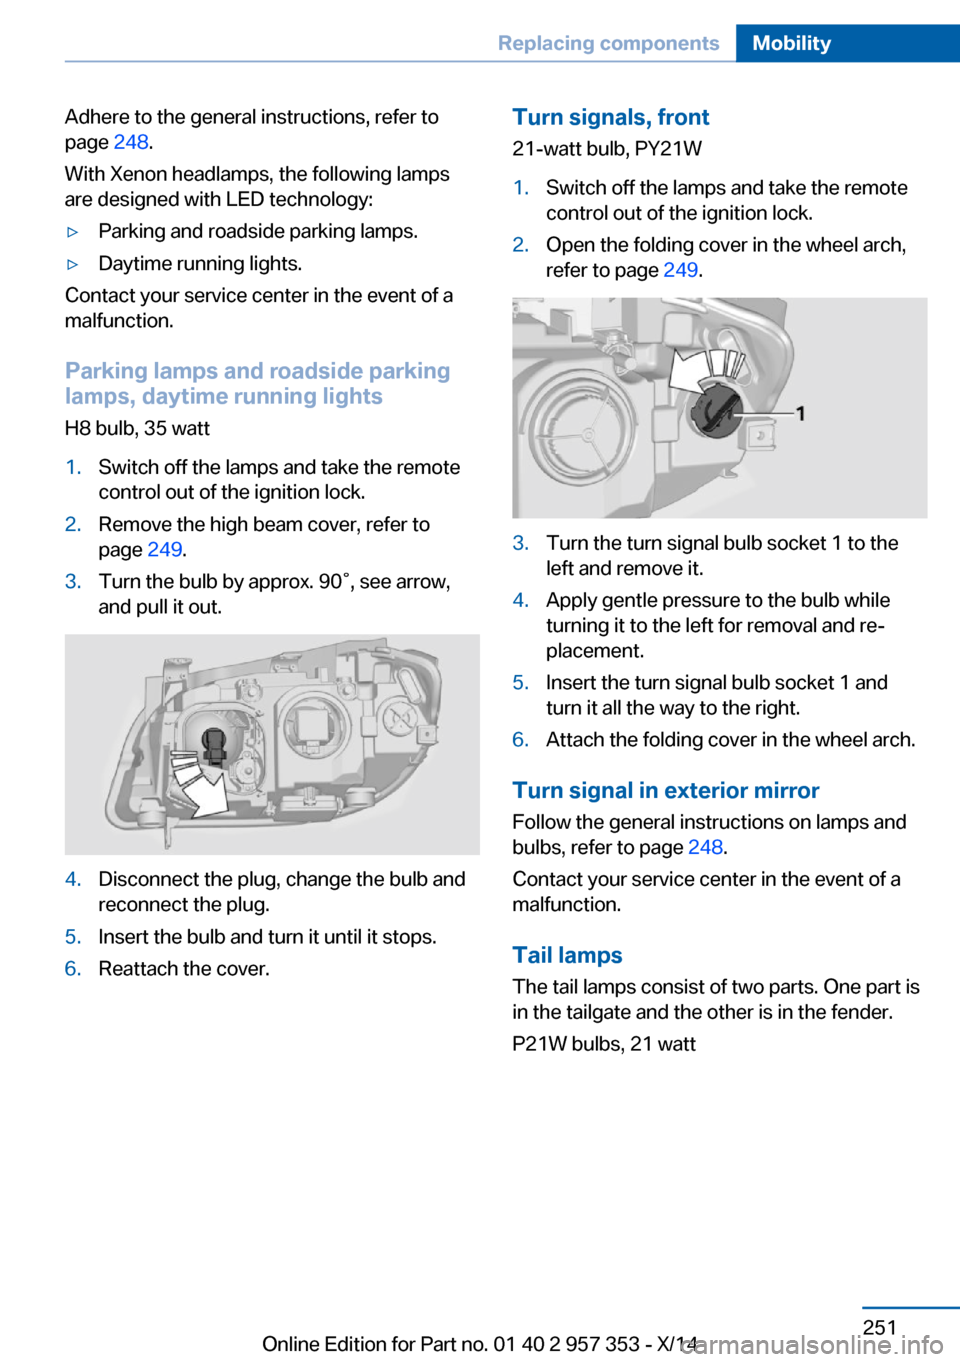
Parking lamps and roadside parking
lamps, daytime running lights
H8 bulb, 35 watt
1.Switch off the lamps and take the remote
control out of the ignition lock.2.Remove the high beam cover, refer to
page 249.3.Turn the bulb by approx. 90˚, see arrow,
and pull it out.4.Disconnect the plug, change the bulb and
reconnect the plug.5.Insert the bulb and turn it until it stops.6.Reattach the cover.Turn signals, front
21-watt bulb, PY21W1.Switch off the lamps and take the remote
control out of the ignition lock.2.Open the folding cover in the wheel arch,
refer to page 249.3.Turn the turn signal bulb socket 1 to the
left and remove it.4.Apply gentle pressure to the bulb while
turning it to the left for removal and re‐
placement.5.Insert the turn signal bulb socket 1 and
turn it all the way to the right.6.Attach the folding cover in the wheel arch.
Turn signal in exterior mirror
Follow the general instructions on lamps and
bulbs, refer to page 248.
Contact your service center in the event of a
malfunction.
Tail lamps
The tail lamps consist of two parts. One part is
in the tailgate and the other is in the fender.
P21W bulbs, 21 watt
Seite 251Replacing componentsMobility251
Online Edition for Part no. 01 40 2 957 353 - X/14
Page 283 of 297
Average speed, refer to Com‐puter 73
Axle loads, refer to Weights 268
B
Backrest curvature, refer to Lumbar support 45
Backrests, refer to Seats 44
Backrest width adjust‐ ment 46
Back seats– Adjusting the backrest
tilt 119
Backup camera 105
Backup camera, obstacle marking 107
Backup camera, pathway lines 106
Backup camera, turning lines 106
Backup lamps, bulb replace‐ ment 252
Balance 164
Band-aids, refer to First aid kit 256
Bass 164
Battery
– Remote control 30
Battery disposal 254
Battery, refer to Vehicle bat‐ tery 253
Battery replacement, remote control for vehicle 38
Before entering the car wash 261
Belts, refer to Safety belts 46
Belt tensioners, refer to Safety belts 46
Beverage holder, refer to Cu‐ pholder 125
Black and white map dis‐ play 158
Blower, refer to Air flow rate 110
Bluetooth audio 187
Bluetooth connection, acti‐
vating/deactivating 197
BMW Apps 222
BMW EfficientDynamics, re‐ fer to Saving fuel 137
BMW Homepage 6
BMW Internet page 6
BMW maintenance sys‐ tem 245
BMW Online 220
Bottle holder, refer to Cu‐ pholder 125
Brake assistant 97
Brake discs, breaking in 130
Brake fluid, refer to Service requirements 78
Brake force display 96
Brake force distribution, elec‐ tronic 97
Brake lamps– Bulb replacement 252
Brake lamps, brake force dis‐
play 96
Brake lights, adaptive 96
Brake pads, breaking in 130
Brakes
– Parking brake 61
Brakes, BMW maintenance
system 245
Brakes, service require‐ ments 78
Brake system, BMW mainte‐ nance system 245
Braking, notes 131
Breakdown assistance, refer to Roadside Assistance 219
Breakdown, transporting the vehicle 258
Breaking in 130
Brightness on the Control Display 78
Bulb replacement, refer to Lamp and bulb replace‐
ment 248
Button for starting the engine, refer to Start/Stop but‐
ton 57
C
Calendar 212
California Proposition 65 Warning 7
Camera, care 264
Camera, refer to Backup cam‐ era 105
Can holder, refer to Cu‐ pholder 125
Car battery, refer to Vehicle battery 253
Car care products 262
Care 261
Care, displays 264
Care, vehicle 262
Cargo 134
Cargo area 118
Cargo area– Comfort Access 37– Cover 118– Folding up the cargo floor
panel 121– Multi-function hook 122– Partition net 119
Cargo area, capacities 268
Cargo area, enlarging 119
Cargo area lid, refer to Tail‐ gate 35
Cargo area light, refer to Inte‐ rior lights 87
Cargo area net, refer to Parti‐ tion net 119
Cargo area, opening from the inside 36
Cargo area, opening from the outside 36
Cargo floor panel
– Folding up 121
Cargo floor panel, raising 121
Cargo straps, securing cargo 135
Car key, refer to Integrated key/remote control 30
Carpet, care 263
Seite 279Everything from A to ZReference279
Online Edition for Part no. 01 40 2 957 353 - X/14
Page 286 of 297
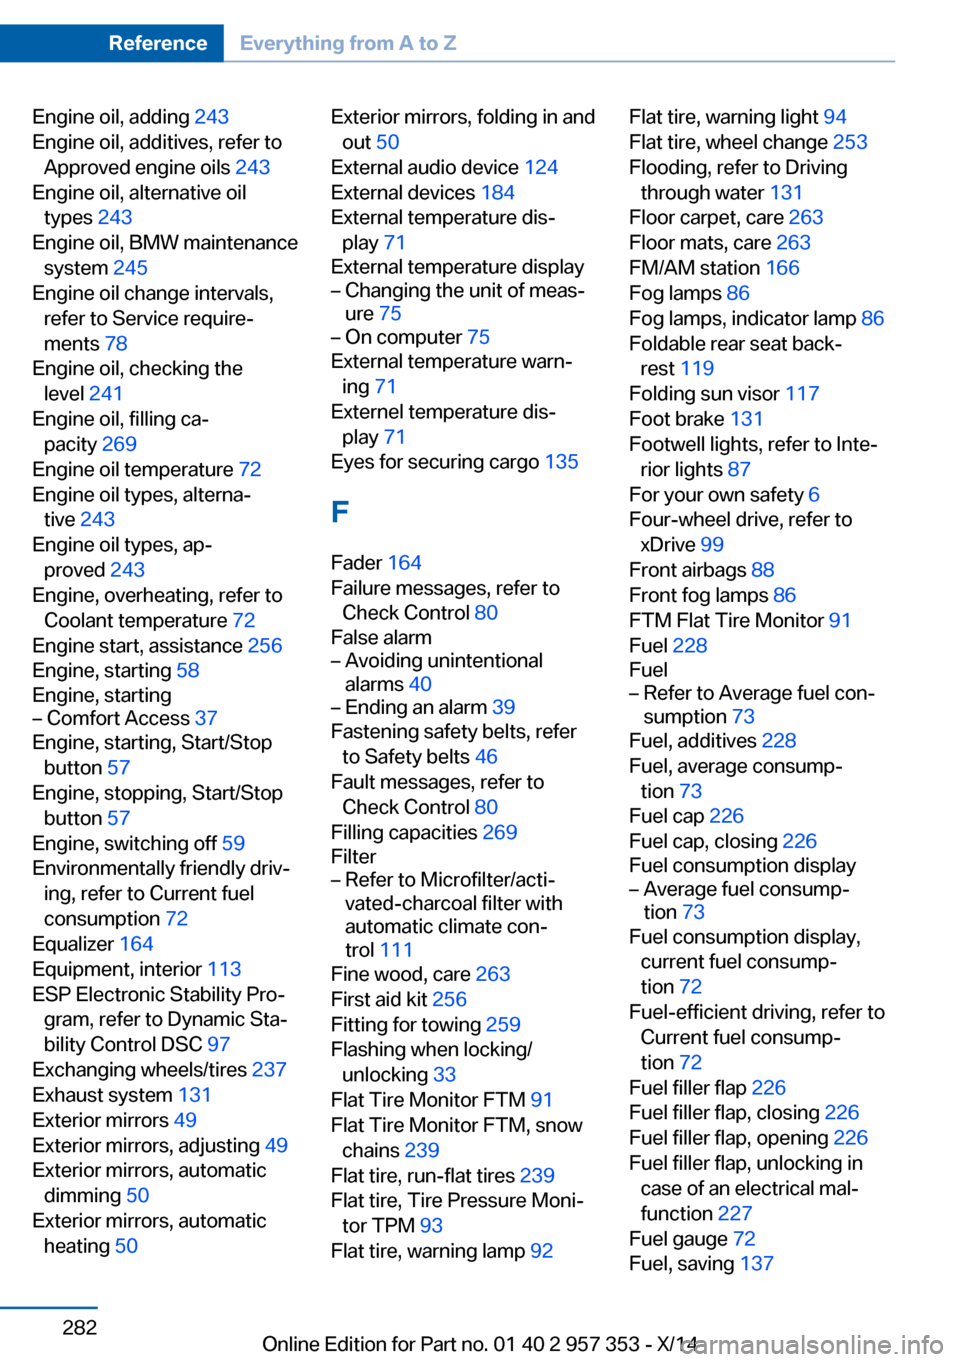
Engine oil, adding 243
Engine oil, additives, refer to Approved engine oils 243
Engine oil, alternative oil types 243
Engine oil, BMW maintenance system 245
Engine oil change intervals, refer to Service require‐
ments 78
Engine oil, checking the level 241
Engine oil, filling ca‐ pacity 269
Engine oil temperature 72
Engine oil types, alterna‐ tive 243
Engine oil types, ap‐ proved 243
Engine, overheating, refer to Coolant temperature 72
Engine start, assistance 256
Engine, starting 58
Engine, starting– Comfort Access 37
Engine, starting, Start/Stop
button 57
Engine, stopping, Start/Stop button 57
Engine, switching off 59
Environmentally friendly driv‐ ing, refer to Current fuel
consumption 72
Equalizer 164
Equipment, interior 113
ESP Electronic Stability Pro‐ gram, refer to Dynamic Sta‐
bility Control DSC 97
Exchanging wheels/tires 237
Exhaust system 131
Exterior mirrors 49
Exterior mirrors, adjusting 49
Exterior mirrors, automatic dimming 50
Exterior mirrors, automatic heating 50
Exterior mirrors, folding in and
out 50
External audio device 124
External devices 184
External temperature dis‐ play 71
External temperature display– Changing the unit of meas‐
ure 75– On computer 75
External temperature warn‐
ing 71
Externel temperature dis‐ play 71
Eyes for securing cargo 135
F
Fader 164
Failure messages, refer to Check Control 80
False alarm
– Avoiding unintentional
alarms 40– Ending an alarm 39
Fastening safety belts, refer
to Safety belts 46
Fault messages, refer to Check Control 80
Filling capacities 269
Filter
– Refer to Microfilter/acti‐
vated-charcoal filter with
automatic climate con‐
trol 111
Fine wood, care 263
First aid kit 256
Fitting for towing 259
Flashing when locking/ unlocking 33
Flat Tire Monitor FTM 91
Flat Tire Monitor FTM, snow chains 239
Flat tire, run-flat tires 239
Flat tire, Tire Pressure Moni‐ tor TPM 93
Flat tire, warning lamp 92
Flat tire, warning light 94
Flat tire, wheel change 253
Flooding, refer to Driving through water 131
Floor carpet, care 263
Floor mats, care 263
FM/AM station 166
Fog lamps 86
Fog lamps, indicator lamp 86
Foldable rear seat back‐ rest 119
Folding sun visor 117
Foot brake 131
Footwell lights, refer to Inte‐ rior lights 87
For your own safety 6
Four-wheel drive, refer to xDrive 99
Front airbags 88
Front fog lamps 86
FTM Flat Tire Monitor 91
Fuel 228
Fuel– Refer to Average fuel con‐
sumption 73
Fuel, additives 228
Fuel, average consump‐ tion 73
Fuel cap 226
Fuel cap, closing 226
Fuel consumption display
– Average fuel consump‐
tion 73
Fuel consumption display,
current fuel consump‐
tion 72
Fuel-efficient driving, refer to Current fuel consump‐
tion 72
Fuel filler flap 226
Fuel filler flap, closing 226
Fuel filler flap, opening 226
Fuel filler flap, unlocking in case of an electrical mal‐
function 227
Fuel gauge 72
Fuel, saving 137
Seite 282ReferenceEverything from A to Z282
Online Edition for Part no. 01 40 2 957 353 - X/14
Page 289 of 297
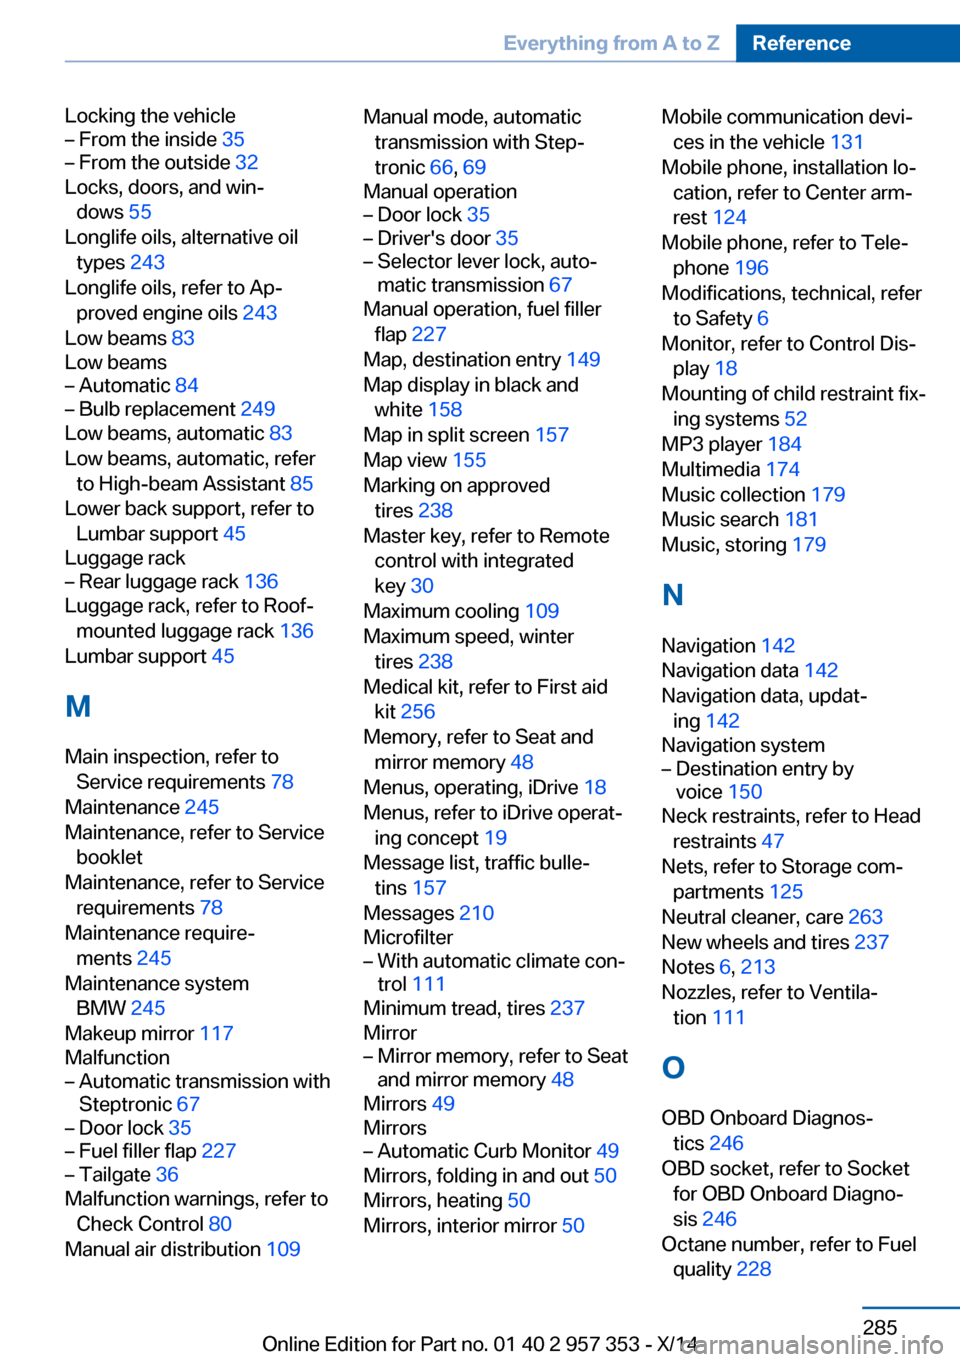
Locking the vehicle– From the inside 35– From the outside 32
Locks, doors, and win‐
dows 55
Longlife oils, alternative oil types 243
Longlife oils, refer to Ap‐ proved engine oils 243
Low beams 83
Low beams
– Automatic 84– Bulb replacement 249
Low beams, automatic 83
Low beams, automatic, refer to High-beam Assistant 85
Lower back support, refer to Lumbar support 45
Luggage rack
– Rear luggage rack 136
Luggage rack, refer to Roof-
mounted luggage rack 136
Lumbar support 45
M
Main inspection, refer to Service requirements 78
Maintenance 245
Maintenance, refer to Service booklet
Maintenance, refer to Service requirements 78
Maintenance require‐ ments 245
Maintenance system BMW 245
Makeup mirror 117
Malfunction
– Automatic transmission with
Steptronic 67– Door lock 35– Fuel filler flap 227– Tailgate 36
Malfunction warnings, refer to
Check Control 80
Manual air distribution 109
Manual mode, automatic
transmission with Step‐
tronic 66, 69
Manual operation– Door lock 35– Driver's door 35– Selector lever lock, auto‐
matic transmission 67
Manual operation, fuel filler
flap 227
Map, destination entry 149
Map display in black and white 158
Map in split screen 157
Map view 155
Marking on approved tires 238
Master key, refer to Remote control with integrated
key 30
Maximum cooling 109
Maximum speed, winter tires 238
Medical kit, refer to First aid kit 256
Memory, refer to Seat and mirror memory 48
Menus, operating, iDrive 18
Menus, refer to iDrive operat‐ ing concept 19
Message list, traffic bulle‐ tins 157
Messages 210
Microfilter
– With automatic climate con‐
trol 111
Minimum tread, tires 237
Mirror
– Mirror memory, refer to Seat
and mirror memory 48
Mirrors 49
Mirrors
– Automatic Curb Monitor 49
Mirrors, folding in and out 50
Mirrors, heating 50
Mirrors, interior mirror 50
Mobile communication devi‐
ces in the vehicle 131
Mobile phone, installation lo‐ cation, refer to Center arm‐
rest 124
Mobile phone, refer to Tele‐ phone 196
Modifications, technical, refer to Safety 6
Monitor, refer to Control Dis‐ play 18
Mounting of child restraint fix‐ ing systems 52
MP3 player 184
Multimedia 174
Music collection 179
Music search 181
Music, storing 179
N
Navigation 142
Navigation data 142
Navigation data, updat‐ ing 142
Navigation system– Destination entry by
voice 150
Neck restraints, refer to Head
restraints 47
Nets, refer to Storage com‐ partments 125
Neutral cleaner, care 263
New wheels and tires 237
Notes 6, 213
Nozzles, refer to Ventila‐ tion 111
O OBD Onboard Diagnos‐ tics 246
OBD socket, refer to Socket for OBD Onboard Diagno‐
sis 246
Octane number, refer to Fuel quality 228
Seite 285Everything from A to ZReference285
Online Edition for Part no. 01 40 2 957 353 - X/14