bulb BMW X1 2015 E84 Owner's Manual
[x] Cancel search | Manufacturer: BMW, Model Year: 2015, Model line: X1, Model: BMW X1 2015 E84Pages: 297, PDF Size: 7.01 MB
Page 6 of 297
Addendum
“BMW recommends that you have the
maintenance carried out by your service
center.”
9. At page 225, under the heading “Apps” and
subheading “Requirements,” the section
that begins, “Use only … ,” should be disre-
garded and the following text should be
read in lieu thereof: “The manufacturer of
your vehicle recommends the use of BMW
recommended software; otherwise there
may be malfunctions in system operations.”
10. At page 232, under the heading “Pressure
specifications,” the sentence beginning,
“The inflation pressures apply to the tire
sizes approved … .” should be disregarded.
11. At page 240, under the heading: “Approved
wheels and tires,” the term “Approved”
should be disregarded and in lieu thereof,
the term “Recommended” should be read
in its place. In addition, the text of that sec-
tion should be disregarded and the follow-
ing text should be read in lieu thereof:
The manufacturer of your vehicle strongly
suggests that you use wheels and tires that
have been recommended by the vehicle
manufacturer for your vehicle type; other-
wise, for example, despite having the same
official size ratings, variations can lead to
body contact and with it, the risk of severe
accidents.
The manufacturer of your vehicle does not
evaluate non-recommended wheels and
tires to determine if they are suitable for use
on your vehicle.
12. At page 243, under the heading “Hood,” the
sentence beginning, “If you are unfamiliar”
should be disregarded.
13. At page 248, under the heading: “Service
and Warranty Information Booklet for US
models and Warranty and Service Guide
Booklet for Canadian models,” the second
paragraph should be disregarded and the
following text read in lieu thereof:
The manufacturer of your vehicle recom-
mends that you have maintenance and
repair performed by your BMW dealer's ser-
vice center or another service center or
repair shop that employs trained personnel
that can perform maintenance and repair
work on your vehicle in accordance with
BMW specifications. The manufacturer of
your vehicle recommends that you maintain
records of all maintenance and repair work
performed on your vehicle.
14. At page 250 and page 252, where it reads:
“Do not perform work/bulb replacement on
xenon headlamps,” that text should be dis-
regarded and in lieu thereof the following
text should be read: “Xenon headlamp work
or replacement can cause serious and fatal
injuries.” In the text that follows, where it
reads: “[h]ave any work on the xenon light-
ing system … ,” the following words should
be read as preceding that passage: “It is
strongly suggested that you … .”
15. At page 255, under the “Battery replace-
ment” section, the text should be disre-
garded and in lieu thereof the following text
should be read:
Use of recommended vehicle batteries
The manufacturer of your vehicle recom-
mends that you use vehicle batteries that it
has tested and recommends for use in your
vehicle; otherwise the vehicle could be
damaged and systems or functions may not
be fully available.
After a battery replacement, the manufac-
turer of your vehicle recommends that you
have the battery registered on your vehicle
by a service center to ensure that all com-
fort functions are fully available, and that
any “check control” messages of these
comfort functions are no longer displayed.
Online Edition for Part no. 01 40 2 954 052 - II/15
Page 66 of 297
To prevent corrosion and uneven brake action,
lightly apply the parking brake from time to
time when coasting, traffic conditions permit‐
ting.
The brake lights do not light up when the park‐
ing brake is pulled.
Turn signal, high beams,
headlamp flasher
Turn signal Do not fold in the exterior mirrors
While driving and when using the turn
signal/hazard warning flashers, do not fold in
the exterior mirrors; otherwise, the additional
turn signal lamps in the exterior mirrors will not
be in the appropriate position and will be diffi‐ cult to detect.◀
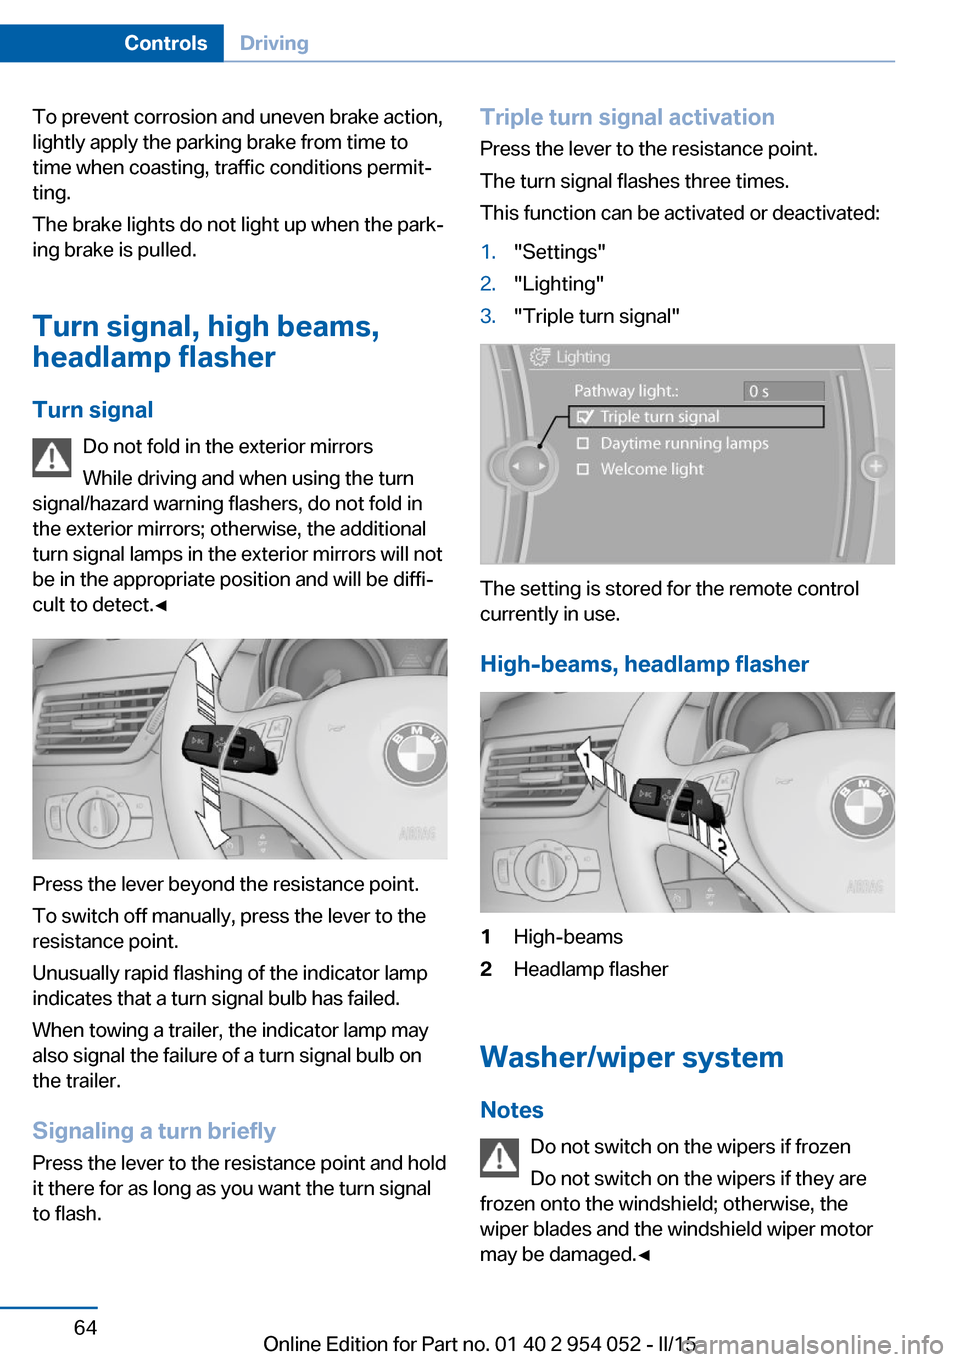
Press the lever beyond the resistance point.
To switch off manually, press the lever to the
resistance point.
Unusually rapid flashing of the indicator lamp
indicates that a turn signal bulb has failed.
When towing a trailer, the indicator lamp may
also signal the failure of a turn signal bulb on
the trailer.
Signaling a turn briefly
Press the lever to the resistance point and hold
it there for as long as you want the turn signal
to flash.
Triple turn signal activation
Press the lever to the resistance point.
The turn signal flashes three times.
This function can be activated or deactivated:1."Settings"2."Lighting"3."Triple turn signal"
The setting is stored for the remote control
currently in use.
High-beams, headlamp flasher
1High-beams2Headlamp flasher
Washer/wiper system Notes Do not switch on the wipers if frozen
Do not switch on the wipers if they are
frozen onto the windshield; otherwise, the
wiper blades and the windshield wiper motor
may be damaged.◀
Seite 64ControlsDriving64
Online Edition for Part no. 01 40 2 954 052 - II/15
Page 252 of 297
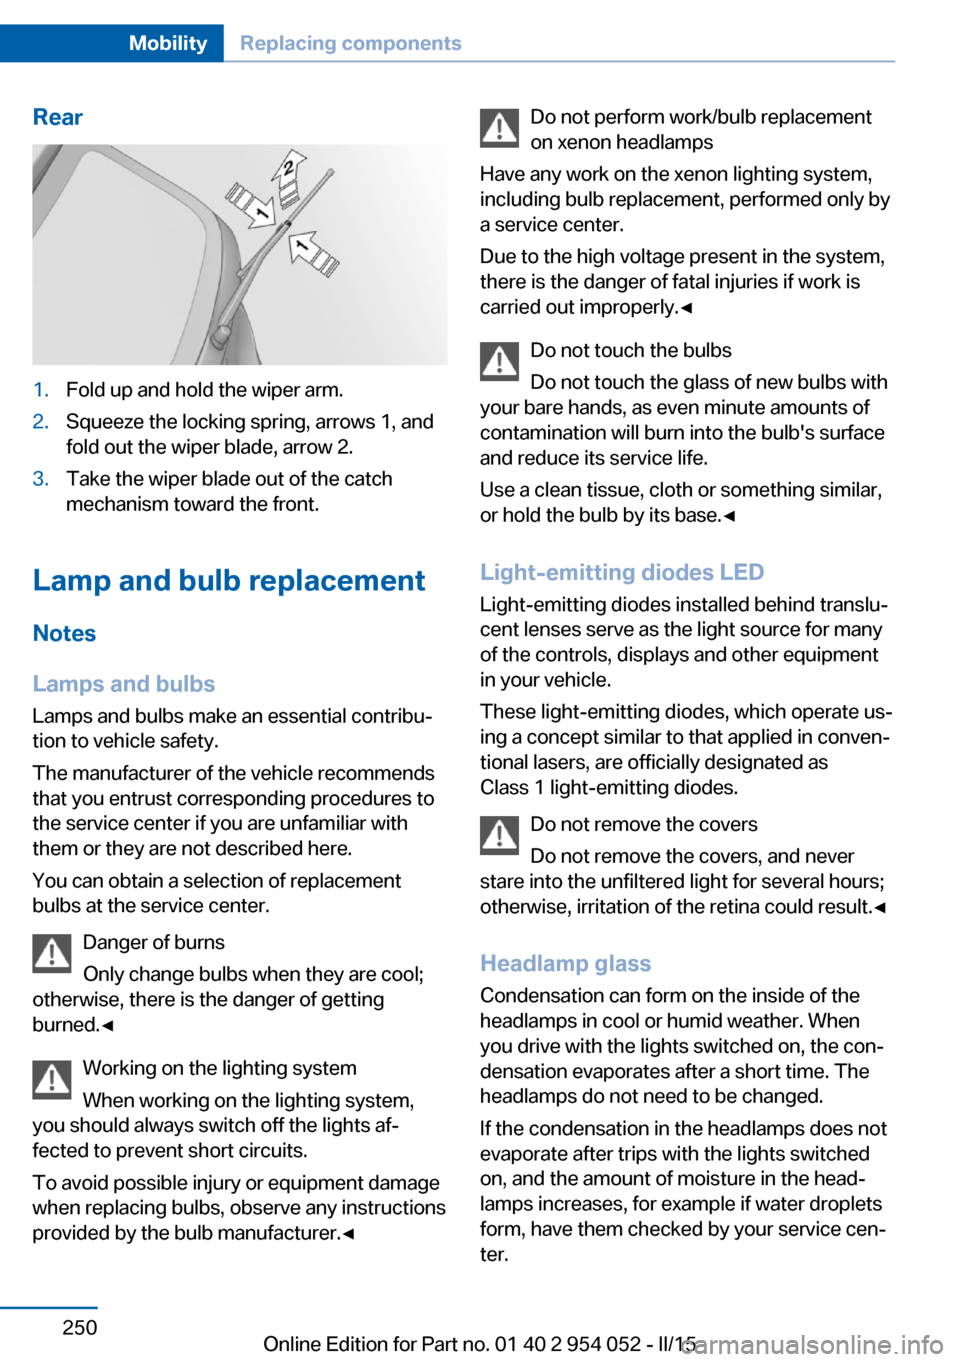
Rear1.Fold up and hold the wiper arm.2.Squeeze the locking spring, arrows 1, and
fold out the wiper blade, arrow 2.3.Take the wiper blade out of the catch
mechanism toward the front.
Lamp and bulb replacement
Notes
Lamps and bulbs
Lamps and bulbs make an essential contribu‐
tion to vehicle safety.
The manufacturer of the vehicle recommends
that you entrust corresponding procedures to
the service center if you are unfamiliar with them or they are not described here.
You can obtain a selection of replacement
bulbs at the service center.
Danger of burns
Only change bulbs when they are cool;
otherwise, there is the danger of getting
burned.◀
Working on the lighting system
When working on the lighting system,
you should always switch off the lights af‐
fected to prevent short circuits.
To avoid possible injury or equipment damage
when replacing bulbs, observe any instructions
provided by the bulb manufacturer.◀
Do not perform work/bulb replacement
on xenon headlamps
Have any work on the xenon lighting system,
including bulb replacement, performed only by
a service center.
Due to the high voltage present in the system,
there is the danger of fatal injuries if work is
carried out improperly.◀
Do not touch the bulbs
Do not touch the glass of new bulbs with
your bare hands, as even minute amounts of
contamination will burn into the bulb's surface
and reduce its service life.
Use a clean tissue, cloth or something similar,
or hold the bulb by its base.◀
Light-emitting diodes LED
Light-emitting diodes installed behind translu‐
cent lenses serve as the light source for many
of the controls, displays and other equipment
in your vehicle.
These light-emitting diodes, which operate us‐
ing a concept similar to that applied in conven‐
tional lasers, are officially designated as
Class 1 light-emitting diodes.
Do not remove the covers
Do not remove the covers, and never
stare into the unfiltered light for several hours; otherwise, irritation of the retina could result.◀
Headlamp glass
Condensation can form on the inside of the
headlamps in cool or humid weather. When
you drive with the lights switched on, the con‐
densation evaporates after a short time. The
headlamps do not need to be changed.
If the condensation in the headlamps does not
evaporate after trips with the lights switched
on, and the amount of moisture in the head‐
lamps increases, for example if water droplets
form, have them checked by your service cen‐
ter.Seite 250MobilityReplacing components250
Online Edition for Part no. 01 40 2 954 052 - II/15
Page 253 of 297
Headlight setting
Changing the bulbs and lights may influence
the headlight settings. Have the headlight set‐
ting checked by a service center and corrected
if necessary after changing bulbs or lights.
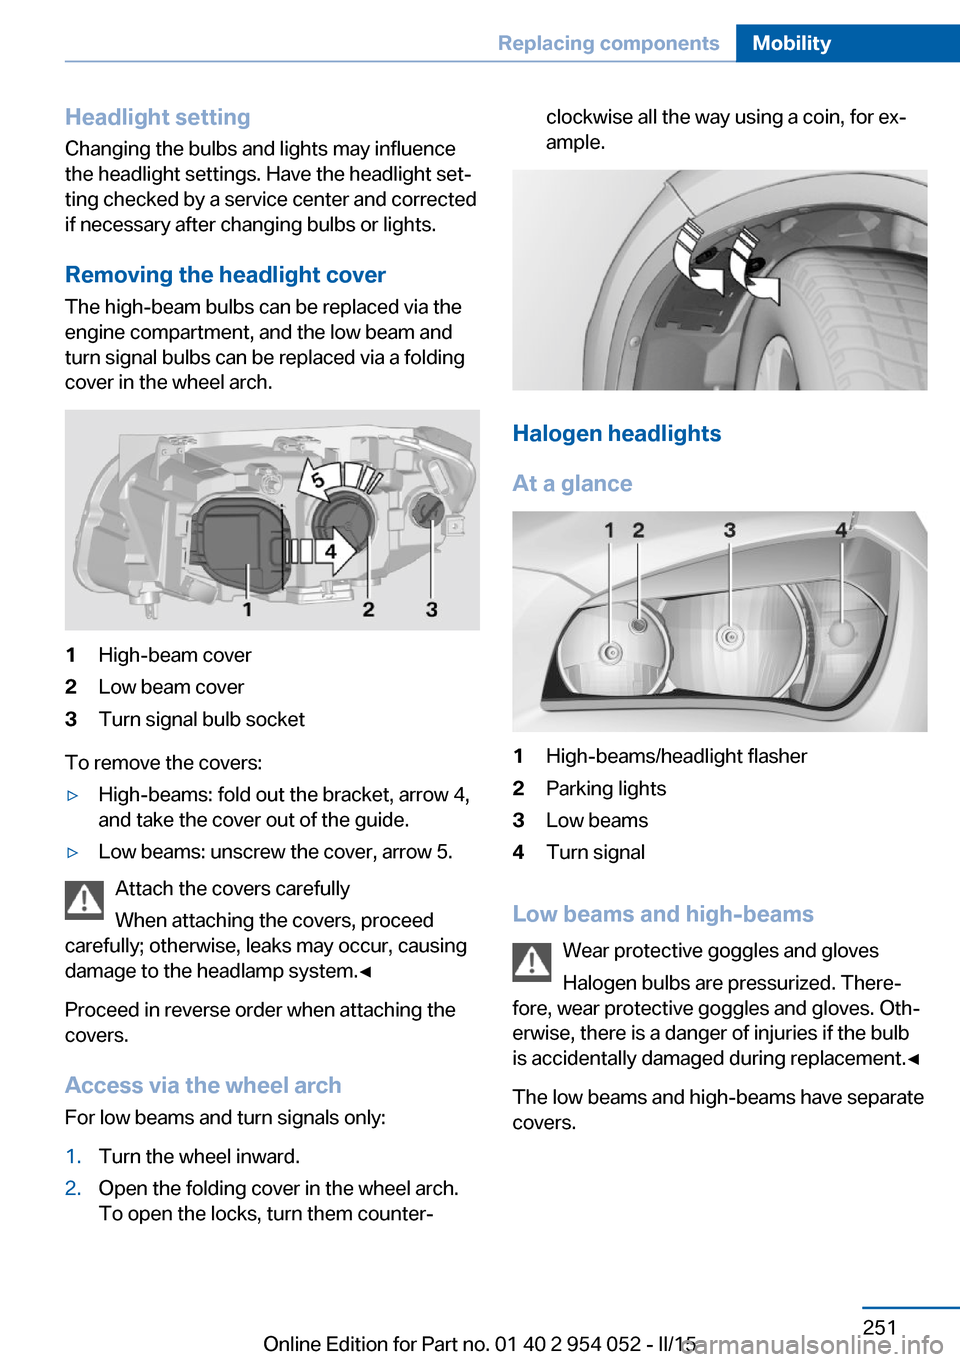
Removing the headlight cover
The high-beam bulbs can be replaced via the
engine compartment, and the low beam and
turn signal bulbs can be replaced via a folding
cover in the wheel arch.1High-beam cover2Low beam cover3Turn signal bulb socket
To remove the covers:
▷High-beams: fold out the bracket, arrow 4,
and take the cover out of the guide.▷Low beams: unscrew the cover, arrow 5.
Attach the covers carefully
When attaching the covers, proceed
carefully; otherwise, leaks may occur, causing
damage to the headlamp system.◀
Proceed in reverse order when attaching the
covers.
Access via the wheel arch For low beams and turn signals only:
1.Turn the wheel inward.2.Open the folding cover in the wheel arch.
To open the locks, turn them counter‐clockwise all the way using a coin, for ex‐
ample.
Halogen headlights
At a glance
1High-beams/headlight flasher2Parking lights3Low beams4Turn signal
Low beams and high-beams Wear protective goggles and gloves
Halogen bulbs are pressurized. There‐
fore, wear protective goggles and gloves. Oth‐
erwise, there is a danger of injuries if the bulb
is accidentally damaged during replacement.◀
The low beams and high-beams have separate
covers.
Seite 251Replacing componentsMobility251
Online Edition for Part no. 01 40 2 954 052 - II/15
Page 254 of 297
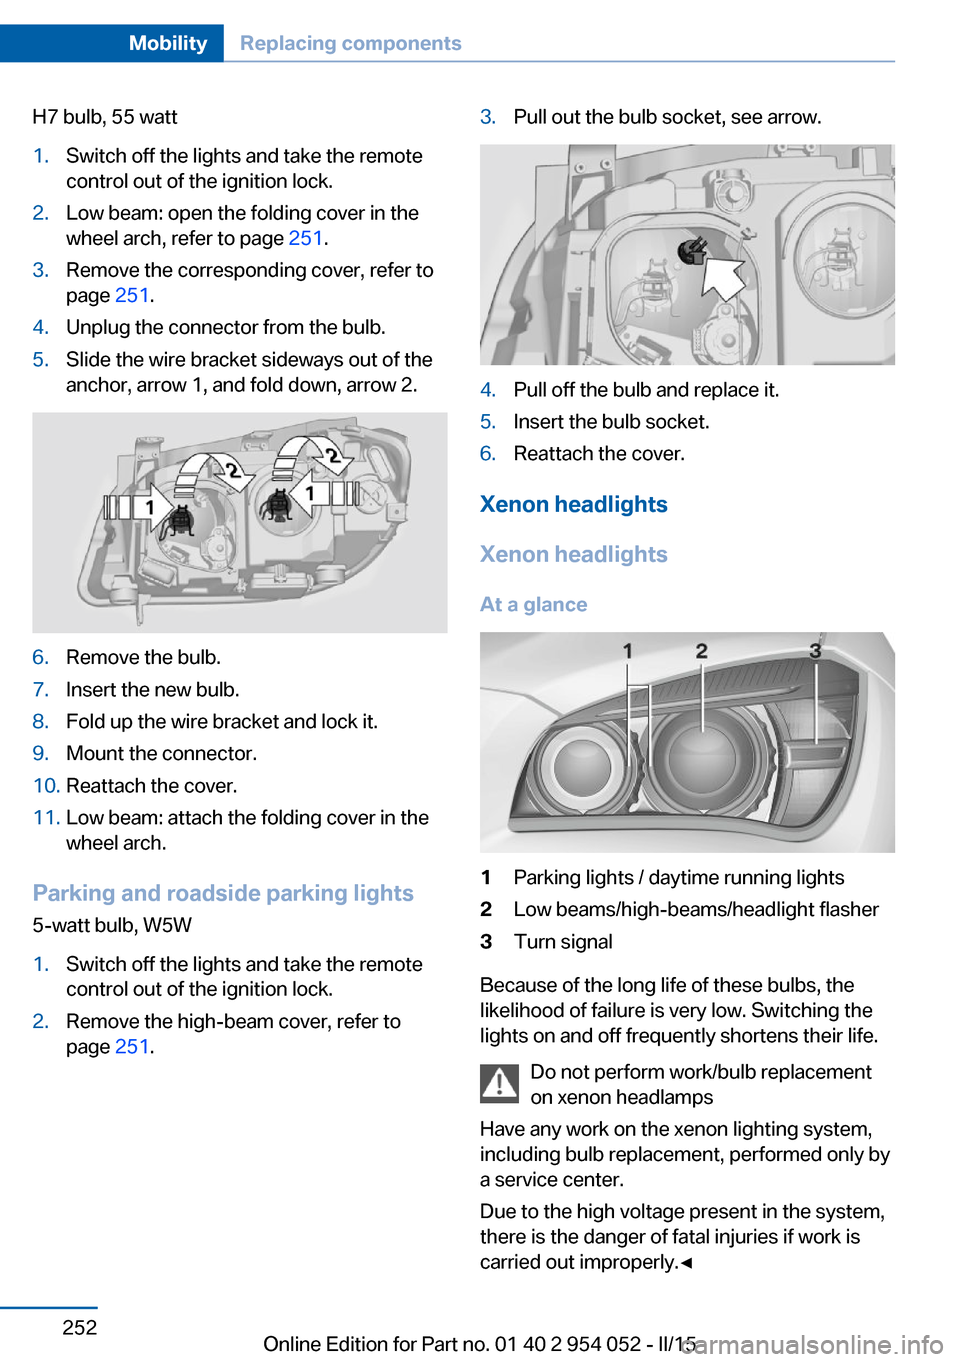
H7 bulb, 55 watt1.Switch off the lights and take the remote
control out of the ignition lock.2.Low beam: open the folding cover in the
wheel arch, refer to page 251.3.Remove the corresponding cover, refer to
page 251.4.Unplug the connector from the bulb.5.Slide the wire bracket sideways out of the
anchor, arrow 1, and fold down, arrow 2.6.Remove the bulb.7.Insert the new bulb.8.Fold up the wire bracket and lock it.9.Mount the connector.10.Reattach the cover.11.Low beam: attach the folding cover in the
wheel arch.
Parking and roadside parking lights
5-watt bulb, W5W
1.Switch off the lights and take the remote
control out of the ignition lock.2.Remove the high-beam cover, refer to
page 251.3.Pull out the bulb socket, see arrow.4.Pull off the bulb and replace it.5.Insert the bulb socket.6.Reattach the cover.
Xenon headlights
Xenon headlights
At a glance
1Parking lights / daytime running lights2Low beams/high-beams/headlight flasher3Turn signal
Because of the long life of these bulbs, the
likelihood of failure is very low. Switching the
lights on and off frequently shortens their life.
Do not perform work/bulb replacement
on xenon headlamps
Have any work on the xenon lighting system,
including bulb replacement, performed only by
a service center.
Due to the high voltage present in the system,
there is the danger of fatal injuries if work is
carried out improperly.◀
Seite 252MobilityReplacing components252
Online Edition for Part no. 01 40 2 954 052 - II/15
Page 255 of 297
Adhere to the general instructions, refer to
page 250.
With Xenon headlights, the following lights are
designed with LED technology:▷Parking and roadside parking lights.▷Daytime running lights.
Contact your service center in the event of a
malfunction.
Parking lights and roadside parking
lights, daytime running lights
H8 bulb, 35 watt
1.Switch off the lights and take the remote
control out of the ignition lock.2.Remove the high-beam cover, refer to
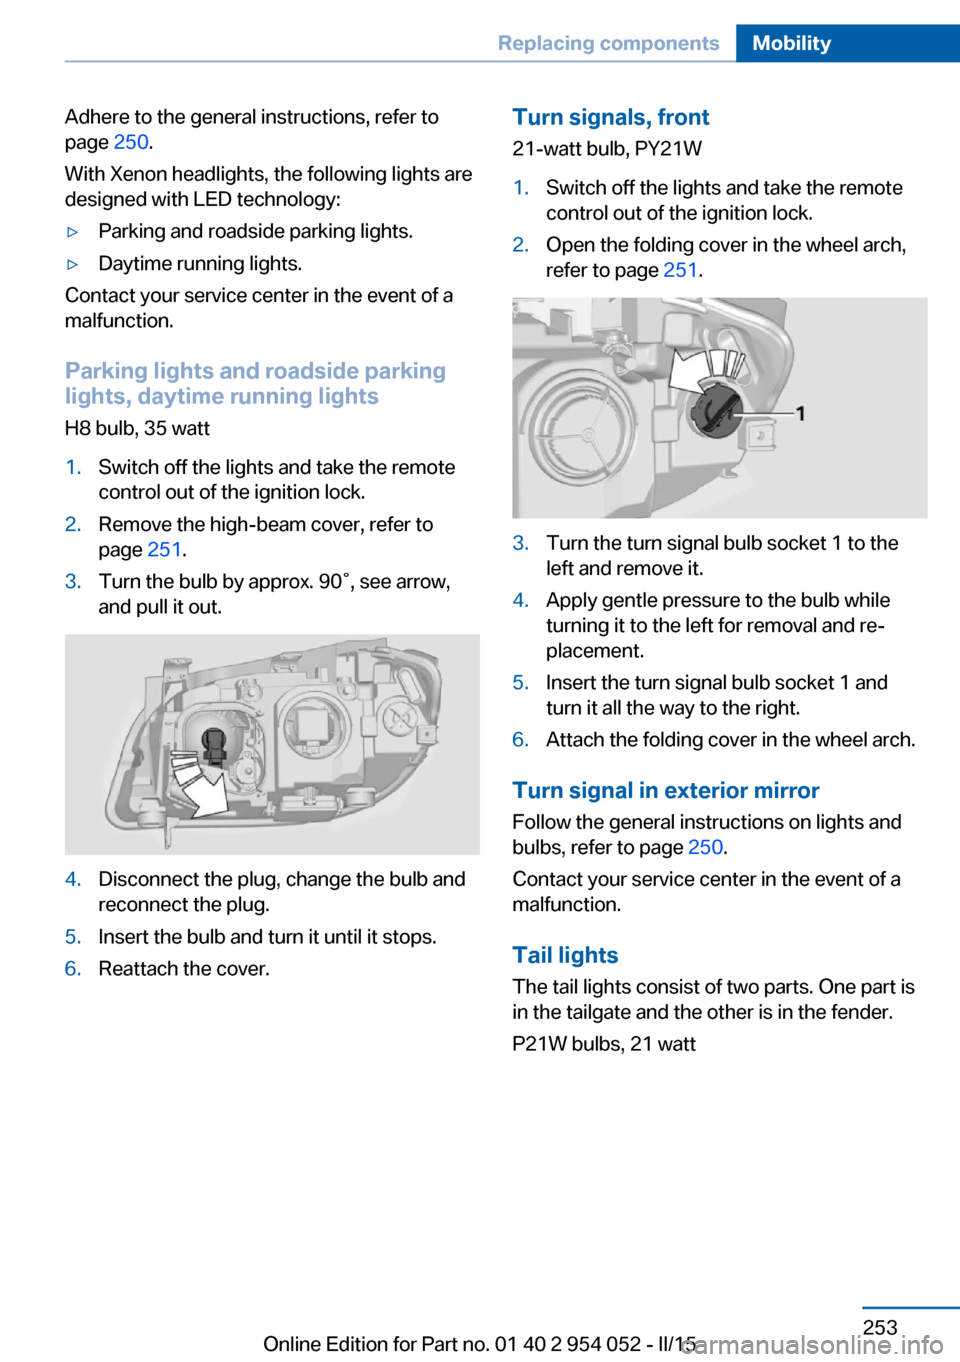
page 251.3.Turn the bulb by approx. 90˚, see arrow,
and pull it out.4.Disconnect the plug, change the bulb and
reconnect the plug.5.Insert the bulb and turn it until it stops.6.Reattach the cover.Turn signals, front
21-watt bulb, PY21W1.Switch off the lights and take the remote
control out of the ignition lock.2.Open the folding cover in the wheel arch,
refer to page 251.3.Turn the turn signal bulb socket 1 to the
left and remove it.4.Apply gentle pressure to the bulb while
turning it to the left for removal and re‐
placement.5.Insert the turn signal bulb socket 1 and
turn it all the way to the right.6.Attach the folding cover in the wheel arch.
Turn signal in exterior mirror
Follow the general instructions on lights and
bulbs, refer to page 250.
Contact your service center in the event of a
malfunction.
Tail lights
The tail lights consist of two parts. One part is
in the tailgate and the other is in the fender.
P21W bulbs, 21 watt
Seite 253Replacing componentsMobility253
Online Edition for Part no. 01 40 2 954 052 - II/15
Page 256 of 297
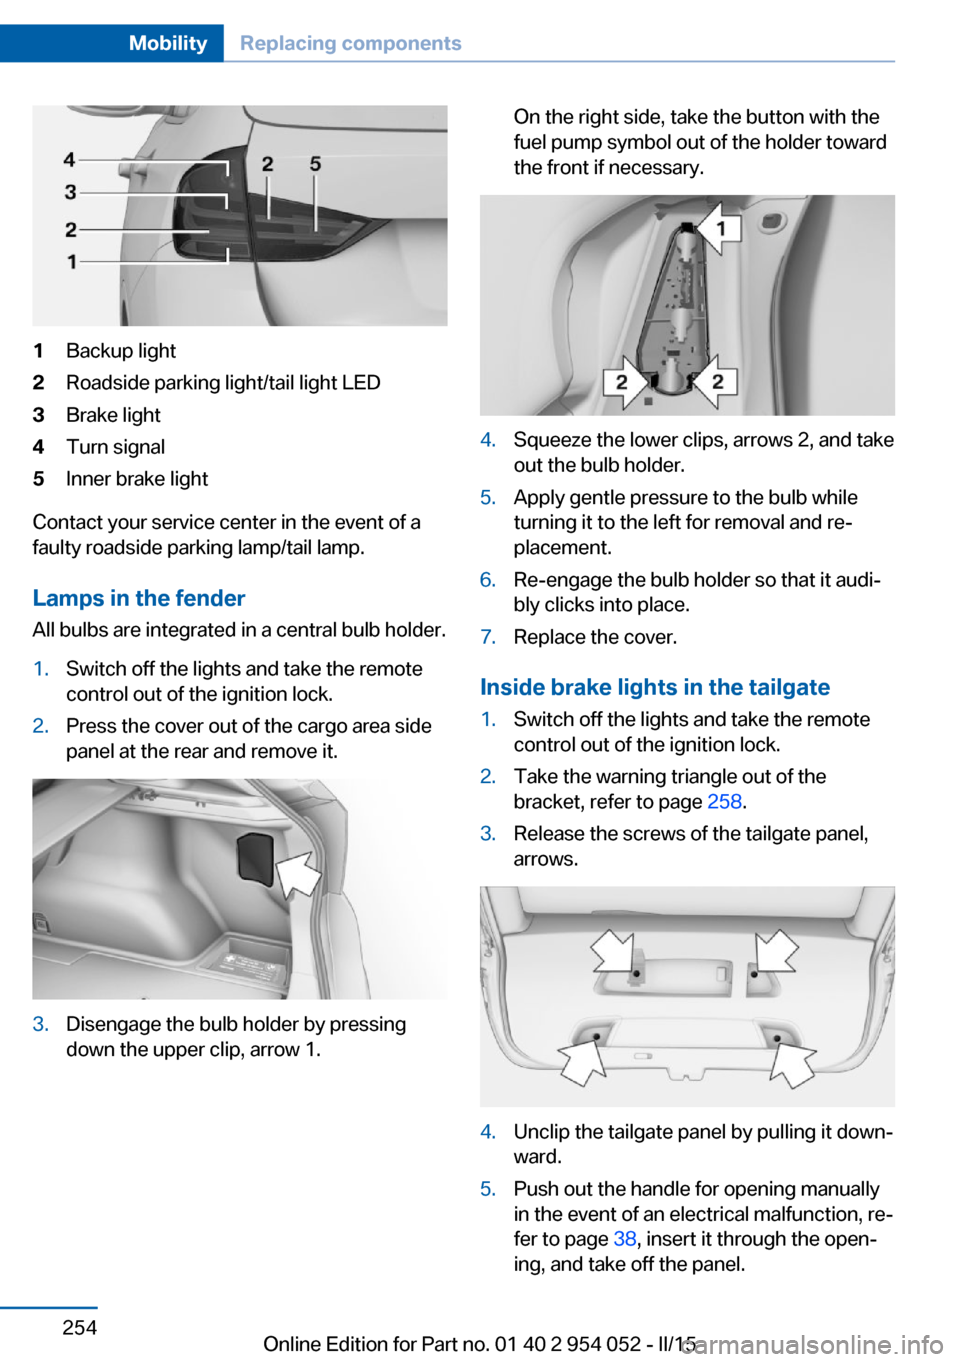
1Backup light2Roadside parking light/tail light LED3Brake light4Turn signal5Inner brake light
Contact your service center in the event of a
faulty roadside parking lamp/tail lamp.
Lamps in the fender All bulbs are integrated in a central bulb holder.
1.Switch off the lights and take the remote
control out of the ignition lock.2.Press the cover out of the cargo area side
panel at the rear and remove it.3.Disengage the bulb holder by pressing
down the upper clip, arrow 1.On the right side, take the button with the
fuel pump symbol out of the holder toward
the front if necessary.4.Squeeze the lower clips, arrows 2, and take
out the bulb holder.5.Apply gentle pressure to the bulb while
turning it to the left for removal and re‐
placement.6.Re-engage the bulb holder so that it audi‐
bly clicks into place.7.Replace the cover.
Inside brake lights in the tailgate
1.Switch off the lights and take the remote
control out of the ignition lock.2.Take the warning triangle out of the
bracket, refer to page 258.3.Release the screws of the tailgate panel,
arrows.4.Unclip the tailgate panel by pulling it down‐
ward.5.Push out the handle for opening manually
in the event of an electrical malfunction, re‐
fer to page 38, insert it through the open‐
ing, and take off the panel.Seite 254MobilityReplacing components254
Online Edition for Part no. 01 40 2 954 052 - II/15
Page 257 of 297
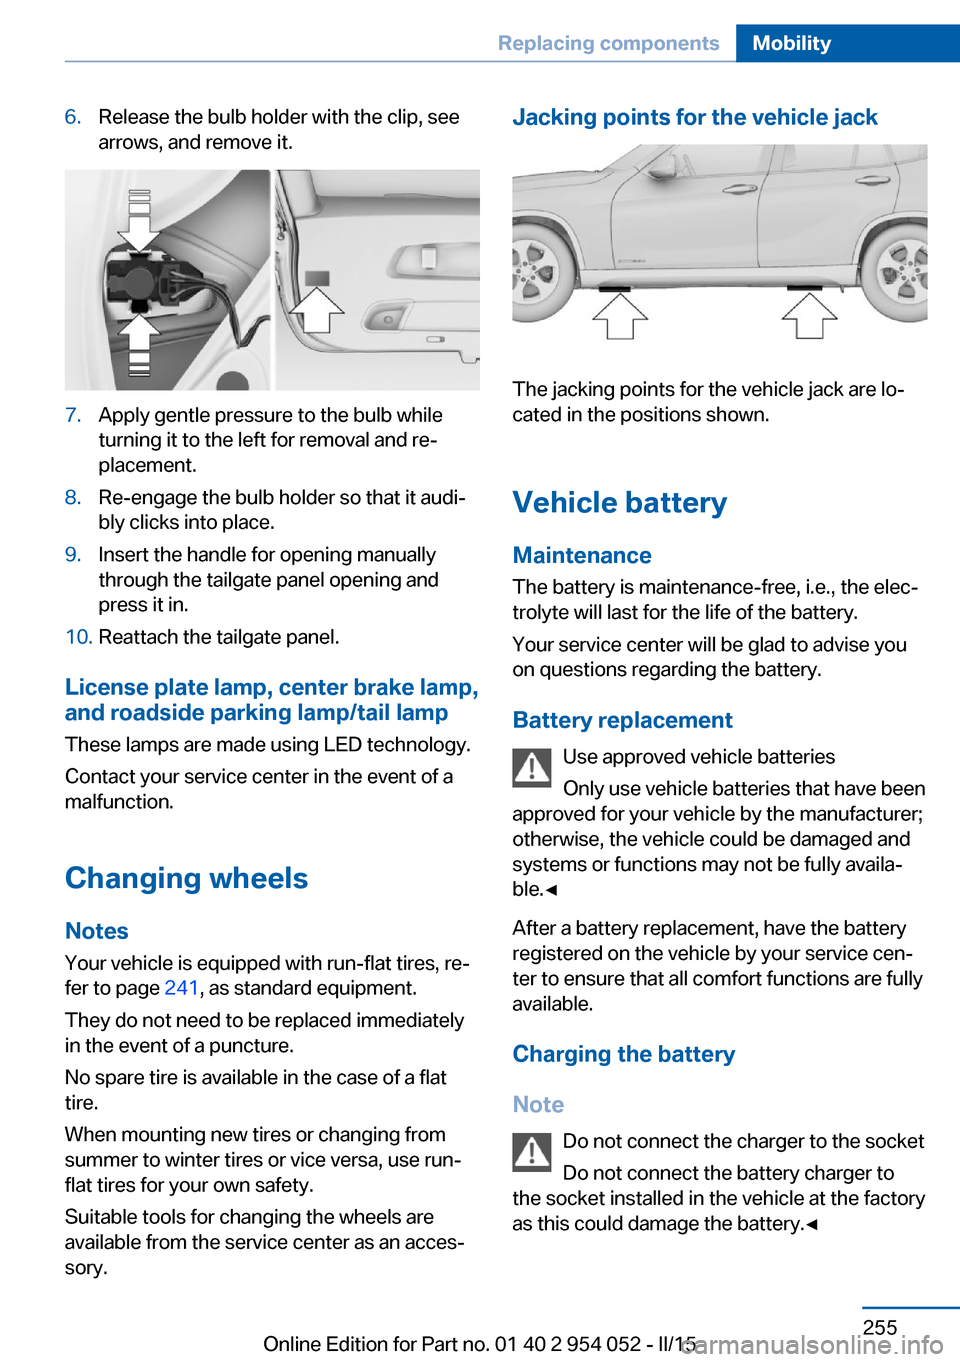
6.Release the bulb holder with the clip, see
arrows, and remove it.7.Apply gentle pressure to the bulb while
turning it to the left for removal and re‐
placement.8.Re-engage the bulb holder so that it audi‐
bly clicks into place.9.Insert the handle for opening manually
through the tailgate panel opening and
press it in.10.Reattach the tailgate panel.
License plate lamp, center brake lamp, and roadside parking lamp/tail lamp
These lamps are made using LED technology.
Contact your service center in the event of a
malfunction.
Changing wheels
Notes
Your vehicle is equipped with run-flat tires, re‐
fer to page 241, as standard equipment.
They do not need to be replaced immediately
in the event of a puncture.
No spare tire is available in the case of a flat
tire.
When mounting new tires or changing from
summer to winter tires or vice versa, use run-
flat tires for your own safety.
Suitable tools for changing the wheels are
available from the service center as an acces‐
sory.
Jacking points for the vehicle jack
The jacking points for the vehicle jack are lo‐
cated in the positions shown.
Vehicle battery
Maintenance
The battery is maintenance-free, i.e., the elec‐ trolyte will last for the life of the battery.
Your service center will be glad to advise you
on questions regarding the battery.
Battery replacement Use approved vehicle batteries
Only use vehicle batteries that have been
approved for your vehicle by the manufacturer;
otherwise, the vehicle could be damaged and
systems or functions may not be fully availa‐
ble.◀
After a battery replacement, have the battery
registered on the vehicle by your service cen‐
ter to ensure that all comfort functions are fully
available.
Charging the battery
Note Do not connect the charger to the socket
Do not connect the battery charger to
the socket installed in the vehicle at the factory
as this could damage the battery.◀
Seite 255Replacing componentsMobility255
Online Edition for Part no. 01 40 2 954 052 - II/15
Page 283 of 297
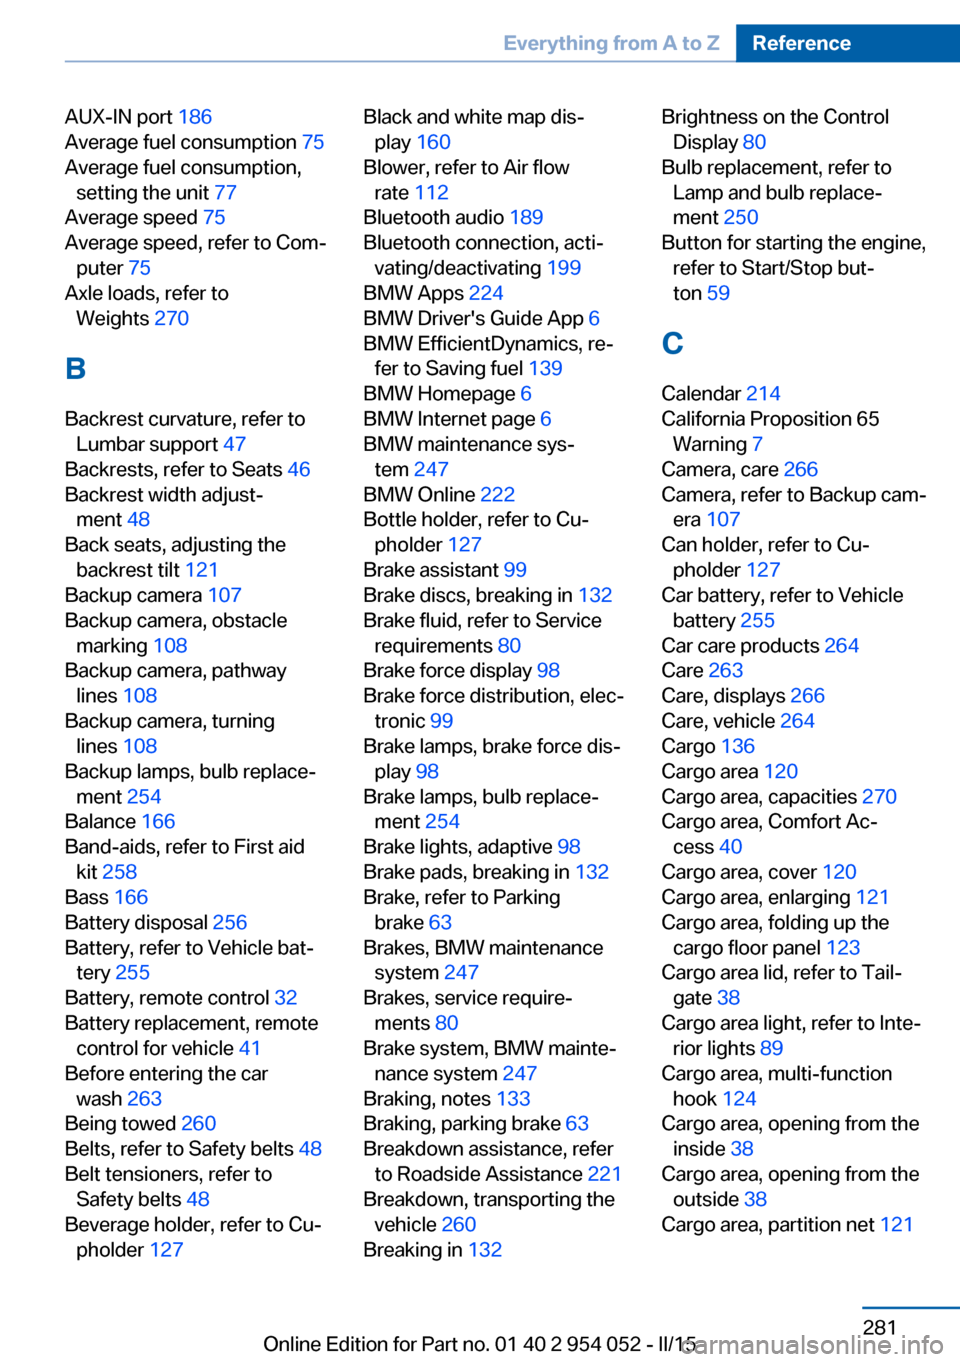
AUX-IN port 186
Average fuel consumption 75
Average fuel consumption, setting the unit 77
Average speed 75
Average speed, refer to Com‐ puter 75
Axle loads, refer to Weights 270
B
Backrest curvature, refer to Lumbar support 47
Backrests, refer to Seats 46
Backrest width adjust‐ ment 48
Back seats, adjusting the backrest tilt 121
Backup camera 107
Backup camera, obstacle marking 108
Backup camera, pathway lines 108
Backup camera, turning lines 108
Backup lamps, bulb replace‐ ment 254
Balance 166
Band-aids, refer to First aid kit 258
Bass 166
Battery disposal 256
Battery, refer to Vehicle bat‐ tery 255
Battery, remote control 32
Battery replacement, remote control for vehicle 41
Before entering the car wash 263
Being towed 260
Belts, refer to Safety belts 48
Belt tensioners, refer to Safety belts 48
Beverage holder, refer to Cu‐ pholder 127 Black and white map dis‐
play 160
Blower, refer to Air flow rate 112
Bluetooth audio 189
Bluetooth connection, acti‐ vating/deactivating 199
BMW Apps 224
BMW Driver's Guide App 6
BMW EfficientDynamics, re‐ fer to Saving fuel 139
BMW Homepage 6
BMW Internet page 6
BMW maintenance sys‐ tem 247
BMW Online 222
Bottle holder, refer to Cu‐ pholder 127
Brake assistant 99
Brake discs, breaking in 132
Brake fluid, refer to Service requirements 80
Brake force display 98
Brake force distribution, elec‐ tronic 99
Brake lamps, brake force dis‐ play 98
Brake lamps, bulb replace‐ ment 254
Brake lights, adaptive 98
Brake pads, breaking in 132
Brake, refer to Parking brake 63
Brakes, BMW maintenance system 247
Brakes, service require‐ ments 80
Brake system, BMW mainte‐ nance system 247
Braking, notes 133
Braking, parking brake 63
Breakdown assistance, refer to Roadside Assistance 221
Breakdown, transporting the vehicle 260
Breaking in 132 Brightness on the Control
Display 80
Bulb replacement, refer to Lamp and bulb replace‐
ment 250
Button for starting the engine, refer to Start/Stop but‐
ton 59
C
Calendar 214
California Proposition 65 Warning 7
Camera, care 266
Camera, refer to Backup cam‐ era 107
Can holder, refer to Cu‐ pholder 127
Car battery, refer to Vehicle battery 255
Car care products 264
Care 263
Care, displays 266
Care, vehicle 264
Cargo 136
Cargo area 120
Cargo area, capacities 270
Cargo area, Comfort Ac‐ cess 40
Cargo area, cover 120
Cargo area, enlarging 121
Cargo area, folding up the cargo floor panel 123
Cargo area lid, refer to Tail‐ gate 38
Cargo area light, refer to Inte‐ rior lights 89
Cargo area, multi-function hook 124
Cargo area, opening from the inside 38
Cargo area, opening from the outside 38
Cargo area, partition net 121 Seite 281Everything from A to ZReference281
Online Edition for Part no. 01 40 2 954 052 - II/15
Page 284 of 297
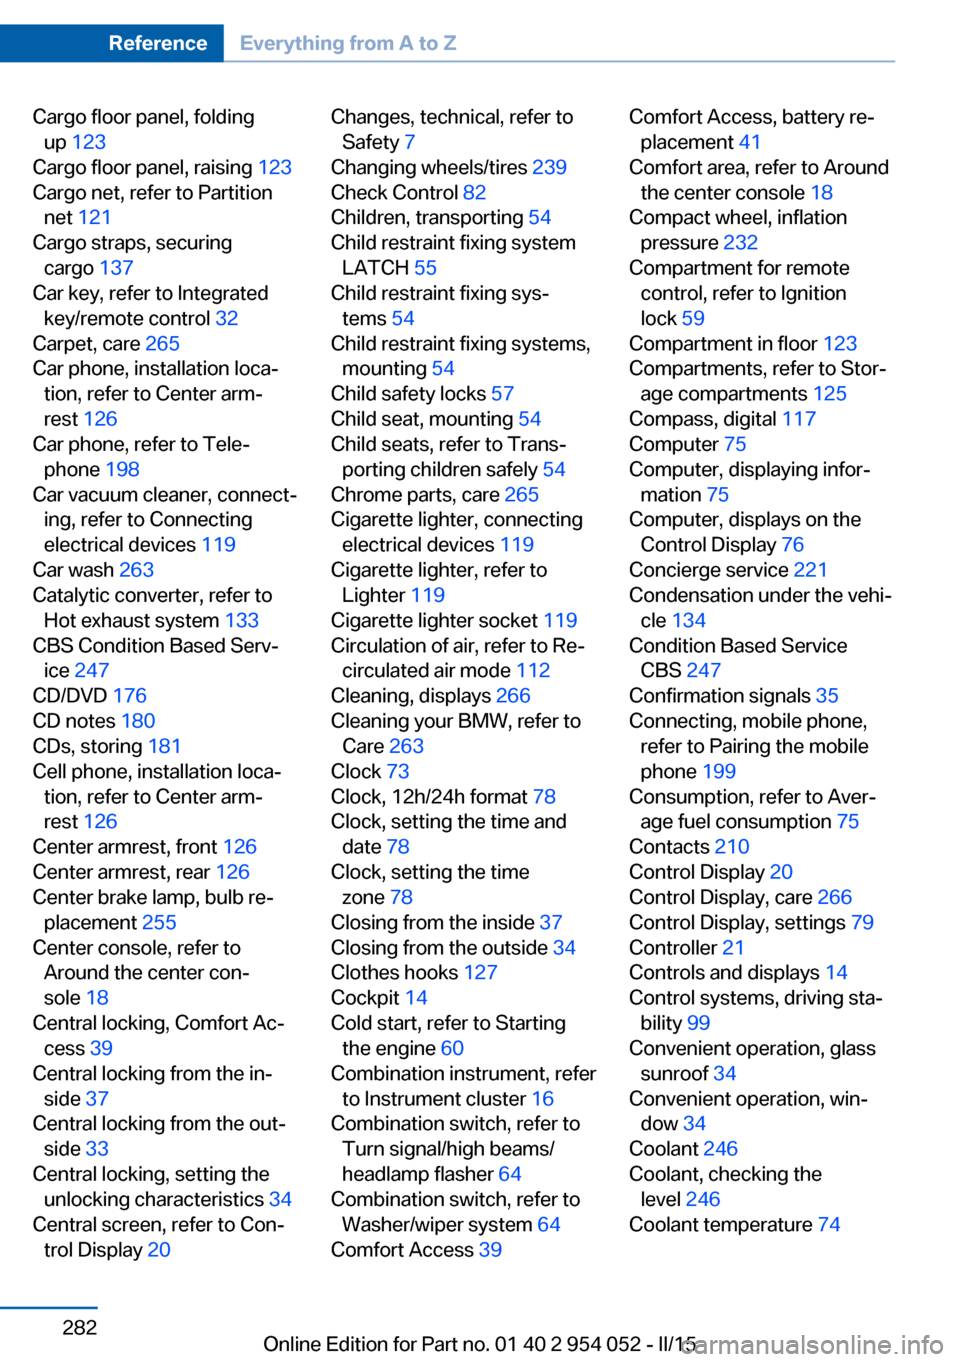
Cargo floor panel, foldingup 123
Cargo floor panel, raising 123
Cargo net, refer to Partition net 121
Cargo straps, securing cargo 137
Car key, refer to Integrated key/remote control 32
Carpet, care 265
Car phone, installation loca‐ tion, refer to Center arm‐
rest 126
Car phone, refer to Tele‐ phone 198
Car vacuum cleaner, connect‐ ing, refer to Connecting
electrical devices 119
Car wash 263
Catalytic converter, refer to Hot exhaust system 133
CBS Condition Based Serv‐ ice 247
CD/DVD 176
CD notes 180
CDs, storing 181
Cell phone, installation loca‐ tion, refer to Center arm‐
rest 126
Center armrest, front 126
Center armrest, rear 126
Center brake lamp, bulb re‐ placement 255
Center console, refer to Around the center con‐
sole 18
Central locking, Comfort Ac‐ cess 39
Central locking from the in‐ side 37
Central locking from the out‐ side 33
Central locking, setting the unlocking characteristics 34
Central screen, refer to Con‐ trol Display 20 Changes, technical, refer to
Safety 7
Changing wheels/tires 239
Check Control 82
Children, transporting 54
Child restraint fixing system LATCH 55
Child restraint fixing sys‐ tems 54
Child restraint fixing systems, mounting 54
Child safety locks 57
Child seat, mounting 54
Child seats, refer to Trans‐ porting children safely 54
Chrome parts, care 265
Cigarette lighter, connecting electrical devices 119
Cigarette lighter, refer to Lighter 119
Cigarette lighter socket 119
Circulation of air, refer to Re‐ circulated air mode 112
Cleaning, displays 266
Cleaning your BMW, refer to Care 263
Clock 73
Clock, 12h/24h format 78
Clock, setting the time and date 78
Clock, setting the time zone 78
Closing from the inside 37
Closing from the outside 34
Clothes hooks 127
Cockpit 14
Cold start, refer to Starting the engine 60
Combination instrument, refer to Instrument cluster 16
Combination switch, refer to Turn signal/high beams/
headlamp flasher 64
Combination switch, refer to Washer/wiper system 64
Comfort Access 39 Comfort Access, battery re‐
placement 41
Comfort area, refer to Around the center console 18
Compact wheel, inflation pressure 232
Compartment for remote control, refer to Ignition
lock 59
Compartment in floor 123
Compartments, refer to Stor‐ age compartments 125
Compass, digital 117
Computer 75
Computer, displaying infor‐ mation 75
Computer, displays on the Control Display 76
Concierge service 221
Condensation under the vehi‐ cle 134
Condition Based Service CBS 247
Confirmation signals 35
Connecting, mobile phone, refer to Pairing the mobile
phone 199
Consumption, refer to Aver‐ age fuel consumption 75
Contacts 210
Control Display 20
Control Display, care 266
Control Display, settings 79
Controller 21
Controls and displays 14
Control systems, driving sta‐ bility 99
Convenient operation, glass sunroof 34
Convenient operation, win‐ dow 34
Coolant 246
Coolant, checking the level 246
Coolant temperature 74 Seite 282ReferenceEverything from A to Z282
Online Edition for Part no. 01 40 2 954 052 - II/15