Delete BMW X1 2016 F48 Owner's Manual
[x] Cancel search | Manufacturer: BMW, Model Year: 2016, Model line: X1, Model: BMW X1 2016 F48Pages: 242, PDF Size: 7.12 MB
Page 9 of 242
▷Operating mode of system components, fill
levels for instance.▷Status messages for the vehicle and from
its individual components, e.g., wheel rota‐
tion speed/vehicle speed, deceleration,
transverse acceleration.▷Malfunctions and faults in important sys‐
tem components, e.g., lights and brakes.▷Responses by the vehicle to special situa‐
tions such as airbag deployment or engag‐
ing the stability control system.▷Ambient conditions, such as temperature.
This data is purely technical in nature and is
used to detect and correct faults and to opti‐
mize vehicle functions. Motion profiles over
routes traveled cannot be created from this
data. When service offerings are used, e.g., re‐
pair services, service processes, warranty
claims, quality assurance, this technical infor‐
mation can be read out from the event and
fault memories by employees of the dealer’s
service center or another qualified service cen‐
ter or repair shop, including the manufacturer,
using special diagnostic tools. You can obtain
further information there if you need it. After an
error is corrected, the information in the fault
memory is deleted or overwritten on a continu‐
ous basis.
With the vehicle in use there are situations
where you can associate these technical data
with individuals if combined with other infor‐
mation, e.g., an accident report, damage to the
vehicle, eye witness accounts — possibly with
the assistance of an expert.
Additional functions that are contractually
agreed with the customer - such as vehicle
emergency locating - you can transmit certain
vehicle data from the vehicle.
Event Data Recorder EDR
This vehicle is equipped with an event data re‐
corder EDR. The main purpose of an EDR is to
record, in certain crash or near crash-like situa‐
tions, such as an air bag deployment or hitting
a road obstacle, data that will assist in under‐
standing how a vehicle’s systems performed.
The EDR is designed to record data related to
vehicle dynamics and safety systems for a
short period of time, typically 30 seconds or
less.
The EDR in this vehicle is designed to record
such data as:▷How various systems in your vehicle were
operating.▷Whether or not the driver and passenger
safety belts were fastened.▷How far, if at all, the driver was depressing
the accelerator and/or brake pedal.▷How fast the vehicle was traveling.
These data can help provide a better under‐
standing of the circumstances in which
crashes and injuries occur.
EDR data are recorded by your vehicle only if a
nontrivial crash situation occurs; no data are
recorded by the EDR under normal driving
conditions and no personal data, e.g., name,
gender, age, and crash location, are recorded.
However, other parties, such as law enforce‐
ment, could combine the EDR data with the
type of personally identifying data routinely ac‐
quired during a crash investigation.
To read data recorded by an EDR, special
equipment is required, and access to the vehi‐
cle or the EDR is needed. In addition to the ve‐
hicle manufacturer, other parties, such as law
enforcement, that have the special equipment,
can read the information if they have access to
the vehicle or the EDR.
Seite 9Information9
Online Edition for Part no. 01 40 2 964 303 - VI/15
Page 22 of 242
▷The system recognizes capital and lower
case letters. For the input of upper/lower
case letters and numbers, it may be neces‐
sary to switch to the corresponding input
mode, e.g. when upper and lower case let‐
ters are written the same way. Switching
between cases, numbers and letters, refer
to page 25.▷Enter characters as they are displayed on
the Control Display.▷Always enter associated characters, such
as accents or periods so that the letter can
be clearly recognized. Possible input de‐
pends on the set language. Where neces‐
sary, enter special characters via the con‐
troller.▷To delete a character, slide to the left on
the touchpad.▷To enter a blank space, slide to the right in
the center of the touchpad.▷To enter a hyphen, slide to the right in the
upper area of the touchpad.▷To enter an underscore, swipe to the right
in the lower area of the touchpad.
Using interactive map and Internet
Via touch-pad move the interactive map in the
navigation system and Internet sites.
FunctionControlsMove interactive map or
Internet sites.Swipe into re‐
spective direc‐
tion.Enlarge/shrink interactive
map or Internet sites.Drag in or out on
the touchpad with
fingers.Display the menu or open
a link in the Internet.Tap once.
Changing settings
You may change control display settings via
touchpad. Swipe left or right accordingly.
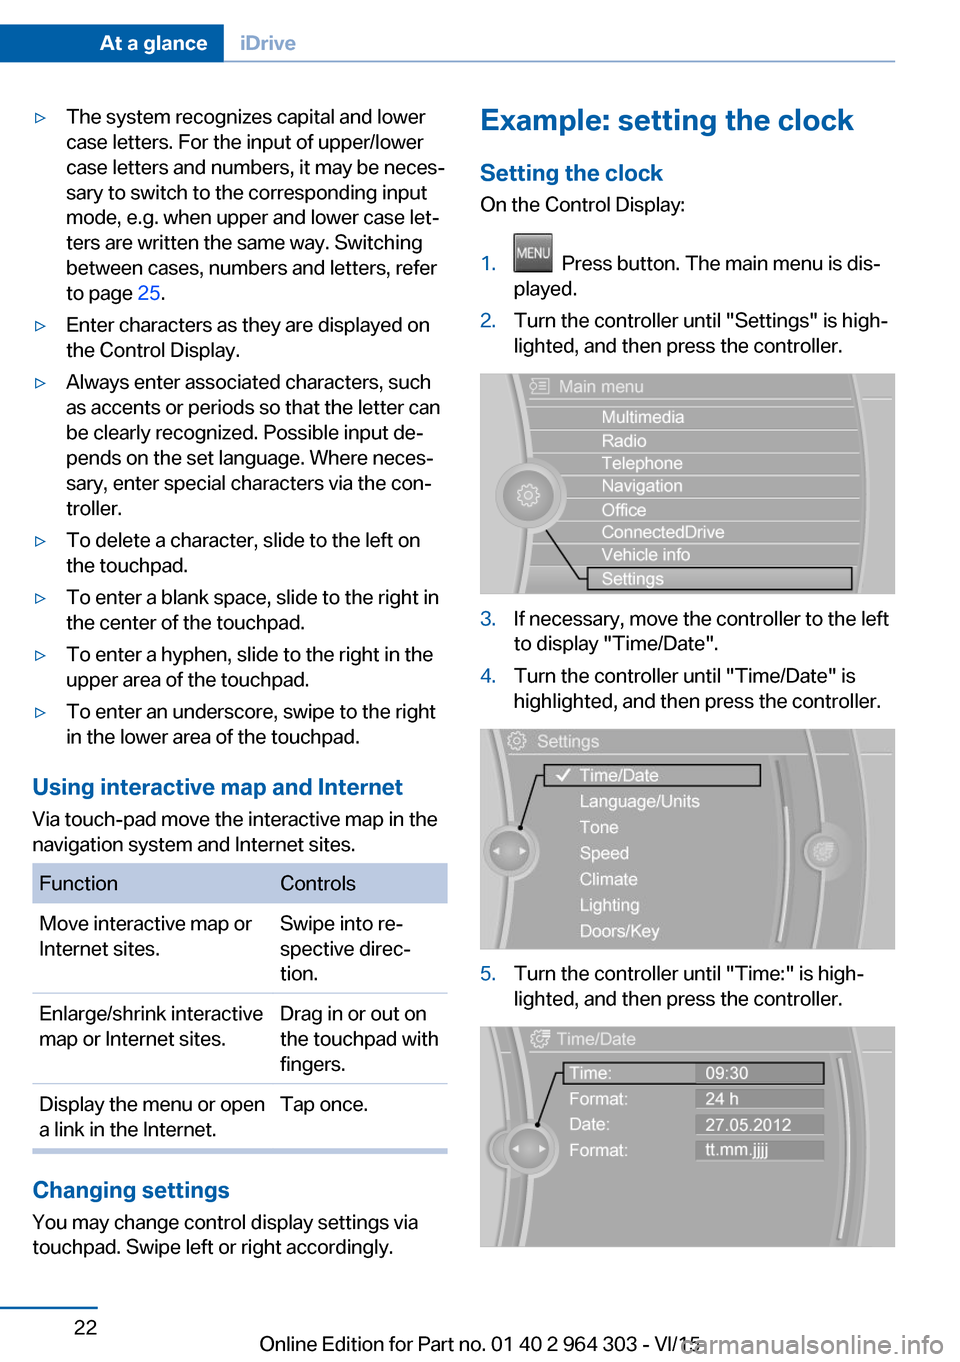
Example: setting the clock
Setting the clock
On the Control Display:1. Press button. The main menu is dis‐
played.2.Turn the controller until "Settings" is high‐
lighted, and then press the controller.3.If necessary, move the controller to the left
to display "Time/Date".4.Turn the controller until "Time/Date" is
highlighted, and then press the controller.5.Turn the controller until "Time:" is high‐
lighted, and then press the controller.Seite 22At a glanceiDrive22
Online Edition for Part no. 01 40 2 964 303 - VI/15
Page 24 of 242
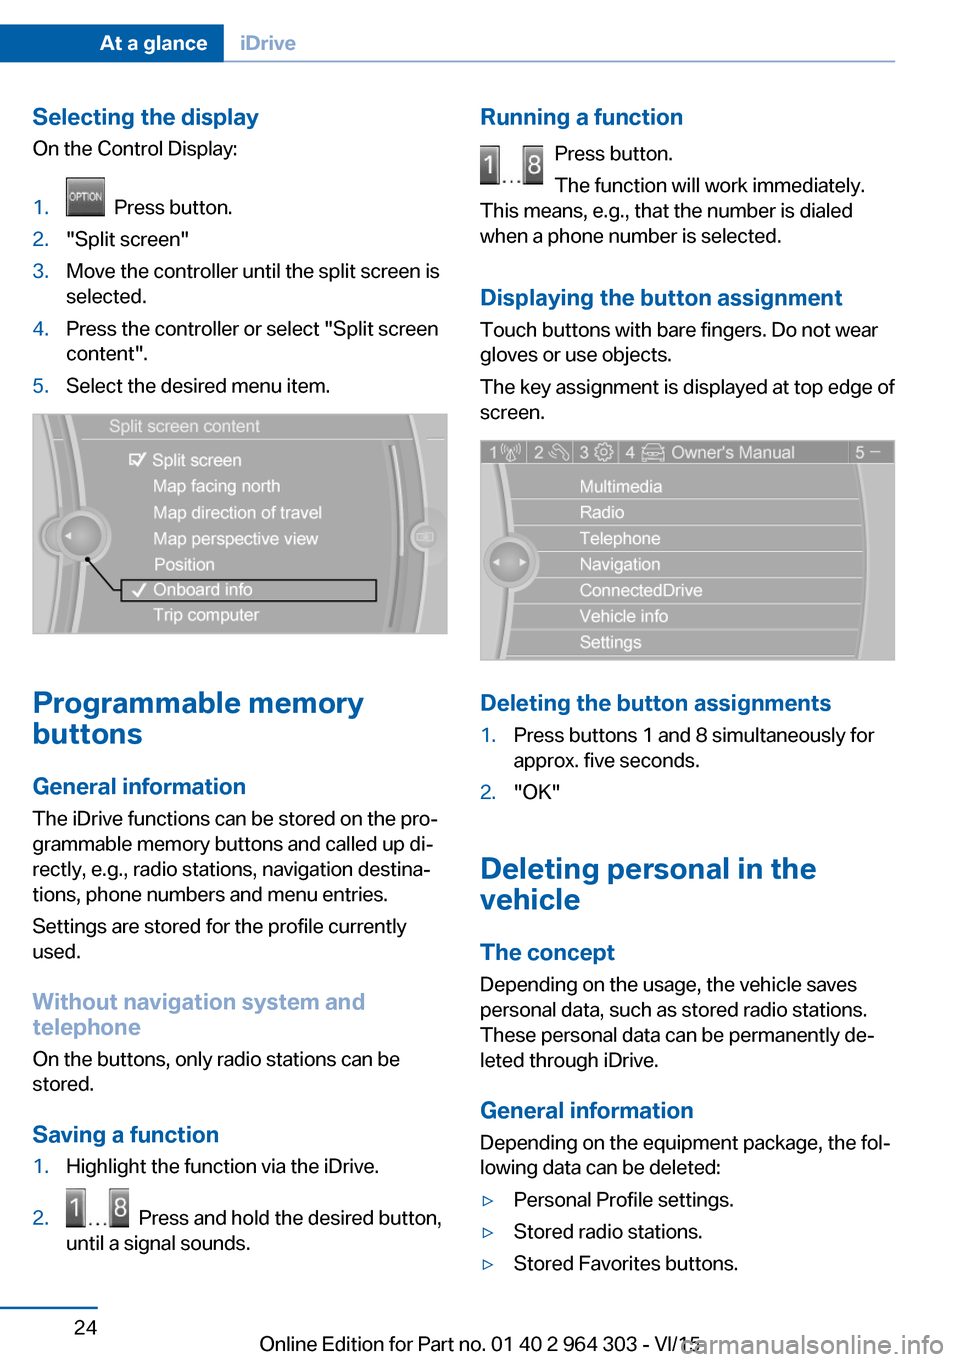
Selecting the display
On the Control Display:1. Press button.2."Split screen"3.Move the controller until the split screen is
selected.4.Press the controller or select "Split screen
content".5.Select the desired menu item.
Programmable memory
buttons
General information
The iDrive functions can be stored on the pro‐
grammable memory buttons and called up di‐
rectly, e.g., radio stations, navigation destina‐
tions, phone numbers and menu entries.
Settings are stored for the profile currently
used.
Without navigation system and
telephone
On the buttons, only radio stations can be
stored.
Saving a function
1.Highlight the function via the iDrive.2. Press and hold the desired button,
until a signal sounds.Running a function
Press button.
The function will work immediately.
This means, e.g., that the number is dialed
when a phone number is selected.
Displaying the button assignment Touch buttons with bare fingers. Do not wear
gloves or use objects.
The key assignment is displayed at top edge of
screen.
Deleting the button assignments
1.Press buttons 1 and 8 simultaneously for
approx. five seconds.2."OK"
Deleting personal in the
vehicle
The concept
Depending on the usage, the vehicle saves
personal data, such as stored radio stations.
These personal data can be permanently de‐
leted through iDrive.
General information
Depending on the equipment package, the fol‐
lowing data can be deleted:
▷Personal Profile settings.▷Stored radio stations.▷Stored Favorites buttons.Seite 24At a glanceiDrive24
Online Edition for Part no. 01 40 2 964 303 - VI/15
Page 25 of 242
▷Travel and on-board comupter information.▷Music collection.▷Navigation, e.g. stored destinations.▷Phone book.▷Online data, e.g. Favorites, cookies.▷Voice notes▷Login accounts.▷RemoteApp smartphone tethering.
Altogether, the deletion of the data can take up
to 30 minutes.
Functional requirement Data can only be deleted while stationary.
Deleting data Heed and follow the instructions on the Con‐
trol Display.
1.Switch on the ignition.2."Settings"3.Open "Options".4."Delete personal data"5."Continue"6."OK"
Entering letters and numbers
General information
On the Control Display:
1.Turn the controller: select letters or num‐
bers.2.Select additional letters or numbers if
needed.3."OK": confirm the entry.SymbolFunction Press the controller: delete the let‐
ter or number. Press the controller for an extended
period: delete all letters or numbers.
Switching between cases, letters and
numbers
Depending on the menu, you can switch be‐
tween entering upper and lower case, letters
and numbers:
SymbolFunction Enter the letters. Enter the numbers. or Tip controller up.
Without navigation system
Select symbol.
Entry comparison
Entering names and addresses: choice is nar‐
rowed down with every letter entered and let‐
ters may be added automatically.
Entries are continuously compared with data
stored in the vehicle.
▷Only those letters are offered during input
for which data is available.▷Target search: names of locations may be
entered in languages available through
Control Display.Seite 25iDriveAt a glance25
Online Edition for Part no. 01 40 2 964 303 - VI/15
Page 127 of 242
Overview
Buttons on the steering wheelPress but‐
tonFunctionCruise control on/off, interrupt‐
ing, refer to page 127.Store/maintain speed, refer to
page 128.Resume speed, refer to
page 129.Reduce distance, refer to
page 128.Increase distance, refer to
page 129.Rocker switch.
Change/maintain speed, refer
to page 128.
Buttons are arranged according to vehicle's
series, optional features and country specifica‐
tions.
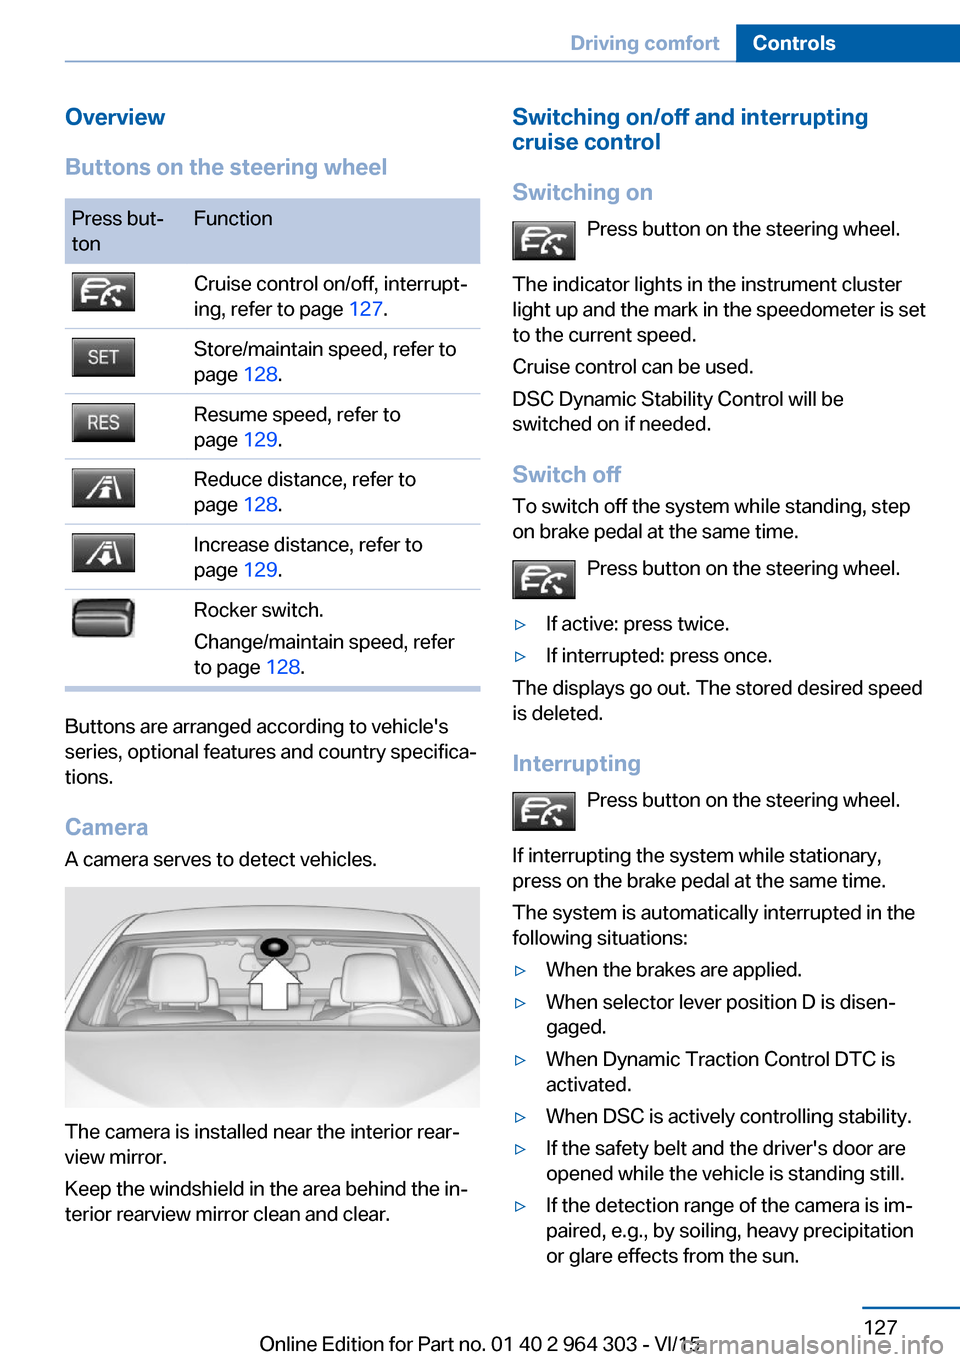
Camera A camera serves to detect vehicles.
The camera is installed near the interior rear‐
view mirror.
Keep the windshield in the area behind the in‐
terior rearview mirror clean and clear.
Switching on/off and interrupting cruise control
Switching on Press button on the steering wheel.
The indicator lights in the instrument cluster
light up and the mark in the speedometer is set
to the current speed.
Cruise control can be used.
DSC Dynamic Stability Control will be
switched on if needed.
Switch off
To switch off the system while standing, step
on brake pedal at the same time.
Press button on the steering wheel.▷If active: press twice.▷If interrupted: press once.
The displays go out. The stored desired speed
is deleted.
Interrupting Press button on the steering wheel.
If interrupting the system while stationary,
press on the brake pedal at the same time.
The system is automatically interrupted in the
following situations:
▷When the brakes are applied.▷When selector lever position D is disen‐
gaged.▷When Dynamic Traction Control DTC is
activated.▷When DSC is actively controlling stability.▷If the safety belt and the driver's door are
opened while the vehicle is standing still.▷If the detection range of the camera is im‐
paired, e.g., by soiling, heavy precipitation
or glare effects from the sun.Seite 127Driving comfortControls127
Online Edition for Part no. 01 40 2 964 303 - VI/15
Page 129 of 242
The instrument cluster displays the set
distance.
Increase distance Press button repeatedly until the de‐
sired distance is set.
The instrument cluster displays the set
distance.
Call up desired speed and distance
While driving Press button with the system inter‐
rupted. Desired speed and distance
are then continued with these settings. The
selected speed is briefly displayed in the info
display.
In the following cases, the stored speed value
is deleted and cannot be called up again:▷When the system is switched off.▷When the ignition is switched off.
While standing
The system brought the vehicle to a complete
standstill:
▷Green marking in the speedometer:
Your vehicle accelerates automatically as
soon as the vehicle in the camera's range
moves off.▷Speedometer markings turn orange: no au‐
tomatic driving off.
To accelerate to the desired speed auto‐
matically, briefly press the accelerator or
press the RES or SET button.
Rolling bars in the distance display indicate
that the vehicle in the camera detection range
has moved away.
The system was paused or your vehicle was
brought to a halt actively through stepping on
the brake pedal and it is standing behind an‐
other vehicle:1. Press button to call up a stored
desired speed.2.Release the brake pedal.3.Step on the accelerator briefly, or press the
RES rocker switch when the vehicle ahead
of you drives away.
Changing between cruise control with/
without distance control
WARNING
The system does not react to traffic driv‐
ing ahead of you, but instead maintains the
stored speed. There is risk of accidents or risk
of property damage. Adjust the desired speed
to the traffic conditions and brake as needed.◀
Changing to Active Cruise Control without dis‐
tance control:
Press and hold this button, or
Press and hold this button.
The indicator lamp in the instrument
cluster lights up.
In order to switch back to Active Cruise Con‐
trol with distance control, press the button
again briefly.
After switching, a Check Control message is
displayed.
Displays in the instrument cluster
Desired speed
▷The marking lights up green:
the system is active.▷The marking lights up or‐
ange: the system has been
interrupted.Seite 129Driving comfortControls129
Online Edition for Part no. 01 40 2 964 303 - VI/15
Page 133 of 242
InformationWARNING
The use of the system can lead to an in‐
creased risk of accidents in the following situa‐
tions:▷On winding roads.▷In heavy traffic.▷On slippery roads, in fog, snow or rain, or
on a loose road surface.
There is risk of accidents or risk of property
damage. Only use the system if driving at con‐
stant speed is possible.◀
Overview
Buttons on the steering wheel
Press buttonFunctionCruise control on, off, pause,
refer to page 133.Store speed, refer to
page 134.Resume speed, refer to
page 134.Rocker switch: change, hold,
store speed, refer to
page 134.
Controls
Switching on Press button on the steering wheel.
The marking in the speedometer is set to the
current speed.
Cruise control can be used.
DSC Dynamic Stability Control will be
switched on if needed.
Switch off
WARNING
The system does not relieve from the
personal responsibility to correctly assess the
traffic situation. Based on the limits of the sys‐
tem, it cannot independently react to all traffic situations. There is risk of an accident. Adjustthe driving style to the traffic conditions. Watch
traffic closely and actively interfere in the re‐
spective situations.◀
Press button on the steering wheel.▷If active: press twice.▷If interrupted: press once.
The displays go out. The stored desired speed
is deleted.
Interrupting When active, press the button on the
steering wheel.
The system is automatically interrupted in the
following situations:
▷When the brakes are applied.▷If the clutch pedal is depressed for a few
seconds or released while a gear is not en‐
gaged.▷If the gear engaged is too high for the cur‐
rent speed.▷If selector lever position N is set.▷If DTC Dynamic Traction Control is acti‐
vated or DSC is deactivated.▷When DSC is actively controlling stability.▷If HDC is activated.Seite 133Driving comfortControls133
Online Edition for Part no. 01 40 2 964 303 - VI/15
Page 151 of 242
Interior equipmentVehicle features and optionsThis chapter describes all standard, country-
specific and optional features offered with the
series. It also describes features that are not
necessarily available in your car, e. g., due to
the selected options or country versions. This
also applies to safety-related functions and
systems. The respectively applicable country
provisions must be observed when using the
respective features and systems.
Universal Integrated Remote Control
The concept The universal garage door opener can operate
up to 3 functions of remote-controlled sys‐
tems such as garage door drives or lighting
systems. The universal garage door opener re‐
places up to 3 different hand-held transmitters.
To operate the remote control, the buttons on
the interior rearview mirror must be program‐
med with the desired functions. The hand-held
transmitter for the particular system is required
in order to program the remote control.
Before selling the vehicle, delete the stored
functions for the sake of security.
Information WARNING
Body parts can be jammed when operat‐
ing remote-controlled systems, e.g. the garage
door, using the universal garage door opener.
There is risk of injuries or risk of property dam‐
age. Make sure that the area of movement of
the respective system is clear during program‐
ming and operation. Also follow the safety in‐
structions of the hand-held transmitter.◀Compatibility
If this symbol is printed on the packag‐
ing or in the instructions of the system
to be controlled, the system is gener‐
ally compatible with the universal garage door opener.
If you have any questions, please contact:▷A dealer’s service center or another quali‐
fied service center or repair shop.▷www.homelink.com on the Internet.
HomeLink is a registered trademark of Gentex
Corporation.
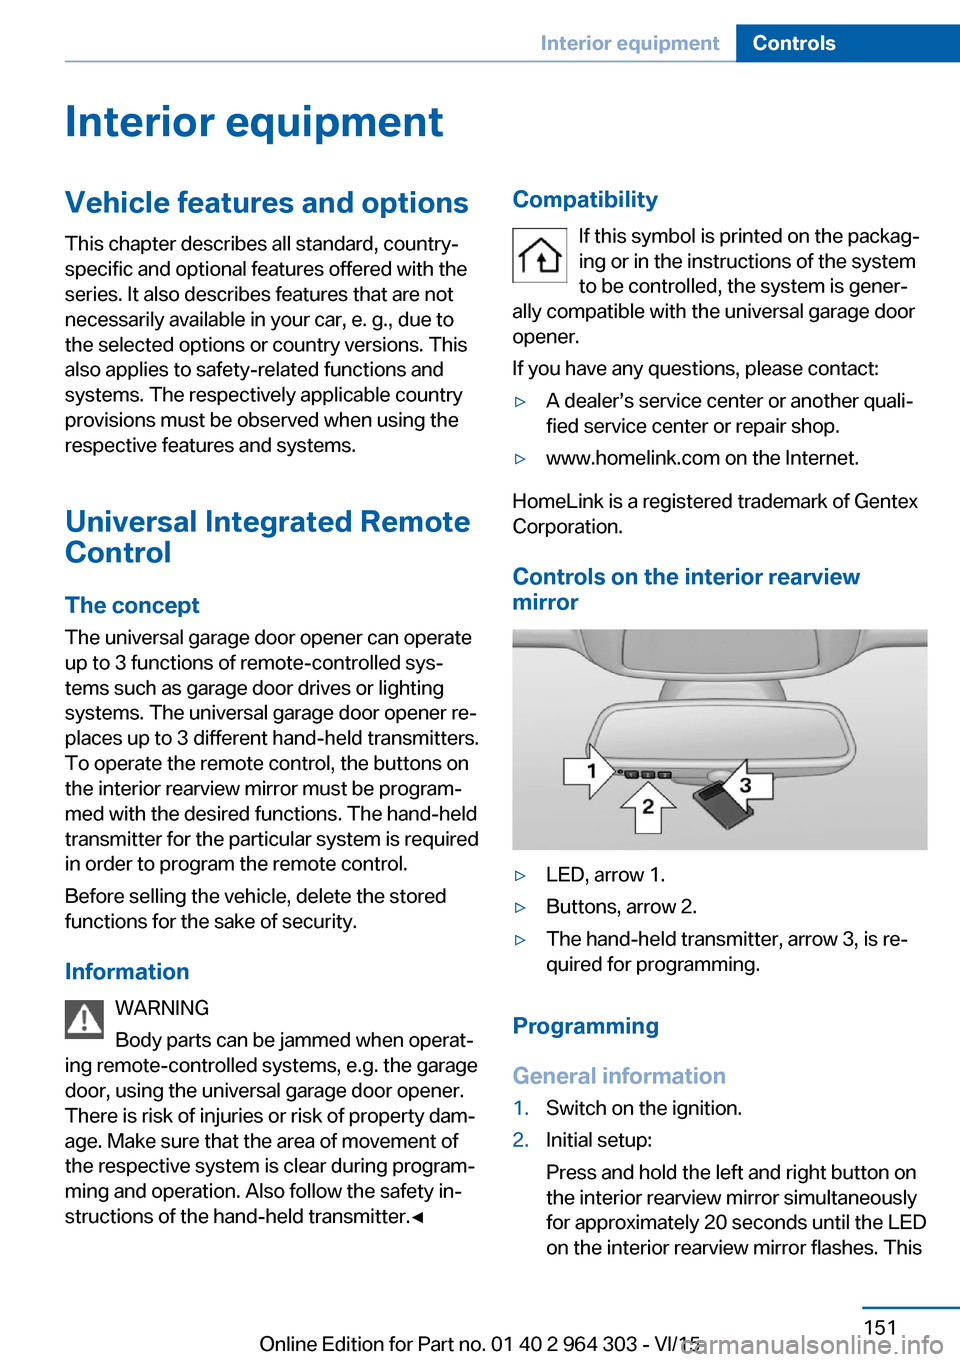
Controls on the interior rearview
mirror
▷LED, arrow 1.▷Buttons, arrow 2.▷The hand-held transmitter, arrow 3, is re‐
quired for programming.
Programming
General information
1.Switch on the ignition.2.Initial setup:
Press and hold the left and right button on
the interior rearview mirror simultaneously
for approximately 20 seconds until the LED
on the interior rearview mirror flashes. ThisSeite 151Interior equipmentControls151
Online Edition for Part no. 01 40 2 964 303 - VI/15
Page 153 of 242
4.Likewise, press and hold the button of the
desired function on the hand-held trans‐
mitter.5.Release both buttons as soon as the inte‐
rior rearview mirror LED flashes more rap‐
idly. The LED flashing faster indicates that
the button on the interior rearview mirror
has been programmed. The system can
then be controlled by the button on the in‐
terior rearview mirror.
If the LED does not flash faster after at
least 60 seconds, change the distance and
repeat the step. Several more attempts at
different distances may be necessary. Wait
at least 15 seconds between attempts.
Canada: if programming with the hand-
held transmitter was interrupted, hold
down the interior rearview mirror button
and repeatedly press and release the
hand-held transmitter button for 2 sec‐
onds.
Controls
WARNING
Body parts can be jammed when operat‐
ing remote-controlled systems, e.g. the garage
door, using the universal garage door opener. There is risk of injuries or risk of property dam‐
age. Make sure that the area of movement of
the respective system is clear during program‐
ming and operation. Also follow the safety in‐
structions of the hand-held transmitter.◀
The system, such as the garage door, can be
operated using the button on the interior rear‐
view mirror while the engine is running or when
the ignition is started. To do this, hold down
the button within receiving range of the system
until the function is activated. The interior rear‐
view mirror LED stays lit while the wireless sig‐
nal is being transmitted.
Deleting stored functions Press and hold the left and right button on the
interior rearview mirror simultaneously for ap‐
proximately 20 seconds until the LED flashes
rapidly. All stored functions are deleted. The
functions cannot be deleted individually.
Digital compass
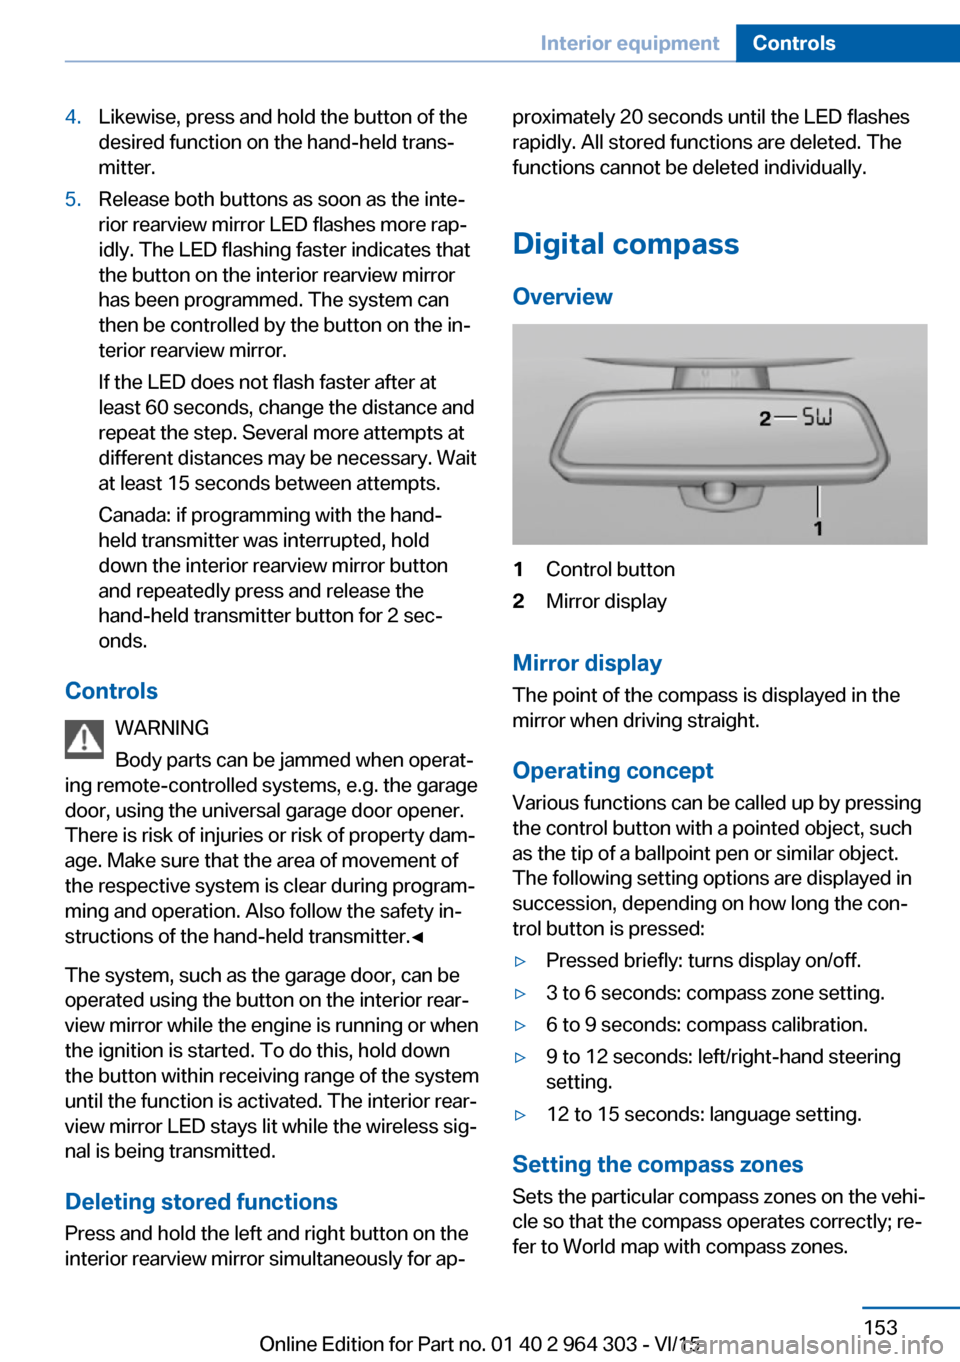
Overview1Control button2Mirror display
Mirror display
The point of the compass is displayed in the
mirror when driving straight.
Operating concept
Various functions can be called up by pressing
the control button with a pointed object, such
as the tip of a ballpoint pen or similar object.
The following setting options are displayed in
succession, depending on how long the con‐
trol button is pressed:
▷Pressed briefly: turns display on/off.▷3 to 6 seconds: compass zone setting.▷6 to 9 seconds: compass calibration.▷9 to 12 seconds: left/right-hand steering
setting.▷12 to 15 seconds: language setting.
Setting the compass zones
Sets the particular compass zones on the vehi‐
cle so that the compass operates correctly; re‐
fer to World map with compass zones.
Seite 153Interior equipmentControls153
Online Edition for Part no. 01 40 2 964 303 - VI/15