light BMW X1 2016 F48 Owner's Manual
[x] Cancel search | Manufacturer: BMW, Model Year: 2016, Model line: X1, Model: BMW X1 2016 F48Pages: 242, PDF Size: 7.12 MB
Page 5 of 242
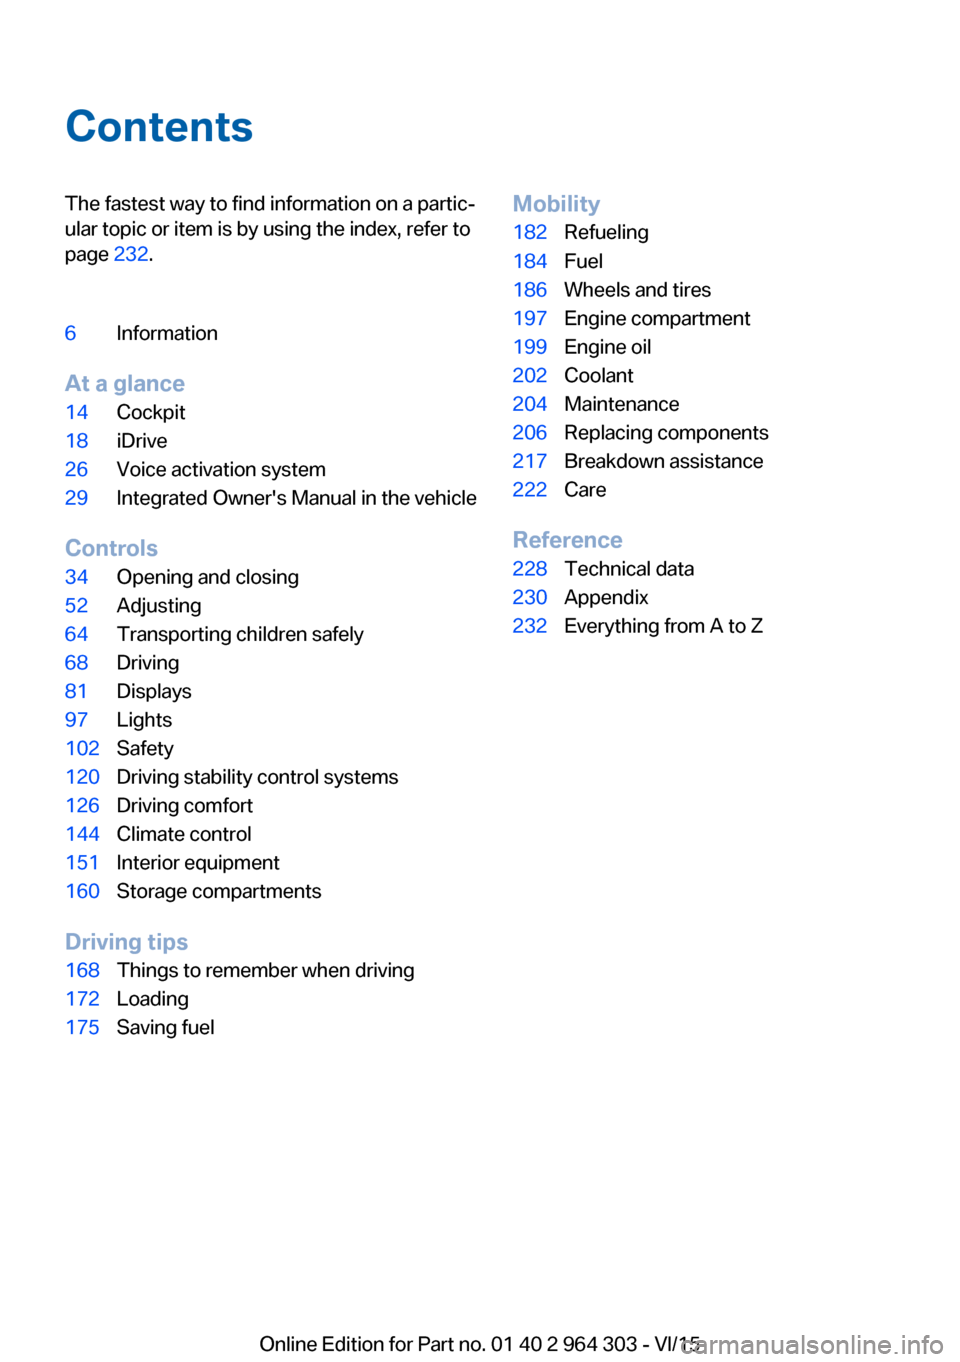
ContentsThe fastest way to find information on a partic‐
ular topic or item is by using the index, refer to
page 232.6Information
At a glance
14Cockpit18iDrive26Voice activation system29Integrated Owner's Manual in the vehicle
Controls
34Opening and closing52Adjusting64Transporting children safely68Driving81Displays97Lights102Safety120Driving stability control systems126Driving comfort144Climate control151Interior equipment160Storage compartments
Driving tips
168Things to remember when driving172Loading175Saving fuelMobility182Refueling184Fuel186Wheels and tires197Engine compartment199Engine oil202Coolant204Maintenance206Replacing components217Breakdown assistance222Care
Reference
228Technical data230Appendix232Everything from A to Z
Online Edition for Part no. 01 40 2 964 303 - VI/15
Page 9 of 242
▷Operating mode of system components, fill
levels for instance.▷Status messages for the vehicle and from
its individual components, e.g., wheel rota‐
tion speed/vehicle speed, deceleration,
transverse acceleration.▷Malfunctions and faults in important sys‐
tem components, e.g., lights and brakes.▷Responses by the vehicle to special situa‐
tions such as airbag deployment or engag‐
ing the stability control system.▷Ambient conditions, such as temperature.
This data is purely technical in nature and is
used to detect and correct faults and to opti‐
mize vehicle functions. Motion profiles over
routes traveled cannot be created from this
data. When service offerings are used, e.g., re‐
pair services, service processes, warranty
claims, quality assurance, this technical infor‐
mation can be read out from the event and
fault memories by employees of the dealer’s
service center or another qualified service cen‐
ter or repair shop, including the manufacturer,
using special diagnostic tools. You can obtain
further information there if you need it. After an
error is corrected, the information in the fault
memory is deleted or overwritten on a continu‐
ous basis.
With the vehicle in use there are situations
where you can associate these technical data
with individuals if combined with other infor‐
mation, e.g., an accident report, damage to the
vehicle, eye witness accounts — possibly with
the assistance of an expert.
Additional functions that are contractually
agreed with the customer - such as vehicle
emergency locating - you can transmit certain
vehicle data from the vehicle.
Event Data Recorder EDR
This vehicle is equipped with an event data re‐
corder EDR. The main purpose of an EDR is to
record, in certain crash or near crash-like situa‐
tions, such as an air bag deployment or hitting
a road obstacle, data that will assist in under‐
standing how a vehicle’s systems performed.
The EDR is designed to record data related to
vehicle dynamics and safety systems for a
short period of time, typically 30 seconds or
less.
The EDR in this vehicle is designed to record
such data as:▷How various systems in your vehicle were
operating.▷Whether or not the driver and passenger
safety belts were fastened.▷How far, if at all, the driver was depressing
the accelerator and/or brake pedal.▷How fast the vehicle was traveling.
These data can help provide a better under‐
standing of the circumstances in which
crashes and injuries occur.
EDR data are recorded by your vehicle only if a
nontrivial crash situation occurs; no data are
recorded by the EDR under normal driving
conditions and no personal data, e.g., name,
gender, age, and crash location, are recorded.
However, other parties, such as law enforce‐
ment, could combine the EDR data with the
type of personally identifying data routinely ac‐
quired during a crash investigation.
To read data recorded by an EDR, special
equipment is required, and access to the vehi‐
cle or the EDR is needed. In addition to the ve‐
hicle manufacturer, other parties, such as law
enforcement, that have the special equipment,
can read the information if they have access to
the vehicle or the EDR.
Seite 9Information9
Online Edition for Part no. 01 40 2 964 303 - VI/15
Page 14 of 242
CockpitVehicle features and options
This chapter describes all standard, country-
specific and optional features offered with the
series. It also describes features that are not
necessarily available in your car, e. g., due tothe selected options or country versions. This
also applies to safety-related functions and
systems. The respectively applicable country
provisions must be observed when using the
respective features and systems.
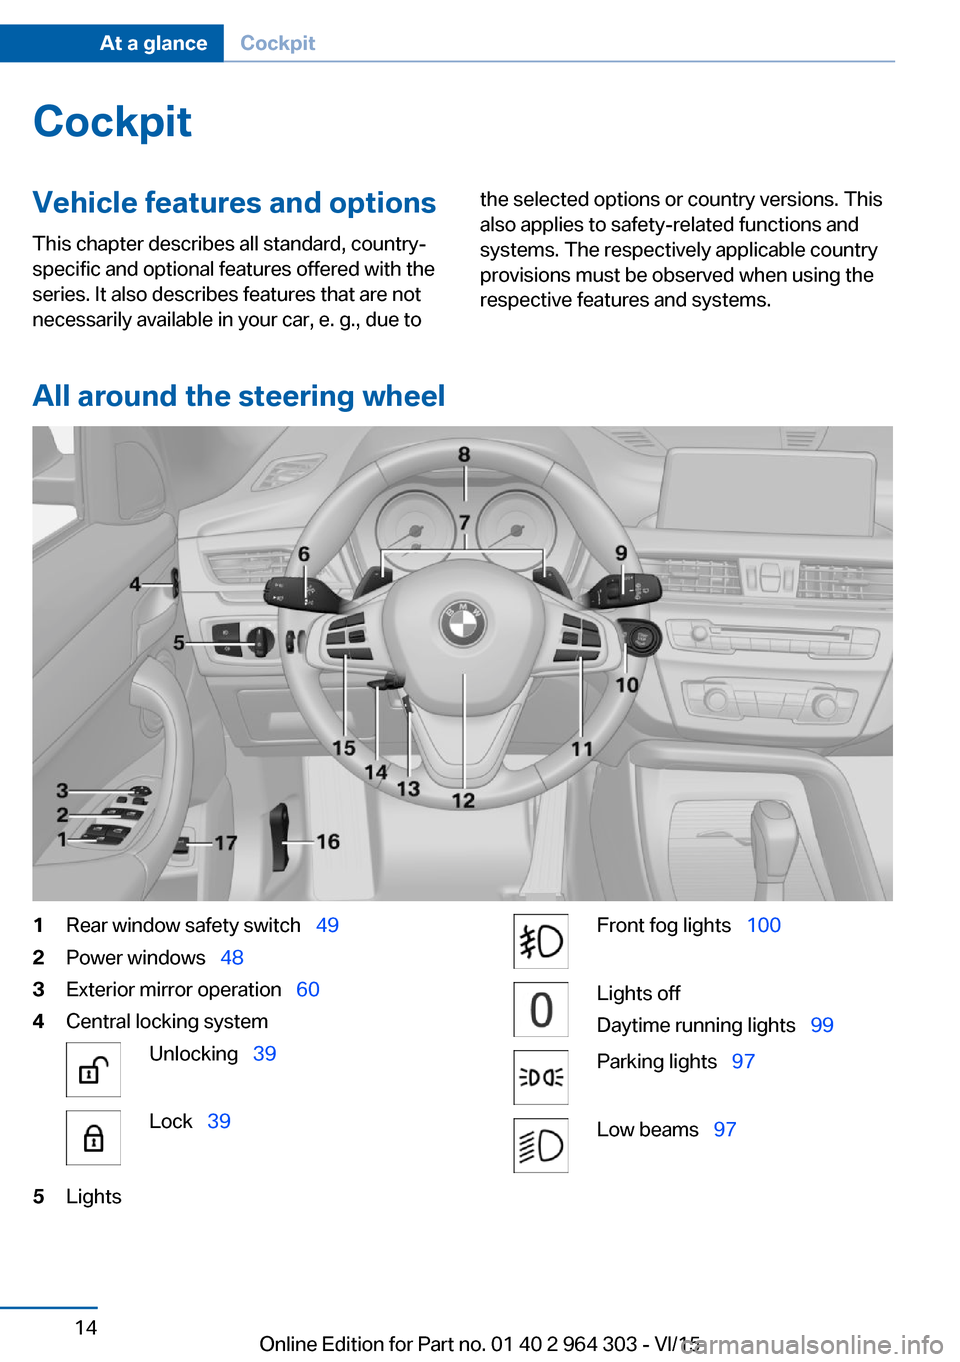
All around the steering wheel
1Rear window safety switch 492Power windows 483Exterior mirror operation 604Central locking systemUnlocking 39Lock 395LightsFront fog lights 100Lights off
Daytime running lights 99Parking lights 97Low beams 97Seite 14At a glanceCockpit14
Online Edition for Part no. 01 40 2 964 303 - VI/15
Page 15 of 242
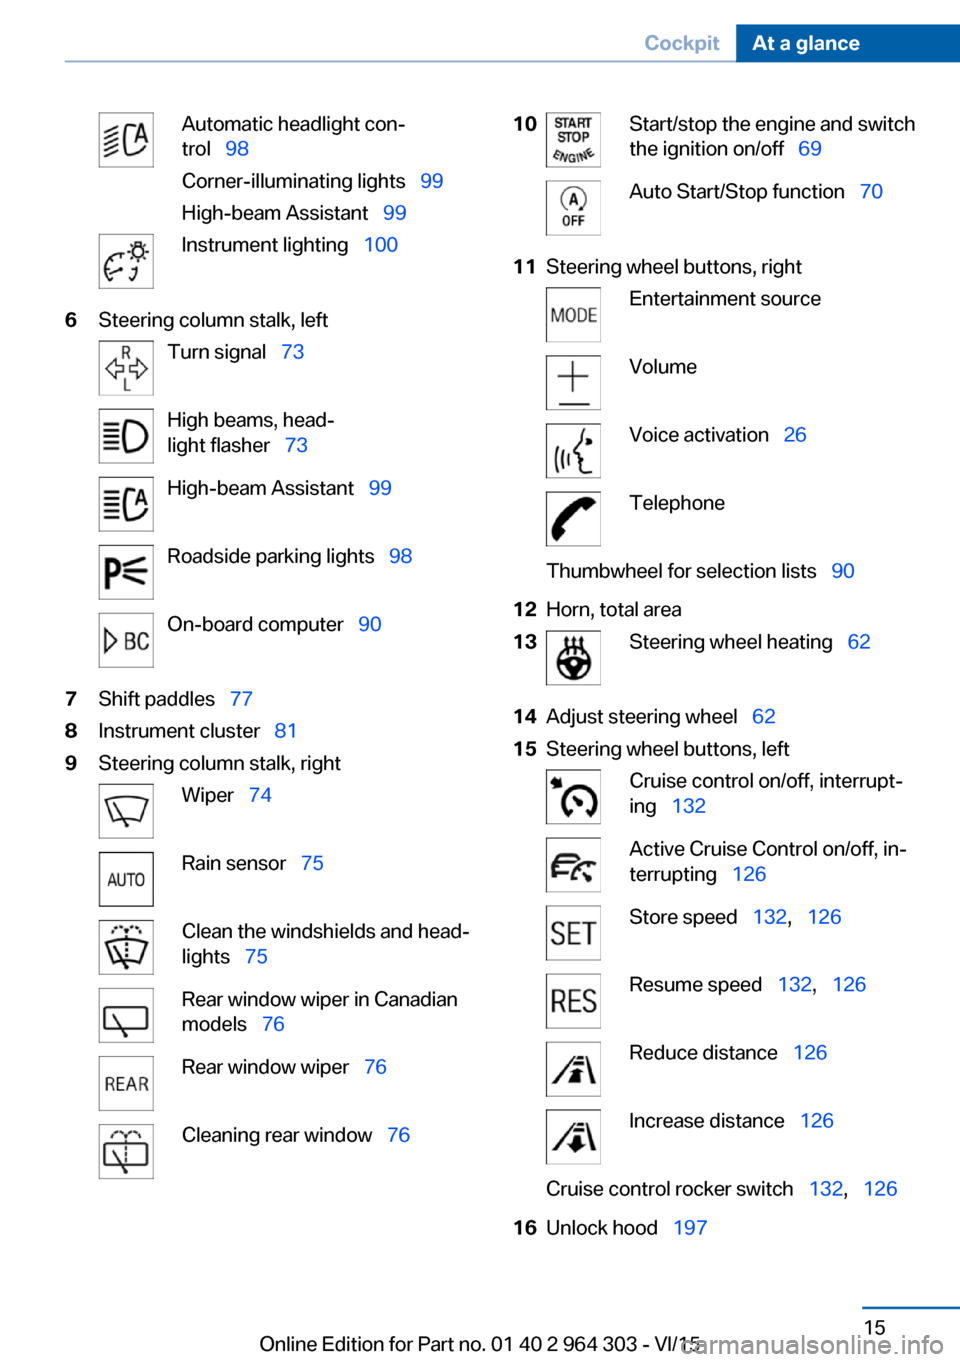
Automatic headlight con‐
trol 98
Corner-illuminating lights 99
High-beam Assistant 99Instrument lighting 1006Steering column stalk, leftTurn signal 73High beams, head‐
light flasher 73High-beam Assistant 99Roadside parking lights 98On-board computer 907Shift paddles 778Instrument cluster 819Steering column stalk, rightWiper 74Rain sensor 75Clean the windshields and head‐
lights 75Rear window wiper in Canadian
models 76Rear window wiper 76Cleaning rear window 7610Start/stop the engine and switch
the ignition on/off 69Auto Start/Stop function 7011Steering wheel buttons, rightEntertainment sourceVolumeVoice activation 26TelephoneThumbwheel for selection lists 9012Horn, total area13Steering wheel heating 6214Adjust steering wheel 6215Steering wheel buttons, leftCruise control on/off, interrupt‐
ing 132Active Cruise Control on/off, in‐
terrupting 126Store speed 132, 126Resume speed 132, 126Reduce distance 126Increase distance 126Cruise control rocker switch 132, 12616Unlock hood 197Seite 15CockpitAt a glance15
Online Edition for Part no. 01 40 2 964 303 - VI/15
Page 17 of 242
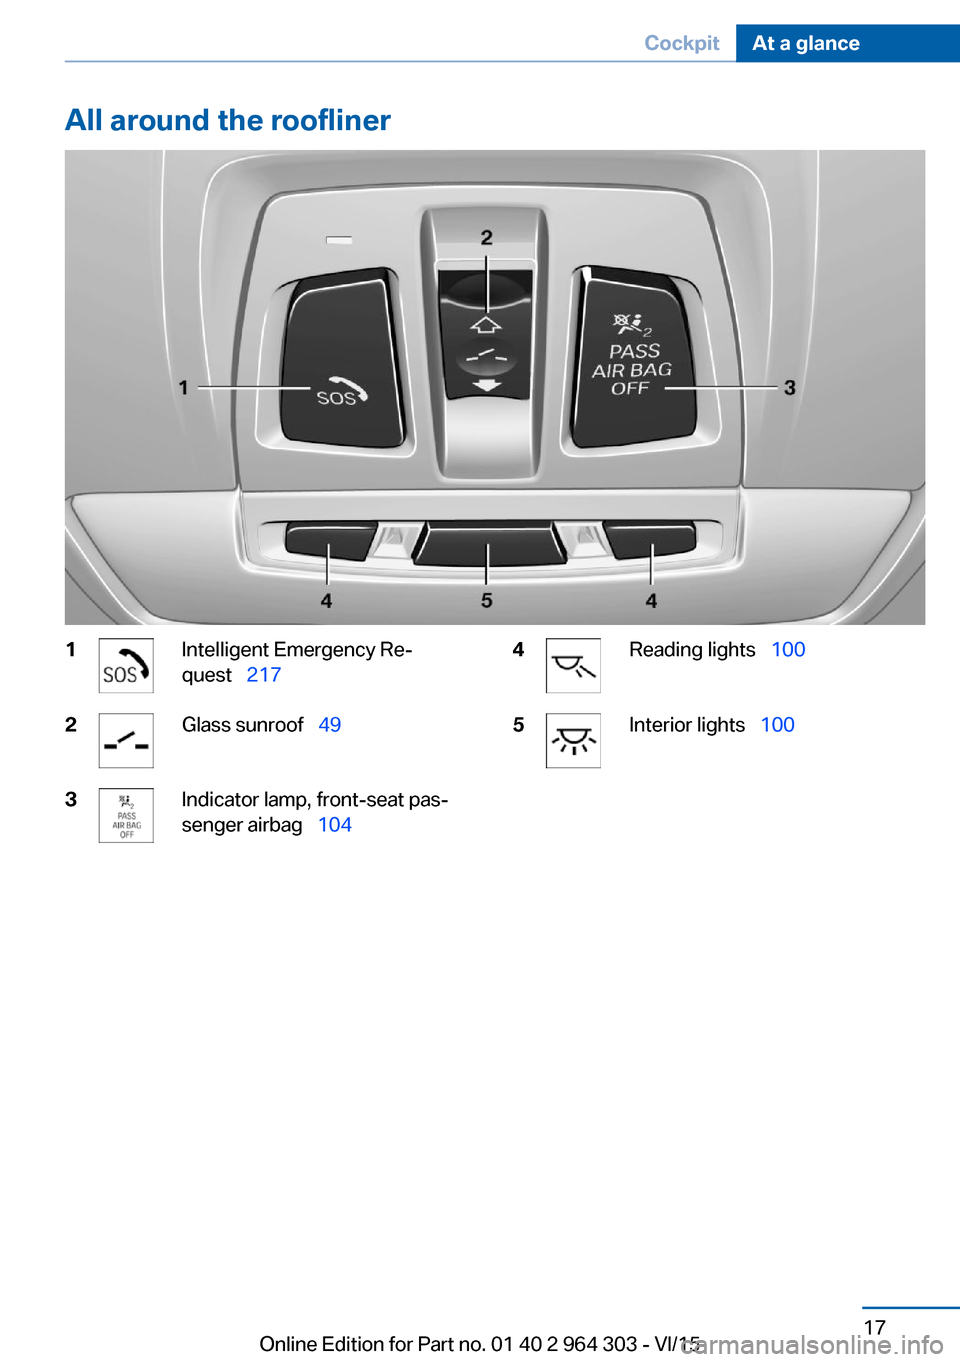
All around the roofliner1Intelligent Emergency Re‐
quest 2172Glass sunroof 493Indicator lamp, front-seat pas‐
senger airbag 1044Reading lights 1005Interior lights 100Seite 17CockpitAt a glance17
Online Edition for Part no. 01 40 2 964 303 - VI/15
Page 20 of 242
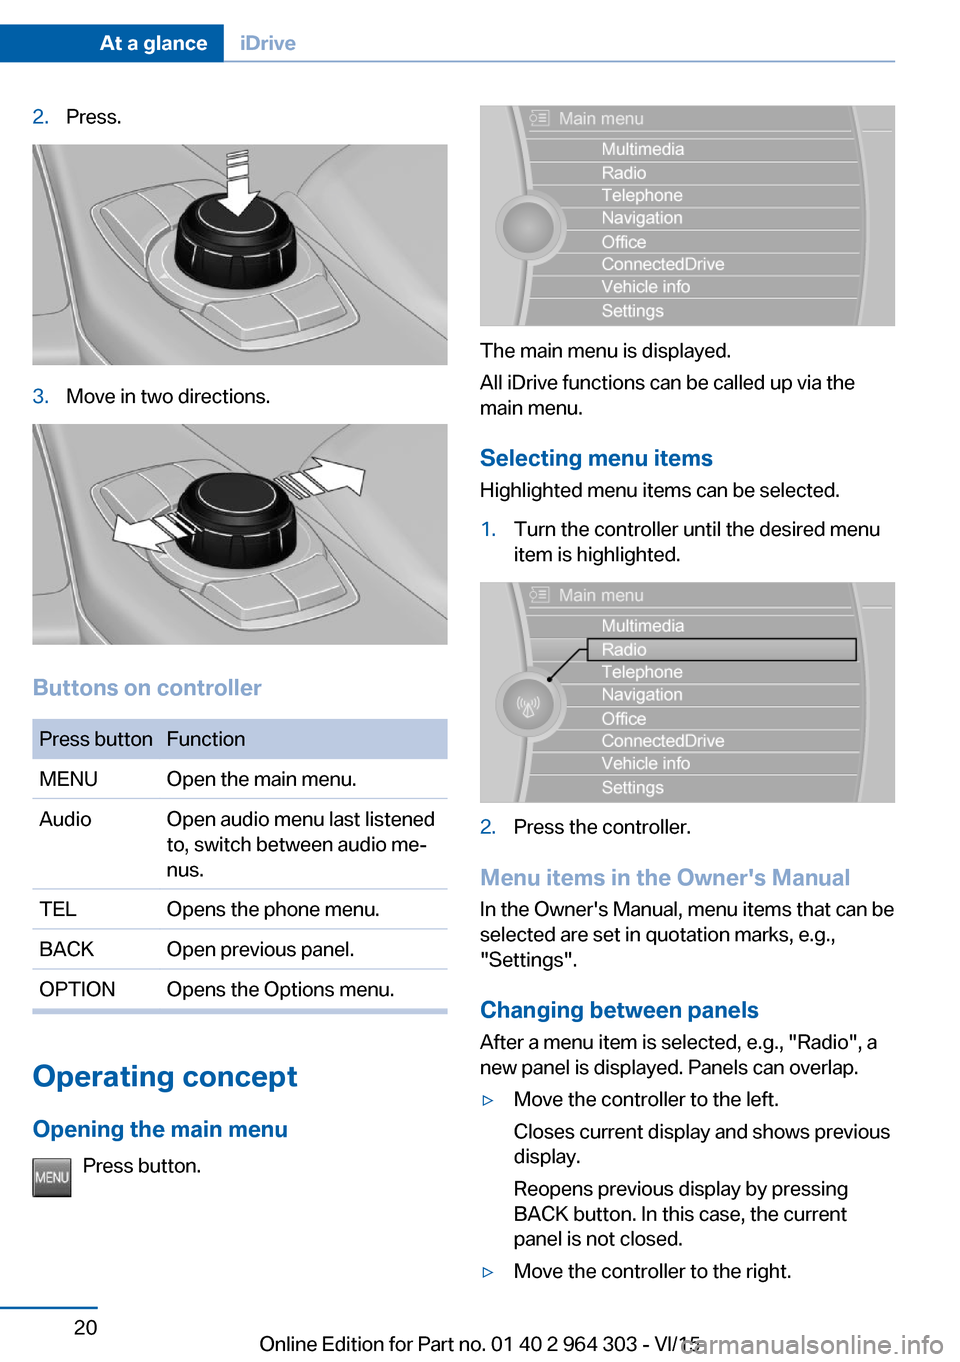
2.Press.3.Move in two directions.
Buttons on controller
Press buttonFunctionMENUOpen the main menu.AudioOpen audio menu last listened
to, switch between audio me‐
nus.TELOpens the phone menu.BACKOpen previous panel.OPTIONOpens the Options menu.
Operating concept
Opening the main menu Press button.
The main menu is displayed.
All iDrive functions can be called up via the
main menu.
Selecting menu items
Highlighted menu items can be selected.
1.Turn the controller until the desired menu
item is highlighted.2.Press the controller.
Menu items in the Owner's Manual
In the Owner's Manual, menu items that can be
selected are set in quotation marks, e.g.,
"Settings".
Changing between panels
After a menu item is selected, e.g., "Radio", a
new panel is displayed. Panels can overlap.
▷Move the controller to the left.
Closes current display and shows previous
display.
Reopens previous display by pressing
BACK button. In this case, the current
panel is not closed.▷Move the controller to the right.Seite 20At a glanceiDrive20
Online Edition for Part no. 01 40 2 964 303 - VI/15
Page 22 of 242
▷The system recognizes capital and lower
case letters. For the input of upper/lower
case letters and numbers, it may be neces‐
sary to switch to the corresponding input
mode, e.g. when upper and lower case let‐
ters are written the same way. Switching
between cases, numbers and letters, refer
to page 25.▷Enter characters as they are displayed on
the Control Display.▷Always enter associated characters, such
as accents or periods so that the letter can
be clearly recognized. Possible input de‐
pends on the set language. Where neces‐
sary, enter special characters via the con‐
troller.▷To delete a character, slide to the left on
the touchpad.▷To enter a blank space, slide to the right in
the center of the touchpad.▷To enter a hyphen, slide to the right in the
upper area of the touchpad.▷To enter an underscore, swipe to the right
in the lower area of the touchpad.
Using interactive map and Internet
Via touch-pad move the interactive map in the
navigation system and Internet sites.
FunctionControlsMove interactive map or
Internet sites.Swipe into re‐
spective direc‐
tion.Enlarge/shrink interactive
map or Internet sites.Drag in or out on
the touchpad with
fingers.Display the menu or open
a link in the Internet.Tap once.
Changing settings
You may change control display settings via
touchpad. Swipe left or right accordingly.
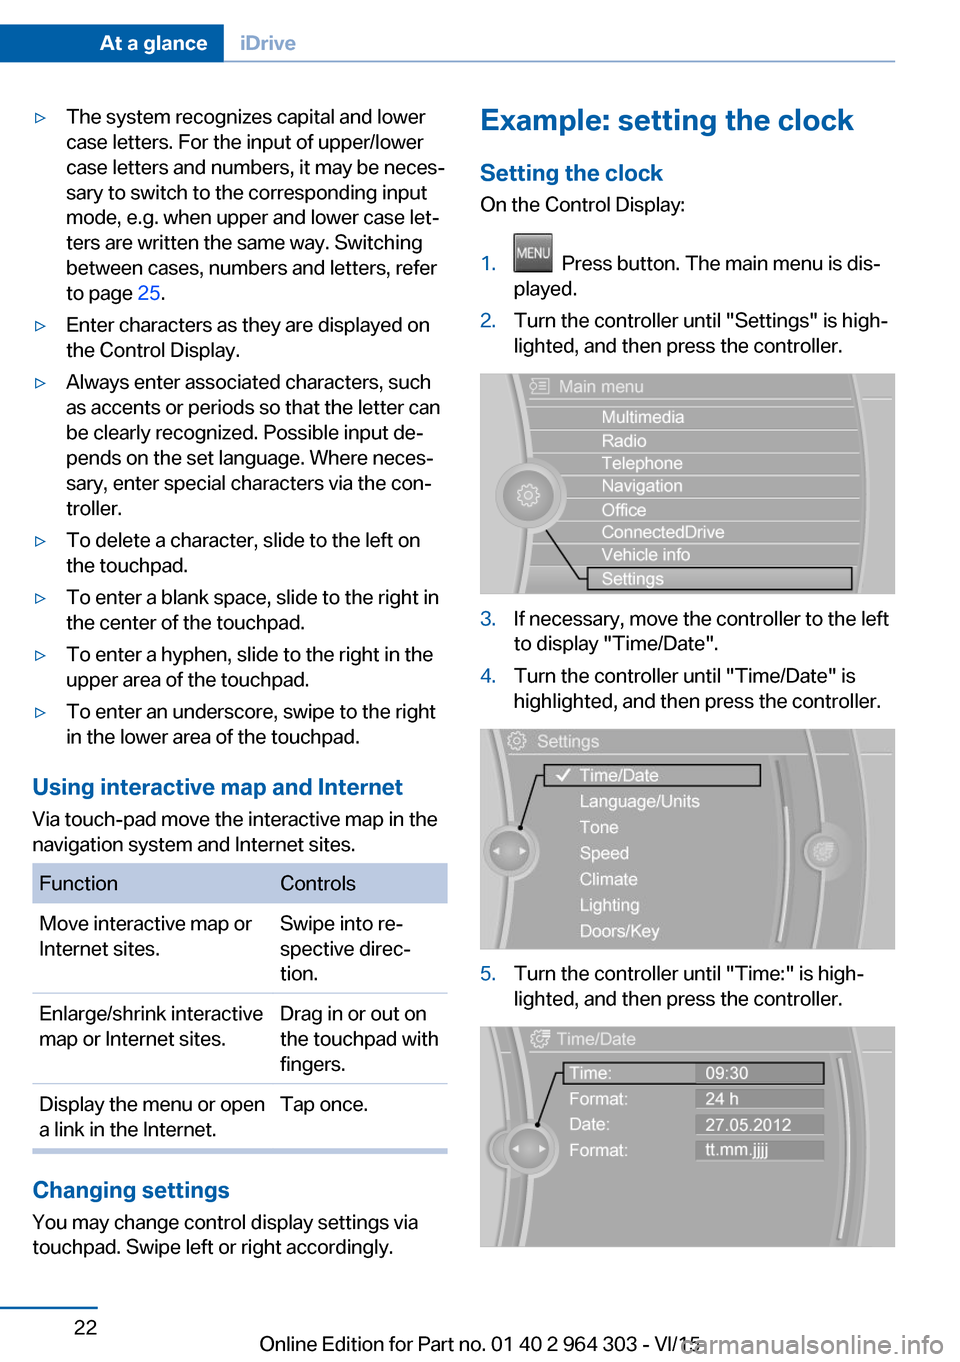
Example: setting the clock
Setting the clock
On the Control Display:1. Press button. The main menu is dis‐
played.2.Turn the controller until "Settings" is high‐
lighted, and then press the controller.3.If necessary, move the controller to the left
to display "Time/Date".4.Turn the controller until "Time/Date" is
highlighted, and then press the controller.5.Turn the controller until "Time:" is high‐
lighted, and then press the controller.Seite 22At a glanceiDrive22
Online Edition for Part no. 01 40 2 964 303 - VI/15
Page 24 of 242
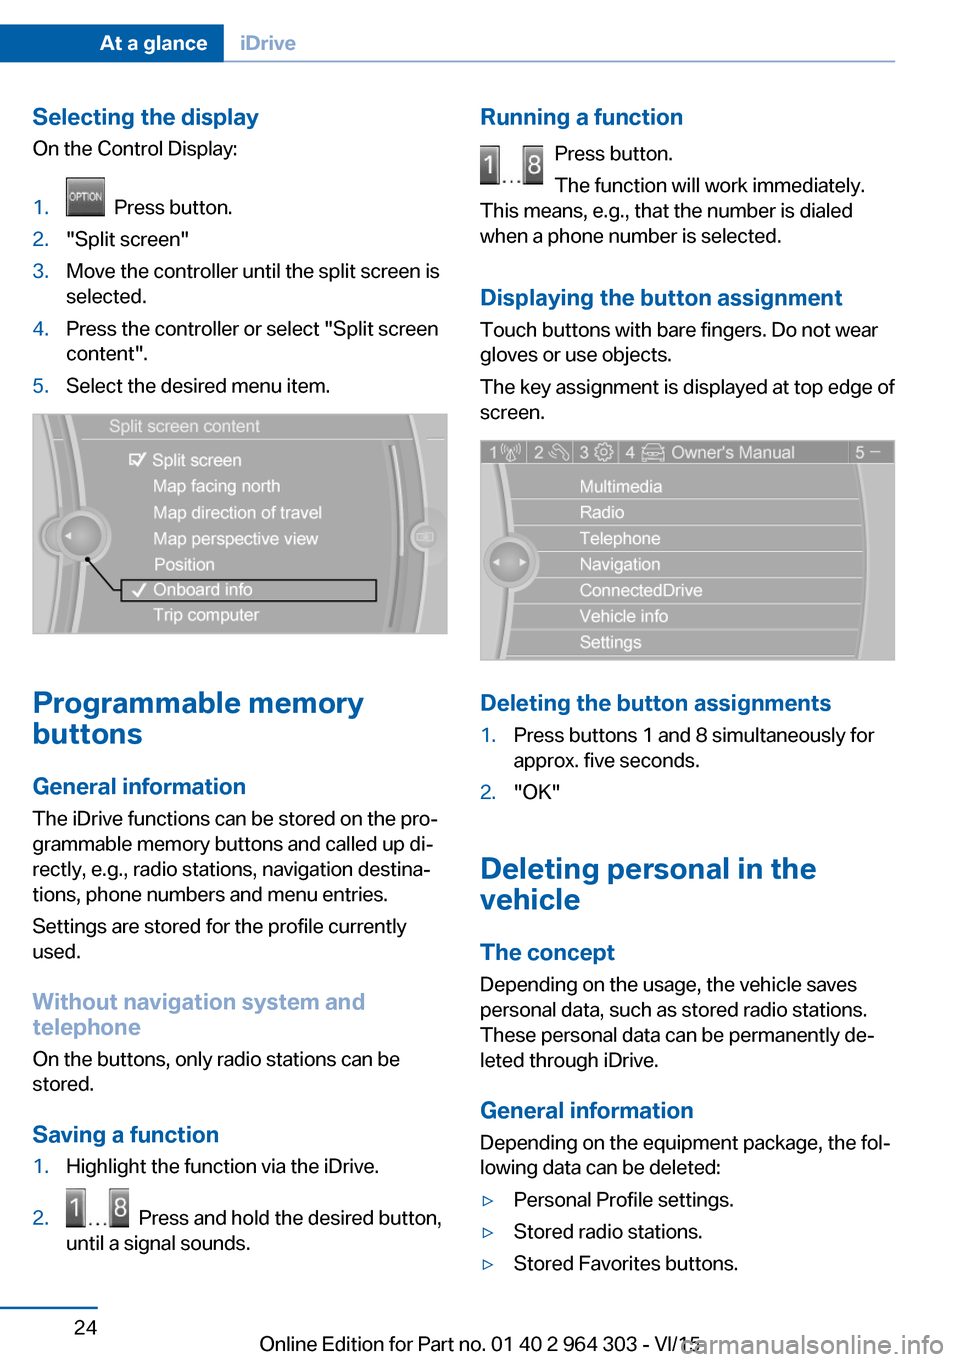
Selecting the display
On the Control Display:1. Press button.2."Split screen"3.Move the controller until the split screen is
selected.4.Press the controller or select "Split screen
content".5.Select the desired menu item.
Programmable memory
buttons
General information
The iDrive functions can be stored on the pro‐
grammable memory buttons and called up di‐
rectly, e.g., radio stations, navigation destina‐
tions, phone numbers and menu entries.
Settings are stored for the profile currently
used.
Without navigation system and
telephone
On the buttons, only radio stations can be
stored.
Saving a function
1.Highlight the function via the iDrive.2. Press and hold the desired button,
until a signal sounds.Running a function
Press button.
The function will work immediately.
This means, e.g., that the number is dialed
when a phone number is selected.
Displaying the button assignment Touch buttons with bare fingers. Do not wear
gloves or use objects.
The key assignment is displayed at top edge of
screen.
Deleting the button assignments
1.Press buttons 1 and 8 simultaneously for
approx. five seconds.2."OK"
Deleting personal in the
vehicle
The concept
Depending on the usage, the vehicle saves
personal data, such as stored radio stations.
These personal data can be permanently de‐
leted through iDrive.
General information
Depending on the equipment package, the fol‐
lowing data can be deleted:
▷Personal Profile settings.▷Stored radio stations.▷Stored Favorites buttons.Seite 24At a glanceiDrive24
Online Edition for Part no. 01 40 2 964 303 - VI/15
Page 29 of 242
Integrated Owner's Manual in the vehicleVehicle features and optionsThis chapter describes all standard, country-
specific and optional features offered with the
series. It also describes features that are not
necessarily available in your car, e. g., due to
the selected options or country versions. This
also applies to safety-related functions and
systems. The respectively applicable country
provisions must be observed when using the
respective features and systems.
Integrated Owner's Manual
in the vehicle
The Integrated Owner's Manual can be dis‐
played on the Control Display. It specifically
describes features and functions found in the
vehicle.
Components of the Integrated
Owner's Manual
The Integrated Owner's Manual consists of
three parts, which offer various levels of infor‐
mation or possible access.
Quick Reference Guide The Quick Reference Guide provides informa‐
tion how to operate the car, how to use basic
vehicle functions or what to do in case of a
breakdown. This information can also be dis‐
played while driving.
Search by images
Image search provides information and de‐
scriptions. This is helpful when the terminol‐
ogy for a feature is not at hand.
Owner's Manual Search for information and descriptions by en‐
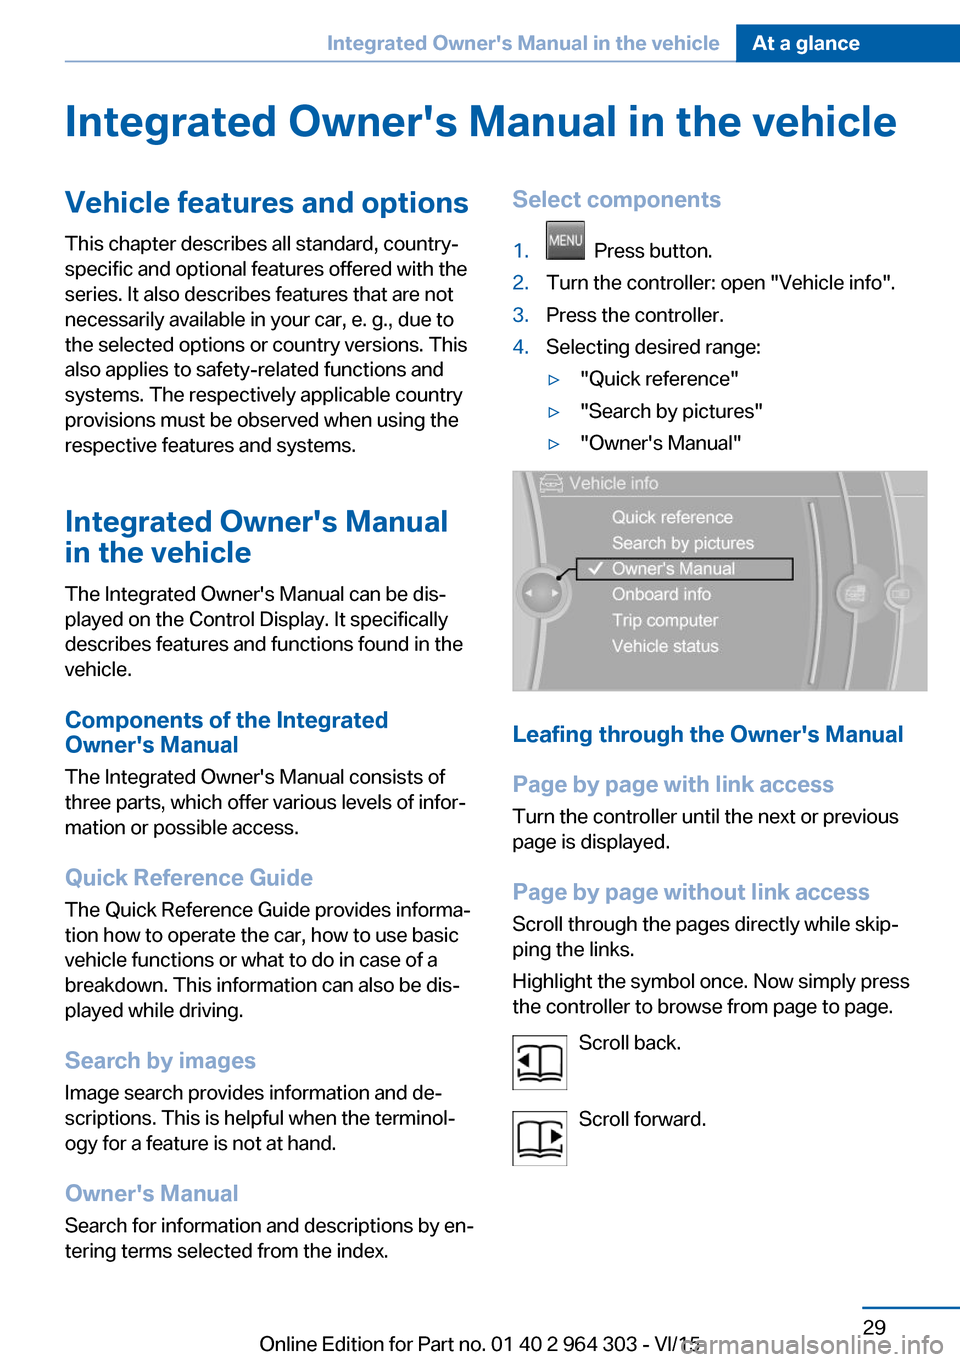
tering terms selected from the index.Select components1. Press button.2.Turn the controller: open "Vehicle info".3.Press the controller.4.Selecting desired range:▷"Quick reference"▷"Search by pictures"▷"Owner's Manual"
Leafing through the Owner's Manual
Page by page with link access
Turn the controller until the next or previous
page is displayed.
Page by page without link access
Scroll through the pages directly while skip‐
ping the links.
Highlight the symbol once. Now simply press
the controller to browse from page to page.
Scroll back.
Scroll forward.
Seite 29Integrated Owner's Manual in the vehicleAt a glance29
Online Edition for Part no. 01 40 2 964 303 - VI/15
Page 35 of 242
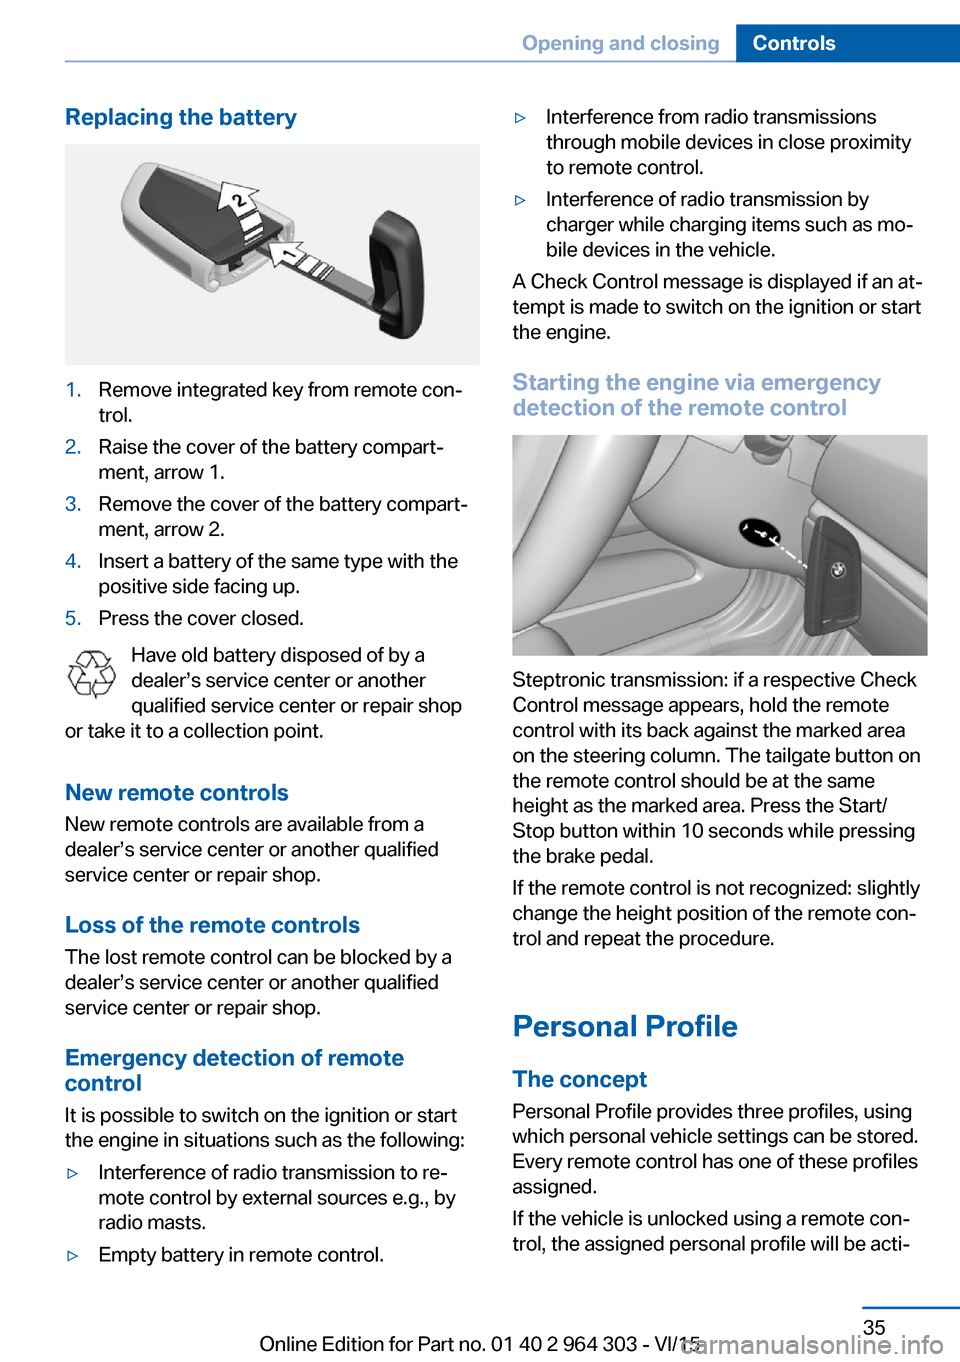
Replacing the battery1.Remove integrated key from remote con‐
trol.2.Raise the cover of the battery compart‐
ment, arrow 1.3.Remove the cover of the battery compart‐
ment, arrow 2.4.Insert a battery of the same type with the
positive side facing up.5.Press the cover closed.
Have old battery disposed of by a
dealer’s service center or another
qualified service center or repair shop
or take it to a collection point.
New remote controlsNew remote controls are available from a
dealer’s service center or another qualified
service center or repair shop.
Loss of the remote controls
The lost remote control can be blocked by a
dealer’s service center or another qualified
service center or repair shop.
Emergency detection of remote
control
It is possible to switch on the ignition or start
the engine in situations such as the following:
▷Interference of radio transmission to re‐
mote control by external sources e.g., by
radio masts.▷Empty battery in remote control.▷Interference from radio transmissions
through mobile devices in close proximity
to remote control.▷Interference of radio transmission by
charger while charging items such as mo‐
bile devices in the vehicle.
A Check Control message is displayed if an at‐
tempt is made to switch on the ignition or start
the engine.
Starting the engine via emergency detection of the remote control
Steptronic transmission: if a respective Check
Control message appears, hold the remote
control with its back against the marked area
on the steering column. The tailgate button on
the remote control should be at the same
height as the marked area. Press the Start/
Stop button within 10 seconds while pressing
the brake pedal.
If the remote control is not recognized: slightly
change the height position of the remote con‐
trol and repeat the procedure.
Personal Profile
The concept Personal Profile provides three profiles, using
which personal vehicle settings can be stored.
Every remote control has one of these profiles
assigned.
If the vehicle is unlocked using a remote con‐
trol, the assigned personal profile will be acti‐
Seite 35Opening and closingControls35
Online Edition for Part no. 01 40 2 964 303 - VI/15