seal BMW X1 2016 F48 Owner's Manual
[x] Cancel search | Manufacturer: BMW, Model Year: 2016, Model line: X1, Model: BMW X1 2016 F48Pages: 242, PDF Size: 7.12 MB
Page 107 of 242
WARNING
A damaged regular tire with low or miss‐
ing tire inflation pressure impacts handling,
such as steering and braking response. Run-
flat tires can maintain limited stability. There is
risk of an accident. Do not continue driving if
the vehicle is not equipped with run-flat tires.
Observe the information on run-flat tires and
continued driving with these tires.◀
A low tire inflation pressure might turn on DSC
Dynamic Stability Control.
Actions in the event of a flat tire
Normal tires1.Identify the damaged tire.
Do this by checking the air pressure in all
four tires.
If the tire inflation pressure in all four tires
is correct, the Tire Pressure Monitor may
not have been initialized. In this case, initi‐
alize the system.
If identification of flat tire damage is not
possible, please contact a dealer’s service
center or another qualified service center
or repair shop.2.Rectify the flat tire on the damaged wheel.
Use of tire sealant, e.g., the Mobility System,
may damage the TPM wheel electronics. In
this case, have the electronics checked at the
next opportunity and have them replaced if
needed.
Run-flat tires
Maximum speed
You may continue driving with a damaged tire
at speeds up to 50 mph/80 km/h.
Continued driving with a flat tire
If continuing to drive with a damaged tire:
1.Avoid sudden braking and steering maneu‐
vers.2.Do not exceed a speed of 50 mph/80 km/h.3.Check the air pressure in all four tires at
the next opportunity.
If the tire inflation pressure in all four tires
is shown to be correct, it is possible that
the Tire Pressure Monitor did not perform
a reset. In that case, carry out a reset.
Possible driving distance with complete loss of
tire inflation pressure:
The possible driving distance after a loss of tire
inflation pressure depends on cargo load, driv‐
ing style and road conditions.
A vehicle with an average load has a possible
driving range of approx. 50 miles/80 km.
A vehicle with a damaged tire reacts differ‐
ently, e.g., it has reduced lane stability during
braking, a longer braking distance and different
self-steering properties. Adjust your driving
style accordingly. Avoid abrupt steering ma‐
neuvers or driving over obstacles, e.g., curbs,
potholes, etc.
Because the possible driving distance de‐
pends on how the vehicle is used during the
trip, the actual distance may be shorter or lon‐
ger depending on the driving speed, road con‐
ditions, external temperature, cargo load, etc.
WARNING
Your vehicle handles differently when a
run-flat tire is damaged and has low or missing
tire inflation pressure, e.g., your lane stability is
reduced when braking, braking distances are
longer and the self-steering properties will
change. There is risk of an accident.
Drive moderately and do not exceed a speed of
50 mph/80 km/h.◀
Final tire failure
Vibrations or loud noises while driving can indi‐
cate the final failure of a tire.
Reduce speed and stop; otherwise, pieces of
the tire could come loose and cause an acci‐
dent.
Seite 107SafetyControls107
Online Edition for Part no. 01 40 2 964 303 - VI/15
Page 162 of 242
Opening
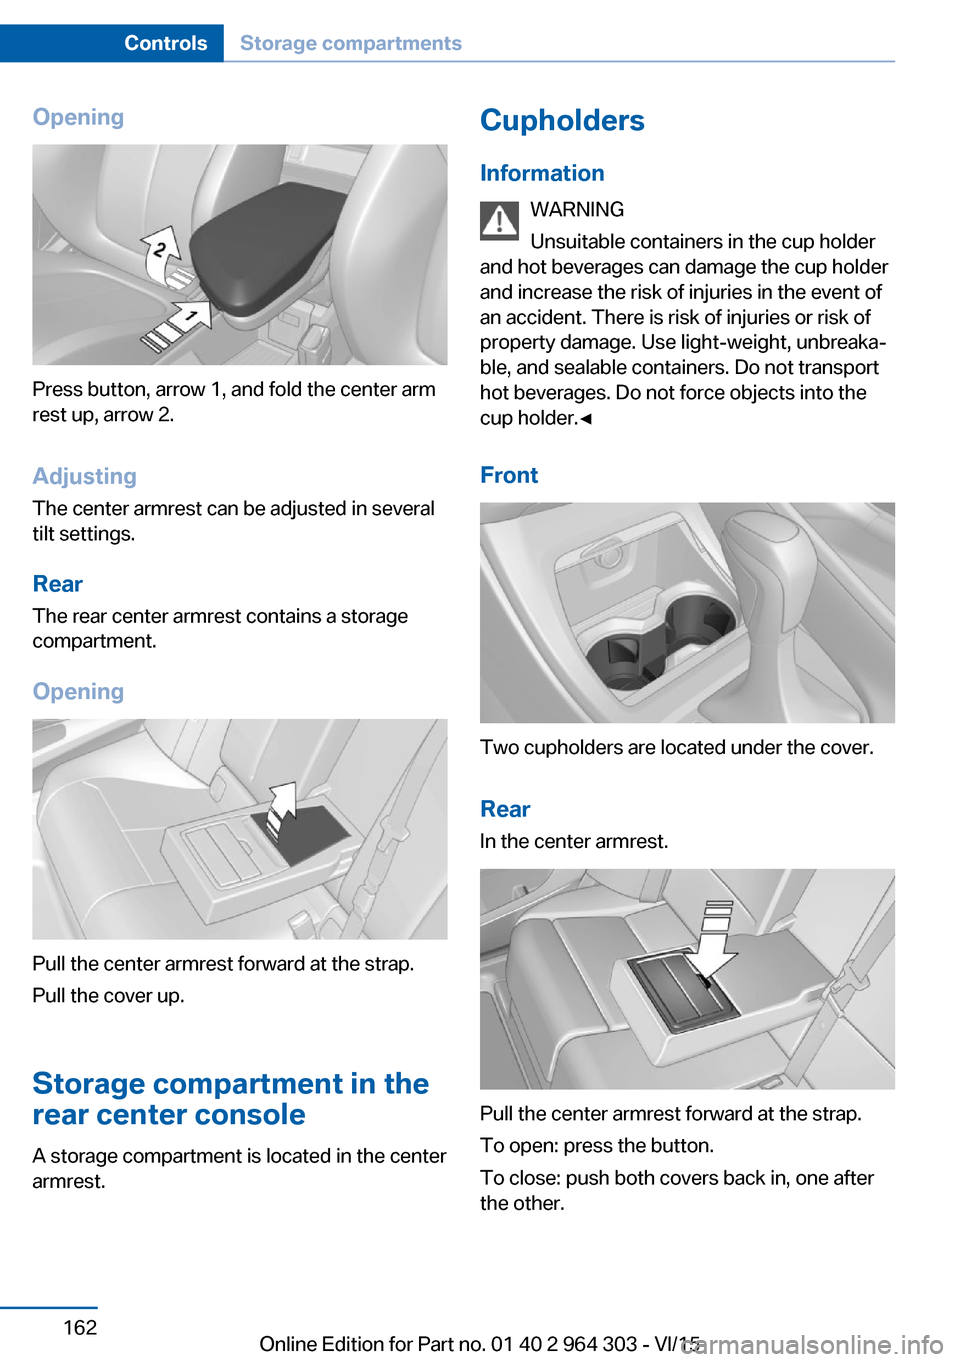
Press button, arrow 1, and fold the center arm
rest up, arrow 2.
Adjusting
The center armrest can be adjusted in several
tilt settings.
RearThe rear center armrest contains a storage
compartment.
Opening
Pull the center armrest forward at the strap.
Pull the cover up.
Storage compartment in the
rear center console
A storage compartment is located in the center
armrest.
Cupholders
Information WARNING
Unsuitable containers in the cup holder
and hot beverages can damage the cup holder
and increase the risk of injuries in the event of
an accident. There is risk of injuries or risk of
property damage. Use light-weight, unbreaka‐
ble, and sealable containers. Do not transport
hot beverages. Do not force objects into the
cup holder.◀
Front
Two cupholders are located under the cover.
Rear In the center armrest.
Pull the center armrest forward at the strap.
To open: press the button.
To close: push both covers back in, one after
the other.
Seite 162ControlsStorage compartments162
Online Edition for Part no. 01 40 2 964 303 - VI/15
Page 192 of 242
StorageStore wheels and tires in a cool, dry place with
as little exposure to light as possible.
Always protect tires against all contact with oil,
grease and fuels.
Do not exceed the maximum tire inflation pres‐
sure indicated on the side wall of the tire.
Run-flat tires Label
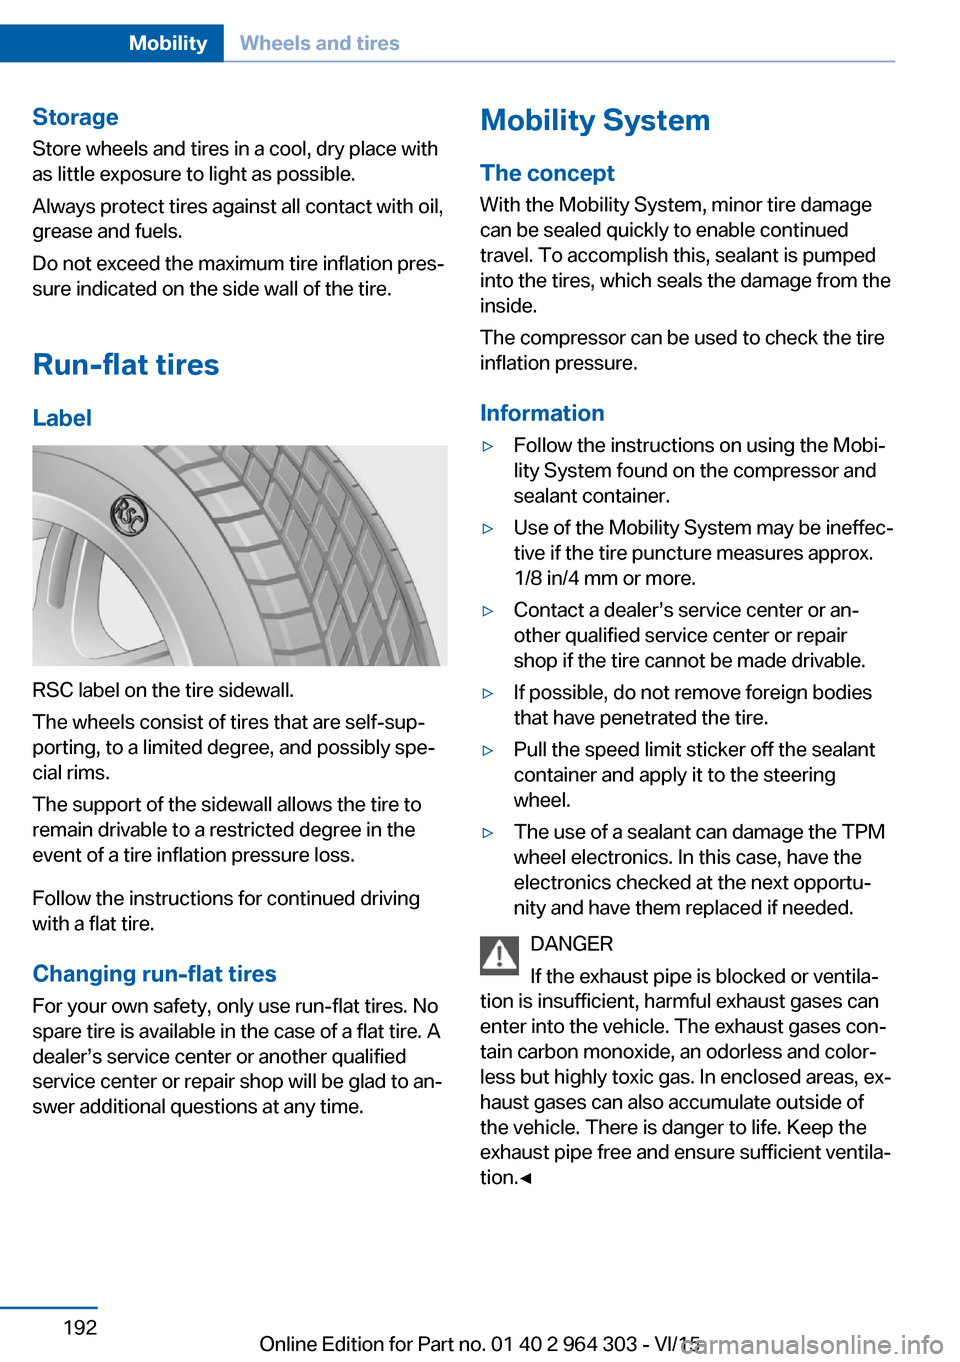
RSC label on the tire sidewall.
The wheels consist of tires that are self-sup‐
porting, to a limited degree, and possibly spe‐
cial rims.
The support of the sidewall allows the tire to
remain drivable to a restricted degree in the
event of a tire inflation pressure loss.
Follow the instructions for continued driving
with a flat tire.
Changing run-flat tires
For your own safety, only use run-flat tires. No
spare tire is available in the case of a flat tire. A
dealer’s service center or another qualified
service center or repair shop will be glad to an‐
swer additional questions at any time.
Mobility System
The concept
With the Mobility System, minor tire damage
can be sealed quickly to enable continued
travel. To accomplish this, sealant is pumped
into the tires, which seals the damage from the
inside.
The compressor can be used to check the tire
inflation pressure.
Information▷Follow the instructions on using the Mobi‐
lity System found on the compressor and
sealant container.▷Use of the Mobility System may be ineffec‐
tive if the tire puncture measures approx.
1/8 in/4 mm or more.▷Contact a dealer’s service center or an‐
other qualified service center or repair
shop if the tire cannot be made drivable.▷If possible, do not remove foreign bodies
that have penetrated the tire.▷Pull the speed limit sticker off the sealant
container and apply it to the steering
wheel.▷The use of a sealant can damage the TPM
wheel electronics. In this case, have the
electronics checked at the next opportu‐
nity and have them replaced if needed.
DANGER
If the exhaust pipe is blocked or ventila‐
tion is insufficient, harmful exhaust gases can
enter into the vehicle. The exhaust gases con‐
tain carbon monoxide, an odorless and color‐
less but highly toxic gas. In enclosed areas, ex‐
haust gases can also accumulate outside of
the vehicle. There is danger to life. Keep the
exhaust pipe free and ensure sufficient ventila‐
tion.◀
Seite 192MobilityWheels and tires192
Online Edition for Part no. 01 40 2 964 303 - VI/15
Page 193 of 242
StorageThe Mobility System is located under the
cargo floor panel.
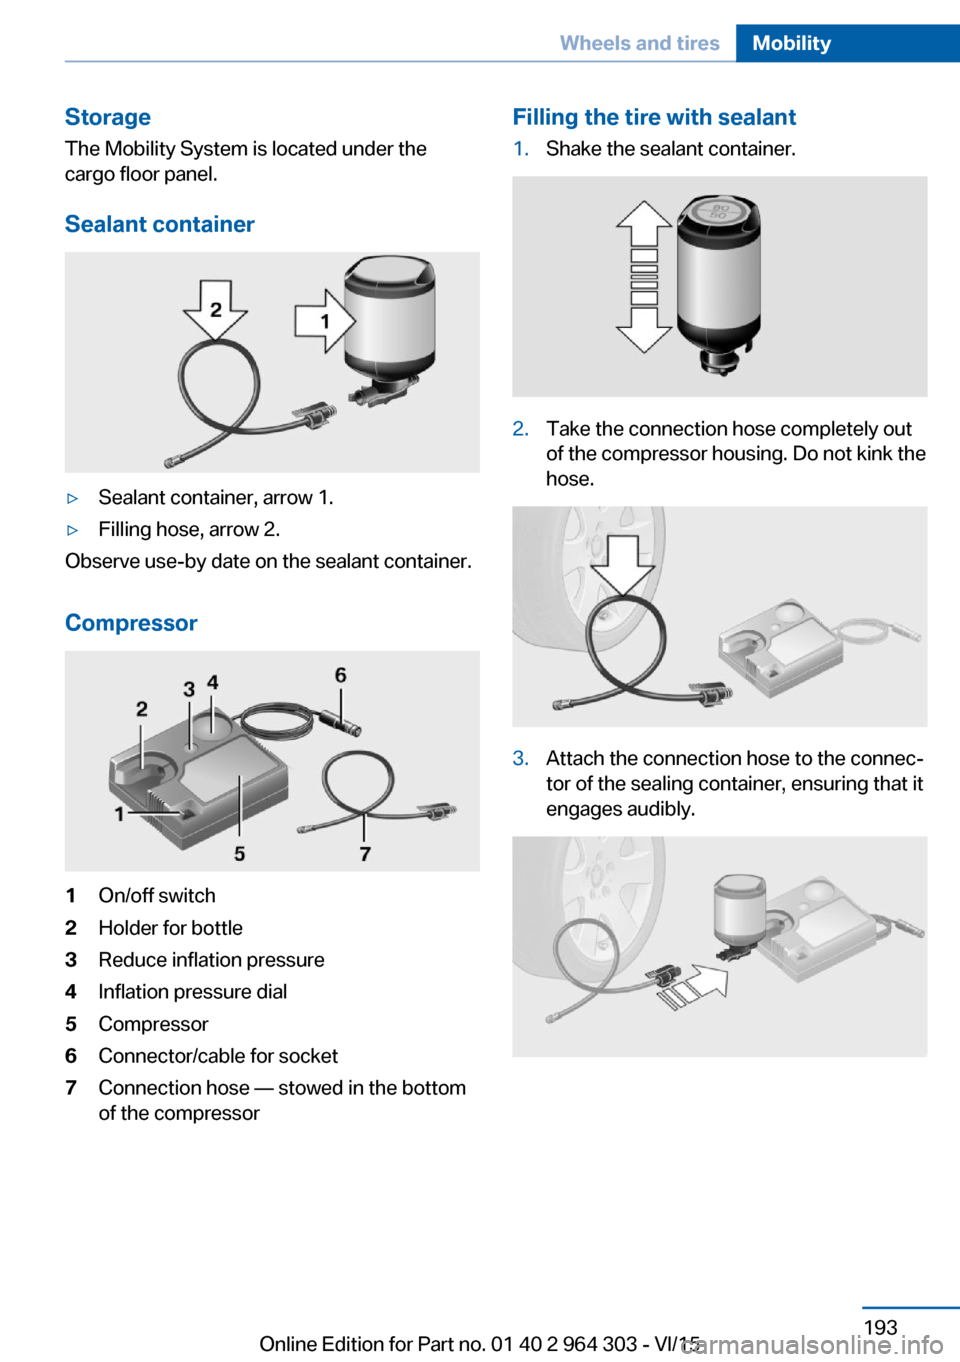
Sealant container▷Sealant container, arrow 1.▷Filling hose, arrow 2.
Observe use-by date on the sealant container.
Compressor
1On/off switch2Holder for bottle3Reduce inflation pressure4Inflation pressure dial5Compressor6Connector/cable for socket7Connection hose — stowed in the bottom
of the compressorFilling the tire with sealant1.Shake the sealant container.2.Take the connection hose completely out
of the compressor housing. Do not kink the
hose.3.Attach the connection hose to the connec‐
tor of the sealing container, ensuring that it
engages audibly.Seite 193Wheels and tiresMobility193
Online Edition for Part no. 01 40 2 964 303 - VI/15
Page 194 of 242
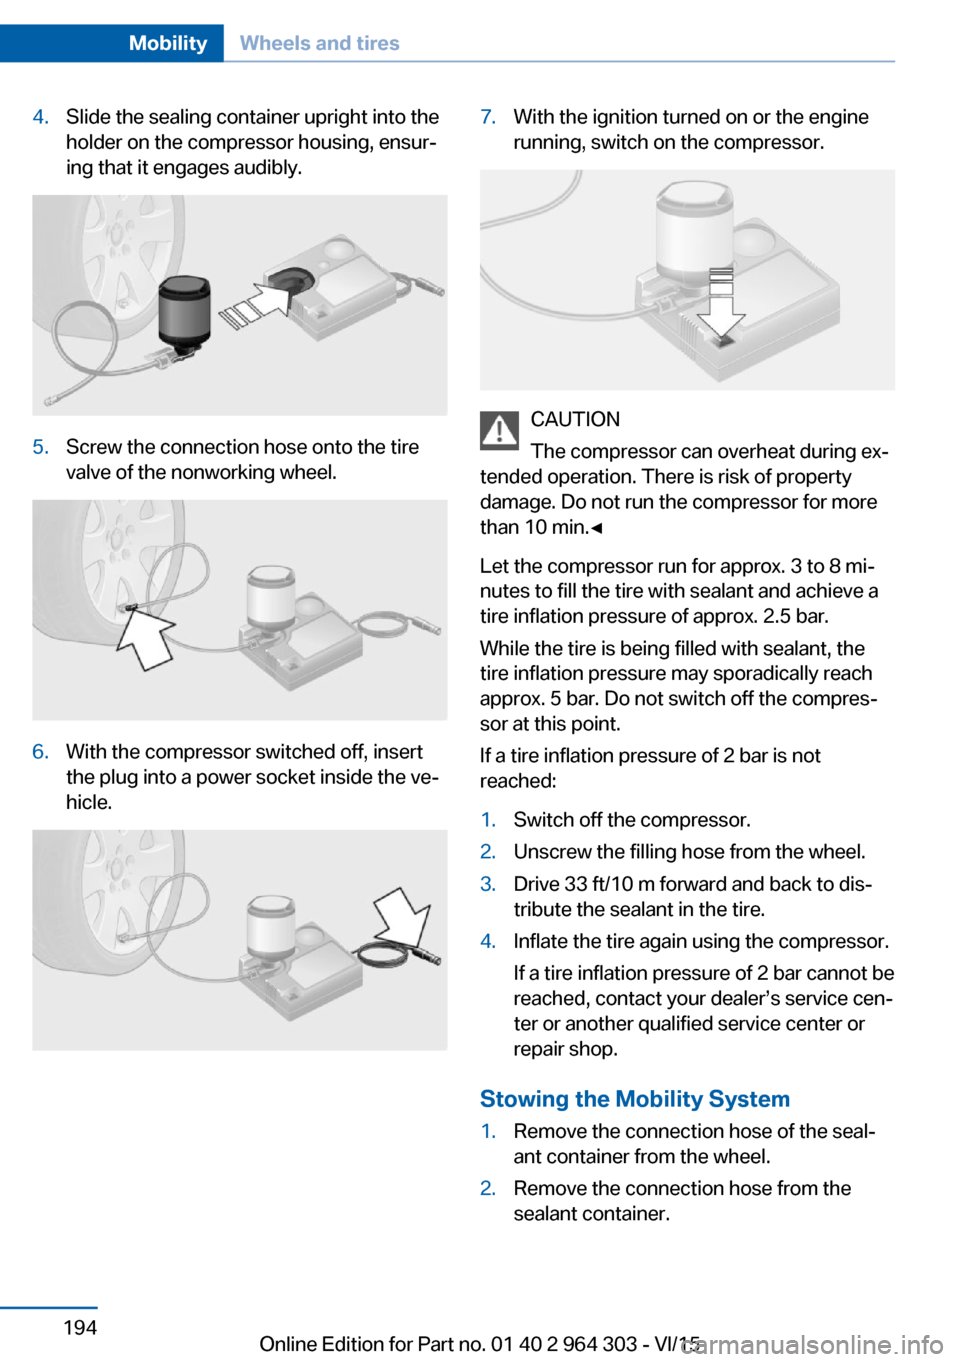
4.Slide the sealing container upright into the
holder on the compressor housing, ensur‐
ing that it engages audibly.5.Screw the connection hose onto the tire
valve of the nonworking wheel.6.With the compressor switched off, insert
the plug into a power socket inside the ve‐
hicle.7.With the ignition turned on or the engine
running, switch on the compressor.
CAUTION
The compressor can overheat during ex‐
tended operation. There is risk of property
damage. Do not run the compressor for more
than 10 min.◀
Let the compressor run for approx. 3 to 8 mi‐
nutes to fill the tire with sealant and achieve a
tire inflation pressure of approx. 2.5 bar.
While the tire is being filled with sealant, the
tire inflation pressure may sporadically reach
approx. 5 bar. Do not switch off the compres‐
sor at this point.
If a tire inflation pressure of 2 bar is not
reached:
1.Switch off the compressor.2.Unscrew the filling hose from the wheel.3.Drive 33 ft/10 m forward and back to dis‐
tribute the sealant in the tire.4.Inflate the tire again using the compressor.
If a tire inflation pressure of 2 bar cannot be
reached, contact your dealer’s service cen‐
ter or another qualified service center or
repair shop.
Stowing the Mobility System
1.Remove the connection hose of the seal‐
ant container from the wheel.2.Remove the connection hose from the
sealant container.Seite 194MobilityWheels and tires194
Online Edition for Part no. 01 40 2 964 303 - VI/15
Page 195 of 242
3.Wrap the empty sealant container and con‐
nection hose in suitable material to avoid
dirtying the trunk.4.Stow the Mobility System back in the vehi‐
cle.
Distributing the sealant
Immediately drive approx. 5 miles/10 km to en‐
sure that the sealant is evenly distributed in the
tire.
Do not exceed a speed of 50 mph/80 km/h.
If possible, do not drive at speeds less than
12 mph/20 km/h.
To correct the tire inflation pressure
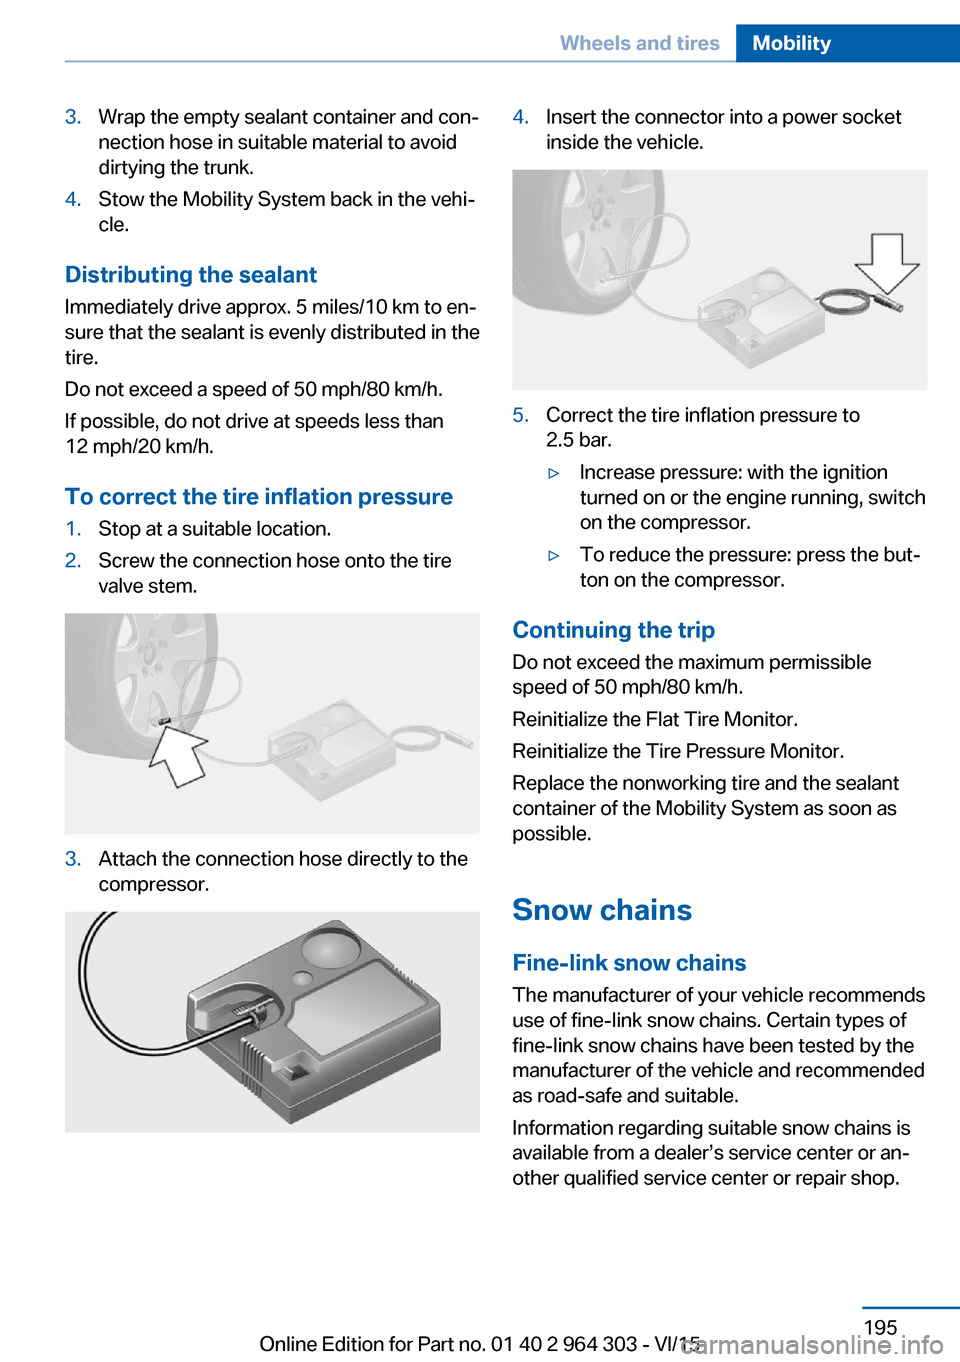
1.Stop at a suitable location.2.Screw the connection hose onto the tire
valve stem.3.Attach the connection hose directly to the
compressor.4.Insert the connector into a power socket
inside the vehicle.5.Correct the tire inflation pressure to
2.5 bar.▷Increase pressure: with the ignition
turned on or the engine running, switch
on the compressor.▷To reduce the pressure: press the but‐
ton on the compressor.
Continuing the trip
Do not exceed the maximum permissible
speed of 50 mph/80 km/h.
Reinitialize the Flat Tire Monitor.
Reinitialize the Tire Pressure Monitor.
Replace the nonworking tire and the sealant
container of the Mobility System as soon as
possible.
Snow chains
Fine-link snow chains
The manufacturer of your vehicle recommends
use of fine-link snow chains. Certain types of
fine-link snow chains have been tested by the
manufacturer of the vehicle and recommended
as road-safe and suitable.
Information regarding suitable snow chains is
available from a dealer’s service center or an‐
other qualified service center or repair shop.
Seite 195Wheels and tiresMobility195
Online Edition for Part no. 01 40 2 964 303 - VI/15
Page 213 of 242
2.Press the nonworking bulb gently into the
socket, turn counterclockwise and remove.▷Upper bulb: reversing lamp▷Lower bulb: inner brake lamp
Only vehicles with halogen headlights:
▷Lower bulb, 5-watt: tail light
Installing the bulb holder
1.Proceed in the reverse order to insert the
new bulb and attach the bulb holder.
Connect the plug to the bulb holder.2.Make sure that the bulb holder is correctly
and firmly seated.
Central brake lamp and license plate
lamp
Follow general instructions, refer to page 206.
These lights are made using LED technology.
Contact a dealer’s service center or another
qualified service center or repair shop in the
event of a malfunction.
Changing wheels
Information When using run-flat tires or sealants, a tire
does not need to be changed immediately in
the event of pressure loss due to a flat tire.
Which is why no spare tire is available.
The tools for changing wheels are available as
accessories from your dealer’s service center
or another qualified service center or repair
shop.
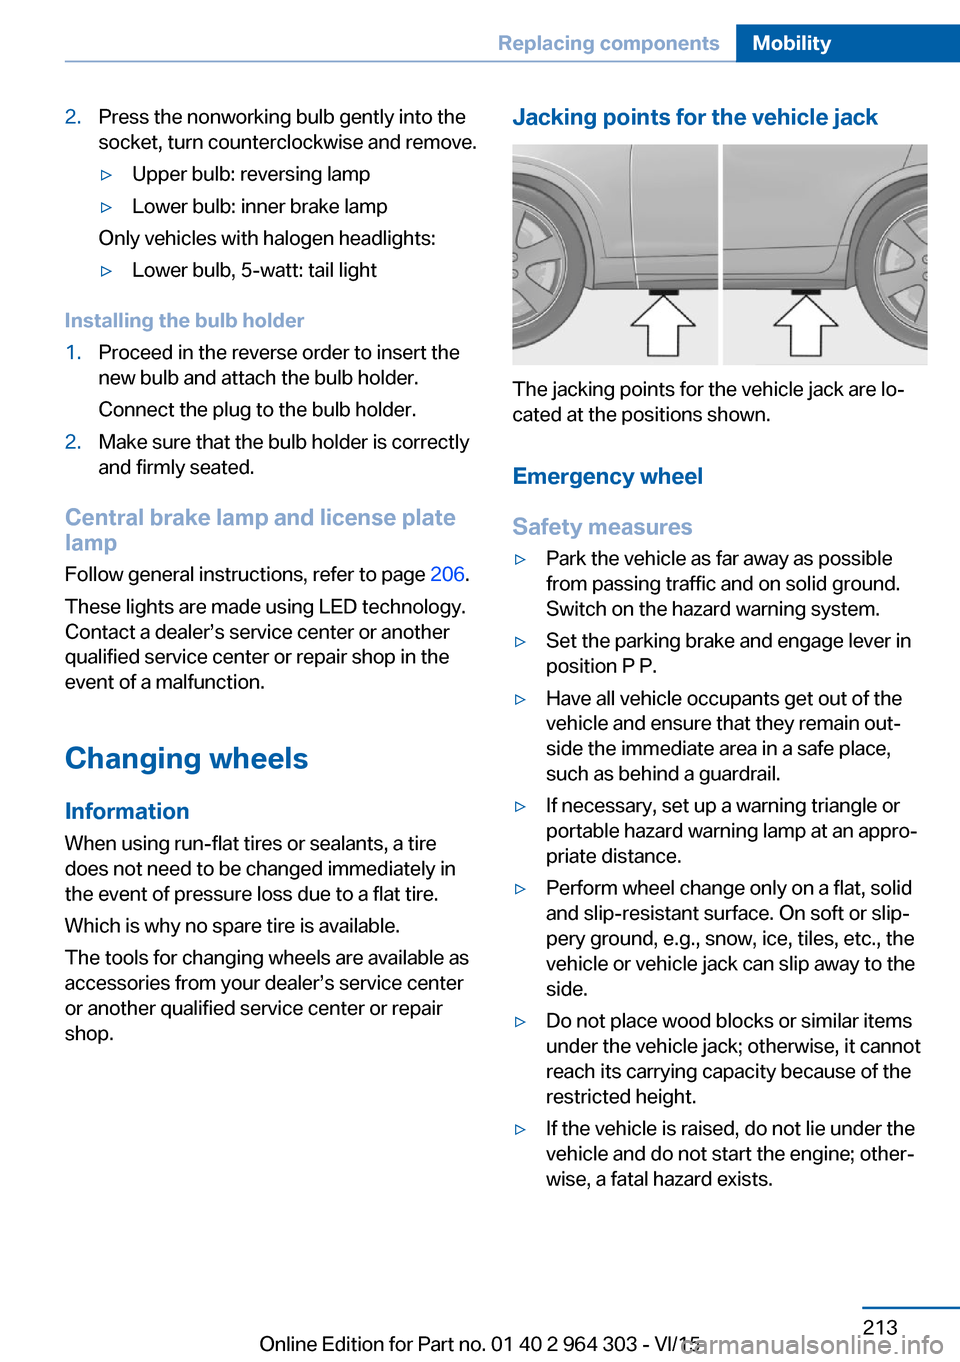
Jacking points for the vehicle jack
The jacking points for the vehicle jack are lo‐
cated at the positions shown.
Emergency wheel
Safety measures
▷Park the vehicle as far away as possible
from passing traffic and on solid ground.
Switch on the hazard warning system.▷Set the parking brake and engage lever in
position P P.▷Have all vehicle occupants get out of the
vehicle and ensure that they remain out‐
side the immediate area in a safe place,
such as behind a guardrail.▷If necessary, set up a warning triangle or
portable hazard warning lamp at an appro‐
priate distance.▷Perform wheel change only on a flat, solid
and slip-resistant surface. On soft or slip‐
pery ground, e.g., snow, ice, tiles, etc., the
vehicle or vehicle jack can slip away to the
side.▷Do not place wood blocks or similar items
under the vehicle jack; otherwise, it cannot
reach its carrying capacity because of the
restricted height.▷If the vehicle is raised, do not lie under the
vehicle and do not start the engine; other‐
wise, a fatal hazard exists.Seite 213Replacing componentsMobility213
Online Edition for Part no. 01 40 2 964 303 - VI/15
Page 222 of 242
CareVehicle features and optionsThis chapter describes all standard, country-
specific and optional features offered with the
series. It also describes features that are not
necessarily available in your car, e. g., due to
the selected options or country versions. This
also applies to safety-related functions and
systems. The respectively applicable country
provisions must be observed when using the
respective features and systems.
Car washes General information
Regularly remove foreign objects such as
leaves in the area below the windshield when
the hood is raised.
Wash your vehicle frequently, particularly in
winter. Intense soiling and road salt can dam‐
age the vehicle.
Steam blaster and high-pressure
washer
Information CAUTION
When cleaning with high-pressure wash‐
ers, components can be damaged due to the
pressure or temperatures being too high.
There is risk of property damage. Maintain suf‐
ficient distance and do not spray too long con‐
tinuously. Follow the user's manual for the
high-pressure washer.◀
Distances and temperature▷Maximum temperature: 140 ℉/60 ℃.▷Minimum distance from sensors, cameras,
seals: 12 in/30 cm.▷Minimum distance from glass sunroof:
31.5 inches/80 cm.
Automatic car washes
Information
▷Give preference to cloth car washes or
those that use soft brushes in order to
avoid paint damage.▷Make sure that the wheels and tires are not
damaged by the transport mechanisms.▷Fold in the exterior mirrors; otherwise, they
may be damaged, depending on the width
of the vehicle.▷Deactivate the rain sensor, refer to
page 75, to avoid unintentional wiper acti‐
vation.▷In some cases, an unintentional alarm can
be triggered by the interior motion sensor
of the alarm system. Follow the instruc‐
tions on avoiding an unintentional alarm,
refer to page 47.
CAUTION
Too high guide rails in car washes can
damage body parts. There is risk of property
damage. Avoid car washes with guide rails
higher than 4 in/10 cm.◀
Before driving into a car wash In order to ensure that the vehicle can roll in a
car wash, take the following steps:
Steptronic transmission:
1.Drive into the car wash.2.Engage selector lever position N.3.Make sure that the parking brake is re‐
leased.4.Switch the engine off.Seite 222MobilityCare222
Online Edition for Part no. 01 40 2 964 303 - VI/15
Page 224 of 242
Clean the upholstery down to the seams using
large sweeping motions. Avoid rubbing the
material vigorously.
CAUTION
Open Velcro® fasteners on articles of
clothing can damage the seat covers. There is
risk of property damage. Ensure that any Vel‐
cro® fasteners are closed.◀
Caring for special components
Light-alloy wheels
When cleaning the vehicle, use only neutral
wheel cleaners having a pH value from 5 to 9.
Do not use abrasive cleaning agents or steam
jets above 140 ℉/60 ℃. Follow the manufac‐
turer's instructions.
Aggressive, acidic or alkaline cleaning agents
can destroy the protective layer of adjacent
components, such as the brake disk.
Chrome surfaces
Carefully clean components such as the radia‐
tor grille or door handles with an ample supply
of water, possibly with shampoo added, partic‐
ularly when they have been exposed to road
salt.
Rubber components
Environmental influences can cause surface
soiling of rubber parts and a loss of gloss. For
cleaning, use only water and suitable care
products, the manufacturer of your vehicle rec‐
ommends original BMW care products.
Treat especially worn rubber parts with rubber
care agents at regular intervals. When cleaning
rubber seals, do not use any silicon-containing
car care products in order to avoid damage or
noises.
Fine wood partsClean fine wood facing and fine wood compo‐
nents only with a moist rag. Then dry with a
soft cloth.Plastic components
These include:▷Imitation leather surfaces.▷Roofliner.▷Lamp lenses.▷Instrument cluster cover.▷Matt black spray-coated components.▷Painted parts in the interior.
Clean with a microfiber cloth.
Dampen cloth lightly with water.
Do not soak the roofliner.
CAUTION
Cleansers that contain alcohol or sol‐
vents, such as lacquer thinners, heavy-duty
grease removers, fuel, or such, can damage
plastic parts. There is risk of property damage.
Clean with a microfiber cloth. Dampen cloth
lightly with water.◀
Safety belts
Dirty belt straps impede the reeling action and
thus have a negative impact on safety.
WARNING
Chemical cleansers can destroy the
safety belt webbing. Missing protective effect
of the safety belts. There is risk of injuries or
danger to life. Use only a mild soapy solution
for cleaning the safety belts.◀
Use only a mild soapy solution, with the safety
belts clipped into their buckles.
Do not allow the switchs to retract the safety
belts until they are dry.
Carpets and floor mats WARNING
Objects in the driver's floor area can limit
the pedal distance or block a depressed pedal.
There is risk of an accident. Stow objects in
the vehicle such that they are secured and
cannot enter into the driver's floor area. Use
Seite 224MobilityCare224
Online Edition for Part no. 01 40 2 964 303 - VI/15
Page 238 of 242
Pinch protection system,glass sunroof 51
Pinch protection system, win‐ dows 49
Plastic, care 224
Power failure 215
Power windows 48
Prescribed engine oil types 201
Pressure, tire air pres‐ sure 186
Pressure warning, tires 109
Profile, see Personal Pro‐ file 35
Programmable memory but‐ tons, iDrive 24
Protective function, glass sunroof 51
Protective function, win‐ dows 49
Push-and-turn switch, see Controller 19
R Radiator fluid 202
Radio 6
Radio-operated key, see Re‐ mote control 34
Radio ready state 68
Rain sensor 75
Rear lights 211
Rear seat backrest tilt 55
Rear seats 55
Rear socket 156
Rearview camera 137
Rearview mirror 60
Rear window de‐ froster 145, 148
Recirculated-air filter 148
Recirculated-air mode 145, 147
Recommended fuel grade 184
Recommended tire brands 191 Refueling 182
Remaining range 86
Remote control/key 34
Remote control, malfunc‐ tion 38
Remote control, univer‐ sal 151
Replacement fuse 216
Replacing parts 206
Replacing wheels/tires 190
Reporting safety malfunc‐ tions 10
RES button, see Camera- based cruise control,
ACC 126
RES button, see Cruise con‐ trol 132
Reserve warning, see Range 86
Reset, Tire Pressure Monitor TPM 106
Retaining straps, securing cargo 173
Retreaded tires 191
Roadside parking lights 98
RON recommended fuel grade 184
Roofliner 17
Roof load capacity 229
Roof-mounted luggage rack 173
Rope for tow-starting/ towing 220
RSC Run Flat System Com‐ ponent, see Run-flat
tires 192
Rubber components, care 224
Run-flat tires 192
S Safe braking 170
Safety belt reminder for driv‐ er's seat and front passen‐
ger seat 57 Safety belts 56
Safety belts, care 224
Safety switch, windows 49
Safety systems, airbags 102
Saving fuel 175
Screen, see Control Dis‐ play 18
Screwdriver, see Onboard ve‐ hicle tool kit 206
Screw thread, refer to Screw thread for tow fitting, screw
thread for tow fitting 221
Sealant 192
Seat and mirror memory 59
Seat belts, see Safety belts 56
Seat heating, front 55
Seating position for chil‐ dren 64
Seats 52
Seats, front 52
Seats, rear 55
Selection list in instrument cluster 90
Selector lever, Steptronic transmission 77
Sensors, care 225
Service and warranty 8
Service requirements, Condi‐ tion Based Service
CBS 204
Service requirements, dis‐ play 87
Services, ConnectedDrive 6
Servotronic 123
SET button, see Camera- based cruise control,
ACC 126
SET button, see Cruise con‐ trol 132
Settings, locking/unlock‐ ing 45
Settings on Control Dis‐ play 93
Settings, storing for seat, mir‐ ror 59 Seite 238ReferenceEverything from A to Z238
Online Edition for Part no. 01 40 2 964 303 - VI/15