BMW X1 SDRIVE28I 2015 Owners Manual
Manufacturer: BMW, Model Year: 2015, Model line: X1 SDRIVE28I, Model: BMW X1 SDRIVE28I 2015Pages: 297, PDF Size: 7.01 MB
Page 111 of 297

Show the obstacle marking via the iDrive, refer
to page 109.
Activating assistance functions
Several assistance functions can be active at
the same time.
Showing the parking aid lines
"Parking aid lines"
Pathway and turning lines are displayed.
Showing the obstacle marking
"Obstacle marking"
Three-dimensionally-shaped markings are dis‐
played.
Image on the Control Display
Switching on the rear view camera
using iDrive
With PDC activated:
"Rear view camera"
The image of the rear view camera is dis‐
played. The setting is stored for the remote
control currently in use.
Brightness
With the rear view camera switched on:
1. Select the symbol.2.Turn the controller until the desired setting
is reached and press the controller.
Contrast
With the rear view camera switched on:
1. Select the symbol.2.Turn the controller until the desired setting
is reached and press the controller.Camera
The lens of the rearview camera is under the
grasping lip of the tailgate.
The presence of dirt can impair image quality.
Clean the lens with a moist, nonabrasive cloth.
Seite 109Driving comfortControls109
Online Edition for Part no. 01 40 2 954 052 - II/15
Page 112 of 297

ClimateVehicle equipmentThis chapter describes all series equipment as
well as country-specific and special equipment
offered for this model series. Therefore, it also
describes equipment that may not be found in
your vehicle, for instance due to the selectedspecial equipment or the country version. This
also applies to safety-related functions and
systems.
When using the features and systems descri‐
bed here, adhere to local regulations.
Automatic climate control
1Manual air distribution2Maximum cooling3Temperature, left4AUTO program5Manual air flow rate, AUTO intensity6Display7Automatic recirculated air control/recircu‐
lated air mode8ALL program9Temperature, right10Defrosting windows and removing conden‐
sation11Switching cooling function on/off manually12Rear window defroster13Seat heating, right 4814Interior temperature sensor, please keep
clear15Seat heating, left 48Seite 110ControlsClimate110
Online Edition for Part no. 01 40 2 954 052 - II/15
Page 113 of 297

NoteSufficient ventilation
When remaining in the vehicle for an ex‐
tended period of time, ensure sufficient exter‐
nal ventilation. Do not continuously use recir‐
culated-air mode; otherwise the air quality in
the interior continuously worsens.◀
Comfortable interior climate For almost all conditions, the AUTO program
4 offers the optimum air distribution and air
flow rate, refer to AUTO program below. Select
a comfortable interior temperature only.
The following sections contain more detailed
information on the available setting options.
Most of these settings are stored for the re‐
mote control currently in use, Personal Profile
settings, refer to page 33.
Manual air distribution
Press the buttons repeatedly to select a pro‐
gram:▷Windows.▷Upper body region.▷Footwell.
The programs can be combined as necessary.
Temperature Turn the wheel to set the de‐
sired temperature.
The automatic climate control
achieves this temperature as
quickly as possible, if necessary
with the maximum cooling or heating capacity,
and then keeps it constant.
Avoid rapidly switching between different tem‐
perature settings. The automatic climate con‐
trol will not have sufficient time to adjust the
set temperature.
Maximum heating power can be obtained with
the highest setting, regardless of the external
temperature.
At the lowest setting, cooling is continuous, re‐
gardless of the external temperature.
Maximum cooling Press the button.
The system is set to the lowest tem‐
perature, maximum air volume and recircu‐
lated-air mode.
Air flows out of the vents for the upper body
region. Open them for this purpose.
Air is cooled as quickly as possible:▷At an external temperature of approx.
32 ℉/0 ℃.▷When the engine is running.
AUTO program
Press the button.
Air volume, air distribution, and tem‐
perature are controlled automatically.
Depending on the selected temperature,
AUTO intensity, and outside influences, the air
is directed to the windshield, side windows,
upper body, and into the footwell.
The cooling function is switched on automati‐
cally with the AUTO program.
At the same time, a condensation sensor con‐
trols the program in such a way that window
condensation is prevented as much as possi‐
ble.
To switch off the program: press the button
again or manually adjust the air distribution.
Intensity of the AUTO programWith the AUTO program switched on, auto‐
matic control of the air volume and air distribu‐
tion can be adjusted:
Seite 111ClimateControls111
Online Edition for Part no. 01 40 2 954 052 - II/15
Page 114 of 297

Press the left or right side of the but‐
ton: decrease or increase the inten‐
sity.
The selected intensity is shown on the display
of the automatic climate control.
Air volume, manual To be able to manually adjust the air volume,
switch off the AUTO program first.
Press the left or right side of the but‐
ton: decrease or increase air volume.
The selected air volume is shown on the dis‐
play of the automatic climate control.
The air volume of the automatic climate control
may be reduced automatically to save battery
power.
Automatic recirculated air mode/
recirculated air mode
You can respond to unpleasant odors or pollu‐ tants in the immediate environment by tempo‐
rarily suspending the supply of outside air. The
system then recirculates the air currently
within the vehicle.
Press the button repeatedly to select
an operating mode:▷LEDs off: outside air flows in continuously.▷Left LED on, automatic recirculated-air
control: a sensor detects pollutants in the
outside air and controls the shutoff auto‐
matically.▷Right LED on, recirculated air mode: the
supply of outside air into the vehicle is per‐
manently blocked.
If the windows are fogged over, switch off
the recirculated-air mode and press the
AUTO button to utilize the condensation
sensor. Make sure that air can flow onto
the windshield.Via the button on the steering wheel
A button on the steering wheel can be used to
quickly switch between recirculated air mode
and the previous setting.
ALL program Press the button.
The current temperature setting for
the driver's side is transferred to the front pas‐
senger side.
If the temperature setting is changed on the
driver's side, the temperature on the front pas‐
senger side changes as well.
The program is switched off if the setting is
changed on the front passenger side or the
button is pressed again.
Defrosting and defogging windows Press the button.
Ice and condensation are quickly re‐
moved from the windshield and the front side
windows.
For this purpose, also switch on the cooling
function.
Cooling function
The passenger compartment can only be
cooled with the engine running.
Press the button.
The air is cooled and dehumidified
and – depending on the temperature setting –
warmed again.
Depending on the weather, the windshield may
fog up briefly when the engine is started.
The cooling function is switched on automati‐
cally with the AUTO program.
When using the automatic climate control,
condensation water, refer to page 134, devel‐
ops that exits underneath the vehicle.Seite 112ControlsClimate112
Online Edition for Part no. 01 40 2 954 052 - II/15
Page 115 of 297

Rear window defrosterPress the button.
The rear window defroster switches
off automatically after a certain period of time.
Switching the system on/off
Switching off Press and hold the left button or, with
the setting at the lowest level, press
the left button.
All displays are cleared except for the rear win‐
dow defroster if it is switched on.
When the automatic climate control is
switched off, the supply of outside air is sus‐
pended. If the air quality deteriorates or the
window fogs over, switch the system back on
and increase the air flow rate.
Switching on Press any button, except for the buttons for
the ALL program or rear window heating.
Ventilation1Use the thumbwheels to smoothly open
and close the air vents2Use the lever to change the direction of the
air flow
Ventilation for cooling
Adjust the vent to direct the air in your direc‐
tion, e.g., if the vehicle interior is hot from the
sun.
Draft-free ventilation
Adjust the vent to let the air flow past you.
Microfilter/activated-charcoal filter
The microfilter traps dust and pollen in the in‐
coming air.
The activated-charcoal filter removes gaseous
pollutants from the outside air that enters the
vehicle.
Your service center replaces this combined fil‐
ter during routine maintenance.
Parked-car ventilation The conceptThe parked-car ventilation blows air into the
passenger compartment to lower interior tem‐
peratures.
The system can be switched on and off at any
external temperature, either directly or by us‐
ing a preset switch-on time. It remains
switched on for 30 minutes.
Since the system uses a substantial amount of
electrical current, refrain from activating it
twice in succession without allowing the bat‐
tery to be recharged in normal operation be‐
tween use.
Open the vents to allow air to flow out.
They can be operated via iDrive.
Switching on/off directly1."Settings"2."Climate"Seite 113ClimateControls113
Online Edition for Part no. 01 40 2 954 052 - II/15
Page 116 of 297
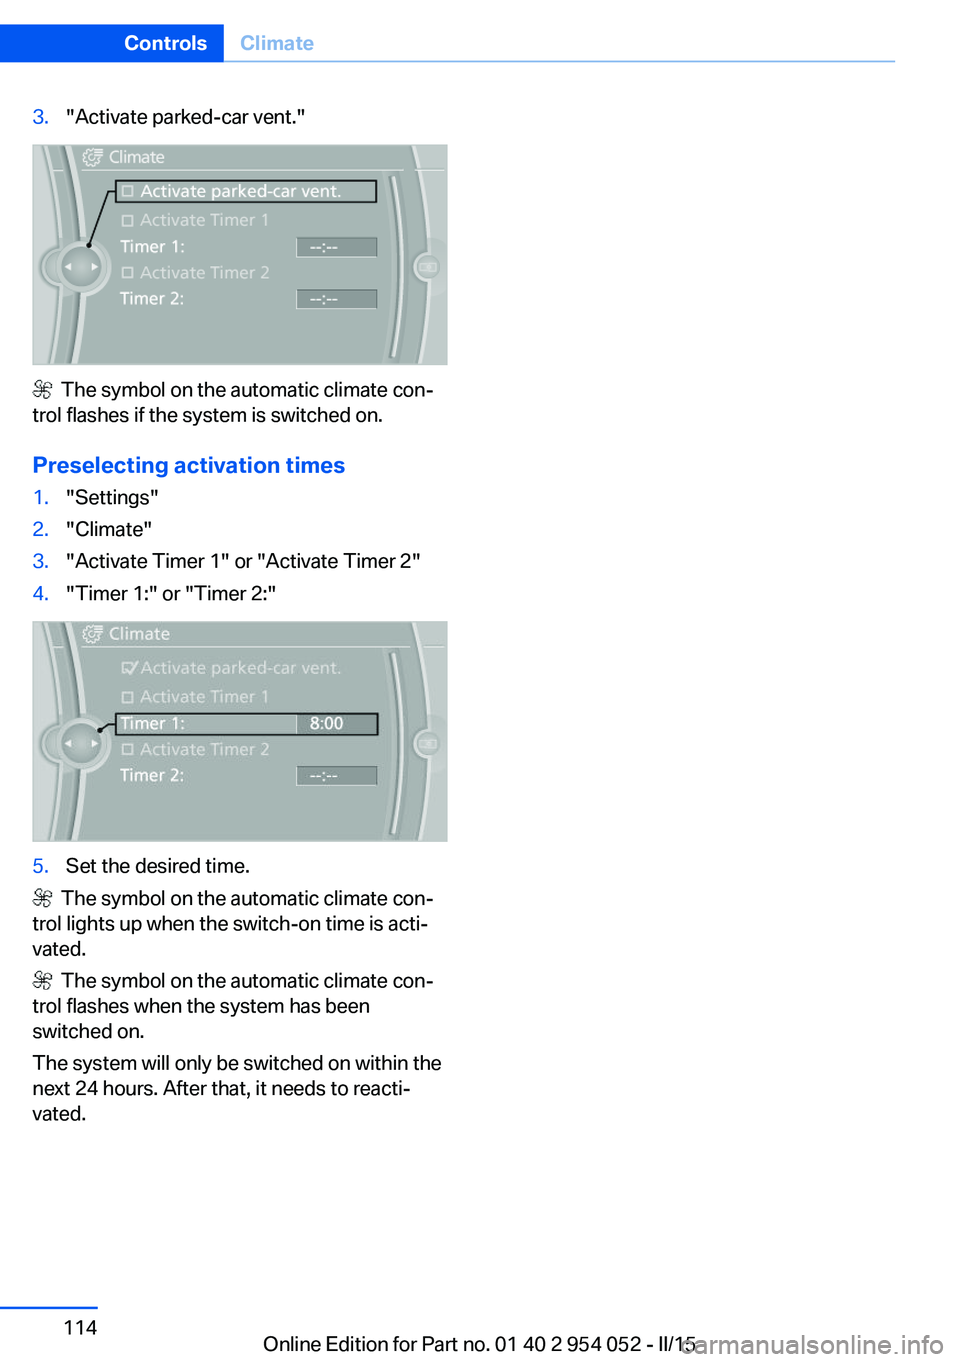
3."Activate parked-car vent."
The symbol on the automatic climate con‐
trol flashes if the system is switched on.
Preselecting activation times
1."Settings"2."Climate"3."Activate Timer 1" or "Activate Timer 2"4."Timer 1:" or "Timer 2:"5.Set the desired time.
The symbol on the automatic climate con‐
trol lights up when the switch-on time is acti‐
vated.
The symbol on the automatic climate con‐
trol flashes when the system has been
switched on.
The system will only be switched on within the
next 24 hours. After that, it needs to reacti‐
vated.
Seite 114ControlsClimate114
Online Edition for Part no. 01 40 2 954 052 - II/15
Page 117 of 297

Interior equipmentVehicle equipmentThis chapter describes all series equipment as
well as country-specific and special equipment
offered for this model series. Therefore, it also
describes equipment that may not be found in
your vehicle, for instance due to the selected
special equipment or the country version. This
also applies to safety-related functions and
systems.
When using the features and systems descri‐
bed here, adhere to local regulations.
Universal garage door
opener
The concept The universal garage door opener can be used
to operate up to 3 functions in remote-control‐
led systems, such as garage door drives or
lighting systems. The universal garage door
opener replaces up to 3 different hand-held transmitters. To operate it, the buttons on the
interior rearview mirror must be programmed
for the desired functions. The hand-held trans‐
mitter for the system is needed for the pro‐
gramming procedure.
During programming
During programming and before activat‐
ing a device using the Universal Garage Door Opener, ensure that there are no people, ani‐
mals, or objects in the range of movement of
the remote-controlled device; otherwise, there
is a risk of injury or damage.
Also follow the safety instructions of the hand-
held transmitter.◀
Before selling the vehicle, delete the stored
functions for security reasons.Compatibility
If this symbol is printed on the packag‐
ing or in the operating instructions of
the system being operated, the system
is generally compatible with the universal ga‐
rage door opener.
If you have any questions, please contact:▷Your service center.▷www.homelink.com on the Internet.
HomeLink is a registered trademark of the
Gentex Corporation.
Controls on the interior rearview
mirror
1LED2Buttons3Hand-held transmitter, required for pro‐
gramming.
Programming
General information
1.Switch on the ignition.2.Initial setup:
Press the right and left buttons on the inte‐
rior rearview mirror simultaneously for ap‐
prox. 20 seconds until the LED on the inte‐
rior rearview mirror begins to flash. All
programmed settings of the buttons on the
interior rearview mirror are deleted.Seite 115Interior equipmentControls115
Online Edition for Part no. 01 40 2 954 052 - II/15
Page 118 of 297

3.Hold the hand-held transmitter of the sys‐
tem to be operated a distance of approx. 1
to 3 in/2.5 to 8 cm away from the buttons
on the interior rearview mirror. The re‐
quired distance depends on the particular
hand-held transmitter.4.Press the button of the desired function on
the hand-held transmitter and the button
being programmed on the interior rearview
mirror simultaneously and hold. The LED
on the interior rearview mirror flashes
slowly at first.5.When the LED flashes more rapidly, re‐
lease both buttons. Rapid flashing indi‐
cates that the button on the interior rear‐
view mirror has been programmed.
If the LED does not flash faster after
60 seconds, change the distance between
the interior rearview mirror and the hand-
held transmitter and repeat the step. Multi‐
ple trials at different distances may be nec‐
essary. Wait at least 15 seconds between
trials.6.To program additional functions on other
buttons, repeat steps 3 to 5.
The systems can be operated with the buttons
on the interior rearview mirror.
Special characteristics of alternating-
code radio systems
If the system cannot be operated after re‐
peated programming, check whether the sys‐
tem to be operated uses an alternating-code
system.
Read the operating instructions of the system
or press and hold the programmed button on
the interior rearview mirror. If the LED on the
interior rearview mirror flashes rapidly at first
and then lights up continuously for 2 seconds,
the system is equipped with an alternating-
code system. This flashing LED pattern re‐
peats itself for approx. 20 seconds.
In systems with an alternating-code system,
the universal garage door opener and the sys‐
tem must be additionally synchronized.
Please obtain additional information on syn‐
chronization in the operating instructions of
the system being set up.
The systems will be easier to synchronize with
the aid of a second person.
Synchronization:1.Park the vehicle within range of the re‐
mote-controlled system.2.Program the corresponding button on the
interior rearview mirror as described.3.Identify and press the synchronization but‐
ton on the system being set up. You have
approx. 30 seconds for the next step.4.Press and hold the button on the interior
rearview mirror for approx. 3 seconds and
then release it. Repeat this step up to three
times if necessary to complete the syn‐
chronization procedure. When synchroni‐
zation is completed, the programmed func‐
tion is executed.
Reprogramming individual buttons
1.Switch on the ignition.2.Hold the hand-held transmitter at a dis‐
tance of approx. 1 to 3 in/2.5 to 8 cm from
the memory buttons.
The required distance depends on the par‐
ticular hand-held transmitter.3.Press the memory button of the universal
garage door opener.4.If the LED flashes slowly after approx.
20 seconds, press the transmit button on
the hand-held transmitter.5.Release both buttons when the LED
flashes rapidly.
If the LED does not flash rapidly after ap‐
prox. 60 seconds, change the distance and
repeat the step.Seite 116ControlsInterior equipment116
Online Edition for Part no. 01 40 2 954 052 - II/15
Page 119 of 297

Canada: if the LED does not flash rapidly
after approx. 60 seconds, change the dis‐
tance and repeat the step. If programming
was aborted by the hand-held transmitter,
hold down the memory button and press
and release the button on the hand-held
transmitter several times for 2 seconds.
Controls
Prior to operation
Before operating a unit with the Universal
Garage Door Opener, ensure that there are no
people, animals, or objects in the range of
movement of the system; otherwise, there is a
risk of injury or damage.
Also follow the safety instructions of the hand-
held transmitter.◀
The system, such as the garage door, can be
operated using the button on the interior rear‐
view mirror with the engine running or the igni‐
tion switched on. When you are within the re‐
ception range of the system, press and hold
the button until the function is initiated. The
LED on the interior rearview mirror lights up
continuously while the radio signal is being
transmitted.
Deleting stored functions Press the right and left buttons on the interior
rearview mirror simultaneously for approx.
20 seconds until the LED flashes rapidly. All
stored functions are deleted. The functions
cannot be deleted individually.
Digital compass1Adjustment button2Display
The display shows you the main or secondary
compass direction in which you are driving.
Operating concept
Various functions can be called up by pressing
the adjustment button with a pointed object
such as a pen. The following adjustment op‐
tions are displayed one after the other, de‐
pending on how long the adjustment button is
pressed:
▷Press briefly: switch the display on/off.▷3 to 6 seconds: set the compass zone.▷6 to 9 seconds: calibrate the compass.▷9 to 12 seconds: set left-hand/right hand
steering.▷12 to 15 seconds: set the language.
Setting compass zones
Set the compass zone corresponding to the
vehicle's geographic location so that the com‐
pass can function correctly; refer to the world
map with compass zones.
Seite 117Interior equipmentControls117
Online Edition for Part no. 01 40 2 954 052 - II/15
Page 120 of 297

Press the adjustment button for 3‑4 seconds.
The number of the compass zone set is shown
in the display.
To change the zone setting, briefly press the
adjustment button repeatedly until the display
shows the number of the compass zone corre‐
sponding to the current location.
The compass is operational again after approx.
10 seconds.
Calibrating the digital compass
The digital compass must be calibrated in the
following situations:▷An incorrect compass direction is shown.▷The cardinal direction displayed does not
change even if the direction of travel
changes.▷Not all compass directions are shown.
Procedure
1.Make sure that there are no large metal ob‐
jects or overhead power lines in the vicinity
of the vehicle and that there is enough
space to drive in a circle.2.Set the currently valid compass zone.3.Press the adjustment button for 6‑7 sec‐
onds to call up C. Then drive at least one
full circle at a maximum speed of
4 mph/7 km/h. When the system is cali‐
brated, the C is replaced by the compass
directions.
Right-hand/left-hand steering
The digital compass is set for right-hand or
left-hand steering at the factory.
Setting the language Press the adjustment button for 12‑13 sec‐
onds. Briefly press the adjustment button
again to switch between English "E" and Ger‐
man "O".
The setting is automatically saved after approx.
10 seconds.
Seite 118ControlsInterior equipment118
Online Edition for Part no. 01 40 2 954 052 - II/15