garage door opener BMW X1 XDRIVE 28I 2013 Owners Manual
[x] Cancel search | Manufacturer: BMW, Model Year: 2013, Model line: X1 XDRIVE 28I, Model: BMW X1 XDRIVE 28I 2013Pages: 291, PDF Size: 6.58 MB
Page 110 of 291
Interior equipmentVehicle equipment
This chapter describes all series equipment as
well as country-specific and special equipment
offered for this model series.Therefore, it also
describes equipment that may not be found in
your vehicle, for instance due to the selected
special equipment or the country version. This
also applies to safety-related functions and sys‐
tems.
Universal Garage Door
Opener
The concept
The Universal Garage Door Opener can be used
to operate up to 3 functions in remote-control‐
led systems, such as garage door drives or light‐
ing systems. The Universal Garage Door Opener
replaces up to 3 different hand-held transmit‐
ters. To operate it, the buttons on the interior
rearview mirror must be programmed for the de‐
sired functions. The hand-held transmitter for
the system is needed for the programming pro‐
cedure.
During programming
During programming and before activat‐
ing a device using the Universal Garage Door
Opener, ensure that there are no people, ani‐
mals, or objects in the range of movement of the
remote-controlled device; otherwise, there is a
risk of injury or damage.
Also follow the safety instructions of the hand-
held transmitter.◀
Before selling the vehicle, delete the stored
functions for security reasons.
Compatibility If this symbol is printed on the packaging
or in the operating instructions of thesystem being operated, the system is generally
compatible with the Universal Garage Door
Opener.
If you have any questions, please contact:▷Your service center.▷www.homelink.com on the Internet.
HomeLink is a registered trademark of Johnson
Controls, Inc.
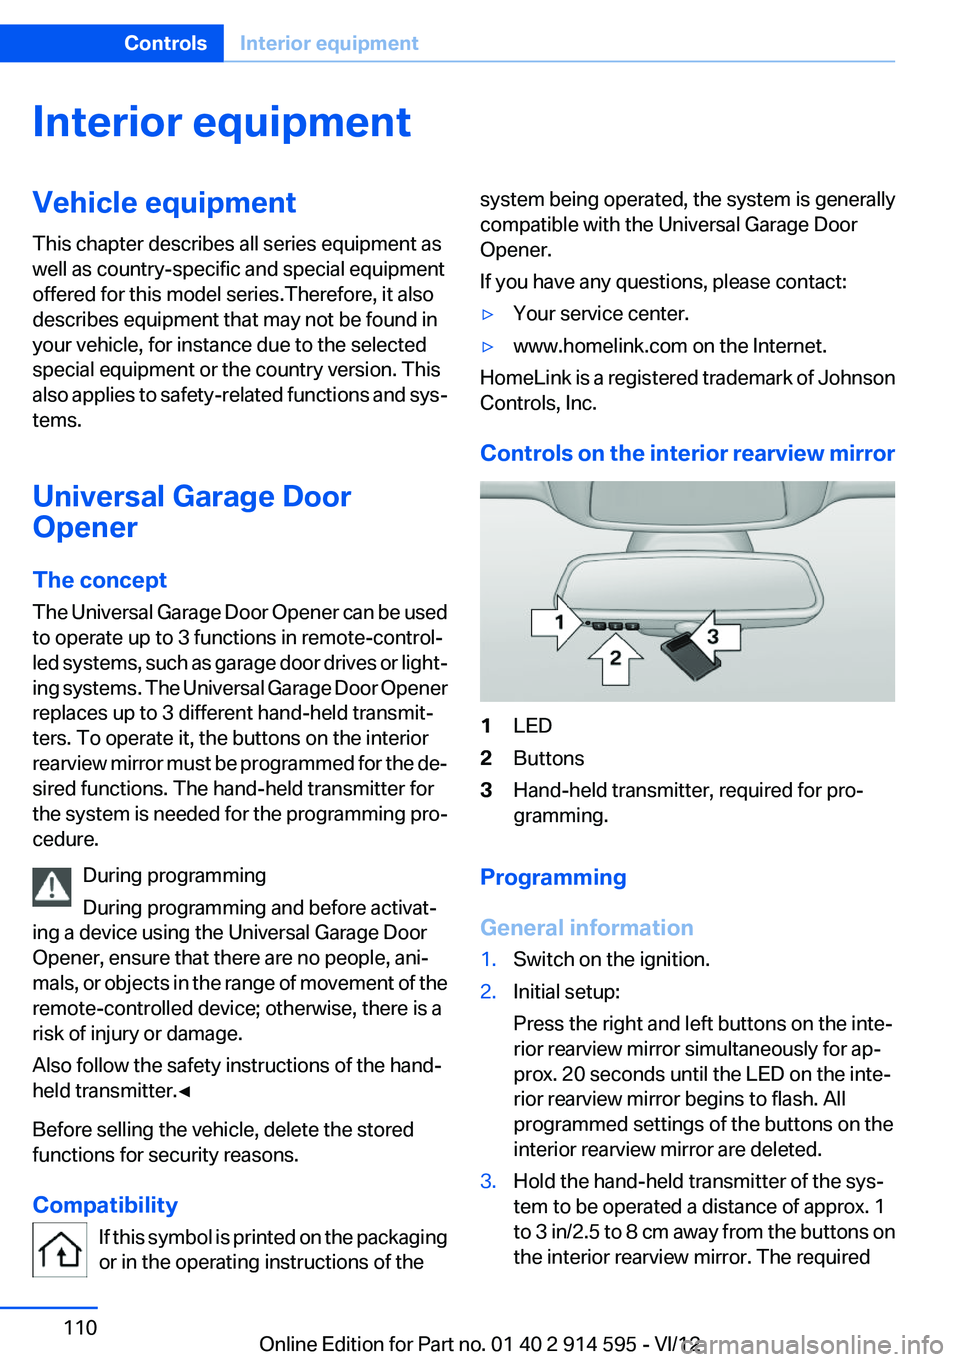
Controls on the interior rearview mirror
1LED2Buttons3Hand-held transmitter, required for pro‐
gramming.
Programming
General information
1.Switch on the ignition.2.Initial setup:
Press the right and left buttons on the inte‐
rior rearview mirror simultaneously for ap‐
prox. 20 seconds until the LED on the inte‐
rior rearview mirror begins to flash. All
programmed settings of the buttons on the
interior rearview mirror are deleted.3.Hold the hand-held transmitter of the sys‐
tem to be operated a distance of approx. 1
to 3 in/2.5 to 8 cm away from the buttons on
the interior rearview mirror. The requiredSeite 110ControlsInterior equipment110
Online Edition for Part no. 01 40 2 914 595 - VI/12
Page 111 of 291
distance depends on the particular hand-
held transmitter.4.Press the button of the desired function on
the hand-held transmitter and the button
being programmed on the interior rearview
mirror simultaneously and hold. The LED on
the interior rearview mirror flashes slowly at
first.5.When the LED flashes more rapidly, release
both buttons. Rapid flashing indicates that
the button on the interior rearview mirror has
been programmed.
If the LED does not flash faster after 60 sec‐
onds, change the distance between the in‐
terior rearview mirror and the hand-held
transmitter and repeat the step. Multiple tri‐
als at different distances may be necessary.
Wait at least 15 seconds between trials.6.To program additional functions on other
buttons, repeat steps 3 to 5.
The systems can be operated with the buttons
on the interior rearview mirror.
Special characteristics of alternating-
code radio systems
If the system cannot be operated after repeated
programming, check whether the system to be
operated uses an alternating-code system.
Read the operating instructions of the system or
press and hold the programmed button on the
interior rearview mirror. If the LED on the interior
rearview mirror flashes rapidly at first and then
lights up continuously for 2 seconds, the system
is equipped with an alternating-code system.
This flashing LED pattern repeats itself for ap‐
prox. 20 seconds.
In systems with an alternating-code system, the
Universal Garage Door Opener and the system
must be additionally synchronized.
Please obtain additional information on syn‐
chronization in the operating instructions of the
system being set up.
The systems will be easier to synchronize with
the aid of a second person.
Synchronization:1.Park the vehicle within range of the remote-
controlled system.2.Program the corresponding button on the
interior rearview mirror as described.3.Identify and press the synchronization but‐
ton on the system being set up. You have
approx. 30 seconds for the next step.4.Press and hold the button on the interior
rearview mirror for approx. 3 seconds and
then release it. Repeat this step up to three
times if necessary to complete the synchro‐
nization procedure. When synchronization
is completed, the programmed function is
executed.
Reprogramming individual buttons
1.Switch on the ignition.2.Hold the hand-held transmitter at a distance
of approx. 1 to 3 in/2.5 to 8 cm from the
memory buttons.
The required distance depends on the par‐
ticular hand-held transmitter.3.Press the memory button of the Universal
Garage Door Opener.4.If the LED flashes slowly after approx.
20 seconds, press the transmit button on
the hand-held transmitter.5.Release both buttons when the LED flashes
rapidly.
If the LED does not flash rapidly after approx.
60 seconds, change the distance and repeat
the step.
Canada: if the LED does not flash rapidly af‐
ter approx. 60 seconds, change the distance
and repeat the step. If programming was
aborted by the hand-held transmitter, hold
down the memory button and press and re‐
lease the button on the hand-held transmit‐
ter several times for 2 seconds.Seite 111Interior equipmentControls111
Online Edition for Part no. 01 40 2 914 595 - VI/12
Page 112 of 291
ControlsPrior to operation
Before operating a unit with the Universal
Garage Door Opener, ensure that there are no
people, animals, or objects in the range of move‐
ment of the system; otherwise, there is a risk of
injury or damage.
Also follow the safety instructions of the hand-
held transmitter.◀
The system, such as the garage door, can be
operated using the button on the interior rear‐
view mirror with the engine running or the igni‐
tion switched on. When you are within the re‐
ception range of the system, press and hold the
button until the function is initiated. The LED on
the interior rearview mirror lights up continu‐
ously while the radio signal is being transmitted.
Deleting stored functions
Press the right and left buttons on the interior
rearview mirror simultaneously for approx.
20 seconds until the LED flashes rapidly. All
stored functions are deleted. The functions can‐
not be deleted individually.
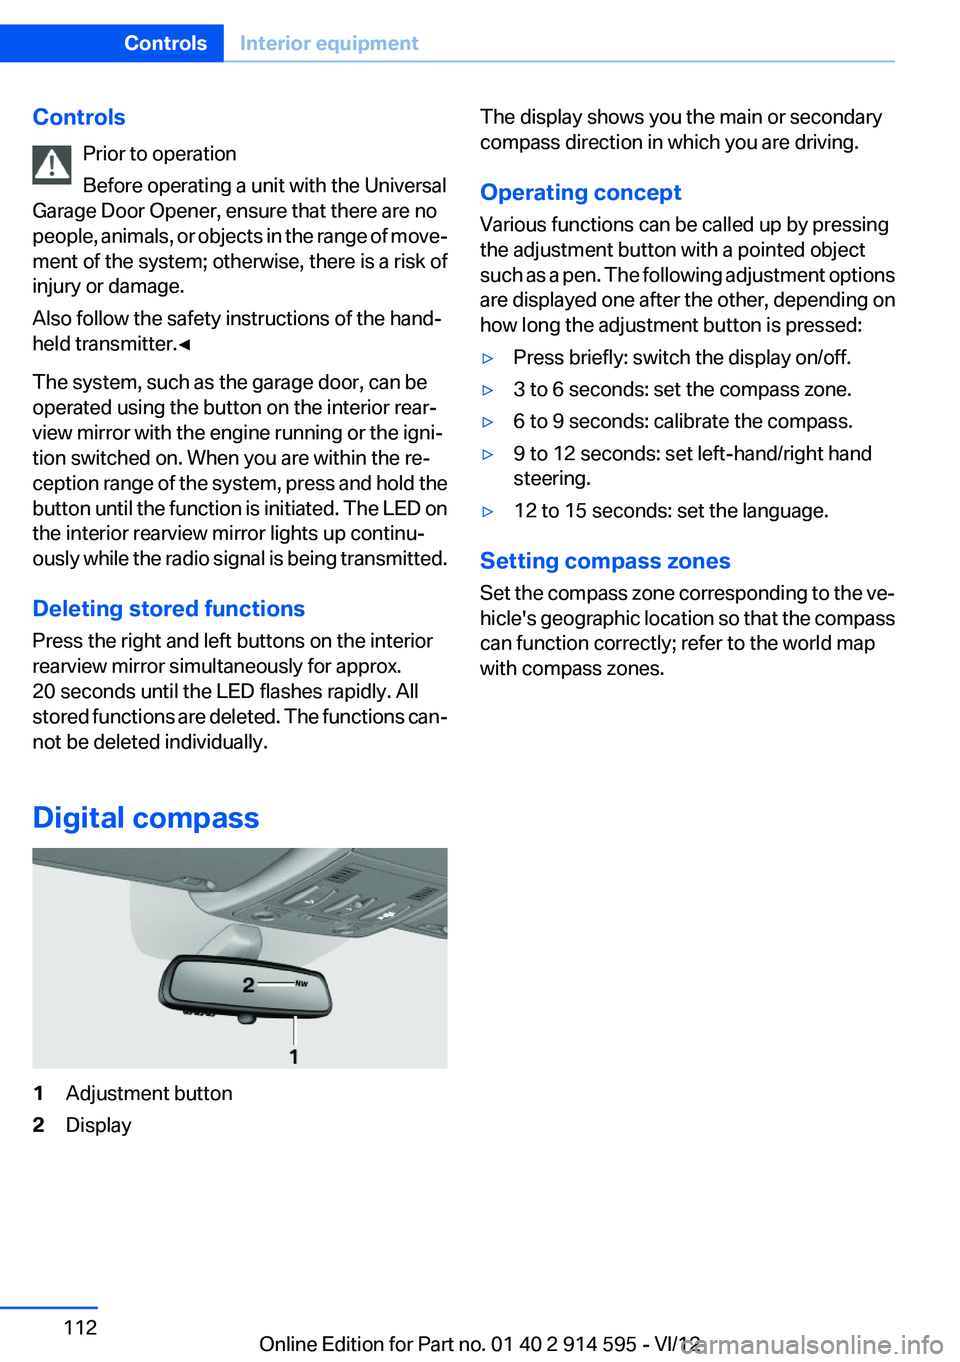
Digital compass1Adjustment button2DisplayThe display shows you the main or secondary
compass direction in which you are driving.
Operating concept
Various functions can be called up by pressing
the adjustment button with a pointed object
such as a pen. The following adjustment options
are displayed one after the other, depending on
how long the adjustment button is pressed:▷Press briefly: switch the display on/off.▷3 to 6 seconds: set the compass zone.▷6 to 9 seconds: calibrate the compass.▷9 to 12 seconds: set left-hand/right hand
steering.▷12 to 15 seconds: set the language.
Setting compass zones
Set the compass zone corresponding to the ve‐
hicle's geographic location so that the compass
can function correctly; refer to the world map
with compass zones.
Seite 112ControlsInterior equipment112
Online Edition for Part no. 01 40 2 914 595 - VI/12
Page 281 of 291
Fuse 252
G
Garage door opener, refer to Universal Garage Door
Opener 110
Gasoline 226
Gasoline gauge, refer to Fuel gauge 69
Gasoline quality 226
Gas station recommenda‐ tion 151
Gear change– Automatic transmission with
Steptronic 62
Gear change, automatic trans‐
mission with Steptronic 66
Gear change, via shift pad‐ dles 66
Gear display, automatic trans‐ mission with Steptronic 62
General driving notes 126
Glass sunroof, electric
– Convenient operation 32– Remote control 32
Glass sunroof, refer to Panor‐
amic glass sunroof 41
Glove compartment 120
Glove compartment
– USB interface 120
Glove compartment, light‐
ing 120
GPS navigation, refer to Navi‐ gation system 138
Gross vehicle weight, refer to Weights 267
H
Halogen headlamps
– Bulb replacement 247
Hand-held transmitter, alter‐
nating code 111
Hands-free microphone 16
Hazard warning sys‐ tem 16, 253
HDC Hill Descent Control 96
HD Radio 163
Head airbags 85
Headlamp control, auto‐ matic 80, 81
Headlamp courtesy delay fea‐ ture 81
Headlamp cover, remov‐ ing 247
Headlamp flasher 59, 82
Headlamp flasher, indicator lamp 15
Headlamps 80
Headlamps– Bulb replacement 247
Headlamps, care 260
Headlamps, cleaning 60
Headlamps, cleaning, washer fluid 62
Headliner 17
Head restraints 46
Head restraints
– Adjusting the height 46– Removing 47
Heating
– Rear window 107– Seats 45
Heating, mirrors 49
Heavy cargo, refer to Stowing cargo 131
Height adjustment
– Seats 43
Height, refer to Dimen‐
sions 266
High-beam Assistant 82
High beams 82
High beams
– Bulb replacement 247
High beams/low beams, auto‐
matic, refer to High-beam
Assistant 82
High beams, indicator lamp 15
High-pressure washers 259
Hill Descent Control HDC 96
Hill drive-off assistant, refer to Drive-off assistant 97
Hills 128
Holder for beverages 122
Holder for remote control, re‐ fer to Ignition lock 54
Homepage 6
Hood 238
Hood, opening 238
Horn 12
Hot exhaust system 126
Hotline 218
House number, entering for navigation 141
Hydraulic brake assistant 94
Hydroplaning 127
I
Ice warning, refer to External temperature warning 68
Icy roads, refer to External temperature warning 68
Identification marks, tires 233
Identification number, refer to Engine compartment 238
iDrive 18
iDrive– Changing settings 74– Changing the date and
time 73– Changing the language 74– Changing the units of meas‐
ure and display format 72– Setting the brightness 75
Ignition 54
Ignition key position 1, refer to Radio ready state 54
Ignition key position 2, refer to Ignition on 54
Ignition key, refer to Remote control with integrated
key 30
Ignition lock 54
Ignition, switched off 55
Ignition, switched on 54
Indication of a flat tire 89, 91
Indicator and warning lamps 15
Seite 281Everything from A to ZReference281
Online Edition for Part no. 01 40 2 914 595 - VI/12
Page 285 of 291
Remaining range for service,refer to Service require‐
ments 75
Remaining range, refer to Range 70
Reminders 211
Remote control– Battery replacement 38– Comfort Access 36– Garage door opener 110– Malfunction 33, 38– Tailgate 33– Universal 110
Remote control, removing
from the ignition lock 54
Remote control, service data 243
Remote inquiry 198
Replacement fuse 252
Replacement remote con‐ trol 30
Replacing wheels/tires 235
Reporting safety defects 8
Reserve warning, refer to Fuel
gauge 69
Reservoir for washer fluid, re‐ fer to Washer fluid reser‐
voir 62
Resetting, Tire Pressure Mon‐ itor TPM 91
Restraining systems
– Refer to Safety belts 45
Restraint systems for chil‐
dren 50
Retaining straps, securing cargo 131
Retreaded tires 236
Reverse gear
– Automatic transmission with
Steptronic 63
Road, avoiding 149
Road detour 149
Roadside Assistance 216
Roadside parking lamp
– Bulb replacement 248
Roadside parking lamps 82
RON gasoline quality 226
RON, refer to Fuel quality 226
Roof load capacity 267
Roof-mounted luggage rack 132
Rope, refer to Towing 257
Route 150
Route criteria, route 149
Route, displaying 150
Route section, bypassing 150
RSC Runflat System Compo‐ nent, refer to Run-flat
tires 236
Rubber components, care 261
Run-flat tires 236
Run-flat tires, tire inflation pressure 228
Running lights, refer to Parking lamps/low beams 80
S
Safe braking 127
Safety 6
Safety belts 45
Safety belts– Damage 46
Safety belts, care 261
Safety belts, indicator/warning lamp 46
Safety belts, reminder 46
Safety switch for rear win‐ dows 41
Safety systems
– Safety belts 45
Safety systems, airbags 85
Safety tires, refer to Run-flat tires 236
Satellite radio 164
Saving fuel 133
Scale, changing during navi‐ gation 152
Screen, refer to Control Dis‐ play 18
Search, refer to BMW On‐ line 217
Seat adjustment– Manual 43
Seat adjustment, electric 44
Seat and mirror memory 47
Seat belts
– Refer to Safety belts 45
Seat heating 45
Seats
– Adjusting 43– Adjusting electrically 44– Heating 45– Memory, refer to Seat and
mirror memory 47– Sitting safely 43– Storing the setting, refer to
Seat and mirror memory 47
Selector lever, automatic
transmission with Step‐
tronic 62, 65
Selector lever lock, overrid‐ ing 64
Selector lever lock, refer to Changing selector lever po‐
sitions, Shiftlock 62
Selector lever lock, releas‐ ing 65
Selector lever positions, auto‐ matic transmission with
Steptronic 62
Sensors, care 261
Service and warranty 7
Service data in the remote control 243
Service interval display, refer to Condition Based Service
CBS 243
Service interval display, refer to Service requirements 75
Service requirements 75
Service requirements, CBS Condition Based Serv‐
ice 243
Service, Roadside Assis‐ tance 254
Servotronic 97
Seite 285Everything from A to ZReference285
Online Edition for Part no. 01 40 2 914 595 - VI/12
Page 287 of 291
Tasks 210
Technical changes, refer to Safety 6
Technical data 266
Telephone 192
Telephone, adjusting the vol‐ ume 196
Telephone, installation loca‐ tion, refer to Center arm‐
rest 120
TeleService 216
Temperature– Automatic climate con‐
trol 106– Changing the unit of meas‐
ure 72
Temperature, coolant, refer to
Coolant temperature 69
Temperature display
– External temperature 68– External temperature warn‐
ing 68– Setting the unit 72
Temperature, engine oil 69
Temperature warning 68
Text messages 207
Theft alarm system, refer to Alarm system 38
Thigh support adjustment 44
Third brake lamp, refer to Cen‐ ter brake lamp 250
Tilting the passenger side mir‐ ror 48
Time
– Setting the time 72– Setting the time zone 73
Tire age 233
Tire identification marks 233
Tire inflation pressure 228
Tire inflation pressure, check‐ ing 228
Tire pressure monitor, refer to Flat Tire Monitor 88
Tire Pressure Monitor TPM 90
Tire Quality Grading 233
Tires– Inflation pressure 228
Tires, breaking in 126
Tires, changing 235
Tires, condition 234
Tires, damage 235
Tire size 233
Tires, minimum tread 234
Tires, retreaded tires 236
Tires, run-flat tires 236
Tires, storage 236
Tire tread 234
Toll roads, route 149
Tone 160
Tool kit, refer to Onboard ve‐ hicle tool kit 245
Tools, refer to Onboard vehicle tool kit 245
Tow bar 257
Tow fitting 258
Towing 256
Towing another vehicle 256
Towing, being towed 256
Towing with automatic trans‐ mission 256
Town/city, navigation 141
Tow rope 257
Tow-starting 256, 258
TPM Tire Pressure Moni‐ tor 90
Traction control 95
Traffic bulletins, naviga‐ tion 153
Transmission
– Automatic transmission with
Steptronic 62– Overriding selector lever lock
in case of automatic trans‐
mission with Steptronic 64
Transmission, automatic
transmission with Step‐
tronic 64
Transmission lock
– Refer to Changing selector
lever positions 62– Refer to P Park 63Transmission positions, auto‐
matic transmission with
Steptronic 64
Transporting children safely 50
Treble, tone 160
Trip computer, refer to Dis‐ plays on the Control Dis‐
play 70
Trip-distance counter, refer to Trip odometer 68
Triple turn signal activa‐ tion 59
Trip odometer 68
Trips, planning 147
Trunk, refer to Cargo area 115
Turning circle, refer to Dimen‐ sions 266
Turning lamps, refer to Adap‐ tive light control 81
Turn signal– Indicator/warning lamp 14
Turn signals 59
Turn signals
– Bulb replacement 249– Bulb replacement, front 249
Turn signals, triple turn signal
activation 59
U
Uniform Tire Quality Grading/ UTQG 233
Unintentional alarms, avoid‐ ing 39
Units
– Average fuel consump‐
tion 72– Temperature 72
Units of measure, changing on
Control Display 72
Universal Garage Door Opener 110
Universal remote control 110
Seite 287Everything from A to ZReference287
Online Edition for Part no. 01 40 2 914 595 - VI/12