towing BMW X1 XDRIVE 28I 2013 Owners Manual
[x] Cancel search | Manufacturer: BMW, Model Year: 2013, Model line: X1 XDRIVE 28I, Model: BMW X1 XDRIVE 28I 2013Pages: 291, PDF Size: 6.58 MB
Page 130 of 291
LoadingVehicle equipment
This chapter describes all series equipment as
well as country-specific and special equipment
offered for this model series.Therefore, it also
describes equipment that may not be found in
your vehicle, for instance due to the selected
special equipment or the country version. This
also applies to safety-related functions and sys‐
tems.
General information Overloading the vehicle
To avoid exceeding the approved carrying
capacity of the tires, never overload the vehicle.
Overloading can lead to overheating and in‐
creases the rate at which damage develops in‐
side the tires. This could result in a sudden loss
of tire inflation pressure.◀
No fluids in the cargo area
Make sure that fluids do not leak into the
cargo area; otherwise, the vehicle may be dam‐
aged.◀
Determining the load limit1.Locate the following statement on your ve‐
hicle’s placard:▷The combined weight of occupants and
cargo should never exceed XXX kg orYYY lbs. Otherwise, damage to the ve‐
hicle and unstable driving situations may
result.2.Determine the combined weight of the
driver and passengers that will be riding in
your vehicle.3.Subtract the combined weight of the driver
and passengers from XXX kilograms or YYY
pounds.4.The resulting figure equals the available
amount of cargo and luggage load capacity.
For example, if the YYY amount equals
1,000 lbs and there will be four 150 lbs pas‐
sengers in your vehicle, the amount of avail‐
able cargo and luggage load capacity is
400 lbs: 1,000 lbs minus 600 lbs = 400 lbs.5.Determine the combined weight of luggage
and cargo being loaded on the vehicle. That
weight may not safely exceed the available
cargo and luggage load capacity calculated
in Step 4.6.If your vehicle will be towing a trailer, load
from your trailer will be transfered to your
vehicle. Consult the manual for transporting
a trailer to determine how this may reduce
the available cargo and luggage load ca‐
pacity of your vehicle.
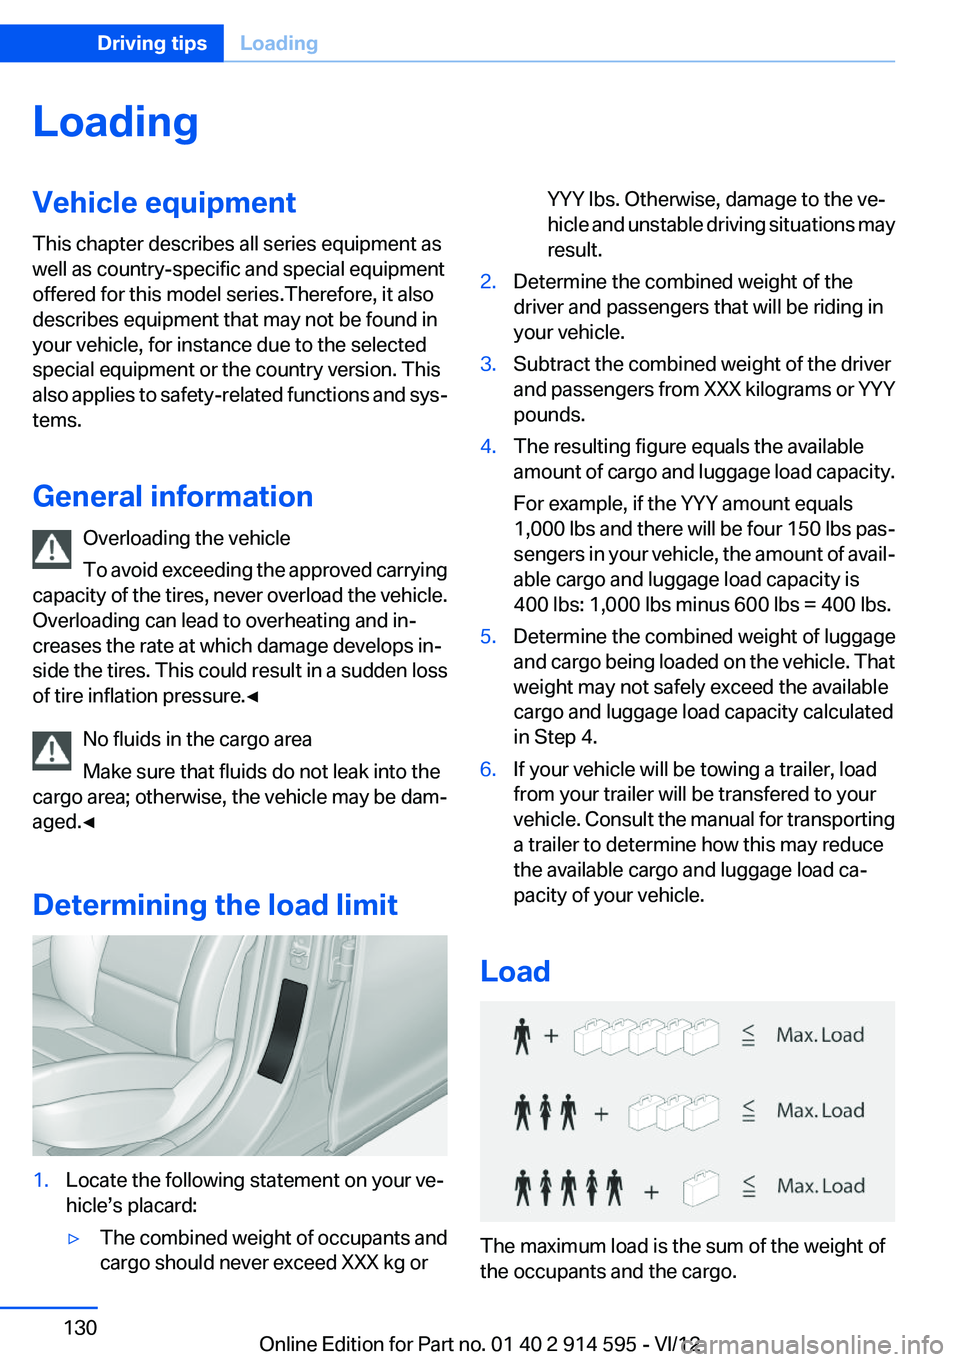
Load
The maximum load is the sum of the weight of
the occupants and the cargo.
Seite 130Driving tipsLoading130
Online Edition for Part no. 01 40 2 914 595 - VI/12
Page 131 of 291
The greater the weight of the occupants, the
less cargo that can be transported.
Stowing cargo▷Very heavy cargo: when the rear seat is not
occupied, secure each of the outer safety
belts in the opposite buckle.▷Heavy cargo: stow as far forward and as low
as possible, ideally directly behind the back‐
rests.▷Cover sharp edges and corners.▷Do not pile cargo higher than the top edge
of the backrests.▷If necessary, fold down the rear backrests to
stow cargo.▷Use the partition net, refer to page 116, to
protect passengers. Make sure that objects
cannot penetrate the partition net.▷Place protective material around any sharp-
edged or pointed objects that could bump
against the rear window while the vehicle is
in motion.Securing cargo
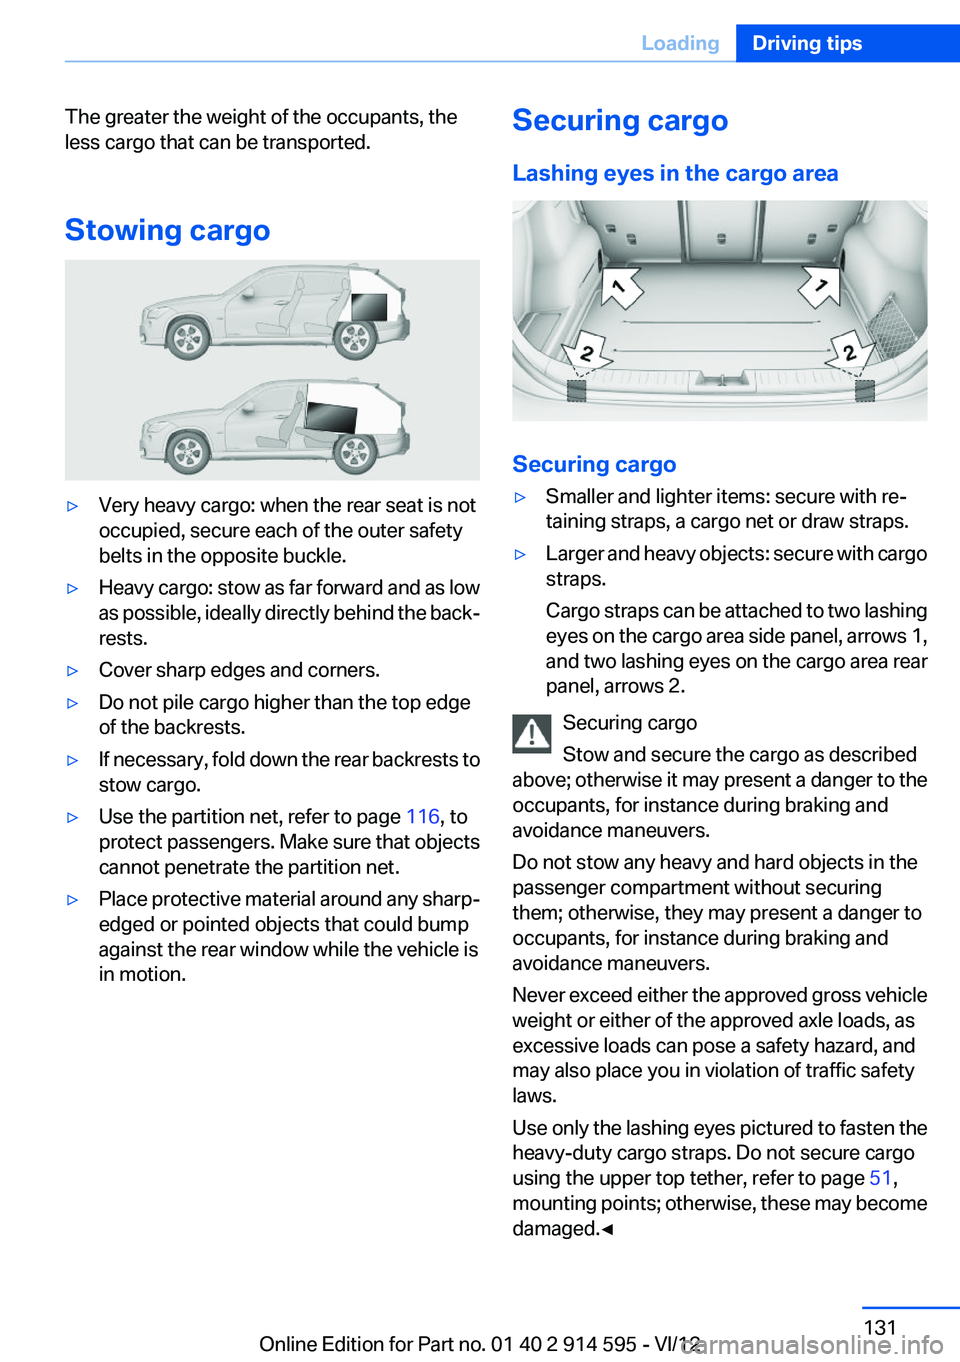
Lashing eyes in the cargo area
Securing cargo
▷Smaller and lighter items: secure with re‐
taining straps, a cargo net or draw straps.▷Larger and heavy objects: secure with cargo
straps.
Cargo straps can be attached to two lashing
eyes on the cargo area side panel, arrows 1,
and two lashing eyes on the cargo area rear
panel, arrows 2.
Securing cargo
Stow and secure the cargo as described
above; otherwise it may present a danger to the
occupants, for instance during braking and
avoidance maneuvers.
Do not stow any heavy and hard objects in the
passenger compartment without securing
them; otherwise, they may present a danger to
occupants, for instance during braking and
avoidance maneuvers.
Never exceed either the approved gross vehicle
weight or either of the approved axle loads, as
excessive loads can pose a safety hazard, and
may also place you in violation of traffic safety
laws.
Use only the lashing eyes pictured to fasten the
heavy-duty cargo straps. Do not secure cargo
using the upper top tether, refer to page 51,
mounting points; otherwise, these may become
damaged.◀
Seite 131LoadingDriving tips131
Online Edition for Part no. 01 40 2 914 595 - VI/12
Page 256 of 291
sponding engine or body ground of the ve‐
hicle to be started.
Starting the engine
Never use spray fluids to start the engine.
1.Start the engine of the assisting vehicle and
let it run for several minutes at an increased
idle speed.
If the vehicle being started has a diesel en‐
gine: let the engine of the assisting vehicle
run for approx. 10 minutes.2.Start the engine of the vehicle being started
in the usual way.
If the first starting attempt is not successful,
wait a few minutes before making another
attempt in order to allow the discharged bat‐
tery to recharge.3.Let both engines run for several minutes.4.Disconnect the jumper cables in the reverse
order.
Check the battery and recharge if necessary.
Tow-starting and towing Observe applicable laws and regulations
Observe applicable laws and regulations
for tow-starting and towing.◀
No additional passengers
Do not transport any passengers other
than the driver in a vehicle that is being towed. ◀
Automatic transmission, 8-gear:
transporting your vehicle
Note
Your vehicle is not permitted to be towed.
Therefore, contact a service center in the event
of a breakdown.
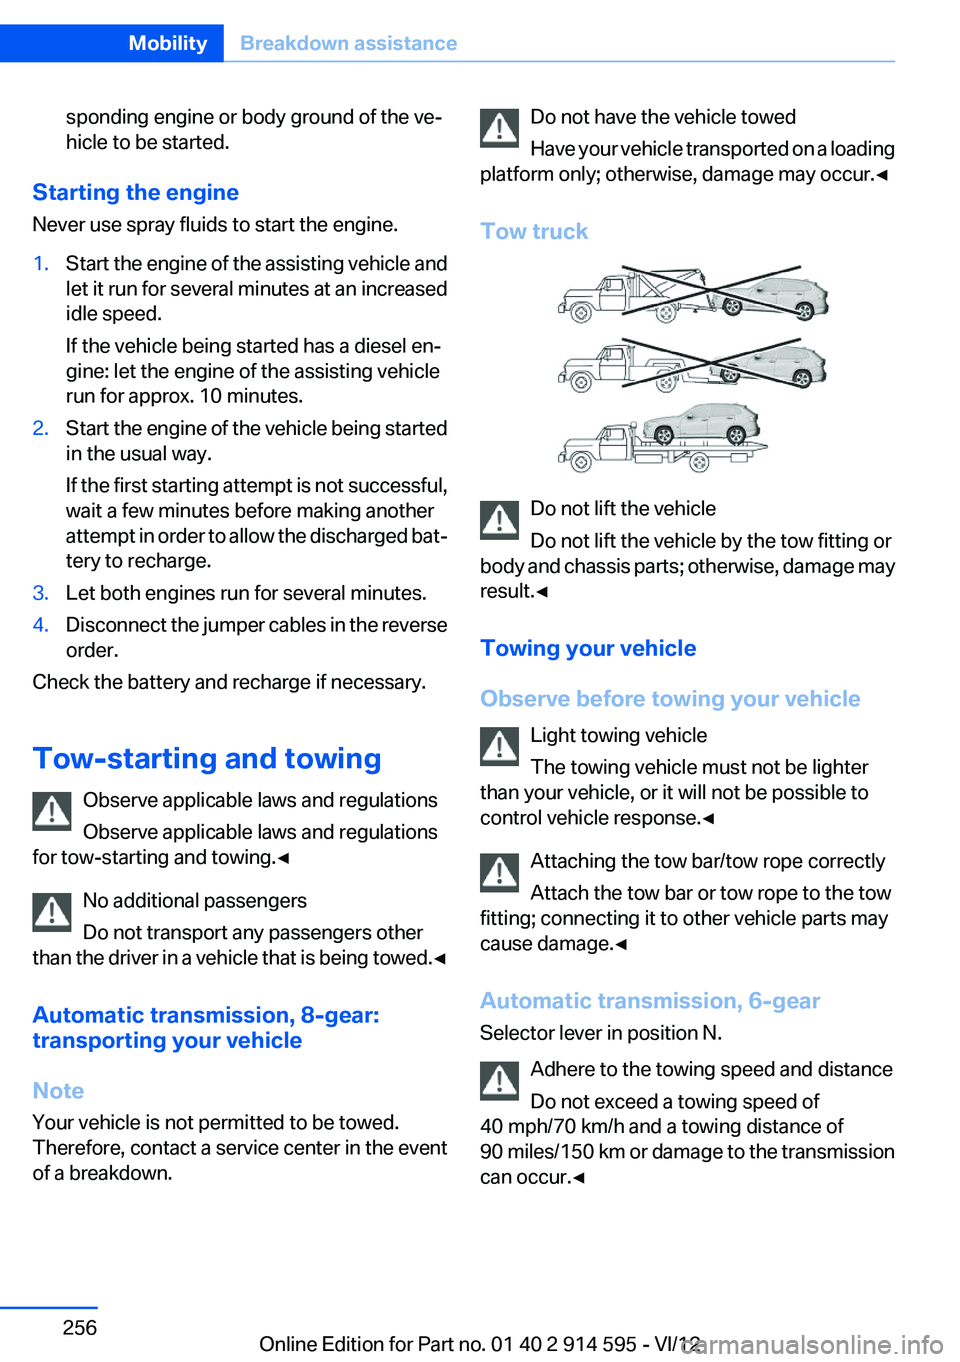
Do not have the vehicle towed
Have your vehicle transported on a loading
platform only; otherwise, damage may occur.◀
Tow truck
Do not lift the vehicle
Do not lift the vehicle by the tow fitting or
body and chassis parts; otherwise, damage may
result.◀
Towing your vehicle
Observe before towing your vehicle Light towing vehicle
The towing vehicle must not be lighter
than your vehicle, or it will not be possible to
control vehicle response.◀
Attaching the tow bar/tow rope correctly
Attach the tow bar or tow rope to the tow
fitting; connecting it to other vehicle parts may
cause damage.◀
Automatic transmission, 6-gear
Selector lever in position N.
Adhere to the towing speed and distance
Do not exceed a towing speed of
40 mph/70 km/h and a towing distance of
90 miles/150 km or damage to the transmission
can occur.◀
Seite 256MobilityBreakdown assistance256
Online Edition for Part no. 01 40 2 914 595 - VI/12
Page 257 of 291
Being towedFollow the towing instructions
Follow all towing instructions, or vehicle
damage or accidents may occur.◀▷Make sure that the ignition is switched on;
otherwise, the low beams, tail lamps, turn
signals, and windshield wipers may be un‐
available.▷Do not tow the vehicle with the rear axle
tilted, as the front wheels could turn.▷When the engine is stopped, there is no
power assist. Consequently, more force
needs to be applied when braking and steer‐
ing.▷Larger steering wheel movements are re‐
quired.▷Switch on the hazard warning system, de‐
pending on local regulations.▷If the electrical system has failed, clearly
identify the vehicle being towed by placing
a sign or a warning triangle in the rear win‐
dow.
Towing other vehicles
General information Light towing vehicle
Your vehicle must not be lighter than the
vehicle being towed; otherwise, it will not be
possible to control vehicle response.◀
Attaching the tow bar/tow rope correctly
Attach the tow bar or tow rope to the tow
fitting; connecting it to other vehicle parts may
cause damage.◀
▷Switch on the hazard warning system, de‐
pending on local regulations.▷If the electrical system has failed, clearly
identify the vehicle being towed by placing
a sign or a warning triangle in the rear win‐
dow.Towing methods
Do not lift the vehicle
Do not lift the vehicle by the tow fitting or
body and chassis parts; otherwise, damage may
result.◀
Tow bar
The tow fittings used should be on the same
side on both vehicles.
Should it prove impossible to avoid mounting
the tow bar at an offset angle, please observe
the following:▷Clearance and maneuvering capability will
be sharply limited during cornering.▷The tow bar will generate lateral forces if it
is attached offset.
Tow rope
When starting to tow the vehicle, make sure that
the tow rope is taut.
To avoid jerking and the associated stresses on
the vehicle components when towing, always
use nylon ropes or nylon straps.
Attaching the tow rope correctly
Only secure the tow rope on the tow fit‐
ting; otherwise, damage can occur when it is se‐
cured on other parts of the vehicle.◀
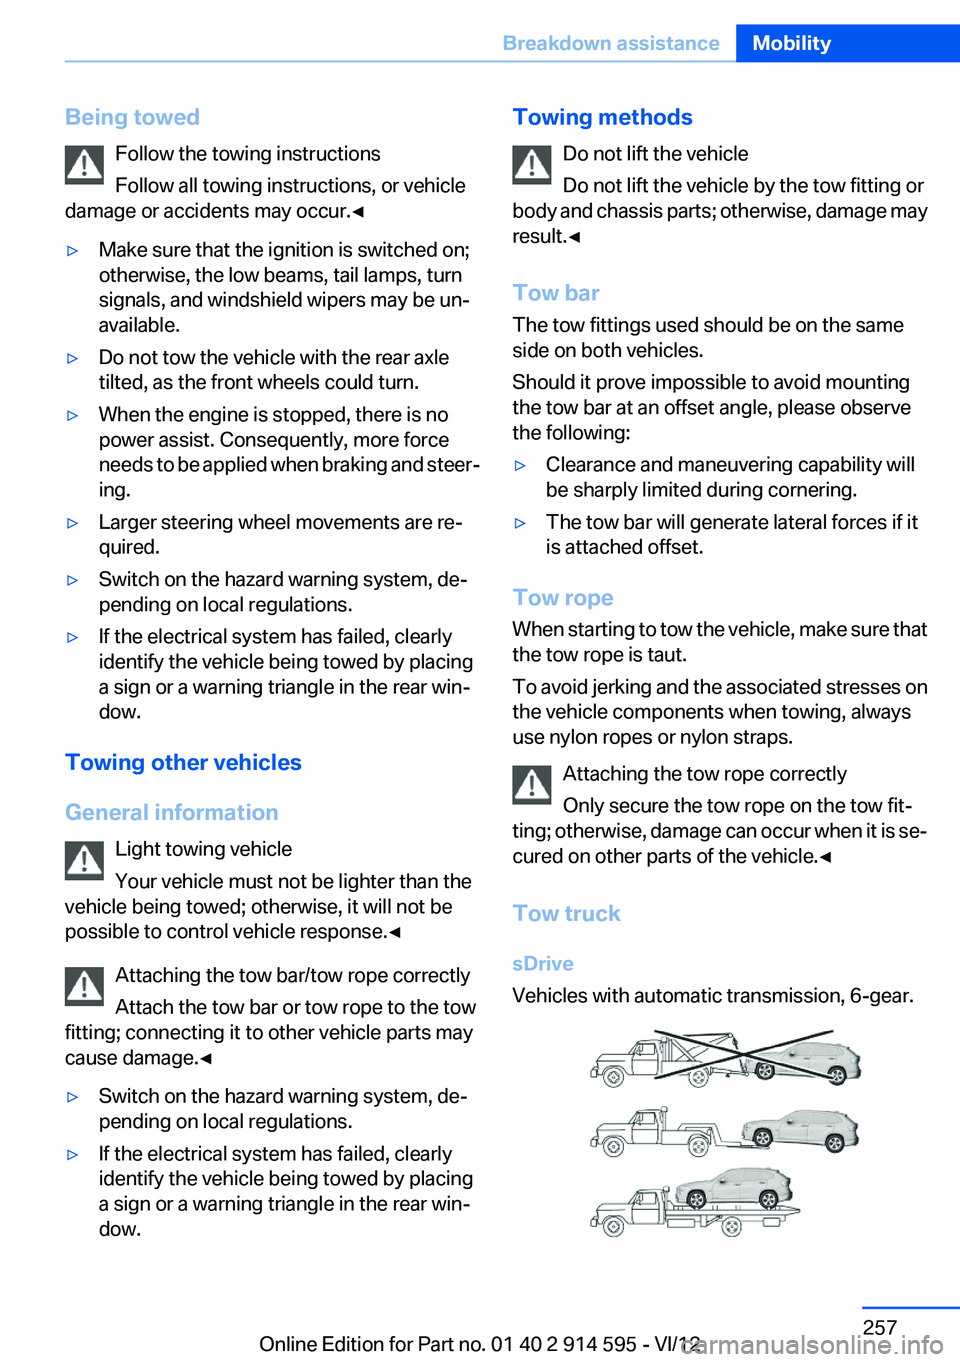
Tow truck
sDrive
Vehicles with automatic transmission, 6-gear.
Seite 257Breakdown assistanceMobility257
Online Edition for Part no. 01 40 2 914 595 - VI/12
Page 258 of 291
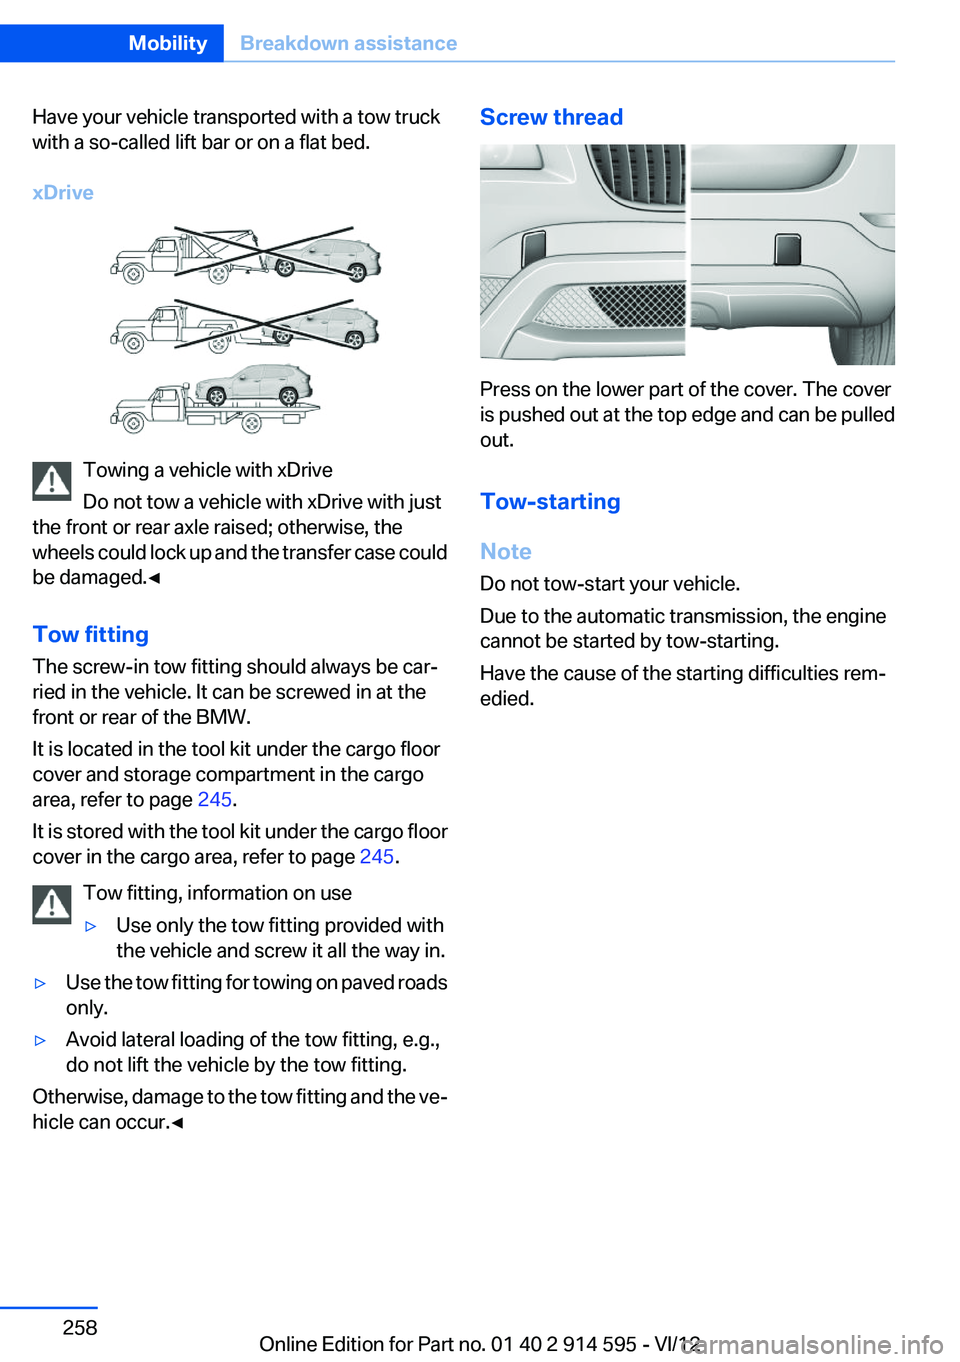
Have your vehicle transported with a tow truck
with a so-called lift bar or on a flat bed.
xDrive
Towing a vehicle with xDrive
Do not tow a vehicle with xDrive with just
the front or rear axle raised; otherwise, the
wheels could lock up and the transfer case could
be damaged.◀
Tow fitting
The screw-in tow fitting should always be car‐
ried in the vehicle. It can be screwed in at the
front or rear of the BMW.
It is located in the tool kit under the cargo floor
cover and storage compartment in the cargo
area, refer to page 245.
It is stored with the tool kit under the cargo floor
cover in the cargo area, refer to page 245.
Tow fitting, information on use
▷Use only the tow fitting provided with
the vehicle and screw it all the way in.▷Use the tow fitting for towing on paved roads
only.▷Avoid lateral loading of the tow fitting, e.g.,
do not lift the vehicle by the tow fitting.
Otherwise, damage to the tow fitting and the ve‐
hicle can occur.◀
Screw thread
Press on the lower part of the cover. The cover
is pushed out at the top edge and can be pulled
out.
Tow-starting
Note
Do not tow-start your vehicle.
Due to the automatic transmission, the engine
cannot be started by tow-starting.
Have the cause of the starting difficulties rem‐
edied.
Seite 258MobilityBreakdown assistance258
Online Edition for Part no. 01 40 2 914 595 - VI/12
Page 280 of 291
Engine oil, additives, refer toApproved engine oils 241
Engine oil, alternative oil types 241
Engine oil, BMW maintenance system 243
Engine oil change intervals, re‐ fer to Service require‐
ments 75
Engine oil, checking the level 239
Engine oil, filling capacity 267
Engine oil temperature 69
Engine oil types, alterna‐ tive 241
Engine oil types, ap‐ proved 241
Engine, overheating, refer to Coolant temperature 69
Engine start, assistance 255
Engine, starting 55
Engine, starting– Comfort Access 36
Engine, starting, Start/Stop
button 54
Engine, stopping, Start/Stop button 54
Engine, switching off 55
Entry lamps, refer to Interior lamps 84
Environmentally friendly driv‐ ing, refer to Current fuel con‐
sumption 69
Equalizer 160
Equipment, interior 110
ESP Electronic Stability Pro‐ gram, refer to Dynamic Sta‐
bility Control DSC 94
Exchanging wheels/tires 235
Exhaust system 126
Exterior mirrors 48
Exterior mirrors, adjusting 48
Exterior mirrors, automatic dimming 49
Exterior mirrors, automatic heating 49
Exterior mirrors, folding in and
out 48
External audio device 121
External devices 181
External temperature dis‐ play 68
External temperature display– Changing the unit of meas‐
ure 72– On computer 72
External temperature warn‐
ing 68
Externel temperature dis‐ play 68
Eyes for securing cargo 131
F
Fader 160
Failure messages, refer to Check Control 77
False alarm
– Avoiding unintentional
alarms 39– Ending an alarm 39
Fastening safety belts, refer to
Safety belts 45
Fault messages, refer to Check Control 77
Filling capacities 267
Filter
– Refer to Microfilter/acti‐
vated-charcoal filter with au‐
tomatic climate control 108
Fine wood, care 261
First aid kit 254
Fitting for towing 258
Flashing when locking/unlock‐ ing 33
Flat Tire Monitor FTM 88
Flat Tire Monitor FTM, snow chains 237
Flat tire, run-flat tires 236
Flat tire, Tire Pressure Monitor TPM 90
Flat tire, warning lamp 89, 91
Flat tire, wheel change 250
Flooding, refer to Driving
through water 127
Floor carpet, care 261
Floor mats, care 261
FM/AM station 162
Fog lamps 83
Fog lamps, indicator lamp 83
Foldable rear seat back‐ rest 115
Foot brake 127
Footwell lamps, refer to Inte‐ rior lamps 84
For your own safety 6
Four-wheel drive, refer to xDrive 96
Front airbags 85
Front fog lamps 83
FTM Flat Tire Monitor 88
Fuel 226
Fuel– Refer to Average fuel con‐
sumption 70
Fuel, additives 226
Fuel, average consump‐ tion 70
Fuel cap 224
Fuel cap, closing 224
Fuel consumption display
– Average fuel consump‐
tion 70
Fuel consumption display,
current fuel consumption 69
Fuel-efficient driving, refer to Current fuel consumption 69
Fuel filler flap, closing 224
Fuel filler flap, opening 224
Fuel filler flap, unlocking in case of an electrical malfunc‐
tion 225
Fuel gauge 69
Fuel, saving 133
Fuel tank capacity, refer to Fill‐ ing capacities 267
Fuel tank contents, refer to Filling capacities 267
Fuel tank, refer to Filling ca‐ pacities 267
Seite 280ReferenceEverything from A to Z280
Online Edition for Part no. 01 40 2 914 595 - VI/12
Page 281 of 291
Fuse 252
G
Garage door opener, refer to Universal Garage Door
Opener 110
Gasoline 226
Gasoline gauge, refer to Fuel gauge 69
Gasoline quality 226
Gas station recommenda‐ tion 151
Gear change– Automatic transmission with
Steptronic 62
Gear change, automatic trans‐
mission with Steptronic 66
Gear change, via shift pad‐ dles 66
Gear display, automatic trans‐ mission with Steptronic 62
General driving notes 126
Glass sunroof, electric
– Convenient operation 32– Remote control 32
Glass sunroof, refer to Panor‐
amic glass sunroof 41
Glove compartment 120
Glove compartment
– USB interface 120
Glove compartment, light‐
ing 120
GPS navigation, refer to Navi‐ gation system 138
Gross vehicle weight, refer to Weights 267
H
Halogen headlamps
– Bulb replacement 247
Hand-held transmitter, alter‐
nating code 111
Hands-free microphone 16
Hazard warning sys‐ tem 16, 253
HDC Hill Descent Control 96
HD Radio 163
Head airbags 85
Headlamp control, auto‐ matic 80, 81
Headlamp courtesy delay fea‐ ture 81
Headlamp cover, remov‐ ing 247
Headlamp flasher 59, 82
Headlamp flasher, indicator lamp 15
Headlamps 80
Headlamps– Bulb replacement 247
Headlamps, care 260
Headlamps, cleaning 60
Headlamps, cleaning, washer fluid 62
Headliner 17
Head restraints 46
Head restraints
– Adjusting the height 46– Removing 47
Heating
– Rear window 107– Seats 45
Heating, mirrors 49
Heavy cargo, refer to Stowing cargo 131
Height adjustment
– Seats 43
Height, refer to Dimen‐
sions 266
High-beam Assistant 82
High beams 82
High beams
– Bulb replacement 247
High beams/low beams, auto‐
matic, refer to High-beam
Assistant 82
High beams, indicator lamp 15
High-pressure washers 259
Hill Descent Control HDC 96
Hill drive-off assistant, refer to Drive-off assistant 97
Hills 128
Holder for beverages 122
Holder for remote control, re‐ fer to Ignition lock 54
Homepage 6
Hood 238
Hood, opening 238
Horn 12
Hot exhaust system 126
Hotline 218
House number, entering for navigation 141
Hydraulic brake assistant 94
Hydroplaning 127
I
Ice warning, refer to External temperature warning 68
Icy roads, refer to External temperature warning 68
Identification marks, tires 233
Identification number, refer to Engine compartment 238
iDrive 18
iDrive– Changing settings 74– Changing the date and
time 73– Changing the language 74– Changing the units of meas‐
ure and display format 72– Setting the brightness 75
Ignition 54
Ignition key position 1, refer to Radio ready state 54
Ignition key position 2, refer to Ignition on 54
Ignition key, refer to Remote control with integrated
key 30
Ignition lock 54
Ignition, switched off 55
Ignition, switched on 54
Indication of a flat tire 89, 91
Indicator and warning lamps 15
Seite 281Everything from A to ZReference281
Online Edition for Part no. 01 40 2 914 595 - VI/12
Page 285 of 291
Remaining range for service,refer to Service require‐
ments 75
Remaining range, refer to Range 70
Reminders 211
Remote control– Battery replacement 38– Comfort Access 36– Garage door opener 110– Malfunction 33, 38– Tailgate 33– Universal 110
Remote control, removing
from the ignition lock 54
Remote control, service data 243
Remote inquiry 198
Replacement fuse 252
Replacement remote con‐ trol 30
Replacing wheels/tires 235
Reporting safety defects 8
Reserve warning, refer to Fuel
gauge 69
Reservoir for washer fluid, re‐ fer to Washer fluid reser‐
voir 62
Resetting, Tire Pressure Mon‐ itor TPM 91
Restraining systems
– Refer to Safety belts 45
Restraint systems for chil‐
dren 50
Retaining straps, securing cargo 131
Retreaded tires 236
Reverse gear
– Automatic transmission with
Steptronic 63
Road, avoiding 149
Road detour 149
Roadside Assistance 216
Roadside parking lamp
– Bulb replacement 248
Roadside parking lamps 82
RON gasoline quality 226
RON, refer to Fuel quality 226
Roof load capacity 267
Roof-mounted luggage rack 132
Rope, refer to Towing 257
Route 150
Route criteria, route 149
Route, displaying 150
Route section, bypassing 150
RSC Runflat System Compo‐ nent, refer to Run-flat
tires 236
Rubber components, care 261
Run-flat tires 236
Run-flat tires, tire inflation pressure 228
Running lights, refer to Parking lamps/low beams 80
S
Safe braking 127
Safety 6
Safety belts 45
Safety belts– Damage 46
Safety belts, care 261
Safety belts, indicator/warning lamp 46
Safety belts, reminder 46
Safety switch for rear win‐ dows 41
Safety systems
– Safety belts 45
Safety systems, airbags 85
Safety tires, refer to Run-flat tires 236
Satellite radio 164
Saving fuel 133
Scale, changing during navi‐ gation 152
Screen, refer to Control Dis‐ play 18
Search, refer to BMW On‐ line 217
Seat adjustment– Manual 43
Seat adjustment, electric 44
Seat and mirror memory 47
Seat belts
– Refer to Safety belts 45
Seat heating 45
Seats
– Adjusting 43– Adjusting electrically 44– Heating 45– Memory, refer to Seat and
mirror memory 47– Sitting safely 43– Storing the setting, refer to
Seat and mirror memory 47
Selector lever, automatic
transmission with Step‐
tronic 62, 65
Selector lever lock, overrid‐ ing 64
Selector lever lock, refer to Changing selector lever po‐
sitions, Shiftlock 62
Selector lever lock, releas‐ ing 65
Selector lever positions, auto‐ matic transmission with
Steptronic 62
Sensors, care 261
Service and warranty 7
Service data in the remote control 243
Service interval display, refer to Condition Based Service
CBS 243
Service interval display, refer to Service requirements 75
Service requirements 75
Service requirements, CBS Condition Based Serv‐
ice 243
Service, Roadside Assis‐ tance 254
Servotronic 97
Seite 285Everything from A to ZReference285
Online Edition for Part no. 01 40 2 914 595 - VI/12
Page 287 of 291
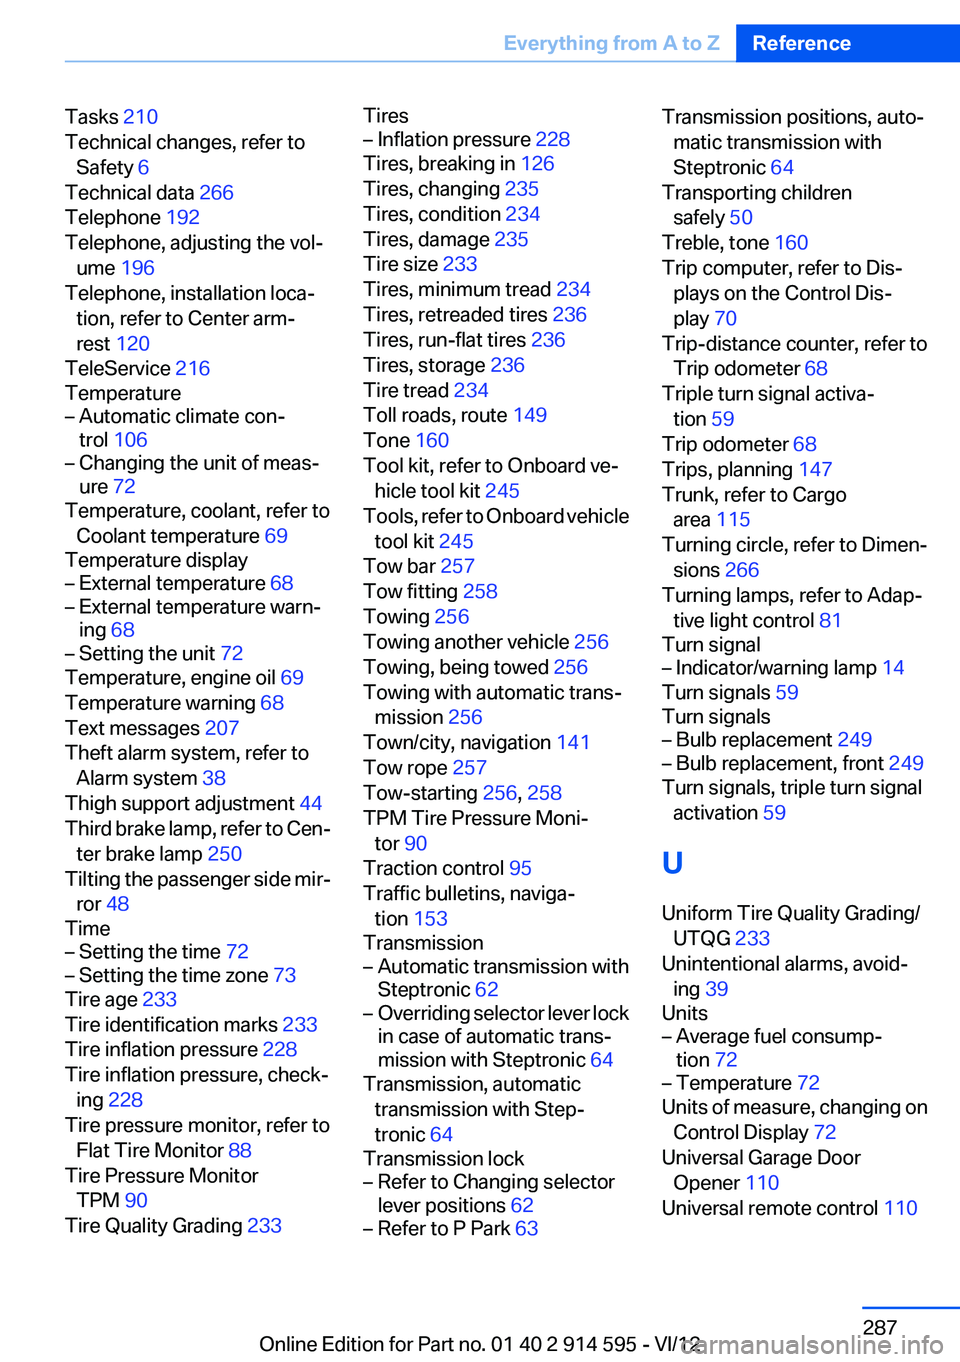
Tasks 210
Technical changes, refer to Safety 6
Technical data 266
Telephone 192
Telephone, adjusting the vol‐ ume 196
Telephone, installation loca‐ tion, refer to Center arm‐
rest 120
TeleService 216
Temperature– Automatic climate con‐
trol 106– Changing the unit of meas‐
ure 72
Temperature, coolant, refer to
Coolant temperature 69
Temperature display
– External temperature 68– External temperature warn‐
ing 68– Setting the unit 72
Temperature, engine oil 69
Temperature warning 68
Text messages 207
Theft alarm system, refer to Alarm system 38
Thigh support adjustment 44
Third brake lamp, refer to Cen‐ ter brake lamp 250
Tilting the passenger side mir‐ ror 48
Time
– Setting the time 72– Setting the time zone 73
Tire age 233
Tire identification marks 233
Tire inflation pressure 228
Tire inflation pressure, check‐ ing 228
Tire pressure monitor, refer to Flat Tire Monitor 88
Tire Pressure Monitor TPM 90
Tire Quality Grading 233
Tires– Inflation pressure 228
Tires, breaking in 126
Tires, changing 235
Tires, condition 234
Tires, damage 235
Tire size 233
Tires, minimum tread 234
Tires, retreaded tires 236
Tires, run-flat tires 236
Tires, storage 236
Tire tread 234
Toll roads, route 149
Tone 160
Tool kit, refer to Onboard ve‐ hicle tool kit 245
Tools, refer to Onboard vehicle tool kit 245
Tow bar 257
Tow fitting 258
Towing 256
Towing another vehicle 256
Towing, being towed 256
Towing with automatic trans‐ mission 256
Town/city, navigation 141
Tow rope 257
Tow-starting 256, 258
TPM Tire Pressure Moni‐ tor 90
Traction control 95
Traffic bulletins, naviga‐ tion 153
Transmission
– Automatic transmission with
Steptronic 62– Overriding selector lever lock
in case of automatic trans‐
mission with Steptronic 64
Transmission, automatic
transmission with Step‐
tronic 64
Transmission lock
– Refer to Changing selector
lever positions 62– Refer to P Park 63Transmission positions, auto‐
matic transmission with
Steptronic 64
Transporting children safely 50
Treble, tone 160
Trip computer, refer to Dis‐ plays on the Control Dis‐
play 70
Trip-distance counter, refer to Trip odometer 68
Triple turn signal activa‐ tion 59
Trip odometer 68
Trips, planning 147
Trunk, refer to Cargo area 115
Turning circle, refer to Dimen‐ sions 266
Turning lamps, refer to Adap‐ tive light control 81
Turn signal– Indicator/warning lamp 14
Turn signals 59
Turn signals
– Bulb replacement 249– Bulb replacement, front 249
Turn signals, triple turn signal
activation 59
U
Uniform Tire Quality Grading/ UTQG 233
Unintentional alarms, avoid‐ ing 39
Units
– Average fuel consump‐
tion 72– Temperature 72
Units of measure, changing on
Control Display 72
Universal Garage Door Opener 110
Universal remote control 110
Seite 287Everything from A to ZReference287
Online Edition for Part no. 01 40 2 914 595 - VI/12