key BMW X3 2.5I 2004 E83 Owner's Guide
[x] Cancel search | Manufacturer: BMW, Model Year: 2004, Model line: X3 2.5I, Model: BMW X3 2.5I 2004 E83Pages: 132, PDF Size: 3.62 MB
Page 48 of 132
Everything under control
46
Between the blue and red fields
Normal operating range. The dial may wan-
der into the red field.
Red
Comes on while driving:
The engine is overheated. Switch off the
engine immediately and allow it to cool
down.
Checking coolant level, refer to page 96.
When you switch on the ignition, the warn-
ing lamp 1 comes on briefly to confirm that
the system is operational.
Service Interval Display
Remaining distance until next
service due
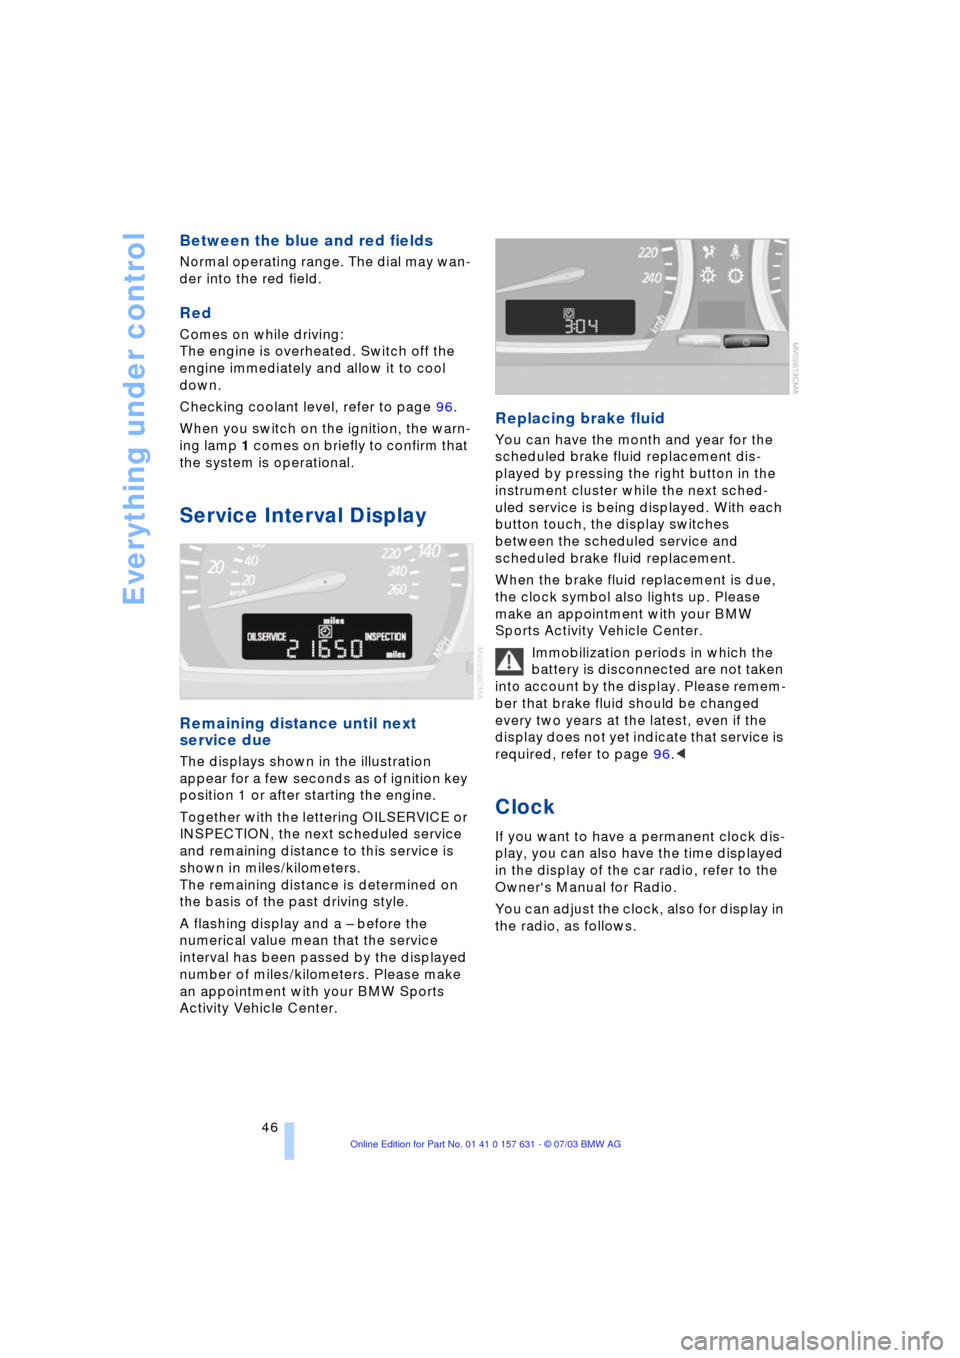
The displays shown in the illustration
appear for a few seconds as of ignition key
position 1 or after starting the engine.
Together with the lettering OILSERVICE or
INSPECTION, the next scheduled service
and remaining distance to this service is
shown in miles/kilometers.
The remaining distance is determined on
the basis of the past driving style.
A flashing display and a Ð before the
numerical value mean that the service
interval has been passed by the displayed
number of miles/kilometers. Please make
an appointment with your BMW Sports
Activity Vehicle Center.
Replacing brake fluid
You can have the month and year for the
scheduled brake fluid replacement dis-
played by pressing the right button in the
instrument cluster while the next sched-
uled service is being displayed. With each
button touch, the display switches
between the scheduled service and
scheduled brake fluid replacement.
When the brake fluid replacement is due,
the clock symbol also lights up. Please
make an appointment with your BMW
Sports Activity Vehicle Center.
Immobilization periods in which the
battery is disconnected are not taken
into account by the display. Please remem-
ber that brake fluid should be changed
every two years at the latest, even if the
display does not yet indicate that service is
required, refer to page 96.<
Clock
If you want to have a permanent clock dis-
play, you can also have the time displayed
in the display of the car radio, refer to the
Owner's Manual for Radio.
You can adjust the clock, also for display in
the radio, as follows.
Page 49 of 132
Reference
At a glance
Controls
Driving tips
Mobility
47
Setting the time
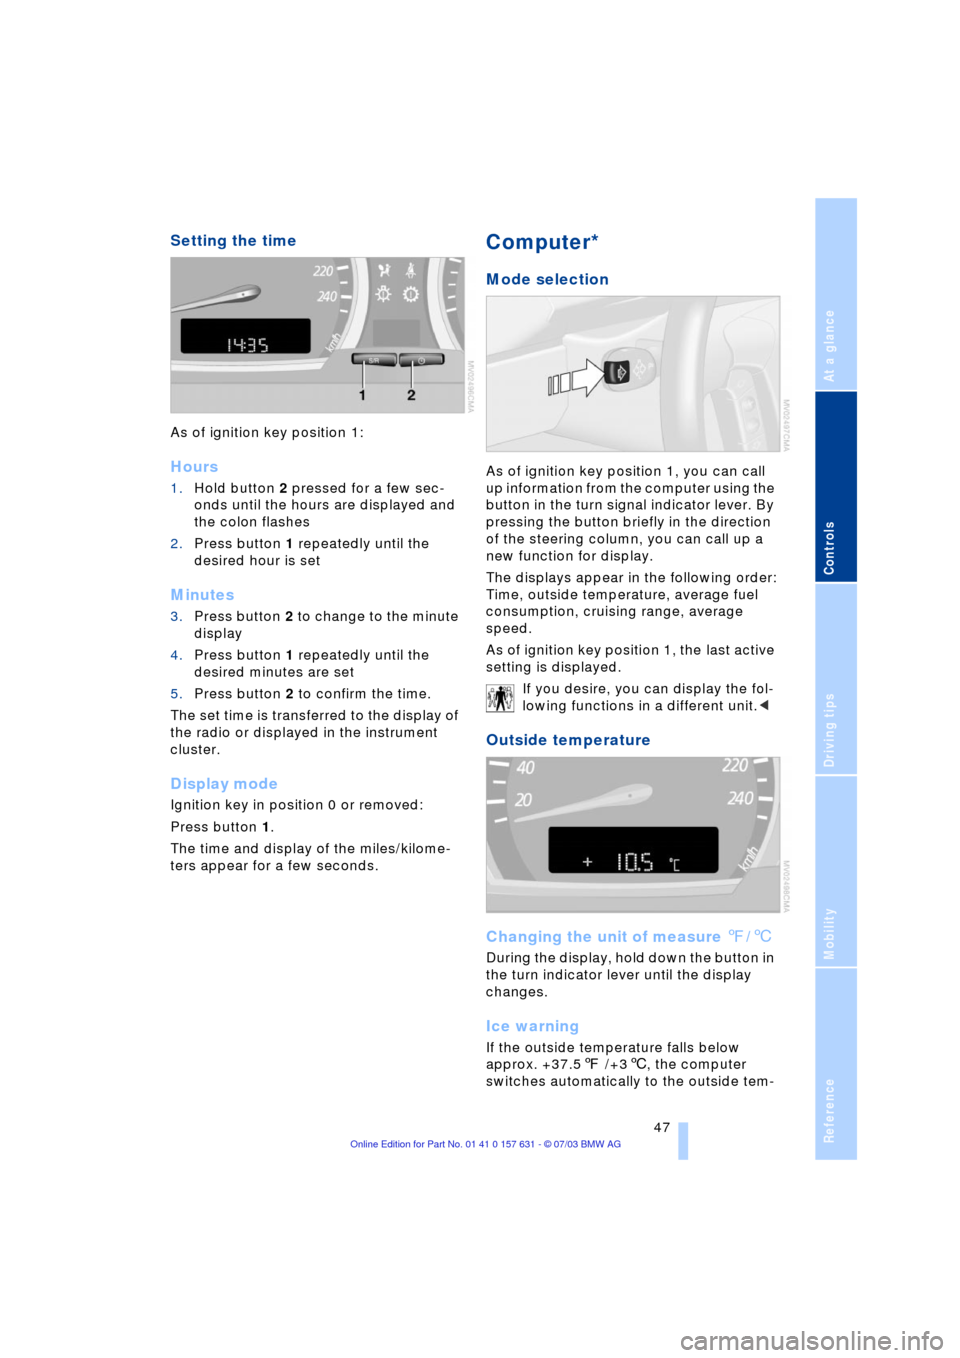
As of ignition key position 1:
Hours
1.Hold button 2 pressed for a few sec-
onds until the hours are displayed and
the colon flashes
2.Press button 1 repeatedly until the
desired hour is set
Minutes
3.Press button 2 to change to the minute
display
4.Press button 1 repeatedly until the
desired minutes are set
5.Press button 2 to confirm the time.
The set time is transferred to the display of
the radio or displayed in the instrument
cluster.
Display mode
Ignition key in position 0 or removed:
Press button 1.
The time and display of the miles/kilome-
ters appear for a few seconds.
Computer*
Mode selection
As of ignition key position 1, you can call
up information from the computer using the
button in the turn signal indicator lever. By
pressing the button briefly in the direction
of the steering column, you can call up a
new function for display.
The displays appear in the following order:
Time, outside temperature, average fuel
consumption, cruising range, average
speed.
As of ignition key position 1, the last active
setting is displayed.
If you desire, you can display the fol-
lowing functions in a different unit.<
Outside temperature
Changing the unit of measure 7/6
During the display, hold down the button in
the turn indicator lever until the display
changes.
Ice warning
If the outside temperature falls below
approx. +37.57 /+36, the computer
switches automatically to the outside tem-
Page 51 of 132
Reference
At a glance
Controls
Driving tips
Mobility
49
Technology for comfort, convenience
and safety
Park Distance Control PDC*
The concept
PDC provides extra safety and conven-
ience during parking maneuvers. Signal
tones indicate the current distance to an
object behind or in front of your vehicle.
Four ultrasonic sensors in both the
bumpers monitor the distance to the near-
est object.
The front and rear sensors on the corners
have a range of approx. 2 ft/60 cm. The
two rear middle sensors have a range of
approx. 5 ft/1.50 m and the two front mid-
dle sensors of approx. 2.6 ft/80 cm.
PDC is a parking aid that can indicate
objects when they are approached
slowly, as is usually the case when parking.
Avoid approaching objects too fast, other-
wise the system may give warning of phys-
ical obstacles too late.<
If you are driving with a trailer, the rear sen-
sors are unable to make proper measure-
ments Ð so they do not switch on.
Automatic mode
As of ignition key position 2, the system
automatically assumes operational status
after a few seconds each time you engage
reverse gear or selector-lever position R.
Wait this short period before park-
ing.<
You can have a signal tone pro-
grammed into the system to verify
that the PDC is active.<
Automatic deactivation
After driving a distance of more than
approx. 160 ft/50 m or exceeding a speed
of approx. 20 mph/30 km/h, the system
switches off and the indicator lamp goes
out. You can reactivate the system manu-
ally as needed.
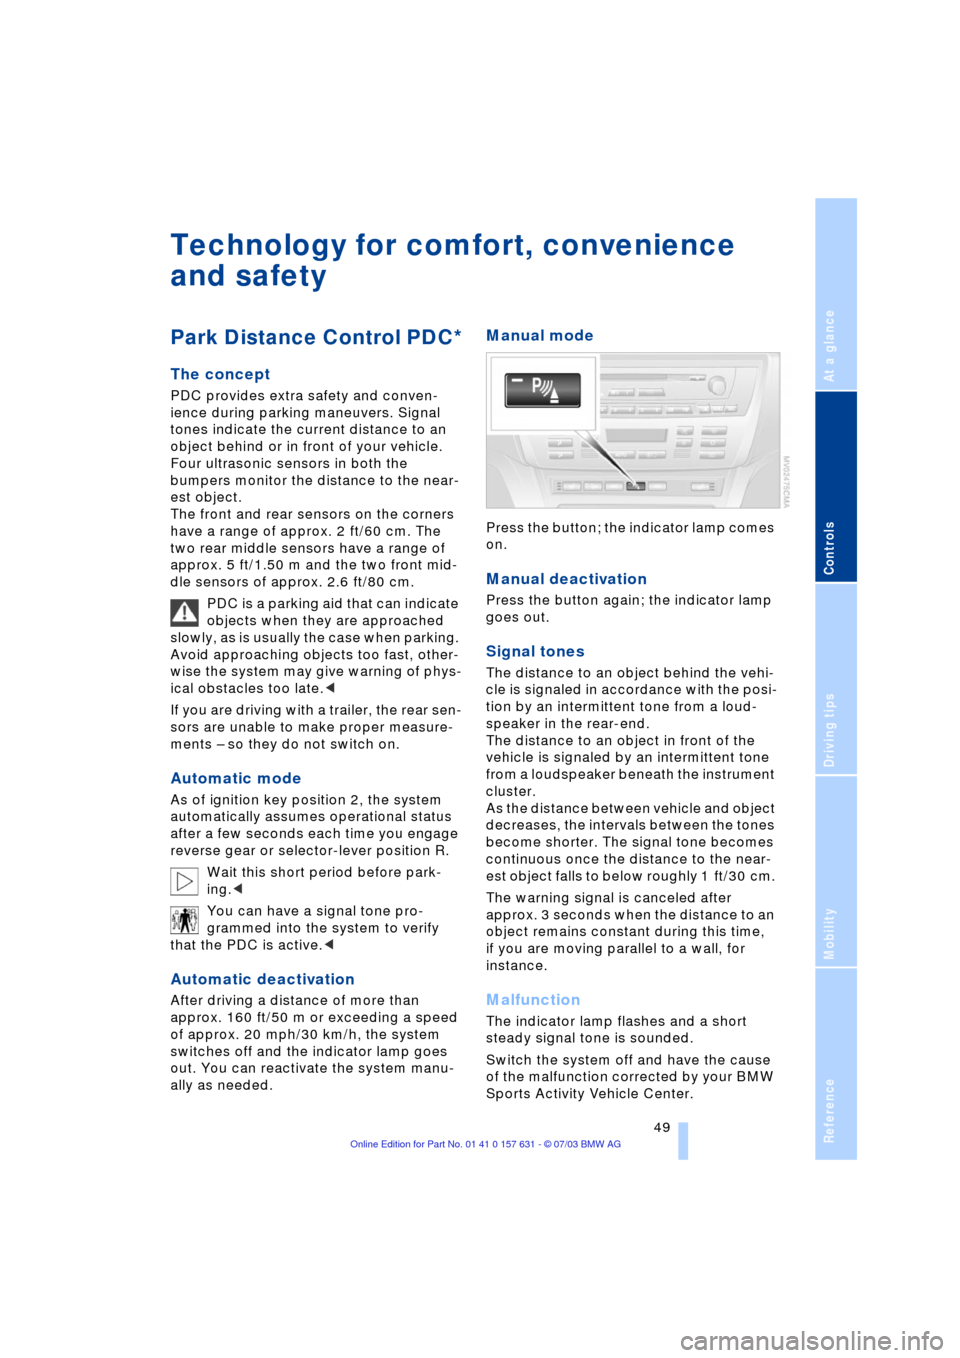
Manual mode
Press the button; the indicator lamp comes
on.
Manual deactivation
Press the button again; the indicator lamp
goes out.
Signal tones
The distance to an object behind the vehi-
cle is signaled in accordance with the posi-
tion by an intermittent tone from a loud-
speaker in the rear-end.
The distance to an object in front of the
vehicle is signaled by an intermittent tone
from a loudspeaker beneath the instrument
cluster.
As the distance between vehicle and object
decreases, the intervals between the tones
become shorter. The signal tone becomes
continuous once the distance to the near-
est object falls to below roughly 1 ft/30 cm.
The warning signal is canceled after
approx. 3 seconds when the distance to an
object remains constant during this time,
if you are moving parallel to a wall, for
instance.
Malfunction
The indicator lamp flashes and a short
steady signal tone is sounded.
Switch the system off and have the cause
of the malfunction corrected by your BMW
Sports Activity Vehicle Center.
Page 57 of 132
Reference
At a glance
Controls
Driving tips
Mobility
55
To ensure compliance with official safety
regulations, please also entrust disposal of
airbag generators to a BMW Sports Activity
Vehicle Center.<
Airbag warning information is also provided
on the sun visors.
Automatic deactivation of the front
passenger airbags
Your BMW has a seat occupation detection
system. By evaluating the weight on the
front passenger's seat, the system detects
whether or not the seat is occupied by a
child in the child-restraint system or an
adult.
>When a child is seated in the child-
restraint system or with an empty seat,
the front and side airbags are deacti-
vated on the passenger's side
>When an adult is traveling in the front
seat, the front and side airbags remain
active on the passenger side.
With heavier children, the front pas-
senger airbags can remain active, or
with very light adults or teenagers the front
passenger airbags can be deactivated
unintentionally.
The condition of the front passenger air-
bags is indicated via the telltale lamp, refer
to Indicator lamps in the following. In this
case transport the corresponding persons
on the rear seat.
Except when persons to be transported, do
not increase the load on the front passen-
ger seat with additional items. Do not fit
seat covers, seat cushion padding, ball
mats or other items to the front passenger
seat unless they are specifically recom-
mended by BMW. Do not place any items
under the seat. Otherwise, the function of
the seat occupation detection could be
impaired.<
Indicator/warning lamp
Airbag system operational
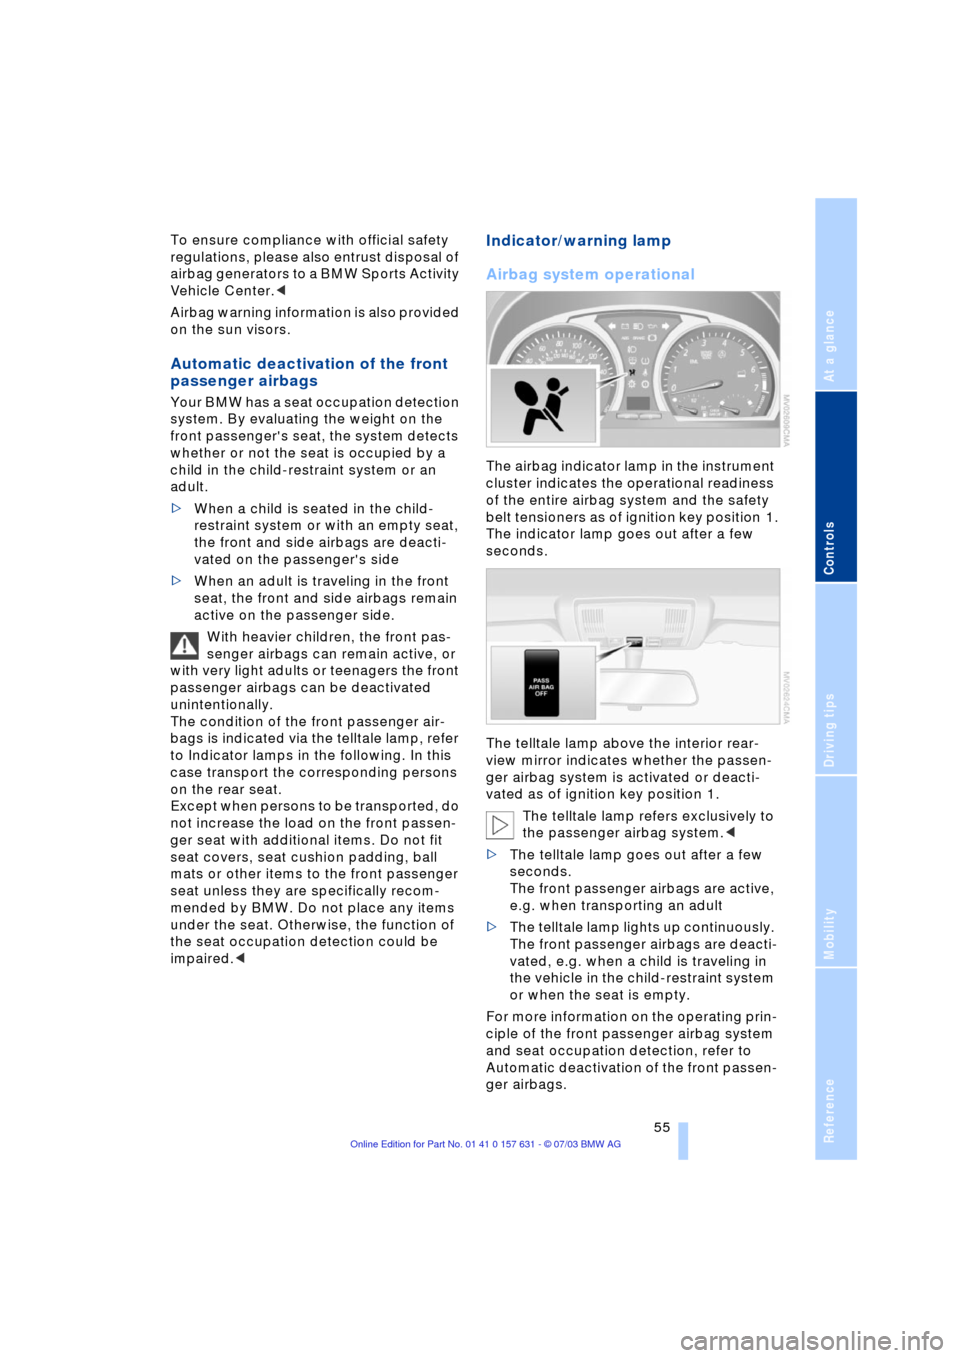
The airbag indicator lamp in the instrument
cluster indicates the operational readiness
of the entire airbag system and the safety
belt tensioners as of ignition key position 1.
The indicator lamp goes out after a few
seconds.
The telltale lamp above the interior rear-
view mirror indicates whether the passen-
ger airbag system is activated or deacti-
vated as of ignition key position 1.
The telltale lamp refers exclusively to
the passenger airbag system.<
>The telltale lamp goes out after a few
seconds.
The front passenger airbags are active,
e.g. when transporting an adult
>The telltale lamp lights up continuously.
The front passenger airbags are deacti-
vated, e.g. when a child is traveling in
the vehicle in the child-restraint system
or when the seat is empty.
For more information on the operating prin-
ciple of the front passenger airbag system
and seat occupation detection, refer to
Automatic deactivation of the front passen-
ger airbags.
Page 58 of 132

Technology for comfort, convenience and safety
56
Airbag system malfunction
A system malfunction could prevent
the system from responding in the
expected manner to an impact occurring
within its normal response range.
Please have the airbag system checked
immediately by a BMW Sports Activity
Vehicle Center.<
There is a fault in the airbag system
if the airbag indicator lamp in the
instrument cluster behaves as fol-
lows:
>Indicator lamp does not light up as of
ignition key position 1
>Indicator lamp remains lit continuously
>Indicator lamp lights up while the vehi-
cle is being driven.
Page 59 of 132
Reference
At a glance
Controls
Driving tips
Mobility
57
Lamps
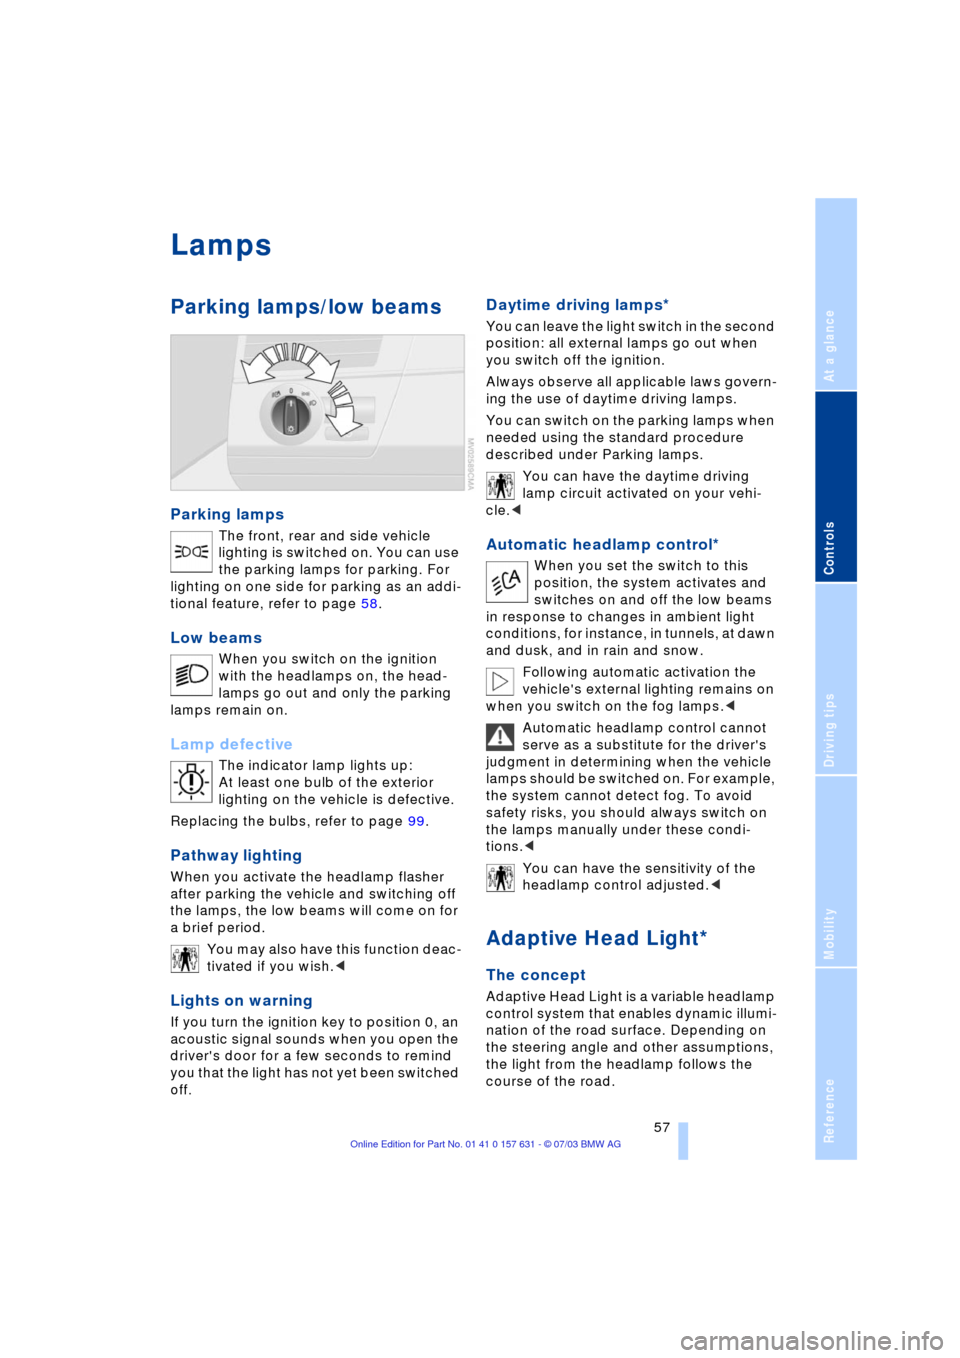
Parking lamps/low beams
Parking lamps
The front, rear and side vehicle
lighting is switched on. You can use
the parking lamps for parking. For
lighting on one side for parking as an addi-
tional feature, refer to page 58.
Low beams
When you switch on the ignition
with the headlamps on, the head-
lamps go out and only the parking
lamps remain on.
Lamp defective
The indicator lamp lights up:
At least one bulb of the exterior
lighting on the vehicle is defective.
Replacing the bulbs, refer to page 99.
Pathway lighting
When you activate the headlamp flasher
after parking the vehicle and switching off
the lamps, the low beams will come on for
a brief period.
You may also have this function deac-
tivated if you wish.<
Lights on warning
If you turn the ignition key to position 0, an
acoustic signal sounds when you open the
driver's door for a few seconds to remind
you that the light has not yet been switched
off
.
Daytime driving lamps*
You can leave the light switch in the second
position: all external lamps go out when
you switch off the ignition.
Always observe all applicable laws govern-
ing the use of daytime driving lamps.
You can switch on the parking lamps when
needed using the standard procedure
described under Parking lamps.
You can have the daytime driving
lamp circuit activated on your vehi-
cle.<
Automatic headlamp control*
When you set the switch to this
position, the system activates and
switches on and off the low beams
in response to changes in ambient light
conditions, for instance, in tunnels, at dawn
and dusk, and in rain and snow.
Following automatic activation the
vehicle's external lighting remains on
when you switch on the fog lamps.<
Automatic headlamp control cannot
serve as a substitute for the driver's
judgment in determining when the vehicle
lamps should be switched on. For example,
the system cannot detect fog. To avoid
safety risks, you should always switch on
the lamps manually under these condi-
tions.<
You can have the sensitivity of the
headlamp control adjusted.<
Adaptive Head Light*
The concept
Adaptive Head Light is a variable headlamp
control system that enables dynamic illumi-
nation of the road surface. Depending on
the steering angle and other assumptions,
the light from the headlamp follows the
course of the road.
Page 60 of 132
Lamps
58
Activating the Adaptive Head Light
In ignition key position 2, turn the
light switch to the position 'Auto-
matic headlamp control'.
When the vehicle is backing up, the
Adaptive Head Light is inactive; when
the vehicle is at a standstill, it is only active
in one direction.<
Malfunction
The LED above the symbol for automatic
headlamp control flashes. Please have it
checked by your BMW Sports Activity
Vehicle Center.
Instrument lighting
Turn the serrated dial to adjust the illumina-
tion intensity.
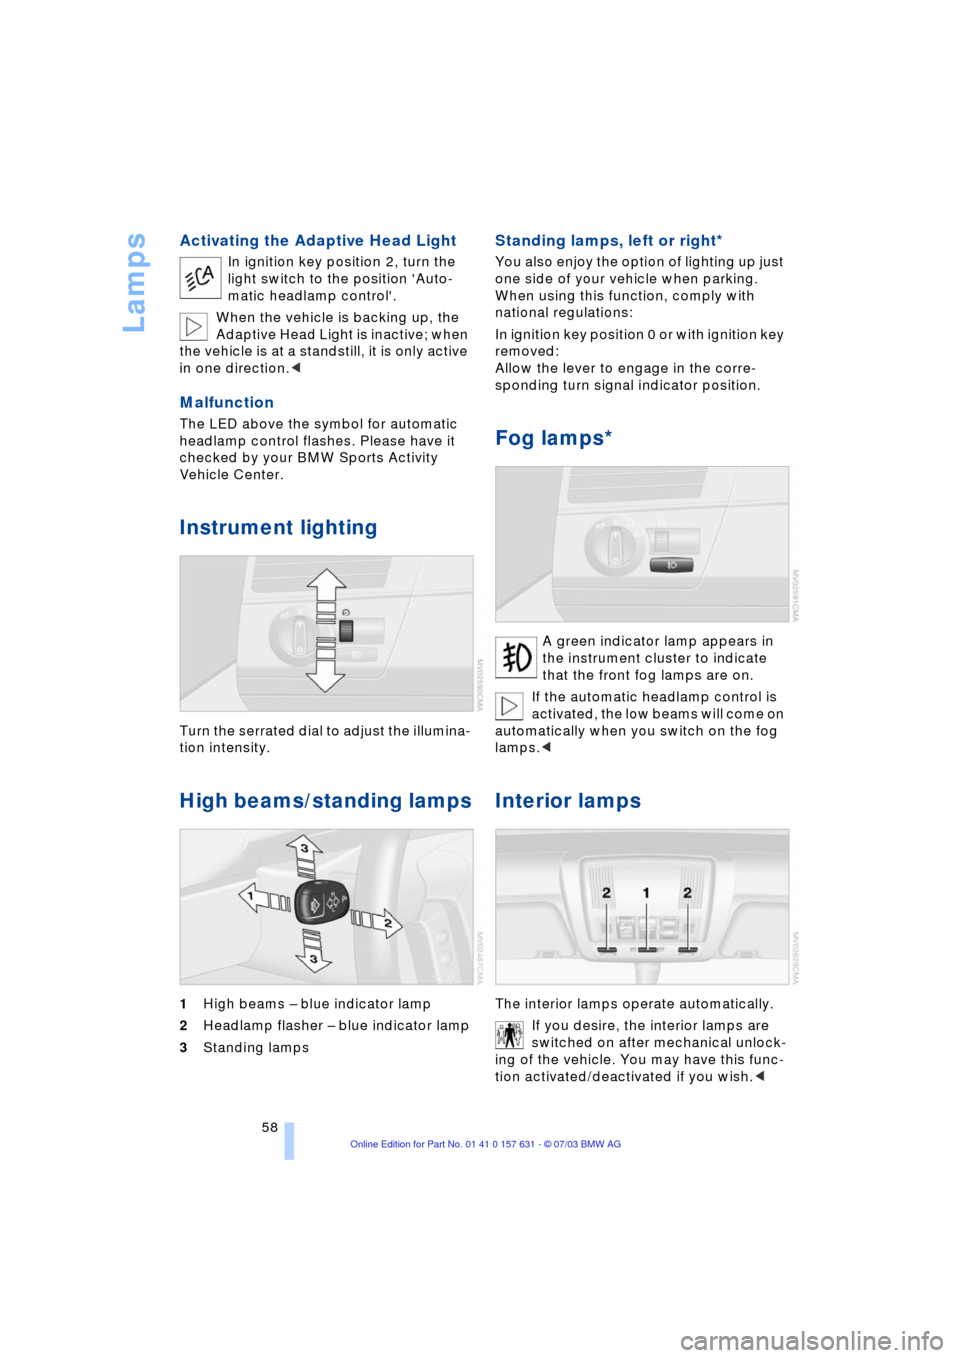
High beams/standing lamps
1High beams Ð blue indicator lamp
2Headlamp flasher Ð blue indicator lamp
3Standing lamps
Standing lamps, left or right*
You also enjoy the option of lighting up just
one side of your vehicle when parking.
When using this function, comply with
national regulations:
In ignition key position 0 or with ignition key
removed:
Allow the lever to engage in the corre-
sponding turn signal indicator position.
Fog lamps*
A green indicator lamp appears in
the instrument cluster to indicate
that the front fog lamps are on.
If the automatic headlamp control is
activated, the low beams will come on
automatically when you switch on the fog
lamps.<
Interior lamps
The interior lamps operate automatically.
If you desire, the interior lamps are
switched on after mechanical unlock-
ing of the vehicle. You may have this func-
tion activated/deactivated if you wish.<
Page 68 of 132
Practical interior accessories
66
Practical interior accessories
Integrated universal remote
control*
The concept
The integrated universal remote control
replaces up to three different hand-held
transmitters for various items of radio-con-
trolled equipment such as door openers
and house alarm systems. The integrated
universal remote control recognizes and
learns the transmitted signal of each of the
original hand-held transmitters.
The signal of an original hand-held trans-
mitter can be programmed on one of the
three memory buttons 1. Following that,
each of the devices can be actuated with
the appropriately programmed memory
button 1. The indicator lamp 2 flashes to
confirm transmission of the signal.
If the vehicle is sold, the memory of the
memory buttons 1 should be cleared, refer
to page 67.
To prevent possible damage or injury,
before programming or using the inte-
grated universal remote control, always
inspect the immediate area to make certain
that no people, animals or objects are
within the travel range of the device. Also,
comply with the safety precautions of the
original hand-held transmitter.<
Checking the compatibility
If you see this symbol on the pack-
aging or in the manual supplied with
the original hand-held transmitter, it
is safe to assume that it is compatible with
the integrated universal remote control.
If you have additional questions,
please consult your BMW Sports
Activity Vehicle Center or call
1-800-355-3515.
You can also visit these websites:
www.bmwusa.com or
www.homelink.com. HomeLink is a registered trademark owned
by Johnson Controls, Inc.<
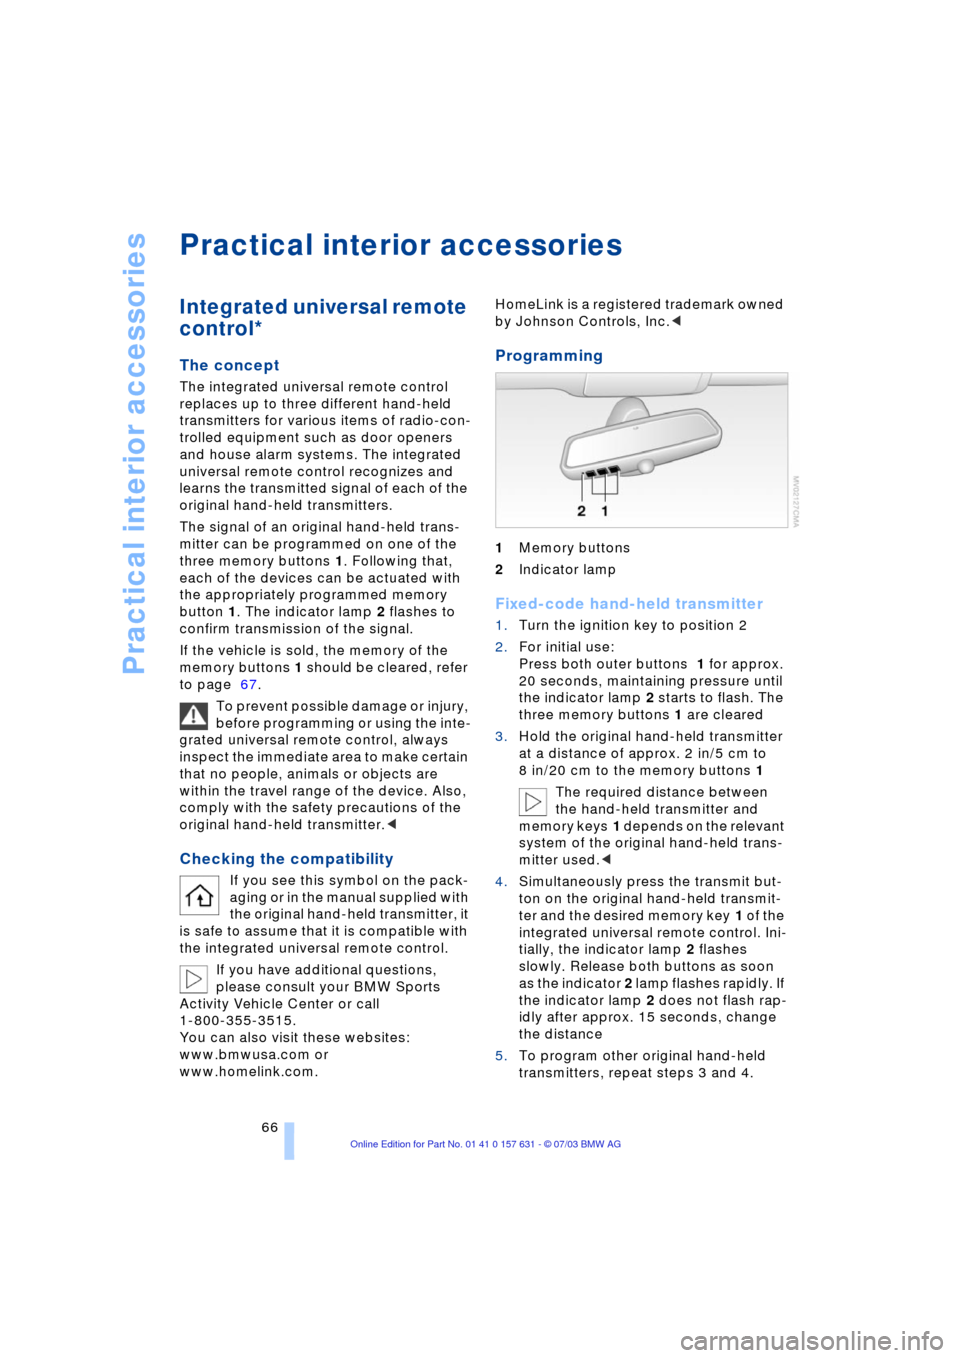
Programming
1Memory buttons
2Indicator lamp
Fixed-code hand-held transmitter
1.Turn the ignition key to position 2
2.For initial use:
Press both outer buttons 1 for approx.
20 seconds, maintaining pressure until
the indicator lamp 2 starts to flash. The
three memory buttons 1 are cleared
3.Hold the original hand-held transmitter
at a distance of approx. 2 in/5 cm to
8 in/20 cm to the memory buttons 1
The required distance between
the hand-held transmitter and
memory keys 1 depends on the relevant
system of the original hand-held trans-
mitter used.<
4.Simultaneously press the transmit but-
ton on the original hand-held transmit-
ter and the desired memory key 1 of the
integrated universal remote control. Ini-
tially, the indicator lamp 2 flashes
slowly. Release both buttons as soon
as the indicator 2 lamp flashes rapidly. If
the indicator lamp 2 does not flash rap-
idly after approx. 15 seconds, change
the distance
5.To program other original hand-held
transmitters, repeat steps 3 and 4.
Page 69 of 132
Reference
At a glance
Controls
Driving tips
Mobility
67
The corresponding memory button 1 is now
programmed with the signal of the original
hand-held transmitter.
The equipment can be used as of ignition
key position 2.
If the device cannot be operated after
repeated programming, check
whether the original hand-held transmitter
uses an alternating-code system. To do so,
either read the instructions of the original
hand-held transmitter or press and hold
down the programmed memory button 1 of
the integrated universal remote control. If
the indicator lamp 2 on the integrated uni-
versal remote control flashes rapidly for a
short time then lights up for approx. 2 sec-
onds, this indicates that the original hand-
held transmitter uses an alternating-code
system. In the case of an alternating-code
system, program the memory buttons 1 as
described at the section on alternating-
code transmitters.<
Alternating-code transmitters
Consult the operating instructions of the
unit you wish to set when programming the
universal remote control. You will find infor-
mation there on the possibilities for syn-
chronization.
When programming hand-held transmitters
that employ an alternating code, please
observe the following supplementary
instructions:
Programming will be easier with the
aid of a second person.<
1.Park your vehicle within the range of the
remote-controlled device
2.Program the integrated universal
remote control as described above at
Fixed-code hand-held transmitters
3.Locate the button at the receiver of the
equipment to be set, e.g. on the drive
4.Press the button on the receiver of the
device you want to set up. After step 4,
you have approx. 30 seconds for step 5
5.Press the programmed memory
button 1 of the integrated universal
remote control three times. The corresponding memory button 1 is now
programmed with the signal of the original
hand-held transmitter.
If you have questions, please contact
your BMW Sports Activity Vehicle
Center.<
Clearing the memory buttons
Press both outer buttons 1 of the inte-
grated universal remote control for approx.
20 seconds, maintaining pressure until the
indicator lamp 2 starts to flash. All three
memory buttons are cleared.
The memory of individual memory
buttons 1 cannot be cleared.
Beverage holders
Front
Depending on your optional equipment, the
center console contains either one or two
beverage holders.
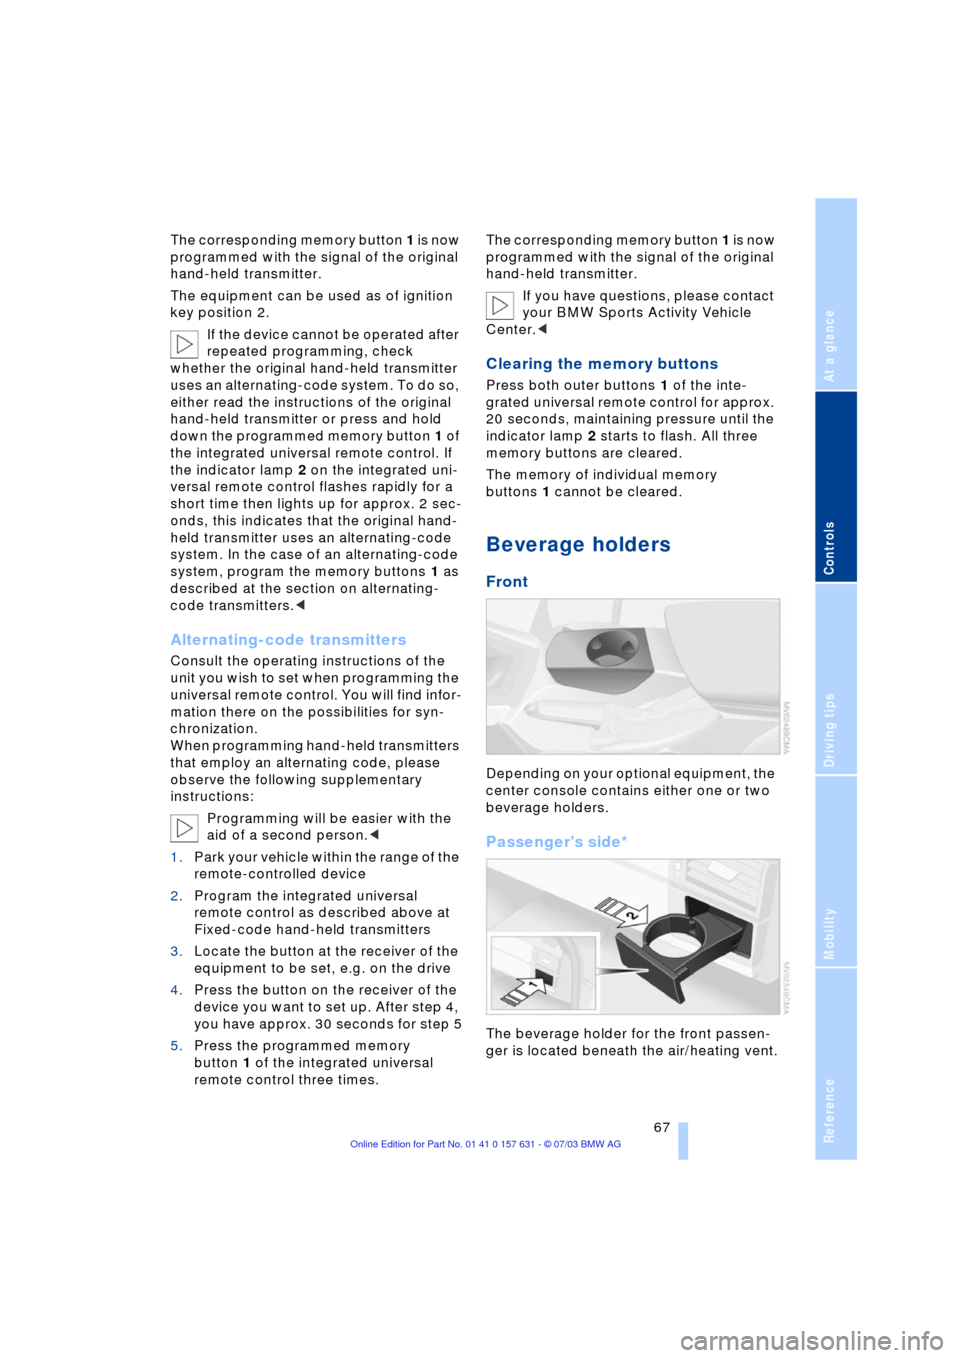
Passenger's side*
The beverage holder for the front passen-
ger is located beneath the air/heating vent.
Page 70 of 132
Practical interior accessories
68 1.Press the trim piece below the air/heat-
ing vent, arrow 1
2.Insert beverage
3.Adapt the holding arm to the size of the
beverage container, refer to arrow 2.
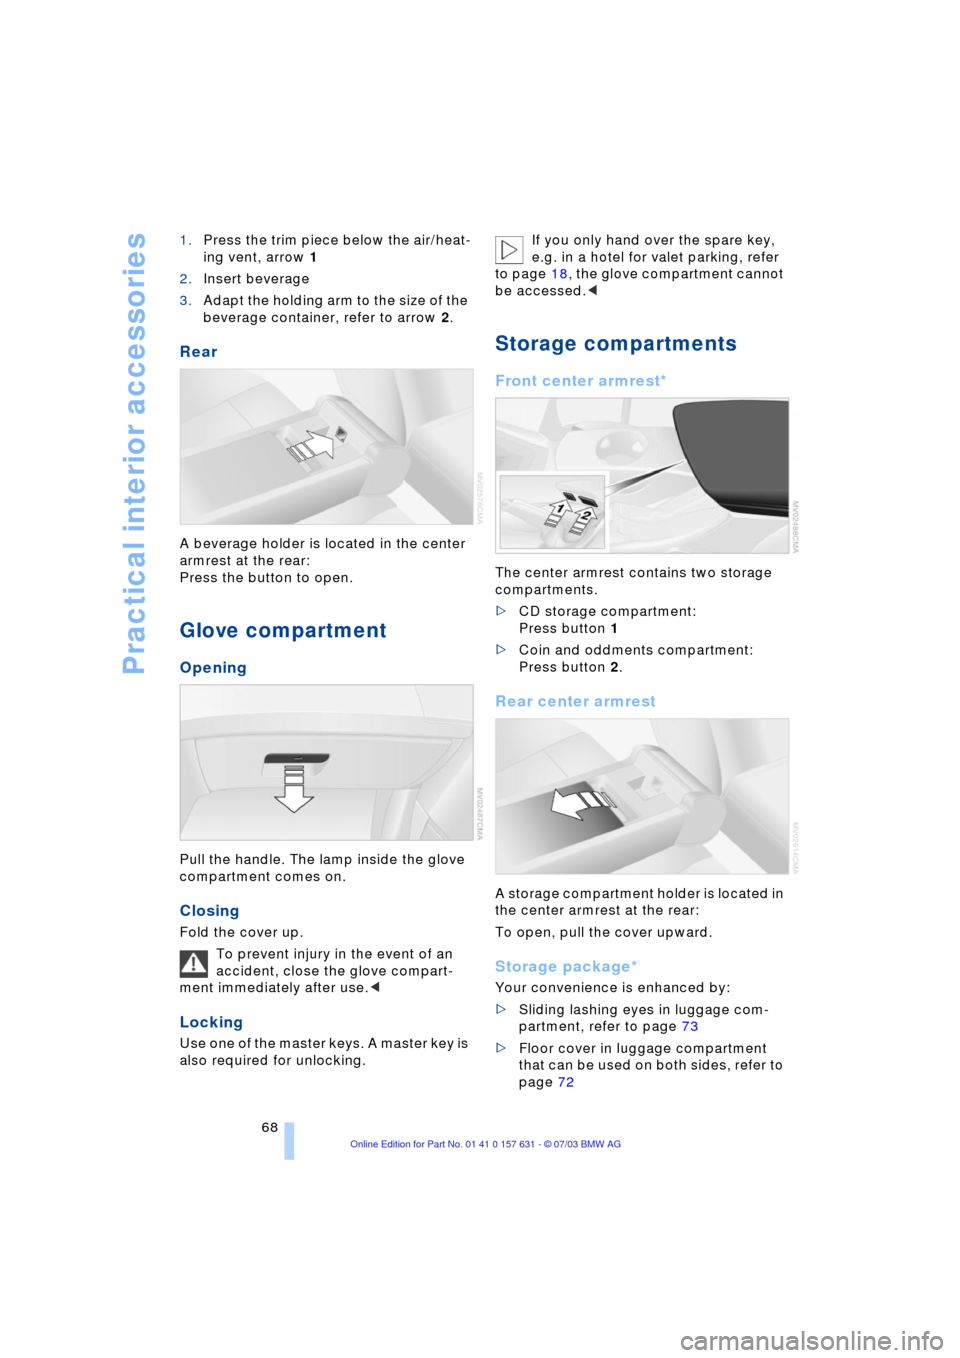
Rear
A beverage holder is located in the center
armrest at the rear:
Press the button to open.
Glove compartment
Opening
Pull the handle. The lamp inside the glove
compartment comes on.
Closing
Fold the cover up.
To prevent injury in the event of an
accident, close the glove compart-
ment immediately after use.<
Locking
Use one of the master keys. A master key is
also required for unlocking. If you only hand over the spare key,
e.g. in a hotel for valet parking, refer
to page 18, the glove compartment cannot
be accessed.<
Storage compartments
Front center armrest*
The center armrest contains two storage
compartments.
>CD storage compartment:
Press button 1
>Coin and oddments compartment:
Press button 2.
Rear center armrest
A storage compartment holder is located in
the center armrest at the rear:
To open, pull the cover upward.
Storage package*
Your convenience is enhanced by:
>Sliding lashing eyes in luggage com-
partment, refer to page 73
>Floor cover in luggage compartment
that can be used on both sides, refer to
page 72