BMW X3 2.5I SAV 2004 Owners Manual
Manufacturer: BMW, Model Year: 2004, Model line: X3 2.5I SAV, Model: BMW X3 2.5I SAV 2004Pages: 132, PDF Size: 3.62 MB
Page 101 of 132
Reference
At a glance
Controls
Driving tips
Mobility
99
Replacing components
Onboard tool kit
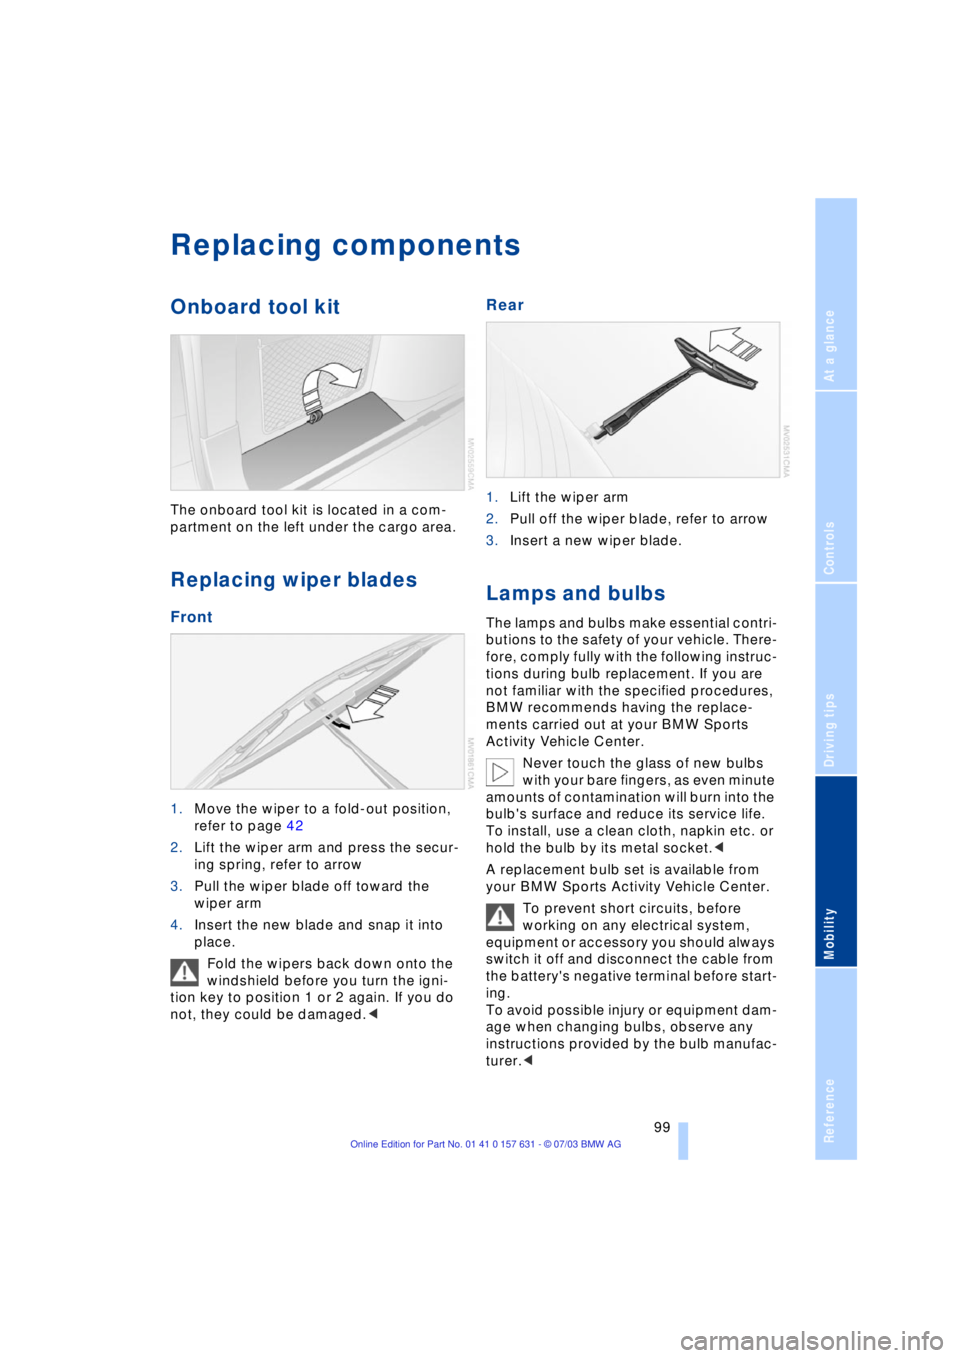
The onboard tool kit is located in a com-
partment on the left under the cargo area.
Replacing wiper blades
Front
1.Move the wiper to a fold-out position,
refer to page 42
2.Lift the wiper arm and press the secur-
ing spring, refer to arrow
3.Pull the wiper blade off toward the
wiper arm
4.Insert the new blade and snap it into
place.
Fold the wipers back down onto the
windshield before you turn the igni-
tion key to position 1 or 2 again. If you do
not, they could be damaged.<
Rear
1.Lift the wiper arm
2.Pull off the wiper blade, refer to arrow
3.Insert a new wiper blade.
Lamps and bulbs
The lamps and bulbs make essential contri-
butions to the safety of your vehicle. There-
fore, comply fully with the following instruc-
tions during bulb replacement. If you are
not familiar with the specified procedures,
BMW recommends having the replace-
ments carried out at your BMW Sports
Activity Vehicle Center.
Never touch the glass of new bulbs
with your bare fingers, as even minute
amounts of contamination will burn into the
bulb's surface and reduce its service life.
To install, use a clean cloth, napkin etc. or
hold the bulb by its metal socket.<
A replacement bulb set is available from
your BMW Sports Activity Vehicle Center.
To prevent short circuits, before
working on any electrical system,
equipment or accessory you should always
switch it off and disconnect the cable from
the battery's negative terminal before start-
ing.
To avoid possible injury or equipment dam-
age when changing bulbs, observe any
instructions provided by the bulb manufac-
turer.<
Page 102 of 132
Replacing components
100 When maintaining the headlamps,
please comply with the instructions in
the separate Caring for your vehicle bro-
chure.<
Halogen low beams
H7 bulb, 55 Watts
Always wear gloves and eye protec-
tion Ð the atmosphere within the bulb
is pressurized. Failure to observe this pre-
caution can lead to personal injury should
the bulb be damaged.<
Driver's side
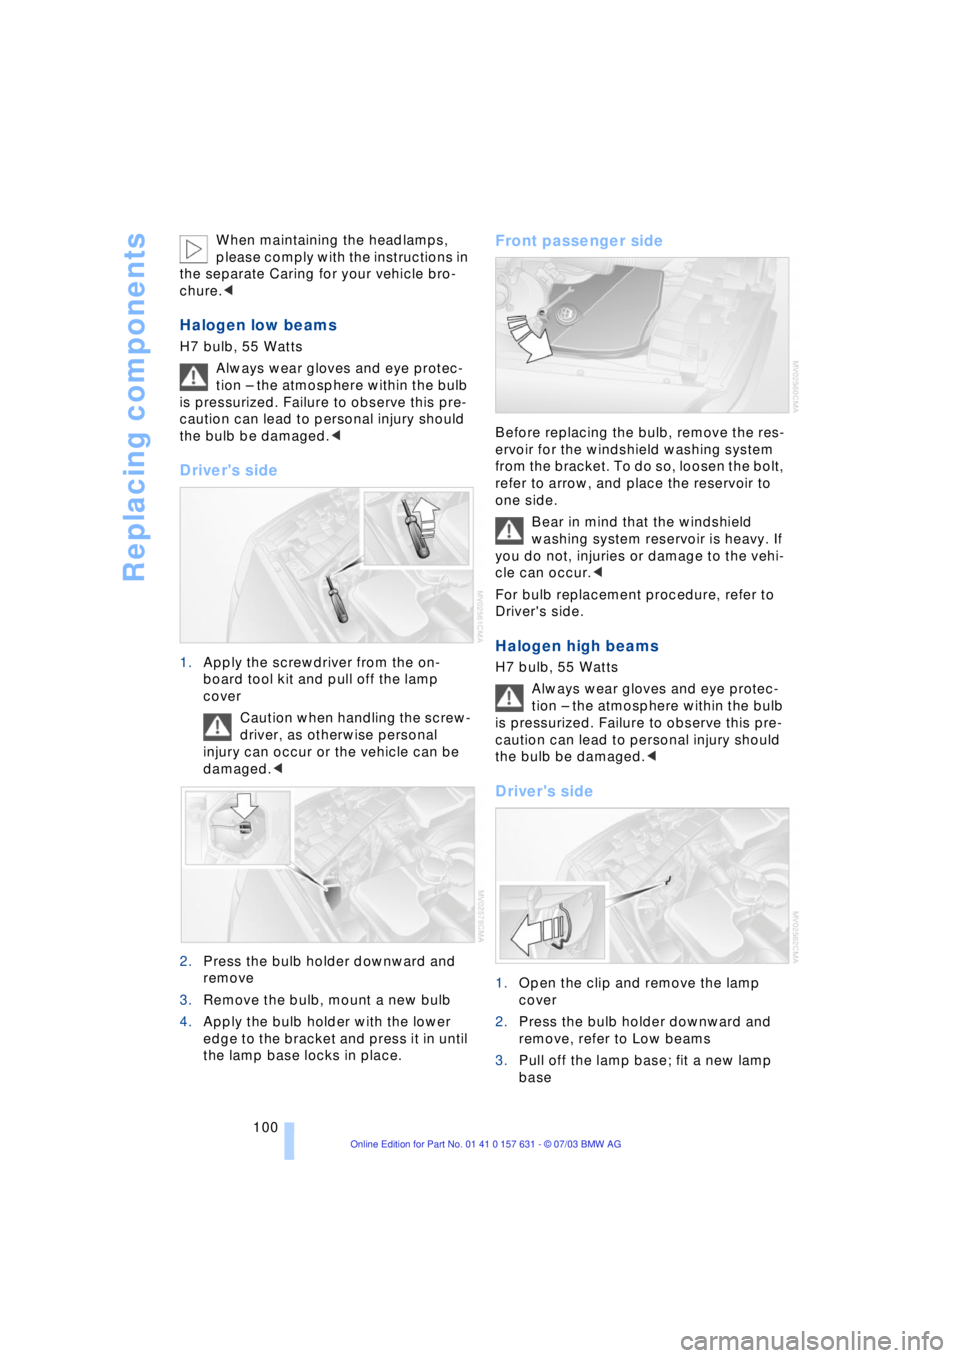
1.Apply the screwdriver from the on-
board tool kit and pull off the lamp
cover
Caution when handling the screw-
driver, as otherwise personal
injury can occur or the vehicle can be
damaged.<
2.Press the bulb holder downward and
remove
3.Remove the bulb, mount a new bulb
4.Apply the bulb holder with the lower
edge to the bracket and press it in until
the lamp base locks in place.
Front passenger side
Before replacing the bulb, remove the res-
ervoir for the windshield washing system
from the bracket. To do so, loosen the bolt,
refer to arrow, and place the reservoir to
one side.
Bear in mind that the windshield
washing system reservoir is heavy. If
you do not, injuries or damage to the vehi-
cle can occur.<
For bulb replacement procedure, refer to
Driver's side.
Halogen high beams
H7 bulb, 55 Watts
Always wear gloves and eye protec-
tion Ð the atmosphere within the bulb
is pressurized. Failure to observe this pre-
caution can lead to personal injury should
the bulb be damaged.<
Driver's side
1.Open the clip and remove the lamp
cover
2.Press the bulb holder downward and
remove, refer to Low beams
3.Pull off the lamp base; fit a new lamp
base
Page 103 of 132
Reference
At a glance
Controls
Driving tips
Mobility
101
4.Apply the lamp base with the lower
edge to the bracket and press it in until
the lamp base locks in place.
Make sure that the cover does not fall
into the engine compartment, as oth-
erwise the vehicle can be damaged or
other road users can be endangered.<
Front passenger side
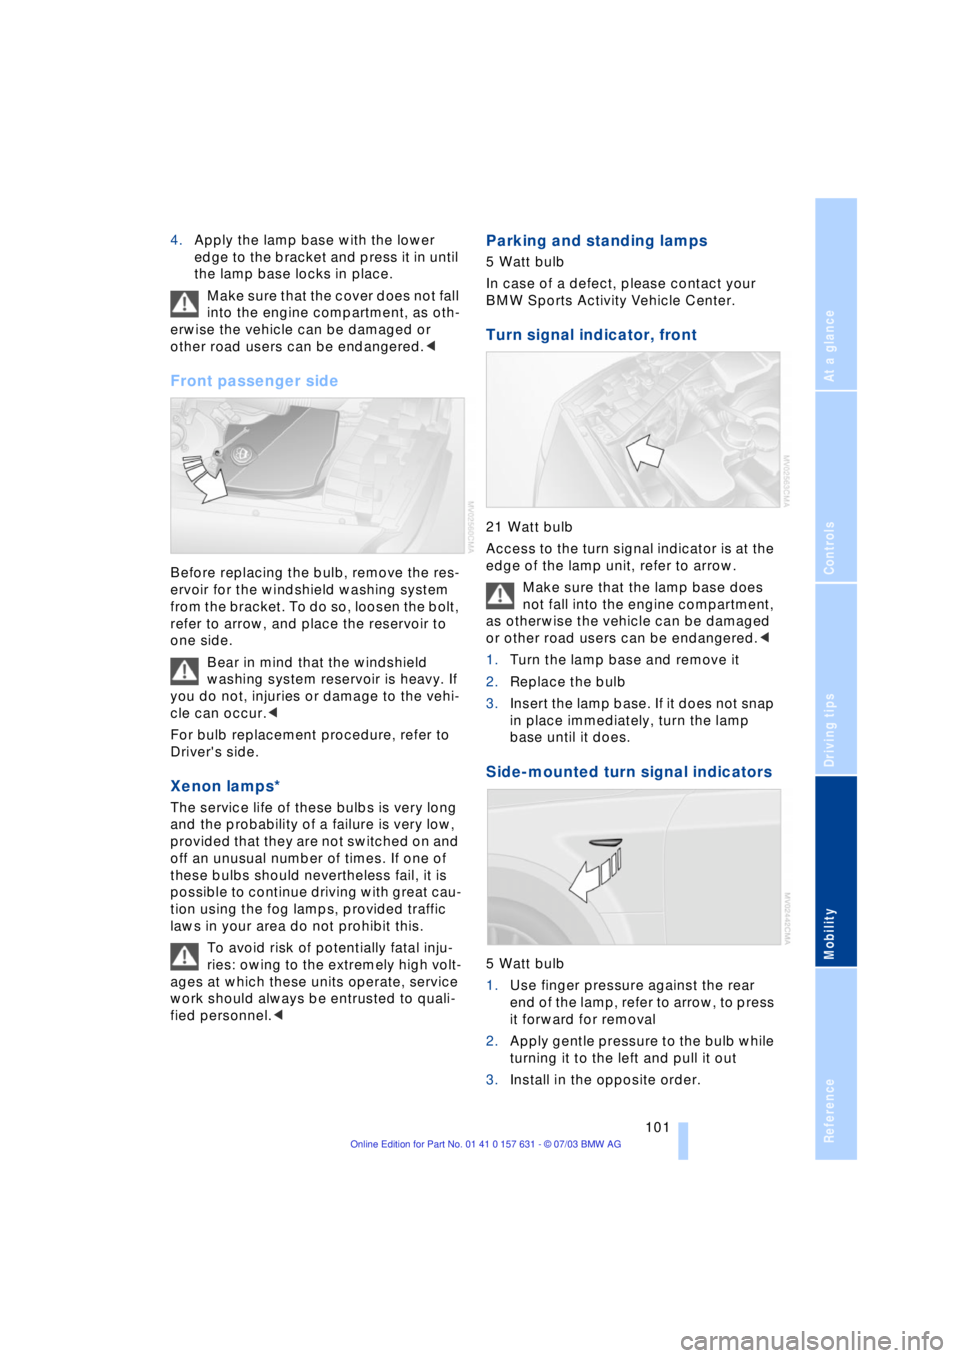
Before replacing the bulb, remove the res-
ervoir for the windshield washing system
from the bracket. To do so, loosen the bolt,
refer to arrow, and place the reservoir to
one side.
Bear in mind that the windshield
washing system reservoir is heavy. If
you do not, injuries or damage to the vehi-
cle can occur.<
For bulb replacement procedure, refer to
Driver's side.
Xenon lamps*
The service life of these bulbs is very long
and the probability of a failure is very low,
provided that they are not switched on and
off an unusual number of times. If one of
these bulbs should nevertheless fail, it is
possible to continue driving with great cau-
tion using the fog lamps, provided traffic
laws in your area do not prohibit this.
To avoid risk of potentially fatal inju-
ries: owing to the extremely high volt-
ages at which these units operate, service
work should always be entrusted to quali-
fied personnel.<
Parking and standing lamps
5 Watt bulb
In case of a defect, please contact your
BMW Sports Activity Vehicle Center.
Turn signal indicator, front
21 Watt bulb
Access to the turn signal indicator is at the
edge of the lamp unit, refer to arrow.
Make sure that the lamp base does
not fall into the engine compartment,
as otherwise the vehicle can be damaged
or other road users can be endangered.<
1.Turn the lamp base and remove it
2.Replace the bulb
3.Insert the lamp base. If it does not snap
in place immediately, turn the lamp
base until it does.
Side-mounted turn signal indicators
5 Watt bulb
1.Use finger pressure against the rear
end of the lamp, refer to arrow, to press
it forward for removal
2.Apply gentle pressure to the bulb while
turning it to the left and pull it out
3.Install in the opposite order.
Page 104 of 132
Replacing components
102
Front fog lamps
H11 bulb, 55 Watts
Always wear gloves and eye protec-
tion Ð the atmosphere within the bulb
is pressurized. Failure to observe this pre-
caution can lead to personal injury should
the bulb be damaged.<
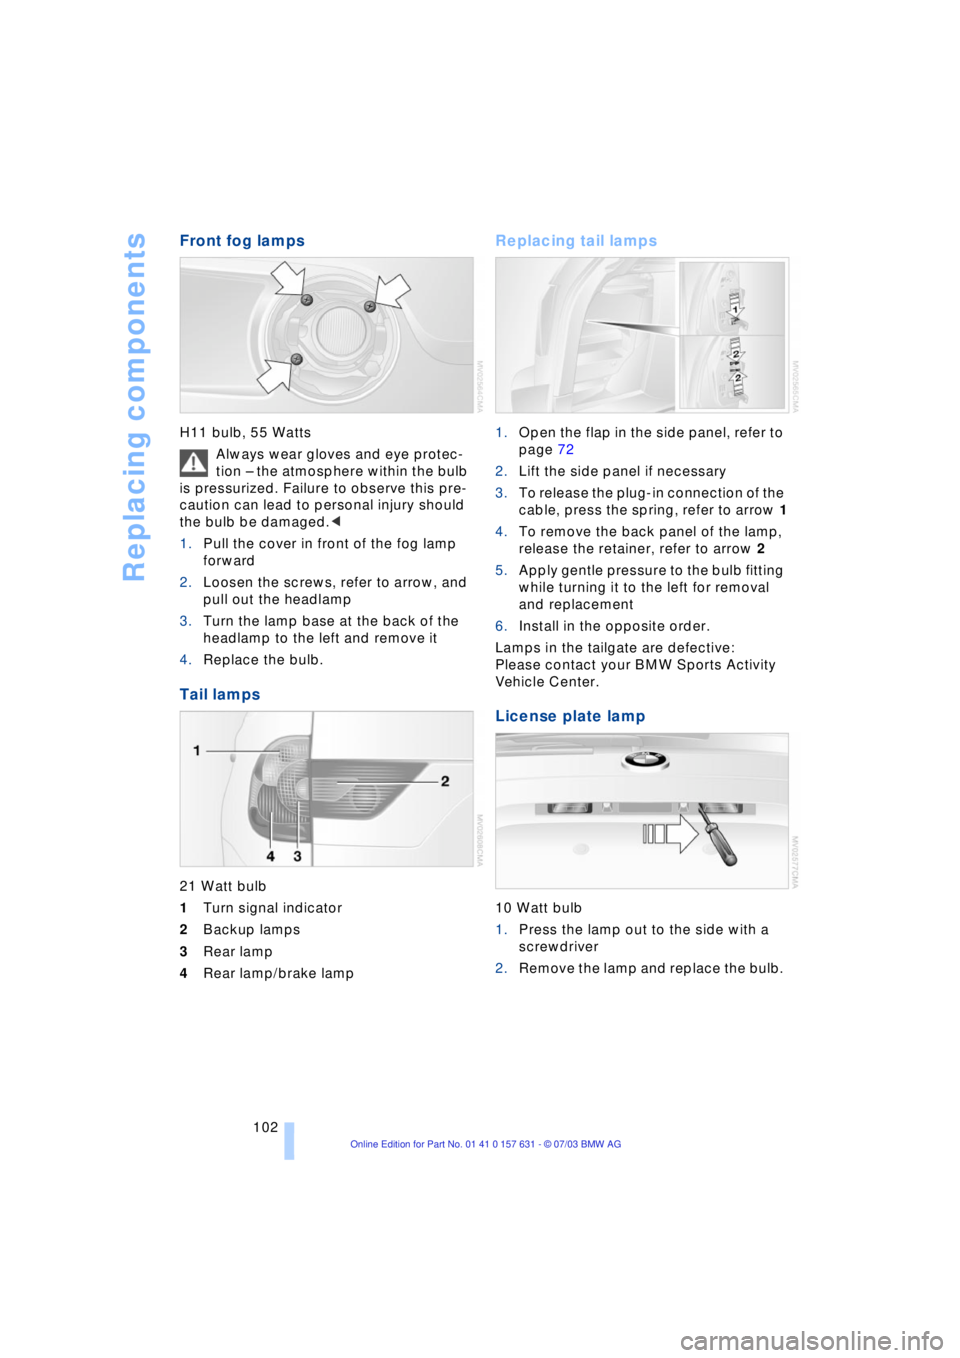
1.Pull the cover in front of the fog lamp
forward
2.Loosen the screws, refer to arrow, and
pull out the headlamp
3.Turn the lamp base at the back of the
headlamp to the left and remove it
4.Replace the bulb.
Tail lamps
21 Watt bulb
1Turn signal indicator
2Backup lamps
3Rear lamp
4Rear lamp/brake lamp
Replacing tail lamps
1.Open the flap in the side panel, refer to
page 72
2.Lift the side panel if necessary
3.To release the plug-in connection of the
cable, press the spring, refer to arrow 1
4.To remove the back panel of the lamp,
release the retainer, refer to arrow 2
5.Apply gentle pressure to the bulb fitting
while turning it to the left for removal
and replacement
6.Install in the opposite order.
Lamps in the tailgate are defective:
Please contact your BMW Sports Activity
Vehicle Center.
License plate lamp
10 Watt bulb
1.Press the lamp out to the side with a
screwdriver
2.Remove the lamp and replace the bulb.
Page 105 of 132
Reference
At a glance
Controls
Driving tips
Mobility
103
Tailgate lamp
5 Watt bulb
1.Pull off the bulb holder
2.Replace the bulb.
Light-emitting diodes LEDs
Light-emitting diodes installed behind
translucent lenses serve as the light source
for many of the controls and displays in
your vehicle. These light-emitting diodes,
which operate using a concept similar to
that applied in conventional lasers, are offi-
cially designated as Class 1 light-emitting
diodes.
Do not remove the covers, and never
stare into the unfiltered light for sev-
eral hours, as irritation of the retina could
result.<
Changing a wheel
Safety precautions to observe in the
event of a flat tire and during all tire
changes:
Park the vehicle as far as possible from
passing traffic. Park on a firm, flat, surface.
Switch on the hazard warning flashers.
Lock the steering wheel in straight-ahead
setting of the wheels. Set the handbrake
and engage first gear, reverse gear or
selector-lever position P.
All passengers should be outside the vehi-
cle and well away from your immediate
working area, behind a guardrail, for
instance.
If a warning triangle or portable hazard
warning lamp is required, set it up on the
roadside at an appropriate distance from
the rear of the vehicle. Comply with all safety guidelines and regulations.
Change the wheel only on a level, firm sur-
face which is not slippery. The vehicle or
the jack could slip to the side if you attempt
to raise the vehicle on a soft or slippery sur-
face such as snow, ice, tiles, etc.
Position the jack on a firm support surface.
Do not use a wooden block or similar
object as a support base for the jack, as
this would prevent it from extending to its
full support height and reduce its load-car-
rying capacity.
To avoid serious or fatal injury: never lie
under the vehicle, and never start the
engine while it is supported by the jack.<
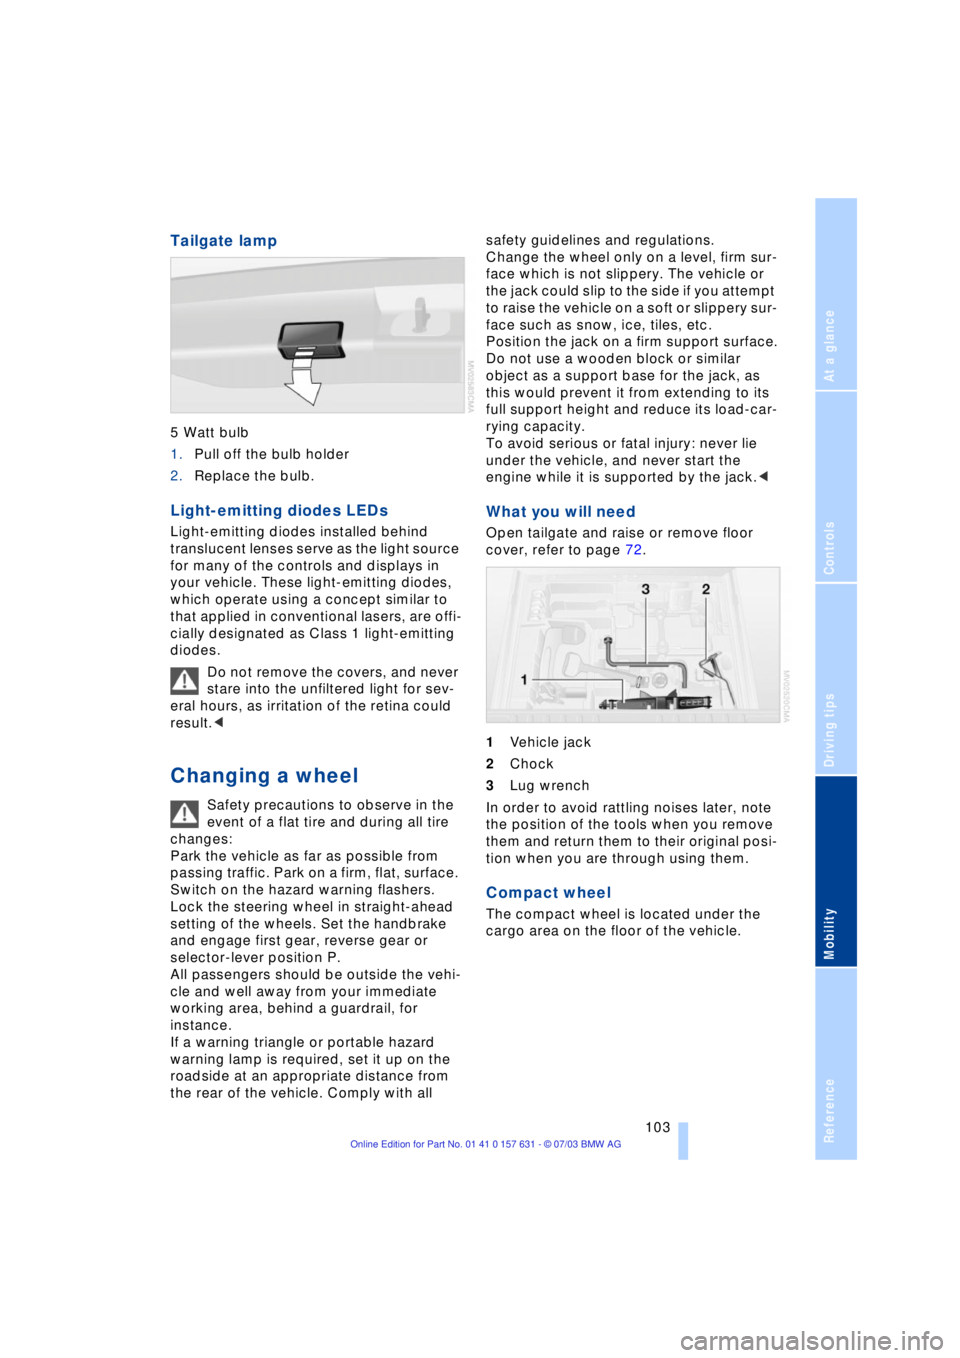
What you will need
Open tailgate and raise or remove floor
cover, refer to page 72.
1Vehicle jack
2Chock
3Lug wrench
In order to avoid rattling noises later, note
the position of the tools when you remove
them and return them to their original posi-
tion when you are through using them.
Compact wheel
The compact wheel is located under the
cargo area on the floor of the vehicle.
Page 106 of 132
Replacing components
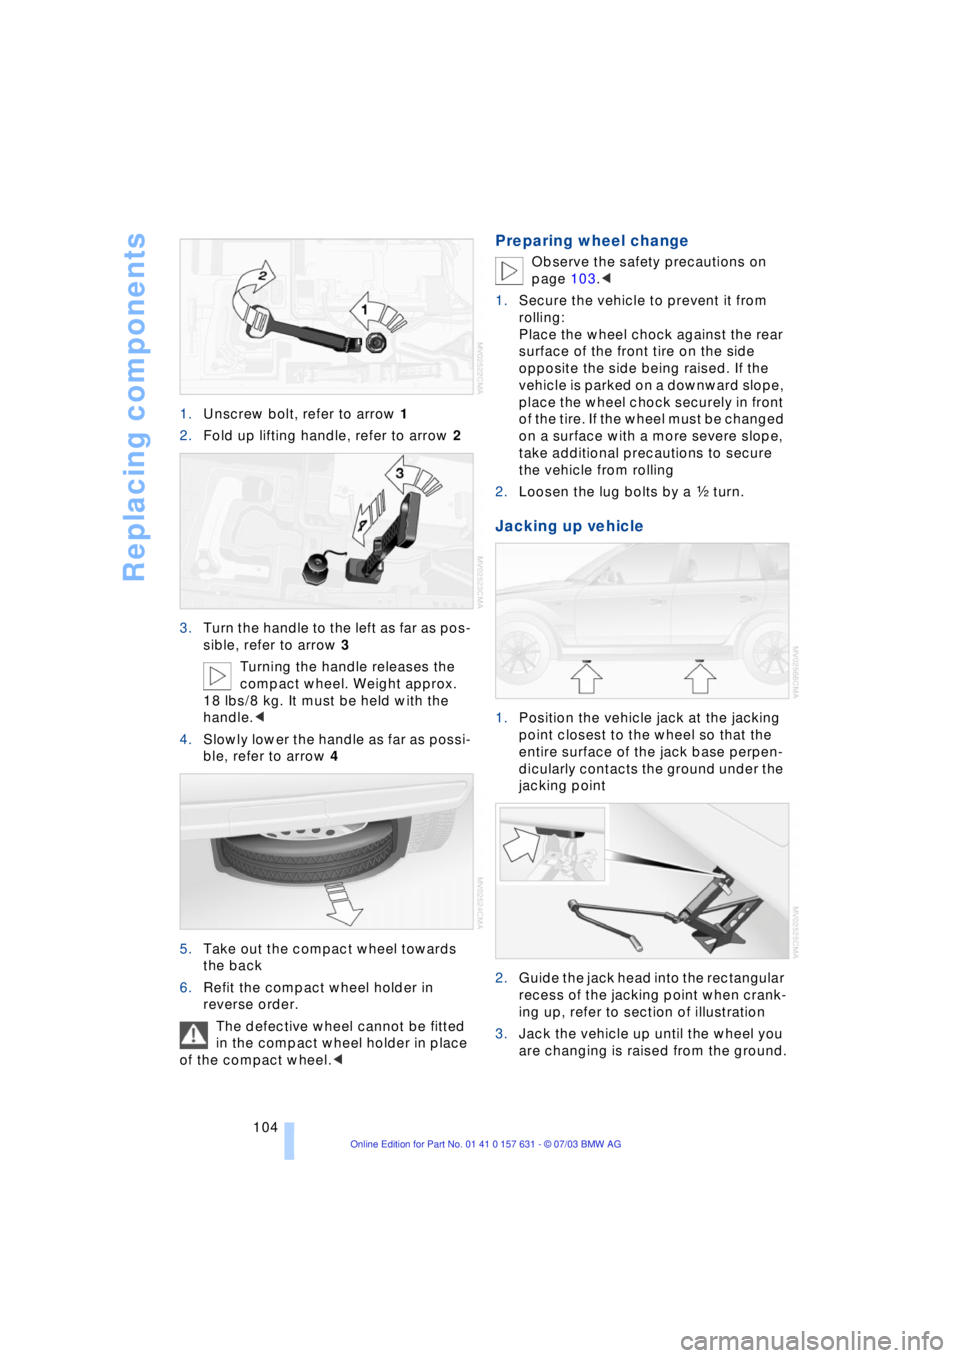
104 1.Unscrew bolt, refer to arrow 1
2.Fold up lifting handle, refer to arrow 2
3.Turn the handle to the left as far as pos-
sible, refer to arrow 3
Turning the handle releases the
compact wheel. Weight approx.
18 lbs/8 kg. It must be held with the
handle.<
4.Slowly lower the handle as far as possi-
ble, refer to arrow 4
5.Take out the compact wheel towards
the back
6.Refit the compact wheel holder in
reverse order.
The defective wheel cannot be fitted
in the compact wheel holder in place
of the compact wheel.<
Preparing wheel change
Observe the safety precautions on
page 103.<
1.Secure the vehicle to prevent it from
rolling:
Place the wheel chock against the rear
surface of the front tire on the side
opposite the side being raised. If the
vehicle is parked on a downward slope,
place the wheel chock securely in front
of the tire. If the wheel must be changed
on a surface with a more severe slope,
take additional precautions to secure
the vehicle from rolling
2.Loosen the lug bolts by a g turn.
Jacking up vehicle
1.Position the vehicle jack at the jacking
point closest to the wheel so that the
entire surface of the jack base perpen-
dicularly contacts the ground under the
jacking point
2.Guide the jack head into the rectangular
recess of the jacking point when crank-
ing up, refer to section of illustration
3.Jack the vehicle up until the wheel you
are changing is raised from the ground.
Page 107 of 132
Reference
At a glance
Controls
Driving tips
Mobility
105
Mounting compact wheel
1.Unscrew the lug bolts and remove the
wheel
2.Remove accumulations of mud or dirt
from the mounting surfaces of the
wheel and hub. Clean the lug bolts
3.Position the new wheel or compact
wheel. Secure the wheel by turning at
least two lug bolts into opposite bolt
holes
4.Screw in the remaining lug bolts.
Tighten all the bolts securely in a diag-
onal pattern
5.Lower the jack and remove it from
beneath the vehicle
6.Tighten the lug bolts in a diagonal pat-
tern
7.Check and correct the tire inflation
pressure at the earliest opportunity.
Protect valve stems and valve stem
seal caps against dirt and contamina-
tion. Dirt in valve stems is a frequent source
of gradual air loss.<
After mounting the compact wheel or cor-
recting the inflation pressure, reinitialize
the Flat Tire Monitor, refer to page 53.
The vehicle jack is designed for
changing wheels only. Do not attempt
to raise another vehicle model with it or to
raise any load of any kind. To do so could
cause accidents and personal injury.
To ensure safety, always have the lug bolts
checked with a calibrated torque wrench to
ensure that they are tightened to the spec-
ified torque of 101 lb ft/140 Nm as soon as
possible.<
Stow the defective wheel in the luggage
compartment.
When you mount wheels other than Genu-
ine BMW light-alloy wheels, different lug
bolts may also be required.
Replace the defective tire as soon as pos-
sible and have the new wheel/tire bal-
anced.
Driving with the compact wheel
Drive reservedly and do not exceed a
speed of 50 mph/80 km/h. Do not
deactivate DSC, as otherwise unstable
driving conditions may result.<
The driving characteristics change, for
example reduced track stability on braking,
extended braking distance, and altered
self-steering characteristics in the limit
range. In conjunction with winter tires,
these characteristics are more pro-
nounced.
Only one compact wheel may be
mounted. You should re-equipping to
wheels and tires of the original size as
quickly as possible.<
Battery
Battery care
The battery is 100% maintenance-free, i.e.,
the electrolyte will last for the life of the bat-
tery when the vehicle is operated in a tem-
perate climate.
Please contact your BMW Sports
Activity Vehicle Center with any ques-
tions concerning the battery.<
Do not disconnect the battery when
the engine is running. If you do so, the
ensuing voltage surge will damage the
vehicle's onboard electronics.<
Indicator lamp
The battery charge-current indica-
tor lamp lights up:
The battery is no longer being
charged. There is a defect on the alternator
V-belt or charge current circuit of the alter-
nator. Contact the nearest BMW Sports
Activity Vehicle Center.
Do not continue driving if the V-belt is
defective. The engine could be dam-
aged due to overheating.
Moreover, an increased amount of force is
required for steering if the onboard supply
voltage falls dramatically.<
Page 108 of 132
Replacing components
106
Charging the battery
Charge the battery in the vehicle only when
the engine is not running. Use the connec-
tions provided in the engine compartment.
For correct connections, refer to Jump-
starting on page 108.
Disposal
Bring old batteries to a collection
point or your BMW Sports Activity
Vehicle Center. Maintain the battery in an
upright position for transport and storage.
Always restrain the battery to prevent it
from tipping over during transport.<
Fuses
Never attempt to repair a blown fuse,
and do not replace a defective fuse
with a substitute of another color or amper-
age rating, as this could lead to a circuit
overload, ultimately resulting in a fire in the
vehicle.<
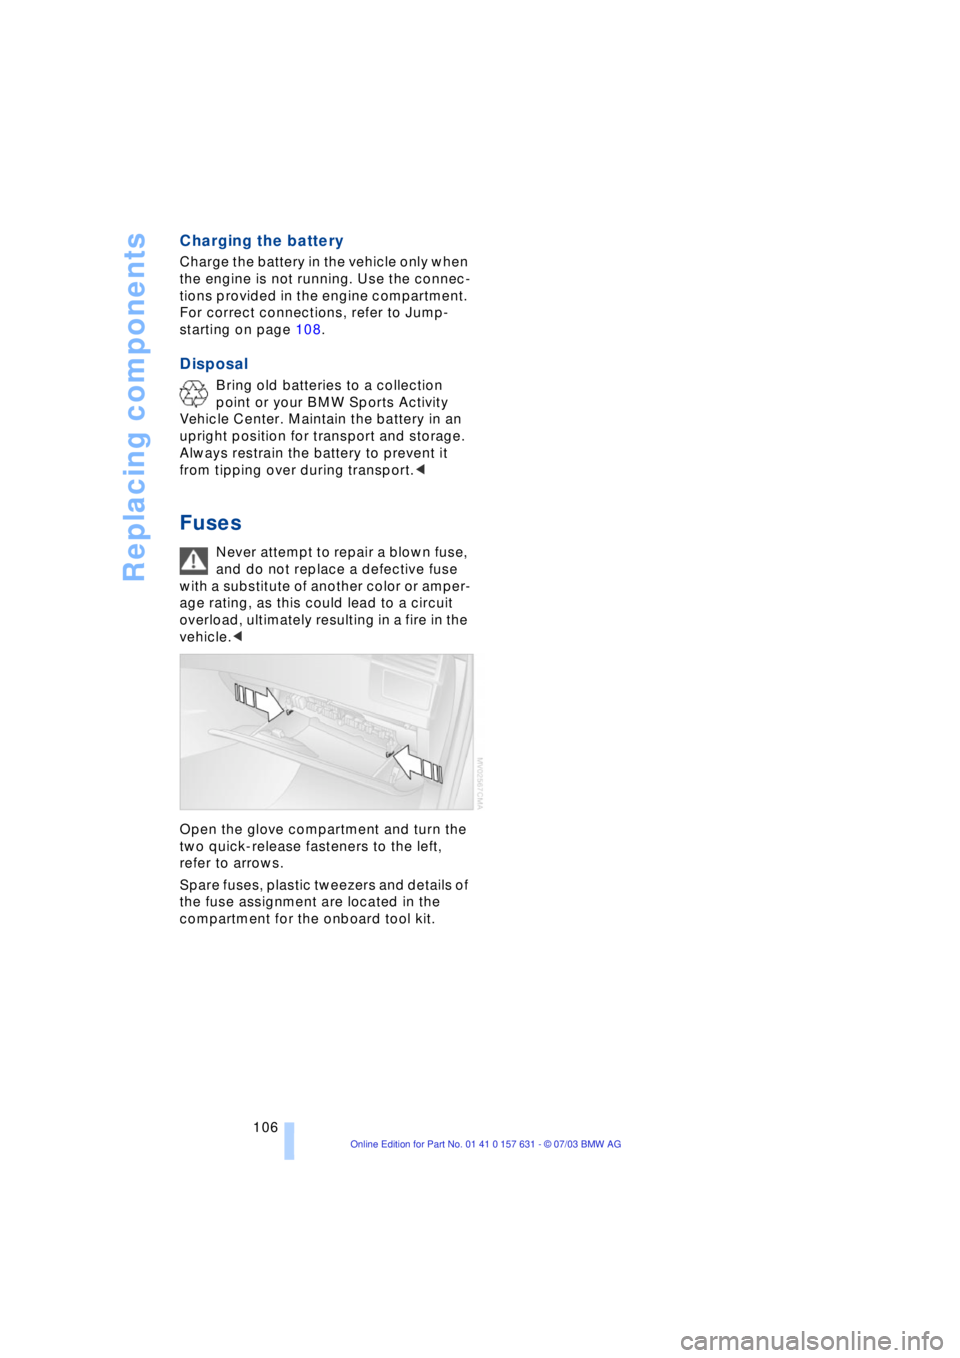
Open the glove compartment and turn the
two quick-release fasteners to the left,
refer to arrows.
Spare fuses, plastic tweezers and details of
the fuse assignment are located in the
compartment for the onboard tool kit.
Page 109 of 132
Reference
At a glance
Controls
Driving tips
Mobility
107
Giving and receiving assistance
Receiving assistance
The Roadside Assistance of the BMW
Group offers you assistance in the event of
a breakdown around the clock, also at
weekends and on public holidays.
The phone numbers of the Roadside Assis-
tance control center in your home country
can be found in the BMW Dealer Directory.
In the case of vehicles with the corre-
sponding equipment, you can use buttons
in the headlining to contact Roadside
Assistance or start an emergency call.
When an emergency call is started, a tele-
phone connection is set up to the general
emergency call center.
In vehicles where BMW Assist is enabled,
the phone system will also automatically
establish contact with the BMW Assist
emergency call center. If the current loca-
tion of your vehicle can be determined, this
is transferred to the BMW Assist emer-
gency call center.
The condition for starting an emergency
call or contacting Roadside Assistance:
>The car phone is logged on to a mobile
telephone network
>The emergency call system is operable.
Starting an emergency call*
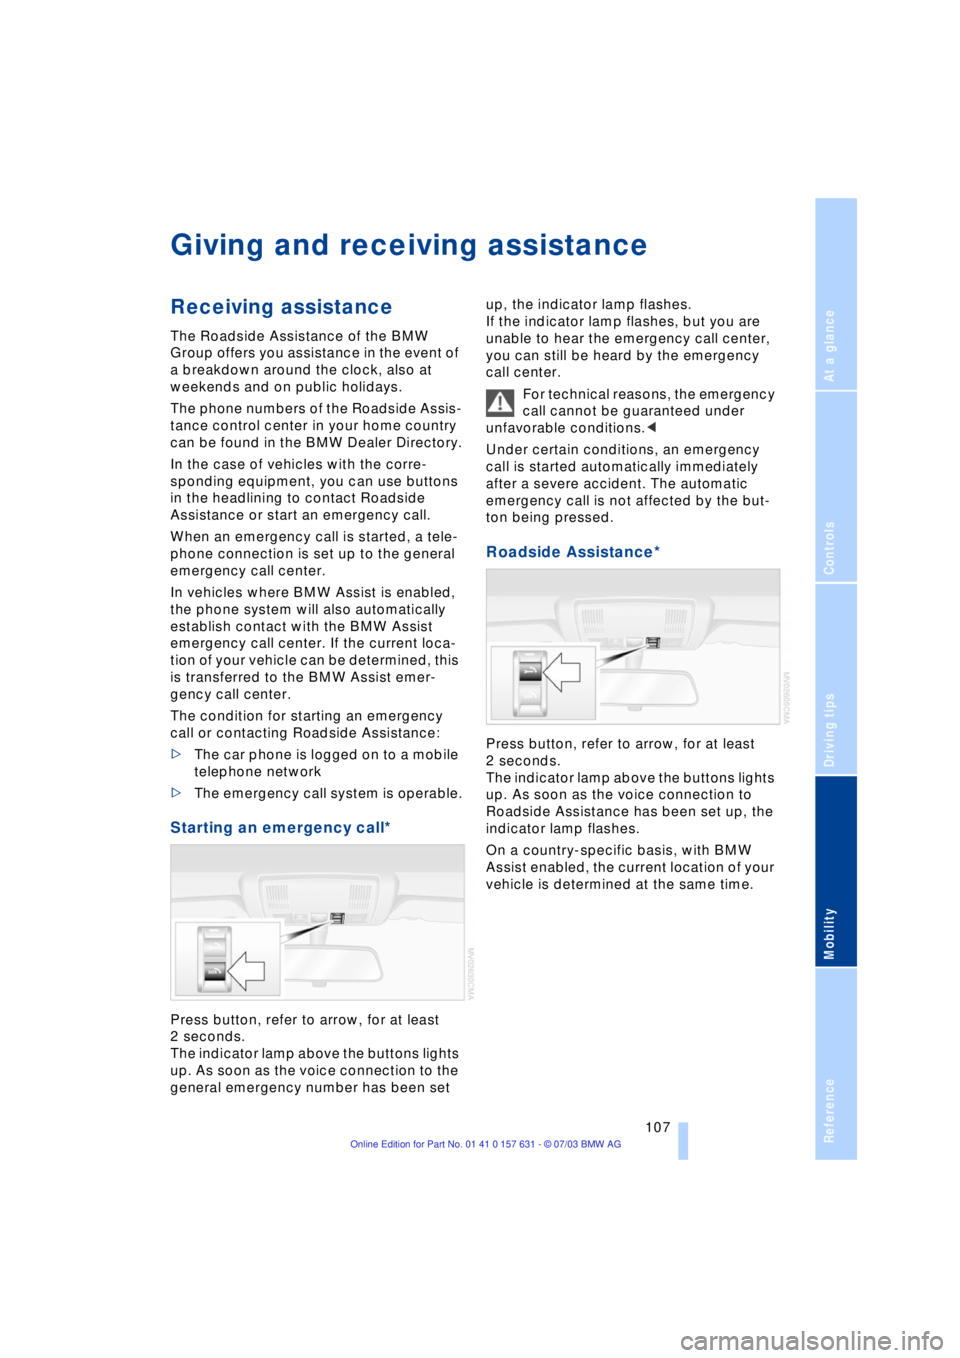
Press button, refer to arrow, for at least
2 seconds.
The indicator lamp above the buttons lights
up. As soon as the voice connection to the
general emergency number has been set up, the indicator lamp flashes.
If the indicator lamp flashes, but you are
unable to hear the emergency call center,
you can still be heard by the emergency
call center.
For technical reasons, the emergency
call cannot be guaranteed under
unfavorable conditions.<
Under certain conditions, an emergency
call is started automatically immediately
after a severe accident. The automatic
emergency call is not affected by the but-
ton being pressed.
Roadside Assistance*
Press button, refer to arrow, for at least
2 seconds.
The indicator lamp above the buttons lights
up. As soon as the voice connection to
Roadside Assistance has been set up, the
indicator lamp flashes.
On a country-specific basis, with BMW
Assist enabled, the current location of your
vehicle is determined at the same time.
Page 110 of 132
Giving and receiving assistance
108
Warning triangle*
To open the side trim panel: press the but-
ton.
Comply with legal requirements
requiring you to carry a hazard warn-
ing triangle in the vehicle.<
First-aid kit*
Beneath the front passenger's seat.
To open: pull the handle and fold the cover
downward.
To close: fold the cover up.
Some of the articles in the first-aid kit
may be used within a limited time
only. For this reason, check the expiration
dates of each of the items regularly, and
replace any whose expiration dates have
passed. You can find replacements in any
pharmacy.
Always observe all legal regulations
requiring a first-aid kit to be carried in the
vehicle.<
Jump-starting
When your battery is discharged you can
use two jumper cables to start your vehicle
with power from the battery in a second
vehicle. You can also use the same method
to help start another vehicle. Use only
jumper cables with fully-insulated clamp
handles.
To avoid the risk of potentially fatal
injury, always avoid all contact with
electrical components while the engine is
running. Carefully observe the following
instructions to avoid personal injury and/or
damage to one or both vehicles.<
Preparing
1.Check whether the battery of the other
vehicle has a voltage of 12 Volts and
approximately the same capacitance
in Ah. This information can be found on
the battery
2.Switch off the engine of the support
vehicle
3.Switch off any electrical systems and
components in both vehicles.
Ensure that no contact exists
between the bodywork on the two
vehicles, otherwise there is a danger of
short circuits.<
Connecting the jumper cables
To avoid personal injury from sparks,
always observe this sequence when
connecting jumper cables.<
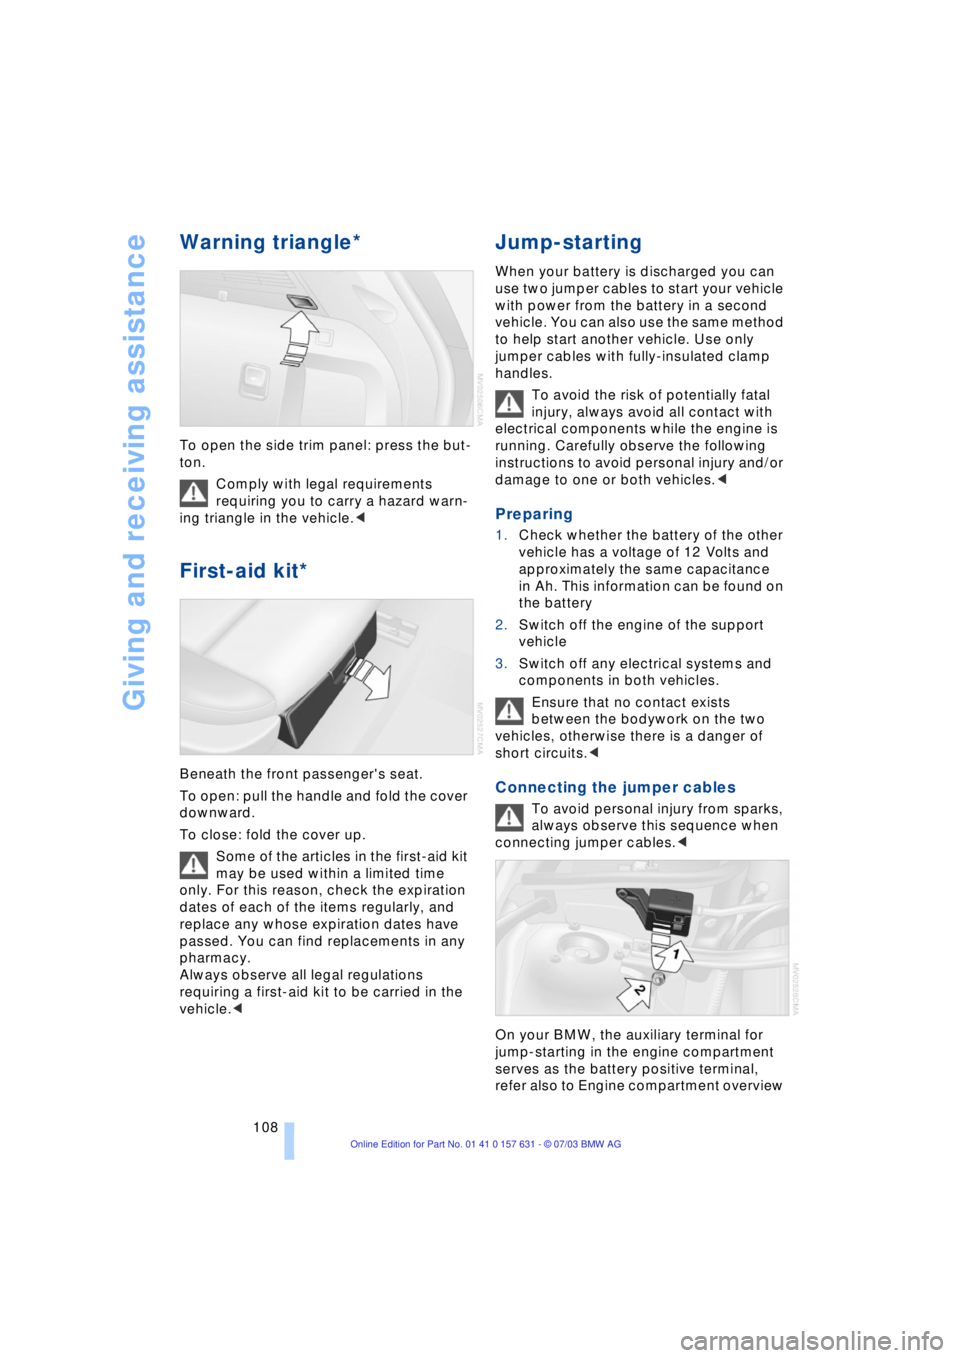
On your BMW, the auxiliary terminal for
jump-starting in the engine compartment
serves as the battery positive terminal,
refer also to Engine compartment overview