automatic transmission BMW X3 2012 User Guide
[x] Cancel search | Manufacturer: BMW, Model Year: 2012, Model line: X3, Model: BMW X3 2012Pages: 278, PDF Size: 10.15 MB
Page 102 of 278
False warnings
PDC may issue a warning under the following
conditions even though there is no obstacle
within the detection range:▷In heavy rain.▷When sensors are very dirty or covered in
ice.▷When sensors are covered in snow.▷On rough road surfaces.▷In large buildings with right angles and
smooth walls, e.g., in underground garages.▷In heavy exhaust.▷Due to other ultrasound sources, e.g.,
sweeping machines, high pressure steam
cleaners or neon lights.
Switching on automatically
Select transmission position R with the engine
running.
Switching off automatically
The system switches off and the LED goes out:
▷After approx. 160 ft/50 m when driving for‐
ward.▷Above approx. 22 mph/36 km/h when driv‐
ing forward.
Switch on the system again if necessary.
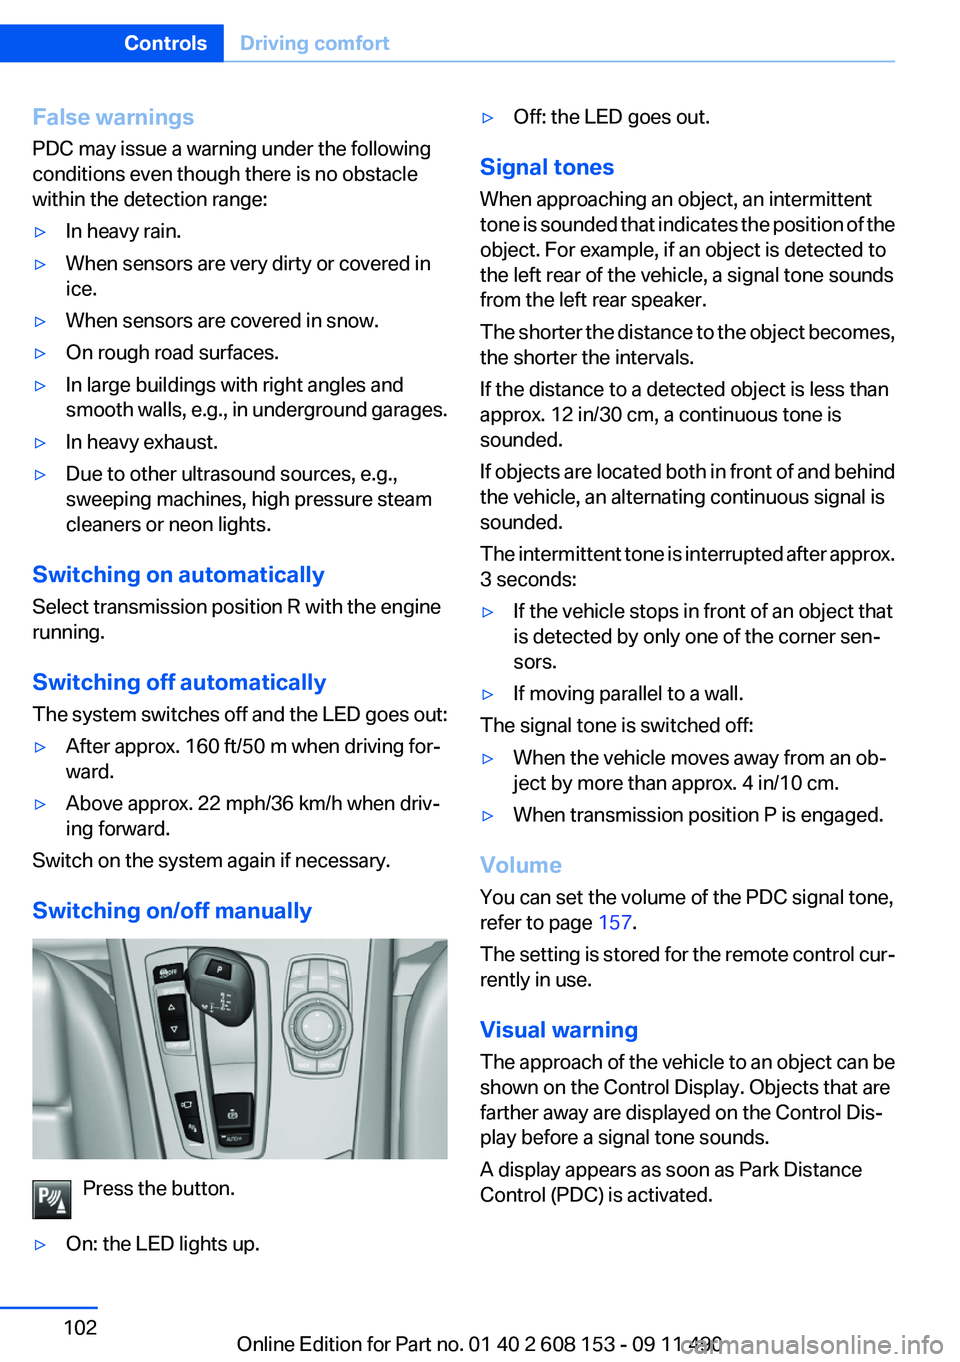
Switching on/off manually
Press the button.
▷On: the LED lights up.▷Off: the LED goes out.
Signal tones
When approaching an object, an intermittent
tone is sounded that indicates the position of the
object. For example, if an object is detected to
the left rear of the vehicle, a signal tone sounds
from the left rear speaker.
The shorter the distance to the object becomes,
the shorter the intervals.
If the distance to a detected object is less than
approx. 12 in/30 cm, a continuous tone is
sounded.
If objects are located both in front of and behind
the vehicle, an alternating continuous signal is
sounded.
The intermittent tone is interrupted after approx.
3 seconds:
▷If the vehicle stops in front of an object that
is detected by only one of the corner sen‐
sors.▷If moving parallel to a wall.
The signal tone is switched off:
▷When the vehicle moves away from an ob‐
ject by more than approx. 4 in/10 cm.▷When transmission position P is engaged.
Volume
You can set the volume of the PDC signal tone,
refer to page 157.
The setting is stored for the remote control cur‐
rently in use.
Visual warning
The approach of the vehicle to an object can be
shown on the Control Display. Objects that are
farther away are displayed on the Control Dis‐
play before a signal tone sounds.
A display appears as soon as Park Distance
Control (PDC) is activated.
Seite 102ControlsDriving comfort102
Online Edition for Part no. 01 40 2 608 153 - 09 11 490
Page 103 of 278
If the backup camera image was selected last, it
again appears on the display. To switch to PDC:1. "Rear view camera" Select the symbol
on the Control Display.2.Press the controller.
The setting is stored for the remote control cur‐
rently in use.
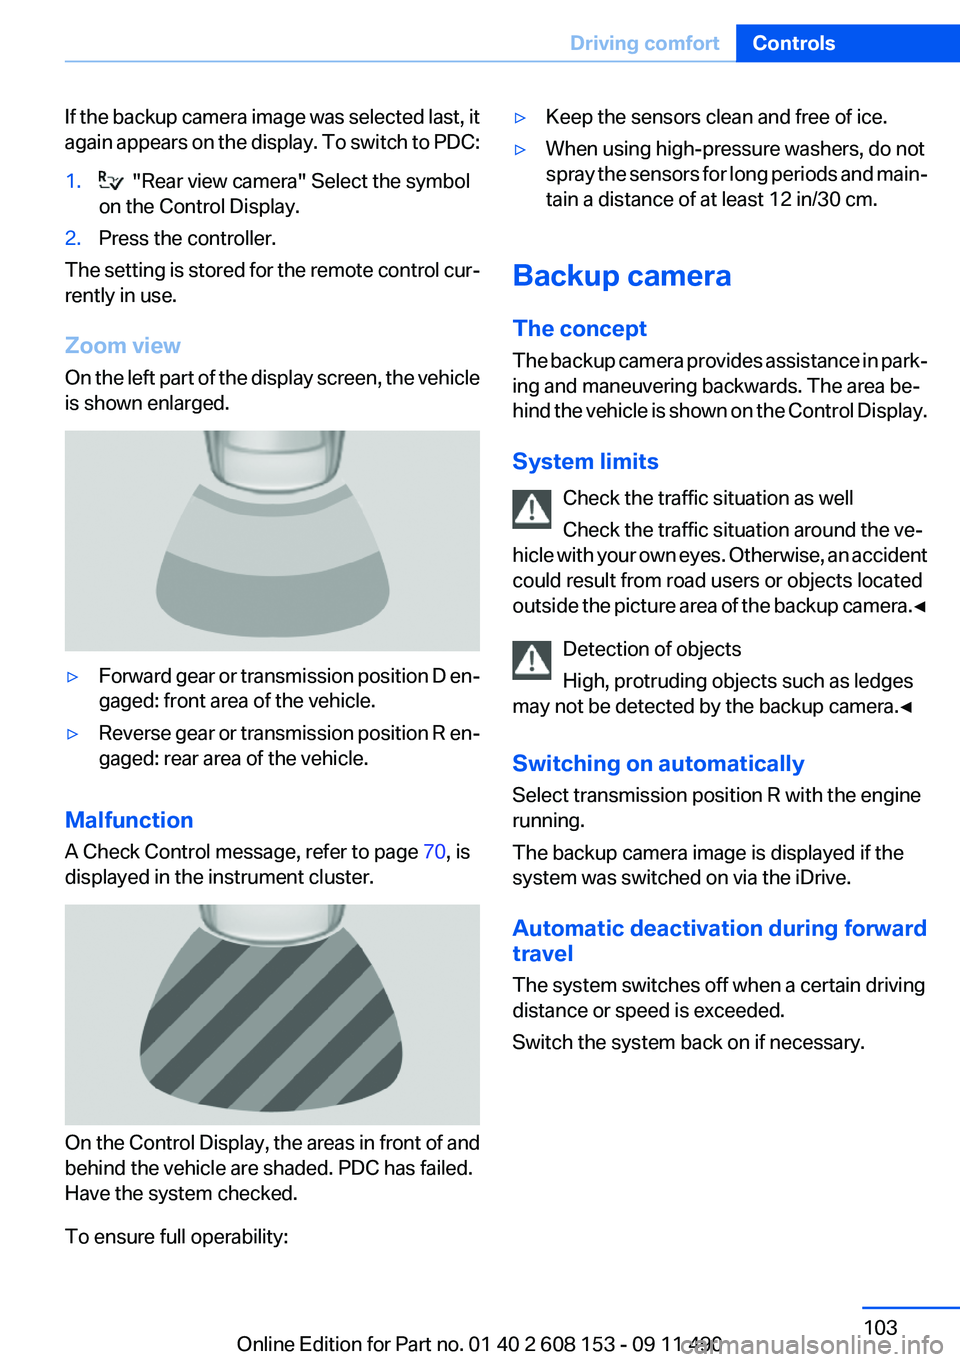
Zoom view
On the left part of the display screen, the vehicle
is shown enlarged.
▷Forward gear or transmission position D en‐
gaged: front area of the vehicle.▷Reverse gear or transmission position R en‐
gaged: rear area of the vehicle.
Malfunction
A Check Control message, refer to page 70, is
displayed in the instrument cluster.
On the Control Display, the areas in front of and
behind the vehicle are shaded. PDC has failed.
Have the system checked.
To ensure full operability:
▷Keep the sensors clean and free of ice.▷When using high-pressure washers, do not
spray the sensors for long periods and main‐
tain a distance of at least 12 in/30 cm.
Backup camera
The concept
The backup camera provides assistance in park‐
ing and maneuvering backwards. The area be‐
hind the vehicle is shown on the Control Display.
System limits Check the traffic situation as well
Check the traffic situation around the ve‐
hicle with your own eyes. Otherwise, an accident
could result from road users or objects located
outside the picture area of the backup camera. ◀
Detection of objects
High, protruding objects such as ledges
may not be detected by the backup camera.◀
Switching on automatically
Select transmission position R with the engine
running.
The backup camera image is displayed if the
system was switched on via the iDrive.
Automatic deactivation during forward
travel
The system switches off when a certain driving
distance or speed is exceeded.
Switch the system back on if necessary.
Seite 103Driving comfortControls103
Online Edition for Part no. 01 40 2 608 153 - 09 11 490
Page 106 of 278
Top View
The concept
Top View assists you in parking and maneuver‐
ing. The area around the doors and the road area
around the vehicle are shown on the Control
Display for this purpose.
Capturing the image
The image is captured by two cameras
integrated in the exterior mirrors and by the
backup camera.
The range is approx. 7 ft/2 m to the side and rear.
In this way, obstacles up to the height of the ex‐
terior mirrors are detected early.
System limits
Top View cannot be used in the following situa‐
tions:▷With a door open.▷With the tailgate open.▷With an exterior mirror folded in.▷In poor light.
A Check Control message is displayed in some
of these situations.
Check the traffic situation as well
Check the traffic situation around the ve‐
hicle with your own eyes. Otherwise, an accident
could result from road users or objects located
outside the picture area of the cameras.◀
Switching on automatically
Select transmission position R with the engine
running.
The Top View and PDC images are displayed if
the system is switched on via iDrive.
Automatic deactivation during forward
travel
The system switches off when a certain driving
distance or speed is exceeded.
Switch the system back on if necessary.
Switching on/off manually
Press the button.
▷On: the LED lights up.▷Off: the LED goes out.
If Top View is displayed, switch on the backup
camera via the iDrive, refer to page 107.
Visual warning
The approach of the vehicle to an object can be
shown on the Control Display.
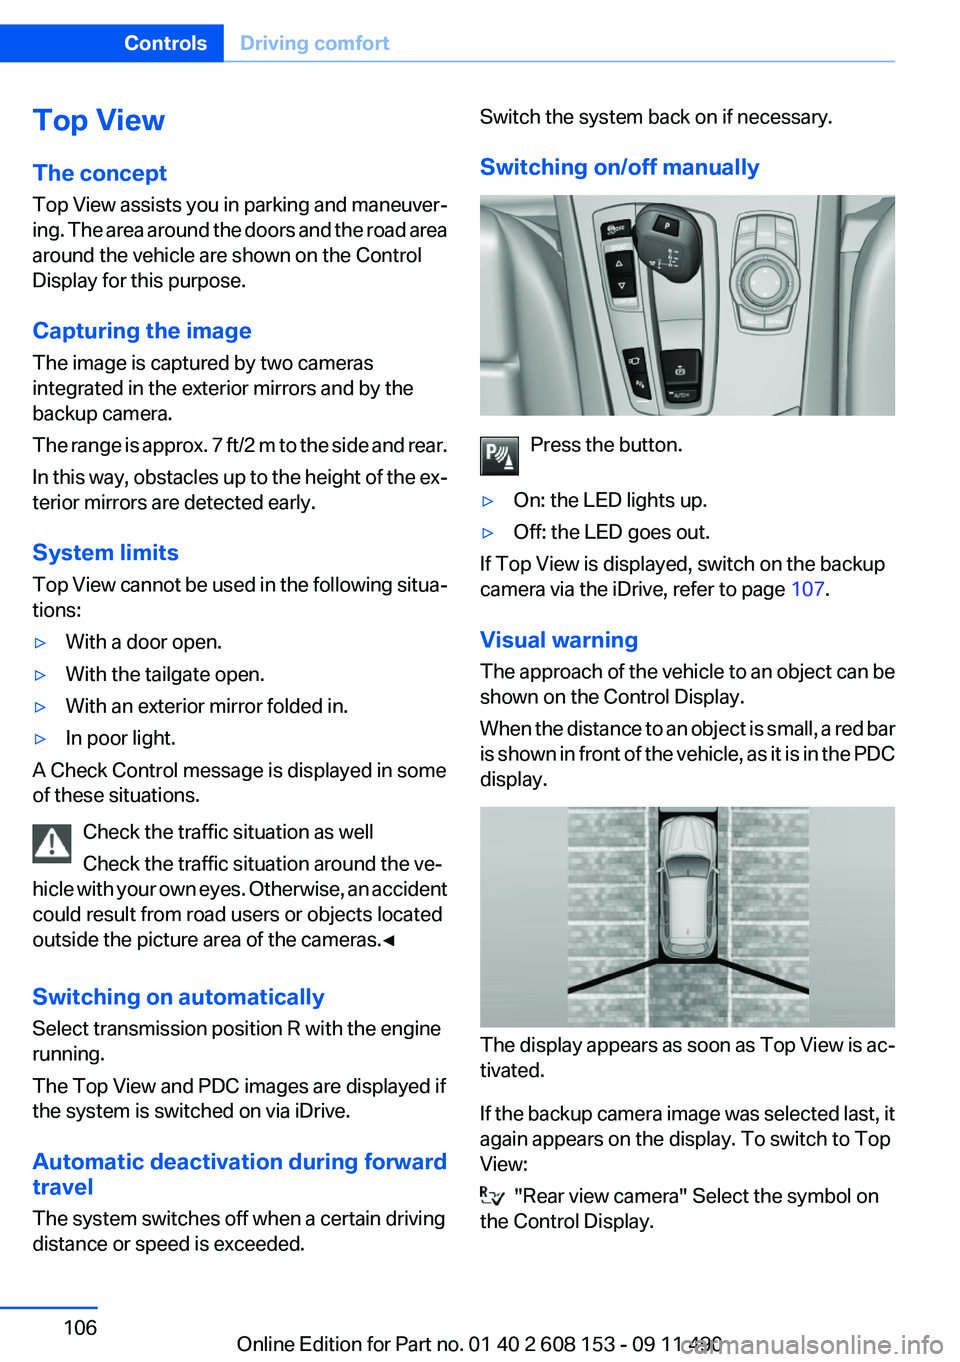
When the distance to an object is small, a red bar
is shown in front of the vehicle, as it is in the PDC
display.
The display appears as soon as Top View is ac‐
tivated.
If the backup camera image was selected last, it
again appears on the display. To switch to Top
View:
"Rear view camera" Select the symbol on
the Control Display.
Seite 106ControlsDriving comfort106
Online Edition for Part no. 01 40 2 608 153 - 09 11 490
Page 130 of 278
In this way braking efficiency will be available
when you need it.
Hills
Drive long or steep downhill gradients in the gear
in which the least braking is required. Otherwise,
the brake system may overheat, resulting in a
reduction in the brake system efficiency.
Manual transmission:
You can increase the engine's braking effect by
shifting down, going all the way to first gear, if
necessary.
Automatic transmission:
You can increase the engine's braking effect by
shifting down in the manual mode of the auto‐
matic transmission, refer to page 65.
Avoid load on the brakes
Avoid placing excessive load on the brake
system. Light but consistent brake pressure can
lead to high temperatures, brake wear and pos‐
sibly even brake failure.◀
Do not drive in neutral
Do not drive in neutral or with the engine
stopped, as doing so disables engine braking. In
addition, steering and brake assist is unavailable
with the engine stopped.◀
Brake disc corrosion
Corrosion on the brake discs and contamination
on the brake pads are furthered by:▷Low mileage.▷Extended periods when the vehicle is not
used at all.▷Infrequent use of the brakes.
Corrosion occurs when the minimum pressure
that must be exerted by the pads during brake
applications to clean the discs is not reached.
Should corrosion form on the brake discs, the
brakes will tend to respond with a pulsating ef‐
fect that generally cannot be corrected.
Condensation under the parked vehicle
When using the automatic climate control, con‐
densation water develops that exits underneath
the vehicle.
Therefore, traces of condensed water under the
vehicle are normal.
Roof-mounted luggage rack
Note
Installation only possible with roof rack.
Roof racks are available as special accessories.
Attachment to the rack
Follow the installation instructions of the roof
rack.
Mounting
Be sure that adequate clearance is maintained
for tilting and opening the glass sunroof.
Loading
Because roof racks raise the vehicle's center of
gravity when loaded, they have a major effect on
vehicle handling and steering response.
Therefore, note the following when loading and
driving:▷Do not exceed the approved roof/axle loads
and the approved gross vehicle weight.▷Distribute the roof load uniformly.▷The roof load should not be too large in area.▷Always place the heaviest pieces on the bot‐
tom.▷Secure the roof luggage firmly, e.g., tie with
ratchet straps.▷Do not let objects project into the opening
path of the tailgate.▷Drive smoothly. Avoid sudden acceleration
and braking maneuvers. Take corners gen‐
tly.Seite 130Driving tipsThings to remember when driving130
Online Edition for Part no. 01 40 2 608 153 - 09 11 490
Page 162 of 278
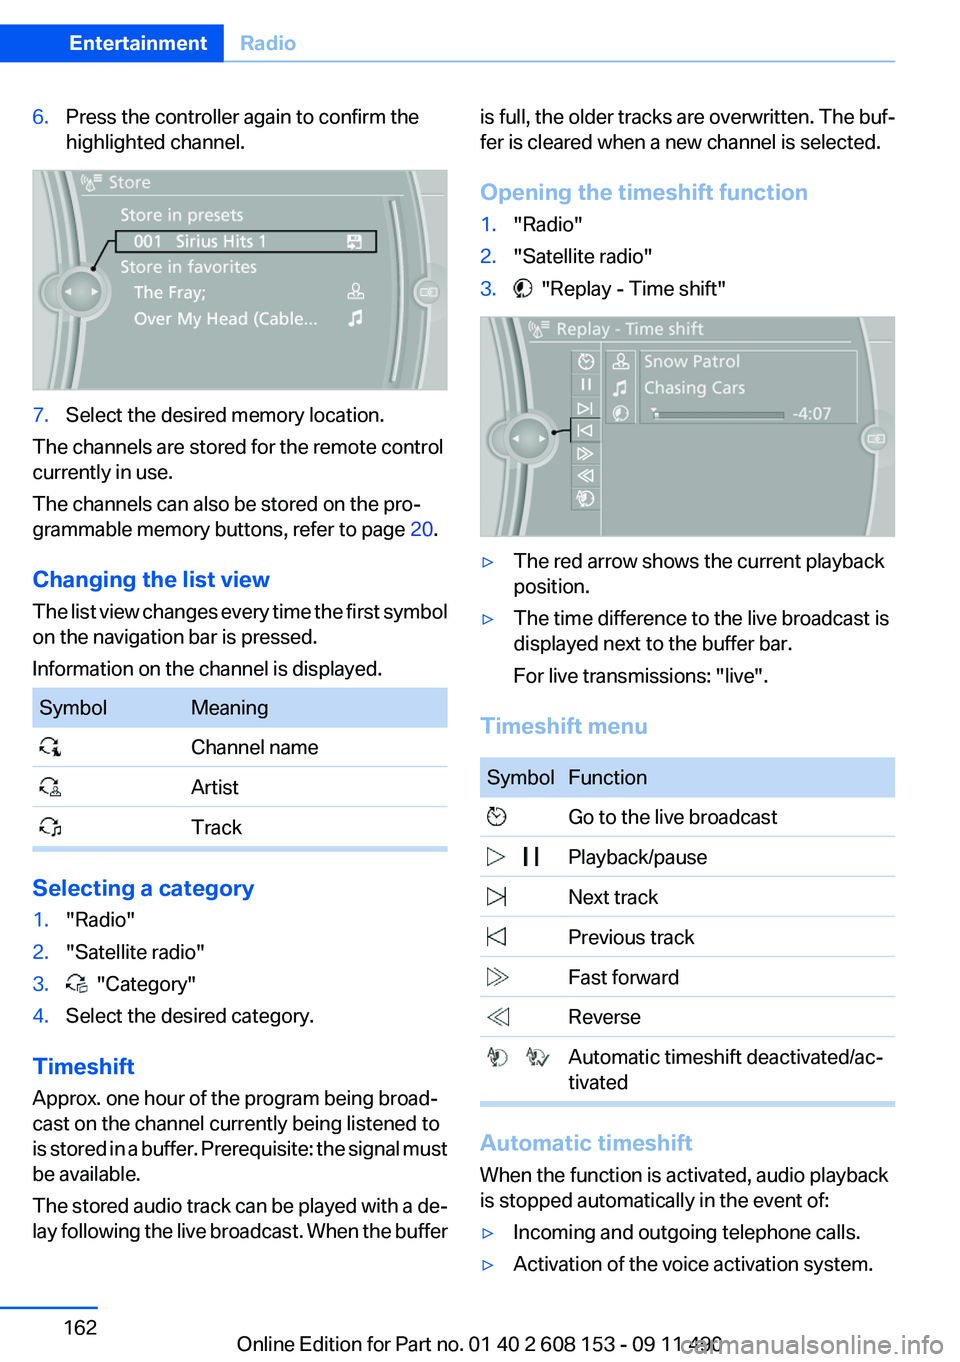
6.Press the controller again to confirm the
highlighted channel.7.Select the desired memory location.
The channels are stored for the remote control
currently in use.
The channels can also be stored on the pro‐
grammable memory buttons, refer to page 20.
Changing the list view
The list view changes every time the first symbol
on the navigation bar is pressed.
Information on the channel is displayed.
SymbolMeaning Channel name Artist Track
Selecting a category
1."Radio"2."Satellite radio"3. "Category"4.Select the desired category.
Timeshift
Approx. one hour of the program being broad‐
cast on the channel currently being listened to
is stored in a buffer. Prerequisite: the signal must
be available.
The stored audio track can be played with a de‐
lay following the live broadcast. When the buffer
is full, the older tracks are overwritten. The buf‐
fer is cleared when a new channel is selected.
Opening the timeshift function1."Radio"2."Satellite radio"3. "Replay - Time shift"▷The red arrow shows the current playback
position.▷The time difference to the live broadcast is
displayed next to the buffer bar.
For live transmissions: "live".
Timeshift menu
SymbolFunction Go to the live broadcast Playback/pause Next track Previous track Fast forward Reverse Automatic timeshift deactivated/ac‐
tivated
Automatic timeshift
When the function is activated, audio playback
is stopped automatically in the event of:
▷Incoming and outgoing telephone calls.▷Activation of the voice activation system.Seite 162EntertainmentRadio162
Online Edition for Part no. 01 40 2 608 153 - 09 11 490
Page 191 of 278
3.Highlight the mobile phone to be config‐
ured.4."Options" Open.5."Configure phone"6.At least one function must be selected.▷"Telephone"▷"Additional telephone"▷"Audio"7."OK"
If a function is assigned to a mobile phone, the
function will be deactivated where appropriate
for a mobile phone that is already connected and
the mobile phone will be unpaired.
Swapping the telephone and additional
telephone
The function of the telephone and additional tel‐
ephone can be swapped automatically.
1."Telephone"2."Bluetooth® (phone)"3."Swap phone/addit. phone"
Unpairing the mobile phone
1."Telephone"2."Bluetooth® (phone)"3.Highlight the mobile phone that is to be un‐
paired.4."Options" Open.5."Remove phone from list"
What to do if...
Information on suitable mobile phones, refer to
page 188.
The mobile phone could not be paired or con‐
nected.
▷Is Bluetooth activated in the vehicle and on
the mobile phone? Activate Bluetooth in the
vehicle and on the mobile phone.▷Do the Bluetooth passkeys on the mobile
phone and the vehicle match? Enter thesame passkey on the mobile phone and via
iDrive.▷Did it take longer than 30 seconds to enter
the passkey? Repeat the pairing procedure.▷Are too many Bluetooth devices connected
to the mobile phone or vehicle? Delete con‐
nections with other devices if necessary.▷Is the audio connection activated? Deacti‐
vate the audio connection.▷Is the mobile phone in power-save mode or
does it have only a limited remaining battery
life? Charge the mobile phone in the snap-
in adapter or via the charging cable.▷Depending on the mobile phone, it is possi‐
ble that only one cell phone can be con‐
nected to the vehicle. Unpair the connected
cell phone from the vehicle and pair and con‐
nect only one cell phone.
The mobile phone no longer reacts.
▷Switch the mobile phone off and on again.▷Ambient temperatures too high or too low?
Do not subject the mobile phone to extreme
ambient temperatures.
The telephone functions are not available.
▷Is the mobile phone paired as an additional
telephone and is the additional telephone
function deactivated? Activate the function.▷Is an outgoing call not possible? Connect
the mobile phone as a telephone.
No or not all phone book entries are displayed,
or they are incomplete.
▷Transmission of the phone book entries is
not yet complete.▷It is possible that only the phone book en‐
tries of the mobile phone or the SIM card are
transmitted.▷It may not be possible to display phone book
entries with special characters.▷The number of phone book entries being
stored is too high.▷Is the data volume of the contact too large,
e.g., due to stored information such asSeite 191Professional mobile phone preparation packageCommunication191
Online Edition for Part no. 01 40 2 608 153 - 09 11 490
Page 209 of 278
ConnectedDriveVehicle equipment
All standard, country-specific and optional
equipment that is offered in the model series is
described in this chapter. Therefore, equipment
is also described that is not available in a vehicle,
e. g., because of the selected optional equip‐
ment or country variant. This also applies for
safety-related functions and systems.
BMW Assist
General information
BMW Assist provides you with certain services,
e.g., transmission of the position data of your
vehicle to the BMW Assist Response Center if
an Emergency Request has been initiated.
Many BMW Assist services depend on the indi‐
vidually agreed upon contract.
After your contract has expired, the BMW Assist
system will be deactivated by the BMW Assist
Response Center without your having to visit a
service center. After the BMW Assist system
has been deactivated, no BMW Assist services
will be available. The BMW Assist system can be
reactivated by a service center after you sign a
new contract.
Requirements▷The installed BMW Assist system is logged
in to a wireless communications network.
This network must be capable of transmit‐
ting the services.▷To transmit position data, the vehicle must
be able to determine the current position.▷The BMW Assist service contract was
signed with your service center or with the
BMW Assist Response Center. Enabling
must have been completed.▷BMW Assist is activated.Services offered▷Emergency Request: when you press the
SOS button, a connection to the BMW As‐
sist Response Center is established. The
BMW Assist Response Center then speaks
with you and takes further steps to help you.▷Automatic Collision Notification: under cer‐
tain conditions, a connection is established
to the BMW Assist Response Center after a
serious accident. If possible, the BMW As‐
sist Response Center then speaks with you
and takes further steps to help you.▷Enhanced Roadside Assistance: BMW
Roadside Assistance can be contacted if as‐
sistance is needed in the event of a break‐
down. If possible, the vehicle and position
data are transmitted in the process.▷Customer Relations: connection with Cus‐
tomer Relations for information on all as‐
pects of your vehicle.▷TeleService: data on your vehicle's service
status or required inspections are transmit‐
ted to your service center, either automati‐
cally before a service due date or when you
request a BMW service appointment.▷Remote Door Unlock: the BMW Assist Re‐
sponse Center provides assistance if, for ex‐
ample, the remote control is not available
and the vehicle needs to be opened.▷Stolen Vehicle Recovery: after you report
that your vehicle was stolen to the police, the
BMW Assist Response Center can deter‐
mine its position.▷In addition to these services, the optional
Convenience Plan offers Concierge service
and information for route planning, traffic,
and weather. A limited number of calls can
be made via the BMW Assist Response
Center with Critical Calling if, for example,
the mobile phone is not available or dis‐
charged.Seite 209ConnectedDriveCommunication209
Online Edition for Part no. 01 40 2 608 153 - 09 11 490
Page 211 of 278
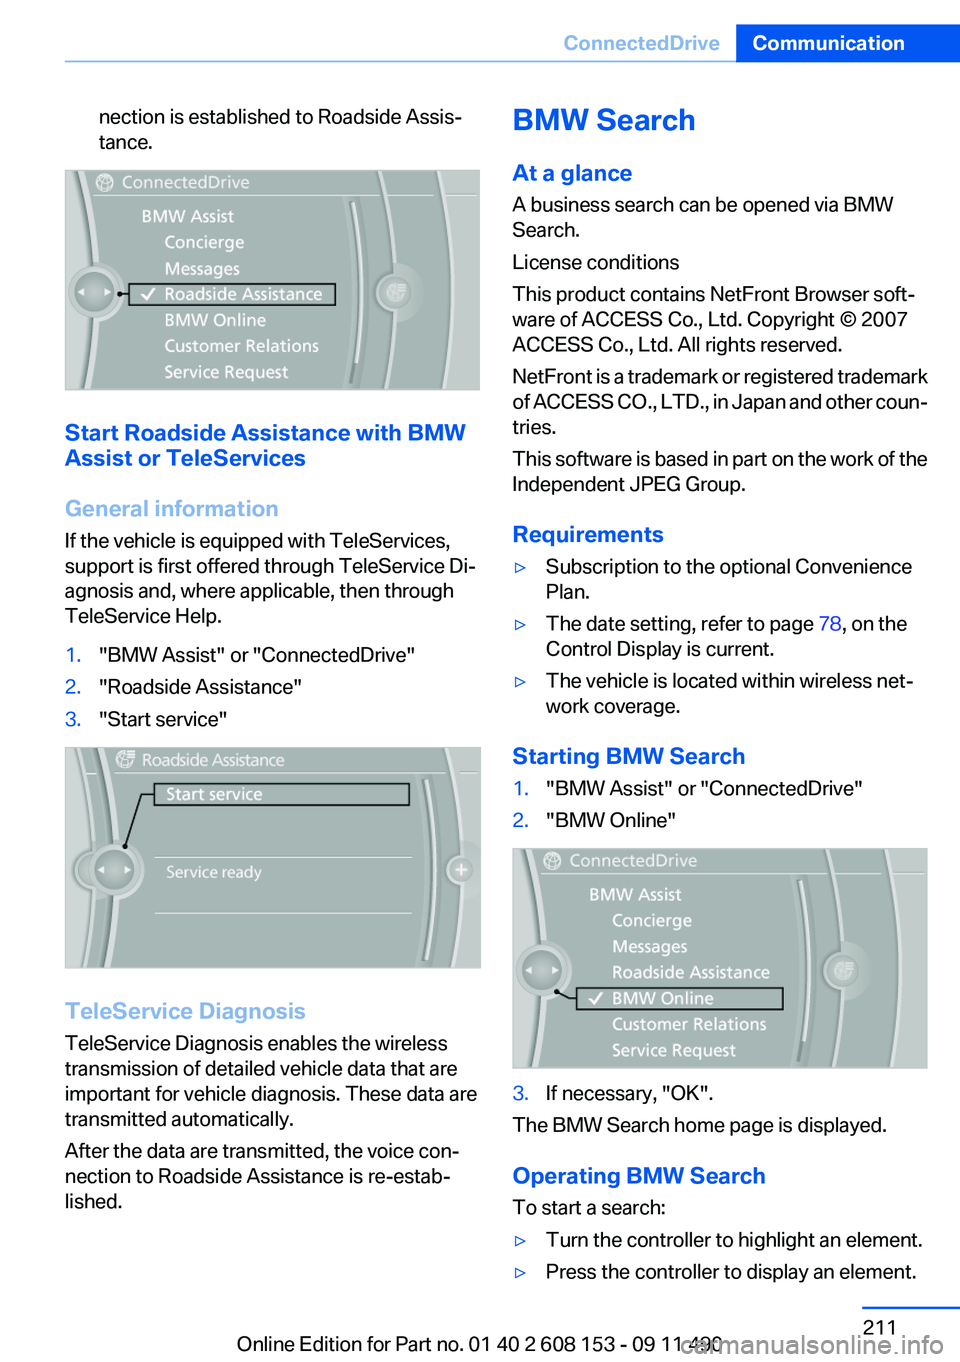
nection is established to Roadside Assis‐
tance.
Start Roadside Assistance with BMW
Assist or TeleServices
General information
If the vehicle is equipped with TeleServices,
support is first offered through TeleService Di‐
agnosis and, where applicable, then through
TeleService Help.
1."BMW Assist" or "ConnectedDrive"2."Roadside Assistance"3."Start service"
TeleService Diagnosis
TeleService Diagnosis enables the wireless
transmission of detailed vehicle data that are
important for vehicle diagnosis. These data are
transmitted automatically.
After the data are transmitted, the voice con‐
nection to Roadside Assistance is re-estab‐
lished.
BMW Search
At a glance
A business search can be opened via BMW
Search.
License conditions
This product contains NetFront Browser soft‐
ware of ACCESS Co., Ltd. Copyright © 2007
ACCESS Co., Ltd. All rights reserved.
NetFront is a trademark or registered trademark
of ACCESS CO., LTD., in Japan and other coun‐
tries.
This software is based in part on the work of the
Independent JPEG Group.
Requirements▷Subscription to the optional Convenience
Plan.▷The date setting, refer to page 78, on the
Control Display is current.▷The vehicle is located within wireless net‐
work coverage.
Starting BMW Search
1."BMW Assist" or "ConnectedDrive"2."BMW Online"3.If necessary, "OK".
The BMW Search home page is displayed.
Operating BMW Search
To start a search:
▷Turn the controller to highlight an element.▷Press the controller to display an element.Seite 211ConnectedDriveCommunication211
Online Edition for Part no. 01 40 2 608 153 - 09 11 490
Page 246 of 278
attempt in order to allow the discharged bat‐
tery to recharge.3.Let both engines run for several minutes.4.Disconnect the jumper cables in the reverse
order.
Check the battery and recharge if necessary.
Tow-starting and towing
Automatic transmission: transporting
your vehicle
Note
Your vehicle is not permitted to be towed.
Therefore, contact a service center in the event
of a breakdown.
Do not have the vehicle towed
Have your vehicle transported on a loading
platform only; otherwise, damage may occur.◀
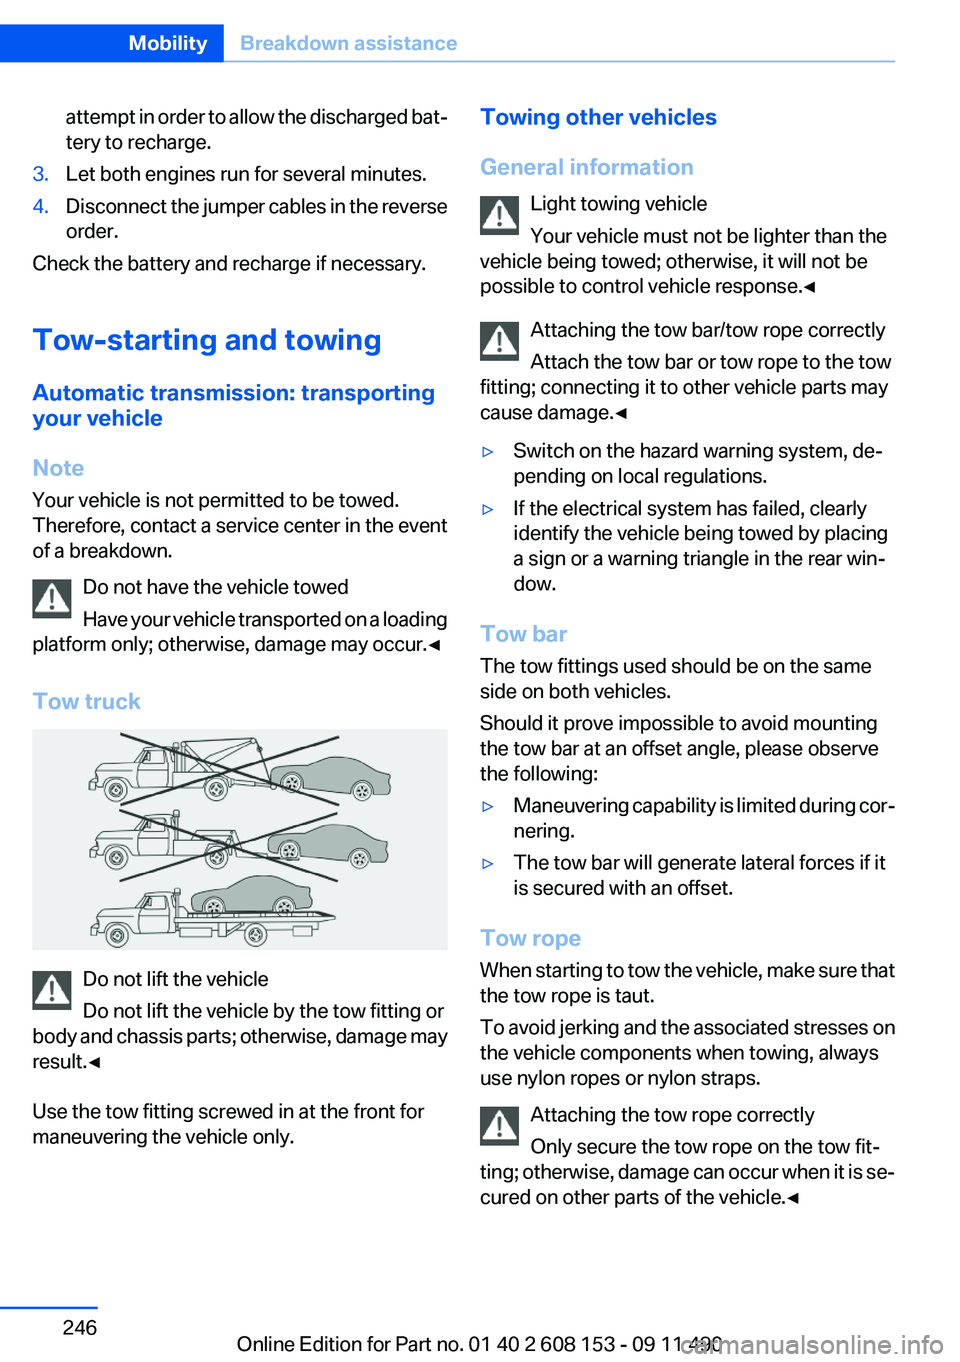
Tow truck
Do not lift the vehicle
Do not lift the vehicle by the tow fitting or
body and chassis parts; otherwise, damage may
result.◀
Use the tow fitting screwed in at the front for
maneuvering the vehicle only.
Towing other vehicles
General information Light towing vehicle
Your vehicle must not be lighter than the
vehicle being towed; otherwise, it will not be
possible to control vehicle response.◀
Attaching the tow bar/tow rope correctly
Attach the tow bar or tow rope to the tow
fitting; connecting it to other vehicle parts may
cause damage.◀▷Switch on the hazard warning system, de‐
pending on local regulations.▷If the electrical system has failed, clearly
identify the vehicle being towed by placing
a sign or a warning triangle in the rear win‐
dow.
Tow bar
The tow fittings used should be on the same
side on both vehicles.
Should it prove impossible to avoid mounting
the tow bar at an offset angle, please observe
the following:
▷Maneuvering capability is limited during cor‐
nering.▷The tow bar will generate lateral forces if it
is secured with an offset.
Tow rope
When starting to tow the vehicle, make sure that
the tow rope is taut.
To avoid jerking and the associated stresses on
the vehicle components when towing, always
use nylon ropes or nylon straps.
Attaching the tow rope correctly
Only secure the tow rope on the tow fit‐
ting; otherwise, damage can occur when it is se‐
cured on other parts of the vehicle.◀
Seite 246MobilityBreakdown assistance246
Online Edition for Part no. 01 40 2 608 153 - 09 11 490
Page 247 of 278
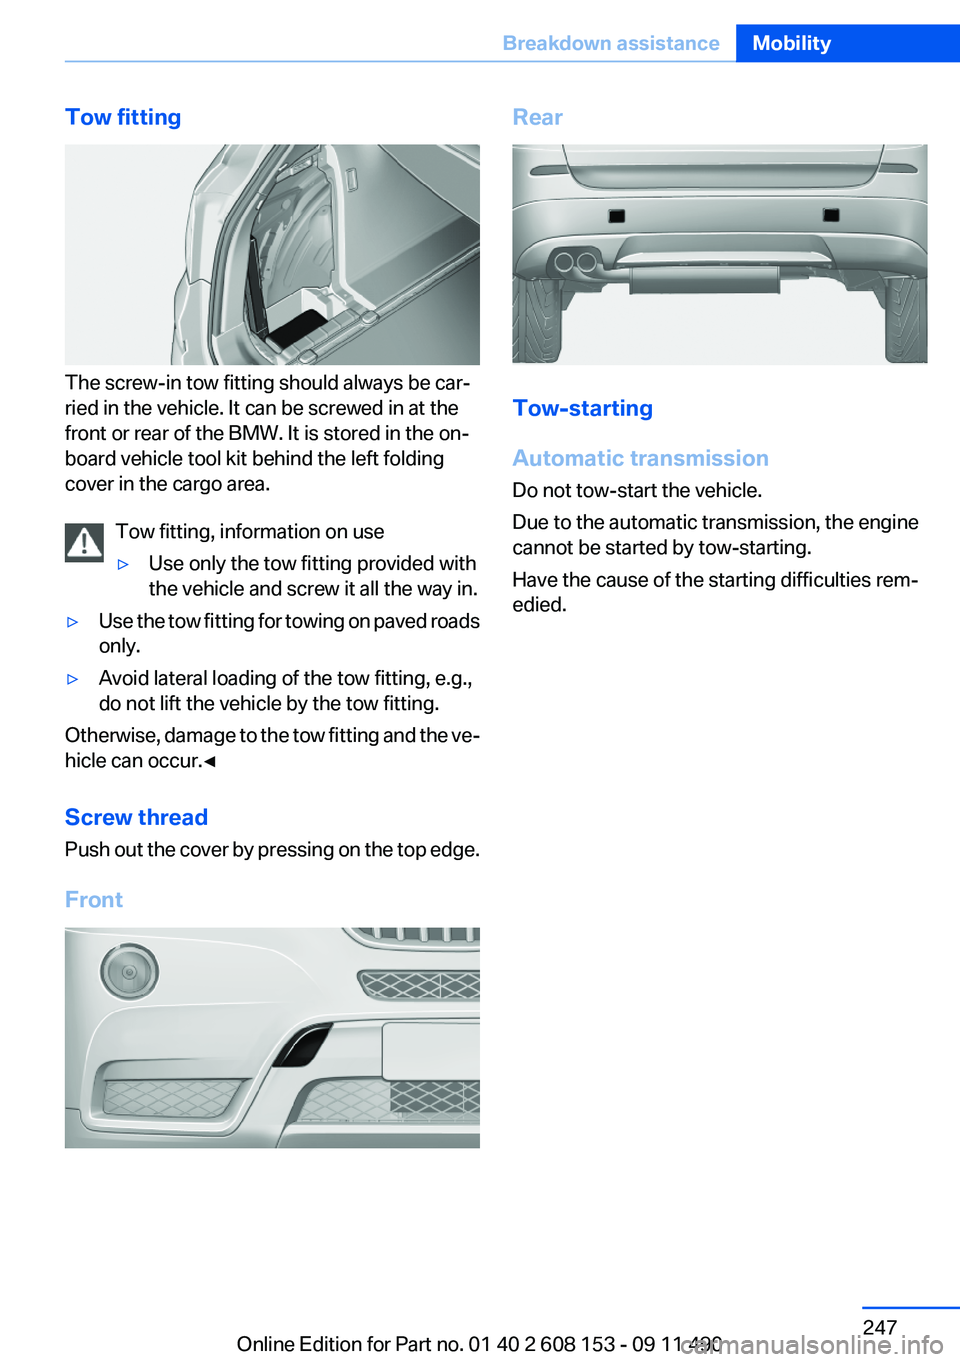
Tow fitting
The screw-in tow fitting should always be car‐
ried in the vehicle. It can be screwed in at the
front or rear of the BMW. It is stored in the on‐
board vehicle tool kit behind the left folding
cover in the cargo area.
Tow fitting, information on use
▷Use only the tow fitting provided with
the vehicle and screw it all the way in.▷Use the tow fitting for towing on paved roads
only.▷Avoid lateral loading of the tow fitting, e.g.,
do not lift the vehicle by the tow fitting.
Otherwise, damage to the tow fitting and the ve‐
hicle can occur.◀
Screw thread
Push out the cover by pressing on the top edge.
Front
Rear
Tow-starting
Automatic transmission
Do not tow-start the vehicle.
Due to the automatic transmission, the engine
cannot be started by tow-starting.
Have the cause of the starting difficulties rem‐
edied.
Seite 247Breakdown assistanceMobility247
Online Edition for Part no. 01 40 2 608 153 - 09 11 490