belt BMW X3 2012 User Guide
[x] Cancel search | Manufacturer: BMW, Model Year: 2012, Model line: X3, Model: BMW X3 2012Pages: 278, PDF Size: 10.15 MB
Page 85 of 278
SafetyVehicle equipment
All standard, country-specific and optional
equipment that is offered in the model series is
described in this chapter. Therefore, equipmentis also described that is not available in a vehicle,
e. g., because of the selected optional equip‐
ment or country variant. This also applies for
safety-related functions and systems.
Airbags
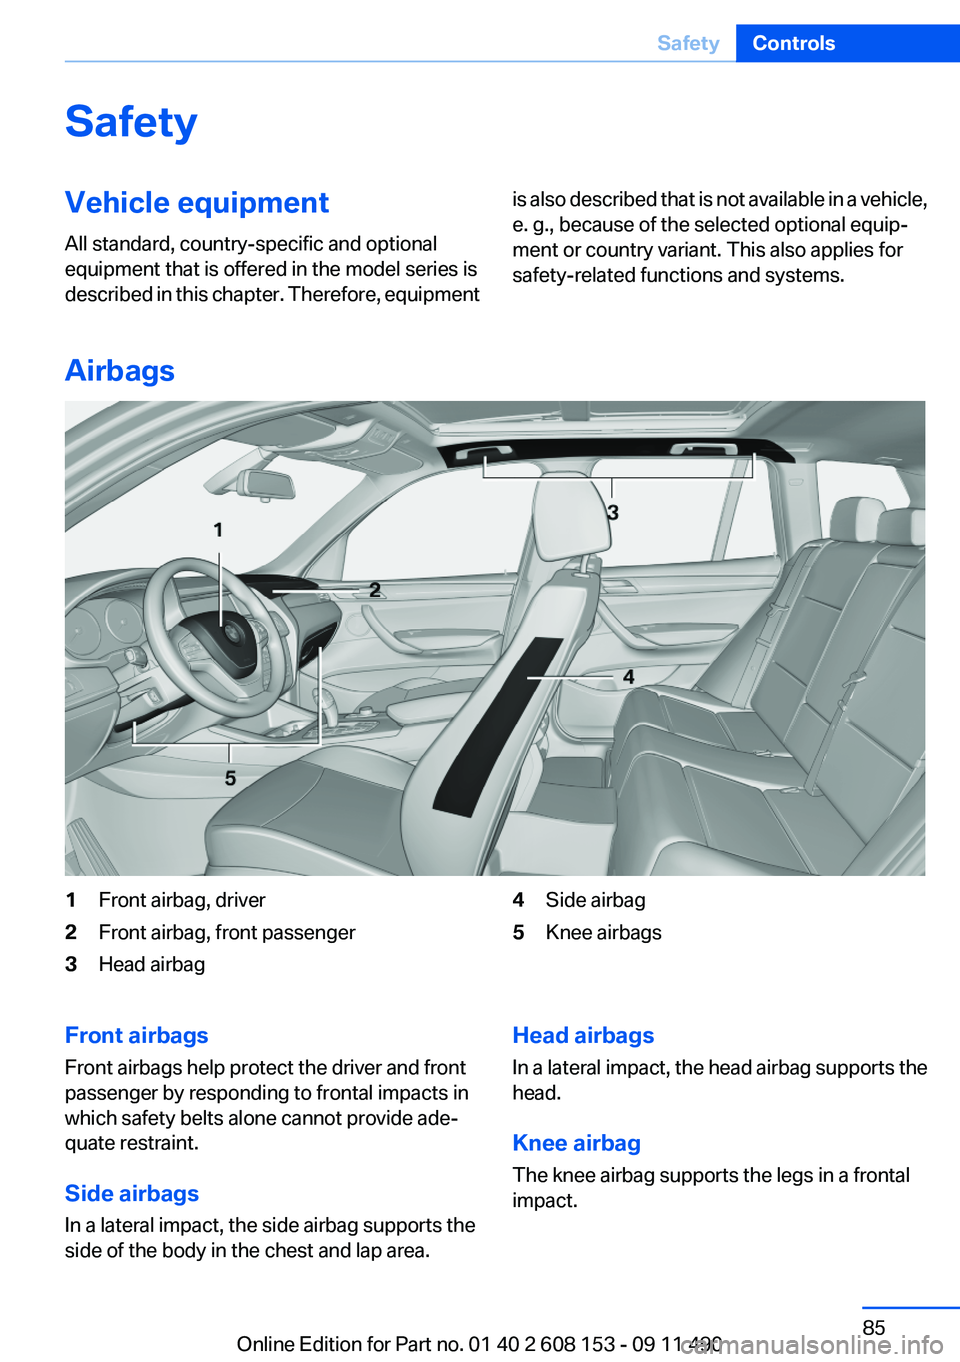
1Front airbag, driver2Front airbag, front passenger3Head airbag4Side airbag5Knee airbagsFront airbags
Front airbags help protect the driver and front
passenger by responding to frontal impacts in
which safety belts alone cannot provide ade‐
quate restraint.
Side airbags
In a lateral impact, the side airbag supports the
side of the body in the chest and lap area.Head airbags
In a lateral impact, the head airbag supports the
head.
Knee airbag
The knee airbag supports the legs in a frontal
impact.Seite 85SafetyControls85
Online Edition for Part no. 01 40 2 608 153 - 09 11 490
Page 86 of 278
Protective action
Airbags are not triggered in every impact situa‐
tion, e.g., in less severe accidents or rear-end
collisions.
Information on how to ensure the optimal
protective effect of the airbags▷Keep at a distance from the airbags.▷Always grasp the steering wheel on the
steering wheel rim, holding your hands at
the 3 o'clock and 9 o'clock positions, to keep
the danger of injury to your hands or arms as
low as possible if the airbag is triggered.▷There should be no people, animals, or ob‐
jects between an airbag and a person.▷Do not use the cover of the front airbag on
the front passenger side as a storage area.▷Keep the dashboard and window on the
front passenger side clear, i.e., do not cover
with adhesive labels or coverings, and do not
attach holders such as for navigation instru‐
ments and mobile phones.▷Make sure that the front passenger is sitting
correctly, i.e., keeps his or her feet and legs
in the footwell; otherwise, leg injuries can
occur if the front airbag is triggered.▷Do not place slip covers, seat cushions or
other objects on the front passenger seat
that are not approved specifically for seats
with integrated side airbags.▷Do not hang pieces of clothing, such as jack‐
ets, over the backrests.▷Make sure that occupants keep their heads
away from the side airbag and do not rest
against the head airbag; otherwise, injuries
can occur if the airbags are triggered.▷Do not remove the airbag restraint system.▷Do not remove the steering wheel.▷Do not apply adhesive materials to the air‐
bag cover panels, cover them or modify
them in any way.▷Never modify either the individual compo‐
nents or the wiring in the airbag system. This
also applies to steering wheel covers, the
dashboard, the seats, the roof pillars and the
sides of the headliner.◀
Even when all instructions are followed closely,
injury from contact with the airbags cannot be
ruled out in certain situations.
The ignition and inflation noise may lead to
short-term and, in most cases, temporary hear‐
ing impairment in sensitive individuals.
In the case of a malfunction, deactivation
and after triggering of the airbags
Do not touch the individual components imme‐
diately after the system has been triggered; oth‐
erwise, there is the danger of burns.
Only have the airbags checked, repaired or dis‐
mantled and the airbag generator scrapped by
your service center or a workshop that has the
necessary authorization for handling explosives.
Non-professional attempts to service the sys‐
tem could lead to failure in an emergency or un‐
desired triggering of the airbag, either of which
could result in injury.◀
Warnings and information on the airbags are
also found on the sun visors.
Functional readiness of the airbag
system
When the ignition is switch on, the warn‐
ing lamp in the instrument cluster lights
up briefly and thereby indicates the op‐
erational readiness of the entire airbag system
and the belt tensioner.
Airbag system malfunctioning
▷Warning lamp does not come on when the
ignition is turned on.▷The warning lamp lights up continuously.Seite 86ControlsSafety86
Online Edition for Part no. 01 40 2 608 153 - 09 11 490
Page 120 of 278
folded down. Otherwise, injury or damage may
result.◀
Locking the backrest
Before carrying persons in the rear, en‐
gage and thereby lock the backrests, or the re‐
straining effect of the safety belts during an ac‐
cident may be limited.◀
Ensure that the lock is securely engaged
When folding back the backrest, be sure
that it locks in place securely. The red warning
field in the control display disappears. If it is not
properly engaged, transported cargo could en‐
ter the passenger compartment during braking
or evasive maneuvers and endanger the vehicle
occupants.◀
Using the middle safety belt
If the middle safety belt in the rear is used,
the larger section of the backrest must be
locked. Otherwise, the safety belt will not have
a restraining effect.◀
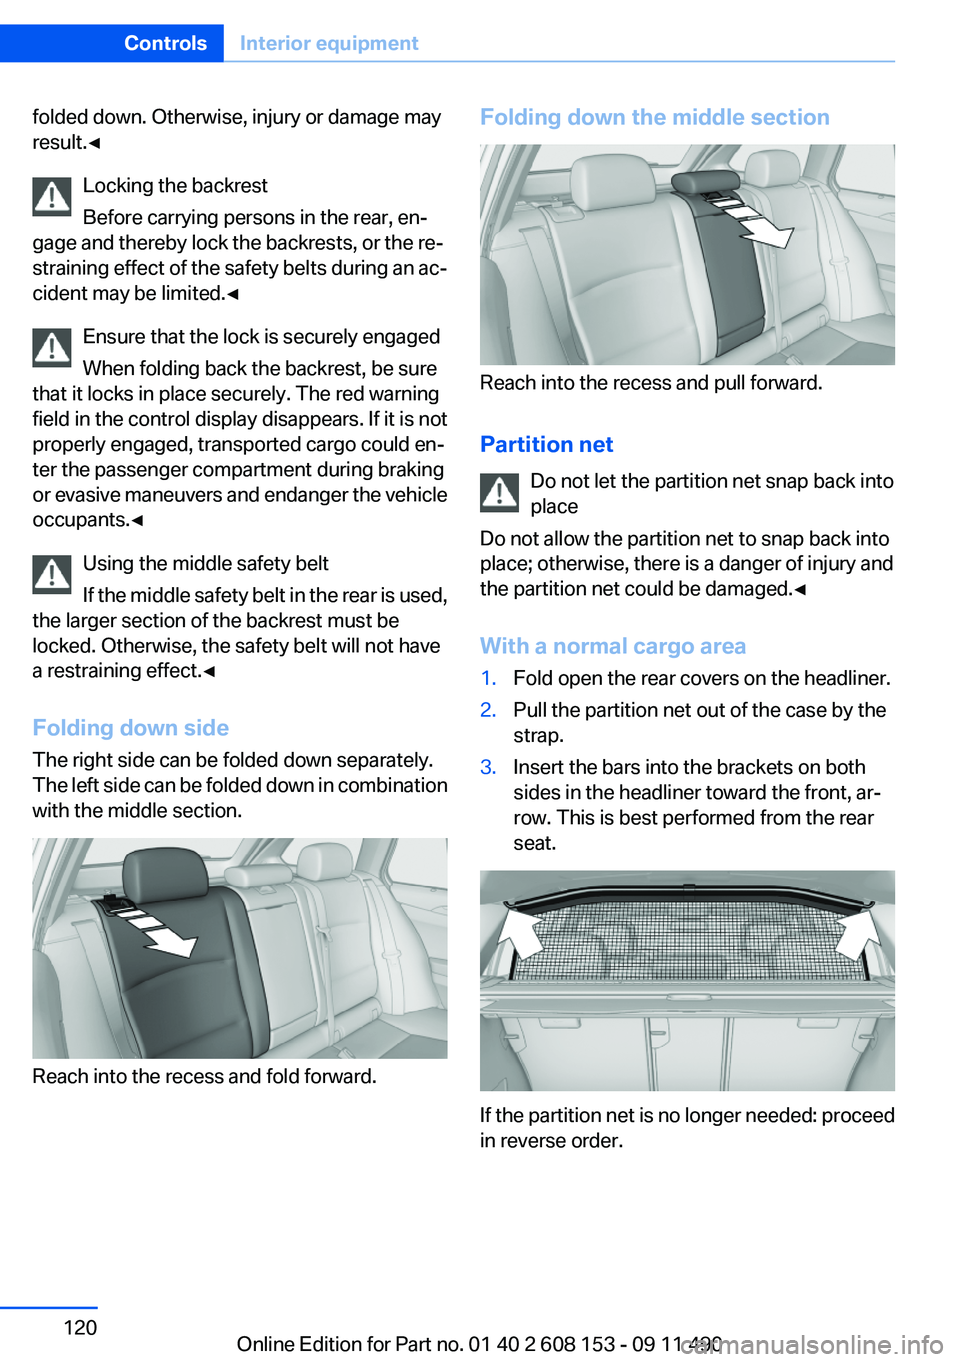
Folding down side
The right side can be folded down separately.
The left side can be folded down in combination
with the middle section.
Reach into the recess and fold forward.
Folding down the middle section
Reach into the recess and pull forward.
Partition net Do not let the partition net snap back into
place
Do not allow the partition net to snap back into
place; otherwise, there is a danger of injury and
the partition net could be damaged.◀
With a normal cargo area
1.Fold open the rear covers on the headliner.2.Pull the partition net out of the case by the
strap.3.Insert the bars into the brackets on both
sides in the headliner toward the front, ar‐
row. This is best performed from the rear
seat.
If the partition net is no longer needed: proceed
in reverse order.
Seite 120ControlsInterior equipment120
Online Edition for Part no. 01 40 2 608 153 - 09 11 490
Page 132 of 278
Stowing cargo▷Very heavy cargo: when the rear seat is not
occupied, secure each of the outer safety
belts in the opposite buckle.▷Cover sharp edges and corners.▷Do not stack cargo above the top edge of the
backrests.▷Heavy cargo: stow as far forward and as low
as possible, ideally directly behind the rear
seat.▷If necessary, fold down the rear backrests to
stow cargo.▷Use the partition net, refer to page 120, to
protect passengers. Make sure that objects
cannot penetrate the partition net.▷Place protective material around any sharp-
edged or pointed objects that could bump
against the rear window while the vehicle is
in motion.Securing cargo
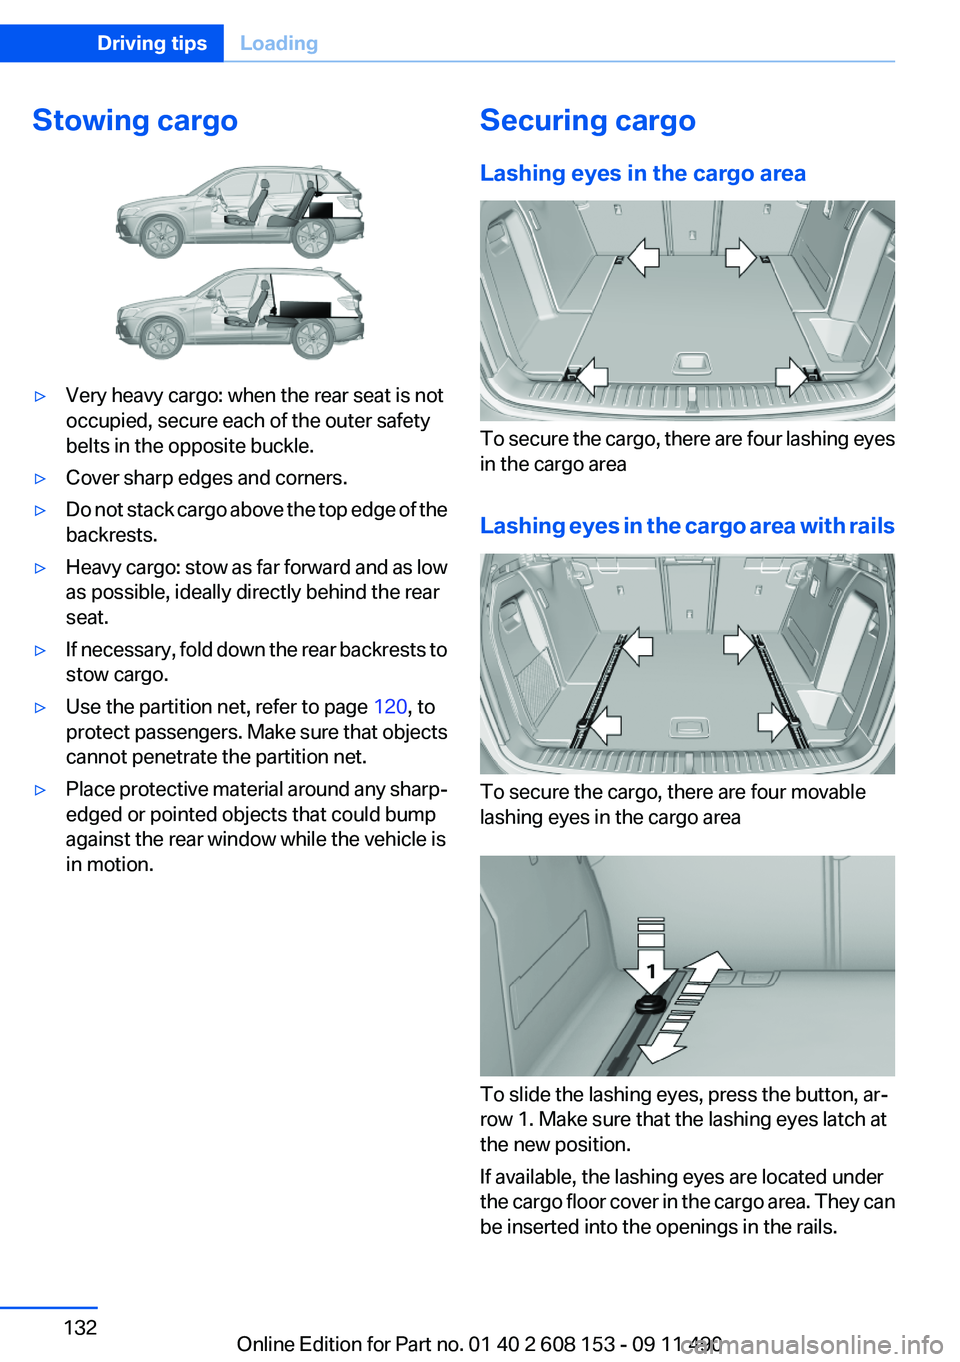
Lashing eyes in the cargo area
To secure the cargo, there are four lashing eyes
in the cargo area
Lashing eyes in the cargo area with rails
To secure the cargo, there are four movable
lashing eyes in the cargo area
To slide the lashing eyes, press the button, ar‐
row 1. Make sure that the lashing eyes latch at
the new position.
If available, the lashing eyes are located under
the cargo floor cover in the cargo area. They can
be inserted into the openings in the rails.
Seite 132Driving tipsLoading132
Online Edition for Part no. 01 40 2 608 153 - 09 11 490
Page 157 of 278
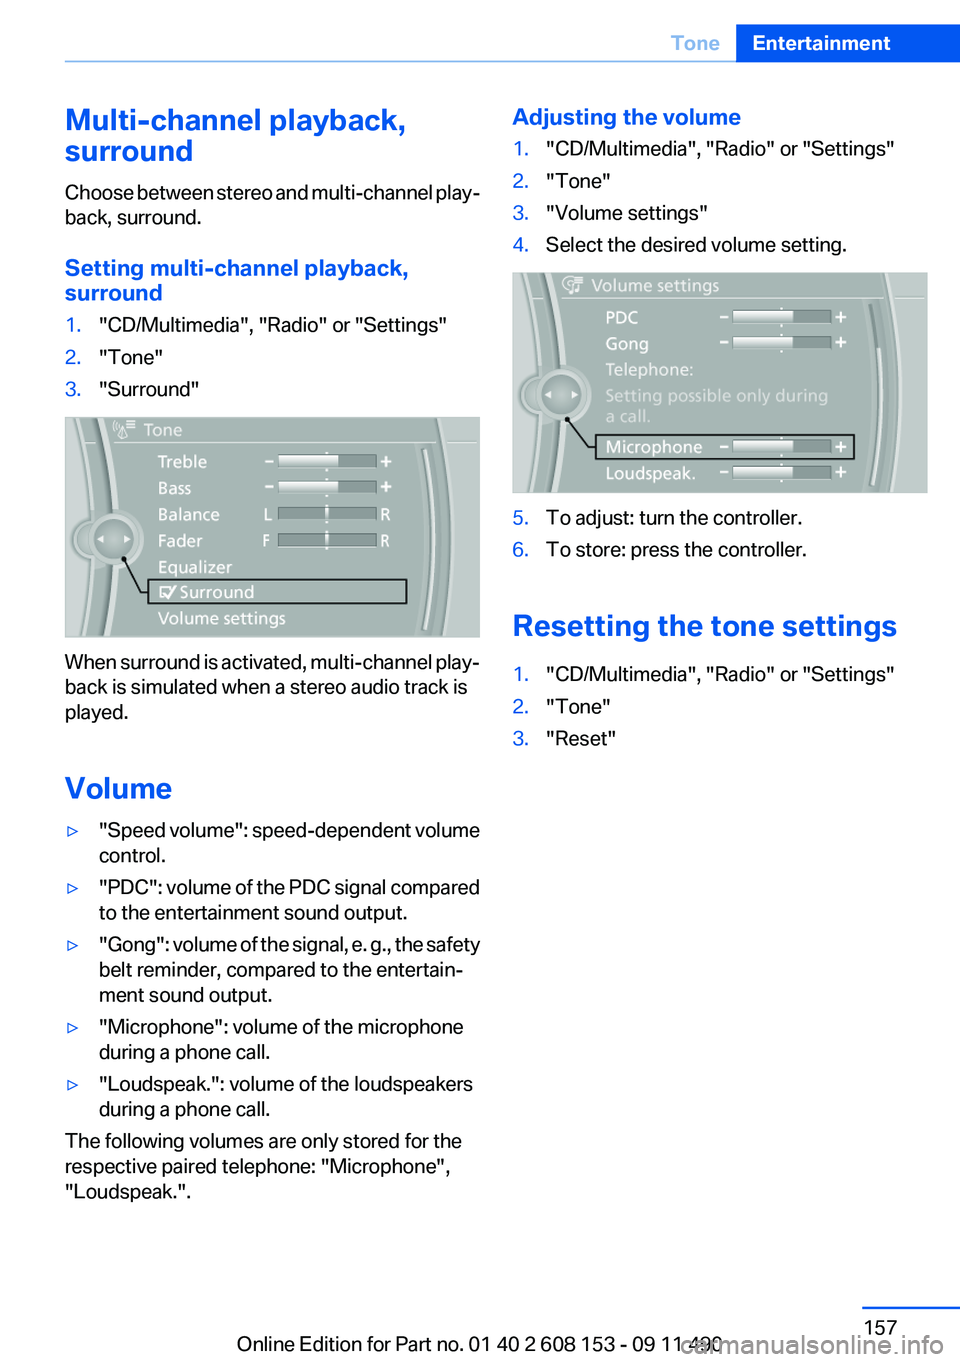
Multi-channel playback,
surround
Choose between stereo and multi-channel play‐
back, surround.
Setting multi-channel playback,
surround1."CD/Multimedia", "Radio" or "Settings"2."Tone"3."Surround"
When surround is activated, multi-channel play‐
back is simulated when a stereo audio track is
played.
Volume
▷" Speed volume": speed-dependent volume
control.▷"PDC" : volume of the PDC signal compared
to the entertainment sound output.▷"Gong" : volume of the signal, e. g., the safety
belt reminder, compared to the entertain‐
ment sound output.▷"Microphone": volume of the microphone
during a phone call.▷"Loudspeak.": volume of the loudspeakers
during a phone call.
The following volumes are only stored for the
respective paired telephone: "Microphone",
"Loudspeak.".
Adjusting the volume1."CD/Multimedia", "Radio" or "Settings"2."Tone"3."Volume settings"4.Select the desired volume setting.5.To adjust: turn the controller.6.To store: press the controller.
Resetting the tone settings
1."CD/Multimedia", "Radio" or "Settings"2."Tone"3."Reset"Seite 157ToneEntertainment157
Online Edition for Part no. 01 40 2 608 153 - 09 11 490
Page 250 of 278
Damage from Velcro® fasteners
Open Velcro® fasteners on pants or other
articles of clothing can damage the seat covers.
Ensure that any Velcro® fasteners are closed. ◀
Caring for special components
Light-alloy wheels
Use wheel cleaner, particularly during the winter
months. Do not use aggressive, acidic, strongly
alkaline or abrasive cleaners, or steam jets
above 140 ℉/60 ℃; follow the manufacturer's
instructions.
Chrome surfaces
Carefully clean components such as the radiator
grille or door handles with an ample supply of
water, possibly with shampoo added, particu‐
larly when they have been exposed to road salt.
Rubber components
Aside from water, treat only with rubber cleans‐
ers.
When cleaning rubber seals, do not use any sil‐
icon-containing car care products in order to
avoid damage or reduced noise damping.
Fine wood parts
Clean fine wood facing and fine wood compo‐
nents only with a moist rag. Then dry with a soft
cloth.
Plastic components
These include:▷Imitation leather surfaces.▷Headliner.▷Lamp lenses.▷Instrument cluster cover.▷Matte black spray-coated components.▷Painted parts in the interior.
Clean with a microfiber cloth.
Lightly dampen the cloth with water.
Do not soak the headliner.
Do not use cleansers that contain alcohol
or solvents
Do not use cleansers that contain alcohol or sol‐
vents, such as lacquer thinners, heavy-duty
grease removers, fuel, or such; this could lead to
surface damage.◀
Safety belts
Dirty belt straps impede the reeling action and
thus have a negative impact on safety.
Chemical cleaning
Do not clean chemically; this can destroy
the webbing.◀
Use only a mild soapy solution, with the safety
belts clipped into their buckles.
Do not allow the reels to retract the safety belts
until they are dry.
Floor carpets and floor mats No objects in the area around the pedals
Keep floor mats, carpets, and any other
objects out of the area of motion of the pedals;
otherwise, the function of the pedals could be
impeded while driving
Do not place additional floor mats over existing
mats or other objects.
Only use floor mats that have been approved for
the vehicle and can be properly fixed in place.
Ensure that the floor mats are securely fastened
again after they were removed for cleaning, for
example.◀
Floor mats can be removed from the passenger
compartment for cleaning.
If the floor carpets are very dirty, clean with a
microfiber cloth and water or a textile cleaner. To
prevent matting of the carpet, rub back and forth
in the direction of travel only.Seite 250MobilityCare250
Online Edition for Part no. 01 40 2 608 153 - 09 11 490
Page 268 of 278
Everything from A to Z
IndexA
ABS, Antilock Brake Sys‐ tem 94
Activated-charcoal filter 114
Adaptive brake lights, refer to Brake force display 93
Adaptive light control 82
Additional telephone 188
Additives, oil 232
Adjustments, seats/head re‐ straints 46
After washing vehicle 249
Airbags 85
Airbags, indicator/warning light 86
Air circulation, refer to Recir‐ culated-air mode 110, 113
Air distribution, manual 109, 112
Air drying, refer to Cooling function 110, 113
Air pressure, tires 221
Air vents, refer to Ventila‐ tion 114
Air volume, automatic climate control 110, 113
Alarm system 41
Alarm, unintentional 42
All around the center con‐ sole 14
All around the headliner 15
All around the steering wheel 12
ALL program, automatic cli‐ mate control 113
All-season tires, refer to Win‐ ter tires 226
All-wheel-drive 95
Alternating-code hand-held transmitter 117 Alternative oil types 232
AM/FM station 158
Announcement, navigation, refer to Spoken instruc‐
tions 148
Antifreeze, washer fluid 64
Antilock Brake System, ABS 94
Anti-slip control, refer to DSC 94
Applications 214
Appointments 204
Approved engine oils 232
Apps 214
Apps, video playback 181
Armrest, refer to Center arm‐ rest 123
Arrival time 76
Assist 209
Assistance, Roadside Assis‐ tance 244
Audio playback 167
Audio playback, Blue‐ tooth 181
AUTO H button, refer to Auto‐ matic Hold 60
AUTO intensity 112
Automatic car wash 248
Automatic climate con‐ trol 109
Automatic climate control with enhanced features 111
Automatic Curb Monitor 53
Automatic deactivation, front passenger airbags 87
Automatic headlamp con‐ trol 81
Automatic Hold 60
Automatic locking 37
Automatic recirculated-air control 113 Automatic tailgate 38
Automatic transmission with Steptronic 65
AUTO program, automatic cli‐ mate control 112
AUTO program, climate con‐ trol 110
AUTO program, intensity 112
AUX-IN port 178
Average fuel consumption 76
Average speed 76
Axle loads, weights 256
B
Backrest curvature, refer to Lumbar support 48
Backrest, width 48
Backup camera 103
Balance 156
Band-Aids, refer to First aid kit 244
Bar for tow-starting/tow‐ ing 246
Bass 156
Battery replacement, vehicle battery 241
Battery replacement, vehicle remote control 30
Battery, vehicle 241
Belts, safety belts 49
Beverage holder, cu‐ pholder 123
Blinds, sun protection 44
Bluetooth audio 181
Bluetooth connection, activat‐ ing/deactivating 189
BMW Assist 209
BMW homepage 6
BMW Internet page 6 Seite 268ReferenceEverything from A to Z268
Online Edition for Part no. 01 40 2 608 153 - 09 11 490
Page 274 of 278
R
Radiator fluid 232
Radio 158
Radio-operated key, refer to Remote control 30
Radio ready state 59
Rain sensor 63
Random 167
Random playback 167
RDS 159
Reading out loud 206
Rear lamps 240
Rear socket 118
Rearview mirror 52
Rear window de‐ froster 111, 113
Recirculated-air filter 114
Recirculated-air mode 110, 113
Recommended tire brands 226
Refueling 218
Remaining range 73
Reminders 205
Remote control/key 30
Remote control, malfunc‐ tion 36
Remote control, universal 116
Replacement fuse 242
Replacing parts 236
Replacing wheels/tires 226
Reporting safety defects 8
Reserve warning, refer to Range 73
Resetting, Tire Pressure Mon‐ itor TPM 89
Retaining straps, securing cargo 132
Retreaded tires 226
Roadside Assistance 210
Roadside parking lamps 82
Roller sunblinds 44
Roof load capacity 256
Roof-mounted luggage rack 130 Rope for tow-starting/tow‐
ing 246
Route 147
Route criteria, route 146
Route, displaying 147
Routes, avoiding 146
Route section, bypassing 147
RPM, engine 255
RSC Runflat System Compo‐ nent, refer to Run-flat
tires 227
Rubber components, care 250
Run-flat tires 227
S
Safe braking 129
Safety 6
Safety belt reminder 50
Safety belts 49
Safety belts, care 250
Safety switch, windows 43
Safety systems, airbags 85
Satellite radio 160
Saving fuel 134
Scale, changing during navi‐ gation 149
Screen, refer to Control Dis‐ play 16
Screwdriver 236
Screw thread for tow fit‐ ting 247
Search, refer to BMW Search 211
Seat and mirror memory 52
Seat belts, refer to Safety belts 49
Seat heating, front 48
Seat heating, rear 49
Seating position for chil‐ dren 55
Seats 46
Selection list in instrument cluster 75 Selector lever, automatic
transmission 65
Sensors, care 251
Service and warranty 7
Service requirements, Condi‐ tion Based Service CBS 234
Service requirements, dis‐ play 74
Service, Roadside Assis‐ tance 244
Settings on Control Dis‐ play 78
Settings, storing for seat, mir‐ ror 52
Shifting, automatic transmis‐ sion 65
Shift paddles on steering wheel 67
Short commands 258
Side airbags 85
Signaling, horn 12
Signals when unlocking 35
Sitting safely 46
Size 254
Slide/tilt glass roof 44
Smallest turning circle 255
Snap-in adapter, mobile phone 196
Snow chains 227
Socket 118
Socket, OBD Onboard Diag‐ nostics 235
Software applications, iPhone 214
Software update 185
Spare fuse 242
Special destinations, naviga‐ tion 141
Specified engine oil types 232
Speed, average 76
Speed limit, setting 76
Speed Volume, volume equal‐ ization 157
Split screen 20
Split screen map settings 150 Seite 274ReferenceEverything from A to Z274
Online Edition for Part no. 01 40 2 608 153 - 09 11 490