seats BMW X3 2013 F25 Owner's Manual
[x] Cancel search | Manufacturer: BMW, Model Year: 2013, Model line: X3, Model: BMW X3 2013 F25Pages: 212, PDF Size: 4.8 MB
Page 52 of 212
AdjustingVehicle equipment
All standard, country-specific and optional
equipment that is offered in the model series is
described in this chapter. Therefore, equip‐
ment is also described that is not available in a
vehicle, e. g., because of the selected optional
equipment or country variant. This also applies
for safety-related functions and systems.
Sitting safely The ideal seating position can make a vital
contribution to relaxed, fatigue-free driving.
The seating position plays an important role in
an accident in combination with:▷Safety belts, refer to page 51.▷Head restraints, refer to page 52.▷Airbags, refer to page 94.
Seats
General information Do not adjust the seat while driving
Do not adjust the driver's seat while driv‐
ing, or the seat could respond with unexpected
movement and the ensuing loss of vehicle
control could lead to an accident.◀
Do not incline the backrest too far to the
rear
Also on the front passenger side, do not incline
the backrest on the front passenger side too
far to the rear during driving, or there is a risk of
slipping under the safety belt in the event of an
accident. This would eliminate the protection
normally provided by the belt.◀
Manually adjustable seats
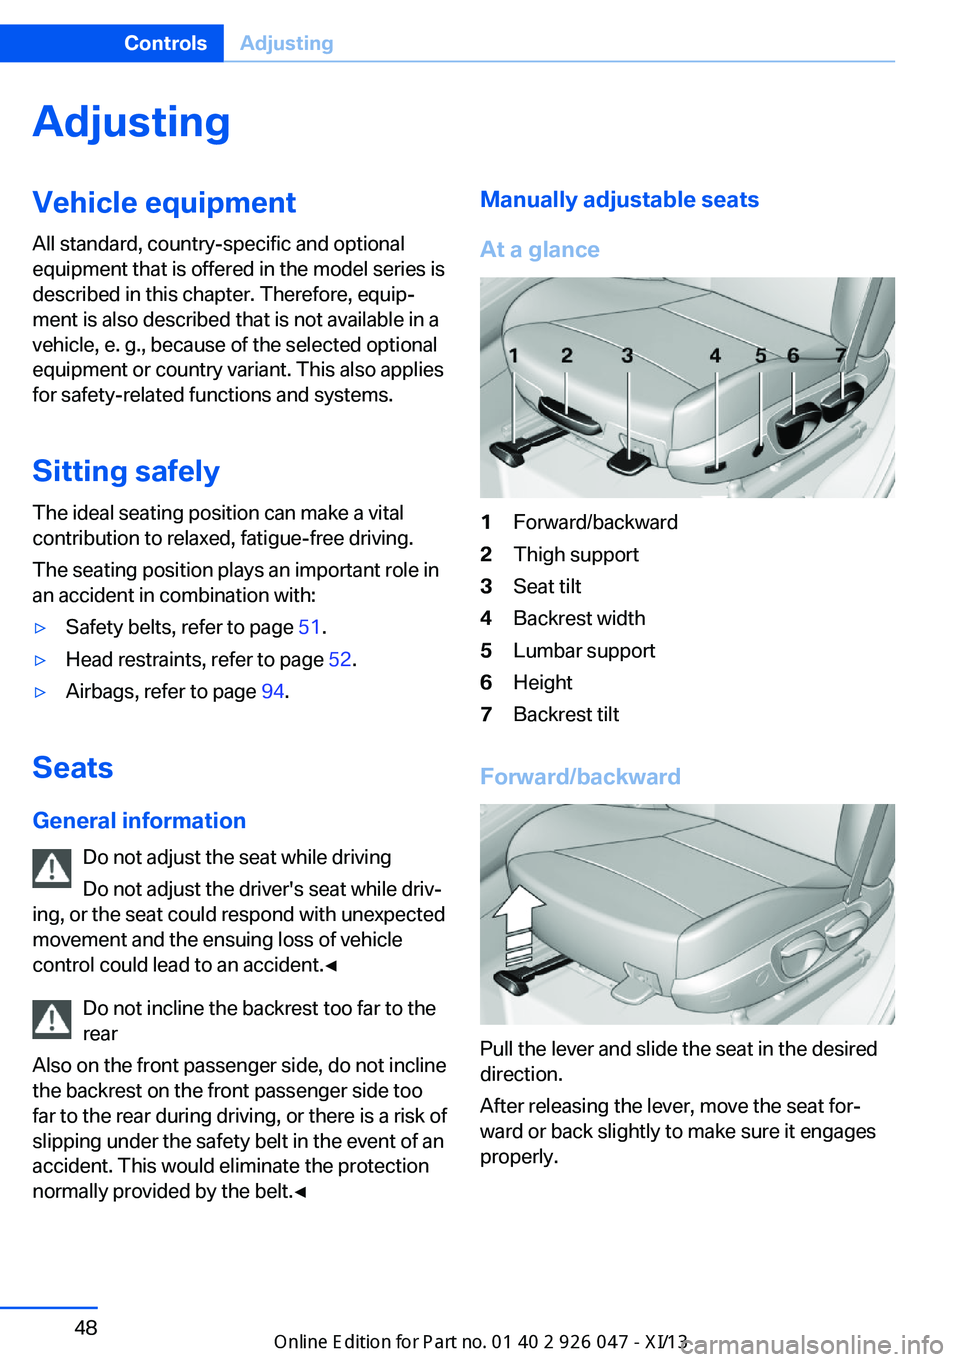
At a glance1Forward/backward2Thigh support3Seat tilt4Backrest width5Lumbar support6Height7Backrest tilt
Forward/backward
Pull the lever and slide the seat in the desired
direction.
After releasing the lever, move the seat for‐
ward or back slightly to make sure it engages
properly.
Seite 48ControlsAdjusting48
Online Edition for Part no. 01 40 2 911 041 - VI/13
Page 53 of 212
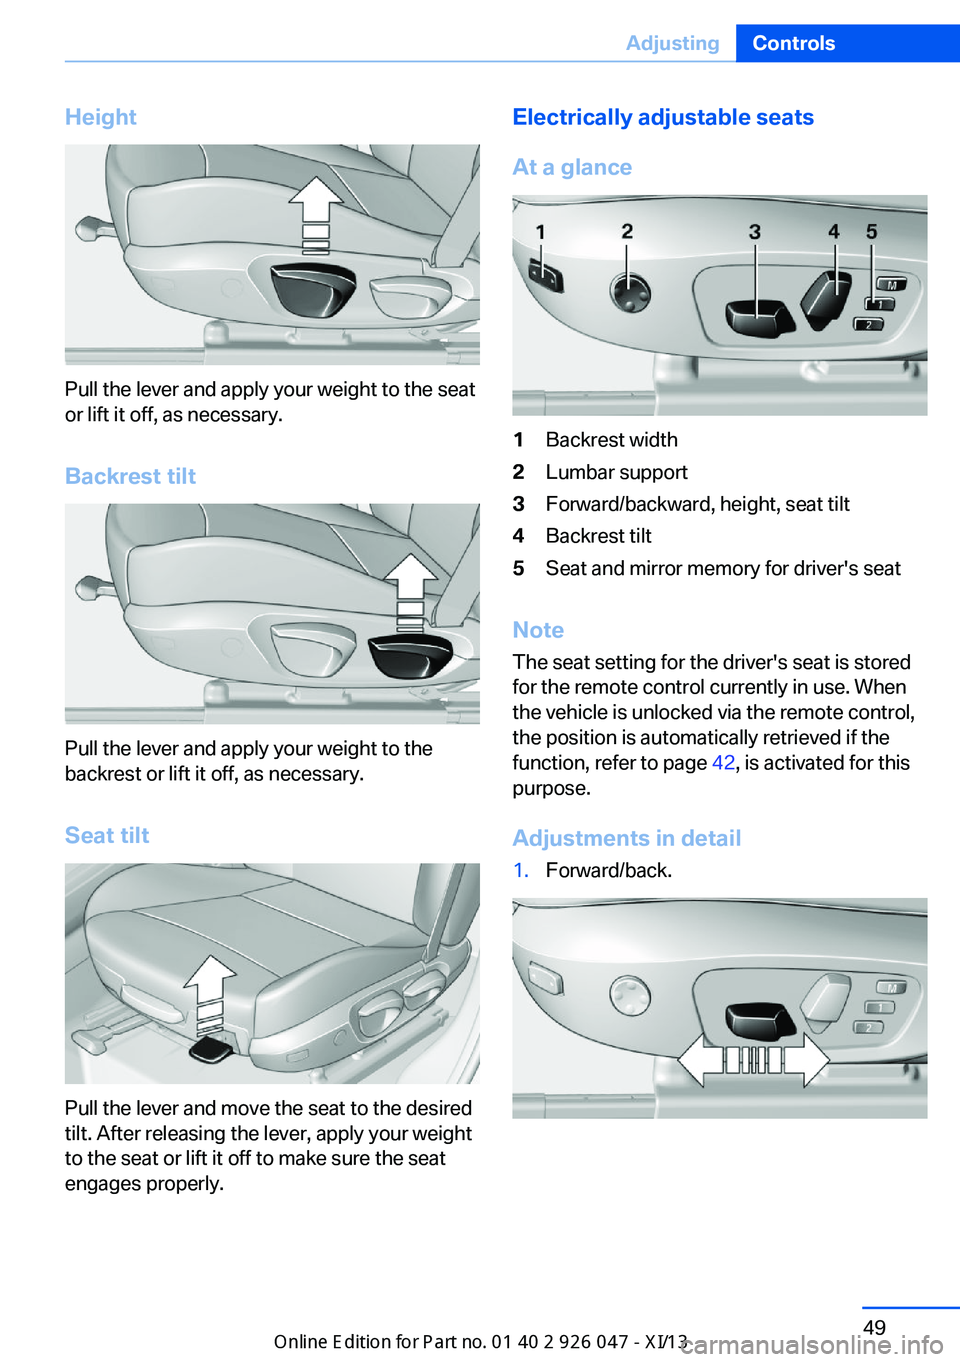
Height
Pull the lever and apply your weight to the seat
or lift it off, as necessary.
Backrest tilt
Pull the lever and apply your weight to the
backrest or lift it off, as necessary.
Seat tilt
Pull the lever and move the seat to the desired
tilt. After releasing the lever, apply your weight
to the seat or lift it off to make sure the seat
engages properly.
Electrically adjustable seats
At a glance1Backrest width2Lumbar support3Forward/backward, height, seat tilt4Backrest tilt5Seat and mirror memory for driver's seat
Note The seat setting for the driver's seat is stored
for the remote control currently in use. When
the vehicle is unlocked via the remote control,
the position is automatically retrieved if the
function, refer to page 42, is activated for this
purpose.
Adjustments in detail
1.Forward/back.Seite 49AdjustingControls49
Online Edition for Part no. 01 40 2 911 041 - VI/13
Page 55 of 212
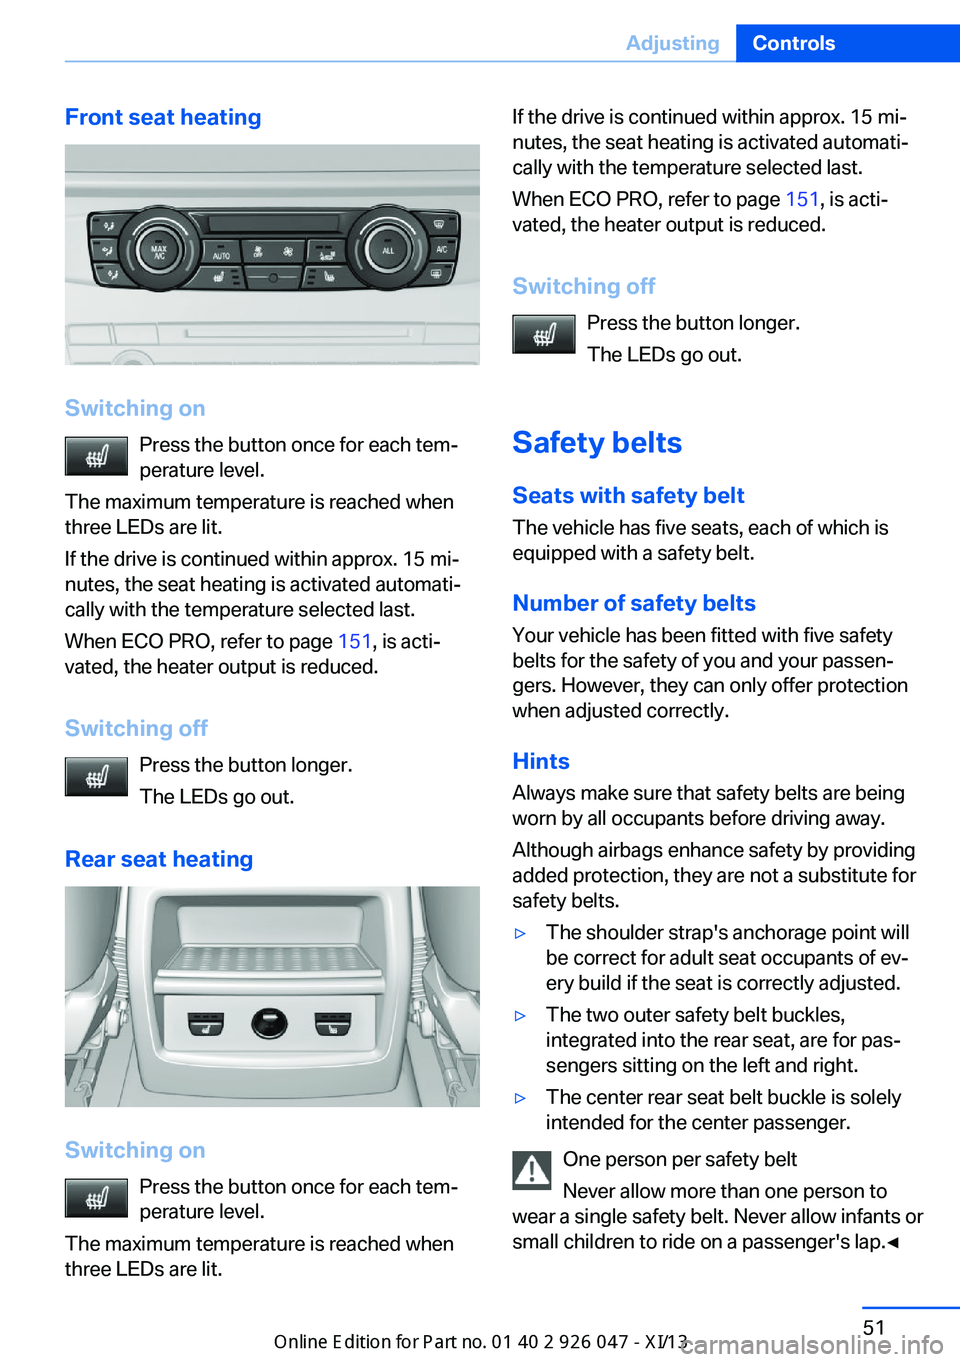
Front seat heating
Switching onPress the button once for each tem‐
perature level.
The maximum temperature is reached when
three LEDs are lit.
If the drive is continued within approx. 15 mi‐
nutes, the seat heating is activated automati‐
cally with the temperature selected last.
When ECO PRO, refer to page 151, is acti‐
vated, the heater output is reduced.
Switching off Press the button longer.
The LEDs go out.
Rear seat heating
Switching on Press the button once for each tem‐
perature level.
The maximum temperature is reached when
three LEDs are lit.
If the drive is continued within approx. 15 mi‐
nutes, the seat heating is activated automati‐
cally with the temperature selected last.
When ECO PRO, refer to page 151, is acti‐
vated, the heater output is reduced.
Switching off Press the button longer.
The LEDs go out.
Safety belts Seats with safety beltThe vehicle has five seats, each of which is
equipped with a safety belt.
Number of safety belts
Your vehicle has been fitted with five safety
belts for the safety of you and your passen‐
gers. However, they can only offer protection
when adjusted correctly.
Hints
Always make sure that safety belts are being
worn by all occupants before driving away.
Although airbags enhance safety by providing
added protection, they are not a substitute for
safety belts.▷The shoulder strap's anchorage point will
be correct for adult seat occupants of ev‐
ery build if the seat is correctly adjusted.▷The two outer safety belt buckles,
integrated into the rear seat, are for pas‐
sengers sitting on the left and right.▷The center rear seat belt buckle is solely
intended for the center passenger.
One person per safety belt
Never allow more than one person to
wear a single safety belt. Never allow infants or
small children to ride on a passenger's lap.◀
Seite 51AdjustingControls51
Online Edition for Part no. 01 40 2 911 041 - VI/13
Page 56 of 212
Putting on the belt
Lay the belt, without twisting, snugly
across the lap and shoulders, as close to the
body as possible. Make sure that the belt lies
low around the hips in the lap area and does
not press on the abdomen. Otherwise, the belt
can slip over the hips in the lap area in a frontal
impact and injure the abdomen.
The safety belt must not lie across the neck,
rub on sharp edges, be routed over solid or
breakable objects, or be pinched.◀
Reduction of restraining effect
Avoid wearing clothing that prevents the
belt from fitting properly, and pull the shoulder
belt periodically to readjust the tension across
your lap; otherwise, the retention effect of the
safety belt may be reduced.◀
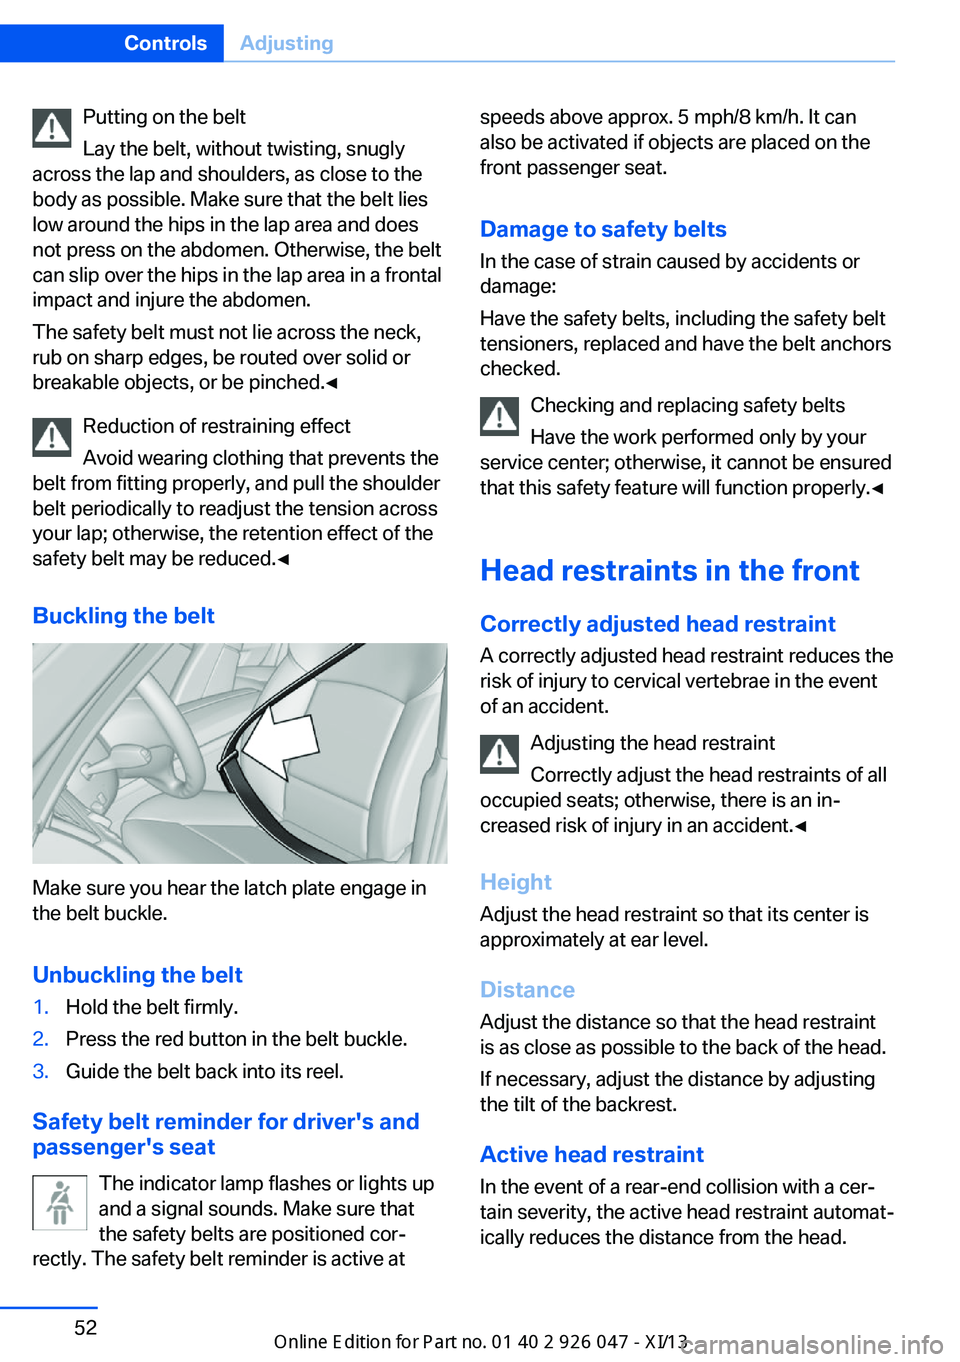
Buckling the belt
Make sure you hear the latch plate engage in
the belt buckle.
Unbuckling the belt
1.Hold the belt firmly.2.Press the red button in the belt buckle.3.Guide the belt back into its reel.
Safety belt reminder for driver's and
passenger's seat
The indicator lamp flashes or lights up
and a signal sounds. Make sure that
the safety belts are positioned cor‐
rectly. The safety belt reminder is active at
speeds above approx. 5 mph/8 km/h. It can
also be activated if objects are placed on the
front passenger seat.
Damage to safety belts In the case of strain caused by accidents or
damage:
Have the safety belts, including the safety belt
tensioners, replaced and have the belt anchors
checked.
Checking and replacing safety belts
Have the work performed only by your
service center; otherwise, it cannot be ensured
that this safety feature will function properly.◀
Head restraints in the front
Correctly adjusted head restraint A correctly adjusted head restraint reduces the
risk of injury to cervical vertebrae in the event
of an accident.
Adjusting the head restraint
Correctly adjust the head restraints of all
occupied seats; otherwise, there is an in‐ creased risk of injury in an accident.◀
Height
Adjust the head restraint so that its center is
approximately at ear level.
Distance Adjust the distance so that the head restraint
is as close as possible to the back of the head.
If necessary, adjust the distance by adjusting
the tilt of the backrest.
Active head restraint In the event of a rear-end collision with a cer‐
tain severity, the active head restraint automat‐
ically reduces the distance from the head.Seite 52ControlsAdjusting52
Online Edition for Part no. 01 40 2 911 041 - VI/13
Page 57 of 212
Reduced protective function▷Do not use seat or head restraint
covers.▷Do not hang objects, e.g., clothes hangers,
on the head restraints.▷Only attach accessories approved by BMW
to the seat or head restraint.
Otherwise, the protective function of the active
head restraint will be impaired and the per‐
sonal safety of the occupants will be endan‐
gered.◀
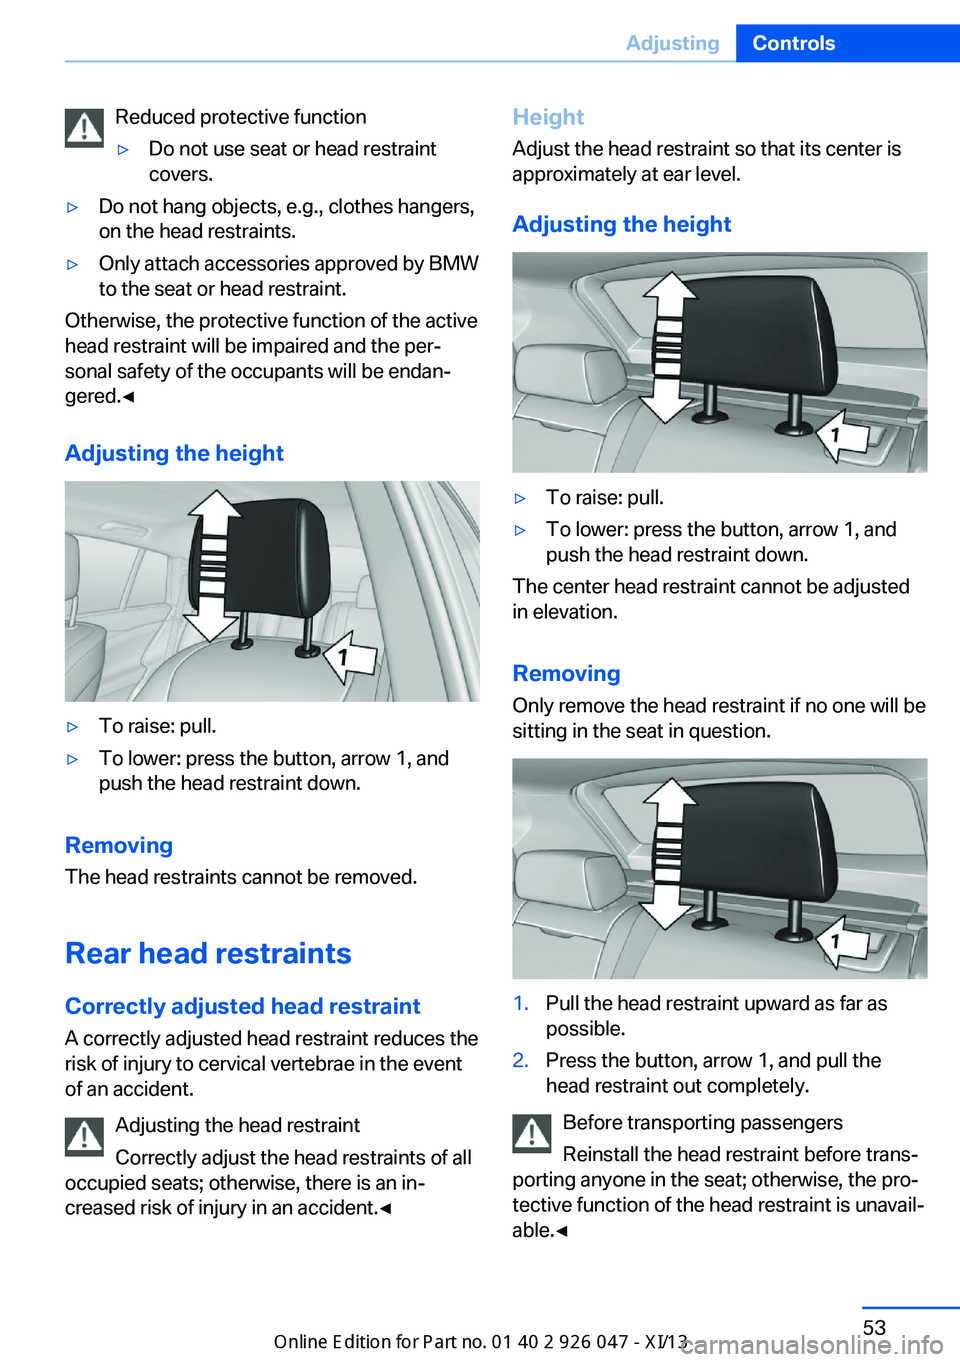
Adjusting the height
▷To raise: pull.▷To lower: press the button, arrow 1, and
push the head restraint down.
Removing
The head restraints cannot be removed.
Rear head restraints
Correctly adjusted head restraint A correctly adjusted head restraint reduces the
risk of injury to cervical vertebrae in the event
of an accident.
Adjusting the head restraint
Correctly adjust the head restraints of all
occupied seats; otherwise, there is an in‐ creased risk of injury in an accident.◀
Height
Adjust the head restraint so that its center is
approximately at ear level.
Adjusting the height▷To raise: pull.▷To lower: press the button, arrow 1, and
push the head restraint down.
The center head restraint cannot be adjusted
in elevation.
RemovingOnly remove the head restraint if no one will be
sitting in the seat in question.
1.Pull the head restraint upward as far as
possible.2.Press the button, arrow 1, and pull the
head restraint out completely.
Before transporting passengers
Reinstall the head restraint before trans‐
porting anyone in the seat; otherwise, the pro‐
tective function of the head restraint is unavail‐
able.◀
Seite 53AdjustingControls53
Online Edition for Part no. 01 40 2 911 041 - VI/13
Page 99 of 212
Protective action
Airbags are not triggered in every impact situa‐
tion, e.g., in less severe accidents or rear-end
collisions.
Information on how to ensure the optimal
protective effect of the airbags▷Keep at a distance from the airbags.▷Always grasp the steering wheel on the
steering wheel rim, holding your hands at
the 3 o'clock and 9 o'clock positions, to
keep the danger of injury to your hands or
arms as low as possible if the airbag is trig‐
gered.▷There should be no people, animals, or ob‐
jects between an airbag and a person.▷Do not use the cover of the front airbag on
the front passenger side as a storage area.▷Keep the dashboard and window on the
front passenger side clear, i.e., do not
cover with adhesive labels or coverings,
and do not attach holders such as for navi‐
gation instruments and mobile phones.▷Make sure that the front passenger is sit‐
ting correctly, i.e., keeps his or her feet and
legs in the footwell; otherwise, leg injuries
can occur if the front airbag is triggered.▷Do not place slip covers, seat cushions or
other objects on the front passenger seat
that are not approved specifically for seats
with integrated side airbags.▷Do not hang pieces of clothing, such as
jackets, over the backrests.▷Make sure that occupants keep their heads
away from the side airbag and do not rest
against the head airbag; otherwise, injuries
can occur if the airbags are triggered.▷Do not remove the airbag restraint system.▷Do not remove the steering wheel.▷Do not apply adhesive materials to the air‐
bag cover panels, cover them or modify
them in any way.▷Never modify either the individual compo‐
nents or the wiring in the airbag system.
This also applies to steering wheel covers,
the dashboard, the seats, the roof pillars
and the sides of the headliner.◀
Even when all instructions are followed closely,
injury from contact with the airbags cannot be
ruled out in certain situations.
The ignition and inflation noise may lead to
short-term and, in most cases, temporary
hearing impairment in sensitive individuals.
In the case of a malfunction, deactivation
and after triggering of the airbags
Do not touch the individual components imme‐
diately after the system has been triggered;
otherwise, there is the danger of burns.
Only have the airbags checked, repaired or dis‐
mantled and the airbag generator scrapped by
your service center or a workshop that has the
necessary authorization for handling explo‐
sives.
Non-professional attempts to service the sys‐
tem could lead to failure in an emergency or
undesired triggering of the airbag, either of
which could result in injury.◀
Warnings and information on the airbags are
also found on the sun visors.
Functional readiness of the airbag
system
When the ignition is switch on, the
warning lamp in the instrument cluster
lights up briefly and thereby indicates
the operational readiness of the entire airbag
system and the belt tensioner.
Airbag system malfunctioning
▷Warning lamp does not come on when the
ignition is turned on.▷The warning lamp lights up continuously.Seite 95SafetyControls95
Online Edition for Part no. 01 40 2 911 041 - VI/13
Page 101 of 212
Detected child seatsThe system generally detects children seated
in a child seat, especially in the child seats that
were required by NHTSA when the vehicle was
manufactured. After installing a child seat,
make sure that the indicator lamp for the front
passenger airbags lights up. This indicates that the child seat has been detected and the
front passenger airbags are not activated.
Strength of the driver's and front
passenger airbag
The strength with which the driver's and front
passenger airbags are triggered depends on
the position of the driver's and front passenger
seats.
To maintain the accuracy of this function over
the long-term, calibrate the front seats when a
corresponding message appears on the Con‐
trol Display.
Calibrating the front seats A corresponding message appears on the
Control Display.1.Move the respective seat forward all the
way.2.Move the respective seat forward again. It
moves forward briefly.3.Readjust the seat to the desired position.
The calibration procedure is completed when
the message on the Control Display disap‐
pears.
If the message continues to be displayed, re‐
peat the calibration.
If the message does not disappear after a re‐
peat calibration, have the system checked as
soon as possible.
Unobstructed area of movement
Ensure that the area of movement of the
seats is unobstructed to avoid personal injury
or damage to objects.◀
Tire Pressure Monitor TPM
The concept The system monitors tire pressure in the four
mounted tires. The system warns you if there
is a significant loss of pressure in one or more
tires. For this purpose, sensors in the tire
valves measure the tire pressure and tire tem‐
perature.
Hints Tire damage due to external factors
Sudden tire damage caused by external
influences cannot be indicated in advance.◀
Pay attention to the other information and indi‐
cations under Tire inflation pressure, refer to
page 159, as well when using the system.
Functional requirements
The system must have been reset with the
correct tire inflation pressure; otherwise, relia‐
ble signaling of tire pressure loss is not en‐
sured.
Reset the system again after each correction
of the tire inflation pressure and after every tire
or wheel change.
Always use wheels with TPM electronics to
ensure that the system will operate properly.
Status display
The current status of the Tire Pressure Moni‐
tor TPM can be displayed on the Control Dis‐
play, e.g., whether or not the TPM is active.1."Vehicle Info"2."Vehicle status"3. "Tire Pressure Monitor"
The status is displayed.
Status display The tire and system status is indicated by the
color of the wheels and a text message on the
Control Display.
Seite 97SafetyControls97
Online Edition for Part no. 01 40 2 911 041 - VI/13
Page 142 of 212
Storage compartmentsVehicle equipmentAll standard, country-specific and optional
equipment that is offered in the model series is
described in this chapter. Therefore, equip‐
ment is also described that is not available in a
vehicle, e. g., because of the selected optional
equipment or country variant. This also applies
for safety-related functions and systems.
Notes No loose objects in the passenger com‐
partment
Do not stow any objects in the passenger
compartment without securing them; other‐
wise, they may present a danger to occupants
for instance during braking and avoidance ma‐
neuvers.◀
Do not place anti-slip mats on the dash‐
board
Do not place anti-slip mats on the dashboard.
The mat materials could damage the dash‐
board.◀
Storage compartments
The following storage compartments are avail‐
able in the vehicle interior:▷Glove compartment on the front passenger
side, refer to page 138.▷Storage compartment in the front center
armrest, refer to page 139.▷Compartments in the doors.▷Pockets on the backrests of the front
seats.▷Net in the front passenger footwell.Glove compartment
Front passenger side
Note Close the glove compartment again im‐
mediately
Close the glove compartment immediately af‐
ter use while driving; otherwise, injury may oc‐
cur during accidents.◀
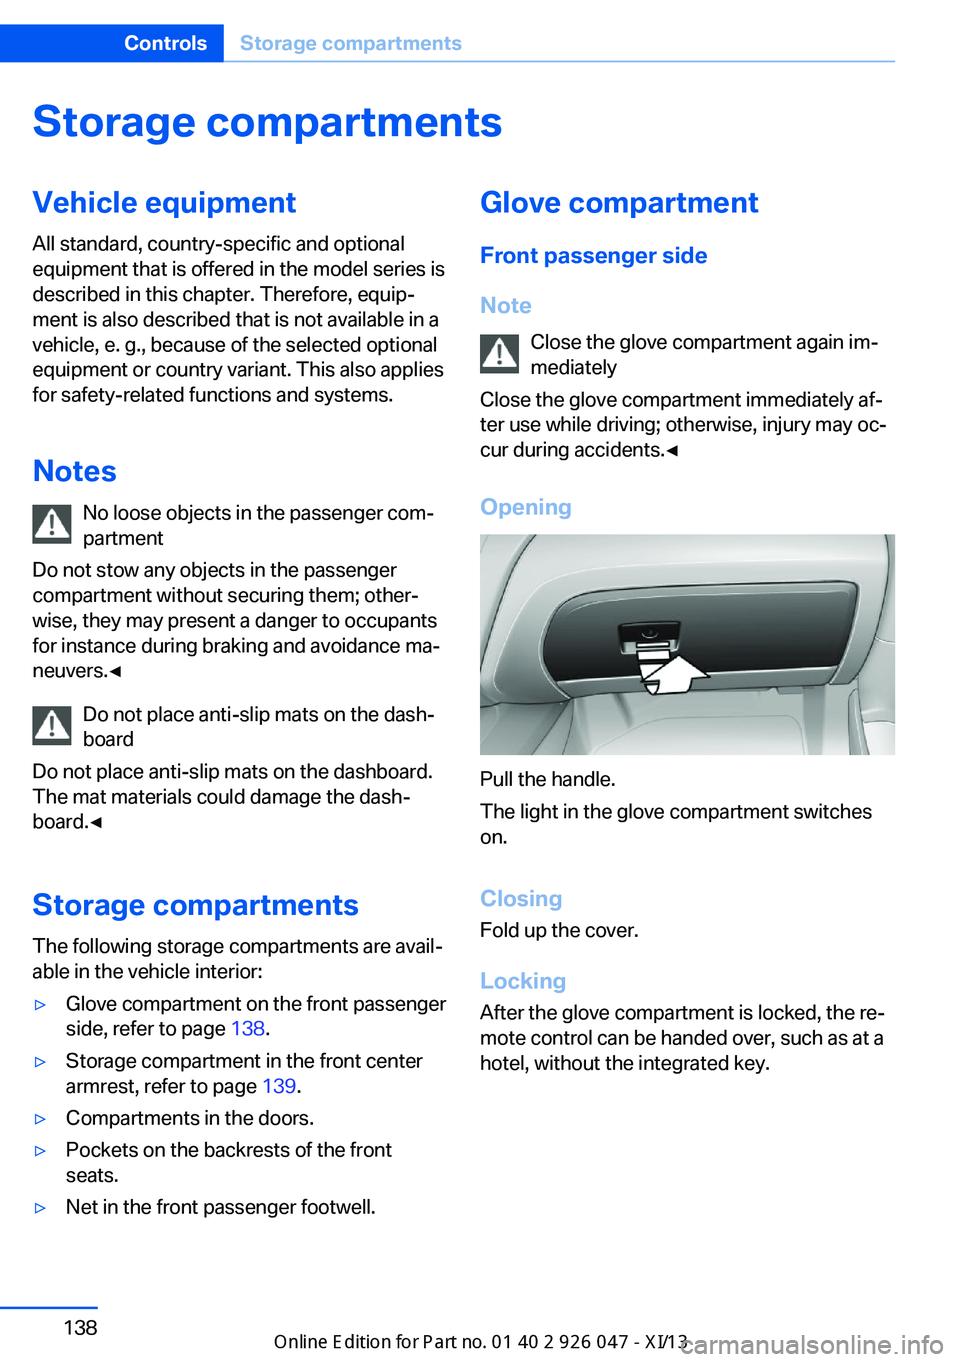
Opening
Pull the handle.
The light in the glove compartment switches
on.
ClosingFold up the cover.
Locking
After the glove compartment is locked, the re‐
mote control can be handed over, such as at a
hotel, without the integrated key.
Seite 138ControlsStorage compartments138
Online Edition for Part no. 01 40 2 911 041 - VI/13
Page 202 of 212
Everything from A to Z
IndexA ABS, Antilock Brake Sys‐ tem 107
Activated-charcoal filter 129
Adaptive brake lights, refer to Brake force display 105
Adaptive light control 90
Additives, oil 170
Adjustments, seats/head re‐ straints 48
After washing vehicle 188
Airbags 94
Airbags, indicator/warning light 95
Air circulation, refer to Recir‐ culated-air mode 125, 128
Air, dehumidifying, refer to Cooling function 125
Air distribution, manual 124, 127
Air drying, refer to Cooling function 128
Air flow, automatic climate control 125, 128
Air pressure, tires 159
Air vents, refer to Ventila‐ tion 129
Alarm system 43
Alarm, unintentional 44
All around the center con‐ sole 14
All around the headliner 15
All around the steering wheel 12
ALL program, automatic cli‐ mate control 128
All-season tires, refer to Win‐ ter tires 165
All-wheel-drive 108 Alternating-code hand-held
transmitter 132
Alternative oil types 170
Ambient light 93
Antifreeze, washer fluid 70
Antilock Brake System, ABS 107
Anti-slip control, refer to DSC 107
Approved engine oils 170
Armrest, refer to Center arm‐ rest 139
Arrival time 86
Assistance, Roadside Assis‐ tance 183
AUTO H button, refer to Au‐ tomatic Hold 66
AUTO intensity 127
Automatic car wash 187
Automatic climate con‐ trol 124
Automatic climate control with enhanced features 126
Automatic Curb Monitor 55
Automatic deactivation, front passenger airbags 96
Automatic headlamp con‐ trol 90
Automatic Hold 66
Automatic locking 42
Automatic recirculated-air control 128
Automatic tailgate 39
Automatic transmission with Steptronic 71
AUTO program, automatic cli‐ mate control 127
AUTO program, climate con‐ trol 125
AUTO program, intensity 127
Auto Start/Stop function 63 Average fuel consumption 86
Average speed 86
Axle loads, weights 195
B Backrest curvature, refer to Lumbar support 50
Backrest, width 50
Backup camera 117
Bad road trips 146
Band-aids, refer to First aid kit 183
Bar for tow-starting/ towing 185
Battery replacement, vehicle battery 180
Battery replacement, vehicle remote control 32
Battery, vehicle 180
Belts, safety belts 51
Beverage holder, cu‐ pholder 139
Blinds, sun protection 46
BMW Assist, see user's manual for Navigation, En‐
tertainment and Communi‐
cation
BMW Homepage 6
BMW Internet page 6
BMW maintenance sys‐ tem 172
Bonus range, ECO PRO 152
Bottle holder, refer to Cu‐ pholder 139
Brake assistant 107
Brake discs, breaking in 144
Brake force display 105
Brake lamps, brake force dis‐ play 105
Brake lights, adaptive 105 Seite 198ReferenceEverything from A to Z198
Online Edition for Part no. 01 40 2 911 041 - VI/13
Page 203 of 212
Brake pads, breaking in 144
Braking, hints 145
Breakdown assis‐ tance 182, 183
Breaking in 144
Brightness of Control Dis‐ play 88
Bulb replacement 175
Bulb replacement, front 176
Bulb replacement, rear 178
Bulbs and lamps 175
Button, Start/Stop 61
Bypassing, refer to Jump- starting 183
C
California Proposition 65 Warning 7
Camera, care 190
Camera, rearview cam‐ era 118
Camera, Top View 120
Can holder, refer to Cu‐ pholder 139
Car battery 180
Car care products 188
Care, displays 190
Care, vehicle 188
Cargo 147
Cargo area 135
Cargo area, enlarging 136
Cargo area lid 38
Cargo area, storage compart‐ ments 140
Cargo cover 135
Cargo, securing 148
Cargo straps, securing cargo 148
Car key, refer to Remote con‐ trol 32
Carpet, care 190
Car wash 187
Catalytic converter, refer to Hot exhaust system 144 CBS Condition Based Serv‐
ice 172
CD/Multimedia, see user's manual for Navigation, En‐
tertainment and Communi‐
cation
Center armrest 139
Center console 14
Center-Lock, see button for central locking 35
Central locking system 35
Central screen, refer to Con‐ trol Display 16
Changes, technical, refer to Safety 7
Changing parts 174
Changing wheels 180
Changing wheels/tires 164
Check Control 78
Checking the oil level elec‐ tronically 169
Children, seating position 57
Children, transporting safely 57
Child restraint fixing sys‐ tem 57
Child restraint fixing system LATCH 58
Child restraint fixing systems, mounting 57
Child safety locks 60
Child seat, mounting 57
Child seats 57
Chrome parts, care 189
Cleaning, displays 190
Climate control 124, 126
Clock 81
Closing/opening from in‐ side 38
Closing/opening via door lock 37
Closing/opening with remote control 35
Clothes hooks 140
Cockpit 12
Collision warning 102 Combination switch, refer to
Turn signals 67
Combination switch, refer to Wiper system 68
Comfort Access 41
COMFORT program, Dy‐ namic Driving Control 111
Compartments in the doors 139
Computer 85
Condensation on win‐ dows 125, 128
Condensation under the vehi‐ cle 146
Condition Based Service CBS 172
Confirmation signal 42
ConnectedDrive, see user's manual for Navigation, En‐
tertainment and Communi‐
cation
ConnectedDrive Services
Connecting electrical devi‐ ces 133
Control Display 16
Control Display, settings 87
Controller 16, 17
Control systems, driving sta‐ bility 107
Convenient opening 36
Coolant 171
Coolant temperature 80
Cooling function 125, 128
Cooling, maximum 127
Cooling system 171
Corrosion on brake discs 146
Cruise control 113
Cruising range 81
Cupholder 139
Current fuel consumption 81
D
Damage, tires 163
Damping control, dy‐ namic 109 Seite 199Everything from A to ZReference199
Online Edition for Part no. 01 40 2 911 041 - VI/13