Tailgate BMW X3 2015 F25 User Guide
[x] Cancel search | Manufacturer: BMW, Model Year: 2015, Model line: X3, Model: BMW X3 2015 F25Pages: 257, PDF Size: 5.26 MB
Page 51 of 257
Press button on the remote control for
at least 3 seconds.
To switch off the alarm: press any button.
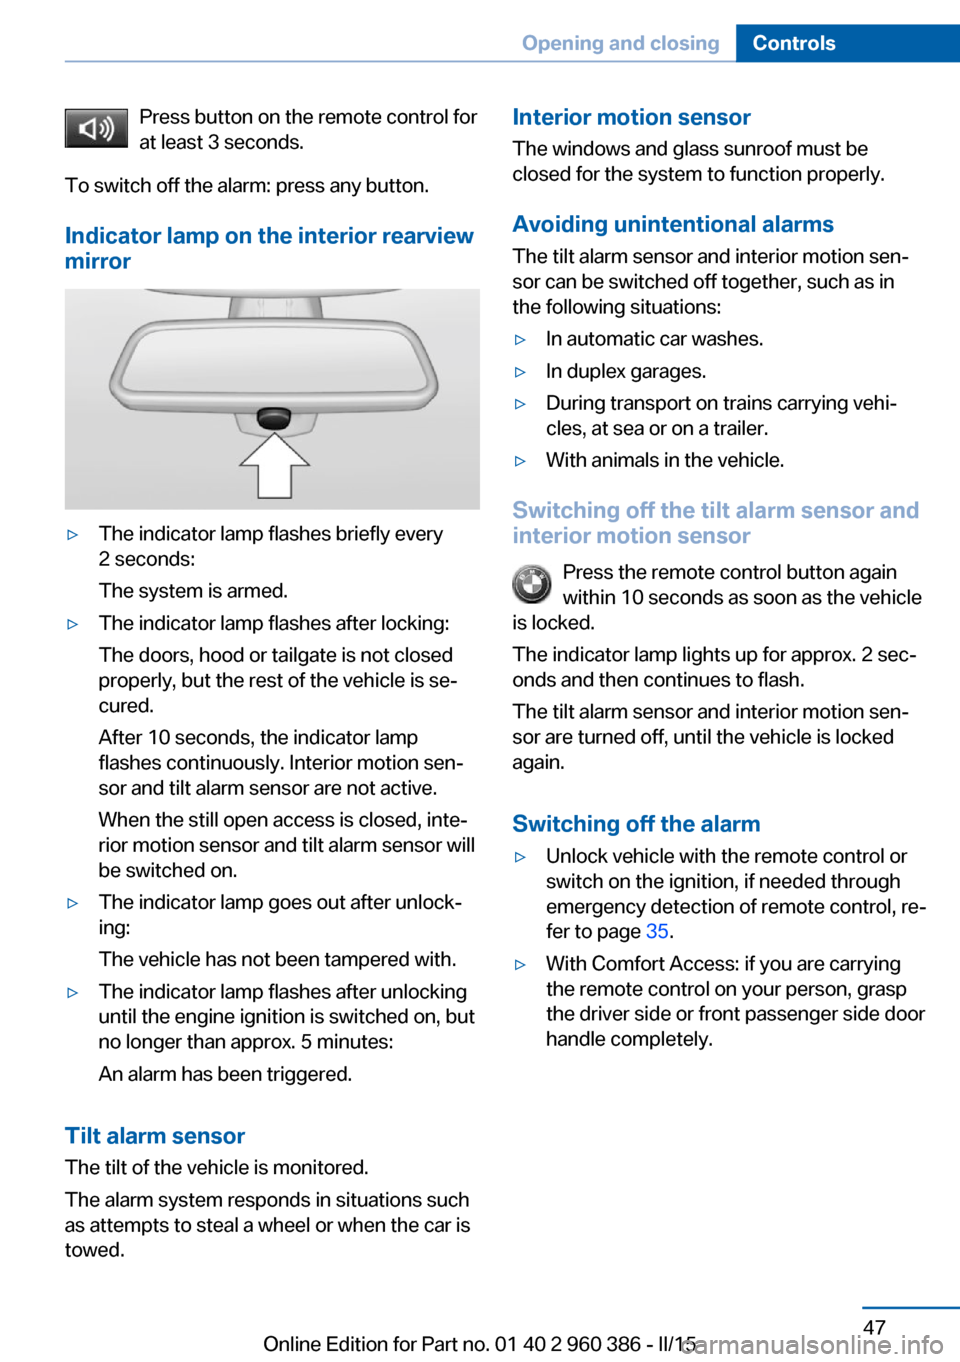
Indicator lamp on the interior rearview
mirror▷The indicator lamp flashes briefly every
2 seconds:
The system is armed.▷The indicator lamp flashes after locking:
The doors, hood or tailgate is not closed
properly, but the rest of the vehicle is se‐
cured.
After 10 seconds, the indicator lamp
flashes continuously. Interior motion sen‐
sor and tilt alarm sensor are not active.
When the still open access is closed, inte‐
rior motion sensor and tilt alarm sensor will
be switched on.▷The indicator lamp goes out after unlock‐
ing:
The vehicle has not been tampered with.▷The indicator lamp flashes after unlocking
until the engine ignition is switched on, but
no longer than approx. 5 minutes:
An alarm has been triggered.
Tilt alarm sensor The tilt of the vehicle is monitored.
The alarm system responds in situations such
as attempts to steal a wheel or when the car is
towed.
Interior motion sensor
The windows and glass sunroof must be
closed for the system to function properly.
Avoiding unintentional alarms
The tilt alarm sensor and interior motion sen‐
sor can be switched off together, such as in
the following situations:▷In automatic car washes.▷In duplex garages.▷During transport on trains carrying vehi‐
cles, at sea or on a trailer.▷With animals in the vehicle.
Switching off the tilt alarm sensor and
interior motion sensor
Press the remote control button again
within 10 seconds as soon as the vehicle
is locked.
The indicator lamp lights up for approx. 2 sec‐
onds and then continues to flash.
The tilt alarm sensor and interior motion sen‐
sor are turned off, until the vehicle is locked again.
Switching off the alarm
▷Unlock vehicle with the remote control or
switch on the ignition, if needed through
emergency detection of remote control, re‐
fer to page 35.▷With Comfort Access: if you are carrying
the remote control on your person, grasp
the driver side or front passenger side door
handle completely.Seite 47Opening and closingControls47
Online Edition for Part no. 01 40 2 960 386 - II/15
Page 63 of 257
Calling up of a seat position
deactivated
After a brief period, calling up stored seat posi‐
tions is deactivated to save battery power.
To reactivate calling up of a seat position:▷Open or close the door or tailgate.▷Press a button on the remote control.▷Press the Start/Stop button.
Mirrors
Exterior mirrors
General information The mirror on the passenger side is more
curved than the driver's side mirror.
Depending on the vehicle equipment, the mir‐
ror setting is stored for the profile currently in
use. When the vehicle is unlocked via the re‐
mote control, the position is automatically re‐
trieved if this function is active.
Note Estimating distances correctly
Objects reflected in the mirror are closer
than they appear. Do not estimate the distance
to the traffic behind you based on what you
see in the mirror, as this will increase your risk
of an accident.◀
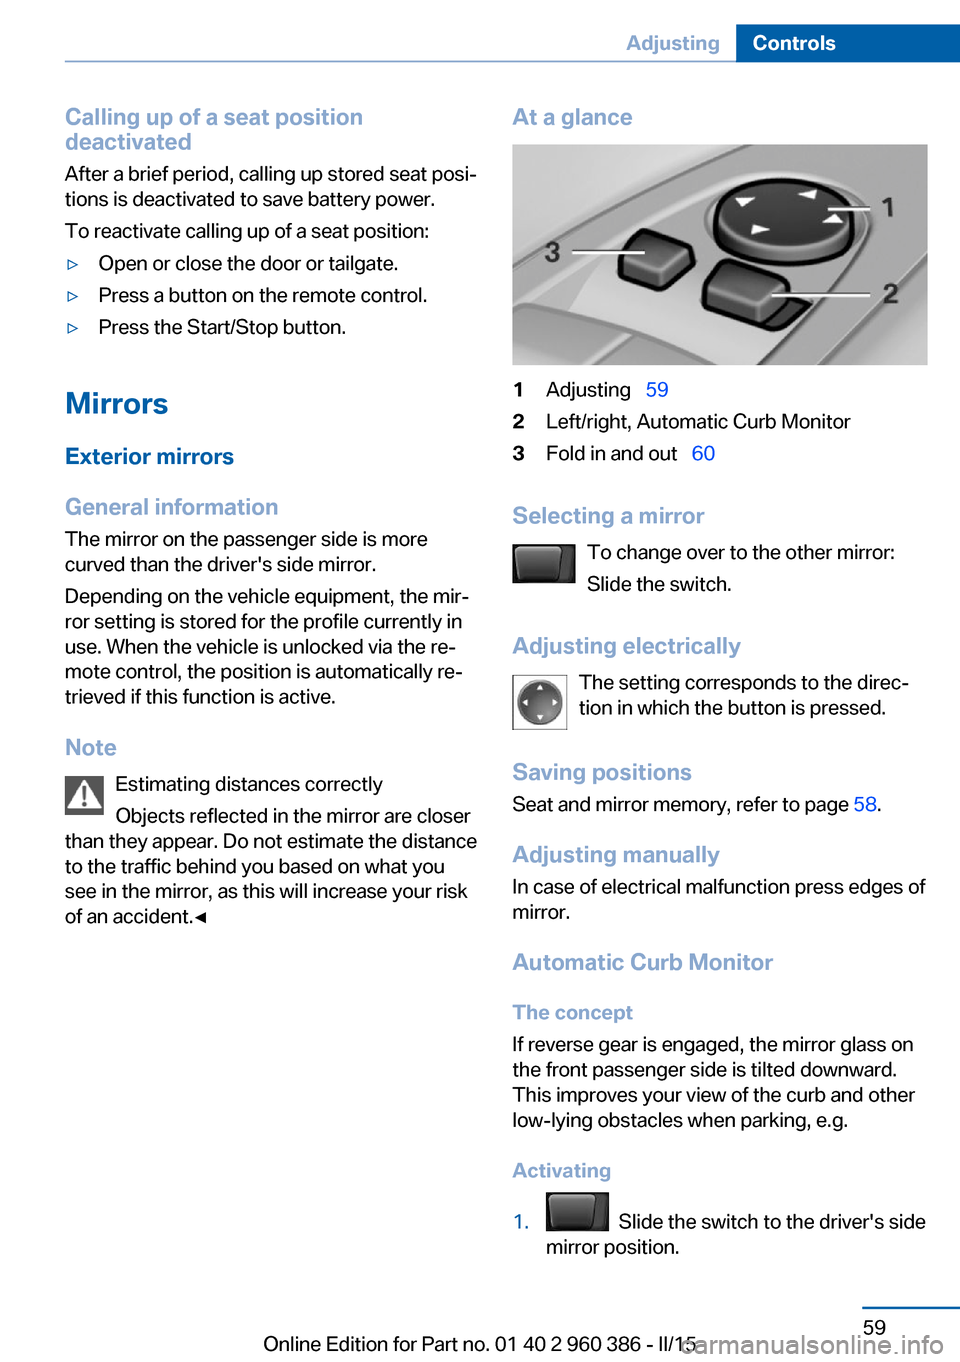
At a glance1Adjusting 592Left/right, Automatic Curb Monitor3Fold in and out 60
Selecting a mirror
To change over to the other mirror:
Slide the switch.
Adjusting electrically The setting corresponds to the direc‐
tion in which the button is pressed.
Saving positions
Seat and mirror memory, refer to page 58.
Adjusting manually
In case of electrical malfunction press edges of
mirror.
Automatic Curb MonitorThe concept
If reverse gear is engaged, the mirror glass on
the front passenger side is tilted downward.
This improves your view of the curb and other
low-lying obstacles when parking, e.g.
Activating
1. Slide the switch to the driver's side
mirror position.
Seite 59AdjustingControls59
Online Edition for Part no. 01 40 2 960 386 - II/15
Page 146 of 257
At a glance
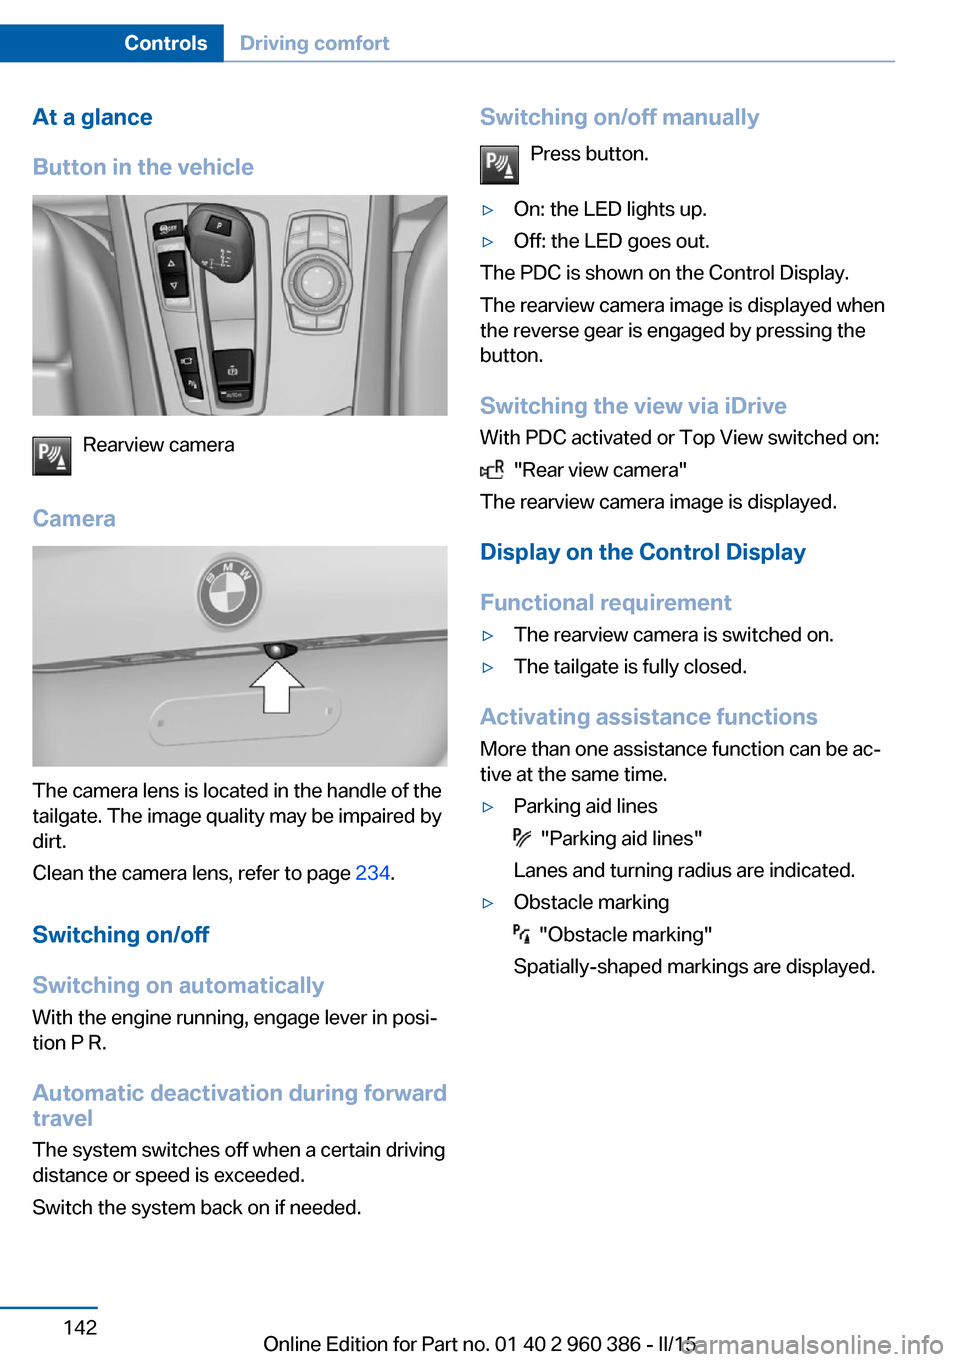
Button in the vehicle
Rearview camera
Camera
The camera lens is located in the handle of the
tailgate. The image quality may be impaired by
dirt.
Clean the camera lens, refer to page 234.
Switching on/off
Switching on automatically With the engine running, engage lever in posi‐
tion P R.
Automatic deactivation during forward travel
The system switches off when a certain driving
distance or speed is exceeded.
Switch the system back on if needed.
Switching on/off manually
Press button.▷On: the LED lights up.▷Off: the LED goes out.
The PDC is shown on the Control Display.
The rearview camera image is displayed when
the reverse gear is engaged by pressing the
button.
Switching the view via iDrive With PDC activated or Top View switched on:
"Rear view camera"
The rearview camera image is displayed.
Display on the Control Display
Functional requirement
▷The rearview camera is switched on.▷The tailgate is fully closed.
Activating assistance functions
More than one assistance function can be ac‐
tive at the same time.
▷Parking aid lines
"Parking aid lines"
Lanes and turning radius are indicated.
▷Obstacle marking
"Obstacle marking"
Spatially-shaped markings are displayed.
Seite 142ControlsDriving comfort142
Online Edition for Part no. 01 40 2 960 386 - II/15
Page 149 of 257
Cameras
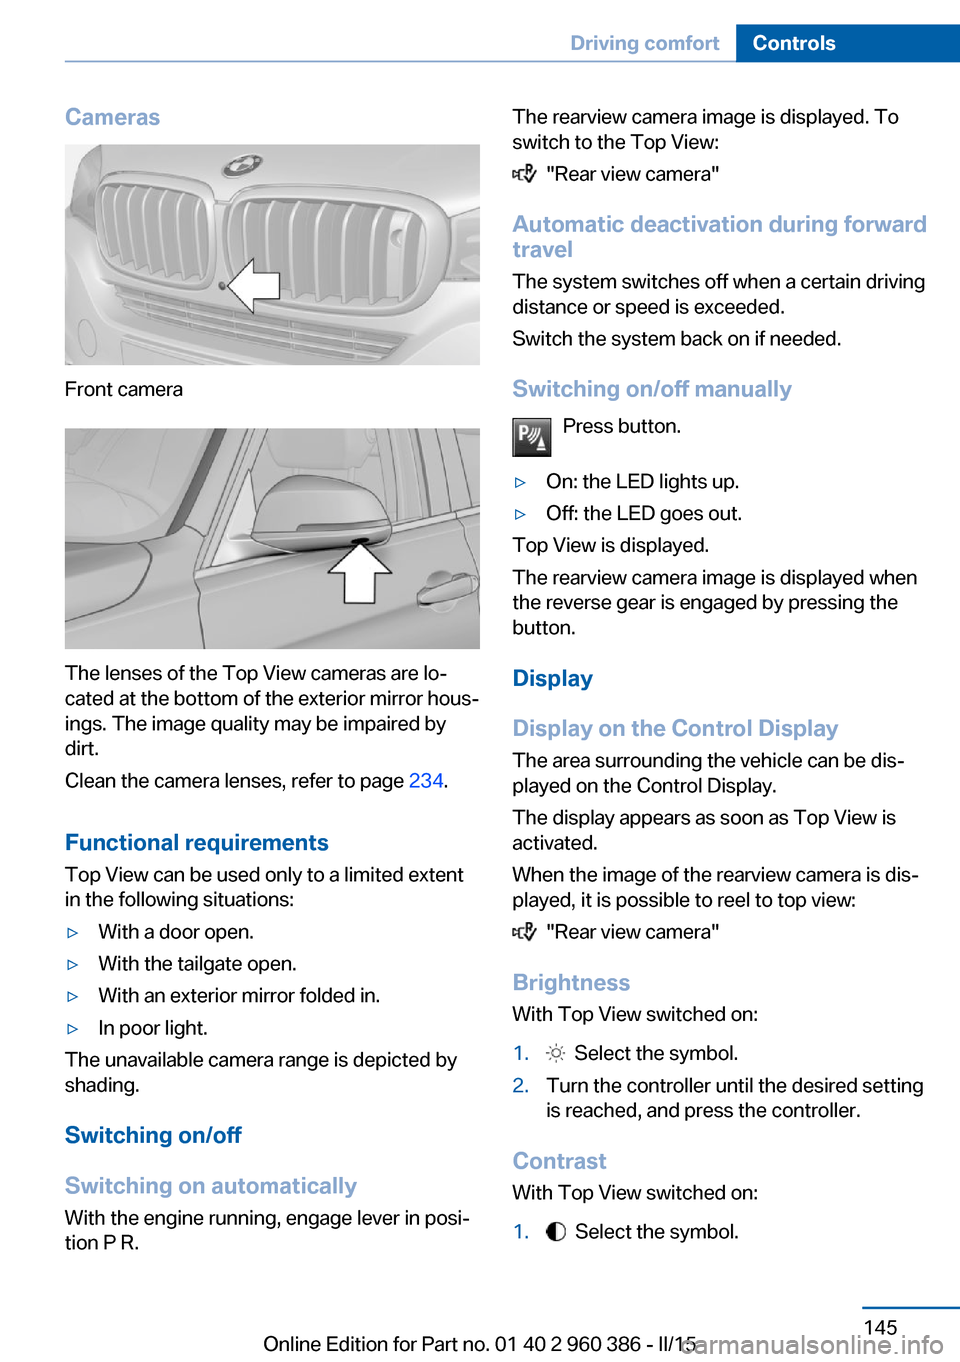
Front camera
The lenses of the Top View cameras are lo‐
cated at the bottom of the exterior mirror hous‐
ings. The image quality may be impaired by
dirt.
Clean the camera lenses, refer to page 234.
Functional requirements
Top View can be used only to a limited extent
in the following situations:
▷With a door open.▷With the tailgate open.▷With an exterior mirror folded in.▷In poor light.
The unavailable camera range is depicted by
shading.
Switching on/off
Switching on automatically With the engine running, engage lever in posi‐
tion P R.
The rearview camera image is displayed. To
switch to the Top View:
"Rear view camera"
Automatic deactivation during forward
travel
The system switches off when a certain driving
distance or speed is exceeded.
Switch the system back on if needed.
Switching on/off manually Press button.
▷On: the LED lights up.▷Off: the LED goes out.
Top View is displayed.
The rearview camera image is displayed when
the reverse gear is engaged by pressing the
button.
Display
Display on the Control Display The area surrounding the vehicle can be dis‐
played on the Control Display.
The display appears as soon as Top View is
activated.
When the image of the rearview camera is dis‐
played, it is possible to reel to top view:
"Rear view camera"
Brightness
With Top View switched on:
1. Select the symbol.2.Turn the controller until the desired setting
is reached, and press the controller.
Contrast
With Top View switched on:
1. Select the symbol.Seite 145Driving comfortControls145
Online Edition for Part no. 01 40 2 960 386 - II/15
Page 152 of 257
Parking assistantThe concept
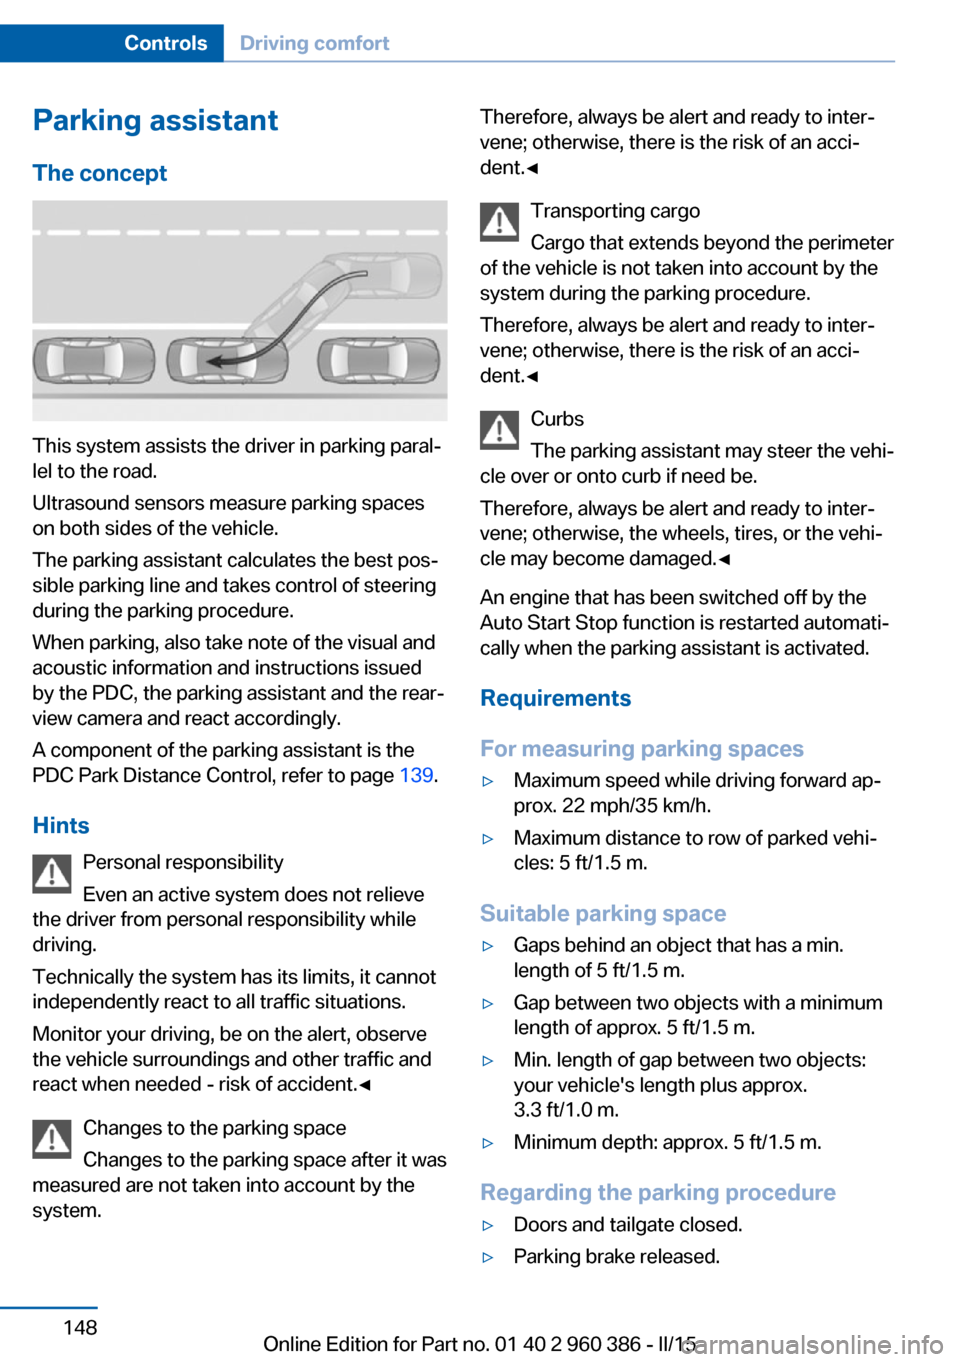
This system assists the driver in parking paral‐
lel to the road.
Ultrasound sensors measure parking spaces
on both sides of the vehicle.
The parking assistant calculates the best pos‐
sible parking line and takes control of steering
during the parking procedure.
When parking, also take note of the visual and
acoustic information and instructions issued
by the PDC, the parking assistant and the rear‐
view camera and react accordingly.
A component of the parking assistant is the
PDC Park Distance Control, refer to page 139.
Hints Personal responsibility
Even an active system does not relieve
the driver from personal responsibility while
driving.
Technically the system has its limits, it cannot
independently react to all traffic situations.
Monitor your driving, be on the alert, observe
the vehicle surroundings and other traffic and
react when needed - risk of accident.◀
Changes to the parking space
Changes to the parking space after it was
measured are not taken into account by the
system.
Therefore, always be alert and ready to inter‐
vene; otherwise, there is the risk of an acci‐
dent.◀
Transporting cargo
Cargo that extends beyond the perimeter
of the vehicle is not taken into account by the
system during the parking procedure.
Therefore, always be alert and ready to inter‐
vene; otherwise, there is the risk of an acci‐
dent.◀
Curbs
The parking assistant may steer the vehi‐
cle over or onto curb if need be.
Therefore, always be alert and ready to inter‐
vene; otherwise, the wheels, tires, or the vehi‐
cle may become damaged.◀
An engine that has been switched off by the
Auto Start Stop function is restarted automati‐
cally when the parking assistant is activated.
Requirements
For measuring parking spaces▷Maximum speed while driving forward ap‐
prox. 22 mph/35 km/h.▷Maximum distance to row of parked vehi‐
cles: 5 ft/1.5 m.
Suitable parking space
▷Gaps behind an object that has a min.
length of 5 ft/1.5 m.▷Gap between two objects with a minimum
length of approx. 5 ft/1.5 m.▷Min. length of gap between two objects:
your vehicle's length plus approx.
3.3 ft/1.0 m.▷Minimum depth: approx. 5 ft/1.5 m.
Regarding the parking procedure
▷Doors and tailgate closed.▷Parking brake released.Seite 148ControlsDriving comfort148
Online Edition for Part no. 01 40 2 960 386 - II/15
Page 179 of 257
near the MAX mark. Uphill and downhill
grades can be traveled up to no more than
50 %.▷On steep downhill grades, use Hill Descent
Control HDC, refer to page 125.
Starting out is possible on uphill grades up
to 30 %. The permissible side tilt is 30 %.▷Avoid that the chassis bottom coming in
contact with the ground.
The ground clearance is no more than 7.8
inches/20 cm and can vary according to
the vehicle's load.▷When wheels continue to spin, depress the
accelerator so that driving stability control
systems can distribute the driving force to
the wheels. Activate DTC Dynamic Trac‐
tion Control if available.
After a trip on poor roads
After a trip on poor roads, check wheels and
tires for damage to maintain driving safety.
Clear heavy soiling from the body.
General driving notes
Closing the tailgate Drive with the tailgate closed
Only drive with the tailgate closed; other‐
wise, in the event of an accident or braking and
evasive maneuvers, passengers and other traf‐
fic may be injured, and the vehicle may be
damaged. In addition, exhaust fumes may en‐
ter the vehicle interior.◀
If driving with the tailgate open cannot be
avoided:
▷Close all windows and the glass sunroof.▷Greatly increase the air flow from the vents.▷Drive moderately.Hot exhaust system
Hot exhaust system
High temperatures are generated in the
exhaust system.
Do not remove the heat shields installed and
never apply undercoating to them. Make sure
that flammable materials, e. g. hay, leaves,
grass, etc. do not come in contact with the hot
exhaust system while driving, while in idle po‐
sition mode, or when parked. Such contact
could lead to a fire, resulting in an increased
risk of serious personal injury as well as prop‐
erty damage.
Do not touch hot exhaust pipes; otherwise,
there is a danger of getting burned.◀
Diesel particulate filter The diesel particulate filter collects soot parti‐
cles and burns them periodically at high tem‐
peratures.
During several minutes of cleaning the follow‐
ing may occur:▷Temporarily, the engine may run less
smoothly.▷Noises and a slight amount of smoke com‐
ing from the exhaust until shortly after the
engine is shut down.▷A somewhat higher engine speed is neces‐
sary to reach usual performance.
Mobile communication devices in the
vehicle
Mobile communication devices in the ve‐
hicle
It is not recommended to use mobile phones,
such as mobile phones, in the vehicle interior
without a direct connection to an external aer‐
ial. Otherwise, the vehicle's electronics and
mobile communication devices can interfere
with each other. In addition, there is no assur‐
ance that the radiation generated during trans‐
Seite 175Things to remember when drivingDriving tips175
Online Edition for Part no. 01 40 2 960 386 - II/15
Page 184 of 257
Cargo net, FlexNetThe flexible cargo net is hooked into eyes and
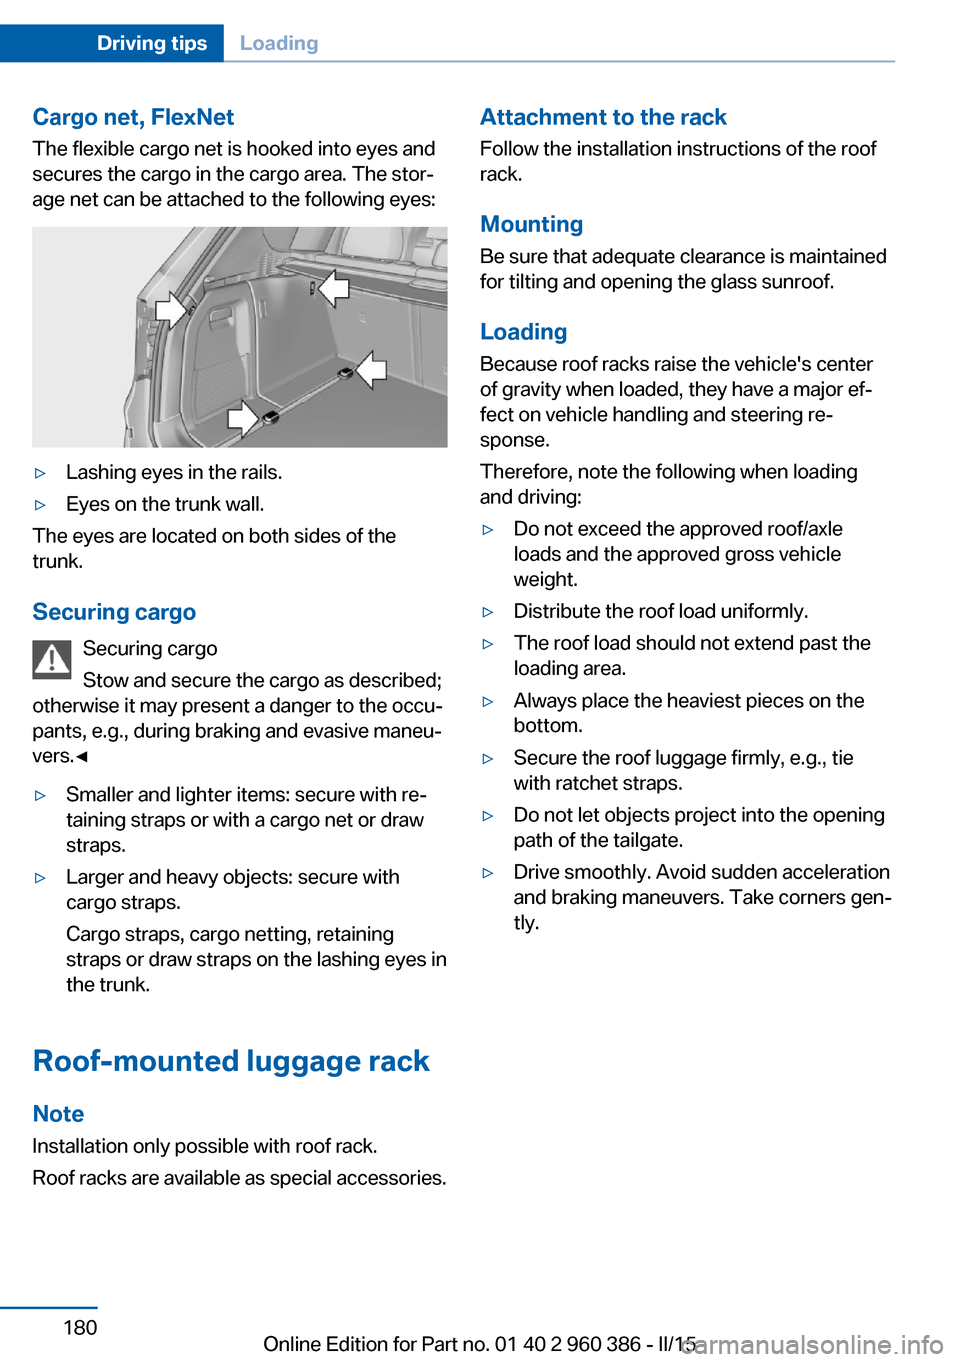
secures the cargo in the cargo area. The stor‐
age net can be attached to the following eyes:▷Lashing eyes in the rails.▷Eyes on the trunk wall.
The eyes are located on both sides of the
trunk.
Securing cargo Securing cargo
Stow and secure the cargo as described;
otherwise it may present a danger to the occu‐
pants, e.g., during braking and evasive maneu‐
vers.◀
▷Smaller and lighter items: secure with re‐
taining straps or with a cargo net or draw
straps.▷Larger and heavy objects: secure with
cargo straps.
Cargo straps, cargo netting, retaining
straps or draw straps on the lashing eyes in
the trunk.
Roof-mounted luggage rack
NoteInstallation only possible with roof rack.
Roof racks are available as special accessories.
Attachment to the rack Follow the installation instructions of the roof
rack.
Mounting
Be sure that adequate clearance is maintained
for tilting and opening the glass sunroof.
LoadingBecause roof racks raise the vehicle's centerof gravity when loaded, they have a major ef‐
fect on vehicle handling and steering re‐
sponse.
Therefore, note the following when loading
and driving:▷Do not exceed the approved roof/axle
loads and the approved gross vehicle
weight.▷Distribute the roof load uniformly.▷The roof load should not extend past the
loading area.▷Always place the heaviest pieces on the
bottom.▷Secure the roof luggage firmly, e.g., tie
with ratchet straps.▷Do not let objects project into the opening
path of the tailgate.▷Drive smoothly. Avoid sudden acceleration
and braking maneuvers. Take corners gen‐
tly.Seite 180Driving tipsLoading180
Online Edition for Part no. 01 40 2 960 386 - II/15
Page 226 of 257
Tail lights, bulb replacement
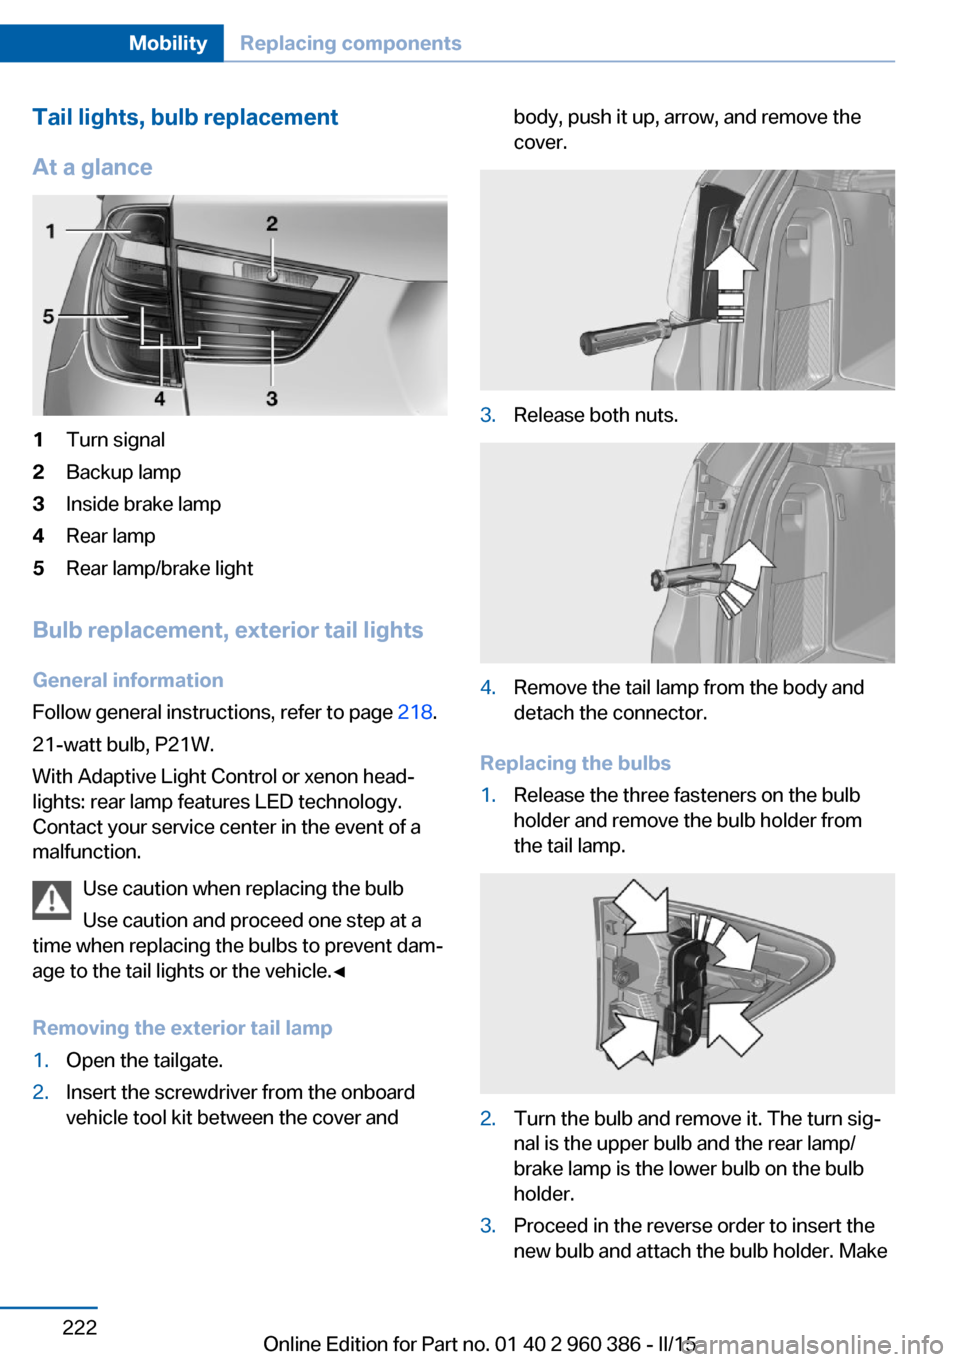
At a glance1Turn signal2Backup lamp3Inside brake lamp4Rear lamp5Rear lamp/brake light
Bulb replacement, exterior tail lights General information
Follow general instructions, refer to page 218.
21-watt bulb, P21W.
With Adaptive Light Control or xenon head‐
lights: rear lamp features LED technology.
Contact your service center in the event of a
malfunction.
Use caution when replacing the bulb
Use caution and proceed one step at a
time when replacing the bulbs to prevent dam‐
age to the tail lights or the vehicle.◀
Removing the exterior tail lamp
1.Open the tailgate.2.Insert the screwdriver from the onboard
vehicle tool kit between the cover andbody, push it up, arrow, and remove the
cover.3.Release both nuts.4.Remove the tail lamp from the body and
detach the connector.
Replacing the bulbs
1.Release the three fasteners on the bulb
holder and remove the bulb holder from
the tail lamp.2.Turn the bulb and remove it. The turn sig‐
nal is the upper bulb and the rear lamp/
brake lamp is the lower bulb on the bulb
holder.3.Proceed in the reverse order to insert the
new bulb and attach the bulb holder. MakeSeite 222MobilityReplacing components222
Online Edition for Part no. 01 40 2 960 386 - II/15
Page 227 of 257
sure that the bulb holder is engaged in all
fasteners.
Installing the tail lamp
1.Connect and install the tail lamp.2.Insert the cover with the three mountings
in the tail lamp. While applying pressure on
the top and bottom bracket, slide the cover
down to the stop.
Lights in the tailgate
General information
Follow general instructions, refer to page 218.
Reversing lights: 16-watt bulb, W16W.
Inner brake lamp: 21-watt bulb, H21W.
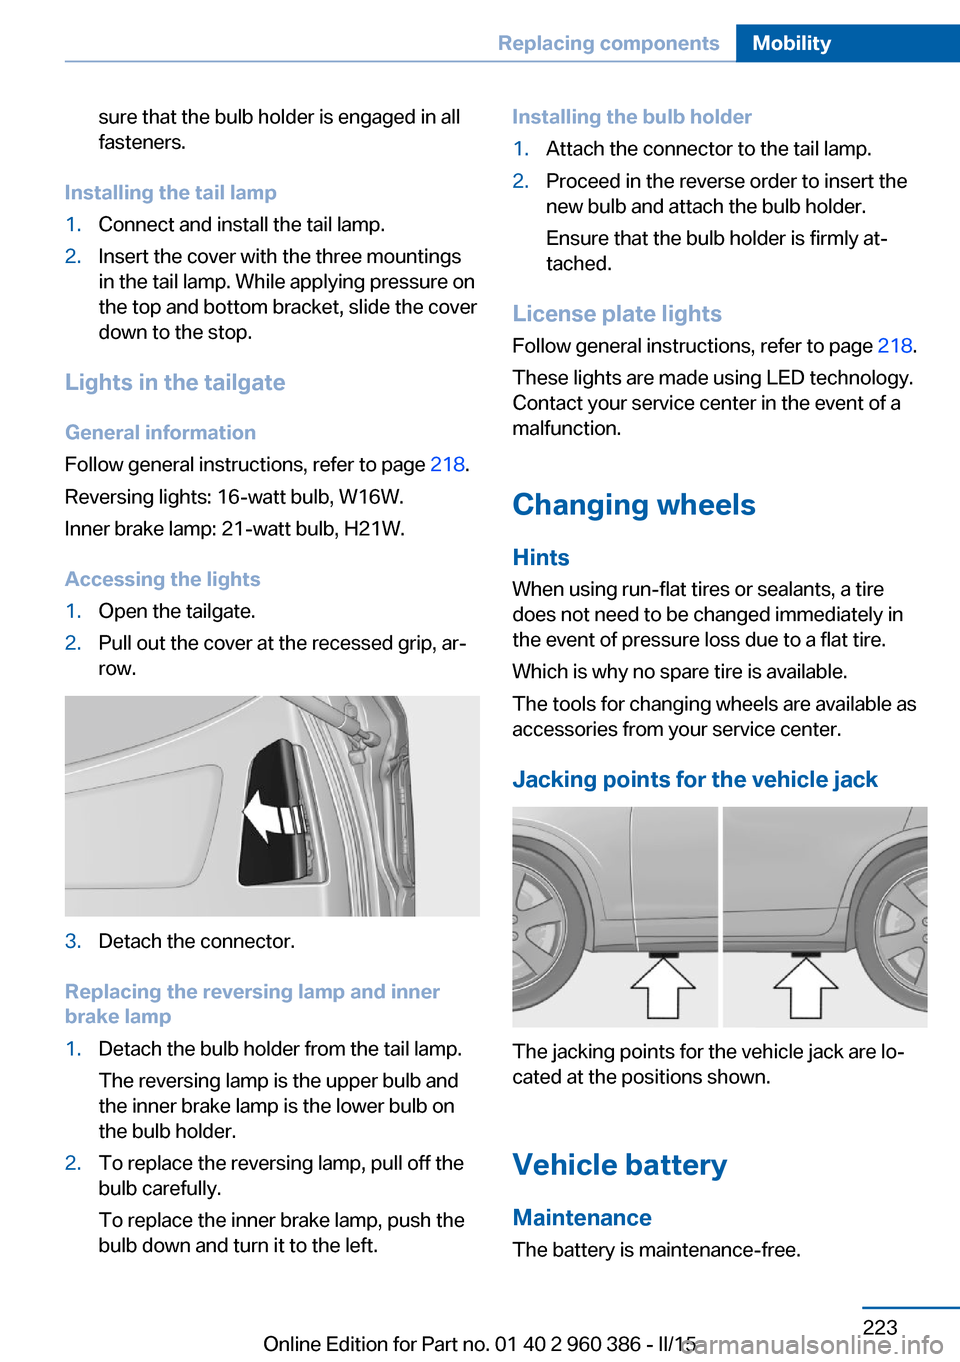
Accessing the lights
1.Open the tailgate.2.Pull out the cover at the recessed grip, ar‐
row.3.Detach the connector.
Replacing the reversing lamp and inner
brake lamp
1.Detach the bulb holder from the tail lamp.
The reversing lamp is the upper bulb and
the inner brake lamp is the lower bulb on
the bulb holder.2.To replace the reversing lamp, pull off the
bulb carefully.
To replace the inner brake lamp, push the
bulb down and turn it to the left.Installing the bulb holder1.Attach the connector to the tail lamp.2.Proceed in the reverse order to insert the
new bulb and attach the bulb holder.
Ensure that the bulb holder is firmly at‐
tached.
License plate lights
Follow general instructions, refer to page 218.
These lights are made using LED technology.
Contact your service center in the event of a
malfunction.
Changing wheels
Hints
When using run-flat tires or sealants, a tire
does not need to be changed immediately in
the event of pressure loss due to a flat tire.
Which is why no spare tire is available.
The tools for changing wheels are available as
accessories from your service center.
Jacking points for the vehicle jack
The jacking points for the vehicle jack are lo‐
cated at the positions shown.
Vehicle battery Maintenance
The battery is maintenance-free.
Seite 223Replacing componentsMobility223
Online Edition for Part no. 01 40 2 960 386 - II/15
Page 246 of 257
Everything from A to Z
IndexA ABS, Antilock Brake Sys‐ tem 123
ACC, Active Cruise Control with Stop & Go 130
Acceleration Assistant, refer to Launch Control 79
Accessories and parts 7
Activated-charcoal filter 157
Active Blind Spot Detec‐ tion 120
Active Cruise Control with Stop & Go, ACC 130
Adaptive brake lights, refer to Brake force display 122
Adaptive Light Control 96
Additives, oil 211
Adjustments, seats/head re‐ straints 52
After washing vehicle 232
Airbags 100
Airbags, indicator/warning light 101
Air circulation, refer to Recir‐ culated-air mode 153, 157
Air, dehumidifying, refer to Cooling function 154, 157
Air distribution, manual 153, 156
Air flow, automatic climate control 153, 156
Air pressure, tires 197
Air vents, refer to Ventila‐ tion 158
Alarm system 46
Alarm, unintentional 47
All around the center con‐ sole 16
All around the roofliner 17 All around the steering
wheel 14
All-season tires, refer to Win‐ ter tires 203
All-wheel-drive 125
Alternating-code hand-held transmitter 161
Alternative oil types 212
Ambient light 99
Antifreeze, washer fluid 75
Antilock Brake System, ABS 123
Anti-slip control, refer to DSC 123
Approved axle load 239
Approved engine oils, see Suitable engine oil
types 212
Armrest, refer to Center arm‐ rest 169
Arrival time 91
Ash tray 162
Assistance when driving off 128
Assist system, refer to Intelli‐ gent Safety 108
AUTO H button 71
AUTO H button, refer to Au‐ tomatic Hold 71
AUTO intensity 156
Automatic car wash 231
Automatic climate con‐ trol 152
Automatic climate control with enhanced features 155
Automatic Cruise Control with Stop & Go 130
Automatic Curb Monitor 59
Automatic deactivation, front- seat passenger airbags 102 Automatic headlight con‐
trol 96
Automatic Hold 71
Automatic locking 46
Automatic recirculated-air control 157
Automatic tailgate 41
Automatic transmission, see Steptronic transmission 76
AUTO program, automatic cli‐ mate control 156
AUTO program, climate con‐ trol 153
AUTO program, intensity 156
Auto Start/Stop function 68
Average fuel consumption 90
Average speed 90
Axle loads, weights 239
B Backrest curvature, refer to Lumbar support 54
Backrest, width 54
Bad road trips 174
Band-aids, refer to First aid kit 227
Bar for tow-starting/ towing 229
Battery replacement, vehicle battery 224
Battery replacement, vehicle remote control 35
Battery, vehicle 223
Belts, safety belts 55
Beverage holder, cu‐ pholder 169
Blinds, sun protection 49
BMW Advanced Diesel 193
BMW Assist, see user's manual for Navigation, En‐Seite 242ReferenceEverything from A to Z242
Online Edition for Part no. 01 40 2 960 386 - II/15